

Focus on a Japanese-inspired garden
A water feature changed our Japanese-inspired garden over night.

A beautiful water Lilly emerges from garden container as part of a water feature in a Japanese-inspired garden landscape.
Adding simple water feature transforms landscape
Most Japanese gardens are small, intimate places where simplicity and nature come together in harmony.
A courtyard works perfectly, but even a small corner of a larger garden can work well. The attention to detail makes a larger Japanese-inspired garden a real handful for most gardeners, so keeping it small allows you to focus on the smaller details that are so important to achieving success.
I think it’s important to add that a Japanese-inspired garden can be nicely integrated into a woodland- style landscape because the two styles work toward the same goal – a nature-inspired woodland. In this post, I am hoping to provide tips to help transition between these two garden styles.
The Japanese garden achieves this most often in an intimate setting where one tree can represent a forest of trees; a single moss-covered rock, a mountain. A small pond or raked pebbles can stand in for a lake, and a patch of soft moss becomes a place to rest both the weary traveller and a viewer’s eye.

Within a day of filling the water feature, this cardinal came for a visit.
Let me just say right from the start that I am, by no means, an expert in Japanese gardens and I certainly fail when it comes to being a highly detailed gardener. By keeping the garden small, however, I manage to maintain the area to an acceptable level, and reap some of the benefits a Japanese-inspired garden offers.
If you are interested in creating your own Japanese-inspired garden, be sure to check out my other posts here

A praying Jinzu baby in the Japanese-inspired garden alongside an art display of “Fish in the Garden” and bird bath. Japanese Forest Grass helps to make the transition from a more traditional woodland garden to the Japanese-inspired landscape.
Adding details to the Japanese garden
Although I am quite happy with the results, I know there is so much more I could do to take the garden to the next level.
Like any garden, this is a landscape in transition. The transition is in two parts: One is the transition from the more traditional front woodland garden to theJapanese-inspired garden; the second is the Japanese garden itself which is slowly taking on more traditional Japanese garden accoutrements from plants to art and the latest water feature.
This spring, we added two large Jinzu statues. One is pictured below overlooking the water feature, and another is at the end of a pathway leading from the Japanese garden into the back woodland garden where it acts as a transition from the two garden styles.

Transitioning to the Woodland
This Japanese garden Jinzu sits at the end of a path leading from the Japanese garden and creates the perfect transition to the more traditional woodland garden.
Another element of the woodland/Japanese transition is the use of Japanese Forest grass that runs across the front of our home along a pathway and under a large Japanese Maple. The Forest grass ties the two gardens together to create a more cohesive transition. Ferns (Ghost fern, maidenhair and Japanese painted ferns) complete the transition and look at home in either the woodland or Japanese garden.

Gardens in transitions
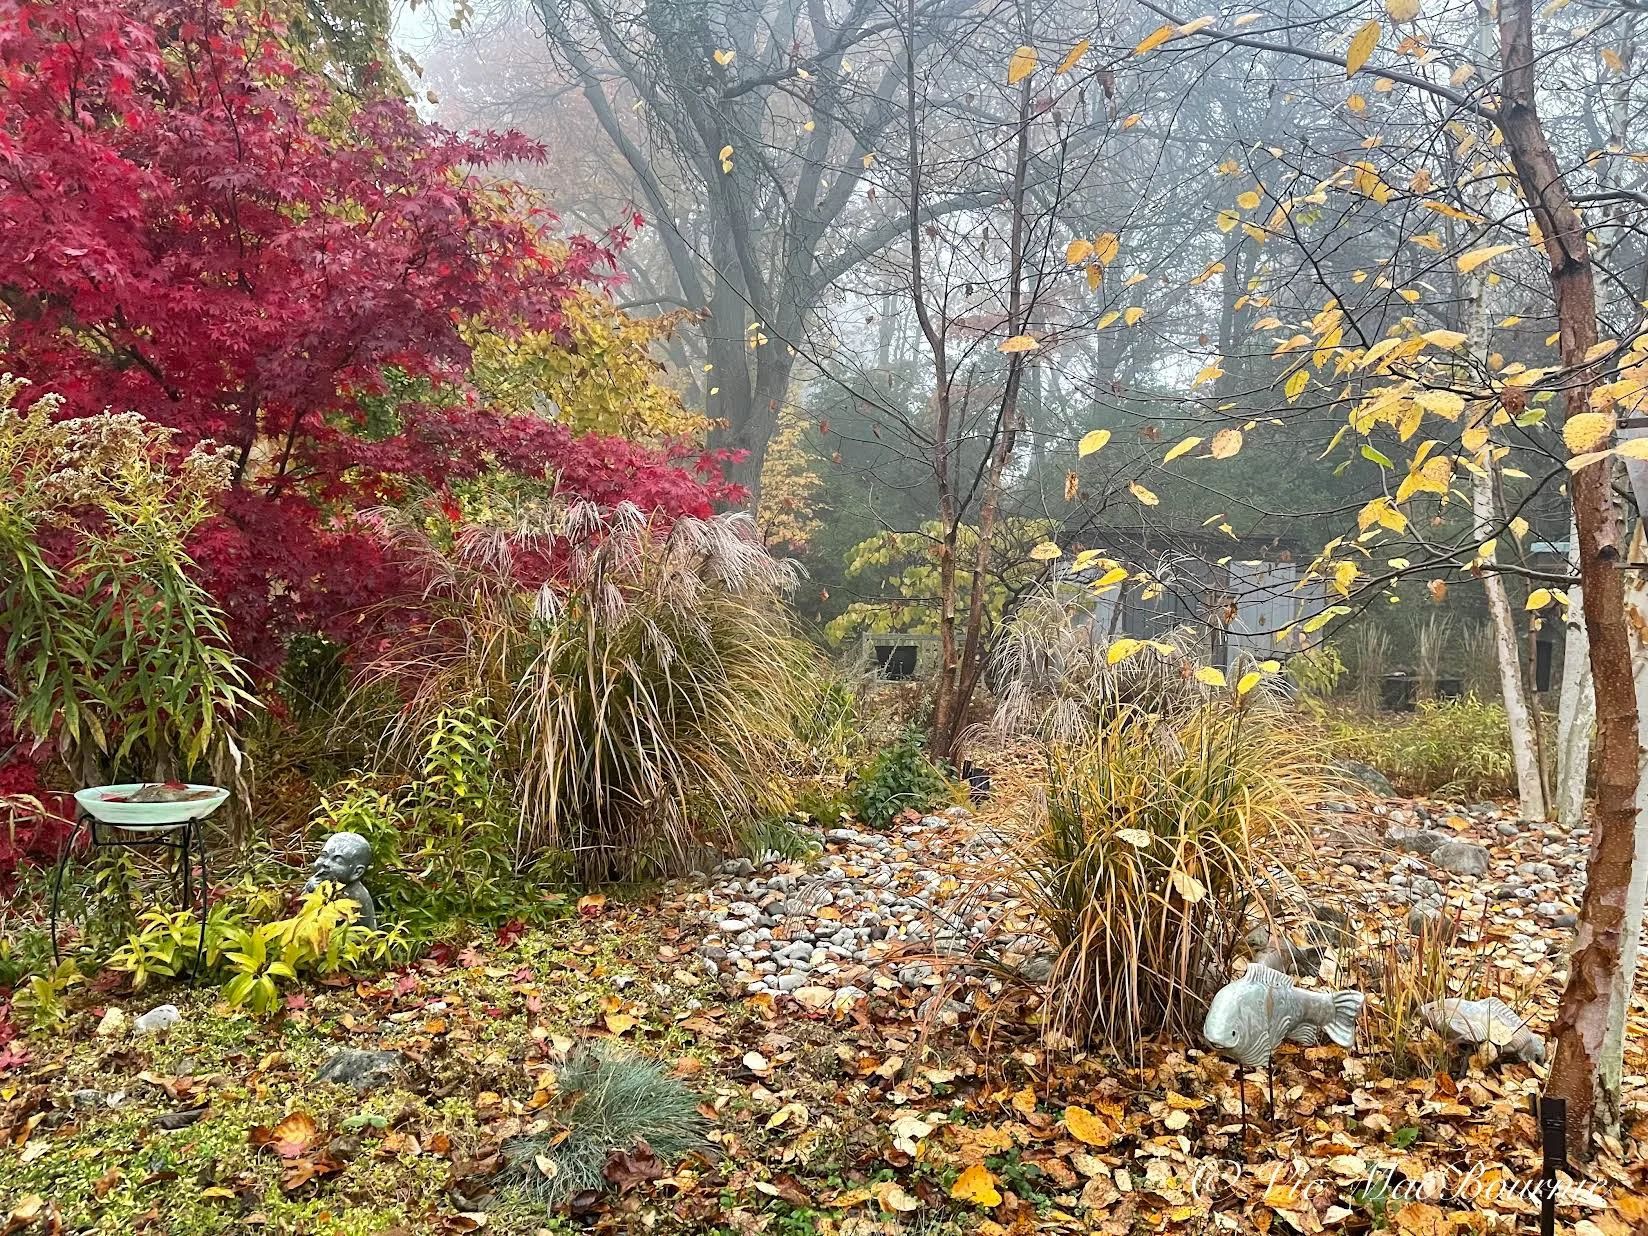
An earlier view of the two gardens shows the beginnings of the transition from the woodland garden to the Japanese-inspired garden.
Currently, the basic structure of the Japanese-inspired garden is intact: two Japanese maples – a large Bloodgood and a smaller weeping variety – bookend the garden and three boulders on one side balance the single one on the other side. Blue, squarecut flagstone surrounded in moss create a pathway to the backyard. Around the boulders, pea gravel creates the transition from boulders to flagstone.

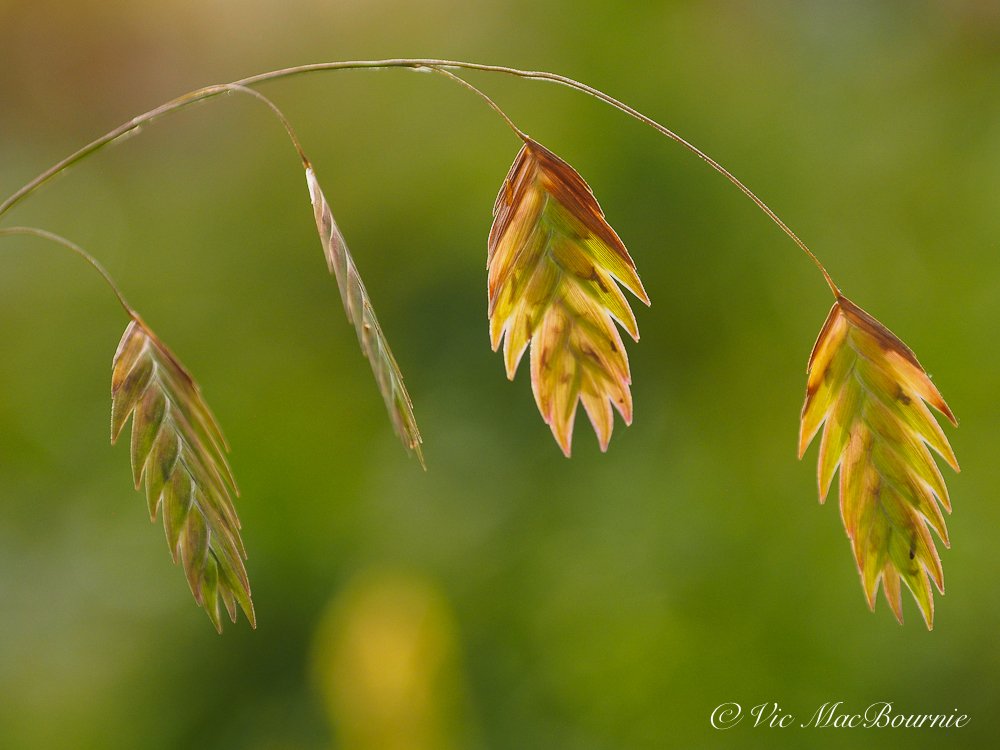
Japanese Forest grass rises up through the fallen Japanese maple leaves in this fall scene.
The Japanese garden in the front of our home acts as a transition both from the more traditional woodland garden that makes up the majority of our front landscape and the passageway to the back garden.
Up until this year, a simple square birdbath straddling both the traditional woodland garden and the Japanese-inspired garden represented the only real water in the front landscape. It worked, but I knew that water (or at least the illusion of water) should play a bigger role in a Japanese-inspired garden.
A large black water bowl and a beautiful hardy water Lilly (see main image at top of page) not only solved the problem, but helped transform the garden in a way I had not expected.

A bird's eye view of the Lilly in the water feature.
The transformation significantly added to the restful, peaceful ambiance in the space. Within days, the small container pond even welcomed a special guest. A lovely male cardinal (see image above) landed on the edge of the container, stared at the beautiful water Lilly before bending down to dip its beak into the dark cold water.
A sign, maybe, that nature approved of the addition. Just a short ways off, a mother and father robin are feeding their brood of three youngsters. I am sure the water, in short order, will be welcomed by other wildlife as the summer heat takes hold.
The addition of the container pond and water Lilly, is the first step in the further intensification of the Japanese-inspired garden.
Two components that also need attention are a large black container in the middle of the landscape that has traditionally been filled with a typical display of colourful annuals, and two matching window boxes that are also home to seasonal annuals.
Colourful flowers really have no place in a Japanese-inspired garden.

Japanese Forest grass rises up through the fallen Japanese maple leaves.
The flowers in the large container have been replaced with a small evergreen tree that will eventually get the bonsai treatment by yours truly.
The flowers will be replaced in the window boxes by ferns and/or possibly more bonsai to take the garden to the next level.
Stay tuned for more details on the garden’s progress.
Below, is a small photo essay taken recently of the Japanese-inspired garden.
All of these images were taken with the Pentax SF10 film camera and the Pentax FA 28-100mm lens with Kodak ASA 200 film. The negatives were scanned on an Epson 500 flatbed scanner and processed with Lightroom and Luminar Neo.
More information is included in the cutlines for the individual images.

The addition of this garden Jinzu adds the finishing touch in front of the water feature.

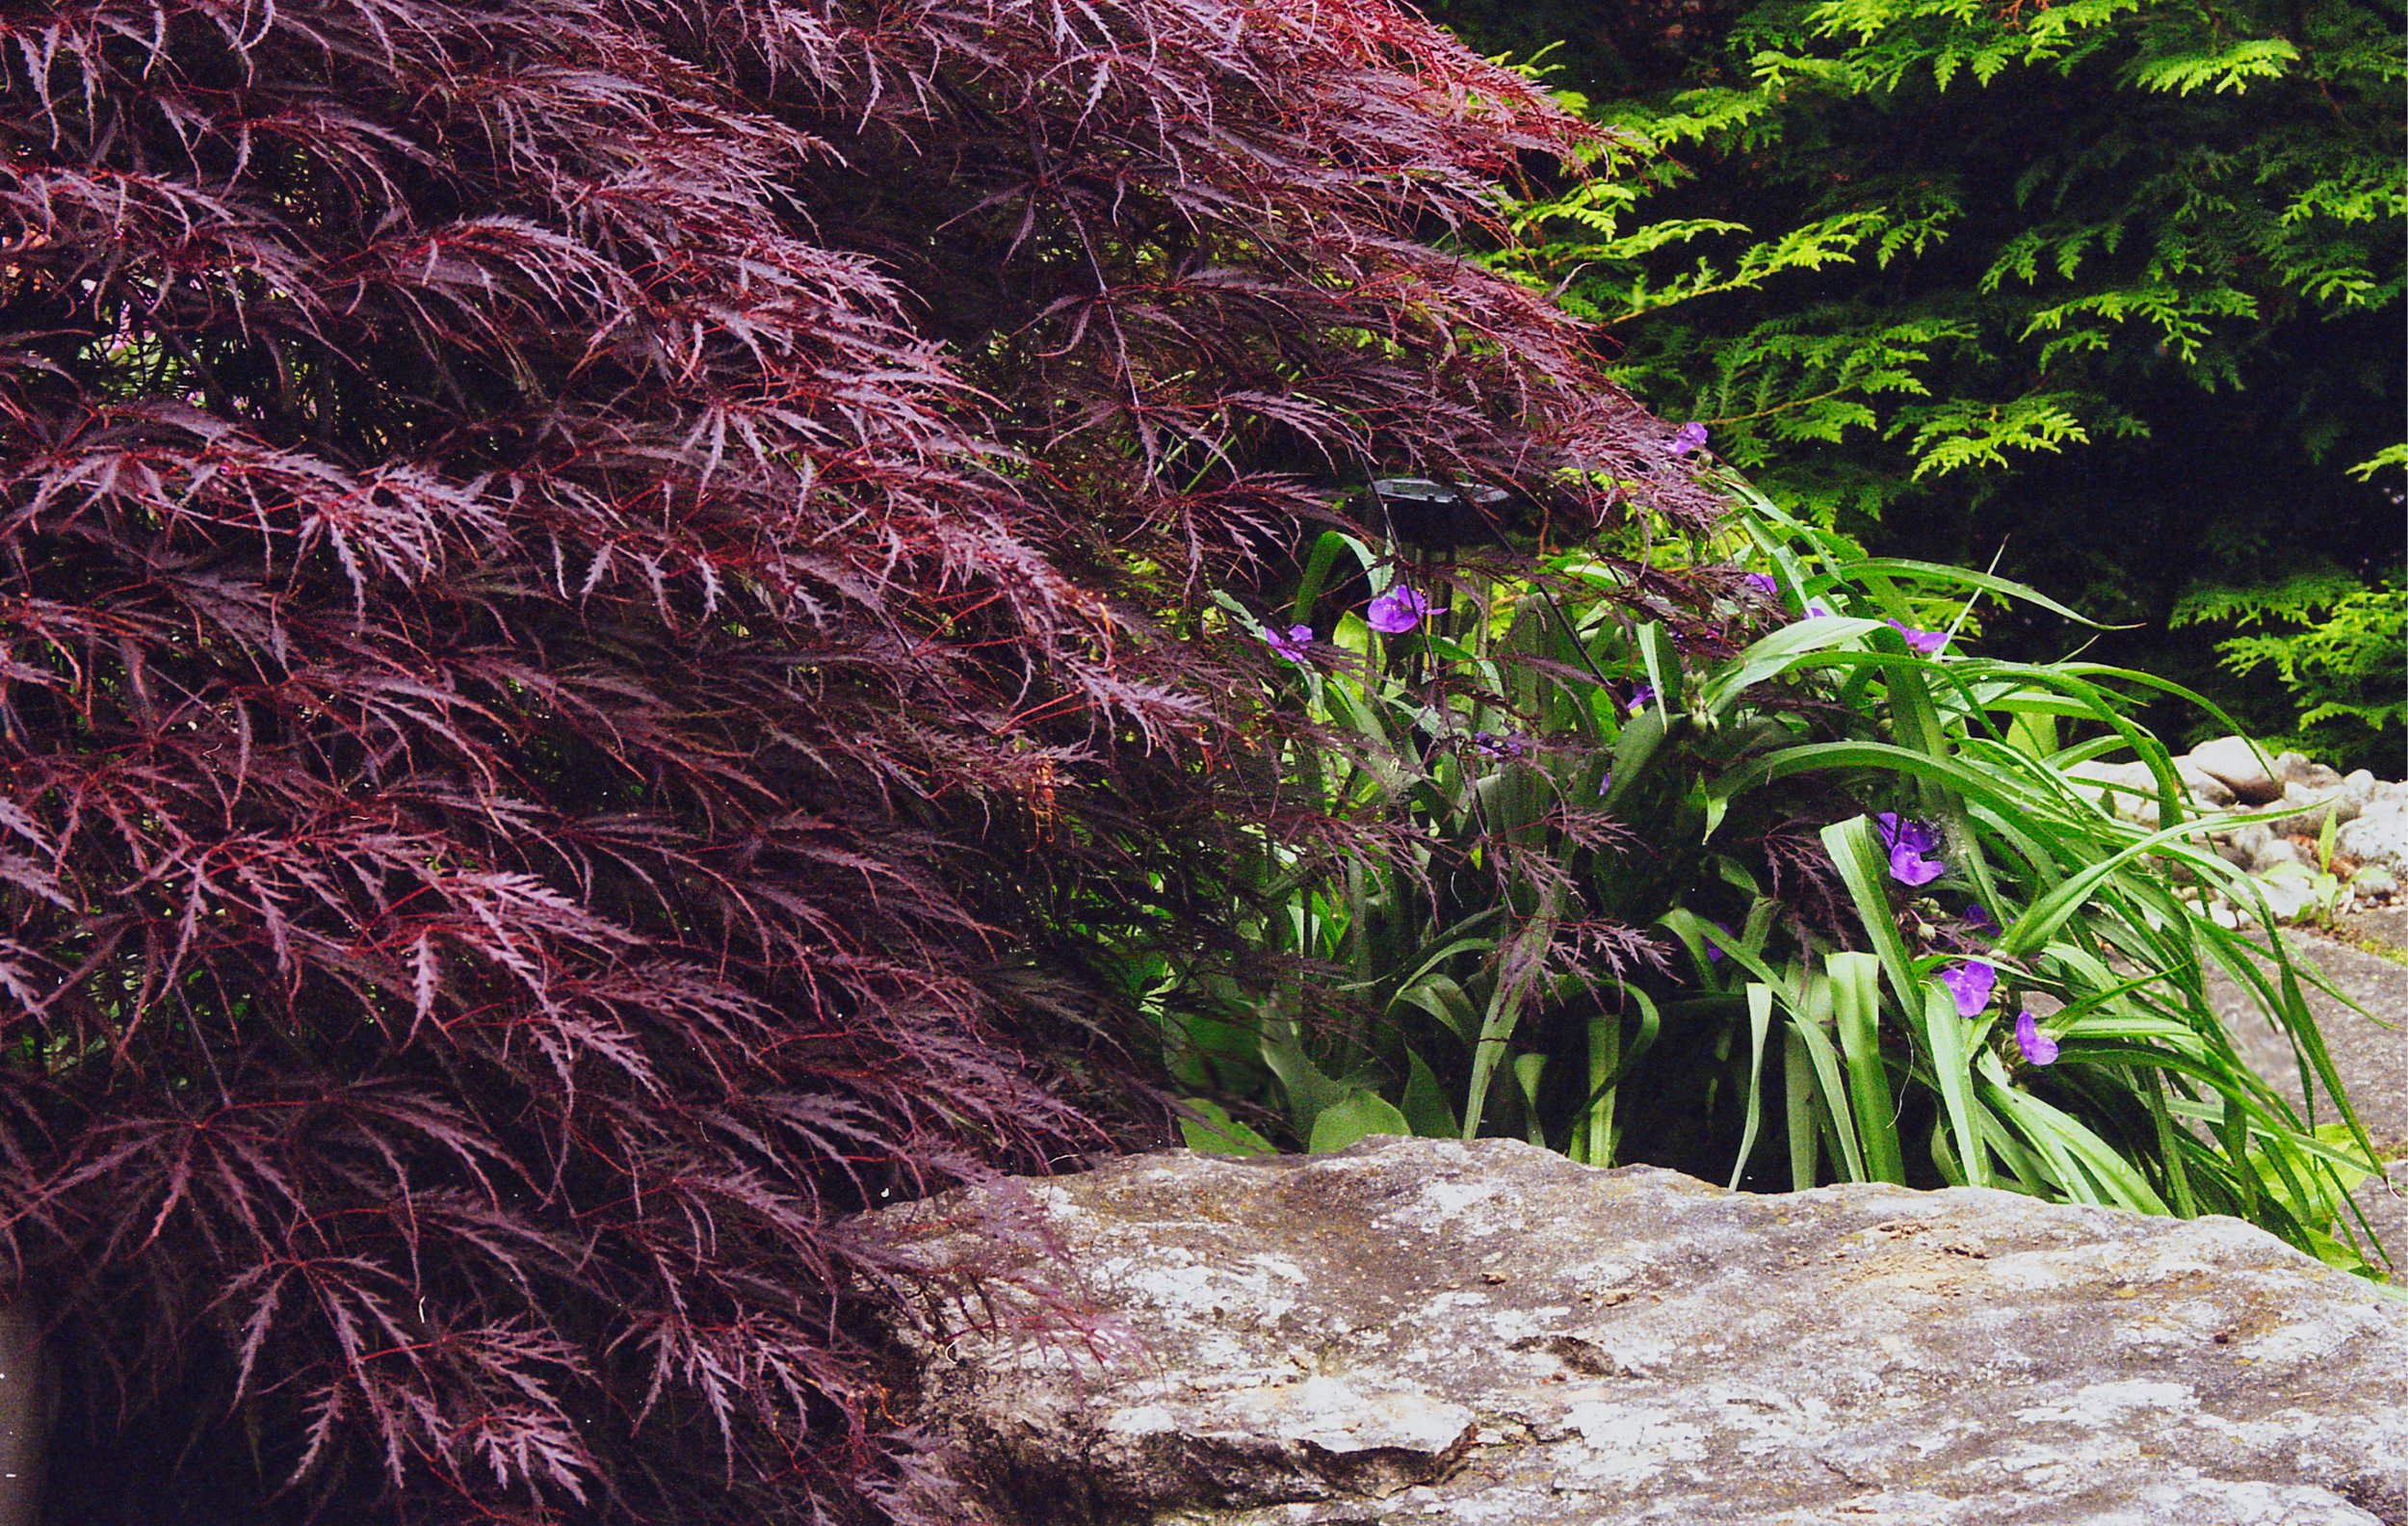
A weeping Japanese Maple and boulder ground the left side of the Japanese-inspired garden.


Three praying Jinzu add a peaceful feel to the garden.

This colourful window boxes don’t quite fit in wth the Japanese style in the rest of the garden and will be changed to create a more simplified look.
If you are interested in how Luminar Neo can improve your digital images post processing, Check out my earlier post on combining Luminar Neo as a plugin for Photoshop and Lightroom.
For a completely different look at what Luminar Neo is capable of producing from digitized film, check out my review of the Pentax PZ20 with Luminar Neo processing of the scanned film here.
• If you are interested in purchasing Luminar Neo, please consider using the code FernsFeathers at checkout to receive a 10 per cent discount. By using this code, I receive a small percentage of the proceeds which helps me to continue producing articles for readers.
• As part of my ongoing search for companies that reflect the best environmental practises, I have teamed with Savetrees.co. If you are committed to helping the environment, you might want to check them out here. They offer outstanding paper products made from sustainable (bamboo) sources. Click this link to check out one of their starter packs.

Minolta 125 film camera: A classic point-and-shoot
The Minolta 125, point-and-shoot, 35mm film camera is ideal for a new photographer or one interested in experimenting with Lomography.

This garden scene was post-processed with Luminar Neo bringing out the colours.
Beginner photographers and Lomography aficionados will love this little gem
This post is a combination of a review of the Minolta 125 film camera as well as a focus on post-processing using Lightroom and Luminar Neo. I hope the post illustrates the importance of post processing your images, whether they are from a digital camera or a film camera. Learning this skill does not have to be difficult. Luminar Neo developers have gone to great lengths to simplify the process so that excellent results are more easily achievable. Please take a moment to check out my other posts on Luminar Neo listed at the end of this post.
If you’re looking for a 35mm film camera that just works with little to no fuss, this little compact Minolta might fit the bill.
Forget about setting it on manual, adjusting apertures or shutter speeds, this is a genuine point-and-shoot camera from the year 2000.
It has a lovely high-quality look to it with a champagne and silver exterior combination that might make you think it’s a very high quality all-metal Contax or Rollei. Pick it up, however, and you’ll know it’s not in that league. It does appear to have an all-aluminum front and bottom plate, but high-quality plastic abounds in the back and in other parts on the camera.
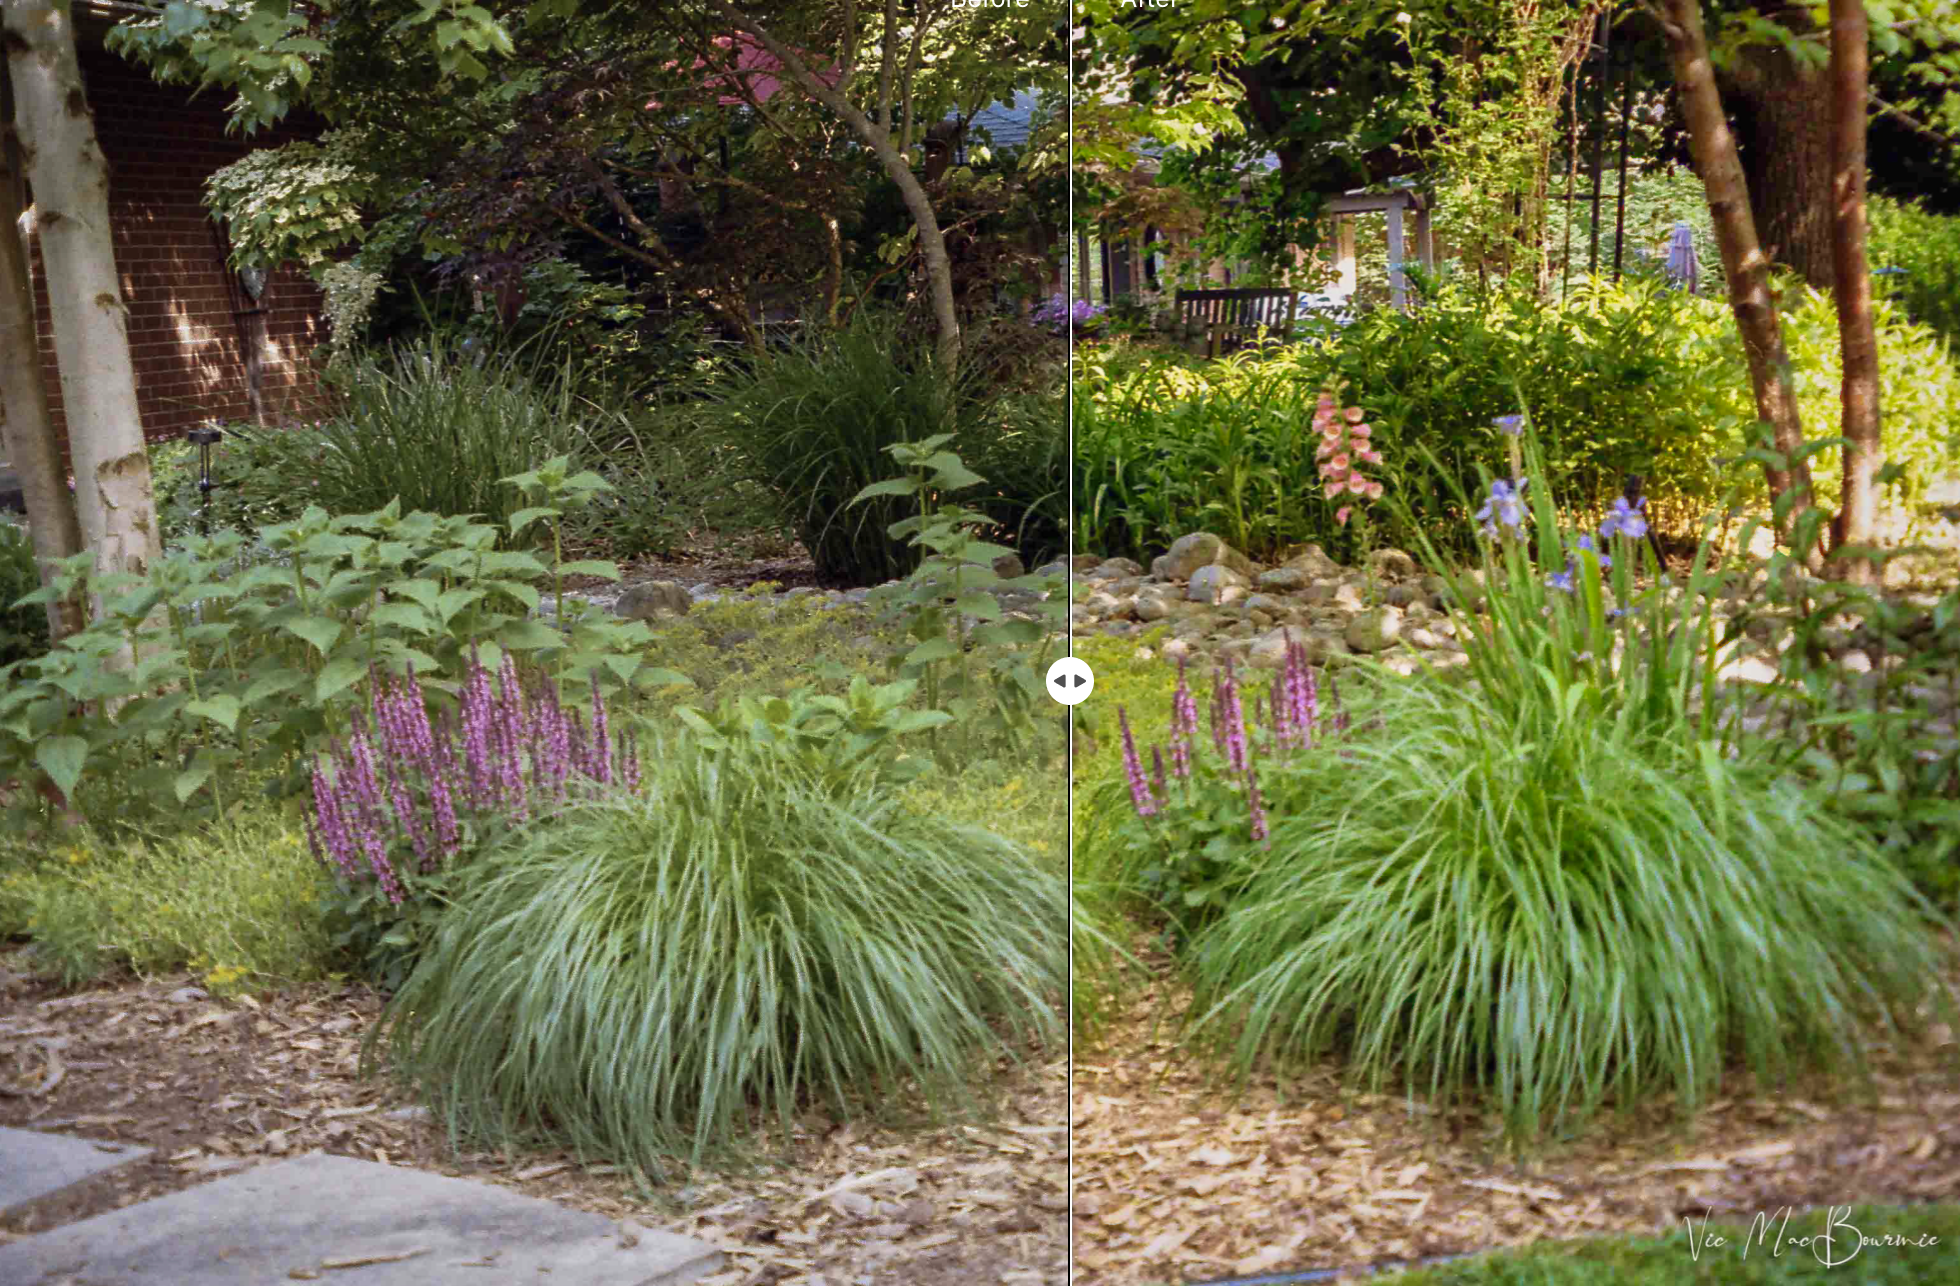
Before and After
Image shows the Before-and-after following some work in Luminar Neo. Notice how the colours, especially the greens and magentas pop in the Luminar Neo image at right.
Mind you, the Minolta Riva Zoom 125 is a fine example of an autofocus, DX-coded, film point-and-shoot camera that can deliver very pleasing results without a lot of thought on your part. It will read film from ISO 25 (think Kodachrome) to 3200 but the recommended film is ISO400. In my tests, I shot ISO 200 for a finer grain, and used a tripod to reduce the chances of motion blur.

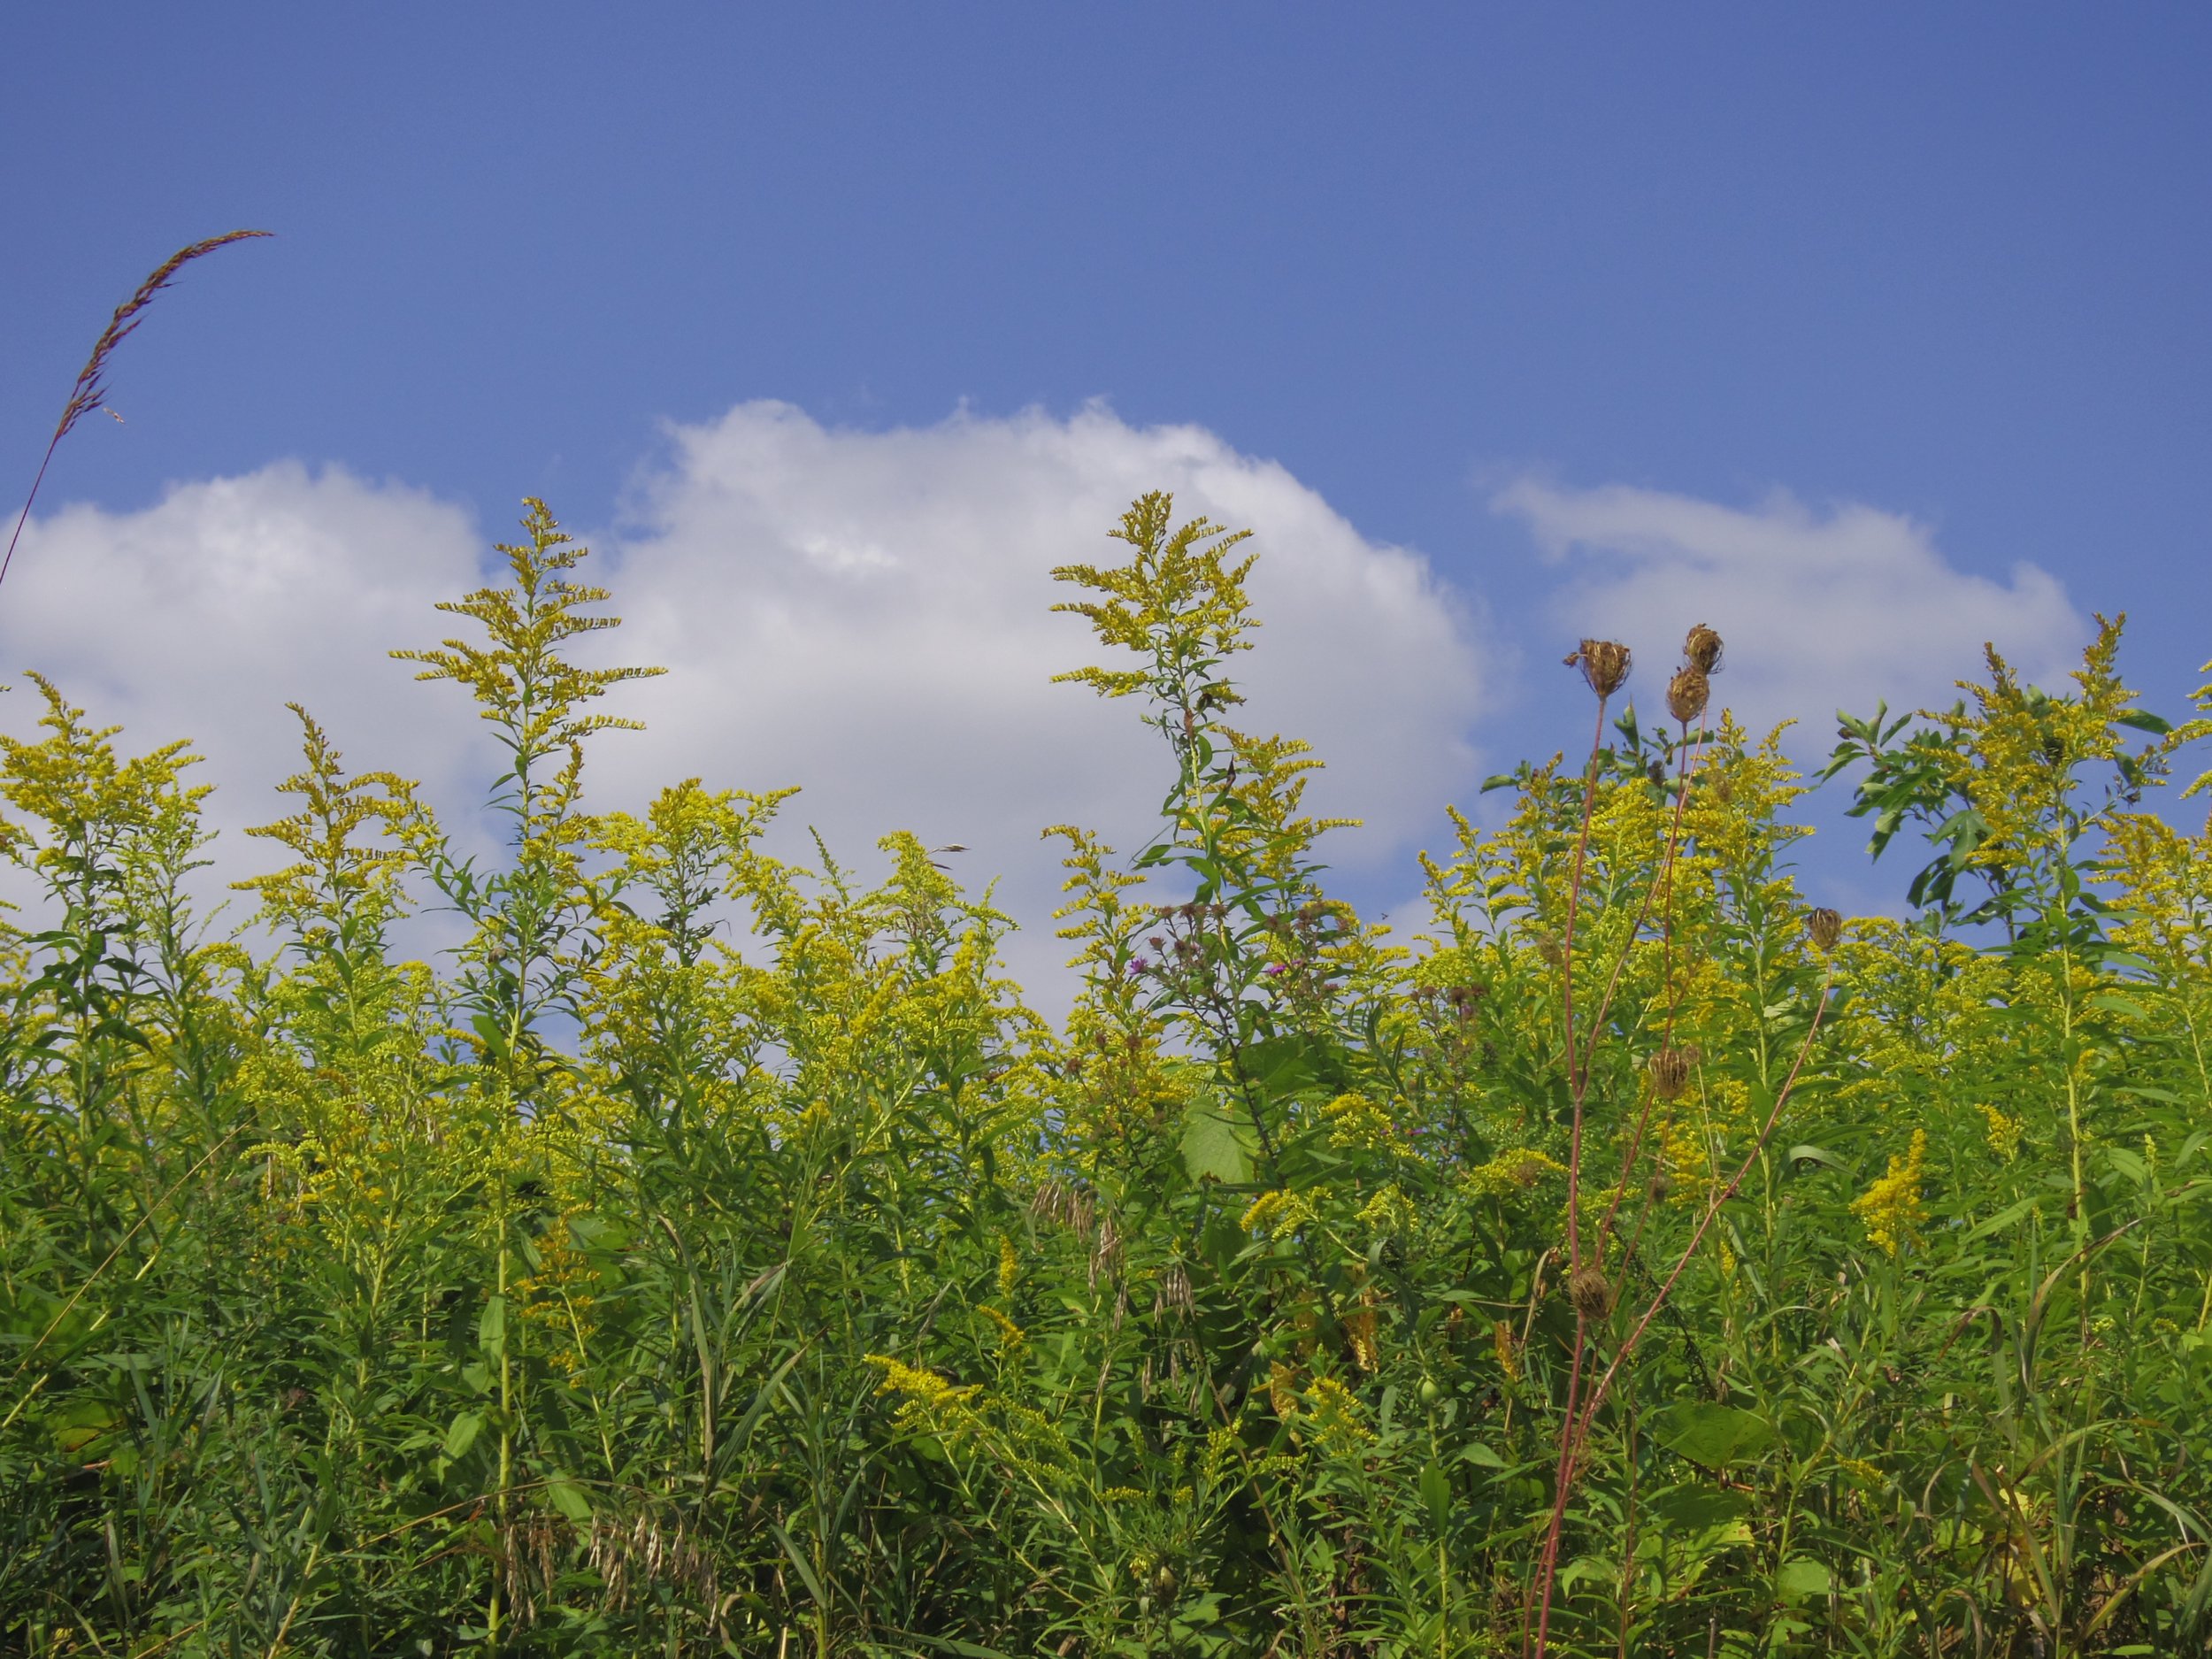
This farm scene was heavily edited in Luminar Neo to increase the colours in the grasses and punch up the reds in the barn. In addition, I replaced the sky in Luminar Neo to add a little more interest. Replacing the sky involved little more than a click of the mouse and a little masking around the barn’s roofline. Below shows the before-and-after image.

Before and After image
This shows the before-and-after image. The photograph on the left is the Lightroom image and the image on the right is after additional post processing with Luminar Neo, including a complete sky replacement.
How it performs
Would it be the only camera I would take on an important shoot? Absolutely not. But, for a very lightweight, simple camera that can fit in a pocket, it’s certainly one that most film shooters would be happy to carry around as a back-up, or one to take with them to grab shots at a party or fun family event.
For students of Lomography, this little Minolta will allow you to focus on getting the images rather than the technical aspects of photography.
A highly competent flash (with red-eye reduction and a fill-flash feature), and superior lens doesn’t hurt either.
What sets the Minolta apart from many point-and-shoot cameras is that sweet Minolta lens that starts at a convenient wide angle range of 37.5mm and stretches to 125mm.

This little Minolta has a nice finish, a great lens and easily fits in your pocket.
Not particularly fast at f4.5 -f10.3, but the built-in flash comes in handy to stop motion and a tripod with the electronic self timer can be used if you are working a landscape. For those who care, the lens is a 6 elements/ 6 group construction with a close-focusing capability of about 2 feet.
Minolta added an ingenious electronic zoom lever that is actually set up to give the user access to the most poplular focal lengths – five to be exact. At the widest end you are at the 37mm focal length – consider it a sweet little 35mm. One click and you are in the 50mm focal length. Hit it again and you’re at the perfect portrait setting 85-100. One more click and the lens zooms to its max at about 125 – close enough to the popular 135mm focal length.
Buy these lenses separately, and you’ll be paying 10 times the cost you could probably pick up one of these on the used market these days.
An orange flashing LED on the viewfinder provides several warnings from; flash will fire, flash charging, and camera-shake warning, depending on the blinking speed. Above the orange light is a green light that tells the shooter the subject is in focus, subject is too close or the contrast is too low for accurate focusing.

Stream and waterfalls
Extensive post-processing was to rescue this image, including removing unwanted objects, adding an Orton-effect to some of the foliage and boosting the blues and greens in the stream and waterfalls to give it a more pleasing colour.

Before editing
This image has had only minor edits to it in Lightroom. The above image shows the results after work in Luminar Neo post processing software.
The flash can be set to auto flash, auto flash with red eye reduction, fill-flash, flash cancel, and night portrait (with red-eye reduction.)
For my woodland garden, landscape and flower test shots, I set the camera on automatic, turned off the flash and popped the camera on a tripod. To ensure the sharpest images possible, I also used the built-in self timer with ASA 200 Kodak film.
For close-focus subjects, lines engraved in the viewfinder corrects parallax issues and helps the user get the image they were hoping to capture. That’s a nice touch for flower photographers looking to capture subjects without a lot of complex macro gear.
It takes a relatively inexpensive single CR123A lithium battery that can handle about 12 rolls of 24 exposure rolls with flash for 50 per cent of the exposures.
Four small buttons on the top control the on/off, flash, timer and date functions. (some cameras including the one I used do not have the date button.)
An LED screen on the top plate provides the needed information including battery life and film counter as well as the camera’s other settings – flash, timer etc.
Important notes: Minolta made it difficult to accidentally open the camera back before the film is rewound. That’s a good thing. The back locks until the film is rewound into the spool. It can be over ridden if you want to change film mid-roll, for example. The other point that needs to be discussed is how to load film. It’s a little tricky at first if you are used to loading 35mm film into a typical SLR. With the Minolta, users just have to place the front of the film onto the spool and let the camera take in the film. Hard to explain, but once you get the hang of it, it works beautifully.
So how about the results?
More results of the Minolta 125 can be viewed on the Lomography site here.

Image shows our back garden with ferns and albums.
The cons
This is probably not the camera for an advanced amateur and certainly not for a professional looking for complete control of the settings.
I am thinking the camera is perfect for the upstart Lomography student looking to have some fun with print film at a reasonable cost. Or a photographer looking for a second camera to use as a simple point-and-shoot.
Unlike so many of today’s digital point-and-shoots, this has a decent viewfinder –maybe a little small – but entirely usable.
It’s a fun camera to grab quick shots. For a street photographer, it gives you quick power up and good autofocus with a nice range of focal lengths that are more than capable of getting the job done.
Its compact form is never going to suggest that you are shooting professionally, but its reach at 125mm will give you lots of opportunity to keep a comfortable working distance.

Image of Cornus Kousa bracts converted to B&W with Luminar Neo. I thought the image would benefit from a B&W conversion. The built-in B&W processing power of Luminar Neo is very impressive and includes a number of presets that allow you to convert any image with a single press of the mouse. In this image, I first converted it to B&W and then proceeded to add a number of effects to achieve the finished result here. Before and after below.

Before and After
The before and after shows the original colour image and finished B&W after processing with Luminar Neo.
It’s the camera to pop in your pocket for a fun night out or a party where getting results is more important than capturing fine photographic images. The strength and simplicity of the flash makes it ideal to capture party portraits. The night mode makes getting night portraits with city lights in the background a simple process.
That’s not to say the camera is not capable of great results.
If you are more serious, put the camera on a tripod and use the electronic self timer to capture impressive results with Minolta’s high-quality lens.

The B&H price in 2001 for the Freedom Zoom 150 with an extended zoom range of 150mm, 25mm for than the sister camera the Freedom Zoom 125.
Look for a good used camera and put it to use. For the price you’ll likely pay, there is no need to worry about it either being damaged or stolen.
In its day, it was considered a sweet little point and shoot. Certainly not the most inexpensive camera in the year 2000. It sold at many of the large New York camera retailers for more than $200. The advertisement shows the B&H price of the Riva 150 at $224.00.
Today, you can probably pick one up for easily less than $100.
That’s a steal for a good working copy.
Post processing with Lightroom and Luminar Neo
Today’s print film offers the photographer plenty of exposure latitude. The above images were shot with Kodak 200 film and scanned on an Epson 500 flatbed scanner.
The initial edit from a high resolution TIFF scan to a jpeg was done in Lightroom. (I have included some of these digital images above.)
Then, I brought the jpeg images into Luminar Neo and went to work on transforming the images into the more creative visions I imagined when I was taking the photographs.
Luminar Neo’s modules allow for a more creative approach to editing your work, if that is the direction you want to take your images. That’s not to say that other post processing programs (including Lightroom and Photoshop) are not capable of similar results, it’s just the these creative processes are built into Luminar Neo.
The ability to try the creative filters will inspire you to experiment more and come away with a more creative finished result.
Whether you like to add a creative touch to your images, or prefer to leave them as they are straight out of the camera, Luminar Neo offers the photographer the ability to make that choice.
Luminar Neo post processing software
If you want more information on how I use Luminar Neo to post process my photos, take a moment to check out my other posts listed below:
• The beauty of the woodland with Luminar Neo
• Can Luminar Neo stand on its own as a post processing package?
• A Walk in the Woods: A Photographic Approach
If you are interested in purchasing Luminar Neo, please consider using the code FernsFeathers at checkout to receive a 10 per cent discount. By using this code, I receive a small percentage of the proceeds which helps me to continue producing articles for readers.


Focus on the Pentax Q’s 08 rare and wonderful wide angle lens
Wide angle photography is taken to a whole new level with the Pentax Q and 08 extreme wide angle lens.

This sunset image shows the impressive results that are capable with the Pentax Q cameras and the 08 wide angle lens.
Another tiny but tough-to-beat legendary Pentax lens
Pentax has made more than its share of legendary lenses, but nothing really comes close to the rare and relatively unknown (except to Q-series owners) 08 wide angle lens.
Why? Because it’s so small and sharp that it defies logic.
In December of 2013, Pentax released their final Q-series lens for their diminutive, mirrorless Q-series cameras. This 17-33mm equivalent lens (depending on the Q camera used) originally sold for almost $500 US and could pass for a 50mm, M-series lens, accept it’s probably smaller and lighter.
Today you would probably be hard pressed to find one much cheaper than the original price thanks, in part, to a combination of quality and rarity.

This garden image was photographed with the Q7 and the 08 extreme wide angle lens. Note the strong colours together with the edge-to edge sharpness.
Of course the whole Q-series of cameras and lenses are ridiculously tiny. The 08 wide angle lens in the Pentax Q “high performance” lens series follows in those same footsteps, but it’s still mind boggling that a lens packing this kind of punch can be this small, have image quality that matches and surpasses some of the finest 35mm equivalent lenses, and boasts such a high-quality build standard.
Pity that so few photographers will ever get the opportunity to run it through its paces. Thankfully, I’m not one of them.
I was able to purchase the lens as part of an entire Q7 series that included the 01 (nifty 50mm), the 02 wide angle, the 06 (70-200 f2.8), the fisheye and the mount shield lens. Despite already owning most of the lenses, let’s just say the offer was too good to refuse.

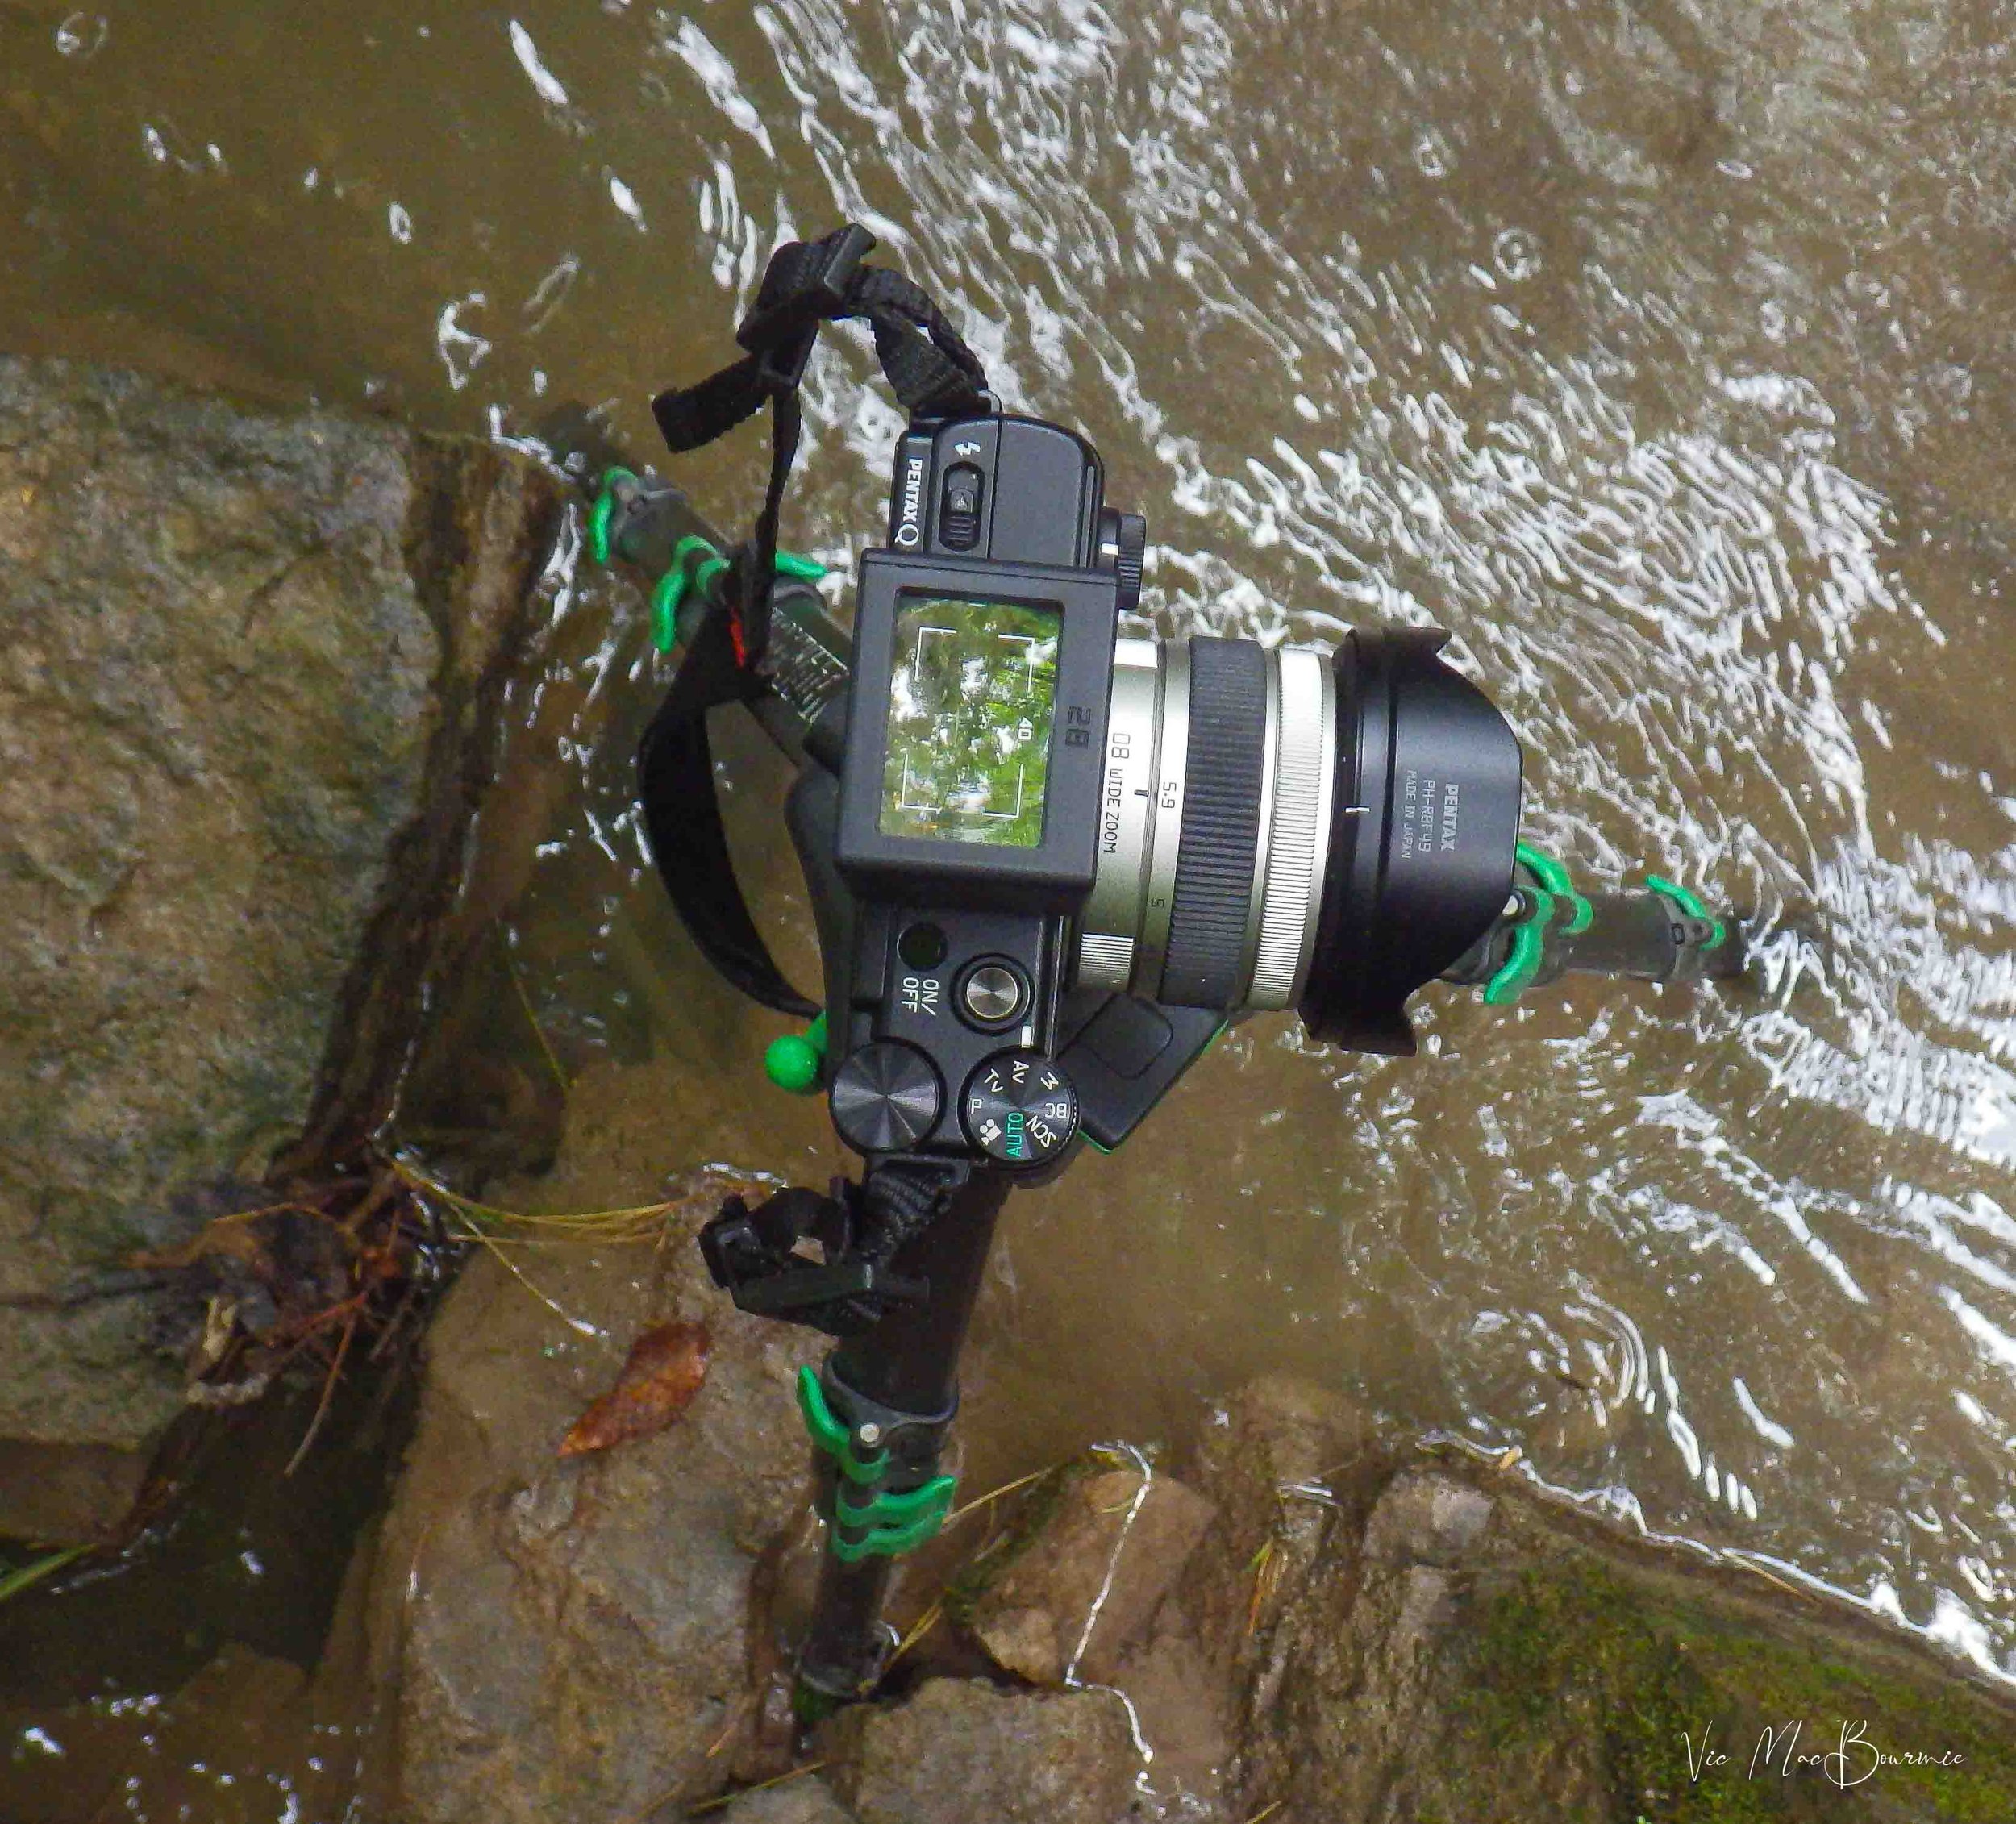
One of several waterfalls images that shows the incredible capabilities of the original Pentax Q camera together with the approximate 17-30mm wide angle lens. This image was shot using an accessory waist level finder (see below) and post processed with Luminar Neo. (see below for details on how you can get 10 per cent off of Luminar Neo with my special code.
“It’s still mind boggling that a lens packing this kind of punch can be this small, have image quality that matches and surpasses some of the finest 35mm equivalent lenses, and boasts such a high-quality build standard.”
This Pentax lens packs a punch
But we are here to focus on one lens only – the Pentax 08 wide angle lens.

Chart provided courtesy of Pentax Users Discussion Group.
First, it’s important to remind Q-series camera users that the various cameras in the lineup have different sized sensors that affect the focal length of the lenses. In the case of the 08 wide angle gem, the different sized sensors mean that the 08’s focal range is equivalent to approximately 21 to 33 mm in the full-frame (24 x 36 mm) format when used on an original Q or Q10 camera, and 17.5 to 27 mm when used on a Q7.
Add to the excellent build quality, wide focal length and miniature size, an image quality that again, defies most logic.
For more Pentax Q-series images with the 08 wide angle lens, be sure to check out my photo gallery here.

This image is one of a series taken on a one-day visit to downtown Toronto. The Pentax Q series of cameras together with the 08 are a great combination for architecture or street photography. Add the waist level finder accessory (see below) and no one would suspect you are taking serious street images.
Sharp throughout; including the corners; excellent distortion control; built-in ND filter, and shutter which prevents rolling shutter and synchronizes with the built-in flash; a built-in autofocus motor that features a quick-shift which allows the photographer to manually fine tune focus without switching out of autofocus mode. There is also a plastic tulip-style lens hood available, (sold separately). The lens mount is made of metal and the front element accepts the traditional 49 mm lens filters.
What more could you ask for in an extreme wide angle lens.
Suffice it to say it’s incredibly wide for such a tiny camera sensor, and with that comes all the challenges the world of wide angle photography presents.
You might think that using an extreme wide angle lens is easy, but that would be a mistake. Even though I have owned the lens for close to a year, maximizing its unique characteristics comes with a whole set of challenges.

This garden image makes use of strong foreground grasses and a misty morning to keep the image simple.
Now, if I lived in an area of epic landscapes, maximizing extreme wide angle lenses would be a whole lot easier. Unfortunately, epic landscapes are hard to come by where I live. Successful extreme wide angle photography begs for simplicity and finding natural images that work with a wide-angle lens takes time and a whole lot of patience.
Nevertheless, in time, I’ve collected a decent selection of images exploring the potential of the lens. I’m sure the lens will be put to the test many more times in the near future and I will try to add them both to this post as well as my photo gallery of Pentax 08 images here.
What others are saying about the Pentax 08 wide angle lens
The following are just a few comments from Pentax Q-series owners who have made images with the 08 wide angle lens.

Tiny but Tough
Pentax’s Q-series 08 wide angle lens is both rare and wonderful with exquisite image quality and very high build quality. Image provided by the Pentax Discussion users group.
From the Pentax Forums discussion group:
“In 2019, I still do not know what beats the Q-system with this and the 06 tele-zoom. As for sharpness, this lens is as good as it gets on the sensors in the Q's. Bokeh is impossible: shoot in BC mode if you need that, but, really, just bokeh in post if you need that. This lens is crazy unique, which alone makes it crazy good.”
“After a few test shots, I believe that this is the perfect lens for the Q system. It's as sharp as the 01, yet incredibly small for an ultra wide. It's almost unbelievable how Pentax has made such a marvelous feat of a lens! Now, if only Ricoh did not scrimp on a hood. With a 06 on Q, and 08 on Q7, and 01 on standby, I'm all set.”
“I was a bit hesitating before purchasing this lens due to the steep pricing (nearly cost as much as I spent on 01+02+06 all together). However, once I received my copy and started shooting with it, all my concerns went away. What a lens! It is certainly compact, quite a bit smaller than 02 or 06 lens. The amazing thing is the IQ, corner sharpness smashed my DA* 16-50. In fact, it is one of the sharpest wide angle lens I have ever seen. Colour reproduction is great, which makes RAW file super easy to work with. To sum up, for any one who owns a Q system camera, this lens is a must_have!”

Waist level finder
This waist level finder accessory from Temu allows the photographer to get the camera at a lower angle or use it more like a view camera. It has no electronics to hook into the camera but is handy to get a different perspective.
Add a waist level viewfinder to your Pentax Q
For most of the waterfall images shot with the Pentax Q and 08 lens, I used an ingenious accessory that allowed me to to get very low and better use foreground elements in the image.
The accessory brings back memories of my beloved Pentax LX with waist level viewfinder, except it can be used on any camera with a hot or cold shoe including the Pentax Q series of cameras. No information is transferred from the camera to the finder, so it is only for compositional purposes. I purchased it primarily for my coveted Sigma DP2 with its 42mm fixed focal length, but it allows me to get a good feeling for what’s in the frame of any camera, especially one that lacks a flip-up digital screen.
I purchased this waist level finder from Temu for less than $60 Cdn. That amounts to about $44 American. I also purchased some very nicely made camera straps at the same time.
Similar waist level finders are also available on Amazon.
For more on both the waist level finder and camera straps, click on the above links.
Finder is ideal fit for Q-series
The accessory waist level finder is handy for all sorts of photographic situations, especially if you want to get low and see the image in a top-down view..
The well-built, waist level finder has markings for a 40mm lens but goes out to about 28mm. It’s a far cry from the 17mm available on the Q-series 08 lens, but it gave me a good idea of the image I would obtain when the camera was set so low that I could not use the back LCD screen with any success.
It is ideal for the 02 lens and the 01 lenses, but will get called on for a number of my digital point-and-shoot cameras when I need to get low or just want to have some fun with the waist-level finder.

The extreme wide angle lens allowed me to take advantage of strong foreground objects including the small waterfalls and rocks.
Conclusion: It’s not always about size
Imagine heading out for a day of photography with a Pentax Q, the 08 wide angle, the 01 nifty fifty and the 06 telephoto slipped into your jacket pocket. Heck you might as well add the 02, a couple of toy lenses and the mount shield lens to round out your gear since everything fits nicely into two pockets or a small camera bag.
Just having a capable camera with you whenever you go out can do wonders for your photographic development. I love my cell phone, but give me a camera with a couple of sweet lenses any day over a phone. And that’s where the Pentax Q line of cameras and lenses really can’t be beat.
These things might be tiny but they aren’t toys. In fact, without the anti-aliasing screen that Pentax chose to eliminate on these cameras, you can shoot them in RAW DNG format with sweet Pentax lenses and get excellent results.
I’m hoping some of the images in this post and on my 08 photo gallery will inspire Q shooters and disbelievers to rethink what is possible with these exceptional mirrorless camera systems.
If you are interested in purchasing Luminar Neo, please consider using the code FernsFeathers at checkout to receive a 10 per cent discount. By using this code, I receive a small percentage of the proceeds which helps me to continue producing articles for readers.


Sigma DP2: Capturing unrivaled detail with a compact camera
Sigma’s DP2 enthusiast camera has a cult following of photographers looking for the highest quality images in a simple point-and-shoot camera.

This image made with the Sigma DP2 shows the incredible detail and colour that the Foveon sensor is capable of recording. Film-like reds and blues and greens that are difficult to create with non-foveon based sensors, including CCD sensors.
It’s a love-hate relationship based on the Foveon sensor
If you know anything about Sigma Foveon cameras, you’ll understand the love-hate relationship owners develop with these coveted little point-and-shoots.
We love them for the quality of the pictures that are possible with such a simple point-and-shoot camera. At the same time, however, we hate them for just about everything else.
For me, love of the final results wins out every time.
It’s almost always about image quality.

Sigma DP2 is a high-end point and shoot camera complete with an APS-C sized foveon sensor.
I have to admit, however, I’m growing to love the quirky little “features” of this camera – from its noisy start-up to its minimalist design. That simple design is hard to ignore, and you can’t help but compare it to the simplicity of the iconic Leica cameras. Even the back buttons’ black-on-black design (making it impossible to read the button functions) is divine. (Although I have read many reviews from photographers unable to appreciate the minimalist approach.)
All you have to do is watch this interview with Sigma CEO Kazuto Yamaki to get a better understanding of Sigma’s approach and direction to minimalist design.
Please take a moment to check out my Gallery of Images taken with the Sigma DP2 here.

The Sigma DP2 and foveon sensor was used to capture this magical forest scene.
Sigma Foveon pros and cons
For those who may not be familiar with these very specialized cameras, let’s explore for a moment what makes them special.
It’s the sensor!
Just like the older, CCD-sensor-based cameras are highly sought after, the Foveon-based Sigma sensor cameras are coveted by those photographers looking for the best possible images out of a pocketable, point-and-shoot camera.
And the Foveon sensor built into these cameras truly delivers.
‘Why, what’s the big deal,?’ you may ask.

A Sigma DP2 with foveon sensor was used to make this image of Cornus Kousa flowers in the woodland garden.
Without getting into all the complexities of how a sensor is made, suffice it to say that the Sigma’s very unique Foveon sensor is actually three sensors sandwiched together to extract the red, blue and green (RBG) colours that combine to give us the full spectrum of colours.
Other cameras use a single sensor to extract the red, green and blue spectrums of light. Sigma uses three sensors in its Foveon-based cameras.
The result is a very complex system that maximizes not only the colour, but the fine detail and micro contrast in the images. Most photographers will agree that the Foveon sensor is the reason the images have the most film-like look right out of the camera.
You may or may not agree, but it’s difficult to argue that these images don’t have a special quality to them that is hard to ignore and even harder to replicate with other, non-foveon sensors.

A simple comparison between the DP1 and DP2 shows similarities in all but the lens size, battery life and ISO capabilities.
Why do so many photographers dislike Sigma cameras?
What are the cons of this love-hate relationship?
I have the Sigma DP2, so this review is based on that camera.
This love/hate relationship starts when you turn it on. The camera makes some weird squeaky grinding noise that can be quite concerning when you first hear it turn it on and the lens pops out. The first time I turned it on, I was sure it was broken. However, that’s just the sound of a DP2 turning on. I can certainly live with that. In fact, the more I hear it, the more I’m even beginning to like that sound.
If that was the only negative, we would have little to complain about. But, of course, it’s only the beginning.

Heavily cropped image
This heavily cropped image shows the capabilities on the RAW images. Despite the extremely heavy crop, the image holds together showing incredible detail and colours.
Let’s start with the focus – it’s not the fastest or the greatest. The writing speed is the slowest I’ve ever experienced in a camera. Even with the fastest SD card you can get, it’s slow.
Speaking of slow, the startup time is also slow.
If that’s not enough, you really need a separate Sigma-based software program – Sigma Photo Pro – to work with the RAW files (although that has changed somewhat with the latest Lightroom release).
The lens is a fixed focal length 42mm lens (35mm equivalent), and there is no built-in shake reduction. Oh, did I mention that you really want to shoot this camera at 100 ISO for best results. Anything over 400 and you probably want to consider converting the image to B&W for best results.
Noise at higher ISOs is a problem.
So, maybe dig out that tripod you have buried in the basement.
The interface is simple enough, but very different than most other cameras I have used. Thankfully, the easily accessible “Quick Menu” makes it quick to change on the fly, once you get used to how it works.
And I would be remiss not to mention the lack of a viewfinder and the rather poor back LCD screen for viewing images.
And, if you are purchasing one of these, consider buying additional batteries. One battery is good for only about 80 images before it needs changing.
There’s probably more I’ve forgotten about, but I think you get the point.
For more on the Sigma DP2, check out my post A misty morning with the Sigma DP2.
This camera is not for everyone.
For those who appreciate slowing down, who don’t need all the bells and whistles, and who enjoy a slow, thoughtful methodical approach to making images, the Sigma series of cameras (and there are a few to choose from) are a perfect choice.
I would not make it my one and only camera, but as a secondary choice for those times when it’s the perfect choice, it’s almost perfect.
“No other camera can match its performance for sunsets and colour reproduction. ”
And, if you own one of these sweet little cameras, you may be sitting on one of the last of the breed of affordable Foveon sensor cameras. Sigma has seemingly announced that any additional Foveon-based cameras could be more of a custom order than a mass-produced piece. They are currently doing research on the Foveon sensor to “modernize” it but that research and development is apparently moving slowly.
All this usually means serious coin for a camera that was never inexpensive to begin with.
Although the camera can be quite pricey because of a combination of high quality images and rarity on the used market, good deals are still available for now if you keep watching on-line market places.
I was fortunate to purchase a Sigma DP2 in mint condition at a very good price. No battery and no charger included, but that was rectified by a quick search on the internet that landed me on Aliexpress where I was able to purchase a couple of batteries and a charger for a very reasonable price.

Minimalism at its finest
The Sigma FP is the company’s most recent example of minimalism at its finest. The FP takes the minimalist features of the the DP1 and DP2 to new heights
For more information on Sigma Cameras including the company’s latest offering the Sigma FP (the ultimate in a minimalist camera) go to Sigma.com
When was the Sigma DP1 and DP2 released?
The original Sigma DP1 was introduced in May of 2008 followed by the DP2 in September 2009.
Although Sigma made very minor changes to the DP2 from the DP1, the main difference centred around the lens’s focal lengths. The original DP1 sported a 16mm, f4 lens (28mm equivalent), while the DP2 had a 41mm f2.8 equivalent lens. The latter offered a little more depth of field control with its more traditional field of view.
As You tuber Mattias Burling points out in his comparison of the two cameras: The “DP2 is not a better performer or an upgrade to the DP1, it’s just a different focal length. DP1 was a 28mm f4 equivalent, and the DP2 is a 41mm f2.8. providing a more shallow depth of field if needed.”

Sigma DP2 was able to capture the fine detail in the flowers of this climbing hydrangea.
The X3f RAW files out of my camera are usually between 17 and 17.7 megabytes but the sensor’s unique construction underestimates the quality that can be pulled out of these APS-C-sized sensors.
I’ve included heavily cropped images in this post and in the accompanying photo gallery to illustrate the incredible capabilities of the foveon sensors.
What users say about the DP2
And don’t just take it from me. On-line opinions from other photographers illustrate the love that is out there for these cameras and sensors.
“I have been using the Sigma DP2 as my everyday camera for the past 2 weeks, and I have mixed feelings about it. The camera is slow and frustrating to use, with a confusing focus and a tendency to crash. However, it takes some of the best pictures I have ever seen, with vibrant colours and a clear, 3 dimensional quality. It’s not great for low light or flash photography, but excels in street photography, making subjects more natural. Overall, it’s a temperamental but impressive camera that I hope will be improved in the future.”
And another user says:
“The files from the camera are “officially the sharpest and most detailed I have ever used with no competition from Bayer systems ccd or cmos, nor Fuji’s X-trans (sensors). No interperlation or anti-aliasing filter. It’s simply bizarre to see the sensor in action… images are simply too sharp. ... It’s simply surreal. … The micro contrast is so high it feels life-like.”
Another said it all:
“No other camera can match its performance for sunsets and colour reproduction. I do recommend it for someone looking for something truly special.”
YouTuber spells out five reason to own the DP2
Well known YouTuber Mattias Burling spelled out his five reasons why you should own the Sigma DP2
pointing out the price of these cameras on the used market (not sure how long they will remain inexpensive), the high quality finish, the controls - “the buttons are nice, nothing special but the “manual focus wheel is simply genius. I could probably go on and on about it and how useful it is for street shooting, so let’s just leave it at being the best thing ever in a camera. It’s also been given a nifty quick menu …. a nice addition and well implemented.”
Mr. Burling wraps it up with the number 1 reason you need to own a DP1 or DP2 or any Sigma foveon camera - the incredible colours. “They are so film like and so organic and just so awesome. It is why putting up with the shortcomings of a Foveon sensor totally worth it.”
In conclusion
I agree wholeheartedly with Mr. Burling on his five points. It’s the reason I’ll be shooting this DP2 every chance I get.
More Sigma cameras with Foveon sensors
In this review, I am focussing on the Sigma DP2 and to a lesser extent the DP1 because I own a DP2, but there are several other Sigma cameras with Foveon sensors that are exceptionally good cameras, though priced appropriately.
If you are interested in exploring Sigma cameras and the Foveon cameras still further, be sure to check out the Merrill line of DP cameras here.
In addition, there are the four Sigma Quattro series cameras. Like the DP series, they differ only in the fixed lenses they sport.
DP0 (14mm or 21mm on a 35mm camera)
DP1 19mm (equivalente to 28mm on a 35mm)
DP2 30mm (45mm equivalent on 35mm)
DP3 50mm (75mm equivalent) f2.8
The waist level viewfinder is made for a 28mm focal length lens, but the lines in the finder are for a 40mm lens. Perfect for the Sigma DP1 and DP2 cameras.
Add a waist level viewfinder to your Sigma DP camera
I recently added an ingenious accessory that allows me to either get a very low angle in my images or see the image much better when the sun makes it difficult to see the back LCD screen. It’s also just a fun addition to the Sigma DP line of cameras or any camera with a hot or cold shoe. It is shown here with the Pentax Q camera.
Waist level finder
Another angle of the waist level finder that is almost made for the Sigma DP2’s 42mm lens. Here it is seen with the diminutive Pentax Q camera.
The accessory brings back memories of my beloved Pentax LX with waist level viewfinder, except it can be used on any camera with a hot or cold shoe. No information is transferred from the camera to the finder, so it is only for compositional purposes. I purchased it primarily for my coveted Sigma DP2 with its 42mm fixed focal length, but it allows me to get a good feeling for what’s in the frame of any camera, especially one that lacks a flip-up digital screen.
I purchased this waist level finder from Temu for less than $60 Cdn. That amounts to about $44 American. I also purchased some very nicely made camera straps at the same time.
Similar waist level finders are also available on Amazon.
For more on both the waist level finder and camera straps, click on the above links.

Dames Rocket:Romancing the ordinary
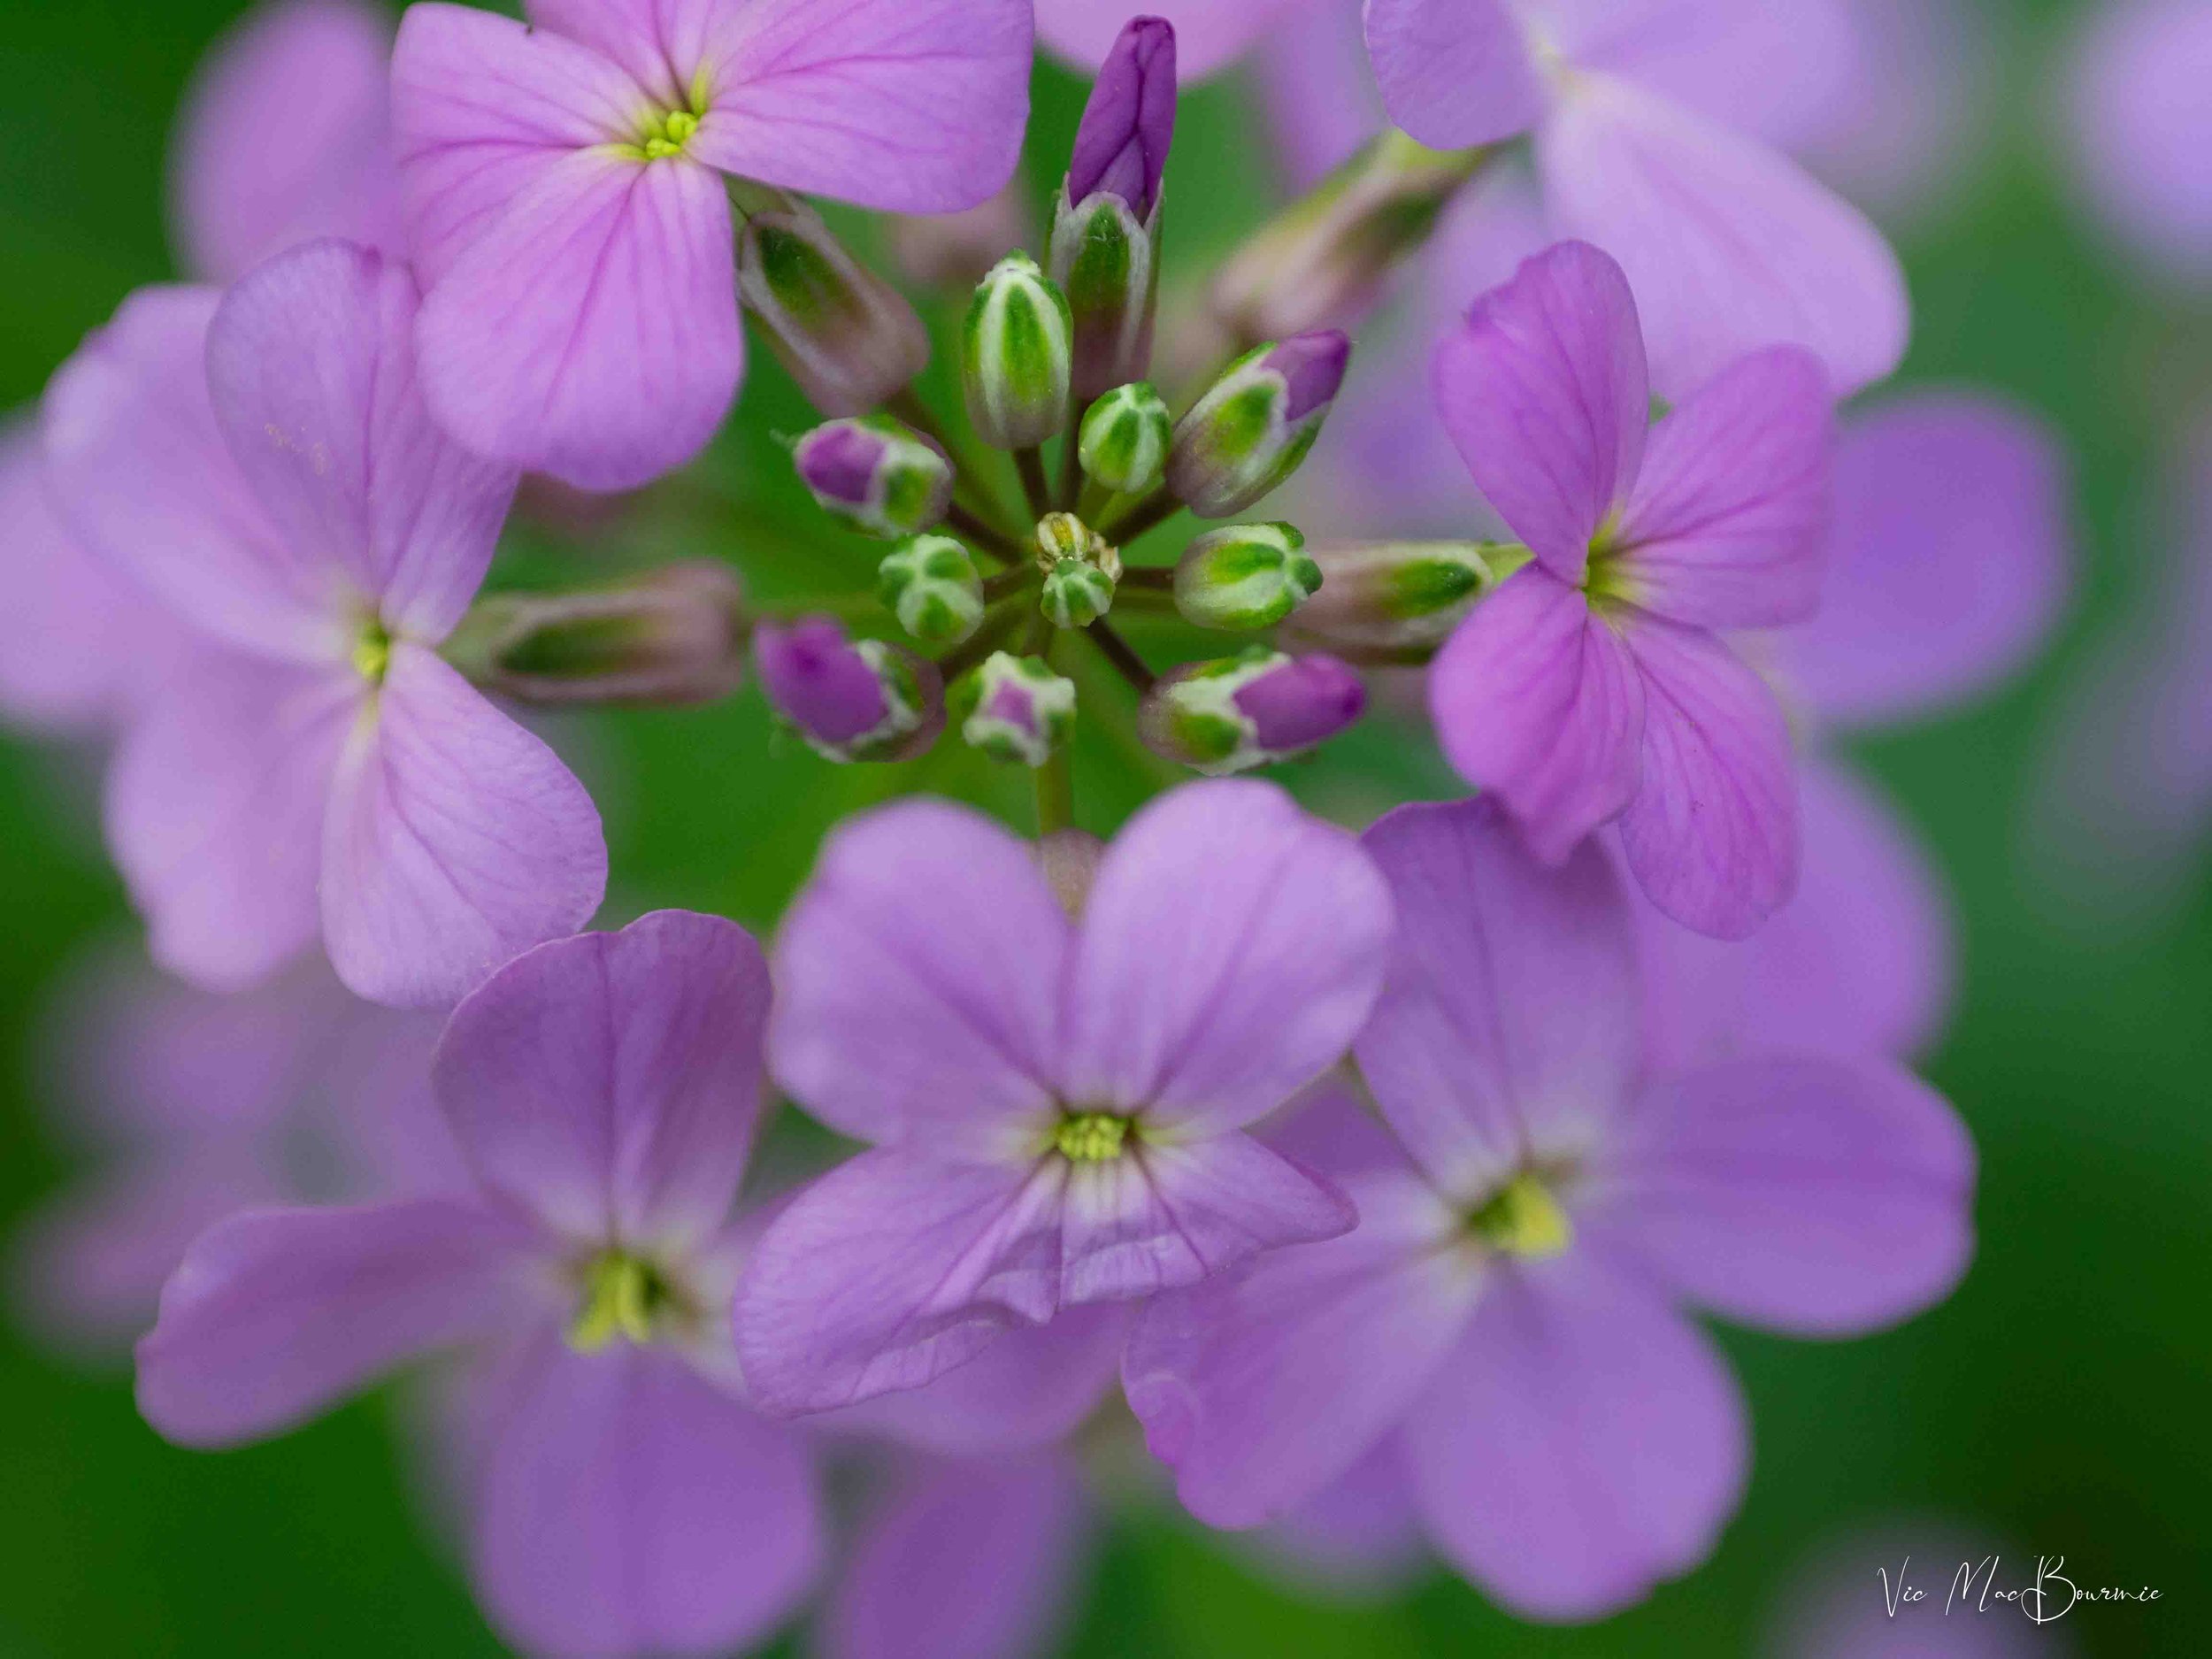
Dames Rocket is considered a non-native invasive plant, but it can be a flower photographer’s dream come true.

Dames Rocket is a lovely phlox-like flower that is often seen along roadsides. This grouping nestled nicely up against a fence line along a nearby forest road and stopped me dead in my path. Although beautiful, they are invasive in our gardens and woodlands and should not be cultivated.
A non-native plant, but a flower photographer’s dream
Nature doesn’t care about the value of a plant, shrub or tree, but somehow she manages to create beautiful vignettes with what she is given.
It’s something we gardeners can learn to do as well.
The problem is, nature can’t tell the difference between native and non-native plants.
If you’re one of those people who have been stopped dead in your tracks by a natural floral display along a roadside, there’s a good chance that display involved a plant commonly named dames rocket.
This plant, Hesperis matronalis, often goes by other names including dame's rocket, damask-violet, dame's-violet, dames-wort, dame's gilliflower, night-scented gilliflower, queen's gilliflower, rogue's gilliflower, sweet rocket, and mother-of-the-evening.

Dames rocket may be considered a roadside weed by many, but its phlox-like flowers affords the flower photographer a wealth of opportunities to explore creative approaches.
Some may see these lovely spring-blooming flowers, which are actually biennials or short-lived perennials native to Eurasia, as nothing more than roadside weeds or, at best, plants that add a nice hit of spring colour to our gardens. Unfortunately they would be right on both occasions.
Like many of these roadside plants, they are the result of plantings that have escaped from cultivation in gardens.
For more on dealing with non-natives in your garden, click here.
For reasons why we should plant native plants in our garden click here

This image shows the Dames Rocket growing wild in a sunnier area of the woodland garden. Once the flowers show a hint of fading they will be removed and disposed of but not on the compost heap.
A threat to native woodland plants
Let’s make it clear, these are not native North American plants and can be aggressive. They are detrimental to our native plants and need to be treated as invasive, non-native plants. They are everywhere in my area invading areas of natural woodland and threatening native plants.
They popped up in sunnier parts of our garden and have, despite their problems, added a lovely hit of colour to these parts of the garden. That, of course, is the problem. They are easily mistaken for native phlox and left to sow seed in the garden. And, their good looks makes the decision to remove them a little more difficult.
But don’t be mislead by their attractiveness.
Be aware that dames rocket is much like garlic mustard and will, if allowed, produce thousands of seeds that will eventually threaten your native plantings. At the very least, remove the flower heads before they begin to die off and dispose of them (not in your compost heap). Preferably, pull the entire plant and roots out and dispose of them before they go to seed.
For more information on this plant and how to control or eliminate it from your garden, check out Wildones.
A non-native plant, but a flower photographer’s dream
In the meantime, I’ll enjoy the flowers while they exist and do what I can to “romance the ordinary” through photography rather than gardening.
I have photographed these early spring-bloomers along the roadsides for years. It wasn’t until they found a home in our garden that I decided to explore the photographic potential just a little further.
The large colonies of plants often seen in open fields and along roadsides open up great possibilities to explore more creative approaches to flower photography. Individually, however, they can also be beatiful subjects.
The following are just a few of the images, I have made recently and over the years.

Dames Rocket is an excellent plant to explore selective focus. By shooting through a mass of flowers with a wide open aperture, you are able to make lovely selective focus images with a dreamy feel to them like the image above.

Dames rocket provides the background in this wildflower meadow image.

A close-up image of a single dames rocket flower shot with selective focus. If you find yourself in a field of these flowers, be sure to explore all the possibilities, especially more creative approaches. By opening up your aperture to f2.8 or grater, you will be able to capture dreamy images. Focus becomes a little more critical under these circumstances as your depth of field becomes very restricted
Dames Rocket photographed from above with Olympus 45mm 1.8 and MCON-P02 close-up lens. By adding Olympus’s high-quality close-up lens to the 45 f.18, I was able to move in close while allowing the flowers to take on a delicate, out-of-focus look.

Dames Rocket photographed with Olympus MCON-P02 close-up lens and post processed with photoshop and Luminar Neo. The high key, dreamy look is the result of using the extensive creative tools provided in Luminar Neo software. More information on Luminar Neo’s extensive tool kit for creating lovely flower and landscape images below.
One of the joys of flower photography is not only making the original image, but using the tools available in photography programs like Photoshop, Lightroom and Luminar Neo to transform the ordinary into more painterly artistic visions that allow you to explore your creative vision.

Dames Rocket flower after creative effects were added in photoshop, but before the image was brought into Luminar Neo for final creative edits.
In the image above, I brought the original image (below) into photoshop where I “extracted” a light purple colour from the original image and used it with a series of PS brushes to create the soft pastel look around the plant.
Using Luminar Neo to add the magic
I then brought the image into Luminar Neo where I was able to tap into the magic of the program’s extensive creative tool kit. Through the use of several modules in Luminar Neo including the develop, mystical, soft focus, vignette and high key modules, I was able to transform the original image into a more creative flower image that better communicated the feel of being in a field of these lovely wildflowers.
For more information on how I use Luminar Neo in my approach to post processing click here for my woodland images article, here for how you can use Luminar Neo as your only post processing software tool, and here for more creative results using Luminar Neo with traditional film photography.
If you are interested in purchasing Luminar Neo, please consider using the code FernsFeathers at checkout to receive a 10 per cent discount. By using this code, I receive a small percentage of the proceeds which helps me to continue producing articles like this one for readers.


How to create a natural log planter
Adding a path-side planter from a large branch or decaying tree trunk is a project everyone can accomplish by following the steps in this post.

A natural log planter with the beginnings of native plantings including a maidenhair fern. The natural curve creates a shady spot for toads, salamanders and other critters. It is important to dig in both ends of the log so that it does not look like it is sitting on top of the soil.
From woodland vignette to garden feature
Part four of a series
One of the best additions we can make to our woodland/wildlife gardens is a simple rotting log, surrounded by native wildflowers and moss.
Not unlike a forest, where large branches and entire trees are left to slowly decay on the ground, our gardens benefit from the same rotting logs on our forest floors. These logs can quickly become home to any number of small woodland creatures, many of which are often unseen unless we really go looking for them.
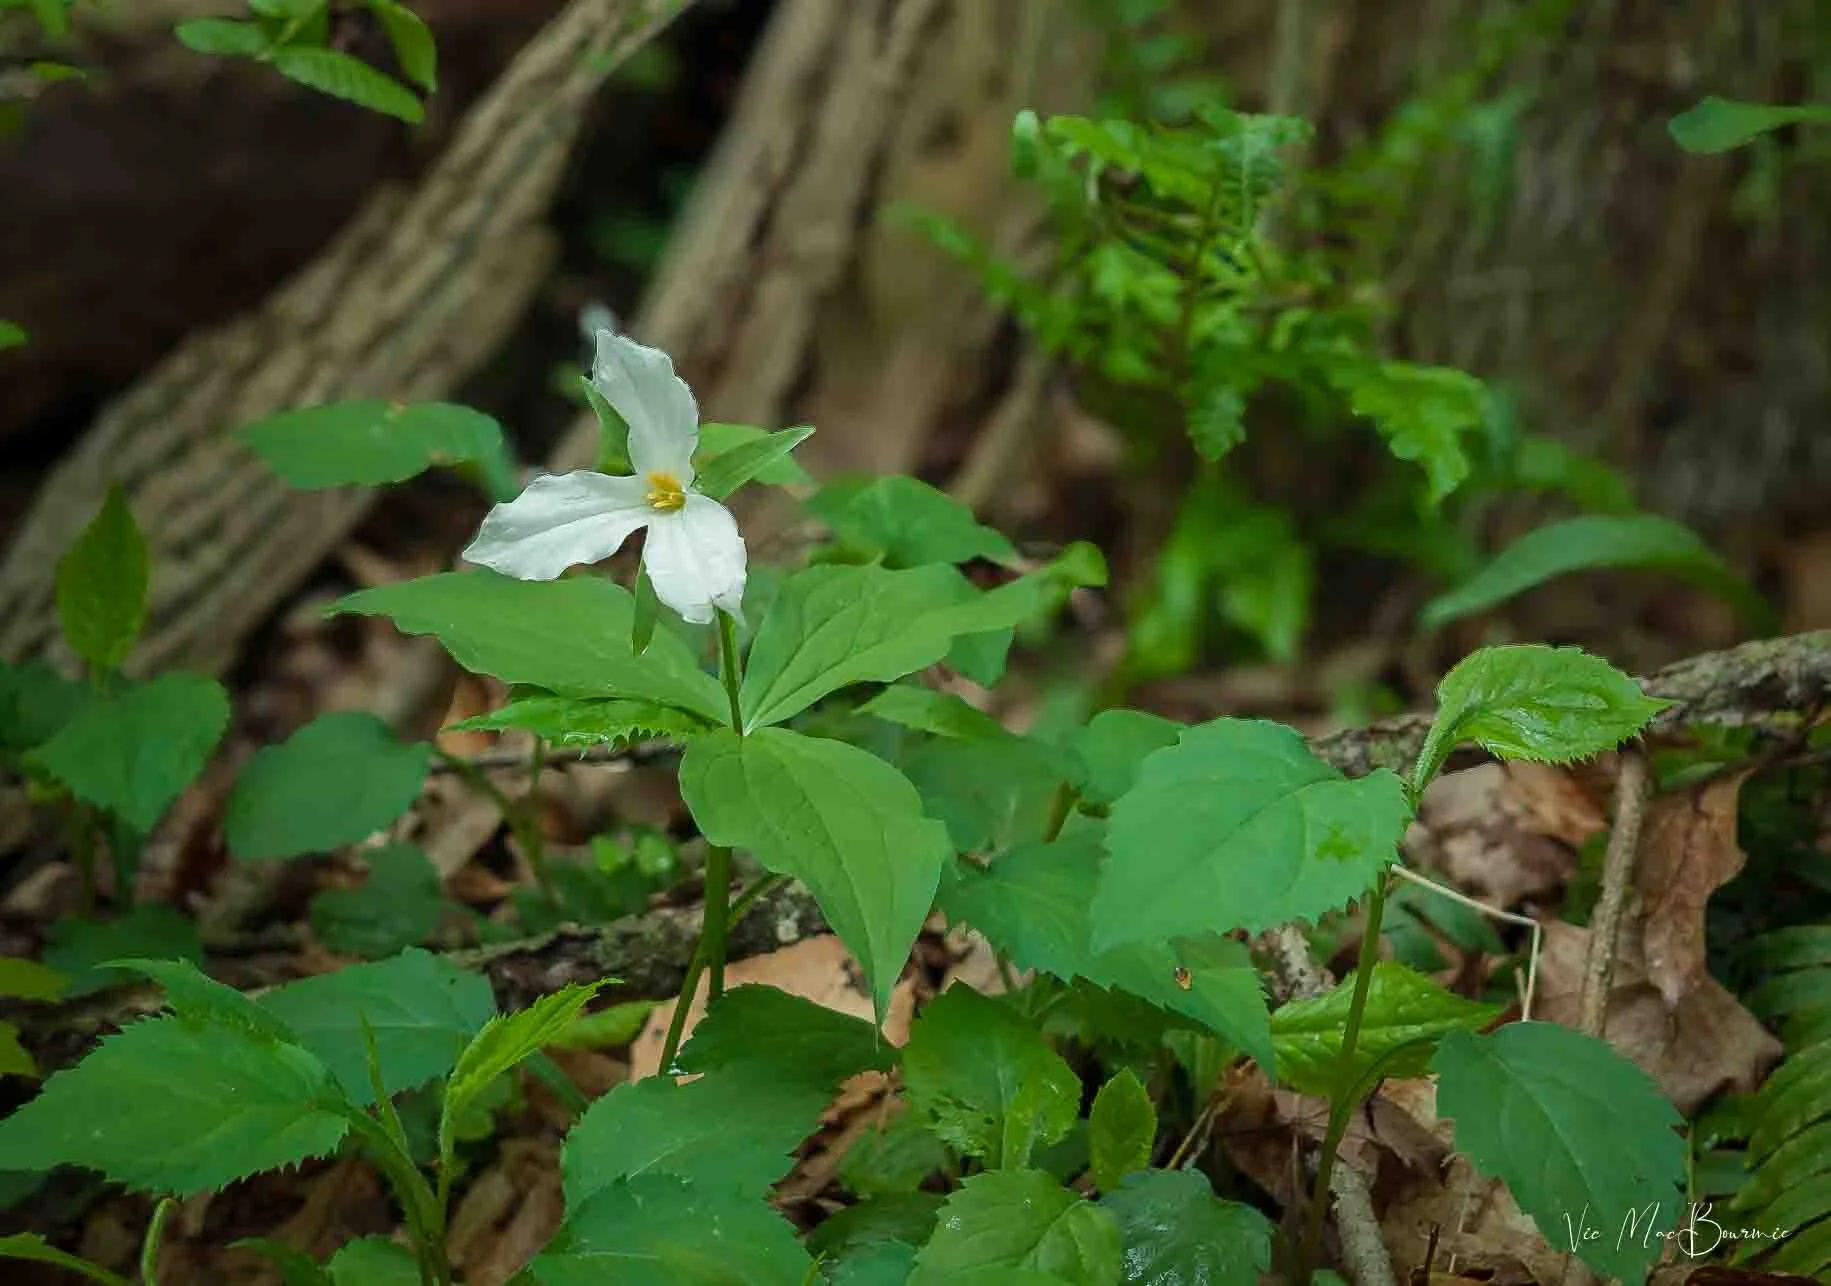
A trillium pokes through the undergrowth from a dead tree stump creating a lovely woodland vignette that can be easily copied in our own woodland gardens.
During my Walks in the Wood, I have been drawn to woodland vignettes – like the one pictured above – surrounding downed tree branches or old tree stumps that have attracted a host of native plants and mosses. Recreating these scenes in my own garden has been a real joy, although I still have much to do before I can say they are completed.
The images above and below represent the beginnings of a project that involves a total of six natural woodland pathway planters.
If it’s large enough, you should see toads, snakes, even salamanders move in to the log along with a myriad of insects and fungi that all work in unison to break down the wood and add nutrients back to the garden.

Moss and a pink wildflower add a nice touch to our woodside planter.
The process of decay is slow and might even go more or less unnoticed, if it wasn’t for the birds and animals that visit the log looking for a quick meal or a place to escape predators. Photographers looking to improve their wildlife opportunities can use the log as a to capture wildlife in a natural setting like the image of the chipmunk farther down the page.
Ideally, we are looking to create a log planter similar to the artistic interpretation below.

A natural log planter is the perfect addition to a woodland garden. Place it along a path so you can enjoy it on your walks through the garden.
Don’t remove those large branches after tree trimming
One of the best decisions I made several years ago was to tell our local tree service company not to cart off the large branches they took down from our upper canopy trees and, instead, leave them be on the ground.
One area where a lot of branches fell was our massive garden of ferns (link to fern garden post). It was the perfect place to just leave the large branches on the ground to break down naturally.
Our massive ferns grow up through the large branches and hide them throughout the summer months. During the early spring and fall and winter, I get to monitor the slow breakdown of the large branches spread over the ground.
“An interesting log or gnarly branch can add a very artistic touch to a shade garden or a final bit of realism to a woodland garden.”
In another area of the garden, I used the large branches that were removed from the tree to create a natural woodpile to provide shelter and habitat for the backyard critters that need places like this to escape predators. I’m sure some of them use it as shelter throughout the winter.
In fall, I throw on a layer or two of fallen leaves to provide even more shelter and create an even better environment for the large branches to break down over time.

If you are able to find a stump or old log with a hole in it, you just might have the perfect outdoor studio for capturing images like this. A few sunflowers dropped in the natural cavity will bring chipmunks and birds to your planter for some great photographic opportunities.
Five tips to find deadwood
If you do not have dead trees or stumps on your property to attract wildlife, you can always go out on a scouting trip to find a handsome trunk or large branch to place artistically in your landscape. Here are a few places to look for deadwood to create your planter.
If there is a natural woods nearby; ask permission to collect a few good-size pieces of deadwood. It’s best to collect soon after a storm blows down the branches, before wildlife have a chance to move in.
Call a nearby tree service company. They are usually willing to let you have anything you can haul off, or you may be able to arrange delivery for a small fee.
Check with your local cable, electric or telephone company. Trimming branches and clearing trees are routine maintenance and they are more than likely happy to let you take them.
Your local parks department and the town or city road crew may be able to help as well. They maintain public trees and are often looking to get rid of large branches.
Keep an eye out for possibilities in your neighbourhood. Your neighbours will probably be pleased to let you cart off their stumps an larger branches. Explain to your neighbours why you want them and how you will be using them. It’s a good way to raise awareness about the value of deadwood.
Deadwood does not have to be left on the ground.
In her book, Natural Landscaping, Gardening with Nature to Create a Backyard Paradise, Sally Roth dedicates several pages to the benefits of using deadwood in the woodland garden.
It is almost as useful standing up as it is lying down, she explains. An interesting log or gnarly branch can add a very artistic touch to a shade garden or a final bit of realism to a woodland garden.
If you have a large, long branch that is manageable, consider creating your own “snag” by simply digging a deep hole and planting the deadwood vertically.
I have a 8- to 9-foot branch planted in the back of our yard near my outdoor photo setup that is a regular stop for woodpeckers, nuthatches, red squirrels and chipmunks.
These are particularly prized by woodpeckers, and they make an excellent foundation for a feeding area. I have drilled holes in the branch where I insert bark butter regularly. You can also wire suet to them or hang a feeder. The dead tree is also the perfect landing spot for birds approaching the feeding station. Keep it far enough away that squirrels can’t leap over to the feeders.
Create a simple log planter
Letting nature slowly break down the logs is certainly one way to help wildlife, but using the logs to create a path-side planter is an even better one.
How often have you been out for a walk and saw the local arbourist either cutting down or trimming up a large tree in the neighbourhood. That’s a great opportunity to ask if they would drop off a large branch or two at your home. If you have access to a truck, you could obviously just throw it in the back and take it home on your own.

Some of the tools I used to hollow out a part of the log to pack it with moss and/or wildflowers. A battery-operated chainsaw is an excellent way to cut the initial grooves, which can then be chiseled out to your liking.
Once you have it home, you can go to work carving out a portion of the log where you can pack in a rich forest soil loaded with compost, rotting leaves and bits of fungi that will quickly go to work breaking down the wood.
If you are comfortable using a chainsaw, you can create a large hollow in the log in no time. If a chainsaw is not something you want to get involved with, you can create the planter with simple tools like a hammer and chisel.
To speed up the process, consider using a power drill to first create holes in the area you want to hollow out. Once the holes have been drilled 5-6 inches deep, you can begin chiselling out the wood. Depending on the size of the log, you may have to drill and chisel out the wood a few times before you have the look and depth you want.
If it’s possible, use a longer drill bit to create drainage holes through the log. Drainage holes may not be necessary since the idea behind the project is to create a rotting log, and the wood in the log will absorb a lot of the moisture anyway, but drainage holes might be appropriate depending on what you are planning to grow in the fallen-log planter.
I have seen many of these natural planters with colourful bedding plants filling them up. That’s fine if you are looking to “pretty-up” a corner of the yard, but using native or at least woodland-style plants in and around a natural planter looks and feels much more appropriate.
Think wildflowers like hepatica, trilliums, maidenhair ferns, mushrooms and small succulents. A natural path-side planter where you can control factors like soil PH, is the perfect place to grow Bunchberry (cornus canadensis) or other acid-loving plants.

Three native foam flowers and a Columbine are added to the back of the planter that can be seen from our patio.
In his book, Landscape with Nature, Using Natural Design to Plan Your Garden, Jeff Cox writes that “you can make a totally natural planter by hollowing out the centre 1 foot deep.” He suggests planting the old log planter with ferns, begonias, impatiens, or hens-and-chicks, but I prefer a more natural approach using native wild flowers including trilliums, dog-tooth violets and even wild ginger along with hepatica and spring beauty. It might also be the perfect spot to try some native orchids.
A log planter can also be a great place to grow a small bonsai-like shrub – suggesting the rebirth from a dead tree into new life. Again, try using a native shrub like a serviceberry, or one of the many small-shrubby native dogwoods, and viburnums preferably one with berries.
Commercial alternatives to a natural log planter
If carving up an old wooden log with a chainsaw or painstakingly chiselling one out is too much, there are much simpler ways to achieve the overall look without lifting a finger.
Commercial stumps are available that give you the look of an old, hollowed out tree stump without the work and the eventual complete break-down. High quality concrete planters can look remarkably real.
This example of an old wooden log planter from Wayfair.com is a good indication of what is available.
The concrete containers that are made to look like a real tree trunk are perfect for the woodland garden. You can purchase ones that stand up more or less vertically to give height, or planters that are more like fallen logs that lie on the ground horizontally.
These have the added benefit of being able to be easily moved around the garden.
Of course, you will lose out on many of the insects and small animals that would readily move into the more natural pathside planter, but you will be gaining a woodland aesthetic that will surely bring a smile every time you pass it by.


Pentax PZ20: A modern, classic film camera?
The Pentax PZ20 is a modern film camera and when teamed with Luminar Neo is capable of magical results.

I could not resist the red barn with its window wide open. Scanned and post processed with Luminar Neo photo editing package. (see below for details)
PZ20 and Luminar Neo take simplicity to creative new heights
The PZ20 is a simplified camera wrapped up in fine heritage and capable of some serious professional work.
But, what the heck was Pentax thinking when they released this workhorse in 1993?
A that time, film photography was in a good place. Digital was still a distant dream and camera manufacturers were working hard to encourage beginner photographers, who were comfortable using point-and-shoot cameras, to graduate to 35mm SLRs.

The PZ20 has the look of a modern digital SLR.
First Pentax released the truly dumbed down but still capable PZ10. Then they introduced the Pentax PZ20. Both were considered stepping stones from simple point-and-shoots to just slightly more complicated but very capable and impressive SLRs complete with a host of interchangeable lenses and packed with modern features capable of making professional-calibre images.
If the professionally-spec’d Pentax PZ1-P was the ultimate camera for wanna-be professionals, the PZ20 was the little sister who could stand alongside her big brother and get the job done with a whole lot less fuss. In truth, the big brother is probably much more capable, but the learning curve for average photographers was off the charts, and the results, well they were pretty much the same for most average users.
Click on the link for my full review of the Pentax PZ1-P.
“If a camera is nothing more than a conduit to capture a properly exposed image, which can then be scanned and manipulated beyond our wildest dreams in 1992, then the PZ20 and cameras like it, are a steal.”
Pentax, like other camera manufacturers at the time, took a professionally-spec’d camera, dumbed it down and said “go take great pictures for a fraction of the cost of your big brother.”
Dit it work? Well, it sure worked for a while as SLR camera sales soared along with film. The film era was doing just fine, thank-you.

Screech owl just hanging out
A heavily cropped image shot with the Pentax PZ20 on Kodak 200 and post processed with Luminar Neo.
The days of beautifully crafted, all-metal cameras might have ended for all but the highest-end cameras, but as everyone knew from The Graduate, “plastics were the future.”
And we’re not talking cheap plastics like the type that often followed in cameras after the PZ line of cameras. These plastics were meant to last, with a feeling of quality that continues with many of today’s better digital offerings.
“Post processing to this extent was literally non-existent when the PZ20 was manufactured, but the digital age has re-imagined the possibilities of these cameras.”
Is the PZ20 still good in 2025?
Okay, but what about this PZ20. Are they any good in 2025?
Damn right they are.
Why, for example, would anyone buy a Pentax Monochrome digital camera when you can buy a PZ20 for under $50 and eat up B&W film like it was 1960?
For the Monochrome lovers out there, I know they’re great cameras and capable of some lovely B&W images, but unless you’re shooting professionally, the PZ line of cameras, a couple rolls of Ilford, a high quality scanner and top-notch photo editing software like Luminar Neo, gets the job done.
Click here for my post on the Pentax Monochrome camera.
But we’re not just talking B&W. I loaded my PZ20 with some off-the-shelf Kodak 200ASA colour film and took it, along with my digital cameras, to see how it measures up.
The results: Pretty damn nice.
“Take a simplified SLR like the Pentax PZ20 and team it with Luminar Neo – an Ai-based post processing program ideal for beginners – and you have the perfect combination of simplicity and creative possibility.”
Now, I like to think that post processing had a lot to do with the results. Negative film is very forgiving so getting the image on film and converting it to digital with a simple scanner, opens a world of possibilities not available in the early ‘90s.
Post processing software opens doors no-one could dream about in 1993 when the PZ20 was introduced. In those days, everything had to be done in-camera when the image was captured. Today, for many of us, that is just the beginning of the process.
Take a simplified SLR like the Pentax PZ20 and team it with Luminar Neo – an Ai-based post processing program ideal for beginners – and you have the perfect combination of simplicity and creative possibility.
And, if a camera is nothing more than a conduit to capture a properly exposed image, which can then be scanned and manipulated beyond our wildest dreams in 1992, then the PZ10 and cameras like it, are a steal.
I think I paid $20 Cdn for mine. For American readers, that’s probably, like the cost of a roll or two of film. And it’s mint and came with an electronic shutter release to boot.
It takes all the Pentax lenses but is really at home with the M and A series of lenses and the F and FA series of autofocus lenses.
As one Pentax enthusiast wrote on Pentax Forums: “If you shoot film-only, this can be a fantastic main camera. On the other hand, if you also have a Pentax DSLR, this camera can also be a fantastic companion, if your lenses are full-frame you can use them even if they do not have an aperture ring (which is the case in most modern lenses).
The autofocus is fast and accurate. It has Hyper Manual and Hyper Program modes in addition to the usual Av, Tv, M, B and P modes. It also has many other fully automatic modes. In manual mode it has spot metering. Actually, it has many functions of more advanced (and heavier) cameras.”
Another reviewer wrote: “Using it, it's actually more enjoyable then it's bigger brother (PZ1-P). Less settings to scroll through, I don't even mind the lack of second control wheel.”
He went on to explain: AF confirmation works too with M, K, A glass. Focus screens are not inter-changeable, but plenty bright enough… . The info screen inside the viewfinder on the right of mine is crap and hard to read, no matter, the meter is present on the top lcd and that works nicely to get the exposure close. Using M42, M, K's glass it's less of a worry as you only have to pay attention to the shutter values….”

Redwing in early morning light
Early spring image of a Redwing blackbird post processed with Luminar Neo photo imaging software.
One user explains that, although the PZ20 lacks AE Exposure lock, it has Hyper Manual and Hyper Program modes which can be used in a similar way. And, unlike the big brother PZ1-P, the PZ20 does not have two dials (one for aperture and the other for shutter speed), instead it has a button to chose which parameter to modify and a rocker switch to change these values.
This is a simplified explanation but the camera certainly gives us the control most of us need to capture a properly exposed, in-focus image.
I’m not really one for the details, you can get them all over the web, but here is a spec sheet from Pentax Forums that may help those inclined.

Thanks to Pentax Forums for the PZ20 digital Spec sheet.
Once we get the images, unlike life in the early ‘90s when we were more or less stuck with what the camera produced, the magic really begins.
I’d love to show you hundreds of images I’ve shot with the camera, but frankly I’ve only put through one roll to date. Many more to follow, including some B&W.
One roll, however, is enough for me to draw some conclusions.
Like I said, the magic begins when the digital images are in front of me and I get to work exploring the creative potential.
Creating presets with Luminar Neo
After some work on the image below, I decided to create a preset to use on all the other images of the abandoned antique truck. The preset helped to create a unified effect for the entire series of images.
For more posts on Luminar Neo click here for a Walk in the woods with Luminar Neo, and here for the question: Can Luminar Neo stand on its own as an image processing package?
The same preset was used on the red-barn-and-window image at the top of the page.

Abandoned truck takes on a mystical look after being post processed with Luminar Neo.
Luminar Neo goes to work on abandoned antique
Above are a few images from that first roll. Below are a few more of my abandoned roadside antique truck that are given a stylized look through post processing entirely with Luminar Neo photo editing software.
The software provides all the necessary tools that other professional photo editing programs provide, but with the addition of some truly exceptional Ai tools that make photo editing – even for the beginner – much simpler than the traditional post processing programs.
Here are just a few examples from the combination of the Pentax PZ20 film camera and Luminar Neo.

Exploring this abandoned truck with a creative eye and the PZ20 helped me to focus on details, which were later manipulated in Luminar Neo photo editing program to create these stylized results.
Luminar Neo, a Ukraine-based photo editing program, allows the photographer to literally have fun adjusting the effects of the filters until they find the perfect setting. For these images, a “mystical” module was called upon to give the images a soft, glowing effect that I thought worked well for the subject.

The front grill shows the GMC logo together with the peeling paint and lovely rusty colours.
Post processing to this extent was literally non-existent when the PZ20 was manufactured, but the digital age has re-imagined the possibilities of these cameras. Many young photographers who have discovered the joys of Lomography are experimenting with cheap film cameras and lenses, but there is no need to resort to the cheapest new film cameras when high-end film cameras and modern software is capable of creating magical images. For images made with the PZ20 by Lomography’s talented creators, you can go here.

Searching out details like this door handle on the truck provided a focus of interest. I later emphasized the details and vibrant colours through post processing after the film was scanned into a digital image.
If you are interested in purchasing Luminar Neo, and exploring the program’s creative possibilities, please consider using the code FernsFeathers at checkout to receive a 10 per cent discount. By using this code, I receive a small percentage of the proceeds, at no additional cost to you, which helps me to continue producing articles for readers.
The program is already a great value, whether you buy it outright or pay on the monthly plan. In addition, you would be helping a Ukrainian-based company in Kiev that we all know is experiencing extremely difficult conditions.
If you are interested in exploring Luminar Neo’s creative possibilities, please consider using my 10 per cent off discount code “FernsFeathers”.
• Looking for a slick new camera strap for your classic camera? I just ordered one of these beautiful braided straps for under $10 Canadian from Temu.

A Walk in the Woods: A photographic approach
Enthusiast cameras from yesterday can be incredibly valuable tools for the everyday photographer looking for a simple carry-everywhere camera. Here are four I took with me for A Walk in the Woods.
This image was shot with the Sigma DP2 and processed with Luminar Neo photo processing software.
Point-and-shoots find their place in the woodlands
Part three of a series
It started as a small project to get some serious exercise, experience the spring woodland in all its glory, and test a few of my favourite point-and-shoot cameras.
It quickly grew into a little bit of a passion, some might say even an obsession.
Before long, I found myself hiking the woodlands around our home several times a week exploring the many paths – big and small, some nothing more than a deer path – that meander through the Conservation lands and lead me to new areas for exploration.
Now, my “Walk in the Woods” project to document this fabulous woodlot I had been ignoring for far too long, has become more of a labour of love than anything that resembles work in any form.
The project combines two passions in my life – woodland/native gardening and photography.
What more can you ask for in life?
How about an outlet for my love of everything photography. Inspired by the works of Canadian photographer Freeman Patterson and his suggestion to embrace projects in your photographic endeavours, I set out to document the spring woodlands.
More posts from the Walk-in-the-Woods series.
• Native plants in the Woodlands
• Walk in the woods photo gallery
I didn’t want to carry in all my heavy equipment, so I opted for lightweight, but higher-end, enthusiast point-and-shoot cameras which I had collected over the years, mostly for the price of a couple cups of good coffee and a donut.
Part of my plan was to show readers of this website how simple, inexpensive enthusiast cameras are more than capable of creating good, maybe even very good images. And, always hoping that a few of the images would more than meet my expectations and enter the realm of excellence. I’m not sure I’ve reached that level, but I’m more than happy with many of the images to date and many more to come.
I’m more than happy with the whole experience and the lessons I’ve learned about woodland gardening from the master herself, Mother Nature.
Point-and-Shoots are not perfect
I’m not kidding myself here. I know that point-and-shoot cameras – even the better ones – have inherent problems with them.
Not the least is the fact they have difficulties achieving soft, out-of focus backgrounds. Their small sensors and minimum aperture openings can be seen as both a pro and con, but mostly influence the images in a negative way.
Photographers looking to achieve beautiful bokeh, for example, either have to work extremely hard to achieve it or simply give up trying.
Well, that’s not entirely true any longer. Today’s post-processing software has changed all that, providing you know how to take advantage of these features.
In addition to trying to get the most out of these enthusiast cameras, part of my challenge was to also show how proper post processing of these images can take them to higher levels than ever expected, especially with modern post processing, including Ai or artificial-intelligence-based applications, including Luminar Neo. But more on that later.
The cameras of choice
I’m going to narrow this review down to four of my favourite, inexpensive, enthusiast point-and-shoots. Here’s a quick look at my cameras of choice.
Lumix DMC-ZS8
• The Lumix DMC-ZS8 travel camera with its 16X, 24-384mm (35mm equivalent) Leica lens that packs a lot of power in its sweet 14.1 megapixel CCD sensor. It’s tiny and very pocketable, but has the heft of a well-made, high-quality camera. Add to these specs, a 3.0-inch LCD display with 230,000 dot resolution.

Lumix DMC-ZS8: CCD sensor.
I got this sweet little package for the ridiculously low price of $10 Canadian, so how could I go wrong? When I went to pick it up, I expected to receive a beat-up old camera that barely worked. What I got was an almost mint CCD-sensored camera with a quality build that left me more than impressed.
I actually managed to capture two of my favourite images of all time driving home from picking up the camera from a distant town. Looking for more information, check out my review here or another one here.
• Then, I added another real gem – the Pentax WG-2 underwater, go-anywhere adventure camera. Again, an on-line marketplace purchase I could not resist.

Pentax WG-2 adventure camera.
My plan was to use the camera to photograph the beautiful clear stream that meandered through the woodland from above and below the water. In fact, I wanted to drop the camera in the stream to get underwater images impossible with any normal camera without underwater housings. Let’s just say my plan is working, but I need to experiment more to get the results I know are possible.
The camera sports 16 megapixels with an aggressive, military-looking armour design that begs to be abused. I’m doing my best, but it still looks like new.
One of the features I find fascinating is its unique macro and digital Microscope modes that feature lights around the lens that light up very, very close subjects in super-macro mode. There is too much packed into this camera to get too deep into it here, but suffice to say that it comes with a 5X Pentax lens that provides a 28mm to 140 (35mm equivalent) internal optical zoom. For a detailed review go here.
• Next is maybe the piece-de-resistance of my compact point and shoots – the Sigma DP2 complete with a micro 4/3-sized Foveon sensor. If this means nothing to you, no worries. Just know that very few cameras in this class compare with the quality obtainable with this incredibly frustrating camera.

Sigma DP-2: Foveon sensor.
Frustrating for so many reasons: A fixed 42mm equivalent lens that is neither wide angle nor telephoto, a writing speed that is slow enough to take a nap waiting for it to complete the process, weird noises on start-up and focusing, and autofocus that leaves something to be desired.
I have not even mentioned the fact that you basically need special Sigma software to properly process the RAW files from the camera. But, when it all comes together, the results can be magic. (More on this later.)
• Finally, there is the 10 megapixel Lumix LX7 workhorse of a camera that continues to impress me in so many ways every time I pick it up.

The Lumix LX7 is an high-end point and shoot with some old-school touches.
This sweet little Lumix brings a touch of old-school to enthusiast cameras with its manual aperture ring, but its 24-90mm equivalent fast Leica f1.8-f8 lens is what makes this one special.
It’s got 70 megapixels built into internal memory. It can take an optional EVF and shoots RAW with the best of them. The LX7 is just one in a line of excellent Lumix LX-series cameras.
For more on the camera and Lumix’s LX series of cameras, check out my full review here.
Can these point-and-shoots deliver?
Okay enough about the tools, let’s take a look at the results.
A couple of images from each camera will help give you an idea of their capabilities and I’ll touch on their shortcomings.
Be sure to check out my “Walk in the Woods” photogallery for many more images made with these cameras.
The Lumix DMC-ZS8 was the first camera I chose for the project. I used it to document the early spring before most of the foliage from the trees and flowers had emerged, so the images can be a little stark.
The Lumix ZS-8 is a pocketable gem

Skunk cabbage emerges from wet areas in the woodlands. The The Lumix ZS-8 was able to capture the lovely muted colours in the scene as well as show off its solid close-focusing ability.

The Lumix ZS-8 was able to capture the fine details in the forest floor of a lovely pine forest. In early spring before the foliage has emerged, it’s important to explore the details the woodland offers us.

My first butterfly of the spring, captured on the Lumix DMC ZS-8, handheld at ISO 100 at 250th/second, at f6.3.

This photos was made more as a documentary image showing the work of woodpeckers on dead and dying trees. I liked the soft muted tones, the story the holes in the tree trunk tell viewers about nature and the search for food as well as the importance of leaving dead trees standing whenever possible. This is also an example of how modern technology can benefit a typical point-and-shoot camera. In the original image, the background trees were all very much in focus, but by using Lightroom’s blur/depth of field module, I was able to soften the distracting background and focus on the main subject. Too much depth of field is a problem with small-sensored cameras. This module can save many pictures that would otherwise be lost by distracting, busy backgrounds.
The Pentax WG2
I had never owned an all-weather camera prior to purchasing the Pentax Optio WG-2. (Most camera makers have one including the Olympus Tough series and Nikon) Frankly, I didn’t expect much from the camera considering its small sensor, many features and the low price I was able to purchase it for.
Boy was I surprised. Although, in landscape mode, the images seem to have a very warm cast, it’s nothing that can’t be adjusted in any photo editing package. I have only had the camera for a short time, but have managed to capture some of my favourite images with it.

The Petax WG2 all-weather, indestructible camera captured this scene of a stream while being half submerged in the water. That’s not something you would do with any other camera without a waterproof housing. The results can be hit and miss but the possibilities are limitless. Fish in the stream, a frog half in and out of the water, waterlilies photographed from underneath the water looking up onto the flowers. Although these cameras are often advertised as “beach and vacation” cameras, they certainly have a place in any nature or garden photographer’s arsenal.

Some flowers’ shapes beg to be photographed from above. I thought these two dog-tooth violet flowers and mottled leaves benefit from a top-down approach. The image was given a mystical effect in post processing using Luminar Neo’s outstanding editing opportunities.

The scene appeared almost out of nowhere as I walked along a path through the early-morning mist. Marsh Marigolds as far as the eye can see were captured by the Pentax WG2’s wide angle lens at 5mm (28mm). And, if this does not impress you, check out the image below shot with the camera’s extreme macro-capable lens and built-in ring light.

An example of the “macro” capabilities of the WG2 camera that features a built-in ring light type of flash for extreme closeups like this marsh Marigold bloom.
Sigma DP2 a special camera and sensor
If you are unfamiliar with the unique features of Sigma’s Foveon-based-sensor cameras and, you are not alone. Suffice it to say that the cameras (and there are more than a few)would never sell except that they offer the possibility of incredible results that are difficult to obtain on other cameras in their class. I would say impossible, but I know there are too many naysayers out there to debate. Needless to say, the results can be incredibly good, but getting there is not easy. Let’s say it’s a camera for the very dedicated among us.

Although the RAW image out of the camera was perfectly good, I did explore the full capabilities of Luminar Neo photo processing software to bring out the most in this image. The result of this hand-held image is one that I am particularly happy with, especially the fine detail that Sigma’s Foveon sensor is known to capture.
The fine detail that the Sigma sensor is able to capture is evident in this image. The background was blurred using Lightroom’s outstanding lens blur tool to focus more on the trillium.

Skunk cabbage takes centre stage in this early spring woodland image with the Sigma DP2. The moss-covered fallen tree proved to be inspiration to create a similar effect in my woodland garden.

A fallen spruce tree and small waterfalls shot hand held with the Sima DP2. I particularly like the water captured at a slow enough shutter speed to show detail while, at the same time, showing the motion of the water.
The Lumix LX7: A gem in the world of point-and-shoots
I may have saved the best for last. Maybe not the best images, but the best all-round camera. The Lumix LX series of cameras are known for their ease of use and outstanding results all wrapped into a camera that exploits our desire for a little retro in our lives.
In my case, a working aperture ring on the lens where us old-school photographers remember it. It’s all just a nice little package that works. I have only had the LX7 out in the woods once or twice but came away with some of my favourite woodland images.

Fern in late afternoon sun beam is a favourite of mine. I love how the low sun kisses the fern and lights it up against the dark background of a fallen tree and barely visible pathway. The image required a two-stop under exposure to get the proper exposure on the fern while letting the background go dark. The fact that there is still detail in the background gives the image an air of mystery and guides you down darkened path. Unless you are shooting in complete manual exposure, taking advantage of the plus- and minus-compensation feature on cameras is necessary to capture images with strong sunlight and dark shadows.

This image of wild strawberry flowers caught my eye along the path. It’s simple, but the vivid greens and textured leaves play nicely against the white flowers.

The Lumix LX7 was able to catch this ray of sunshine on a group of Forget-Me-Nots along the path. Again, I needed to underexpose by several stops so that the flowers were not blown out. Simply following the meter in the camera would have made the highlights to bright and probably make them unrecoverable. Shooting in the RAW format provides the photographer with more latitude in these situations.

The close-focusing capabilities of the Panasonic LX7, and its pocketable size, make it an ideal choice as an everyday walk-around camera. Here, the elusive Mayapple flower was captured hiding under the leaves of the forest ground cover plant. Although I could have removed the green cast, I thought it was appropriate to leave it to illustrate how the flower grows under the leaf of the Mayapple.
I’m hoping this post convinced you of the value of carrying a simple point-and-shoot camera with you at all times both in the garden as well as when you go for a walk, be it in the woods or just a pleasant walk in the neighbourhood. These camera are incredibly useful. Yes, your smart phone can certainly get the job done in a pinch and I’m guessing you always have it with you, but trust me, in most circumstances the camera will deliver better results.
Of course, the camera involves more work. First you have to learn its features, then transfer the images from the SD card to your computer before you even begin the editing process. Once the post processing is completed, you’ll have to save it and then post it to your favourite social media platform.
Sounds like a lot of work. It is. But when done well, it’s incredibly satisfying and rewarding. Take these images and create a book or, at least consider printing some of them.
Explore your creative side with some of the new photo editing software like Luminar Neo, Lightroom and Photoshop just to name a few.
Many of these images were post processed using the Ukraine-based Luminar Neo. I have partnered with the company and can offer readers a 10 per cent discount at checkout with my code “FernsFeathers.” Using the code will not cost you anything, but I get a small amount of money to keep me writing extensive articles like this one.
If you are interested in exploring Luminar Neo further, check out my posts here (Luminar Neo in the woodland garden and nature) and here (Is Luminar Neo the only software I will need) and here (exploring a film camera and Luninar Leo)
Happy shooting.
Native plants on the woodland walk
I take a walk in the woods to explore the native wildflowers. Trilliums, Marsh Marigolds, Wild Geraniums, Mayapples, Forget-me-nots and a host of others that we can use in our own woodland gardens.
“May your life be like a wildflower, growing freely in the beauty and joy of each day.”

As May fades into June, the Trilliums too, begin to fade from their stark white stage, to a lovely shade of pink. Not to be mistaken by the vibrant colours of the red trillium or Wake Robin pictured farther down.
Trilliums, cranesbill, violets and Redbuds: Rooted in the woodlands
Part Two of the series
Most people enjoy a walk in the woodland. They marvel at the discovery of a favourite wildflower, shrub or flowering tree growing deep in the forest.
In many places around the world, those same plants growing in a front garden become the talk of the neighbourhood, often bringing HOA administrators or city inspectors to tell the homeowners to cut these same plants down, or worse, rip them out and replace them with tidy non-native plants that they all know and love.
Is it the plants that are the problem, or where they are growing? should it even matter?

Wild violets early bloomers
Yes, the same violets that neighbours work so hard to keep out of their barren yards of turf grass are among the first blooming native woodland wildflowers.
Without getting into an in-depty discussion of why we need more native plants in our gardens – front and back – I am a firm believer that where and how native plants grow make a world of difference to how they are perceived.
In the woodland and other natural areas, Mother Nature does the planting. Somehow, she seems to know how and where to grow these plants so that they fit in perfectly in most cases and make us stop in our tracks and marvel at their perfection.
Click on the links for my earlier post entitled “A Walk in the Woods” and the accompanying Photo Gallery.

Mayapple in Bloom
Most passersby will never notice the lovely white flower beneath the large, attractive leaves of the Mayapples that spread across the woodland floor, but if you lift one of the leaves you just might see the large white flowers that eventually become the “apple” later in summer. The seeds of the “apple” seed pods are eventually planted by ants and other fauna.
She doesn’t worry about planting in ones, threes or fives. Odd numbers are not in her vocabulary. She plants as many as needed, where they grow best. The fact their placement almost always feels right might be coincidence, or meticulous planning, but we all know it’s really about what comes natural and what really works in that world.
During my walks in the woods, I couldn’t help but notice the familiar and unfamiliar plants that emerged with the coming of spring.
Now, I am no expert on native plants, nor do I believe that there is only room for natives in a garden setting. We definitely need more natives in are gardens, but there are aesthetic and other legitimate reasons for adding non-natives to our garden beds.

A single trillium growing among fallen logs and last year's fallen leaves. I gentle reminder to leave your leaves for the beneficial insects and wildflowers.
In the forest, however, non-natives become more controversial, especially those plants that leave our gardens and spread aggressively into the forest. Buckthorn, wild garlic and purple loosestrife are just three non-native species that threaten our woodlands in Northeastern United States and Southwestern Ontario. There are too many more to list – Lilly of the valley and ditch Lillies (those ubiquitous orange day Lillies that seem to have place in every garden) just to name a few.
Our woodland native plants need protection, but in the meantime, we can enjoy them in their natural environments provided we know when and where to look. Once we find them, we can take note of how and where they are happily growing, and ask ourselves why they are growing so successfully in that particular part of the forest or woodland clearing.
click on the link for my earlier post on why we need to plant more natives in our gardens.
By asking ourselves that question, we can locate them in our own gardens with greater success.
Lesson 1: Mother Nature never plants trilliums where she thinks they will look best or seen by the majority of visitors to the woodland. Instead, they appear where they will grow best – in the right light, in deep, rich forest soil formed over years of leaves falling to the ground and decaying year after year. They are not growing in that sandy soil or heavy clay, many of us try to force our trilliums to grow in our gardens.

A cluster of Wake Robin trilliums photographed from above to show their nodding habit and the habitat where they grow. Notice the abundance of fallen leaves and native white pine needles.
What native Trilliums in the woodland can teach us

A wonderful discovery in the woodland. Not far off a secondary path a grop of red trilliums or wake robins warmed up the woodland floor.
Trilliums are a great example of our spring ephemerals. They begin to emerge when the leaves have yet to fill the tree canopy. Without the leaves shading the ground, the sun’s rays reach down deep into the forest floor warming it quickly and giving a kick start to the winter-dormant plants.
By the time the leaves are emerging from the upper canopy, our trilliums are beginning to appear. First in sunnier west-facing areas that get sufficient morning and afternoon light, followed by other areas on the forest floor.
Click on the link for more on growing trilliums in our woodland gardens.
Mother Nature looks for ideal conditions and then lets the trilliums go to work building drifts and, at times, massive carpets of Ontario’s official wildflower.

A wake robin nodding in their typical style of growth.
On my woodland walks this spring, I have watched the trilliums emerge in various parts of the forest, mostly in small groups rather than large drifts, and certainly not in any large carpets that I have witnessed elsewhere.
Along the way main pathway where hundreds of people walk, run and ride their bikes, the trilliums survive and put on a nice show. Some take up perfect spots overlooking the clear creek that runs alongside the path. These are particularly pretty with the stream flowing past them and make for potentially lovely photos.
But, it’s off the main path over the many surrounding hills where I find the largest number of trilliums and certainly the most photographically pleasing compositions. Here, they are more or less undisturbed. The leaf cover is deeper, the fallen trees are decaying more naturally without much interference from humans and the plants are able to spread their seed more efficiently.
On one recent walk along the main path, I noticed a much smaller path going almost straight up vertically. With my trusted, and highly recommended walking sticks, (Amazon Link) I climbed the steep hill, only to be greeted by a lovely woodland scene full of fallen tree stumps in various levels of decay, wood ferns and trilliums – most in small groups, but others growing singularly.
From my vantage point on the other side of the hill, I could hear people walking by (talking loudly of course even in the quiet of the woodland), but I was in another world entirely.
I imagined creating a similar “secret garden” in a quiet area in our woodland garden. It could never match this magical discovery, but maybe I could capture the spirit of the place.

Native Foam flower (Tiarella) blooms alongside trilliums and other native wildflowers.
Lesson 2: Look to capture special places you discover in the woodland in your own garden. You will likely never replicate the exact feeling, but you can capture the spirit of those places. A fallen log left to become moss-covered, a pocket of deep rich humusy soil where you can successfully grow trilliums and wood ferns. Add a natural seating area where you can escape the noisy world around you. Maybe add a natural stone basin to encourage wildlife to visit your secret place.

Woodland scene
How easy would it be to duplicate this first scene in your woodland garden? The cut tree is the result of the local conservation authority maintaining the forest to some degree after fallen trees block walking paths.
In another, much more distant area of the woodland, I come across a grouping of Wake Robin hidden in a quiet area far from the groups of walkers, families with children out for a stroll and bike riders ripping up the forest floor with their knobby tires.
I’m guessing these, more rare, grouping of maroon trilliums have escaped the eye of people who think the wildflowers are there for only their enjoyment and walk off with either an entire plant or just the flowers, hoping to get them home in time to pop them in a vase.
Or maybe, it’s just ideal conditions that brought them there.
As spring opened its arms to more and more wildlfowers, from the large drifts of Mayapple and skunk cabbage (covered in more depth in my first post A Walk in the Woods), the emergence of large drifts and smaller clumps of Forget-Me-Nots began lighting up the forest floor.

The blue mistiness of a blanket of Forget Me Nots surround a large tree just off the path in the woodland.
Forget Me Nots: Native or non-native?

A ray of sunshine catches a clump of Forget Me Nots along a main path. Being out late in the day allows us to capture special moments like these.
I was always of the understanding that Forget-me-nots were an introduced species that naturalized in our woodlands, but I have learned that, in fact, there is a species of native Forget-Me-Nots in the United States and Canada. That’s good news because they are certainly in abundance in the woodland around my home as well as in our garden.
The species native North America including Ontario, Canada is Myosotis Macrosperma, also known as the large-seed forget-me-not. It is in the borage family (Boraginaceae) and found in a variety of natural habitats, including areas of bottomland forests, mesic forests and prairies. Like most native woodland plans it likes nutrient-rich soils, but can be found growing in less than ideal soils including pastures and fallow fields.
Myosotis macrosperma is a spring blooming herbaceous annual that produces a cyme of white flowers. Myosotis macrosperma can be distinguished from the non-natives by its longer inflorescence nodes, larger and more deciduous calyx, and larger mericarps
While the common forget-me-not (Myosotis sylvatica) is not native to North America and is considered an invasive species, it has naturalized in various regions.
I admit a soft sot for these lovely little flowers and enjoy photographing them whether they are the native or non-native variety. They are not around for long and are certainly willing self-seeders.
Lesson 3: Unless you want to be inundated with an abundance of Forget-me-nots in your spring garden, think twice about introducing them to your garden. On the other hand, if you like the blue carpet of these early spring bloomers, feel free to let them spread through areas of the garden and experience the joy of the misty blue carpet every spring. In an area of our garden, the Forget-Me-Nots are happily spreading and allowed me to capture the image of the spring fawn (above).
Many of the images in this post and other posts from a “Walk in the Woods” were post processed with Luminar Neo software. If you are looking for an inexpensive, but comprehensive editing program for beginners, check out Luminar Neo’s wide ranging tools to take your editing to new heights. Check the bottom of page for a 10 per cent discount code.

A river of Marsh Marigolds is a stunning sight to come upon on a misty morning in early May. Below, a single bloom shows how beautiful they are in close up.
A river of of Marsh Marigold
I stumbled across a river of marsh-marigold (Caltha palustris) also known as kingcup one misty morning on a path a little out of the way of the main walking path, but certainly in an area regularly visited by the many who walk the conservation area trails.

A single marsh marigold bloom from the river that blanketed an area in an open, marshy area of the woodland.
I photographed the incredible scene from every angle I could imagine to ensure I could do it justice. In other areas, smaller clumps of the joyful sunny flowers graced the woodland wetlands.
Marsh Marigolds, is a small to medium sized herbaceous perennial and member of the buttercup family. As its name implies, they are native to marshes, fens, ditches and wet woodlands throughout the northern hemisphere. These lovely plants flower between April and August depending on location. For more details, use this link to read Wikipedia’s extensive description.
Wikipedia includes this description of the flowers or (inflorescence): “The common marsh-marigold mostly has several flowering stems of up to 80 cm (31 in) long, carrying mostly several seated leaflike stipules, although lower ones may be on a short petiole; and between four and six (but occasionally as few as one or as many as 25) flowers. The flowers are approximately 4 cm (1+1⁄2 in) but range between 2–5.5 cm (3⁄4–2+1⁄4 in) in diameter.”
How is that for a mouthful?
Lesson 4: All I know is that these native wildflowers thrive in the local wetlands. Unfortunately, I don’t have a natural or man-made pond in our garden, but if I did, these would be a must-have. Not only do they light up the area with an abundance of golden flowers, they provide pollinators with an early-spring source of food. A win-win for our gardens.

Wild geranium or cranesbill
A wild geranium shows off its lovely mauve flower. These are an important early source of nectar and pollen for a host of insects.
Wild Geranium making their presence felt
Most woodland gardeners have at least one wild geranium (cranesbill) in their gardens. Whether it’s the native plant or one of the many “nativars” that have invaded most nurseries, these hardy, low-growing ground covers work as well in the natural woodlands as they do in our gardens.
Click on the link for my full story on using wild geraniums as a ground cover.
As I write this post in late May, the Wild Geranium are just starting to flower both in the natural woodland and in our garden. The mauve flowers are always a welcoming sight growing among the ferns and adding colour to the forest floor. Check out my earlier post on growing wild geranium as a ground cover in the woodland garden.

Wild strawberry make an appearance in late May. The flowers will eventually turn into a wild strawberry fruit that willed woodland fauna.
As May turns to June and the woodland matures from spring to early summer wildflowers, ferns, mayapple, sedges, Jack-in-the-pulpits and other primarily foliage plants begin to take over from the ephemerals in the woodland, where they go about their business of shading the forest floor.
I’ll keep visiting my woodland, exploring and discovering more native flowers, plants, shrubs and trees as spring turns to summer. Here are just a few more I came across during my Walks in the woodland.

Jack in the Pulpit
Areas of the woodland support numerous Jack in the Pulpits, which easily go unnoticed on the greening forest floor..
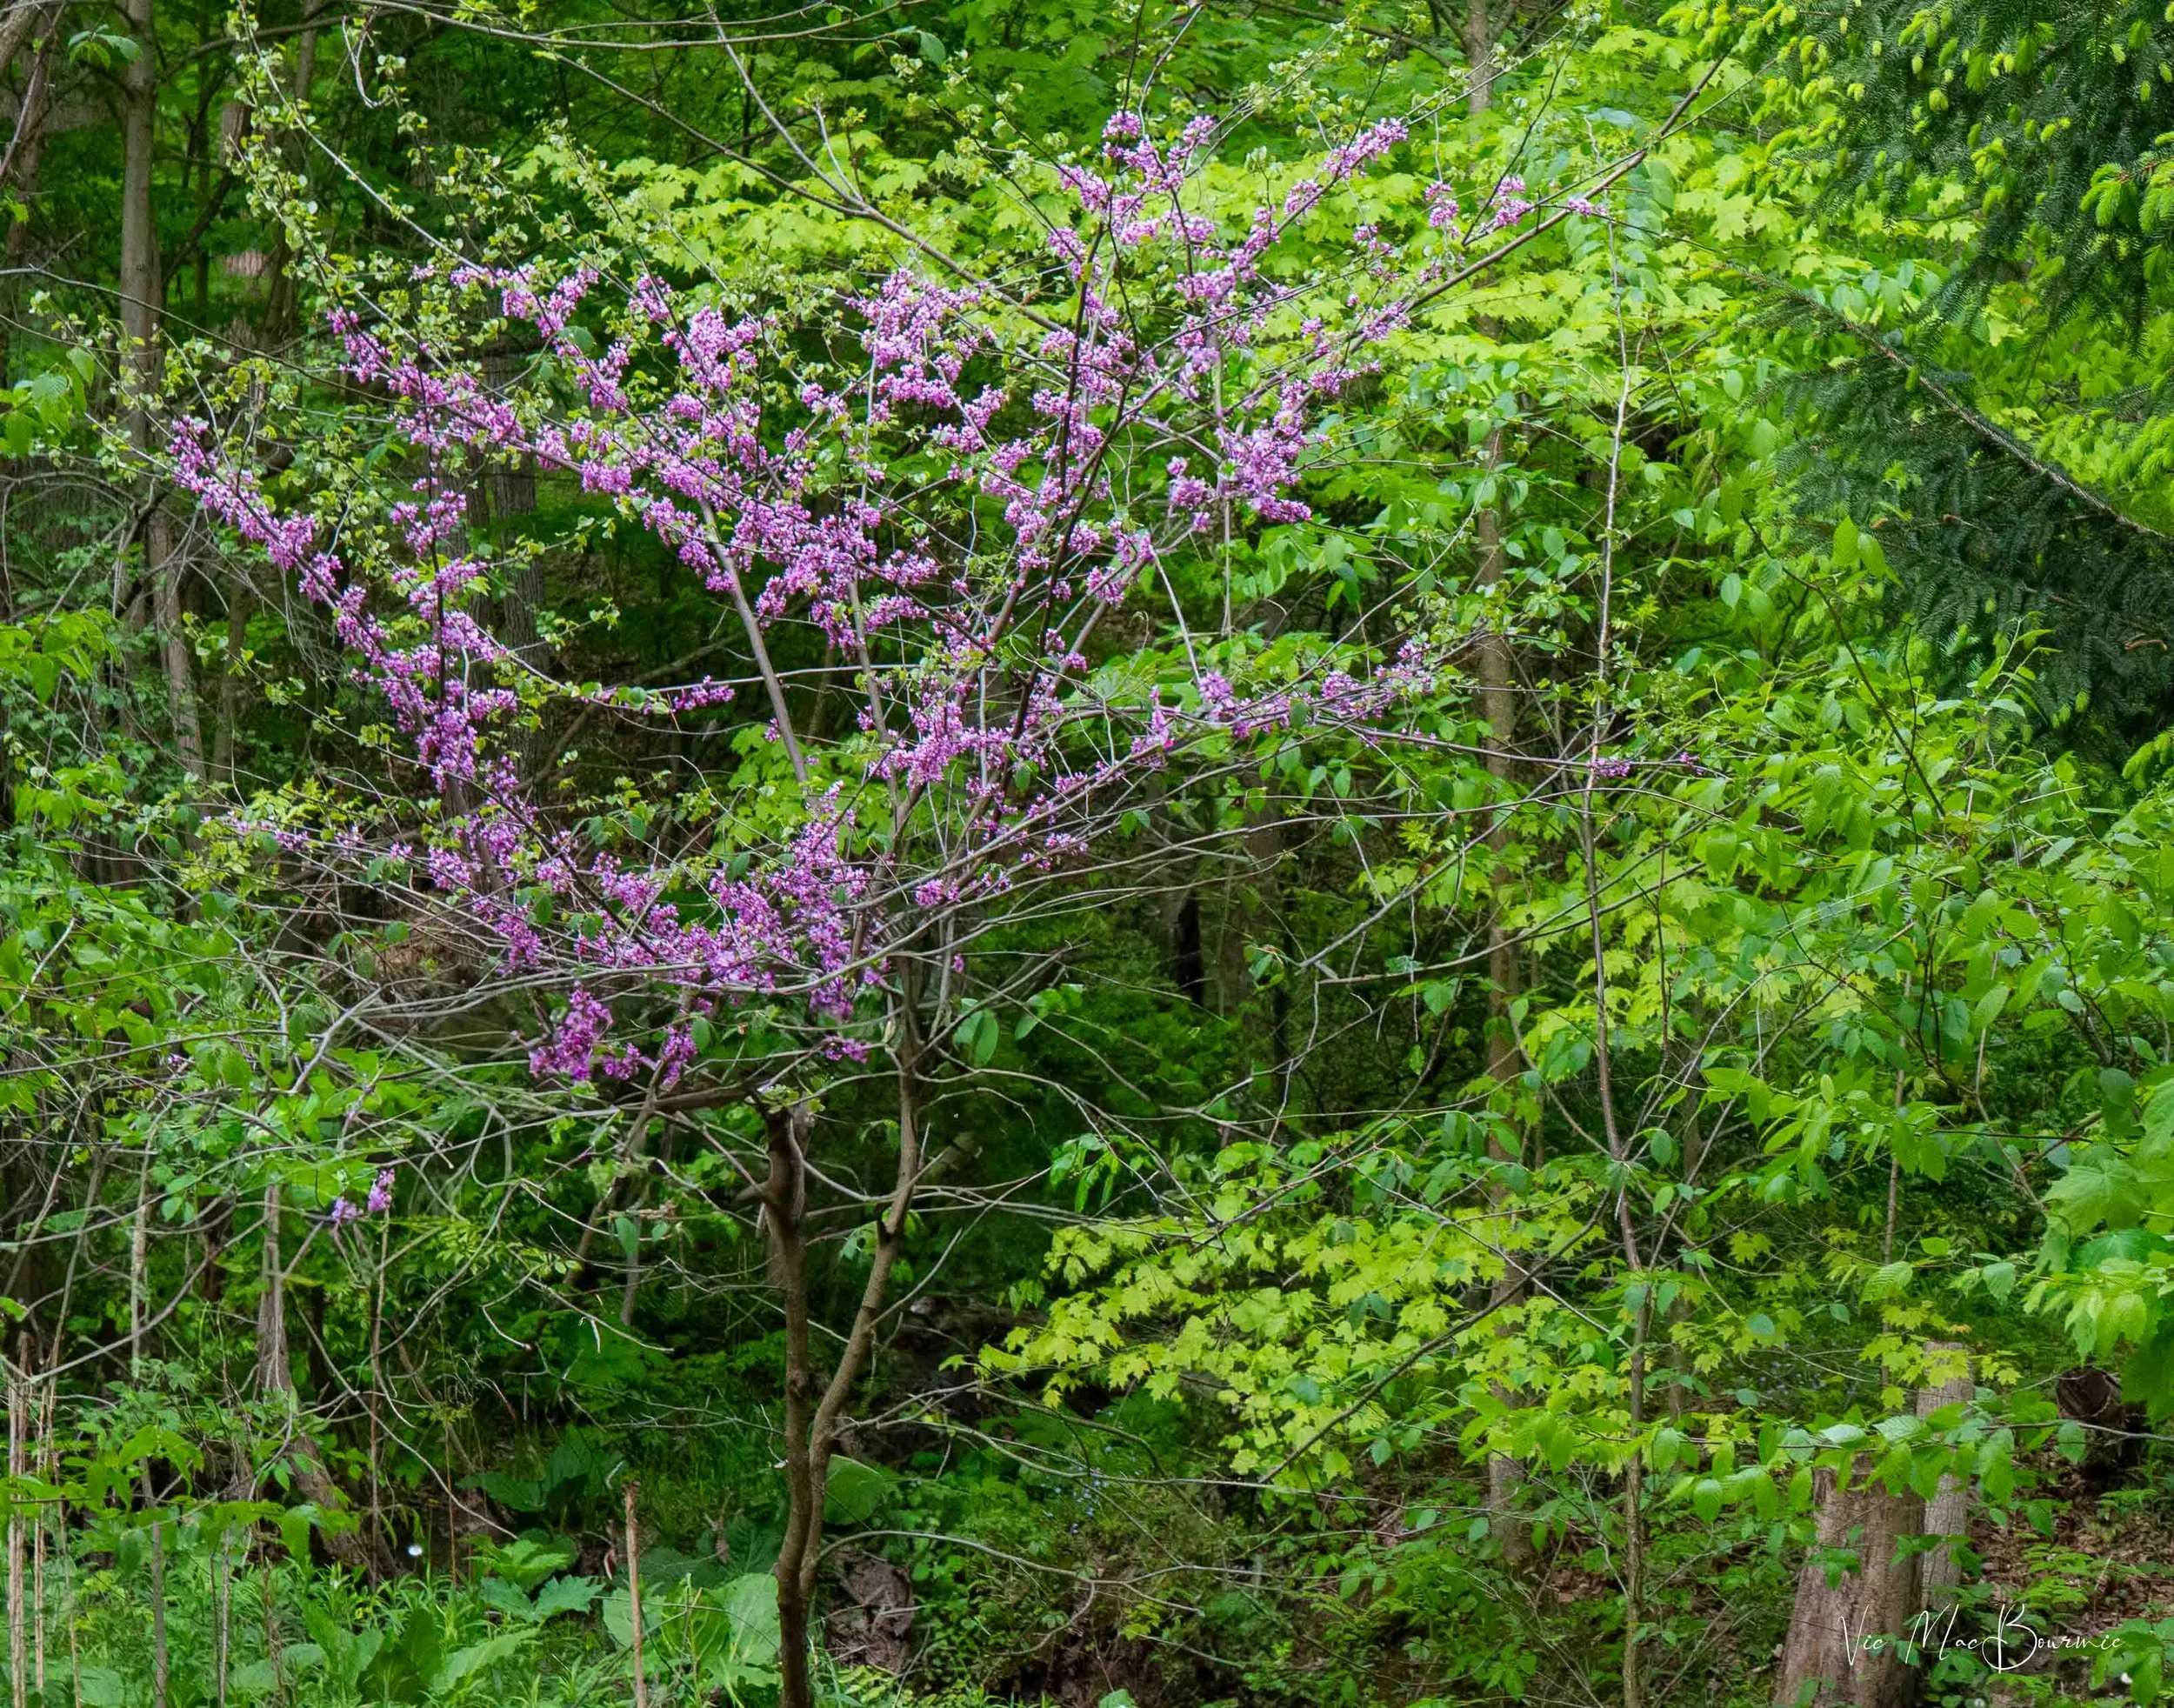
A native Redbud tree has found its roots in a dense part of the woodland along a stream.

A serviceberry tree enjoys a ray of late evening sunshine that lights up it myriad spring flowers. In summer, the tree will be visited by woodland birds and mammals looking to get a taste of its sweet red fruit.
Concluding thoughts on a walk in the woods
Walking in my local woodlands this spring and exploring the flora and fauna that grows naturally there has been an eye-opening experience. Not only have I watched the forest come to life, but I have witnessed the change from week-to-week, day-to-day.
It’s been an inspiring couple of months as the regular visits allow me to become more intimate with the landscape, flora and fauna. Our woodland is actually part of the Hamilton Conservation Authority and is located primarily in a deep, rather hilly ravine.

The Dogtooth violet photographed from above to show habitat and bring out its interesting star shape. The image was processed with Luminar Neo where it was given a soft glow often effect to bring out a dreamy look. For more on Luminar Neo, see links below.
In the past, a very bad hip would never have allowed me to hike the area, especially considering the extreme variations in topography. The only reason I am able to hike these woodlands as extensively as I have is with the use of Nordic hiking sticks. Whether you are young or old, in perfect health or struggling to keep up, Nordic hiking sticks should be an important part of your journey into the woods.
I have used hiking sticks for close to a year and would not be without them on any hike into the woods.
If you live near to a woodland – and most of us do – take time to experience it, explore it and discover the hidden treasures nature provides us if we make the effort.
• Many of the images in this post and my other “Walk in the Woods” articles, are processed with Luminar Neo photo editing software. If you are interested in taking your photographs to a higher level, you should consider exploring Luminar Leo. It’s an ideal software package for those who are new to photo editing. The photo editing software capitalizes on Ai features to make photo editing much simpler for the beginner.
For a completely different look at what Luminar can do with film that is digitized, Check out my review of the Pentax PZ20 and Luminar Neo processing here.
If you decide to purchase Luminar Neo, you can use the code “FernsFeathers” for a 10 per cent discount at checkout.

Can Luminar Neo stand on its own?
Is Luminar Neo the only photo editing software you will ever need? Let’s explore what it offers and see some results.

This image of foxes has been edited using Luminar Neo’s extensive photo editing tools, including Ai erase that was used to remove grasses in front of the foxes’ faces. To see the original image prior to editing, scroll down the page.
Photo editing software package is all most of us need
Luminar Neo is a photo editing program quickly gaining a following in the photography world for its combination of ease of use, exciting Ai features, and ability to go deep into photo editing if that’s what you need.
Add to that, its extremely competitive pricing in either a subscription model, or an outright purchase of the program, and it’s hard to argue that Luminar Neo is not one of the best all-round photo editing packages to compete with the big boys over at Adobe – namely Lightroom and Photoshop.
Oh, did I mention Luminar Neo also takes advantages of the ability to add unlimited, multiple layers?
But can Luminar Neo stand on its own?
That’s the question most photo enthusiasts need to know before jumping into the pool.
The answer to that question is not an easy one. The best I can offer is, it depends.
But let me say this right off the bat, for 95 per cent of photographers looking to take their images to new heights – maybe create some beautiful results on a regular basis or process their garden or travel images so they can be shared on social media, put in a self-published photo book or hung on your wall – Luminar Neo is without a doubt all you need.
In other words, for the vast majority of photographers, Luminar Neo gets the job done with flying colours..
Even if you’re a seasoned professional, Luminar Neo can create memorable images you would have never imagined before.
But, if you are a more of a graphic designer or creative artist than a photographer, or are looking to transform your photography into painterly images that are not obviously recognizable as photographs, or if you need to manipulate text on images as graphic artists often do, your best bet is teaming up Luminar Neo with a more graphic arts-oriented program like Photoshop.
Check out my earlier post on combining Luminar Neo as a plugin for Photoshop and Lightroom.
Not a problem, Luminar Neo has designed its platform so that it can be simply added to Photoshop, or Lightroom as a plugin.
So to answer the original question: Can Luminar Neo stand on its own? The answer is a resounding yes for probably 95 per cent of photographers. For the remaining 5 per cent, just use it as a plugin.
To help prove my point, here are four very different images created using only Luminar Neo, including a “creative” almost painterly image at the end.
The four images illustrate the very real possibilities for photographers and photo artists alike.
So, let’s dive in and look at our first example.

This image of Peggy’s Cove near Halifax, Nova Scotia in Canada, was edited using Luminar Neo.
The first image is more or less a straight forward landscape or travel photograph taken on vacation many years ago at Canada’s Peggy’s Cove near Halifax, Nova Scotia. The image was shot on slide film, scanned on my Epson flatbed and processed entirely with Luminar Neo.

The before and after image below shows exactly what Luminar Neo is capable of producing, quickly and efficiently.
The chart, left, shows the editing tools used to transform and enhance the original image. One of the helpful tools Luminar includes is a list of all the editing done on the image. Other programs may show the changes as “history” but Luminar Neo has it in a separate area in the editing module that not only allows you to see the edits you have applied to the image, but go in and make further changes to tweak the image to your liking.
Without getting into all the details, here are a few of the steps used to achieve the finished image.
I used the Ai feature to denoise the scanned image, followed by some work in the colour enhancement module to lift the washed out colour and boost saturation in the reds.
In addition, I used the dramatic light module for a little added pop as well as the magic light Ai module and Structure Ai modules.
The clone tool was also used to remove some distracting elements in the image. The image was also cropped to focus more on the fishing village and the red boat in the middle of the scene.
A water enhancement module was also used on the image. This module allows you to work with bodies of water to increase colour saturation in the blues and greens, among other things.
The more comfortable you get with the tools, the quicker the editing process becomes and the more confident you are to take your image to higher levels.
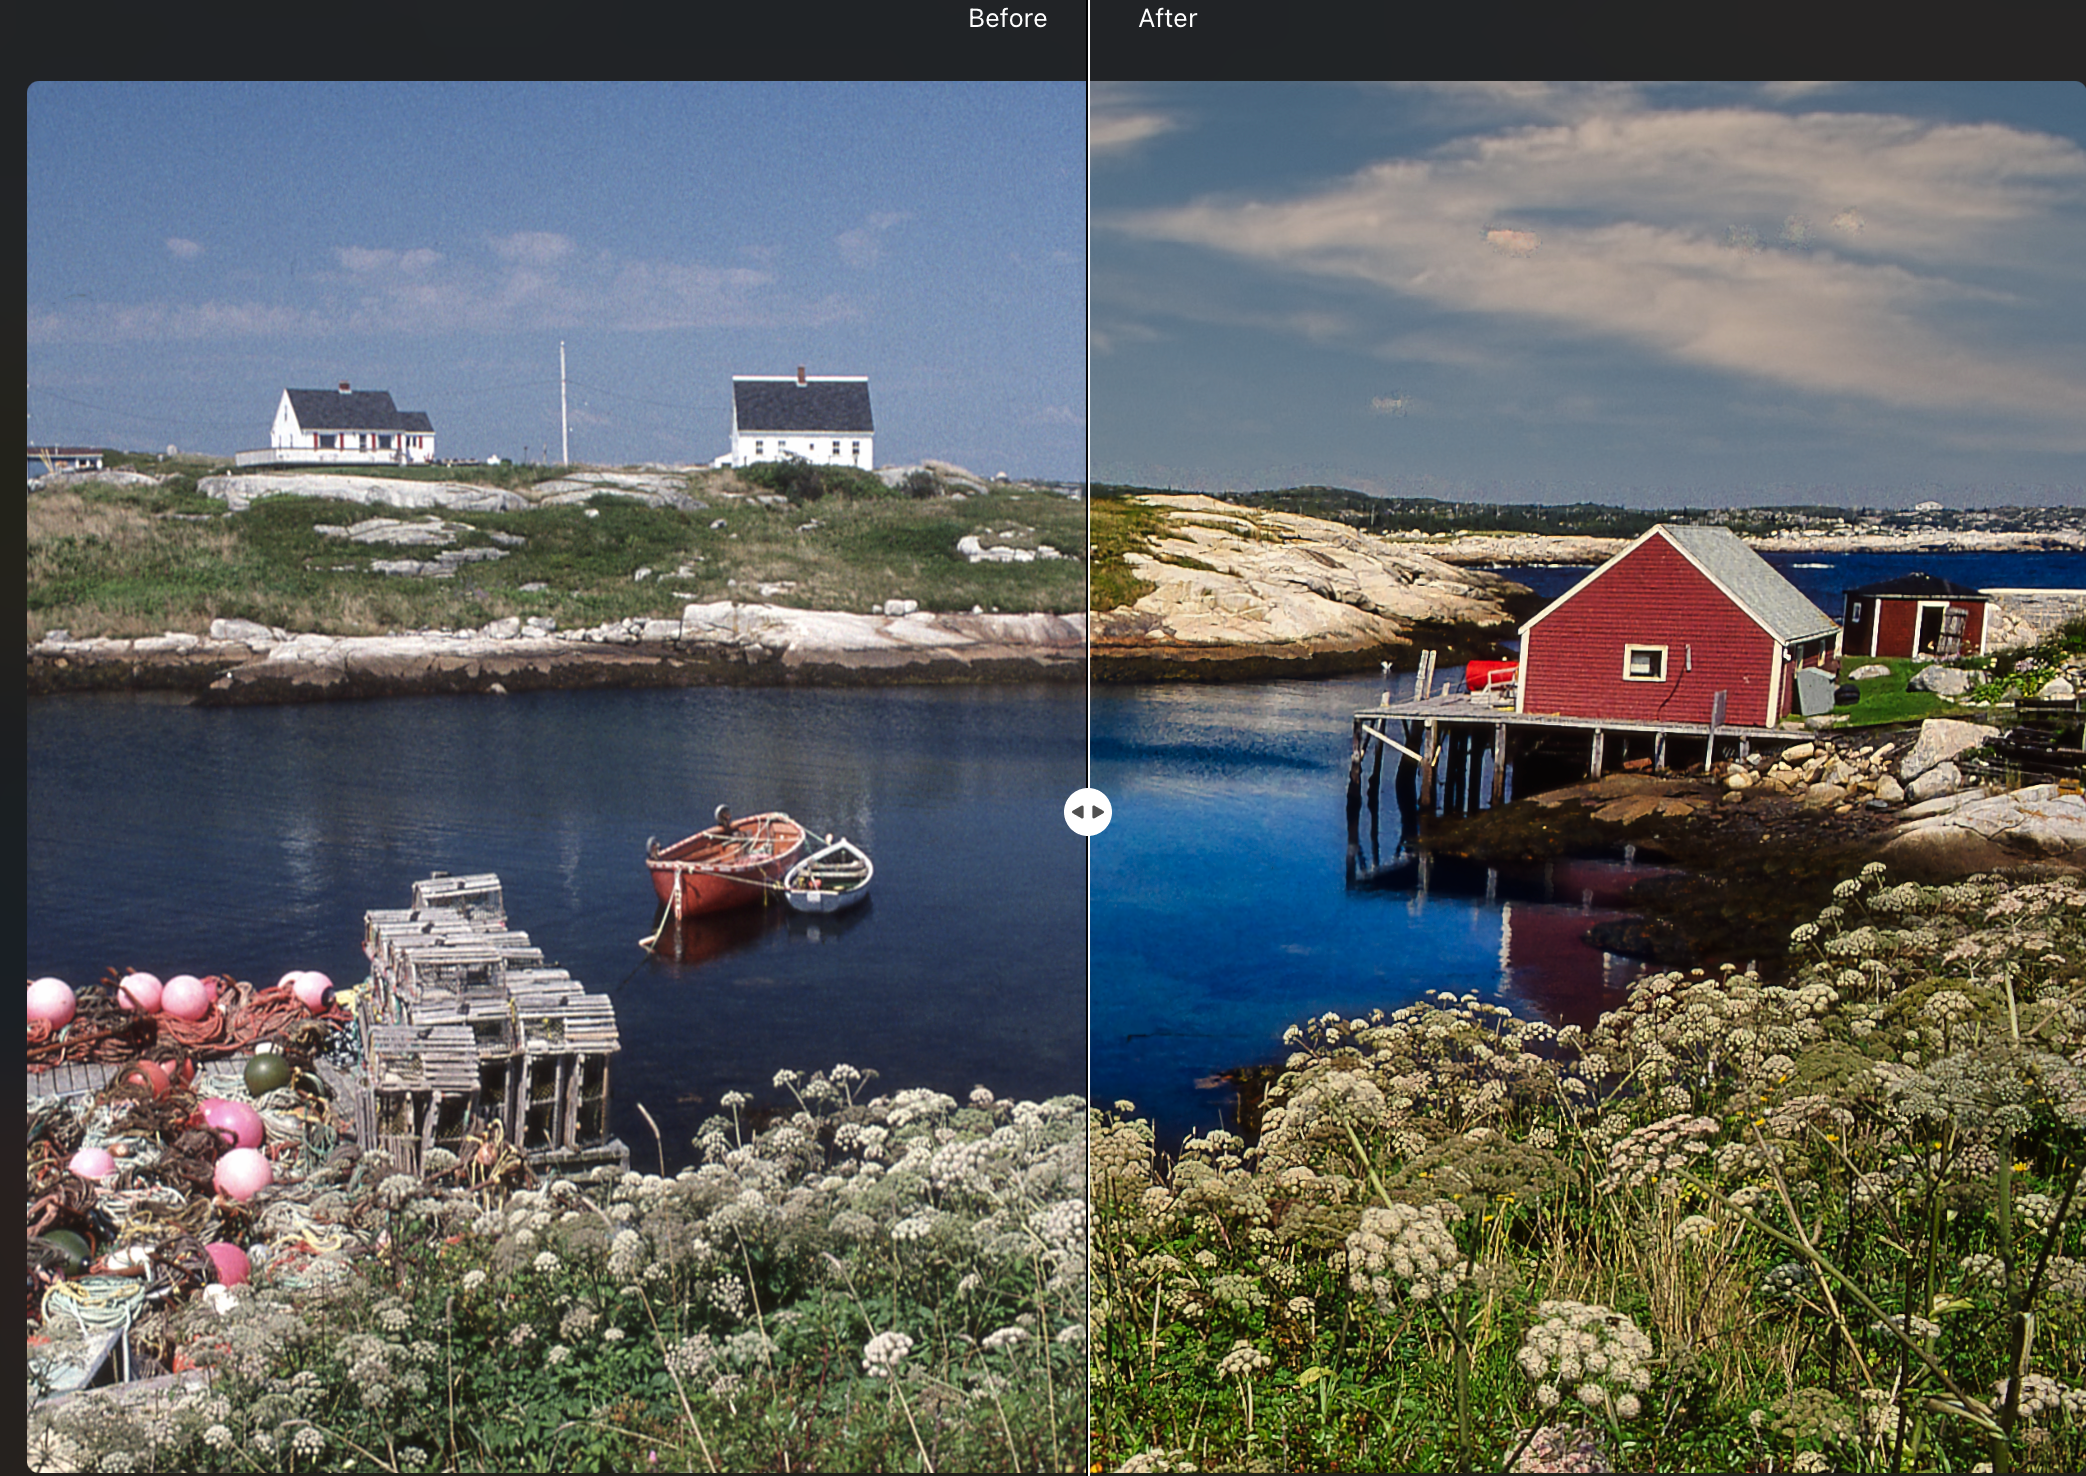
This before and after image shows how far Luminar Neo can take your images with just a few simple editing tools. Notice how the water has been improved as well as the colours punched up. This image was originally shot on slide film and scanned with a flatbed Epson scanner before being taken into Luminar Neo for post processing.
Barn in snow with Sigma’s DP-2
The second image is another landscape showing a lovely red Barn in a snowy landscape shot with Sigma DP-2 equipped with a Foveon sensor.
The red barn really caught my eye as I drove along the road, but it was the sculpted pine that stopped me in my tracks. Add to that the wheat-coloured grasses in the snow and I knew I had to pull over on the busy road to capture the scene. The single 42mm focal length lens on the sigmaDP-2 made cropping in-camera impossible so I took what was offered knowing that I could crop later with the software.

This image of a barn in a snowy landscape was taken with the Sigma DP-2 with its Foveon sensor. The RAW image was first processed in Sigma Photo Pro to convert it to a TIFF. The remaining image was post processed using Luminar Neo’s many editing features, although the image was not heavily edited.

Unedited version
The unedited version shows how effective Luminar Neo can be to enhance landscape images.
I mentioned that it was shot with the Sigma DP-2 because of the incredible detail- and colour-capturing ability that a Foveon-sensored camera is capable of achieving. As a result, I did not increase sharpness or detail in this image or the cropped image.
If you are interested in purchasing Luminar Neo, please consider using the code FernsFeathers at checkout to receive a 10 per cent discount. By using this code, I receive a small percentage of the proceeds which helps me to continue producing articles for readers.
In addition, I had to first run the image through the Sigma proprietary Photo Pro software to convert the raw file to a TIFF to work with it in Luminar Neo. The Sigma Foveon sensor is so unique that it is best to run the raw image through Sigma Photo Pro to convert it to a jpeg or TIFF before working with it in other photo editing software.
With that said, Here are the steps taken in Luminar Neo to edit this original TIFF file.
• Easy Landscape/longexposure preset set at 50 per cent
• Enhance Ai sky set at 65 per cent with an Accent at 20 per cent
• Develop module: Exposure set to -.30 and shadows increased to 40
• Removed a few small distracting details with the erase tool and clone tool.
•Structure Ai: Added 20 per cent overall with a boost of about 5 for the fine details
• First small crop to remove more distracting details
• finally added 23 per cent saturation to red, and 29 to yellow and green colours in the HSL sliders.
• The second image (below) was cropped more severely to focus more on the barn, the tree and the diagonal line of grasses running through the image.
Please write in the comments which of the two images you like more. I’m leaning toward the more cropped image.

The same image cropped to focus on the barn, tree and diagonal line of grasses cutting through the frame.
Foxes in field with sun rays
The top image in this post of the two young foxes was originally shot on slide film and scanned with an Epson scanner.
The image suffered from a lot of problems which Luminar Neo was able to easily solve in post processing. But I was able to take the image to even greater heights by tapping into Luminar Neo’s sun ray module that enables the photographer to add sun rays to the image.

The image above is the unedited version prior to Luminar Neo’s post processing applied. See the edited version at the top and below of this page.
Without going into great detail, the image suffered from grasses partially blocking the fox’s faces. By carefully using the Ai erase tool, the grasses were eliminated on the foxes faces.
Foxes in grass
The edited version is clearly sharper with more contrast and colour. The sun rays were also added in post processing.
The red fur of the foxes were enhanced with HSL (hue, saturation, luminosity) sliders and the grasses were enhanced using the foliage enhancement module.
Finally, Ai sharpening was used to bring the foxes into sharper focus.

This dreamy image of cherry blossom in bloom was created entirely in Luminar Neo using primarily the clone tool while various filters and softening techniques kept the image light and airy.
Cherry blossom in selective focus
The final image we are going to explore involves a more creative approach using Luminar Neo. I mentioned earlier in the post that painterly-quality images are best made with programs like Photoshop, which offers a more flexible painter effect with the ability to create your own paint brushes, sample specific colours and an overall more graphic approach to working with images.
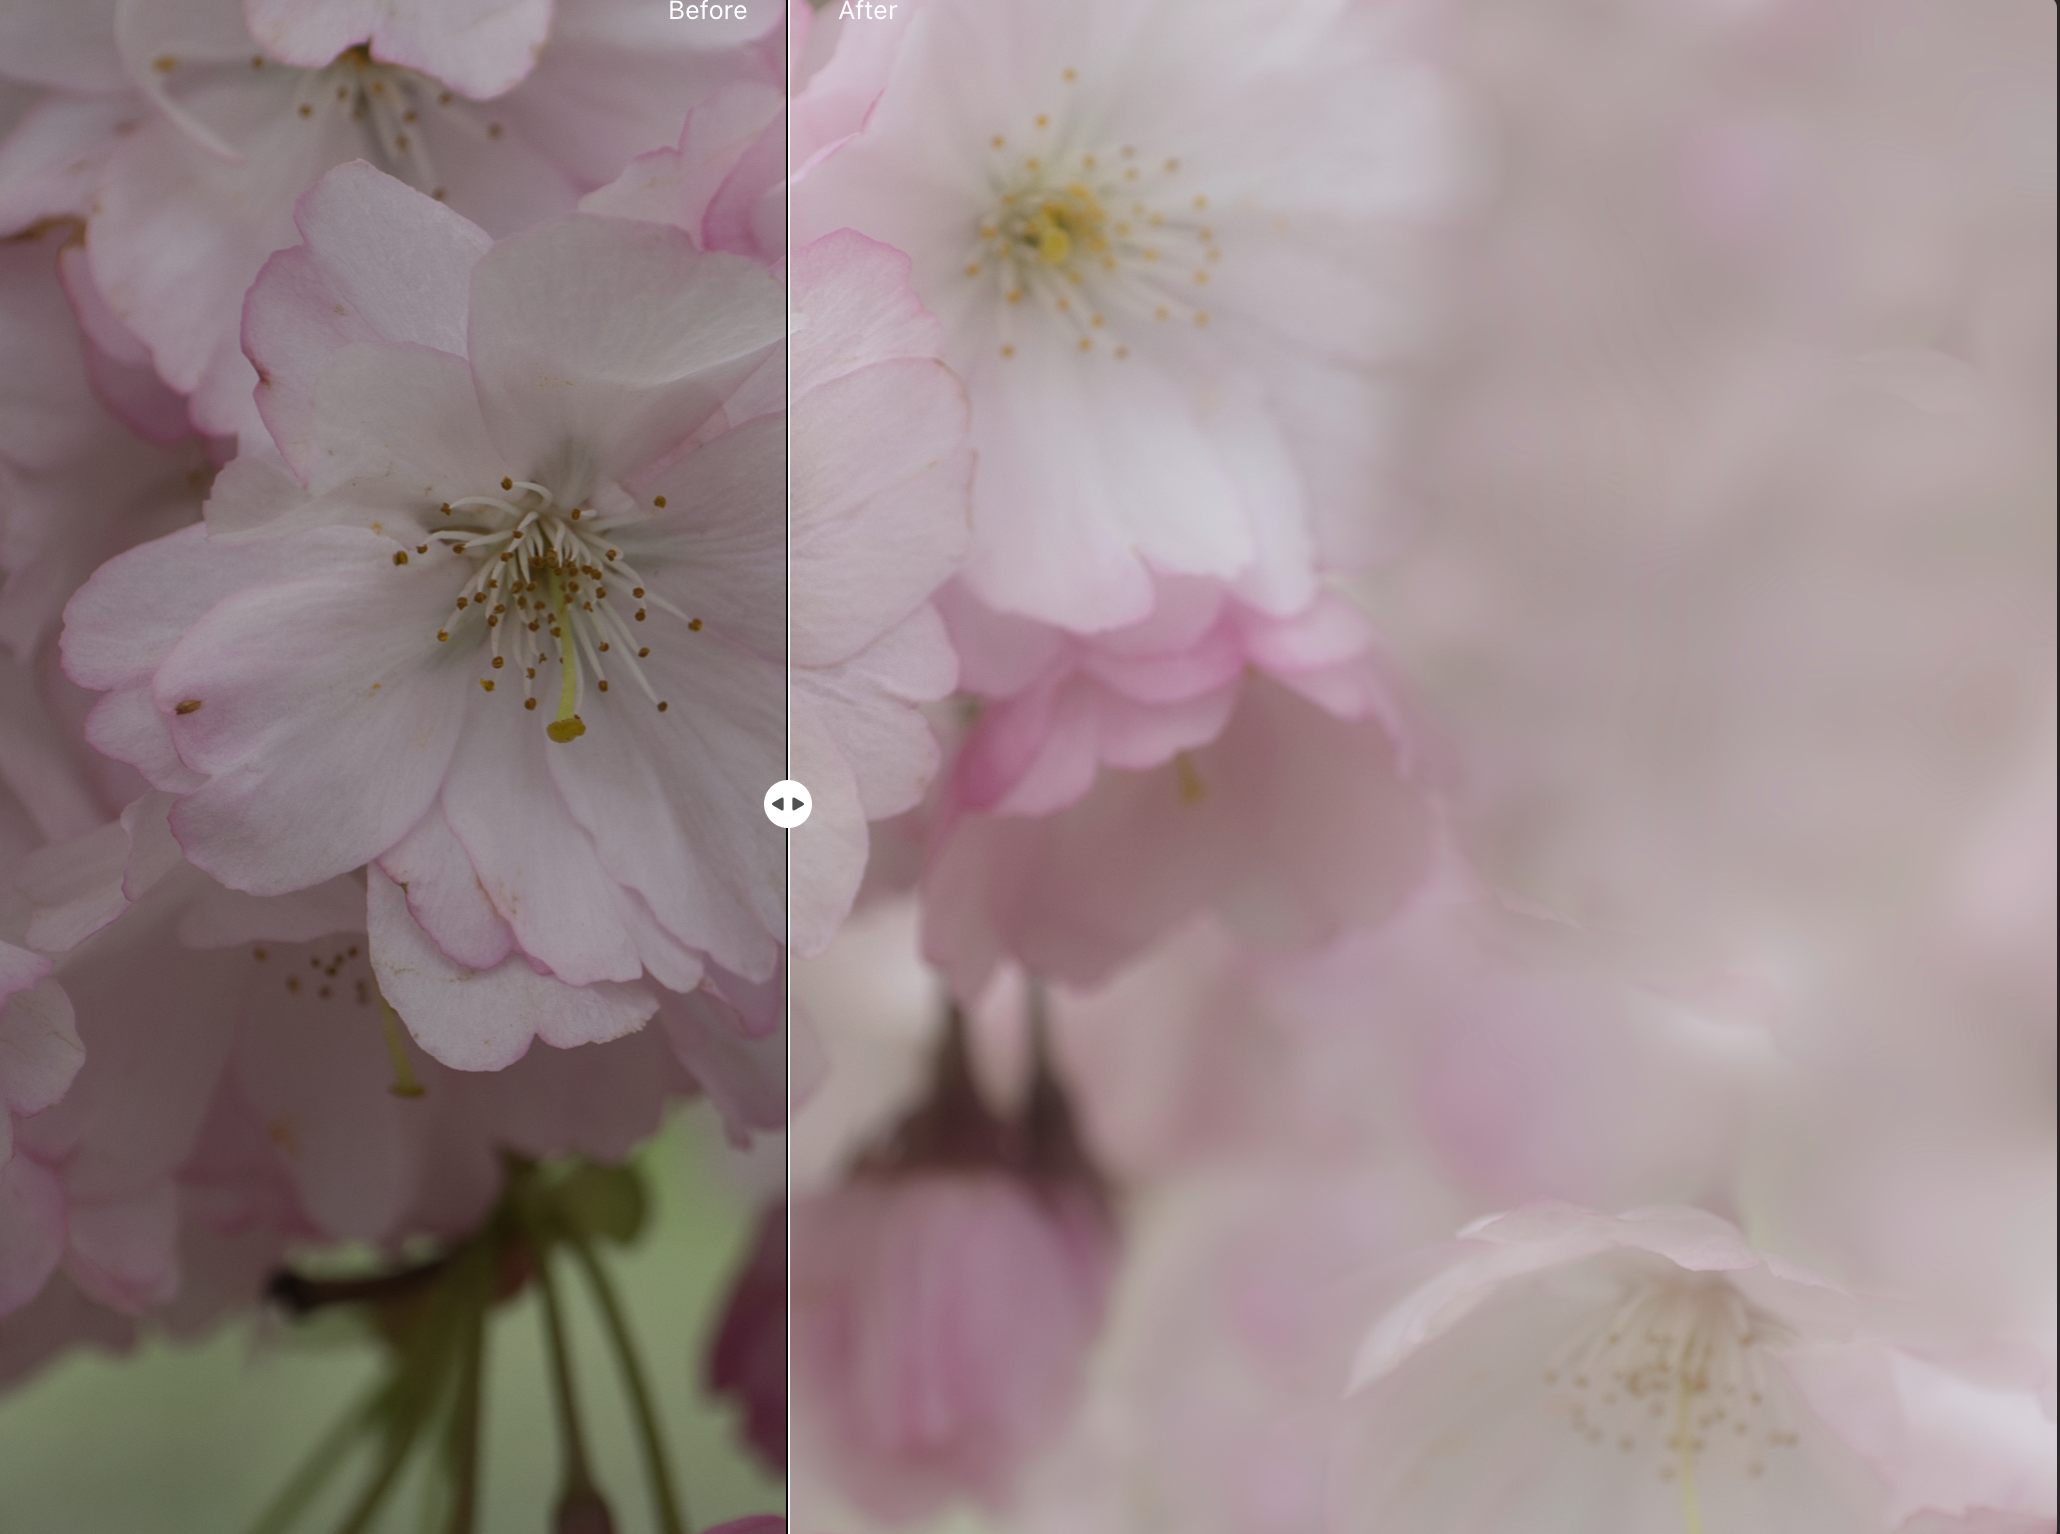
This image shows the Before and After of the image edited in Luminar Neo.
That said, with a little creativity, artistic, painterly images are entirely doable using only Luminar Neo tools.
In this image, I primarily used the clone tool while sampling various parts of the cherry blossoms to create a painterly effect. In addition, gaussian blur filters were masked in to areas of the image to further soften the outer areas of the image.
A high-key filter kept the image light and a vignette set to white rather than the traditional black setting added to the light and airy look.
Conclusion: Is Luminar Neo the only photo editing software you need?
The jury may be still out whether Luminar Neo is the only software you’ll ever need, but I’m hoping my arguments in this post has convinced the jury that it is certainly the only software package most photographers will ever need.
That’s not to say that it’s perfect. I don’t think there is any software that can solve every photographer’s need, but Luminar Neo is inching closer with each new update.
And, if you are like many professional and advanced amateur photographers, you’ll want to have Lightroom and Photoshop at your disposal when you need it. The fact Luminar Neo can be treated as a plugin for these programs makes it the perfect complement to these other high-end programs most of us have grew up using.
If you are still on the fence, Check out my earlier post on combining Luminar Neo as a plugin for Photoshop and Lightroom.
For a completely different look at what Luminar Neo is capable of producing from digitized film, check out my review of the Pentax PZ20 with Luminar Neo processing of the scanned film here.
If you are interested in purchasing Luminar Neo, please consider using the code FernsFeathers at checkout to receive a 10 per cent discount. By using this code, I receive a small percentage of the proceeds which helps me to continue producing articles for readers.

Explore the beauty of the woodland with Luminar Neo
Photographing the woodlands is always exciting, but when you can create magic in post processing using Luminar Neo, the fun never ends.

This image of our woodland garden in fall processed with Luminar Neo. The image’s colours and mist were enhanced with Luminar and the sun rays added to create this ethereal feeling.
New photo software is latest tool to create my woodland images
The woodland calls out to me in all seasons. In spring, the fresh greens beckon with drifts of welcoming wildflowers, while fall explodes with warm shades of burnt orange, yellows and vibrant greens. Summer gives us the possibility of capturing fledgelings and winter offers nature in all its simplicity.
Documenting this change of seasons has been a passion of mine for decades.
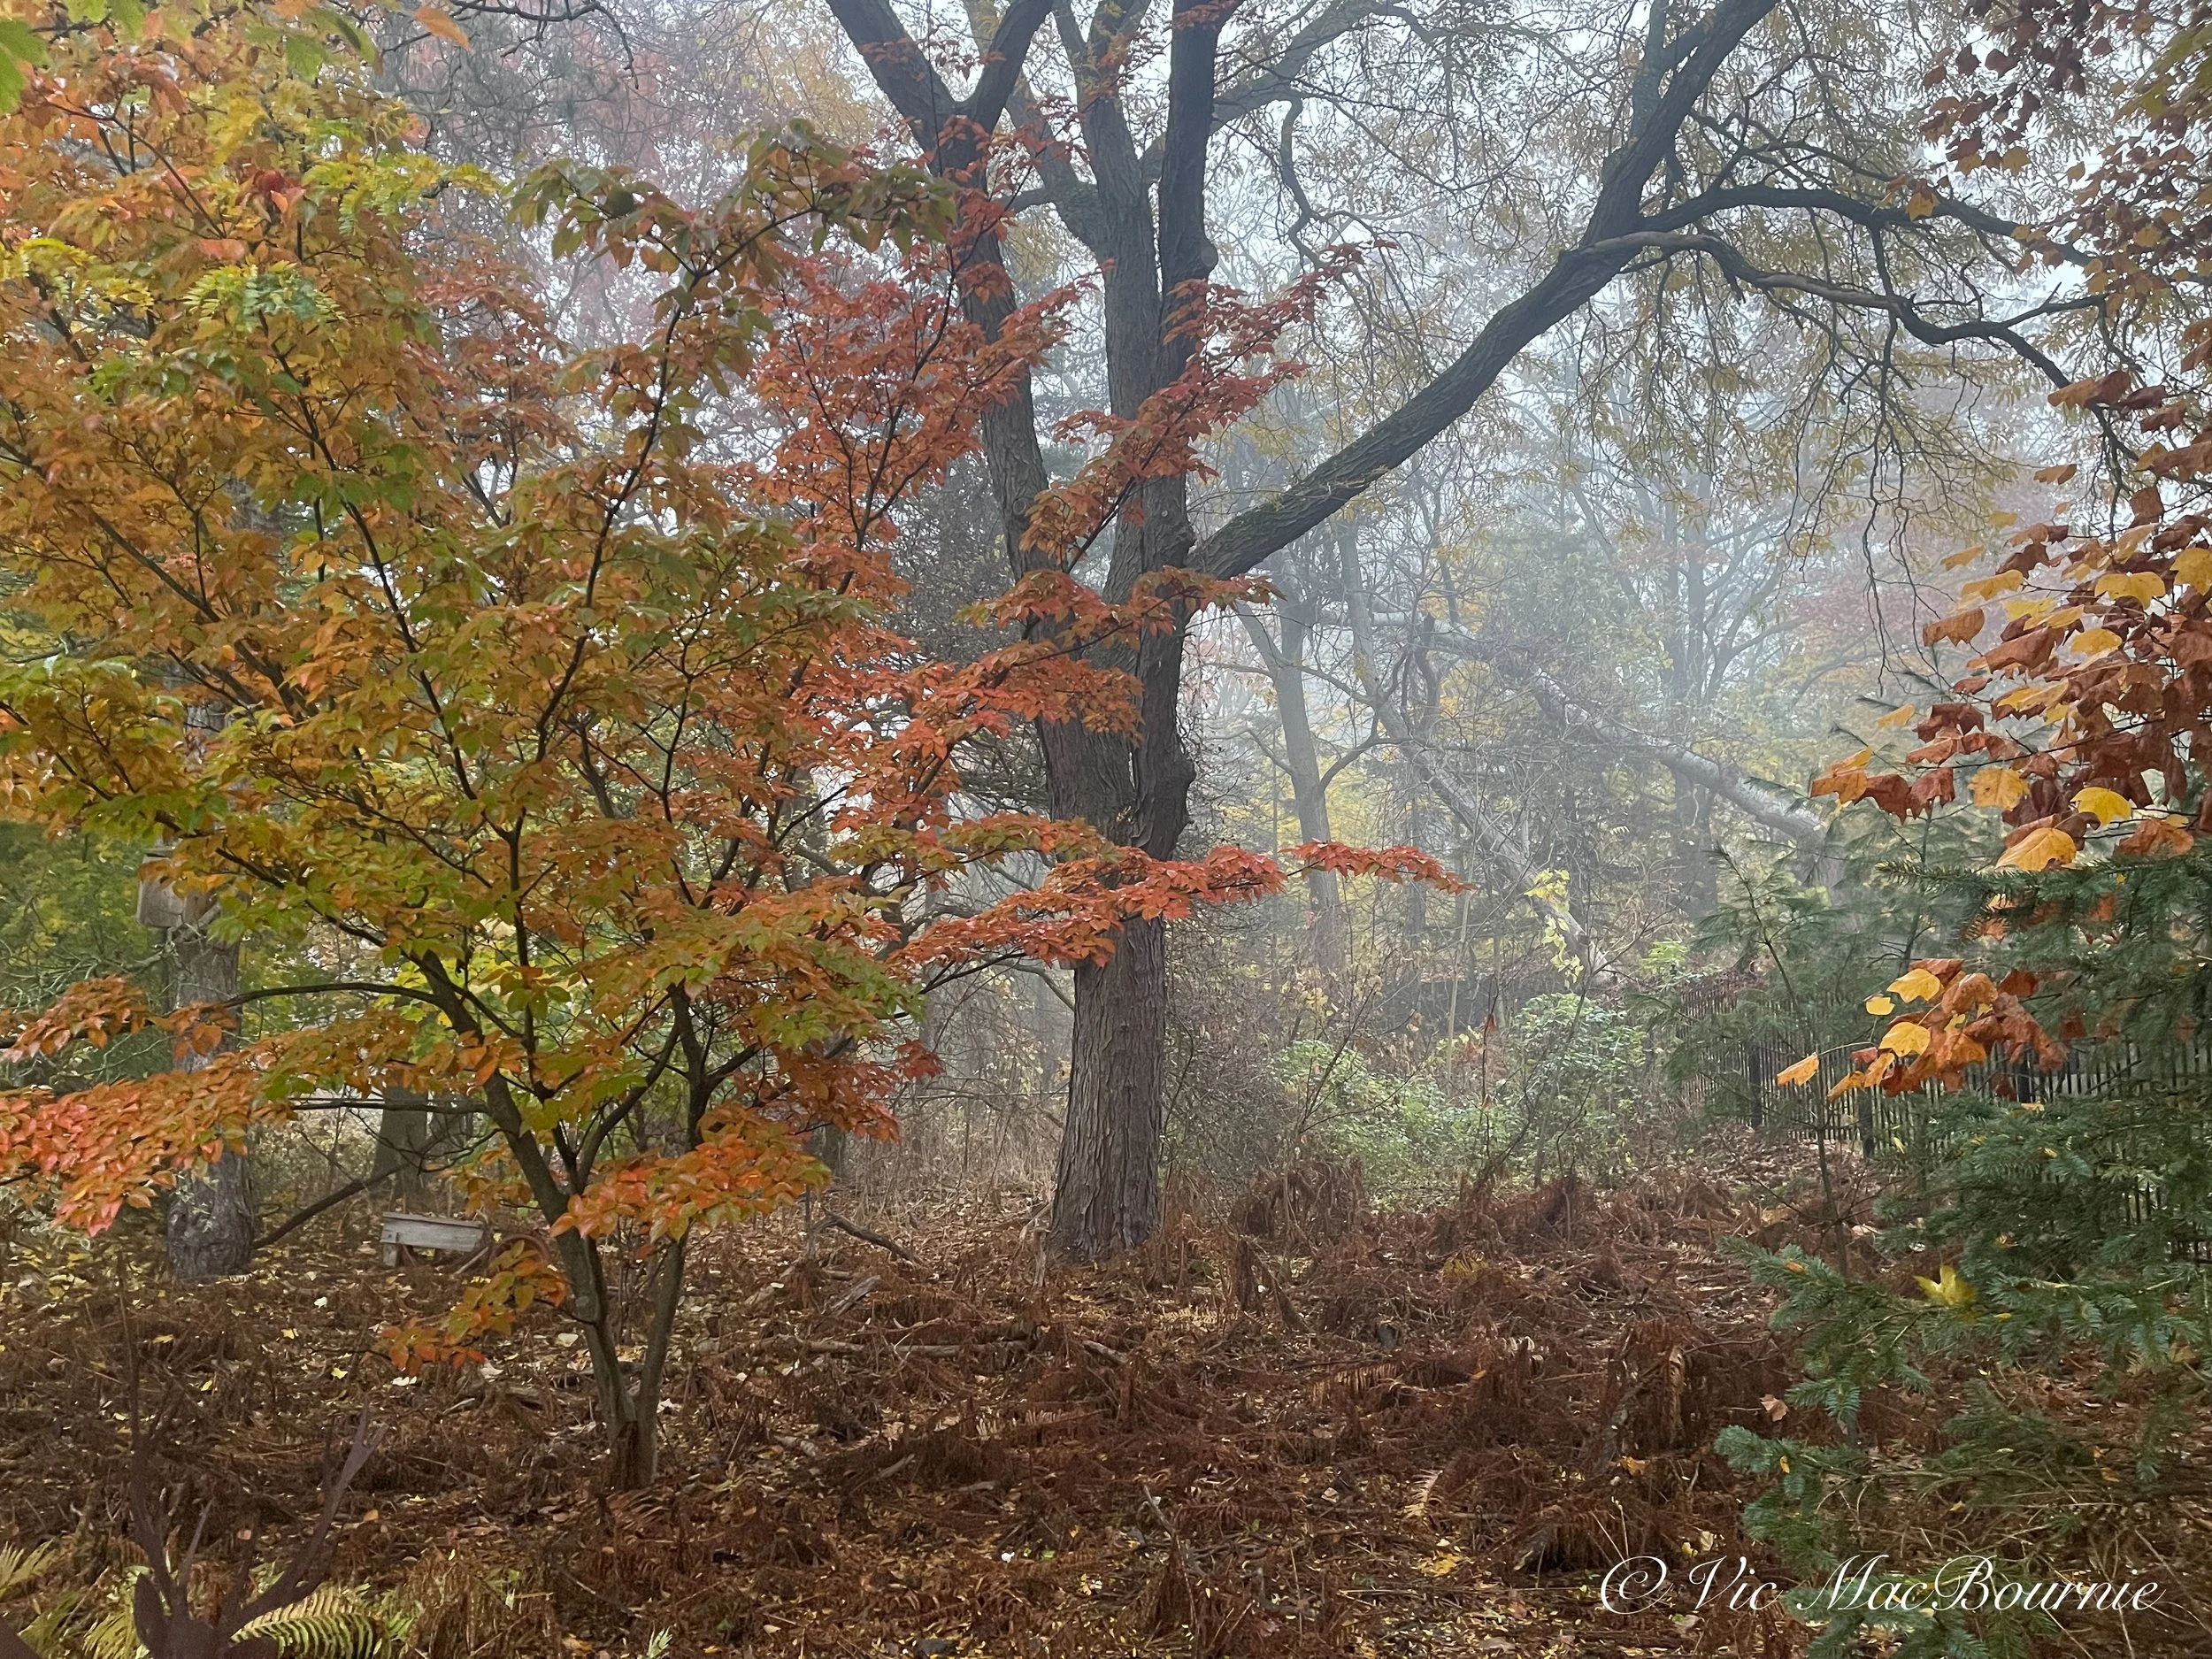
The original image seen here before I added the enhancements (see image above) with Luminar Neo.
My tools of choice have ranged from film cameras loaded with Kodachrome 25 and Fujichrome Velvia, to modern digital cameras ranging from high-end point-and-shoots to digital SLRs and micro 4/3rd cameras.
Photoshop and Lightroom have been important tools along this road, but more recently, a new player has emerged to renew my excitement about capturing and creating memorable images of the woodland, and that tool is Luminar Neo.
Luminar Neo can work alongside Photoshop and Lightroom as plugins, or as a stand alone photo editing program capable of turning your images from average to outstanding. Whether you are new to photo editing, or a master of the trade, Luminar Neo’s tools will satisfy most everyone’s needs.
Read my post on whether Luminar Neo can function as a stand alone photo editing program, here.

Spring in the garden brings an abundance of flowering trees. This cluster of cherry tree blossoms was originally brought into Photoshop for post processing work and then into Luminar Neo for additional work to create an ethereal glow as well as exposure and colour blending. Luminar Neo can work alongside Photoshop and Lightroom as plugins or as a stand alone photo editing program.
Luminar features all the normal editing features of most photo editing programs as well as full masking capabilities. A series of built-in presets allows photographers to create stunning results with the click of a button or two.
Luminar Neo, a photo editing program based out of Ukraine, has taken the best traditional photo editing programs offer and reimagined them to create a simple, easy to understand but incredibly powerful program that enables photographers to create stunning results with a few simple clicks on their computers. If you want to dig deeper into the program’s offerings, there is an incredible wealth of both Ai and traditional tools to transform good images into great ones, and great ones into works of art.
Although I have been using the program for only about one week, I find I am getting very comfortable with its features. The more comfortable I am getting, the more I realize that this may be the photo editing package I have been unknowingly waiting for my entire photographic life.
As I slowly begin to import my images into the program, it becomes increasingly clear that all my vintage slide-film images that I have scanned into my computer have an opportunity for new life with the help of Luminar Neo’s toolbox of features, from pre-programmed presets, to impressive Ai tools that can instantly transform your images with a click of a button.
I should say that Luminar has provided me with the program, but in no way have they tried to influence what and how I review their photo editing program. I will say, however, that along the way they have been incredibly helpful answering questions and providing training.
“Photoshop and Lightroom have been important tools along this road, but more recently, a new player has emerged to renew my excitement about capturing and creating memorable images of the woodland, and that tool is Luminar Neo.”
The following is a brief explanation of how the five images in this post were transformed in post processing using a combination of Photoshop, Lightroom and Luminar Neo. It should be noted, that although Photoshop and Lightroom may have been used for some processing of these images, from my experience to date Luminar Neo is entirely capable of creating most of these images on its own.
In my next post, I plan to take a number of images from start to finish using only Luminar Neo’s wide range of photo editing tools.
Let’s get into Luminar Neo
Luminar Neo features all the normal editing features of most photo editing programs as well as full masking capabilities. A series of built-in presets allows you to create stunning results with the click of a button or two. Presets include modules on: Scenery, Big City Lights, Sunsets, Overcast situations, Landscapes, Waterscapes as well as our Animal Friends. It’s also easy to create your own presets as well as saving your favourites to use later on other images.
The develop/essential module includes a highly effective denoise module, Black &White, Colour, Vignette, Structure and Details settings.


Here you can see the original image prior to subtle enhancements (above) with Luminar Neo.
In the Landscape module, photographers can take advantage of Sunrays, an Ai Twilight Enhancer and Atmosphere enhance as well as a Water-Enhancer module.
There are separate areas for photographers who like to experiment with creative modules including Magic Light, Mood, Toning Neon Glow and Mystical. Black and white and Film Grain modules are perfect for Lomography fans.
It is in the Mystical module under Glow that photographers can choose between soft focus, glow, Orton effect and Orton effect soft. The modules also have a slider that allows photographers to control the amount of the effect, giving you complete control of the look.
Five images processed with Luminar Neo
This post will explore some of the filters used in Luminar Neo to enhance these images.
• In the top image of our woodland garden in fall captured on a smartphone during an early morning walkabout, I used Luminar Neo to enhance the misty morning with its Ai mood feature. In addition, the sun rays were added with the program’s very effective Sun ray module that allows the maker to not only add sun rays, but have complete control over the effect of the rays, including the number of rays, length, strength and warmth.

This waterlily benefited by the water enhancement module by darkening the water and adding a blue cast.
• The second image of a cluster of cherry blossoms was post processed in Photoshop where I used a number of brushes to soften the edges of the image before bringing it into Luminar Neo where it was given a more ethereal look through the use of softening and mood filters as well as a vignette to further lighten the edges. Unlike many other photo editing programs, Luminar’s vignetting capabilities allow the photographer to control how and where the vignetting appears on the image.
• The third image of the deer in the woods, was first processed in Lightroom where a number of distracting elements were removed as well as focus softening added to the background. It was then brought into Luminar Neo where additional mist helped soften the background. Although I liked the original image, Luminar Neo’s mystic filter was called on to create a mood in the image that I think really adds to the mood of the early-morning image.
• Waterlily benefitted from another Luminar Neo module that focuses on enhancing water in your images. The module allows the maker to enhance both the darkness and lightness of the water as well as adjusting the water’s colouring in the blue and green ranges.

Monarch on sunflower was enhanced with Luminar Neo adding subtle sun rays emanating from the top left corner. Subtle orton glow was also added to the original image.
• A combination of subtle orton glow and sun rays were added in Luminar Neo to the monarch butterfly on sunflower.
Final thoughts on Luminar Neo in the woodland
The five woodland images in this post are examples of how Luminar Neo can enhance existing photographs. If you are an experienced photographer, Luminar Neo can be used to enhance images that have already been post processed in other programs. However, as a stand-alone program, Luminar is also a fully-capable editing program.
If you are new to photo editing, Luminar Neo has built-in presets that make post processing as simple as just a few clicks. For more experienced photo editors, the presets can be used as a starting point for more exacting photo enhancements.
This post is meant to give readers a taste of what Luminar Neo offers. The article barely touches on the full capabilities of the complete program. Over the next several months, I will try to provide more detailed information on the many modules and features and how they can be used in the real world, either for nature and woodland images, or other styles of photography from street photography to travel and people photography.
If you are interested in purchasing Luminar Neo, please consider using the code FernsFeathers at checkout to receive a 10 per cent discount. By using this code, I receive a small percentage of the proceeds which helps me to continue producing articles for readers.
What about all those cultivars of Native Plants?
Should nativars be used in our gardens or is it better to stick with unmodified native plants?
Are “Nativars” safe to plant in our gardens?
"‘I love the cultivars or nativars of so many of our native plants. Are they okay to use in our natural garden?”
That’s a question many natural gardeners are asking these days as they try to do what’s best for the environment while at the same time being tempted by a “better” rendition of an already existing native plant.

A hummingbird visits native bee balm in our garden.
What is a nativar and how to spot them at the nursery
First of all, what is a “nativar” anyway? In their book A Garden for The Rusty-Patched Bumblebee, authors Lorraine Johnson and Sheila Colla offer this definition: “You can tell whether a plant is a cultivar because it is “named” in quotation marks.” They then go on to give an example of a named cultivar of the native plant Monard didyma which would be in nurseries with the tag Monad Didyma “Cambridge Scarlet.” This plant would be a cultivated version of the unmodified species plant. These native plants have been “deliberately selected, cross-bred or hybridized for traits that are considered desirable by the nursery trade and gardeners.”
In the image below, the term Nativar is on the flowers name tag and the flower has a name “Ruby Star”. True natives would only use the name Purple Coneflower and/or the botanical name Echinacea Purpurea.

These flower tags are clearly marked ‘Nativar’ in the lower right but the name of the plant “Ruby Star” is a giveaway that this is a hybrid of the native Purple Coneflower. The jury is still out on these plants, but when given the chance, it is always better to use the true native plant.
The authors go on to explain a further complexity gardeners face when trying to decide whether to add the plant to their garden “because some “named” plants for sale at nurseries are “varieties” rather than cultivars. Look for “var” in the name of the plant, which indicates that it is a variety, not a cultivar. Varieties are naturally occurring and are selected by nurseries for their desirable traits.”
Okay so are these “varieties” desirable for your garden, the environment and the wildlife that are dependant on native plants?

Native plants are always a good choice when deciding what to plant in your garden.
The answer to this question is yes. Johnson writes: “In terms of biodiversity, the important difference between varieties and cultivars is that with varieties, the traits can be passed down to the plant’s offspring via sexual reproduction, which leads to genetic diversity within the plants. With cultivars, the trait(s) is not passed down via sexual reproduction, which means that to retain the trait(s), the plant is cloned. Thus each cultivar is genetically identical to every cultivar of the same name, and cultivars do not contribute to genetic biodiversity.”
In other words, “They do not have the genetic variations that ensure resiliency in species and adaptability to stressors such as diseases, pests and climate change,” the authors write.

The authors go on to cite a study by Dr. Annie White at the University of Vermont which arrived at interesting results showing that although native plants performed better than native cultivars in most cases, cultivars were used by pollinators both as a source of nectar and pollen.
Other studies also show varying results.
Authors Johnson and Colla in their informative book A Garden for the rusty-Patched Bumblebee conclude that “in the absence of of empirical data it is prudent to plant unmodified native species. Unless the nativar has been evaluated in a comparative study, its pollinator value is simply assumed, rather than known.”
They conclude that by planting “unmodified native species, you not only contribute to helping pollinators but also to plant conservation, including genetic diversity.”
As readers can conclude, planting unmodified native plants is always the best choice for both the environment and our native wildlife, however, I think planting “nativars” and “varieties” are probably a better choice than planting non-native species, especially when they have the potential to force out native plants by taking over natural areas.
In time, future studies will reveal more information on the dangers and benefits of using these modified native plants and will help to definitely answer the question of whether we should be using these in our garden.
In the meantime, it’s best and safest to stick to native plants.
A Garden for the Rusty-Patched Bumblebee can be purchased at most local bookstores or at on-line stores like Amazon.ca or often used at smaller book sellers under the umbrella group Alibris.
Inspiration: Discovering the essence of your garden
Finding inspiration for garden design has many sources, from nature to the work of fine artists who capture the essence of place in a single image or work of art.

I think this image begins to capture the essence of our garden. The blue jay enjoying a refreshing drink below and in the cover of a beautiful dogwood in full bloom. Images like these can help inspire the vision you are looking for in your garden. It would never have happened if I did not place the bird bath under the dogwood fully expecting similar scenes to occur every day. It could just as easily be a small naturalized pond that was inspired by an experience in a nearby woodland.
Cultivating a vision through fine art and natural experiences
Inspiration can be found in so many places, and yet, we all struggle to find a vision for our garden.
Finding the vision is really the first step to creating it.
That vision is constantly being shaped by a world where we are bombarded with images, videos and garden experts telling us how to create the perfect backyard.
It’s rarely as simple as looking through gardening books and picking out a garden style. We know that adopting another person’s vision for such a personal space is probably not the answer, but the questions remain, where do we get the inspiration to cultivate a vision for our garden?
Obviously, there is no single answer to that question. But, let me share with you a few ways that I am looking for inspiration.
This year, I’ve decided to take a multi-faceted approach to finding garden inspiration. Of course, exploring the natural world is first and foremost, (see my earlier post on using nature as a guide), but books and music can be equally inspiring sources of inspiration. And, I’m not talking about gardening books exactly, although they too can be excellent resources for garden inspiration.
Let’s start with experiencing a natural woodland.
“When the leaves on trees are about the size of squirrels’ ears, when birds returning from months in the south dart around in search of nesting sites and daffodils dance in gardens and meadows, a deep sense of well-being floods over me. Everything good in the world seems possible.”
We are lucky to live in an area surrounded by woodlands and conservation lands. When we first moved here, I explored the area to some extent, but raising a family and work always seemed to get in the way of really getting to know the land intimately. For years, I’ve more or less taken the woodlands around us for granted, rarely exploring it to any great extent.
This year, however, I have decided to make a concentrated effort to fully experience and embrace the natural woodland. That includes spending significant time exploring the paths, wildflowers, stream, trees and wildlife that call it home.
It means experiencing the sounds of the forest, breathing in the fresh air, feeling the rain on my face and sitting quietly in secret places among the wildlife at various times during the day and into the evening. This will help to provide a sense of place.
Even if you do not live in such an area, take the time to visit a local woodlot and experience how nature shapes its natural design. Study the finer details. Look at the forest floor, how a stream or small pond influences the surrounding vegetation. Now take this knowledge and put it to use in your own garden.

A vision of what could be
This image taken in the garden one morning captures the essence of what I want our woodland to represent – wild, mysterious yet open to exploration.
For me, experiencing the surrounding woodland also means documenting it photographically. What am I looking to achieve? you ask. I am looking to find images that help to portray the essence of the emerging spring woodland so that I can incorporate some of these discoveries into my garden.
They don’t have to earth-changing revelations, maybe they are nothing more than gaining a greater understanding of how the plant communities work together.
If we give it a chance, the natural world can be our teacher and provide much of the inspiration for our garden designs.
Like any worthwhile endeavour, I know it will take time and regular explorations into the woodlands.
In fact, the process has already begun. I have ventured into the woodlot several times photographing what inspired me. To date, the images I’ve made have been very uninspiring. But that is expected. I think you have to get to know your subject before you can capture its essence.

Early signs of spring
The skunk cabbage is just starting to emerge with its rather odorous leaves. These plants are an important signal that spring has sprung.
On my last visit, I captured the early emergence of spring as skunk cabbages (Symplocarpus foetidus) began to poke their wonderfully vibrant coloured leaves through the wetlands. Now, few gardeners would likely plant skunk cabbage in their gardens unless they had a large wetland area, but Mayapples and even Hosta leaves sprout up in early spring. Skunk cabbage may well serve as the inspiration to plant native mayapples or non-native hosta to experience that same thrill of early spring emerging skunk cabbage.
My early ventures into the woodland to date, though not photographically successful, will be important images to document the emergence of spring as the trees begin to leaf out, grasses and sedges emerge and the undergrowth once again becomes alive with life.
Stay tuned for more on this spring exploration of the woodland.

This image captures the dreamy vision I have for my garden inspiring me to work to encourage more butterflies such as this Painted Lady and to add delicate flowers to add to the dreamy look.
Focus on artistic vision for creative inspiration
In addition to being outside in nature and experiencing the spring rebirth of the woodlands, I’ve been exploring the books of various visual artists who share many of my interests about the natural world. These fine artists provide a unique look into capturing the essence of a scene.
Studying how they use line and shape, colour and textures, where they place the focus of interest, (even if there is one at all in the piece of art), all contribute to the attempt to capture the essence of the scene.
First, I turned to one of my favourite photographers for both inspiration in the garden as well as photographic inspiration.
Freeman Patterson’s book The Garden (see my post here) was a perfect combination of garden and photographic inspiration.
Many of Patterson’s other books, Photography & the art of seeing, Photography of Natural Things, Photography for the joy of it, Photographing the Word Around You and Odysseys, Meditations and Thoughts for A Life’s Journey, just to name a few, illustrate his unique vision, willingness to experiment with colour and visual design, and contributed to help inspire my own vision of how I can use these concepts in our garden, let alone my photographic pursuits.
Below are two images taken years and miles apart that share many of the same characteristics. Both use a single colour, both are dominated by a large rock mass on a diagonal line, and both suggest the fragile nature of living plants growing in what might be perceived as a hostile environment. The top one was taken in a very wild area in northern Ontario, the other in our garden alongside our driveway. In both cases the stone forms the foundation of the image and the plant life creates the essence showing the delicate balance between hard and soft, life and death.

Inspired by Canadian photographer Freeman Patterson’s approach to the Photography of Natural Things, I made this image of a single fern growing in what appears to be a rock face. The simplicity of line, shape and colour helps to form a vignette that captures the essence of what I am trying to achieve in parts of the garden.

Garden vision from nature
The image above was photographed in a natural setting and may have influenced the image of creeping phlox trailing over the rocks in a garden setting. You may not be able to duplicate the vision, but you can take cues from the natural images.
In his book The Garden, Patterson writes: “When the leaves on trees are about the size of squirrels’ ears, when birds returning from months in the south dart around in search of nesting sites and daffodils dance in gardens and meadows, a deep sense of well-being floods over me. Everything good in the world seems possible.”.
Robert Bateman, a Canadian fine artist who became famous primarily for his incredibly realistic wildlife art, reminded me that nature can be beautiful in its raw form. Some of his images are just tapestries in nature reminding me of my earlier post on a Tapestry of Groundcovers, but others show an animal, bird or other form of wildlife as a small element in a larger scene. The environmental portrait approach is covered in my recent post here, entitled Give your subjects room to breathe.
His work reminded me that a dogwood tree takes on a whole different look and feel when a blue bird sits in its branches. A simple lichen-covered rock can be beautiful in its own right and does not benefit from flowers being planted around it.
His work is a reminder to keep everything in the garden simple and learn to appreciate what nature offers us.
Fine artists who manage to capture a scene in a single painting or photograph teach us another important lesson – to look for the essence of the place.
Essence is defined as “the intrinsic nature or indispensable quality of something, especially something abstract, that determines its character.”
Finding that essence in a single image or painting requires careful composition, design and a thoughtful approach. It is not that much different to creating and implementing a vision for our garden.

A fascinating look at Foliage
Foliage is an elegant oversized coffee table book featuring the beautiful images of master photographer Harold Feinstein.

Foliage is an elegant oversized coffee table book featuring the images of master photographer Harold Feinstein.
These images will change how you look at your garden
If you are one of those gardeners who have yet to embrace the beauty of foliage, Harold Feinstein will change your mind in a hurry.
Feinstein is the master behind the meticulously composed images in the beautifully photographed coffee table book simply entitled FOLIAGE.
The simplicity of the title reflects the same approach Feinstein takes in this breathtaking, 135-page oversized book published back in 2001. Don’t let the age of the book put you off. These digital images are of the utmost quality, printed beautifully and presented in a contemporary, minimalistic approach that lets readers zero in on what is really important.
For woodland gardeners who depend on foliage for most of the growing season, these images prove that we no longer have to be jealous of our cottage gardener friends who like to show off their abundance of colourful and showy flowers.
The next time “one of those people” try to impress you with their fancy flowers, pull this book out and show them what they are missing. If that’s just not your style, leaf through the pages at least once a month in the growing season to remind you why you love woodland gardens.
“With my photographs, I want to do for horticulture what Audubon did for birds and animals.”
Although Foliage is primarily a book of photography, contributing authors Sydney Eddison and Alexandra Anderson-Spivy add a touch of their own with elegant essays on “Looking Beyond the Obvious” and “The Architecture of Nature Enhanced.” Greg Piotrowski adds informative botanical notes to fill out the book.
The hardcover book is available at Amazon book sellers used for just a few dollars here, or at independent booksellers in the United States, Canada and elsewhere here.
It’s a quick read. You can get through the prose with a couple of afternoon teas or morning coffees, but you’ll want to return to it regularly to view the gorgeous images all taken with stark black backgrounds.
Of course, some of the most striking images in the book are ferns – always beautiful for their architectural qualities – but ornamental grasses like Switch grass and Maiden grass have never looked so good. Fruits and vegetables are included along with a full-spread image of gourds.
Hardy geranium foliage, yellow spurge, and a simple Sycamore Maple leaf are just a few of the outstanding images woodland gardeners might appreciate most.
For more on using foliage in the garden, be sure to read my earlier post: The importance of foliage in a woodland or shade garden.
Linden leaves and acorns is a combination that will take you back to a walk through the garden in fall. The simple but lovey image of Maple samaras might even help gardeners get over the dread of all the little maple trees sprouting up through the leaves in spring.
In her opening essay, Alexandra Anderson-Spivy writes: Feinstein excels at making the humblest, most familiar vegetable or weed provoke our astonishment and scrutiny. His wonder at the world remains undimmed. He says, ‘With my photographs, I want to do for horticulture what Audubon did for birds and animals.’ The images in Foliage, perhaps even more than the photographer’s flowers, invite his viewers to ponder the infinite architectural variety of nature. He examines everything from ferns and grasses to grapes and Hosta leaves, from dissected artichokes and tomatoes to a tapestry of maple seeds, every shape isolated against deep black backgrounds. These images teach us again the the gorgeous diversity of nature is an inexhaustible subject.”
There are separate essays on grasses and ferns, edibles, The Essence of Green, The Beneficial Green Plant, Leaf coloration, Cactus and succulents and Seeds of change.
This is not a gardening book. Readers will not learn how to grow, nurture or fertilize a plant, but it will inspire you to look at foliage in a new way and to use it boldly in our gardens.
One final note – I can’t think of a more beautiful book to place on your coffee table for inspiration and to remember why you garden in the shade of a tree.
The hardcover book is available at Amazon book sellers used for just a few dollars here, or at independent booksellers in the United States, Canada and elsewhere here.
• If you are interested in purchasing the book, it is published by Bullfinch Press / Little, Brown and Company Boston • New York • London.
Yellow lady slipper orchids in the garden
Growing hardy Yellow Ladyslippers can be difficult, but the rewards are well worth it.
Where to purchase hardy Yellow Lady Slippers and how to grow them in the garden

It’s hard not to fall in love with Yellow Lady Slippers. These two were among the many photographed in a cedar bog growing alongside Showy Lady slippers (see images below). Never dig these flowers in the wild, they can be purchased through specialty nurseries.
I’ve always had a thing about Lady Slipper orchids. In my earlier years, I spent a lot of time and effort driving all over the area searching out these elusive wild orchids in the forests and wetlands in the area.
Among my favourites were the delicate and truly lovely Yellow Lady slippers.
Some of my best photographic images, in fact, were taken in a nearby cedar bog where the yellow orchids (Cypripedium parviflorum) grew alongside showy ladyslippers. They bloomed in early June and my buddy and I could only stand a half hour or so in the cedar swamp before the mosquitoes and who knows what else ate us alive.
I have not been back to see if the wild orchids are still growing there, but I suspect they have been dug up by gardeners thinking they can grow them in their own yards. Or, maybe even worse, the bog has been drained in the name of progress.
Both are big mistakes, but I want to emphasize that digging these rare wild orchids is almost criminal. For more on why you should never dig wild plants, see my earlier post here.
Not only is it rare for these orchids to survive in a completely different environment than what they were growing in – a heavy cedared bog – many of these orchids need a fungi present in the soil to survive, or at least prosper.

The beauty of wild orchids
Growing hardy native orchids is possible but not for the faint of heart.
And don’t take my word for it. Frasers Thimble Farms, an expert orchid grower on Salt Springs Island on Vancouver Island in Canada states on their website this about growing any hardy Lady Slipper orchid: “The most beautiful of all the Hardy Ground Orchids are the Lady Slippers, however, they are not the easiest plants to grow. Frequently, people need several attempts before mastering their cultivation. In cultivation, many have success growing them in pure perlite or in pots with a mix of equal parts of peat, sand and perlite. In nature, they often grow in bogs, but they tend not to like soggy conditions. Until recently it was not known how to germinate the seed of these beauties, but a few people (labs) have worked out how to in sterile medium (including us now). … We will also have a small selection of mature single eyed divisions of garden grown plants (mature plants). We have also recently begun to sell large plants with two growth points ( double eyed Divisions).
In speaking to Richard Fraser this week via email, he reports that: Yes, in fact, “we grow lady slippers. A few species and a few hybrids. We have been shipping them in the Fall but we don’t ship in the spring anymore. We no longer sell young plants in culture ( still in the test tubes) as the mortality rate was too high. We sell 4-5-6-year-old plants that are near or at bloom size and a few 7-8-year-old plants that are a little larger. We no longer ship to the USA.
Okay, so they are available but at a cost. Expect to pay upward of $100 Cdn with shipping for a mature plant.
Frasers Thimble Farms only sells to Canadian purchasers. There are U.S.-based sellers who grow in labs that only sell to US-based buyers. One mail-order seller is Great Lakes Orchids who have a long history of lab-cultivated hardy orchids. Check on-line for more, if you are interested.
I am sure that an on-line search will also bring up European sellers as well.
How to grow hardy Lady Slipper Orchids
Great Lakes Orchids website has an outstanding comprehensive website page about how to grow a variety of specific hardy Lady slipper orchids. This information is critical for anyone who is thinking of trying their hand at growing these orchids. Go here to see their recommendations on growing orchids.
For example, on Yellow Lady Slippers they recommend the following:
“Existing on a variety of soil compositions, but generally requires a slightly acidic condition, PH 5.5 is typical. It can be found in openings in hardwood forests, androadside ditches, and grassy fields, but the common denominator is PH, PH=5.5
Enjoys full morning sun with high dappled shade in the hot afternoon. Tolerates moisture but sites should be well drained. Can be found on gradients and slopes that provide good drainage. Common name: Small Yellow Lady Slipper.
Recommended soil mix: MetroMix 560 SunCoir, amended PH to 5.5. CEC=medium
Fertilization: Enjoys regular feedings of ¼ strength fertilizer. We use water soluble fertilizer. Stop fertilizing when flowers open.
Water: Typical water supply, city, well, rain water, etc. Municipal chlorine and fluoride are not a problem in any way, they’re fine.
Fungus control: Use a systemic fungicide as per labeled directions
Overwintering: Protect dormant eyes and buds from mice, voles, and squirrels. Hardware cloth may be used; remove early in spring before they break dormancy in spring.”

This group of wild Moccasin flowers were photographed in a sandy-based pine forest. Do not dig these flowers in the wild, they will not grow in your garden without proper fungi in the soil.
East-coast seller to check out
In Canada, an East-coast seller that looks promising is Bunchberry Nurseries that is offering an impressive assortment of Lady Slippers. Jill Covill, owner of Bunchberry Nurseries says that her company does ship orchids to Canadian customers. Jill says customers should go to the website and e-mail her directly to order their favourite Lady Slippers.
Bunchberry Nurseries grow all their Lady Slippers from seed. Check out their website for more information.
My experiment growing hardy Lady Slipper Orchids
Back to my personal experience with these orchids. When I was photographing these orchids in the wild, I never thought I could grow the yellow Lady Slipper in my own garden.
Years later, I was surprised to find out I was able to purchase a Yellow lady slipper from a specialty nursery about an hour from my home. Unfortunately they are no longer in business.

This image shows a trio of wild Showy Orchids growing in a cedar bog. Do not dig these flowers in the wild. It is highly unlikely they will survive in a garden setting. Instead, purchase them from specialty nurseries that propagate them in laboratory settings.
The nursery took advantage of new cutivation methods of native Lady slippers. These Lady slippers orchids – like the orchids that are only recently readily available in every grocery store, nursery and many big box stores – are beginning to get a little more common in gardens as a result of the new scientific cultivation through root cuttings.
Without getting into specifics, cultivating and bringing these cold-hardy varieties remains a painstaking task, which helps explain their high cost.
If cultivating them was difficult, growing them successfully can be even more difficult, depending on a number of factors not the least of which is your garden’s soil, lighting conditions and planting locations.
While I’m saying that growing these orchids can be extremely difficult, I’m also aware that some people have enormous success growing these orchids in their garden. I think it’s a combination of the right soil, location and care, with a fair bit of knowledge and dedication.
I am certainly not an expert Lady slipper grower but have managed to keep the lady slipper alive for several years despite only getting a single bloom a few years back. My guess is that if I don’t do something soon to turn it around, I may end up losing the plant.
So, I’ve decided that this year is going to be the year of the rejuvenation of my Yellow Lady slipper. Once the plant emerges this spring, I plan to dig it up and replant it into a container where I can control the environment where it is growing, including soil, fertilization, sun and water.
I know a lot of readers are going to tell me that they have successfully grown wild orchids for years in their gardens, especially those in the maratimes where Moccasin flowers (Cypripedium acaule, also known as the pink lady's slipper) can grow like weeds in some areas, but here in southern Ontario and I’m guessing the American north east, growing wild orchids is hit and miss and more miss than hit.
Unlike the Moccasin flower, the Yellow Lady Slipper can be more easily grown in a garden setting.
My goal is to get our yellow Lady Slipper to a healthy stage where I can actually divide the clump and begin to enjoy more of these outstanding woodland plants.
If planted in a favourable location with good soil etc, these plants can prosper and form large clumps which can be divided and spread throughout the garden.
I’ll keep readers informed of my progress over the spring and summer.
Stay tuned for more on my Yellow Lady Slippers.
If you are looking for more information on Native Orchids, you might want to purchase Native Orchids of the Southern Appalachian Mountains. (Amazon Link) It’s available both in hard cover an in a kindle version and is considered an authoritative guide showcasing the diversity of the native orchids of the southern Appalachian mountains. The book covers the 52 species--including one discovered by the author and named after him –found in a region encompassing western Virginia and North Carolina and eastern West Virginia, Kentucky, and Tennessee.
If you would like to purchase the book from Alibris (an umbrella group of small book sellers in The US and Canada you can go press on this link. These book sellers often offer outstanding deals on used copies of the books and are highly recommended.

The Garden: An artist’s spiritual approach to shaping our vision of beauty
The Garden is Canadian photographer Freeman Patterson’s tribute to his garden in Shamper’s Bluff, New Brunswick where he combines his passion for nature with his love of gardening and photography.

The Garden is an inspirational journey by photographer Freeman Patterson exploring his passion for both gardening and photography.
“A forest is a dynamic, creative community. Whether it’s forests or fields, there’s no better way to garden than simply to help the community do what comes naturally.”
Making images, finding passion in the natural garden
Beauty is something we crave. We gravitate to it throughout our life, searching for its elusive qualities. We need it in our lives. And as Freeman Patterson writes in his book, The Garden, when we finally find it, we need to celebrate it. We need to dance, to sing. We need to fall in love all over again.
Beauty, however, is many things to many people. For some it is a frost-covered rose in late fall. For others, it is an arching blade of grass covered in a spring’s morning dew. It may be a field of lupins or a magnificent old oak tree backlit against the morning fog. It may be a white moth hiding in plain sight on an old rustic white-washed window frame.
It may even be the sound of a cardinal singing in spring, or the mist rising off the river as the sun slowly makes its appearance over the horizon.
Canadian artist Freeman Patterson makes no apology for needing beauty in his life. Afterall, to some extent at least, this renowned photographer makes his living finding, exploring and celebrating beauty in the natural world.
“We grow plants, especially flowering plants, in our gardens, greenhouses, and window boxes because they are beautiful. Beauty never requires justification, because it balances the ugliness, hurt, and sorrow that are present in every human life to a greater or lesser degree.”
So, it should come as no surprise that the garden is both where he discovered beauty and where he continues to cultivate it.
His is not a formal garden – One of straight rows, colourful blooms and finely manicured pathways. Freeman’s vision is a garden of natural beauty. A woodland, a meadow, a pond and secret places where he can experience the beauty of silence and explore his dreams.

Freeman Patterson in his garden in Shamper’s Bluff, New Brunswick.
And he writes about it in a way only he can – with a spiritual approach that reflects his formal education and Masters of Divinity from Columbia University in New York and undergraduate degree at Acadia University in Nova Scotia. His is a vision developed over years of exploring and searching for that elusive trait we call beauty.
“We grow plants, especially flowering plants, in our gardens, greenhouses, and window boxes because they are beautiful, writes Patterson. “Beauty never requires justification, because it balances the ugliness, hurt, and sorrow that are present in every human life to a greater or lesser degree. Without beauty as inspiration and refuge, our deprived should grow hard and cold, and often we transfer, or project, our unacknowledged suffering onto others, especially those with whom we live and work."
Beauty is invariably a positive factor, an enriching presence, a healing influence. It is true in music, painting, and dance, of clouds in the sky and birds singing in the light of dawn, of flowers, even humble geraniums in kitchen windows.”
“... no matter how tiny or grand, how colourful or restrained, how wild or ordered, the garden is a metaphor for the gardener. When you invite someone into your garden you are inviting them to meet you.”
But his is not a superficial beauty. Freeman recognizes the importance of protecting simple, natural beauty that is all around us. In fact, he has worked his entire life showing people the beauty in everyday things through his photography.
I have always found Freeman’s work inspirational. From the first time I attended one of his day-long presentation to his countless books that help to cultivate both my photographic vision, and a deep spiritual feeling with the land.
Patterson’s photographic vision has brought him great recognition, but it is his writings that has inspired artists, photographers and just simple lovers of nature to explore their dreams and find meaning in their everyday lives.
Patterson recognizes that “Every garden and every gardener is a work in progress. And no matter how tiny or grand, how colourful or restrained, how wild or ordered, the garden is a metaphor for the gardener. When your invite someone into your garden you are inviting them to meet you.”

Stunning photographs combine with exceptional writings that express Pattersons spiritual roots and love of all things natural.
He believes in preserving the natural world. Even the land where he lives and gardens will remain a natural place after he dies. Patterson was a national trustee of the Nature Conservancy of Canada for six years and, in 1997, he donated his property on Shamper's Bluff to the conservancy for an ecological reserve and education area. By donating the land his vision of beauty will live on and help others appreciate nature’s inherent beauty that he has cultivated on his 500-acres of natural gardens.
Patterson gardens with nature, and therefore native plants are an important part of his canvas. He is not a purist, however, and will happily add non-native plants providing they are not considered invasive where he gardens. It is an approach most gardeners are happy to implement.
The Garden takes a seasonal approach to its chapters in the book.
On spring Patterson writes: “Often we ‘attack’ our gardens in a state of frenzy. It’s all too easy in spring to become overly enthusiastic, to prepare a mental or written list of all the jobs that ‘need’ doing and to destroy the magnificence of the season by trying to do them all. What we are really doing, of course, is passing up our enjoyment of the present, in anticipation of a future that, for one reason or another, may never come.”
On growing old he writes: “My garden grows wilder as I grow older. There’s much less formality and restraint than there used to be, nothing planted in rows, and not a straight path to be found. I’m more tolerant of disorder as well, incorporating may beautiful ‘weeds’ into flower beds simply by not pulling them out. I don’t need or want to get anywhere as quickly or directly as I once did, either. Friends tell me I’m more laid back than I used to be and, sure enough, the garden shows it.”
On the environment and natural gardening he writes: “Some people say our country is underpopulated as if humans were the only species living here. But the best possible use of land is to leave it alone, Freeman writes. “let the trees and other plants filter the air, and allow the soil to keep the water clean. Only then can all the elements and species work together to maintain global temperatures that will prevent us from frying or, alternatively, freezing to death.”

The book explores Patterson’s love of nature, his approach to the land and his thinking behind many of the images throughout the book.
His book, The Garden, is a wonderful journey through his life, from growing up as a child in rural New Brunswick not far from where he now gardens at his home at Shamper’s Bluff, to his life threatening liver transplant and his corresponding rediscovery of life’s celebration.
He talks lovingly of his mother and how she introduced him to the beauty of a flower and gardening at an early age. And, he talks –maybe not quite as lovingly – of his father and his very different approach and disdain for a garden cultivated for beauty rather than sustenance.
Throughout the 190-pages of this hardcover book, Patterson masterly combines his two passions in his life – Photography and gardening. The symbiotic relationship is a celebration of art and the natural world revealed in a spiritual approach that leaves the reader wanting more and desperate to get out into their garden to cultivate its beauty whether in the form of photography, a painter’s canvas, or simply in their minds or in their dreams.
Pick this book up. Read it. Experience all it has to offer both in words and images. Then put it down, go out in your garden and experience it. Then, when the time is right, return to The Garden and read it again and again.
It is that good, it’s that inspirational.
If you are looking for a camera to capture garden images, consider KEH Cameras excellent deals on used cameras and lenses at very reasonable prices. Click here to check out their comprehensive website.
Final thoughts on The Garden, the artist and the quest for beauty
I don’t know when I discovered the work of Freeman Patterson. It was likely back in the 1980s when he published the book Photography of the Natural World. I attended his one-day presentation at my alma mater, McMaster University.
It was truly an inspiring day but one that I only realized recently probably changed my life more than I could ever realize at that time. It was also around that time in 1985 that Patterson received The Order Of Canada.
Back then I was youngish, before the day-to-day struggles of raising a family and caring for elderly parents and the like took up most waking hours. It was only after retiring that I rediscovered Freeman Patterson’s writings. Since then, I have grown to better appreciate his writings, his spiritualism and appreciation of the natural world and, most importantly, capturing that feeling through photography.
His book, The Garden, first published in September of 2003 by Key Porter Books, stands as the perfect complement to my two greatest passions in life – photography and gardening. It is an inspiration to continue to pursue my passions and hopefully it will be the inspiration readers find to dive into gardening and even cultivate a new-found passion for documenting their gardens through photography, a paintbrush or maybe just in their dreams.
To order The Garden through Amazon click here.
For fantastic prices from private bookstores in the U.S. and Canada through Alibris on used copies of The Garden and other Freeman Patterson books click here

Give your garden and wildlife images room to breathe
Why not try your hand at taking environmental portraits in nature? Try telling a story rather than moving in too close and put those wide angle lenses to work.
Consider adding more “environmental portraits” to your portfolio this year
In high school one of my buddies was what you call a “close talker.” Great guy. Everyone loved him except when he got up close and personal telling a story or passing on information.
So, whenever he wanted to talk to you, for some reason he felt he had to get so close that it became a bit uncomfortable. You wanted to be polite and not say anything, but inside you’re saying to yourself, “please back off a bit, this is uncomfortable.”
That’s exactly how I feel about many images I see from photographers on social media. I’m not sure if they want to justify the purchase of a very long and expensive telephoto lens, or if they think that getting in as close as possible to a subject instantly makes the image superior to one that has a little breathing room.
In many cases, but I want to make this perfectly clear, obviously not all, the images would benefit from moving back and showing the animal, bird or flower in more of its environment.
This thought was brought home to me this week while reading Portraits of Earth, written by Freeman Patterson my all-time favourite photographer and a Canadian I might add. His environmental portraits of the earth capture the essence of his subjects, while always leaving room to appreciate them in the context of their role on earth.
Of course, there are many occasions when the best shot is a close one, or one that has been closely cropped in post processing. A busy or unnatural background are just two reasons to move in close. An outstanding subject in beautiful light that just begs for a close approach is another. And there are lots of other reasons to get as close to your subject as possible.
In fact, in many instances getting as close as possible still leaves the photographer so far away that you have no other choice but to create an environmental portrait.

But when you are making a picture – whether it’s of a bird, mammal or flower – ask yourself whether the image would benefit from backing off a little. If you are cropping the image during post processing, ask yourself if moving in as close as possible and eliminating all sense of environment is the best choice.
This thought was brought home to me this week while reading Portraits of Earth, written by Freeman Patterson my all-time favourite author and photographer and a Canadian I might add. His environmental portraits of the earth capture the essence of his subjects, while always leaving room to appreciate them in the context of their role on earth. Check out used book retailer Alibris to get great buys on Freeman’s outstanding photography books including his book The Garden that I will be reviewing in the near future.

This image of a bull and female moose in Medicine Lake, Jasper, Alberta is, in my mind, the essence of an environmental portrait of these two magnificent animals. Moving in close would only have ruined the sense of space that the lake and mountains in the background provide. For me, the image illustrates how huge our wild areas are when it can literally dwarf these two massive animals.
This approach, while much more artistic, is also more revealing. If done well, an environmental portrait more often captures the essence of what the photographer was trying to portray much more than an extreme closeup could ever achieve.
As nature and garden photographers, it’s important to show our subjects in their environment whenever possible. By showing our subject in its environment, we reveal the habitat where it lives. A warbler reaching for an insect hidden in the bud of a native dogwood tree, for example, reveals the story of how the warbler survives on its migratory journey and the importance of native trees and plants are to its survival. A fox kit playing outside its den on the edge of a forest provides the viewer with important details of where foxes choose to raise their young. A wildflower growing on the edge of a stream where it thrives in the damp, woodsy soil, illustrates the importance of habitat for that flower’s survival.

Hepatica on river’s edge
These two tiny native hepatica flowers were taken with a wide angle lens to show the environment in which they grow. Water from the stream dampens the soil as the decaying leaves from the deciduous forest break down providing nutrients to these lovely native wildflowers.
Even in our gardens, where flowers might not grow in their natural locations, environmental images help us identify where they grow best, what conditions they thrive in and what flowers may complement them.
I am certainly not against moving in close with a macro lens to capture small details and reveal new worlds to others who may not have the opportunity to experience these intimate views. All I’m saying is don’t be afraid to back away to show the flower, plant, tree, butterfly, bird or mammal in its environment whenever possible.
Some of my favourite images, for example, are environmental portraits that left breathing room for the subject to shine.
Here are just a few from my files that might inspire you to experiment with environmental portraiture rather than an up-close and personal approach that has become all too common these days on social media.
Each image will include an extensive cutline explaining why I think the image works and why I decided to capture the subject in its environment rather that moving in close.

Here, a young male whitetail deer approached me through the tall wildflowers probably unsure of what I was and hoping maybe I was a female deer. The experience was truly wonderful and I wanted to capture the pure wildness of the area. By leaving out-of-focus plants in the foreground and including much of the environment, it created almost a glimpse into the secret life of this young buck.

By leaving room around the Red-wing blackbird singing in spring, it helped to create both a sense of place and time (spring in the marsh) but left room for its song to spread through the image in the direction he is looking. The bull rushes make it clear that it is spring time. An extreme close-up of the bird might well have been a better image in some people’s mind, but it would have failed to provide a sense of space and time.

This tufted titmouse was enjoying a winter’s snowfall out on a limb of a branch. Showing the snow build-up on the branch it is sitting on as well as the branches in the background helps illustrate the extent of the snowfall and maybe helps viewers realize the difficult time that awaited this little fellow over the next few days. Fortunately, my feeder full of birdseed was not too far away and always available for dinner.

Here, a fawn eyes the greenery in our garden while its mom sits quietly nearby, always keeping a close eye on her baby. This environmental portrait clearly says spring with both the size of the little one-week-old fawn as well as the presence of hundreds of blue Forget-Me-Nots that transform the garden into a sea of misty blue.

It’s every photographer’s dream to stumble across a massive drift of trilliums in their prime. But how do you do them justice with one image? Move back, find a centre of interest in the sea of trilliums and capture an environmental portrait of the scene showing as many of the trilliums as possible. By putting the fallen birch tree running diagonally through the middle of the trilliums, I was able to add a dynamic line while still showing the mass of flowers. The fallen birch tree will soon begin to decay and add its nutrients back into the earth to feed future trilliums that will rise up from the woodland floor.
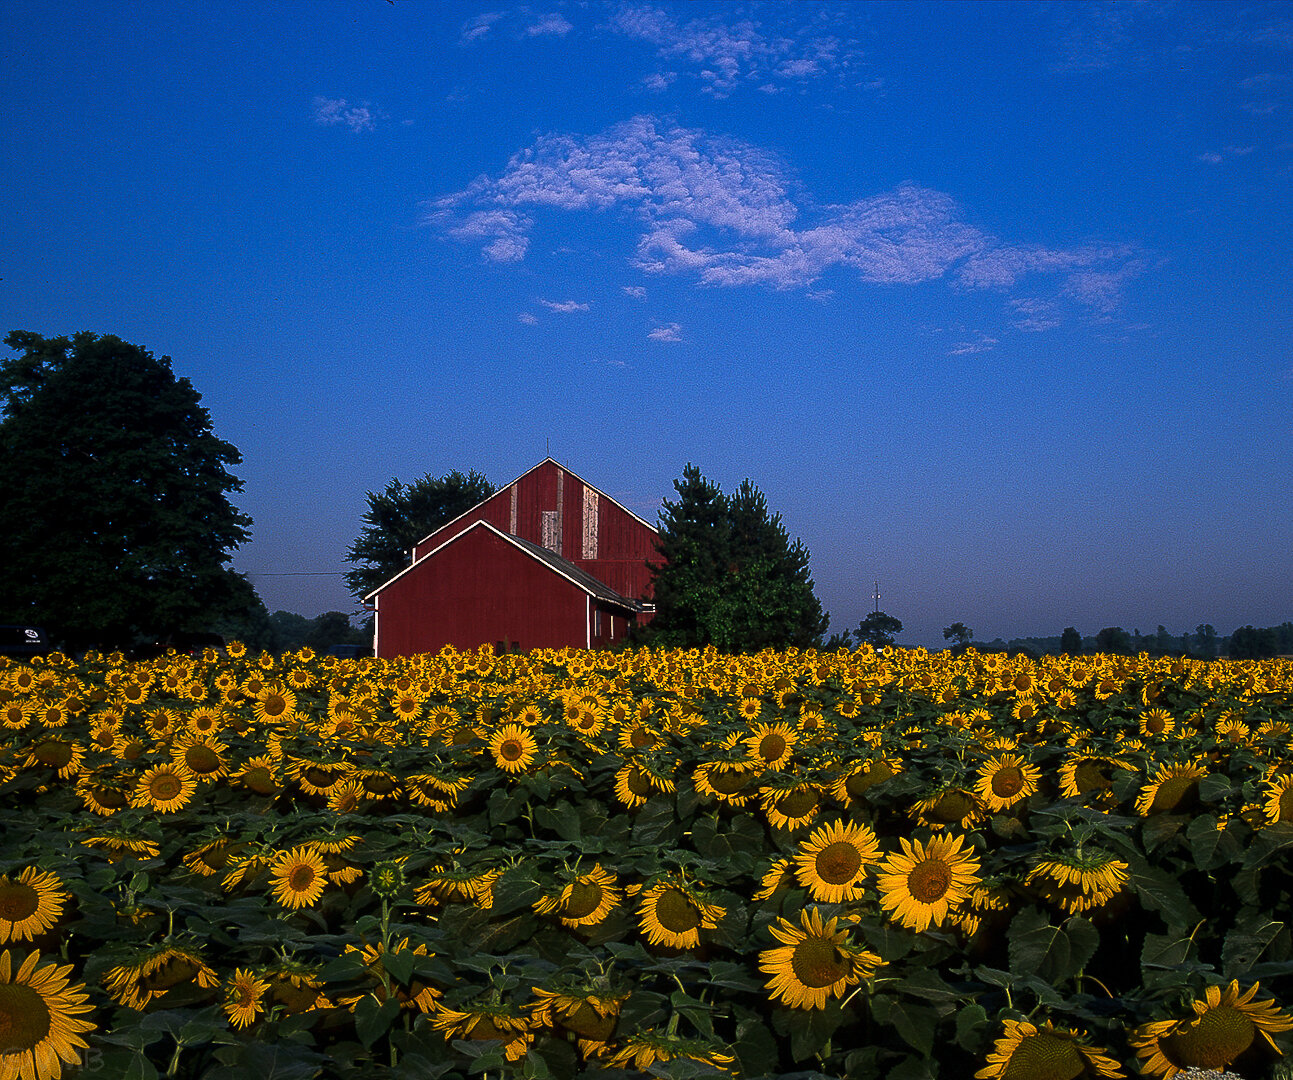
I have many images of sunflowers up close in the garden, but a scene like this begs to be taken as an environmental landscape image. Move back, include several hundred sunflowers and add a high-impact red barn as the subject. Now the sunflowers become part of a larger scene rather than the centre of interest. The environmental portrait illustrates how they are grown and the incredible numbers of flowers. This is a farm near where I live that grows sunflowers for bird seed that it sells to the public. The story behind the image even brings me great joy.

This garden image shows one of our Cornus Kousas in full bloom in early summer. Although I could have moved in closer to show the tree in more detail or even to take macro images of the individual flowers, I thought an environmental approach showing how and where the tree grows tells a better story. Here it is pictured growing at the edge of our massive fern garden, where its roots are shaded all summer. The image shows how the dogwood grows on the edge of a mini woodland beside a lovely Cornus Florida (left) and a smaller (Cornus Mas) between its larger cousins.

This image of a bittern in the reeds is a good example of an environmental portrait that really help to illustrate the environment where this bird lives. Without this context I think the image looses much of its story-telling capacity. By moving in close, it would still be a strong image, but without an illustrative story of not only where the Bittern hunts, but also how it works to become part of its surroundings in order to find prey and protect itself from becoming prey.

This image of a massive bull elk reminds me somewhat of the earlier image of the two moose. By placing it in its environment, viewers are able to get a much better idea of habitat as well as its place in the large landscape.

This image of a single fern struggling to survive in a rock crevice was certainly inspired by Canadian photographer and author Freeman Patterson. The viewer can only imagine its struggle to find enough earth to set its roots down, but its obvious health suggests that it has carved out a niche for itself to not only survive in these harsh conditions but to thrive along with the mosses that it happily shares the rock.

I have many images of these showy orchids up close, but it’s this environmental portrait tat pleases me most. The birch tree, grasses, fallen tree and the hint of the cedar on the left edge provides a hint of where these beautiful orchids grow. The habitat is a swampy, acidic area not too far from where we once lived. It is a difficult environment to photograph in given the mosquitoes and deep mud that are present while they are blooming. It’s also the perfect environment to keep those who want to harm the plants away. Nature sometimes works in its own favour.

I’ve got closer images of this beautiful swallowtail butterfly, but in this image I was able to not only show the environment where the butterfly calls home, I was also able to capture a wasp that is sharings the plant with the Butterly.
It’s hard to argue that a full-frame image of an impressive animal or beautiful flower isn’t necessarily a perfect one. These extreme close-ups can reveal details that an environmental image can’t possibly hope to show. However, extreme close-ups often miss out on the very reason the image is so special to the photographer. That is often based on the fact it was shot either in the wild, or in their garden or some other location that made getting the image more difficult than simply capturing it in a controlled environment.
I can show you hundreds of images shot at my local zoo that I’m proud of capturing. All are very tight shots of the animal restricting as much of the background as possible. Some of the images are excellent and you would be forgiven if you might thing they were shot in the wild.
But they were not. Because of this, they lose a certain validity compared to an image shot in the wild.
So, why not celebrate the fact that these birds are wild, that the flower grows in a wide-open field or by a river bank. Back away, move in close but use a wide angle lens. Show the mountain in the background even if it means your subject takes a little of a back stage.
Stand back and show that beautiful flower growing in your garden. Celebrates that animals’ freedom with an environmental portrait showing the home where it has chosen to live – be it a woodland or your garden.
Celebrate nature on a grand scale and try not to be that close talker we talked about earlier.

A misty morning with the Sigma DP2
A misty morning in late spring with freezing rain still clinging to some of the trees and rural fences captured with the Sigma DP2 and its excellent, built-in 42mm (35mm) lens.

This was my first stop in my morning of misty photographs with the Sigma DP2. The moss-covered rock outcrop is a favourite spot of mine although I have never been able to capture its beauty in the past. The soft, warm light on the morning mist rendered a quiet image, almost monotone in colour if it was not for the hints of soft green moss on the rocky outcrop. Photographed hand held at ISO 200, 1/50th second, f2.8.
Foveon sensor captures details in ethereal scenes
The conditions were just too good not to grab my cameras and head out for a morning shoot in the misty rain of late March.
It’s an in-between season where the snow has more or less vanished, the spring greens have yet to appear and all that really remains are bare trees and wheat-coloured fields. Even the migratory birds have yet to make their appearance.
The misty conditions combined with the remnants of freezing rain still clinging to some trees, shrubs and fenceposts made for a promising morning. Although I took along a digital slr and even a film camera, those two camera bodies remained in the bag so that I could focus entirely on my newly acquired Sigma DP2 with its unique and truly outstanding Foveon sensor.

Along a back country road the thin ice from the previous night’s freezing rain still clung to the steel fencing and roadside plants adding a little sparkle to what is normally a rather drab scene. Although I could have moved in closer to isolate a single plant along the fence line, I think the simplicity of the colours allowed for a more environmental portrait of the scene. Photographed hand held at ISO 100, at 1/160 second, F5.0.
For those not familiar with the Foveon sensor and what makes it so special, there are plenty of articles on-line explaining how the Foveon actually combines three separate sensors into one that is said to create the ultimate film-like look. I don’t know how true that is, but I do know that, even in the short time I have used this high-end enthusiast camera with an almost cult-like following, I’ve noticed that the results are quite unlike any from my other cameras.
One of the features of the Foveon sensor is that it renders extraordinarily fine detail. What better test than to take it out in misty conditions where a lot of the fine details are lost in the mist and rain.
Without any preconceived ideas of how the images would turn out, I took off for the surrounding woodlands and agricultural fields around our home.
If you are looking to purchase a Sigma DP2 or another Foveon-sensored Sigma camera, consider checking out the large selection at KEH Camera Exchange. Click here to see what they have to offer. In Canada, check out Henry’s photography. Link below.
Rather than rambling on about the camera, (I’ll do that in my review at a later date after using the camera over an extended period) I’ve chosen to include a number of images taken on that morning complete with detailed information in the cutlines.
Afterall, I think images speak louder than words is this situation.
All images shot in RAW, converted to TIFF in Sigma PhotoPro and post processed in Lightroom and Photoshop when necessary.

The fence line weaving through the landscape and trees almost in silhouette caught my eye and forced me to stop to explore the scene further. I have driven past this scene many times, but without the mist, it loses much of its charm and sense of mystery. The warm colours in the foreground field work against the overall coolness of the scene revealing hints of the green grass on the horizon. For now, however, the beiges of late winter and early spring still dominate the scenes. This image is heavily cropped to create the panorama effect, but the Foveon sensor is able to still create a useable image for the web at least. ISO 100, 1/125th of a second at F4.5.e Foveon

I am particularly attracted to fenceposts along the side of the road. I think I’m secretly hoping or maybe dreaming for a blue bird or cardinal to land on the post to add a punch of colour. In this image however, the subtle tones of beiges from the spent grasses, and reds from the red-twigged dogwoods in the distance combine with the misty background and glistening ice covered foliage to create a lovely texture that reminds me of the paintings of Canadian artist Robert Bateman or the photographic images of Freeman Patterson. ISO 100, 1/80th second, F3.5.

Keeping with the fence line theme, I noticed this lovely scene incorporating two red Adirondack chairs, a green canoe and bird feeder overlooking a pond. I imagined sitting in the chairs with a coffee in late summer, birds visiting the feeder while ducks went about their business on the pond. Maybe an owl calling in the distance. This image is one of a few that I cropped heavily to move in closer to the subject. Being restricted to the 42mm (35mm equivalent) fixed focal length lens on the Sigma DP2 is difficult to contend with after using longer focal lengths and zoom lenses all my life, but the discipline it invokes is refreshing. Having to move closer to the subject rather than just zooming in to get a closer view is part of how the camera forces you to slow down. The camera’s superior Foveon sensor also provides for the flexibility to crop images and still get acceptable results as was done with this image. Hand held at ISO 100, 1/80th second, f3.5.

In this image, the ice still clings to some of the spent grasses. The fallen tree provides a vertical line leading to the hay bale which helps provide context to where the image was taken on the edge of a farmer’s field. The fallen tree has been left in place providing habitat for a host of insect, mice and other critter that will, in turn, provide a food source for birds, owls, foxes and coyotes that live in the area. ISO 100. 1/100th second at f4.0.

By moving along and in closer, the scene takes on a different feel with the icy grasses standing out against the rounded background of the hay bales.

Mist and freezing rain combined in this image to create a lovely woodland scene combining the warm colours of cattails growing in the marshy open area while a native white pine with hints of ice covering its needles stands proudly on the right side of a spruce forest. The ghostly tree stands in the rule of thirds providing a centre of interest. I particularly like how the combination of the grasses in the foreground warm the rather scene of the cool-tone pine and spruce forest that fades away into the mist. ISO 100, 180th second at f2.8

The delicate red and pink tones in this sene caught my eye while the almost ghostly image of the sumach creates a centre of image for the eyes to stop at before wandering throughout the scene. The misty background adds to the ethereal feel and again helps to simplify an image that would be very busy on a normal day. ISO 100, 1/50th second at f3.2.

When I am in the area, I always make a stop at this local wetland. It can be a wealth of images, from red-winged blackbirds in early spring, leading to warblers and blue birds later in spring. Muskrats, build their home among the reeds and ducks of all kinds nest on the hummocks. Bald eagles have known to visit as well as a host of other predatory birds. Capturing it in a wide variety of atmospheric conditions helps you appreciate the incredible importance of this marshland and all the others that are hanging on as “progress” continues to threaten these vital areas.
Morning mist fades and it’s time to call it a day
One of the secrets to capturing morning mist is to move quickly once you see it. Enjoying that extra coffee may not be the wisest choice if mist is what you are after. In this case, the mist lasted longer than usual because it was caused as much by rain as it was by warm clashing with cool ground.
Nevertheless, it only lasted a couple of hours before it began to dissipate and leave me with uninspiring overcast conditions. With my morning at an end, I returned home to check out the images I had attained.
I was happy with most of the images after processing the RAW files first in Sigma Photo Pro before bringing them into Lightroom to complete the final edits.
I find Sigma images easy to work with for the most part once they are converted into TIFFS and imported into Lightroom. There is one nagging problem that other Sigma photographers have pointed to and that is evident in many of these images. A green cast often works its way into the images, and sure enough you can see it in many of these images despite my attempts to remove or, at least, lessen its effect. It is particularly evident with the white, misty skies.
The green cast is just one of the many negatives that other photographers have pointed out about the camera. Slow focussing, and a painfully slow ability to write images to the SD card, are just two of the many annoyances this camera exhibits. Do these mean the camera is not useable? Absolutely not.
Does it mean that it is not the right camera for some photographers. Absolutely.
But if you are the type of photographer who enjoys the challenge of creating unique images with their own style and look, than the Sigma cameras with their incredible Foveon sensors are certainly worth a try.
If you don’t subscribe to my weekly newsletter, please consider signing up. I write a new newsletter every Sunday covering Woodland gardening, native plants and wildlife with a focus on photography.

Pentax *ist-D: A CCD sensor with DSLR punch
CCD-sensor cameras have developed a bit of a cult following now that working copies are getting harder and harder to find. The Pentax *ist-D is an example of an excellent CCD camera that continues to deliver in its old age.
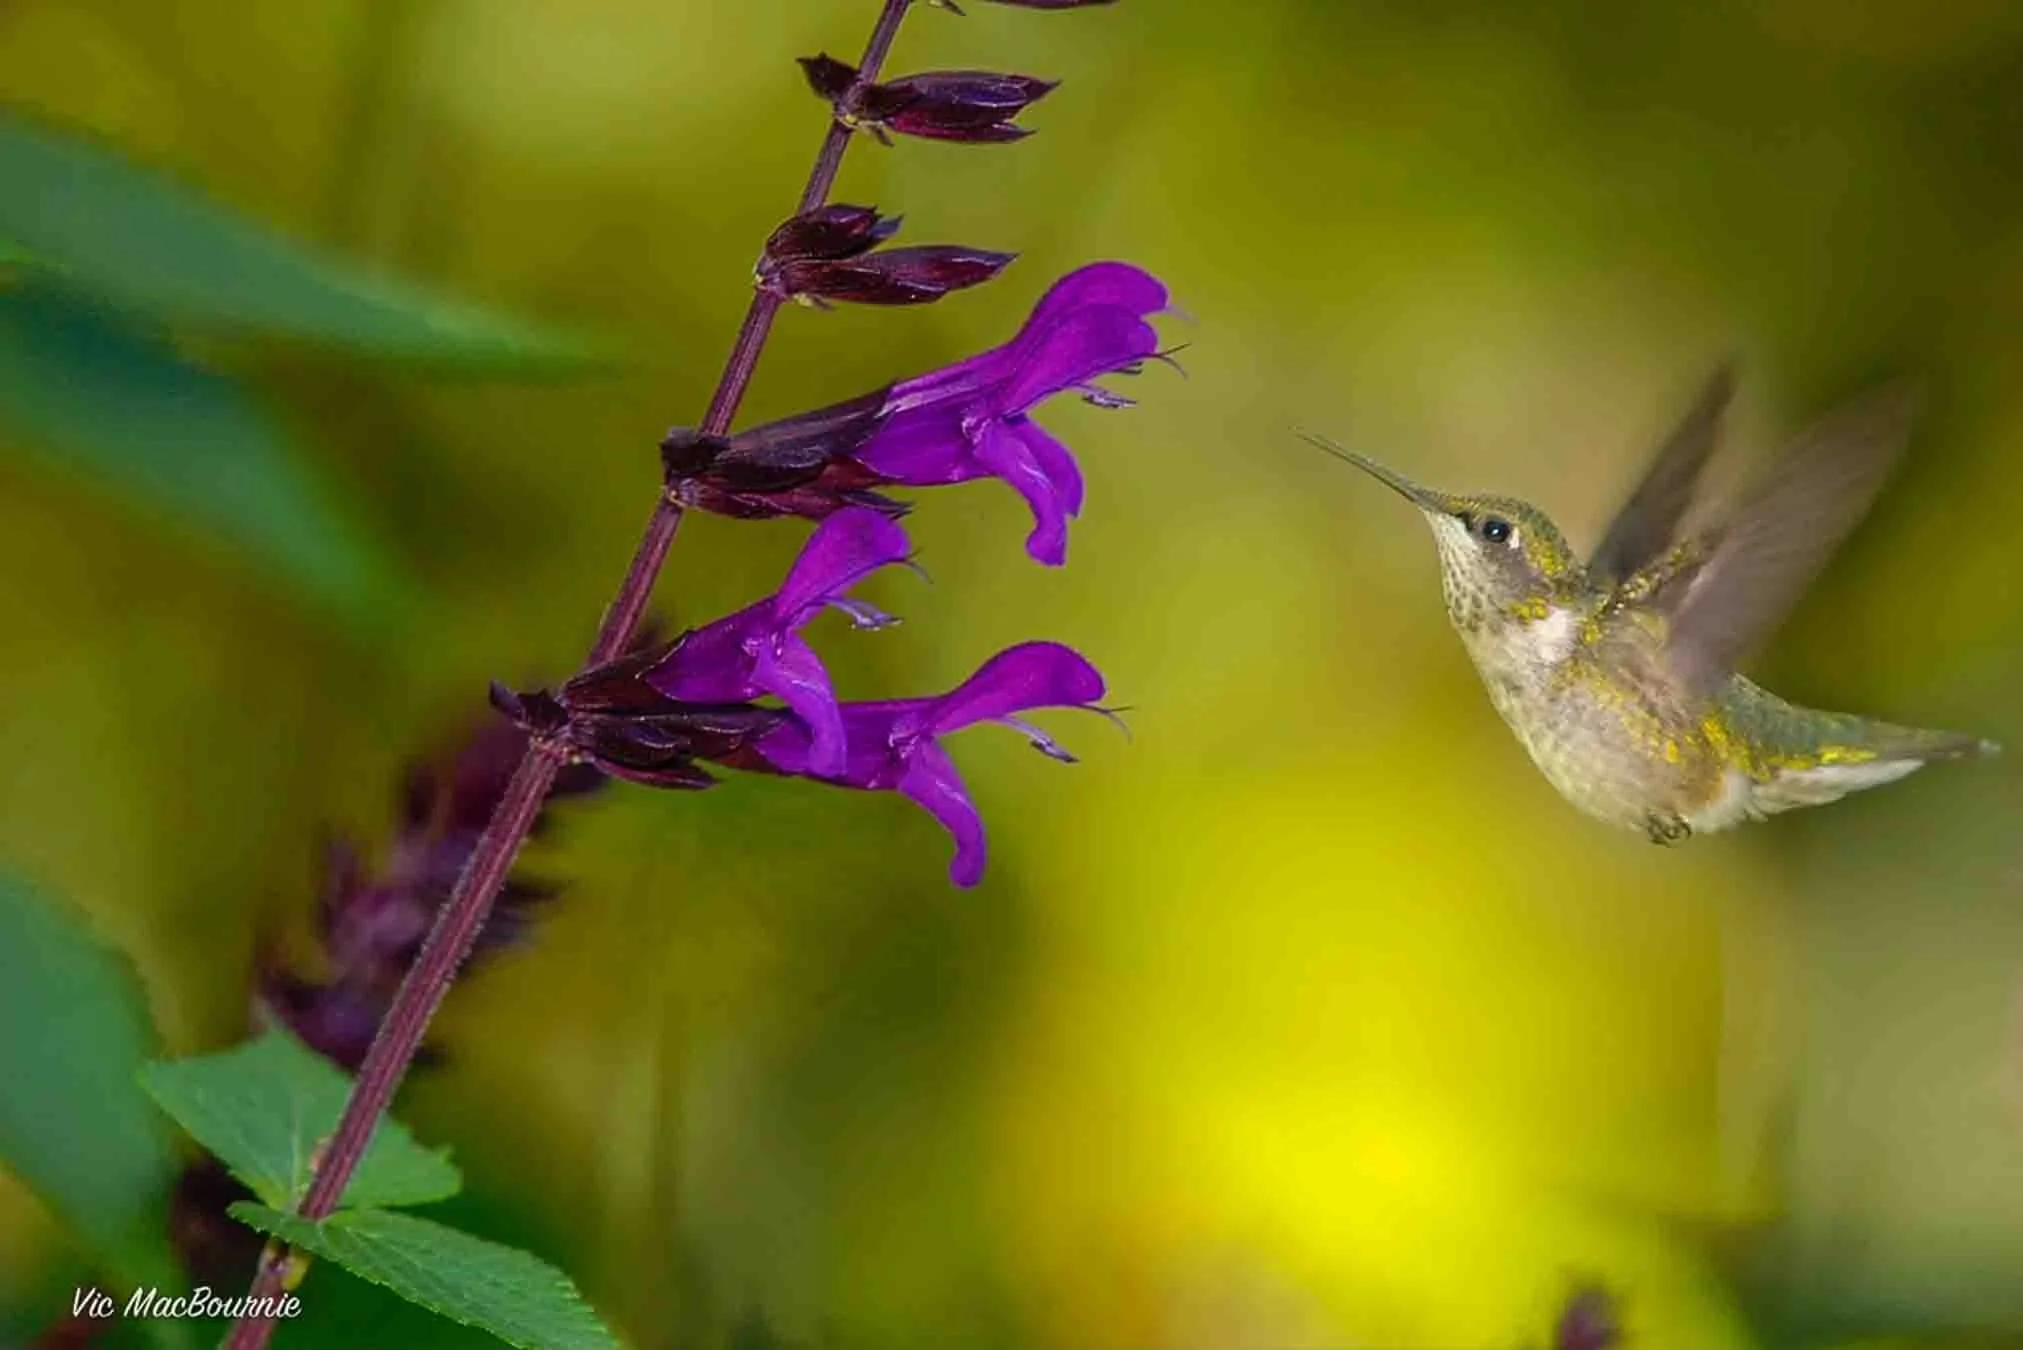
A hummingbird works the salvia in the garden. Photographed with the istD and 300mm F*4.5 lens.
CCD-sensor cameras prized by photographers looking for film-like images
It’s hard to believe that a 20-plus-year-old digital SLR not only still works, but continues to create outstanding images.
Is the answer its outstanding CCD sensor, its build quality, ease of use or all three? I’m going with the all-three conclusion, but that CCD sensor in the original Pentax *istD, which actually was the premiere digital camera for that camera maker, certainly makes this camera a keeper for any photographer looking for those intrinsic qualities that only CCD sensors provide.
Its low price on the used market makes it a camera you might want to grab while you can, especially if you have some fine Pentax glass to complement this highly competent digital SLR. Other notable DSLRs sporting CCD sensors include the Nikon D100, D70, and the Canon EOS-1D as well as the Minolta Maxxum 5D.
There are no doubt other CCD-bssed cameras available, but this post is about the Pentax *ist-D. I know, the name Pentax chose for the camera is completely weird, but Pentax marketing has never reached the heights of its cameras. The marketing department may well be big part of the reason that the camera maker is slowly disappearing from the market. It is certainly not because of the quality of the cameras.
At the time of this writing KEH Camera exchange actually has a Pentax *ist-D listed for just $54, or the price of an inexpensive dinner out with a friend.


Whether you believe in the CCD-sensor hype or not, I find its superior film-like images hard to argue with when it comes to the quality of the images.
And I should know. I’ve owned the 6-megapixel camera since it were first released in February of 2003 and used it for years as my first and only digital SLR. I still use it today as a backup to my CMOS censored Pentax K5.
Defining the positive qualities of the ist-D CCD sensor is difficult, but needless to say time after time when I go through my tens of thousands of images on Lightroom, it’s the images taken on the CCD sensor that catch my eye and please me most.
Photographing in the garden
In the garden, the *ist-D is often my camera of choice to capture the incredible colours of flowers, birds, insects and butterflies that the CCD sensor seems to bring to life more so than the CMOS-based cameras.
The image below of the Ladybugs attacking aphids on a milkweed plant is a good illustration of the colours the CCD sensor can bring out in your images. It is also an interesting example of nature at work in the garden and how important natural predators are in our gardens.

Lady bugs gathering aphids on milkweed. Photographed with the Pentax istD with it’s very capable TTL flash and a 100mm Macro lens.
CCD sensors and the film look
For those who have never given much thought to the sensor in their digital camera, think of it as how analogue photographers used different films to give them very different results. The muted but natural colours of Kodachrome, for example, vs the punchy, vivid colours that Fujichrome delivers. Both deliver fine results, but often very different ones.

And, yes, if you dabble in Lightroom or Photoshop, you can achieve similar results with good post processing if you want to learn the intricacies of the digital darkroom. But, maybe it’s just easier and a whole lot more fun to just use a camera with a CCD sensor to begin with and push it to the max to capture pleasing images.
Check out my other featured posts on Pentax cameras and lenses:
Either way, there is no denying that Pentax’s original DSLR, for me at least, proved to be an excellent purchase – even if it was outrageously expensive coming in at a suggested retail price of US $1,600.
Defining the positive qualities of the ist-D CCD sensor is difficult, but needless to say time after time when I go through my tens of thousands of images on Lightroom, it’s the images taken on the CCD sensor that catch my eye and please me most.
The camera itself with the separate motor drive is a nice, high-quality piece of kit that seems to be able to take anything thrown at it over the years.


Decent autofocus, the fact it takes four AA batteries to power it and its multitude of buttons to prevent the user from having to dig too deep into the menus, makes it simple to use.
However, its back LCD display, use of CF cards and slow writing capabilities, takes away at least some of the joys of using it. It’s not perfect, but no cameras from that era were perfect and most delivered inferior results or were not built with the same quality that earlier film-based cameras offered from Pentax and other camera makers.
I’m not going to go into a full review of this camera here; that’s available elsewhere on the web. But unlike many of those technical reviews, I can offer readers 20 years of images shot with the Pentax *ist-D together with the F*300 f4.5, 28-100 power zoom Pentax lens, 100mm F4 macro lens and the Kiron f2.5, 105 macro just to name a few.

The CCD sensor on the Pentax Ist-d is capable of revealing gorgeous colours with very film-like qualities.
What others say about the Pentax *ist-D
All of these comments are taken from the Pentax Forums - an excellent resource for all things Pentax. Also, the charts below are courtesy of Pentax Forums.
• “I bougth my copy in 2013. It looked like it had taken a beating, and it had! I bought it to use in very harsh environments such as dry, sandy deserts, beaches and wetlands. It did its job and never skipped a beat. AA batteries made it much easier to manage power supply.”
• “I purchased my first *istD used to begin taking real estate photos. I have since shot over 50,000 photos with the same camera. It has never ever missed a beat. It is absolutely top rated for reliability in my situation. I leave this camera in a Pelican case in a truck with a sunroof in the super hot Mississippi summer heat and it doesn't seem to mind.”
• “That *ist D was my main camera for almost 8 years. Here's what I liked and disliked about it:
Likes:
- Small size and weight. There has still never been a DSLR with better specifications that is smaller and lighter, by a long shot. For years I waited for a real D replacement, but it never appeared. Now Pentax doesn't even offer an entry-level model that small. If you want something this small today, you have to go to an entry-level Nikon or Canon. Have fun with that.
- Pentax lenses. Yes others have greater quantity, but narrowing it down to the lenses I might actually buy, Pentax's selection, both old and new, was more interesting.
- Compatible with TTL flash. It was the only Pentax DSLR compatible with TTL flash, and I used an old AF500FTZ for years. On all other models, the 500 is manual-only (no Auto Thyristor mode).
- Ability to set three completely separate sets of settings. Weird that the K-7 doesn't offer that. It was the one part of going to the K-7 that was an uncomfortable downgrade.
- Everything else was good enough. Though N/C are better at some things, there was no deal-breaker for my needs with the *ist D. It was a small, light camera that did everything I wanted and took the lenses I liked.
Dislikes:
- Slow write times! Even with the fastest cards (Lexar with "Write Assist" technology), RAW write times were about 6 - 6.5 seconds. For cards without the Lexar "Write Assist" technology, make that 7 seconds. And the buffer was only 5 RAW files. So very often I'd fill the buffer and have to wait 6 seconds for each shot thereafter. This was by far my biggest dislike, bigger than all the others combined. My understanding is that it was the last DSLR to do writes in software; just months later the D70 appeared with much faster writes, doing it in hardware. Then the DS, and all other Pentax DSLRs, have had much faster writes.
- That grip. It was not great to hold. The battery grip made it better but at the cost of increased size. All other Pentax DSLRs have been MUCH better to hold.
- Batteries. For best results you want to use CR-V3 batteries (NIMH rechargeables make the AF slower with lower voltage; Alkaline rechargeables could fry it with higher voltage). But they are expensive. Finally I found that I could find large lots of them in unusual brands on eBay, pretty cheaply. That was an improvement but still annoying. Yes it's nice that if you run out of battery you can find alkaline AAs just about anywhere. But in real life the only time I ever needed that was at a beach, far away from any place where I could get AAs.
- Can't control ISO with wheel. I mostly use aperture priority, so one of the two wheels usually goes unused. When the K-10D came out with the ability to control ISO on one of the wheels in aperture-priority mode, I wished they'd do a firmware update that allowed that on the *ist D. But no such luck.
- Control wheel. Hard to hit it right, and to hit it hard enough for it to respond. Not a good design. But I don't like the K-7 solution much better.
- Small, low resolution LCD. Much better on the K-7.
- Can't write both RAW and Jpeg. I don't have a lot of time for PP, but my wife uses my shots for scrapbooking. Converting all those shots to Jpeg was often an issue. When the K-10D came out with the ability to write both, I wished they'd do a firmware update that allowed that on the *ist D. But no such luck.”
The charts below are provided by the Pentax forums website at www.pentaxforums.com


In conclusion
Your first DSLR is like your first girl or boyfriend, there’s always a soft spot and a little love for them left over even if others have since taken their place.
For me, there have been many other digital cameras that followed the *ist-D, but she still holds a place in my heart. I am lucky enough to still own a very good working copy of Pentax’s first DSLR and plan to continue to use it until that mirror slaps against the camera internals for the last time.
This summer, I plan to give it a good workout and will report on how well it holds up. It continues to provide high quality images out of its 6 megapixels and the joy it continues to give me makes it an important part of my growing arsenal of cameras.
Stay tuned.
For more on Pentax cameras, including the PZ1-P and the PZ-20 click here for the PZ20 and here for the PZ1-P
Please take a few moments to check out my gallery of images here.

River cruises offer incredible garden experiences
Nothing says spring quite like tulips, daffodils and a range of colourful spring bulbs. There are lots of ways to experience tulip festivals from local events to European river cruises to Amsterdam, the motherland of tulips.
Visit spectacular spring tulip displays, private and public gardens all in luxury


All of the above images were provided by the Tulip Festival of Amsterdam
Imagine waking up to a sea of tulips as far as the eye can see. Sheets of red, yellow and orange stretching out before you only broken up by a windmill or workers harvesting the flowers for markets around the world.
And then, imagine your biggest decision of the day is whether to order the Coq au Vin (chicken in wine) or the Boeuf Bourguignon (beef stew) at your dinner table overlooking the Rhine River as you cruise from Amsterdam to Basel Switzerland.
It’s just another day in the life of a European river cruise.
These are the experiences of a typical European river cruiser visiting The Netherlands and Belgium in spring. Every year thousands of Americans, Canadians, Asians and Europeans board Avalon, Viking, Scenic and other river boats to experience this spring phenomenon along the Rhine River.
Of course, experiencing spring in The Netherlands is just the beginning of an incredible week of touring historical and iconic French and German cities along the Rhine River.
Even outside of the spring touring season and the incredible tulip displays, gardens and floral displays are front and centre along the river cruise routes, with breathtaking container plantings and window boxes. In many towns along the routes, window boxes, hanging baskets and impressive container plantings greet visitors adding incredible beauty to already magical towns.
Tours of the Black Forest in the state of Baden-Württemberg in southwestern Germany, close to the borders with France and Switzerland offers visitors an opportunity to experience a natural woodland in the heart of Europe. The forest earned its name from the Ancient Romans who found it so thick, dark and impenetratable that they named it the Black Forest.
Today, locals and tourists visit the area for its hiking opportunities, as well as a wealth of museums, small towns and villages that are known for their abundance of cuckoo clocks.

Window boxes line many of the smaller canals and gardeners can get plenty of great ideas with the spectacular container plantings along the cobblestone streets and pathways in the quaint commercial areas.
When it comes to gardening on a small scale, it’s tough to beat the artistic touch and attention to detail European gardeners bring to the table.
My wife, daughter and I have booked a river cruise along the Rhine for September. I’d love to experience the spring tulips, but circumstances led us to a September cruise. My research, however, go me thinking how readers of this website might appreciate learning a little more about what garden experiences can be found on a river cruise. During these let’s say difficult times, cruising Europe just might be the perfect escape from the pressures facing Americans and Canadians at home.

One of the highlights of any trip to The Netherlands in spring is the Keukenhof gardens considered to be one of the best garden of The Netherlands. Seven million tulip bulbs on eight acres of incredible beauty from about the middle of March through to the middle of May. For more on seeing the best tulip displays check out this post from Jessica Lynn writes.
Of course, you don’t have to go on a river cruise to experience spectacular spring blooming tulips. In Ottawa Canada, the tulip festival runs from May 9th to the 19th at Commissioners Park. The festival features massive tulip displays, family-friendly activities, and celebrates the flower's beauty and its historic ties to Canada's capital. Click here for more information on the Ottawa tulip festival.

Make it stand out
Whatever it is, the way you tell your story online can make all the difference.
Closer to where I live, The Hamilton/Burlington Royal Botanical Gardens offers incredible spring displays in its sunken rock garden. Many of the images in this post are from the RBG rock garden display. More on the Royal Botanical Gardens, with a focus on their woodland gardens, here.
Many public gardens have incredible spring bulb displays of tulips, daffodils and Hyacinths. They are a great way to welcome spring and get ideas on the best way to use bulbs in our gardens.

In our woodland garden, tulips are almost impossible to grow because of the deer, but we do have a few daffodils in our front garden. Naturalized plantings of tulips and daffodils can work perfectly in a woodland garden setting. Distribute the bulbs in a more natural way, maybe among ferns, to maintain a naturalized look.
You might consider leaving the more formal plantings of your favourite bulbs in the front of your property.
Whether you are planning a river cruise or just a visit to a local public garden, now is the time to begin planning. I suspect most of the cruises will be already sold out for this season, but you may be able to get a deal on a package if you check out one of the many cruise lines.
In any case, experiencing spring bulb displays are an excellent way to welcome spring.
Comparing a tiny trio of digital and film cameras in the garden using B&W images.