
Can Luminar Neo stand on its own?

This image of foxes has been edited using Luminar Neo’s extensive photo editing tools, including Ai erase that was used to remove grasses in front of the foxes’ faces. To see the original image prior to editing, scroll down the page.
Photo editing software package is all most of us need
Luminar Neo is a photo editing program quickly gaining a following in the photography world for its combination of ease of use, exciting Ai features, and ability to go deep into photo editing if that’s what you need.
Add to that, its extremely competitive pricing in either a subscription model, or an outright purchase of the program, and it’s hard to argue that Luminar Neo is not one of the best all-round photo editing packages to compete with the big boys over at Adobe – namely Lightroom and Photoshop.
Oh, did I mention Luminar Neo also takes advantages of the ability to add unlimited, multiple layers?
But can Luminar Neo stand on its own?
That’s the question most photo enthusiasts need to know before jumping into the pool.
The answer to that question is not an easy one. The best I can offer is, it depends.
But let me say this right off the bat, for 95 per cent of photographers looking to take their images to new heights – maybe create some beautiful results on a regular basis or process their garden or travel images so they can be shared on social media, put in a self-published photo book or hung on your wall – Luminar Neo is without a doubt all you need.
In other words, for the vast majority of photographers, Luminar Neo gets the job done with flying colours..
Even if you’re a seasoned professional, Luminar Neo can create memorable images you would have never imagined before.
But, if you are a more of a graphic designer or creative artist than a photographer, or are looking to transform your photography into painterly images that are not obviously recognizable as photographs, or if you need to manipulate text on images as graphic artists often do, your best bet is teaming up Luminar Neo with a more graphic arts-oriented program like Photoshop.
Check out my earlier post on combining Luminar Neo as a plugin for Photoshop and Lightroom.
Not a problem, Luminar Neo has designed its platform so that it can be simply added to Photoshop, or Lightroom as a plugin.
So to answer the original question: Can Luminar Neo stand on its own? The answer is a resounding yes for probably 95 per cent of photographers. For the remaining 5 per cent, just use it as a plugin.
To help prove my point, here are four very different images created using only Luminar Neo, including a “creative” almost painterly image at the end.
The four images illustrate the very real possibilities for photographers and photo artists alike.
So, let’s dive in and look at our first example.

This image of Peggy’s Cove near Halifax, Nova Scotia in Canada, was edited using Luminar Neo.
The first image is more or less a straight forward landscape or travel photograph taken on vacation many years ago at Canada’s Peggy’s Cove near Halifax, Nova Scotia. The image was shot on slide film, scanned on my Epson flatbed and processed entirely with Luminar Neo.

The before and after image below shows exactly what Luminar Neo is capable of producing, quickly and efficiently.
The chart, left, shows the editing tools used to transform and enhance the original image. One of the helpful tools Luminar includes is a list of all the editing done on the image. Other programs may show the changes as “history” but Luminar Neo has it in a separate area in the editing module that not only allows you to see the edits you have applied to the image, but go in and make further changes to tweak the image to your liking.
Without getting into all the details, here are a few of the steps used to achieve the finished image.
I used the Ai feature to denoise the scanned image, followed by some work in the colour enhancement module to lift the washed out colour and boost saturation in the reds.
In addition, I used the dramatic light module for a little added pop as well as the magic light Ai module and Structure Ai modules.
The clone tool was also used to remove some distracting elements in the image. The image was also cropped to focus more on the fishing village and the red boat in the middle of the scene.
A water enhancement module was also used on the image. This module allows you to work with bodies of water to increase colour saturation in the blues and greens, among other things.
The more comfortable you get with the tools, the quicker the editing process becomes and the more confident you are to take your image to higher levels.
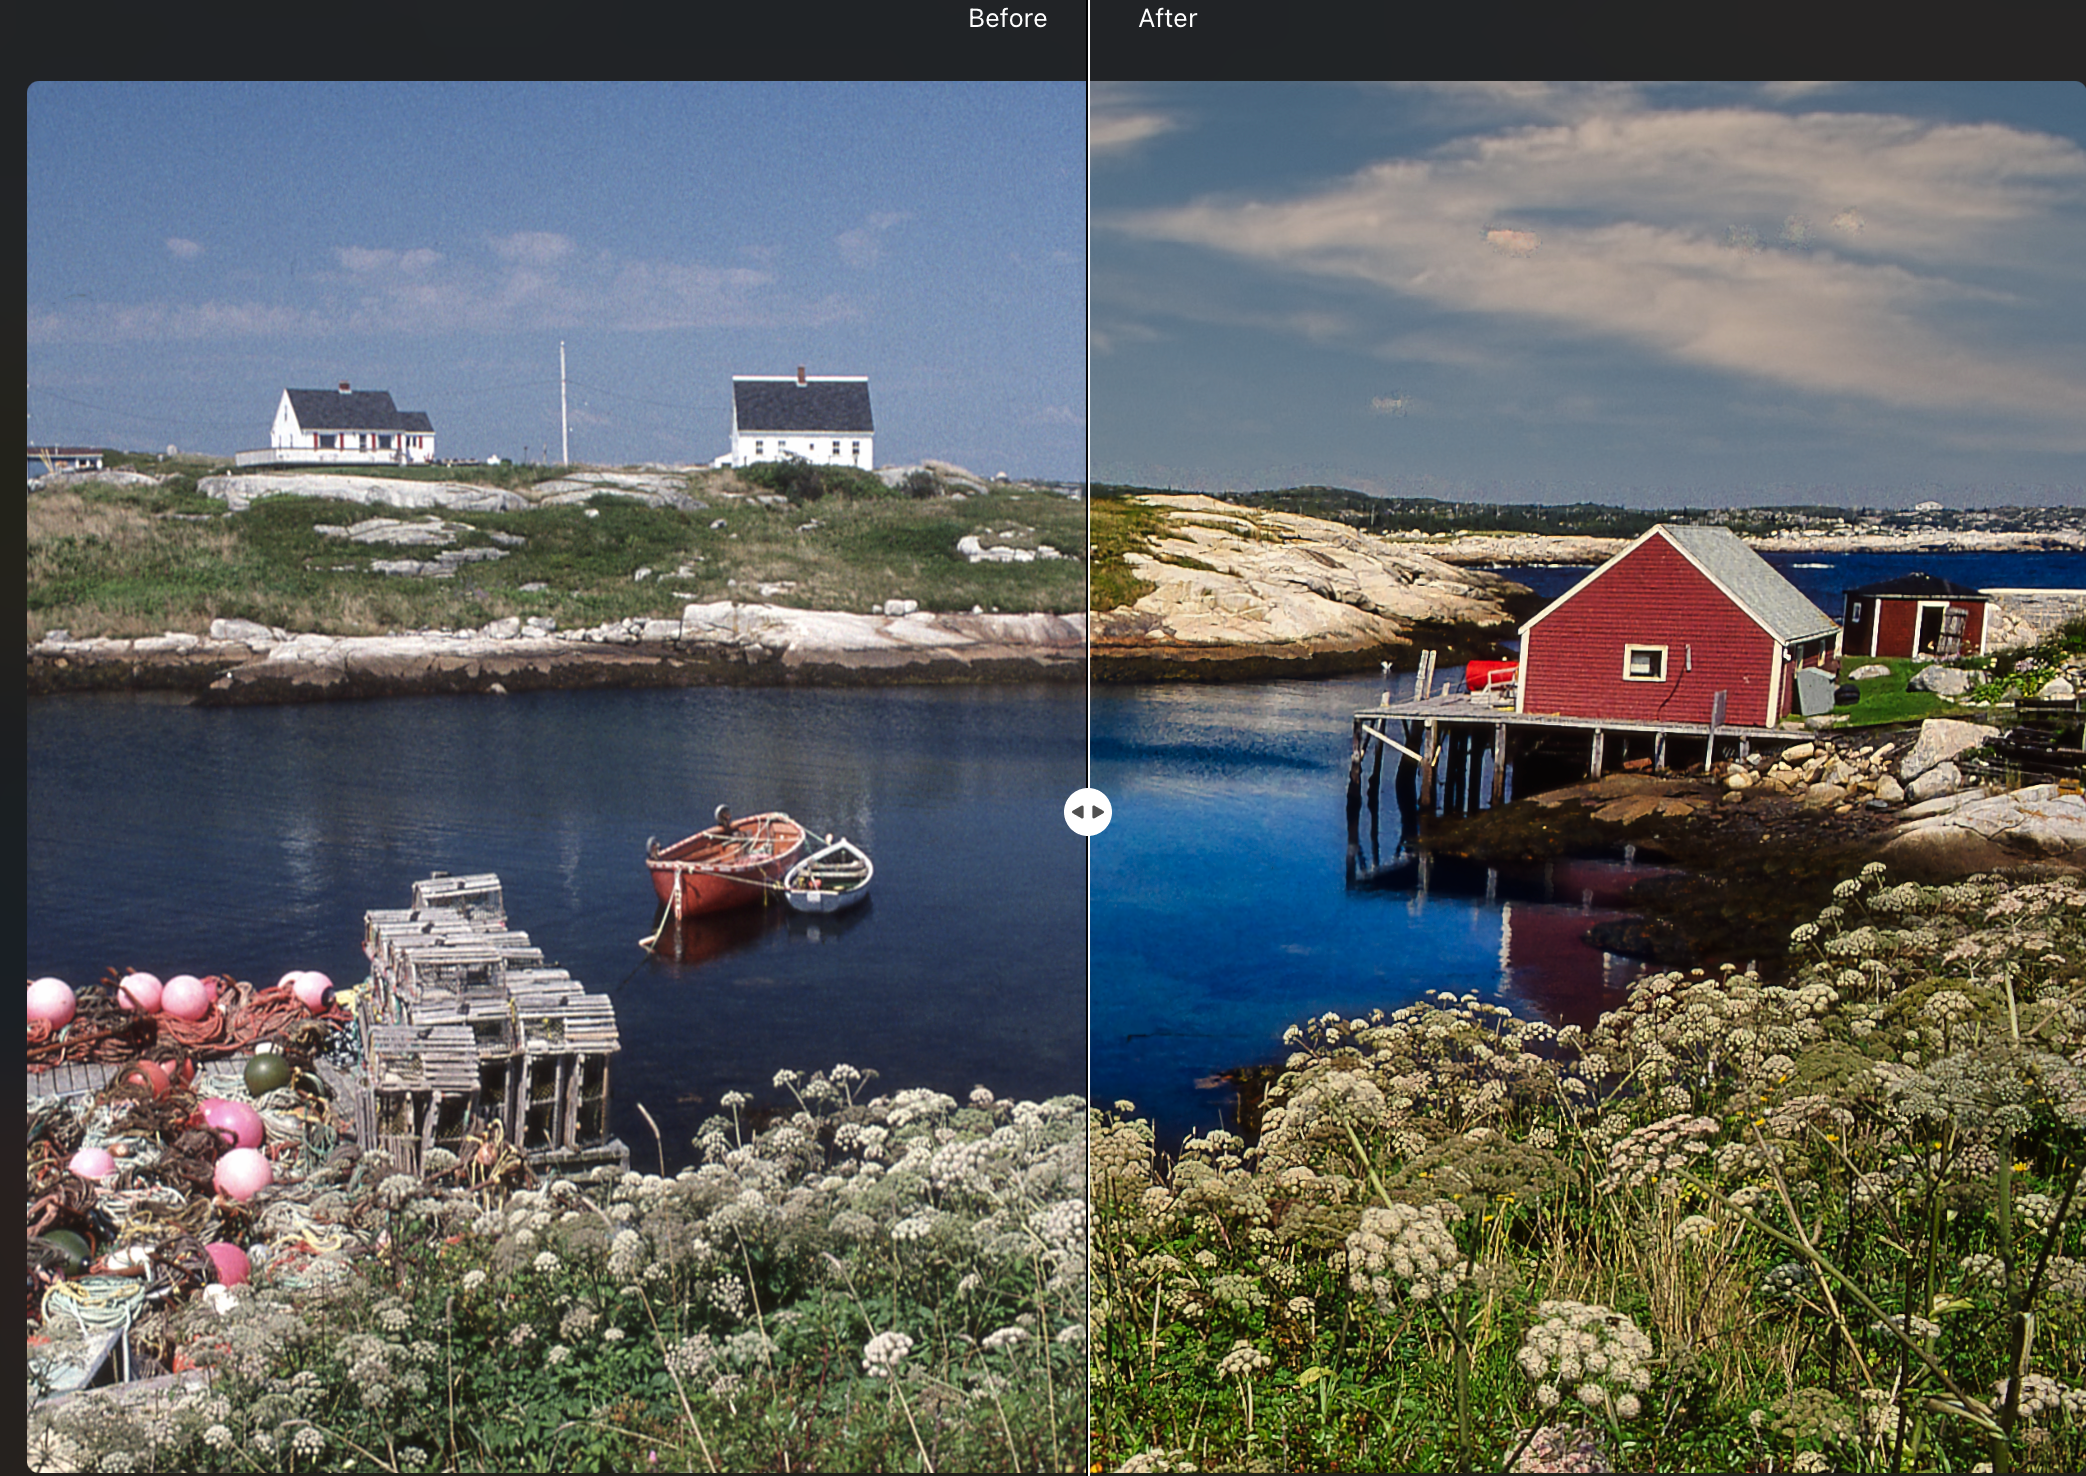
This before and after image shows how far Luminar Neo can take your images with just a few simple editing tools. Notice how the water has been improved as well as the colours punched up. This image was originally shot on slide film and scanned with a flatbed Epson scanner before being taken into Luminar Neo for post processing.
Barn in snow with Sigma’s DP-2
The second image is another landscape showing a lovely red Barn in a snowy landscape shot with Sigma DP-2 equipped with a Foveon sensor.
The red barn really caught my eye as I drove along the road, but it was the sculpted pine that stopped me in my tracks. Add to that the wheat-coloured grasses in the snow and I knew I had to pull over on the busy road to capture the scene. The single 42mm focal length lens on the sigmaDP-2 made cropping in-camera impossible so I took what was offered knowing that I could crop later with the software.

This image of a barn in a snowy landscape was taken with the Sigma DP-2 with its Foveon sensor. The RAW image was first processed in Sigma Photo Pro to convert it to a TIFF. The remaining image was post processed using Luminar Neo’s many editing features, although the image was not heavily edited.

Unedited version
The unedited version shows how effective Luminar Neo can be to enhance landscape images.
I mentioned that it was shot with the Sigma DP-2 because of the incredible detail- and colour-capturing ability that a Foveon-sensored camera is capable of achieving. As a result, I did not increase sharpness or detail in this image or the cropped image.
If you are interested in purchasing Luminar Neo, please consider using the code FernsFeathers at checkout to receive a 10 per cent discount. By using this code, I receive a small percentage of the proceeds which helps me to continue producing articles for readers.
In addition, I had to first run the image through the Sigma proprietary Photo Pro software to convert the raw file to a TIFF to work with it in Luminar Neo. The Sigma Foveon sensor is so unique that it is best to run the raw image through Sigma Photo Pro to convert it to a jpeg or TIFF before working with it in other photo editing software.
With that said, Here are the steps taken in Luminar Neo to edit this original TIFF file.
• Easy Landscape/longexposure preset set at 50 per cent
• Enhance Ai sky set at 65 per cent with an Accent at 20 per cent
• Develop module: Exposure set to -.30 and shadows increased to 40
• Removed a few small distracting details with the erase tool and clone tool.
•Structure Ai: Added 20 per cent overall with a boost of about 5 for the fine details
• First small crop to remove more distracting details
• finally added 23 per cent saturation to red, and 29 to yellow and green colours in the HSL sliders.
• The second image (below) was cropped more severely to focus more on the barn, the tree and the diagonal line of grasses running through the image.
Please write in the comments which of the two images you like more. I’m leaning toward the more cropped image.

The same image cropped to focus on the barn, tree and diagonal line of grasses cutting through the frame.
Foxes in field with sun rays
The top image in this post of the two young foxes was originally shot on slide film and scanned with an Epson scanner.
The image suffered from a lot of problems which Luminar Neo was able to easily solve in post processing. But I was able to take the image to even greater heights by tapping into Luminar Neo’s sun ray module that enables the photographer to add sun rays to the image.

The image above is the unedited version prior to Luminar Neo’s post processing applied. See the edited version at the top and below of this page.
Without going into great detail, the image suffered from grasses partially blocking the fox’s faces. By carefully using the Ai erase tool, the grasses were eliminated on the foxes faces.

Foxes in grass
The edited version is clearly sharper with more contrast and colour. The sun rays were also added in post processing.
The red fur of the foxes were enhanced with HSL (hue, saturation, luminosity) sliders and the grasses were enhanced using the foliage enhancement module.
Finally, Ai sharpening was used to bring the foxes into sharper focus.

This dreamy image of cherry blossom in bloom was created entirely in Luminar Neo using primarily the clone tool while various filters and softening techniques kept the image light and airy.
Cherry blossom in selective focus
The final image we are going to explore involves a more creative approach using Luminar Neo. I mentioned earlier in the post that painterly-quality images are best made with programs like Photoshop, which offers a more flexible painter effect with the ability to create your own paint brushes, sample specific colours and an overall more graphic approach to working with images.
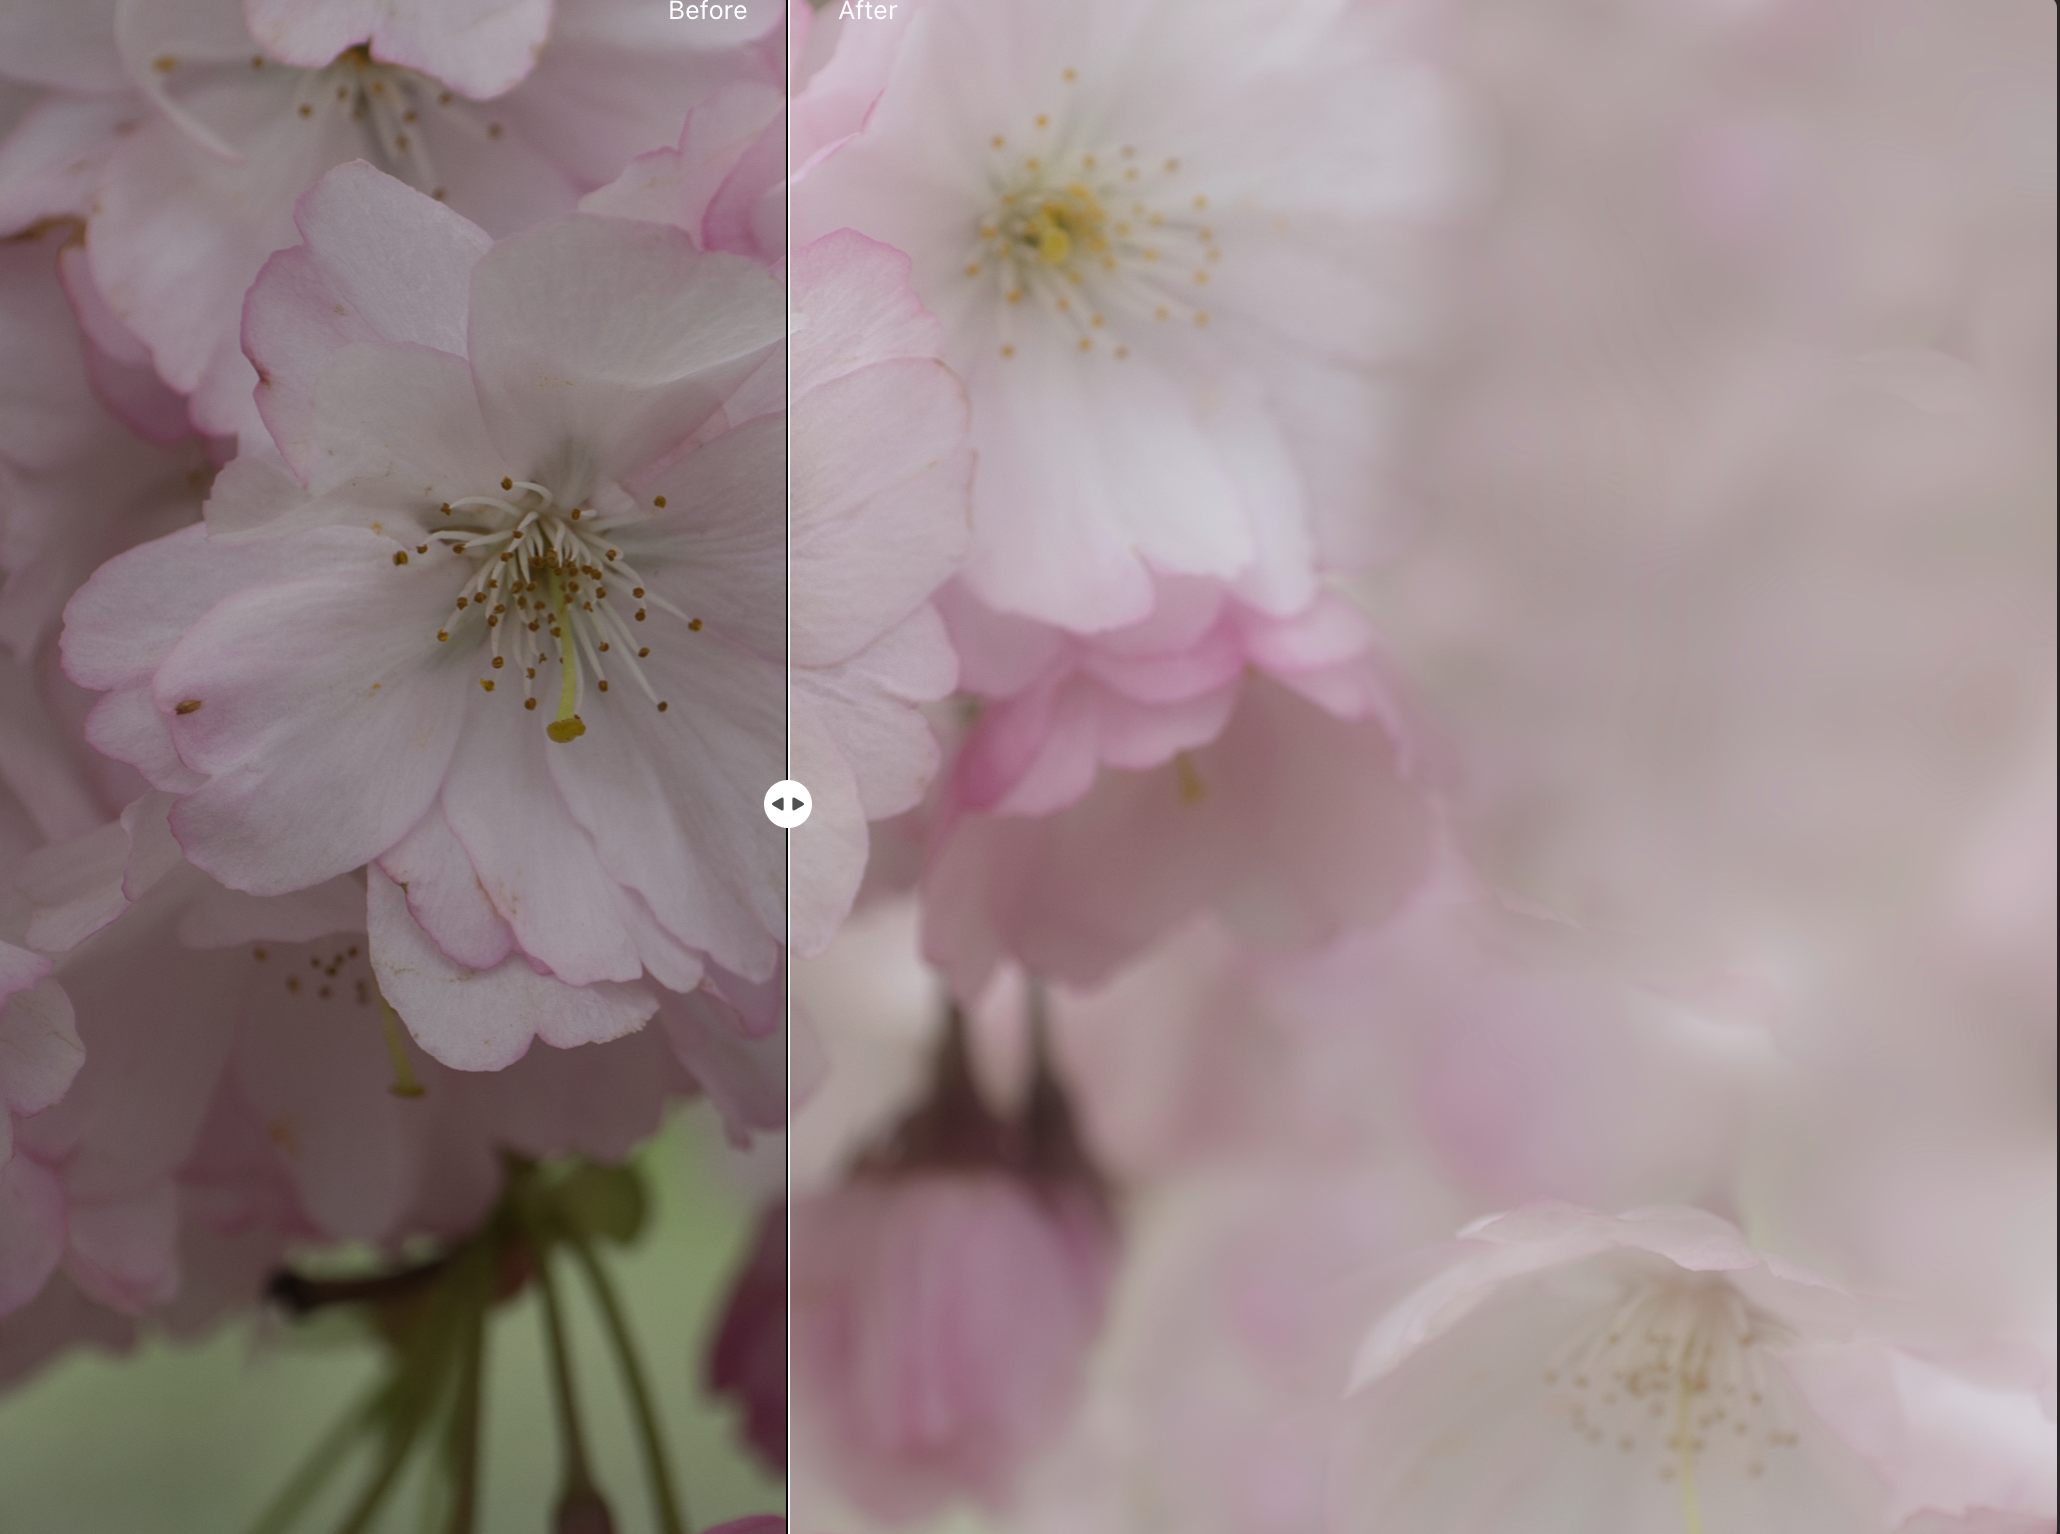
This image shows the Before and After of the image edited in Luminar Neo.
That said, with a little creativity, artistic, painterly images are entirely doable using only Luminar Neo tools.
In this image, I primarily used the clone tool while sampling various parts of the cherry blossoms to create a painterly effect. In addition, gaussian blur filters were masked in to areas of the image to further soften the outer areas of the image.
A high-key filter kept the image light and a vignette set to white rather than the traditional black setting added to the light and airy look.
Conclusion: Is Luminar Neo the only photo editing software you need?
The jury may be still out whether Luminar Neo is the only software you’ll ever need, but I’m hoping my arguments in this post has convinced the jury that it is certainly the only software package most photographers will ever need.
That’s not to say that it’s perfect. I don’t think there is any software that can solve every photographer’s need, but Luminar Neo is inching closer with each new update.
And, if you are like many professional and advanced amateur photographers, you’ll want to have Lightroom and Photoshop at your disposal when you need it. The fact Luminar Neo can be treated as a plugin for these programs makes it the perfect complement to these other high-end programs most of us have grew up using.
If you are still on the fence, Check out my earlier post on combining Luminar Neo as a plugin for Photoshop and Lightroom.
For a completely different look at what Luminar Neo is capable of producing from digitized film, check out my review of the Pentax PZ20 with Luminar Neo processing of the scanned film here.
If you are interested in purchasing Luminar Neo, please consider using the code FernsFeathers at checkout to receive a 10 per cent discount. By using this code, I receive a small percentage of the proceeds which helps me to continue producing articles for readers.
