

How hard is it to design and create a woodland garden?
Building a Woodland garden can be a fun and rewarding experience. The key is letting go of what you may have perceived as the perfect garden and let nature do much of the work. Your focus should be in establishing layering the site with tall trees, understory trees, shrubs and ground covers. I hope this blog will help you achieve your dream.
Ideas and tips to bring backyard landscape ideas to life
It’s not easy being a woodland gardener.
I mean, how long can you sit and watch the chipmunks playing on the rocks or the birds feeding their young from the nearby birch branch. And those pesky hummingbirds buzzing around feeding from the cardinal flowers, not to mention the feeders hanging on the pole beside you.
Eventually you’ll need a break from not having to cut grass, deadhead the flowers and prune the shrubs to within an inch of their life.
So how hard is it to create a woodland garden? It’s important to know that a woodland garden design is most likely the easiest of all gardens to maintain providing you’re willing to relax a little. It’s the ultimate low-maintenance backyard landscape, but it will require some work to get it established at the front end. Plant trees, shrubs and get a ground cover established and then relax and learn to work with nature rather than against it.
It’s not all fun and games.
Add the burden of trying to satisfy our friendly chipmunk after she returns for what seems like her 100th visit to load up on peanuts.
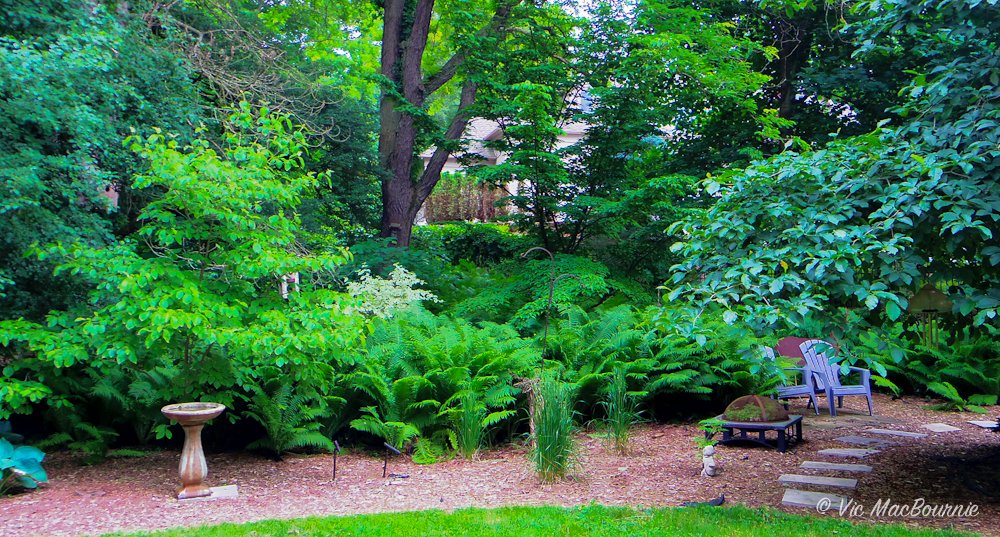
Over in the corner of the garden, a doe rests in the tall ferns, while her two fawns romp around waiting for their day to begin.
Like I say, “this ain’t easy.”
And the noise! The birds, the bees, it’s all so overwhelming.
Nap time can’t come soon enough around here.
If this sounds good to you, it may be time to reconsider your backyard landscape design and use the information contained here on this website for backyard ideas and tips to create your low-maintenance landscape.
If you are looking for assistance, consider picking up The American Woodland Garden, by acclaimed author Rick Darke, Capturing the Spirit of the Deciduous Forest. It can be difficult to find, but is often available on the used market. Alibris, an U.S.-based used book seller, has copies of The American Woodland Garden for approximately $25 if readers are interested.
“So how hard is it to create a woodland garden? It’s important to know that a woodland garden design is most likely the easiest of all gardens to maintain providing you’re willing to relax a little. It’s the ultimate low-maintenance backyard landscape, but it will require some work to get it established at the front end. Plant trees, shrubs and get a ground cover established and then relax and learn to work with nature rather than against it. ”
If you are interested in exploring the world of shade gardening further, you might like my recent post on The Natural Shade garden.
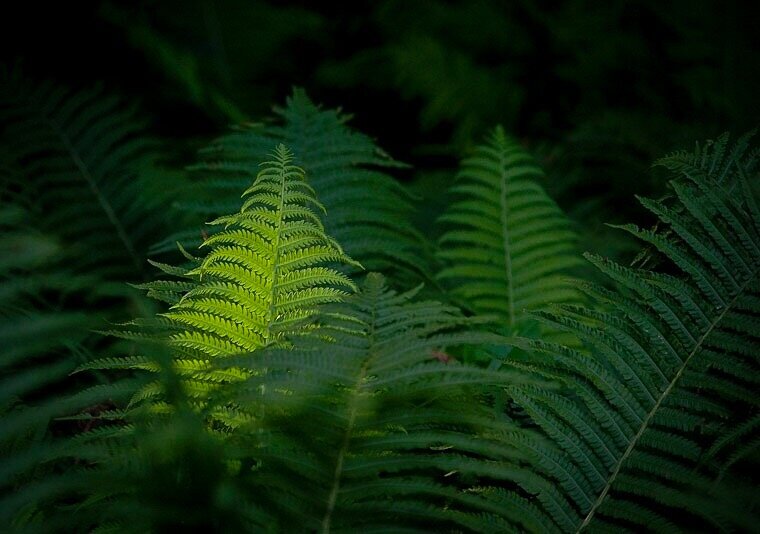
A play of light catches on the fern fronds in our woodland garden where deer often hide their young for the day. The changing light is just one of the pleasures of creating a natural garden and capturing it with a camera.
Let the leaves fall to the ground and just leave them there over the winter.
The decaying leaves are important places for insects and pupae to overwinter. Their decomposition helps to build an earthy, humus-rich soil alive with micro-organisms.
Birds depend on the insects come spring to feed their nestlings. (Check out this post for the complete story on leaving your leaves where they fall.) (Check out this post on how to use fallen leaves to build your Woodland soil.)

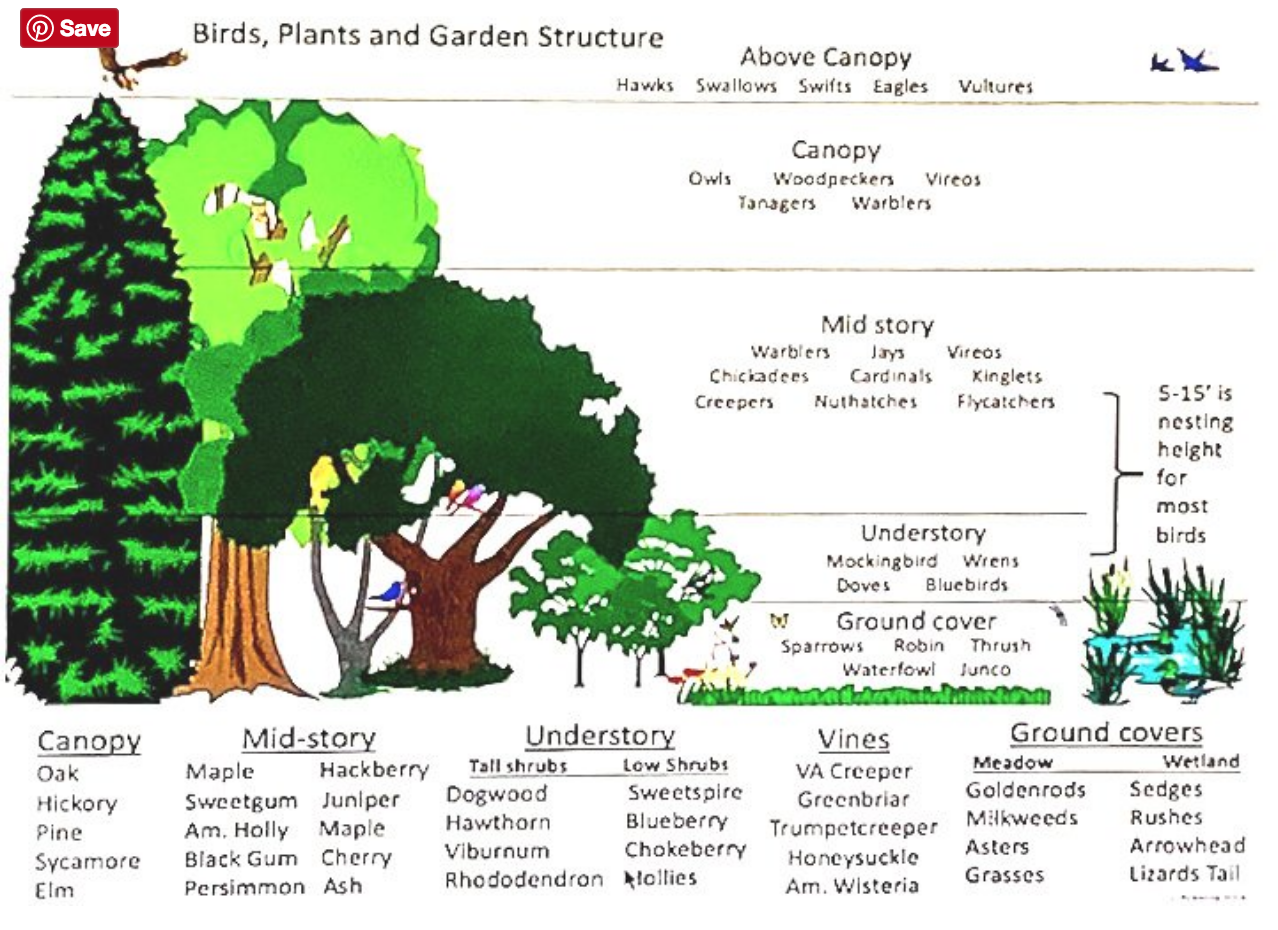
The ultimate woodland wildlife garden incorporates layering. This illustration shows what birds primarily use the various zones.
Relaxing is key to building a woodland garden design
To build a Woodland garden, it’s important to be willing to let nature do its thing and not worry about every little weed (let’s just call it a wild flower shall we).
Instead of spending our days weeding, let’s, instead, ensure our Woodlands are filled with a variety of ground covers that stop weeds from taking over the garden beds.
Try a little Snow-in-Summer in a hot dry area to cover the ground with a living mulch. Not only is Snow-in-Summer a beautiful ground cover, it offers outstanding opportunities for some beautiful selective-focus photography.
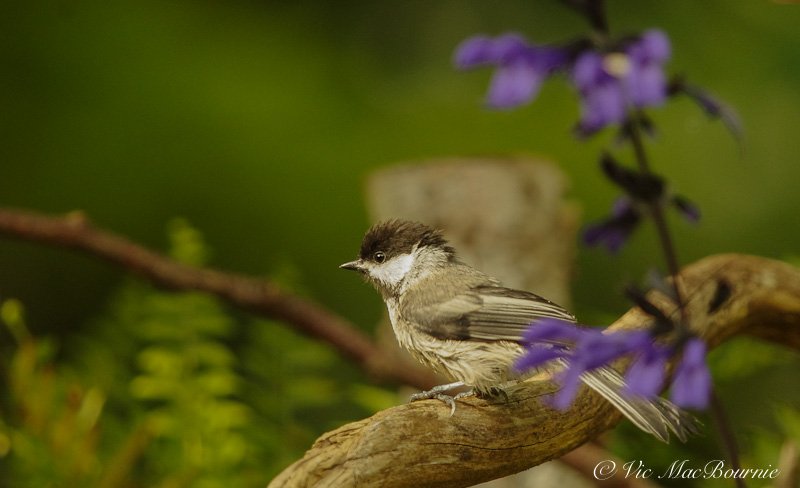
If you do it right, you’ll have plenty of time to photograph the daily life of your garden and its visitors.
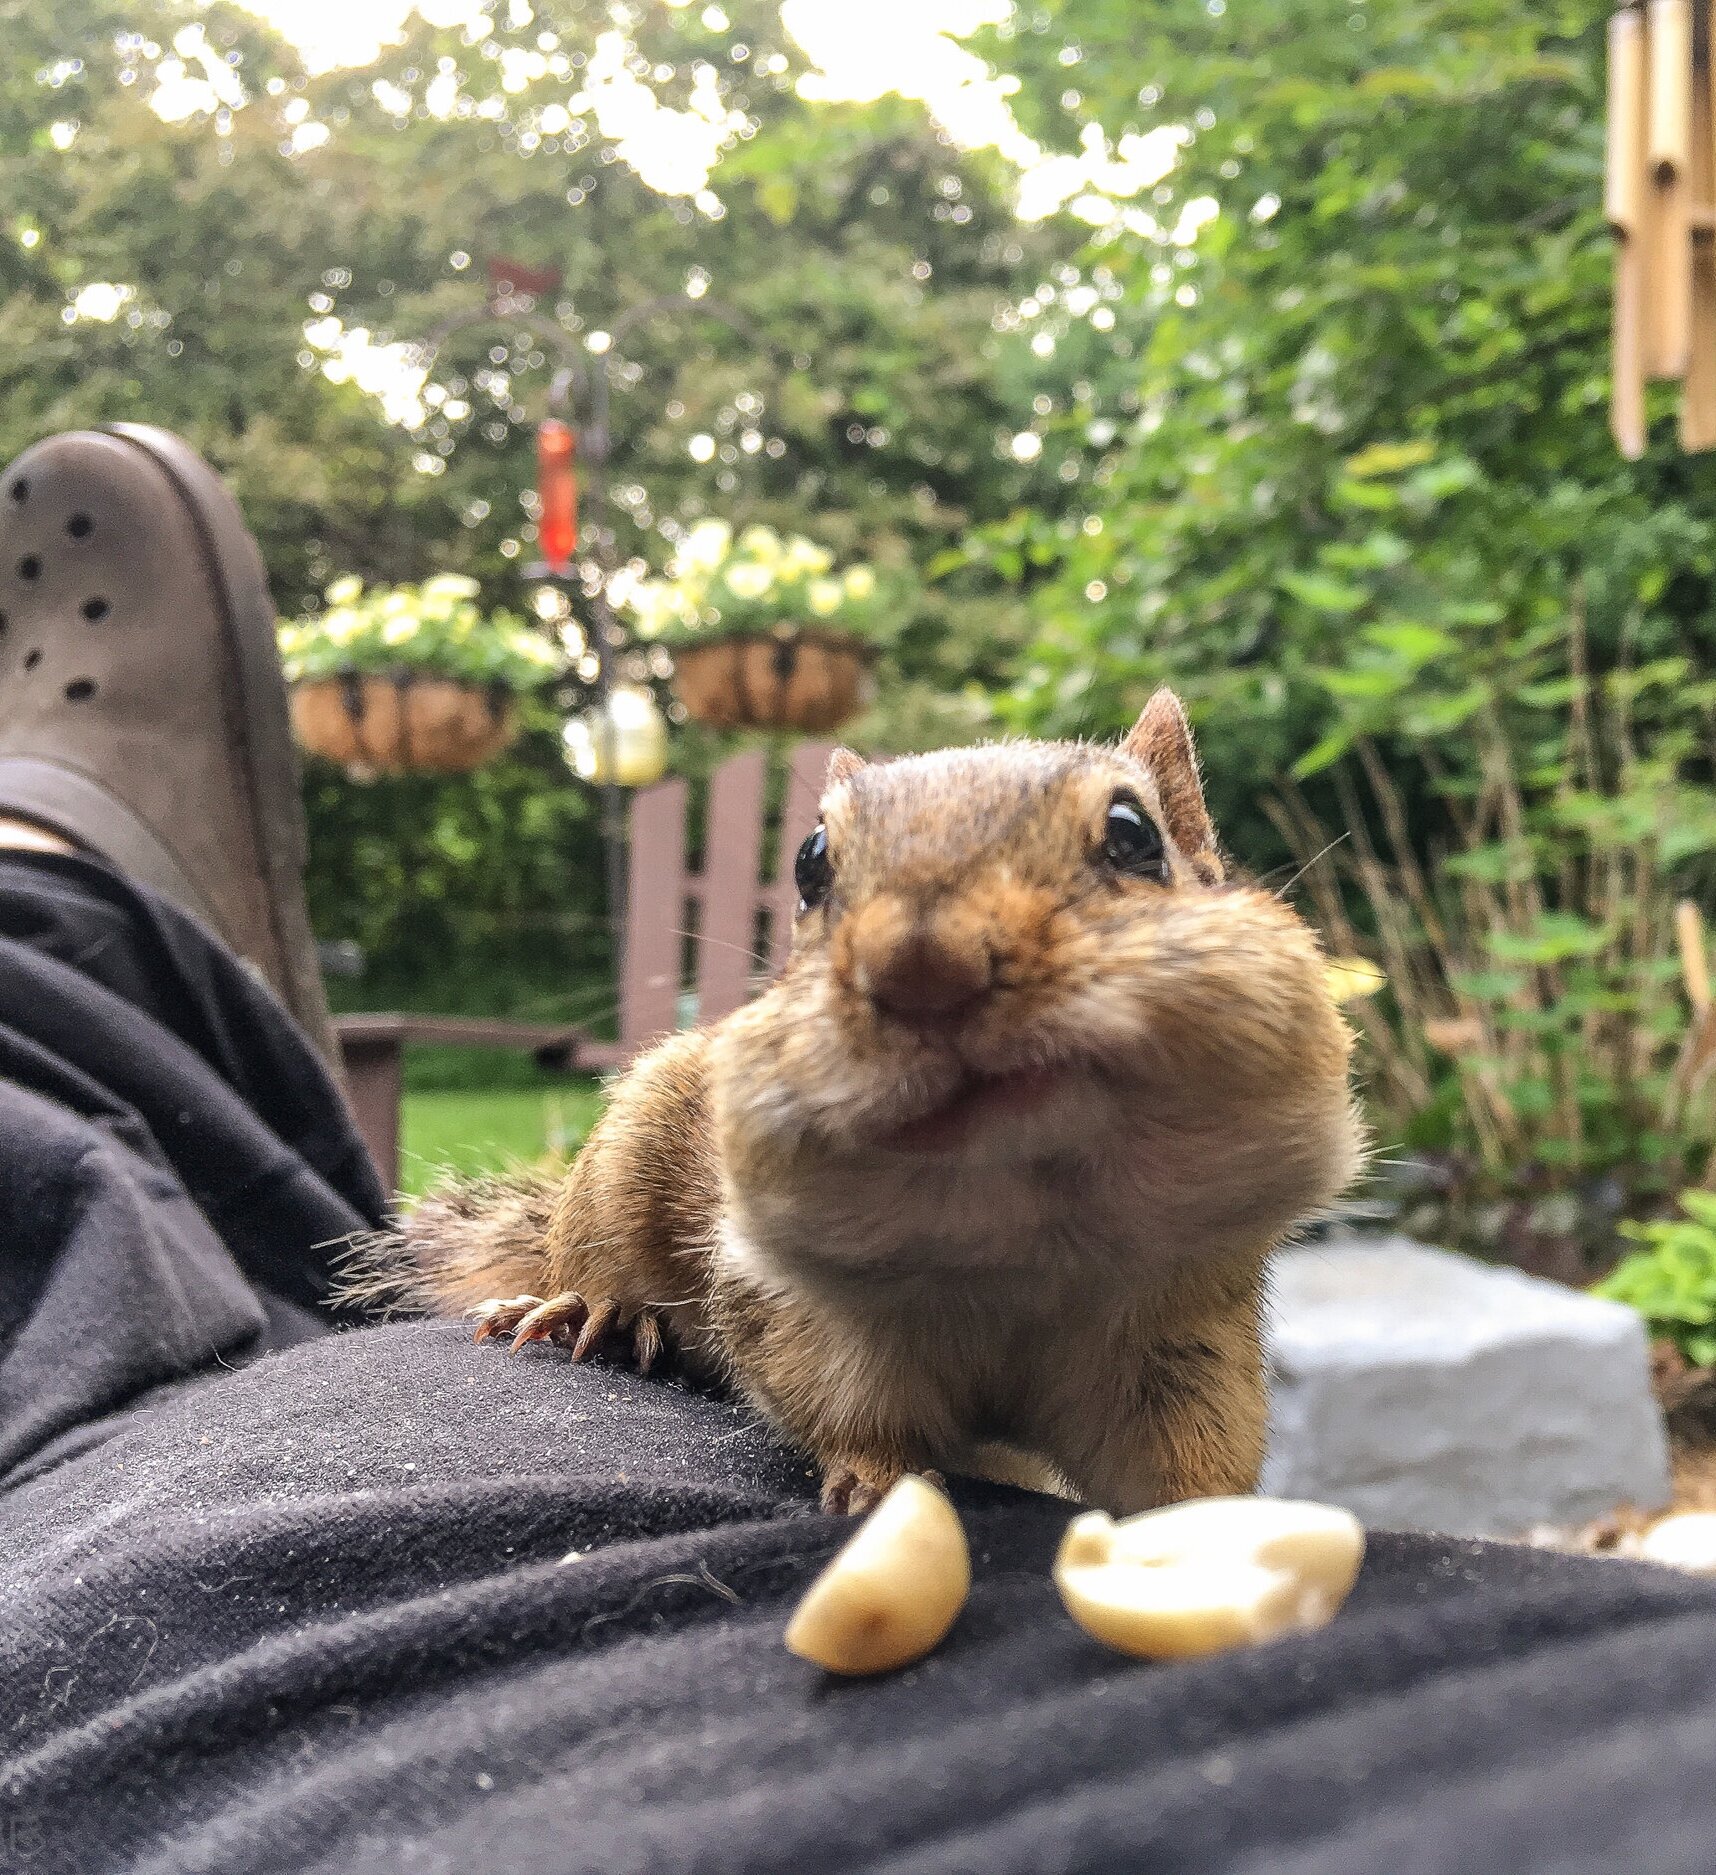
A friendly peanuts joins me for a little lunch. Creating a natural woodland wildlife garden is full of little surprises.
Where living ground covers are inappropriate, let’s use organic mulch like shredded bark, pine needles or composted leaves to cover the soil and restrict any weeds that want to poke up through the soil.
Instead of pulling weeds all summer, let’s relax with a glass wine on the patio and enjoy our feathered friends. Let’s use that time to focus on planting more native plants to attract more insects to our yards that, in turn, will bring more birds to our woodland gardens.
And those hostas that were eaten by our family of deer, let’s just rejoice in the fact we are keeping the local wildlife happy and healthy. (Click here for a gallery of the wildlife that visit our Woodland garden.)
If you can live with that, welcome to my woodland garden blog. It’s aptly named Ferns & Feathers for its abundance of both ferns and feathered friends.
If you care to join me, we’ll tackle this thing together; learn from one another’s shared knowledge and experiences. We can take some time to enjoy a discussion or two about building the woodland garden one tree at a time through layering – from the forest floor to the tips of the tallest trees.
Along the way we’ll share our top 3… top 5… top 10. (Click here for my five favourite bird items or here for my top 5 woodland garden books.
We’ll share what products work best for us, (like this Gorilla Cart or a blue tooth speaker) some time-saving tips, work-saving tips.
I’ll also be sharing garden photography tips, tricks and ideas to bring out the best images hiding in your garden. Doesn’t matter if your best camera is an i-phone, a sweet little point-and-shoot enthusiast camera model or a full-featured digital 35mm camera. I use them all to document our garden and, with a little luck, can pass on some wisdom from a hobby I’ve been enjoying most of my life.

Mornings are a great time to be out in the garden.
And I’ve got some time after recently retiring from almost 40 years in the newspaper business. So, with all this time on my hands, my wife told me to find something to fill it with or else… I decided to combine two of my great loves – gardening and photography – into a fun little spot on the web for like-minded gardeners to pull up an adirondack chair and join me and Holly (our four-legged friend) to share some tall tales, our victories, failures and a decent glass of wine.
Okay, let’s get this show on the road.

Best ground covers for a backyard woodland design
Ground covers are an integral part of a Woodland Garden. Ferns form the backbone of our garden both in the front and back yards, but there are many others. Here are three of my favourite ground covers that I use in my garden.
Three of the best ground covers for the shade garden
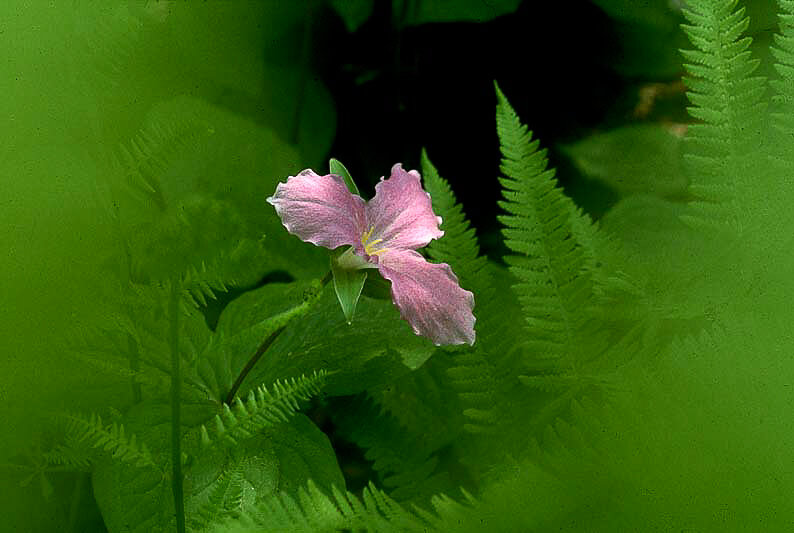
I once had a friend promise me some pink trilliums from her parents’ garden.
I knew back then that white trilliums turn pink as they pass their prime and begin going into decline.
You may ask, ‘what does this have to do with ground covers’?
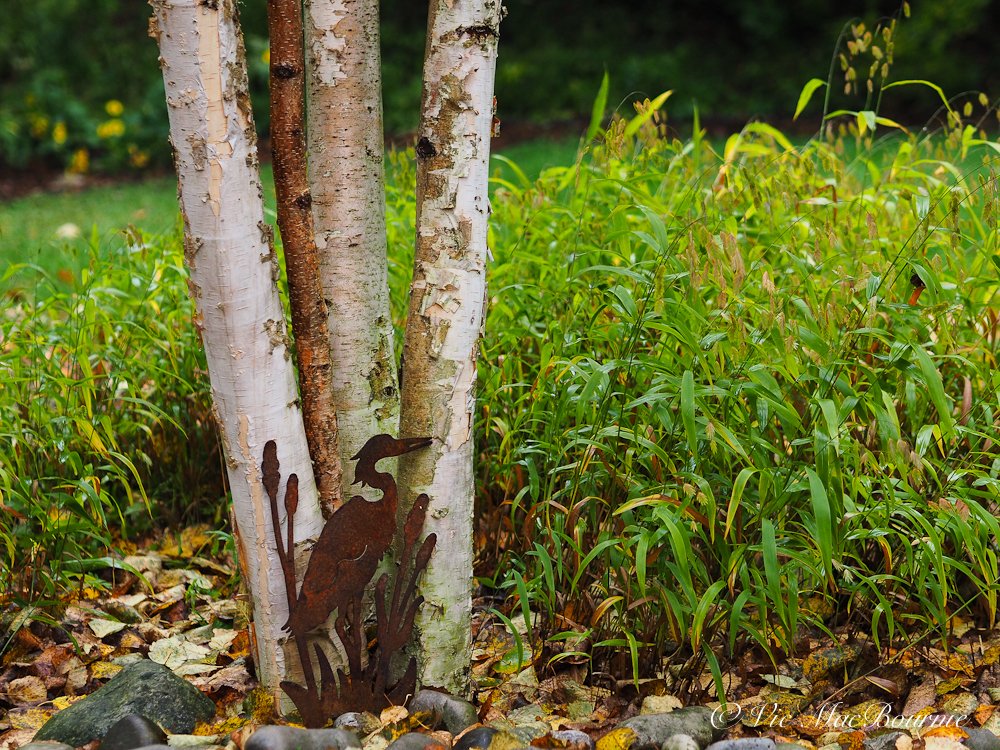
Using native sea oat grasses like these can be an effective groundcover in your garden.
Let’s just say promises of great things are not always what they appear to be, especially when it comes groundcovers.
So the promise of rare pink trillium plants was enticing, but not really what it appeared to be.
In the end, I took the pink trilliums knowing that next spring they would emerge as glorious white trilliums in our landscape eventually turning pink before disappearing again.
So what are the best ground covers?
The best ground covers are the ones that deliver what you need in a specific area of your garden.
Proper research will help guide you to the best plant to achieve the desired effect, rather than an-out-of-control planting that quickly takes over the entire garden.
Consider native plants whenever possible.
Ferns are ideal for shady places and sweet woodruff is always an ideal woodland addition.
Although not native, pachysandra can be an all-around proven winner in most gardens.
Gardeners know, however, that promises can be good or bad depending on how you perceive them. The very nature of a quick-spreading plant makes it a potential problem. Traditional groundcovers spread fast and are considered by many to have aggressive tendencies in our low-maintenance landscapes.
Making the right decision can be the difference in reducing the amount of work and adding to your burden in a big way.
Trying to pull out a huge mass of rapidly expanding, deep-rooted groundcover plants is no fun at all.
Looking for more information on ground covers? Please check out my other posts on ground covers I use in the woodland garden.
• Bunchberry ideal ground cover
• What is the easiest ground cover to grow?
• Creeping thyme as a ground cover
Backyard tips for using ground covers in your landscape
Word of warning, don’t make a mistake here and choose the wrong plant to use as your ground cover.
Many years back, I read a book about the value of using ground covers in your garden design. One of the most important lessons learned from it was to plant several different ground covers and let them compete with one another for supremacy.
It’s a lesson in landscape designs I have followed to this day. The results depend on several factors, including soil type and location.
In most cases, however, there is no clear winner. The ground covers live together in harmony battling for superiority and weaving a tapestry of texture and colour that gives variety to the garden and an informality that seems at home in the woodland or shade garden.
Here are three of my favourite ground covers for our woodland landscape design… there are more, lots more.

This highly informative poster created by Justin Lewis is best viewed on a tablet or desktop.
Ferns are perfect for the woodland garden
Coming in as number one in my garden because they are so darn perfect for a woodland garden is the humble fern. Although the massive, and some would say aggressive ostrich fern (link to proven winners website), dominates most of my gardens in both the front and the back, there are other ferns that make their home here too.
Want more information on creating a fern garden, check out my full post here.
Our ostrich ferns could not be more at home here. They dominate a large “wild” area in a corner of the garden once covered in a work-intensive lawn (link to earlier post about eliminating grass) that I am not sad to see go. Now, the ferns that can grow three-feet tall and spread out three to four feet wide, blanket the ground beneath in a lovely shade and provide perfect habitat for many of our wild critters.
In fact, It’s not uncommon to see a doe park her fawns on the edge of the ferns where they can hide in safety all day. A fox has been known to poke its head out from the thicket of ferns and reptiles, chipmunks and birds are often seen emerging from the fern glen.
In fall, the ferns turn a lovely shade of beige and become the landing zone for many of my leaves from the front garden. All winter, they serve as the ideal location for birds to root around for over wintering insects. I’ve seen wild turkeys working their way through the dead ferns snacking on a host of insects, seeds and berries.

I use ferns as a ground cover but grow several under story plants and small trees up through the ferns.
In keeping with the woodland layering approach, understorey trees (my earlier post on building a woodlandand) shrubs grow up through the ferns. Several Redbuds (single and multi-trunk), a multi-trunk serviceberry, two azaleas and several dogwoods (both Cornus Florida and Kousa) as well as a variegated Curnus Mas are just a few of the understory trees that are at home among the ferns.
Other ferns in the garden include:
The Japanese-painted fern with its silvery fronds hi-lighted by red stalks is simply an outstanding performer in shaded areas where it can really put on a show. It’s not aggressive at all in my garden, but I can split them to add to their numbers if I want to have more and more. And believe me I do. Mine are in the front garden near a bird bath where they are happy in deep shade and are watered regularly when I top up the bird bath. These ferns perform best when they are kept moist.
The Ghost fern. I have only one located in our Japanese-inspired part of the garden, but it can be a show stopper. Larger than the painted fern but apparently a relative. Its soft, very light green colour gives it an almost luminescent appearance in shade, which is where it likely gets its name.
Maidenhair ferns are my absolute favourites. Their delicate fronds and black wirey stalks make these a must-have in any woodland. Although they can be difficult to grow, given the right conditions in a woodland garden, they will thrive. They are perfect in a Japanese-inspired garden. It’s important to note that they need plenty of shade and water. I have mine right up next to some granite boulders where their delicate fronds juxtapose with the heavy texture of the moss-covered rocks. They are also close to a birdbath that reminds me to keep them well-watered.
There are more we’ll get to but that’s a good start.
Any of the native groundcovers listed in the image above, are better than the following non-native groundcovers listed below. If you can use native groundcovers and they work in your area, always choose native over non-native.
In saying that, the following two groundcovers could work in your area as well.
Sweet Woodruff ideal for dry shade garden
The delicate, whorled foliage of Sweet Woodruff together with its early-spring white flowers make this a great ground cover for the woodland garden. It is not native and some would consider it aggressive, but it is not aggressive in my area and in the conditions where I grow it. I have mine under a Crimson Maple competing for space with trilliums, Ostrich ferns and hostas. It spreads nicely but I would not call it aggressive.
Pachysandra is strong performer any landscape design
So this one can be a little aggressive and certainly not a native to Canada and the United States. It’s best not to let it go unchecked by solid barriers.
It’s aggressive nature can be good or bad depending where you are putting it and how you want to use it. It’s pretty common, but it provides a 3- to 4-inch-high ground cover that can take some sun, has delicate white flowers in the spring and can cover ground fast and efficiently. Make sure you have a boundary so it and you know where its limits are. I use it in my front garden where it forms the main ground cover replacing grass that once covered our front lawn. Although many gardeners use it as a sole ground cover under evergreens or other large trees, I like to grow larger woodland plants up through the pachysandra, including hostas, native columbine, ferns, (including Japanese painted and maidenhair), Jack in the pulpits, solomon’s seal, epimedium, grasses and sedges.

Tips and ideas for simple DIY landscaping projects
Simple DIY landscape tips and ideas for for your back or front yard.
Landscaping tips to save time, money and your back
A garden isn’t created in a day, a week or even a month unless, of course, you hire a landscaping company to do it all for you.
Let’s face it, however, that can be an expensive path most of us would prefer not go down. And there is no real reason that most backyard landscaping projects can’t be tackled by homeowners themselves, maybe with some help from friends, family and even a few professionals.
The trick is to have a general plan (even if most of it is in your head) and to tackle the projects one at a time over a number of months and years.

A garden path flows into a dry river bed with bubbling rock.
In our front and back yards, my wife and I have completed most of the projects on our own. Those 8-hour days of heavy lifting and lugging six cubic yards of stone and mulch in wheelbarrows are thankfully behind us now, and we are generally left with maintenance and some minor landscaping projects.
The following are a few tips to help you tackle simple landscape projects on your own or with help from family, friends and even a few professionals to handle dangerous jobs or ones that would benefit from the use of heavy machinery.
• For more landscaping tips, check out my post on investing in landscaping or my earlier post on Ten Money Saving Landscaping Tips.

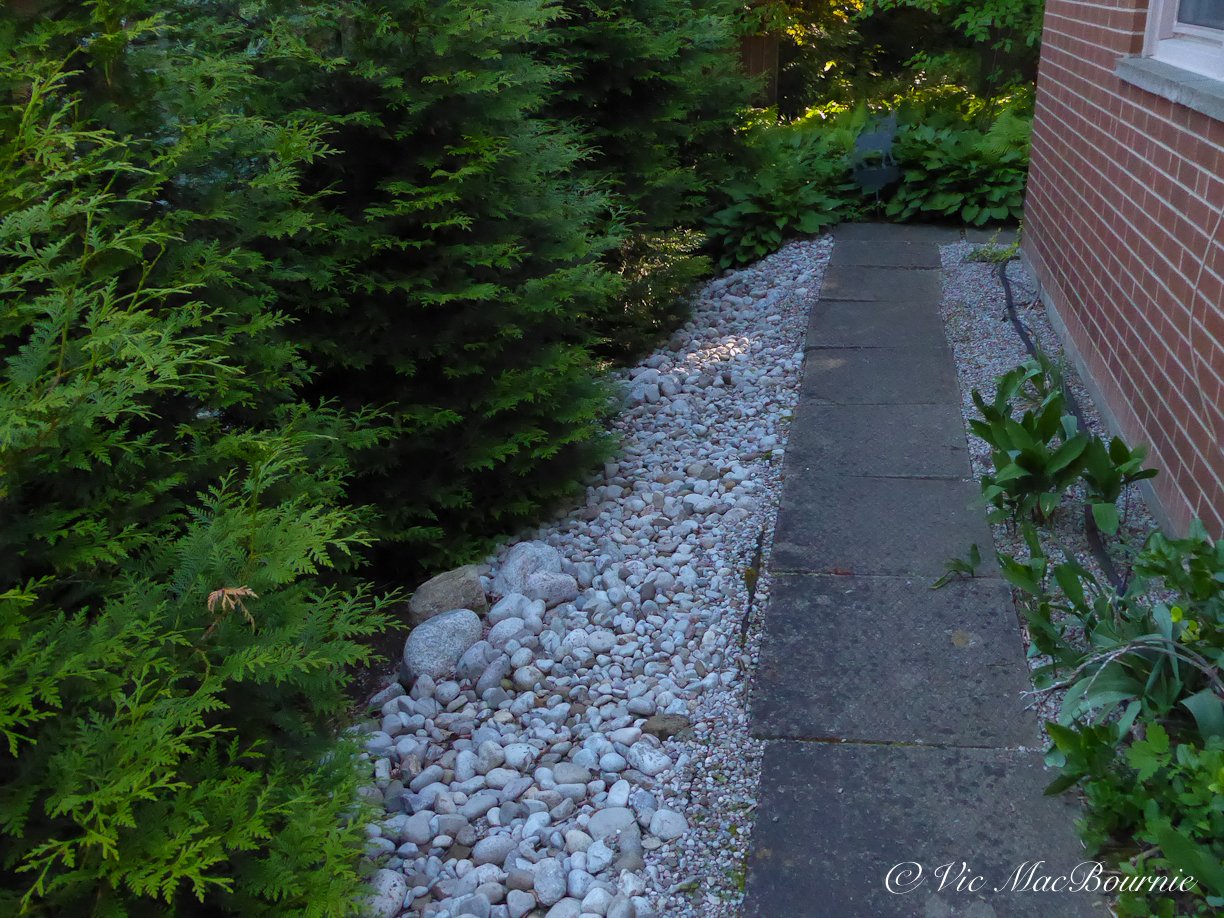
The garden pathway of pea gravel and stepping stones has withstood the test of time.
Building a pathway in the backyard
One of the first projects we tackled when we moved into our home more than 25 years ago was to build a simple pathway in the backyard that stretched almost entirely across the back of our home. Oddly enough, there was nothing connecting one back door to the other except grass – that same turf that covered almost the entirety of the 1/2 acre lot. (About 80 per cent of the grass has been removed. Check out my earlier post on the value of removing most of your grass.
See below, for more on how to remove grass the easy way.
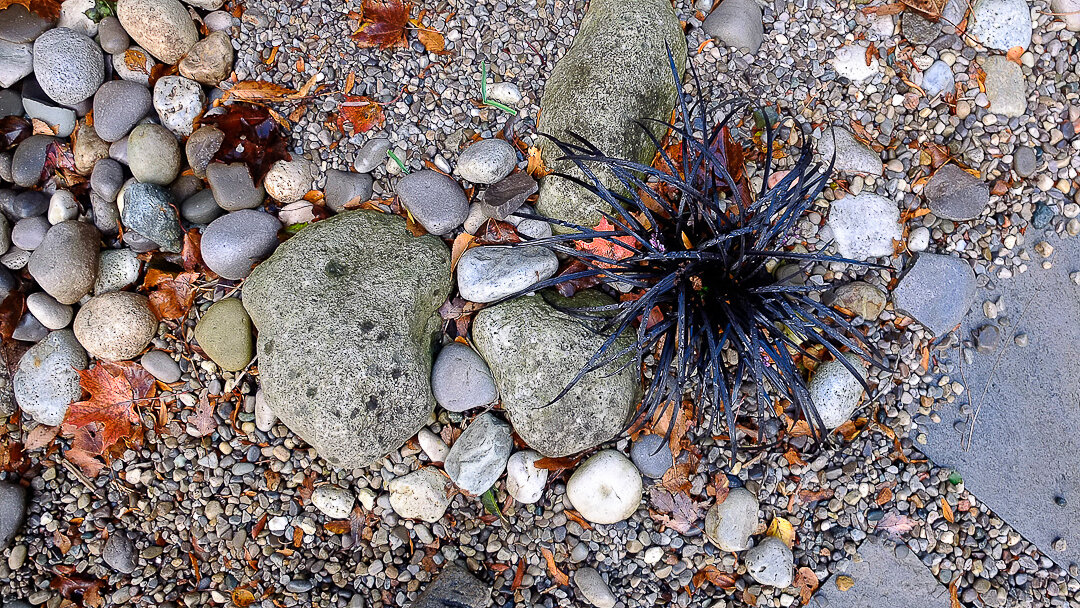
Creating vignettes like this island of mondo grass in the dry river bed pathway adds interest to what could become a boring pathway of pea gravel and flagstone.
The pathway plan
The plan involved enlarging a too-small and -narrow garden that stretched across the back of the house between the two doorways leading to a back patio. By enlarging the garden by creating a larger half-circle garden it would not only give us more gardening space, but be one side of the arched pathway that would lead between the two doorways.
The original pathway needed to be wide enough to use with wheelbarrows and allow easy movement into the patio area of the backyard. By using a combination of pea gravel to form the base and square-cut flagstone to create stepping stones through the pea gravel, we were able to create an organic pathway that looked good, was permanent enough, but still left room to be easily changed over time.
There are a number of reasons I like this approach not the least of which is the satisfying crunch beneath your feet as you walk along the pathway (if you are on the pea gravel), and the almost instantaneous drainage that the pathway provides.
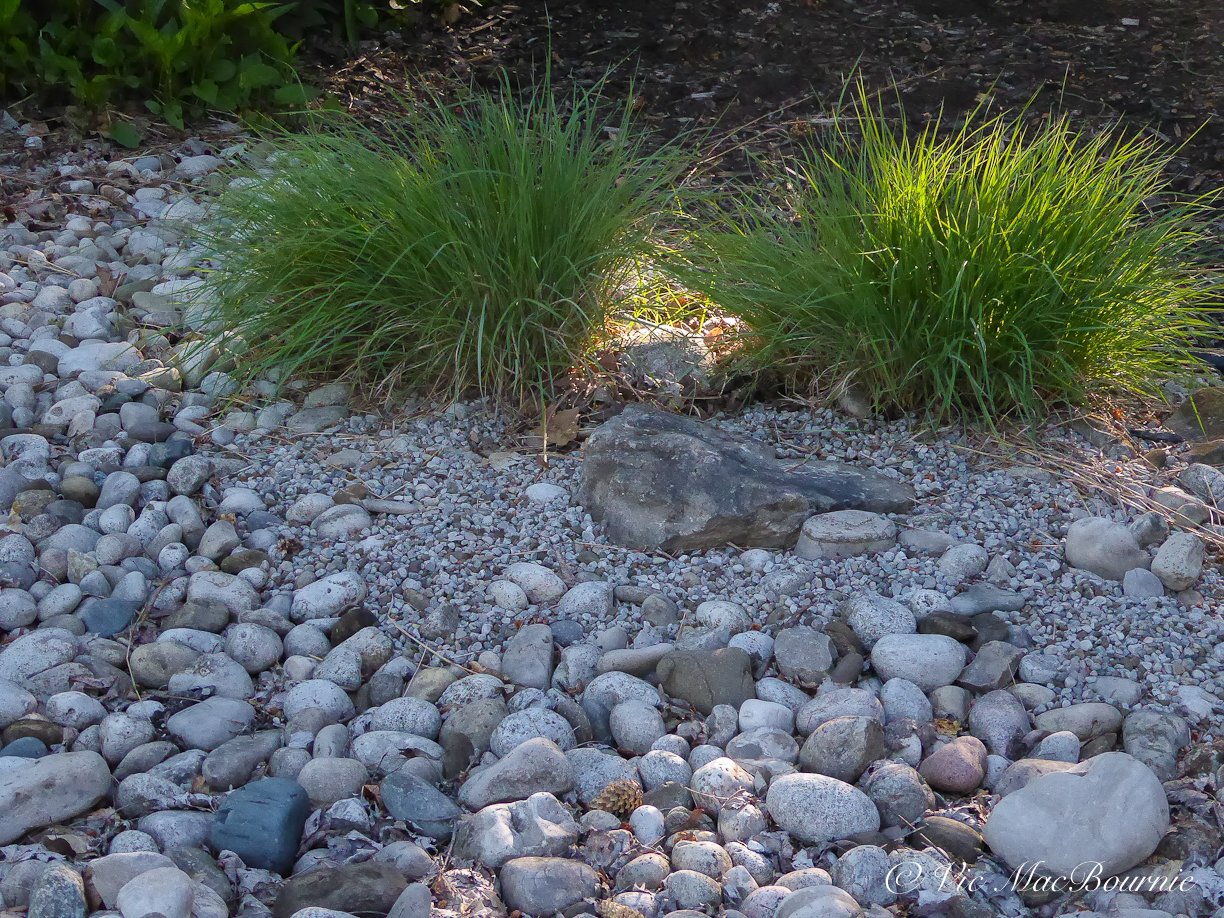
A deep culvert was filled in with river rock to create a dry river bed using pea gravel and different-sized river rock. Notice the grasses used to break up the river rock and give it a more naturalistic look.
The same design style was adopted in several spots throughout the property including in the front where a dry river bed was created to deal with a deep culvert that kept eating cars trying to turn around in the cul-de-sack.(see picture above) We also carried the same theme around the back patio where large boulders were placed surrounded by river rock and pea gravel, as well as the front Japanese-inspired garden. (see below.)
I also used the combination to tie in an existing pathway between the front Japanese-inspired garden with the pathway in the back. (See series of images below.) River rock outcrops and pea gravel fill a space between our property and our neighbours after we planted a strip of cedars to replace a tired hedge. For more on this project, check out this earlier post.
Getting to work building the pathway
In this instance, the grass was removed and two layers of black landscape mulch was put down to keep weeds grass or anything else from growing up through it. Normally, I would just put the black landscape fabric over the grass rather than remove it, but I needed the depth that removing the grass provided to get the proper depth of pea gravel. It’s important to lay the pea gravel to a depth of three to four inches, more would be even better. This completely stops any light from getting to the soil and further reduces the chance of anything growing up through the pathway.

The pathway of pea gravel and square cut flagstone is shown with its edges softened by wild geranium, hostas and snow-in-summer being allowed to freely grow over the pathway. the plants eventually need to be trimmed back but I like the look of a more natural pathway.
Two professional plastic edge strips (not the cheap flimsy stuff you can get at many “big box style” stores) were placed in a semi-circular fashion to hold back the soil of the garden and create a barrier for the pea gravel in the pathway.
Once the pea gravel was dumped and smoothed out, it was a simple matter to place the bluestone stepping stones in a way that was comfortable to walk on. It’s important to note that the flagstone stepping stones, though heavy enough to take typical foot traffic, do move about at times and need to be straightened from time to time.
Pathway building tips
Keep it simple. No need to complicate a simple pathway.
Pea gravel is an excellent choice because it can be easily topped up
Pea gravel and blue flagstone work nicely together creating a bluish-grey walkway through a garden. The combination is perfect for a hot, dry area or for a southwest or xeriscaping yard.
Use double layers of a high quality landscape fabric to ensure long-term success.
Use at least three inches of pea gravel (more is even better). Top up when needed.
Allow plants to grow over the edges to help soften the path. I have used hostas, Japanese painted ferns, black mondo grass and low-growing sedums to name just a few.
The result was a 4-5 foot-wide pathway that picked up from a path from the front of the home and guided visitors across the back of the home to the main patio while it passed through a rather formal garden on the left side and an enlarged, half circle style garden on the right.
Today, about 25 years later, the pathway continues to function much as it was originally intended to do.
Changes over time to the pathway
There have been minor modification to the original idea over the course of its life. One of the benefits of creating a non-permanent project is that it can evolve over time. In this case, the pathway was incorporated to form part of a dry river bed that actually crosses through the pathway.

The birch grove during it’s early stages with the dry river and bubbling rock.
The dry-river bed concept came about after I decided I wanted to create a birch grove that surrounded a pondless waterfall. (link to the making of our birch grove.) I loved the idea, but didn’t like the idea of a waterfall rising out of a flat area. A pondless waterfalls works best if it looks natural and, in this case, it would have looked like a man-made hill with a waterfalls rising out of nowhere.
I do have a hill, however, in the back of my property that just begs for a pondless waterfalls.
Instead of the pondless waterfalls, I went with a small bubbling rock that spilled out into a dry river bed surrounded by three clump birches (the equivalent of about 11 birch trees). The dry river bed runs down to the original pathway, across it and into the original garden which was covered in large river rock and pea gravel interspersed with small, compact hosta, an island of black mondo grass and a few Japanese Painted ferns.
The combined dry river bed, pathway and bubbling rock work together to create a large area across the back of the home.
Plants are allowed to spill over the edge of the pea gravel to create a more organic and free-flowing area without any hard edges. The black plastic edging on the one side has been removed and the other side has long disappeared under the plants that have been allowed to grow over it.
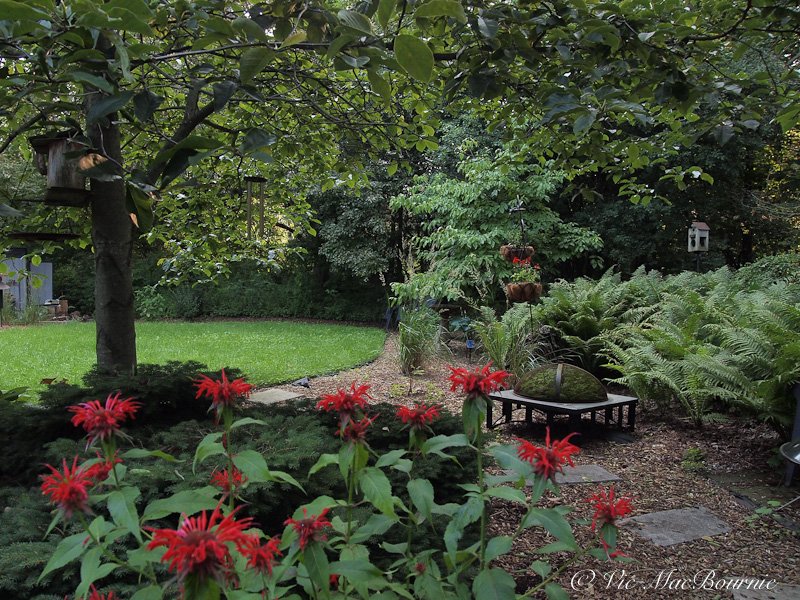
This simple pathway of square cut flagstone wanders through the woodland past a colourful display of bee balm and the fern garden on the right.
Another simple pathway idea
In another, less formal area of the garden, (see above) we used the same square cut flag stones as a stepping stones simply dropped into a thick bed of mulch. Again we used a visually pleasing curved path that leads from the side of the home, past our woodland fern garden to a grassy area in the middle of the woodland garden. The path begins at a deck box at the side of the home and leads past a firepit and a DIY moss garden nestled into an old copper firepit.
This simple pathway is as much aesthetic as it is useful helping to break up a large expanse of cedar mulch.
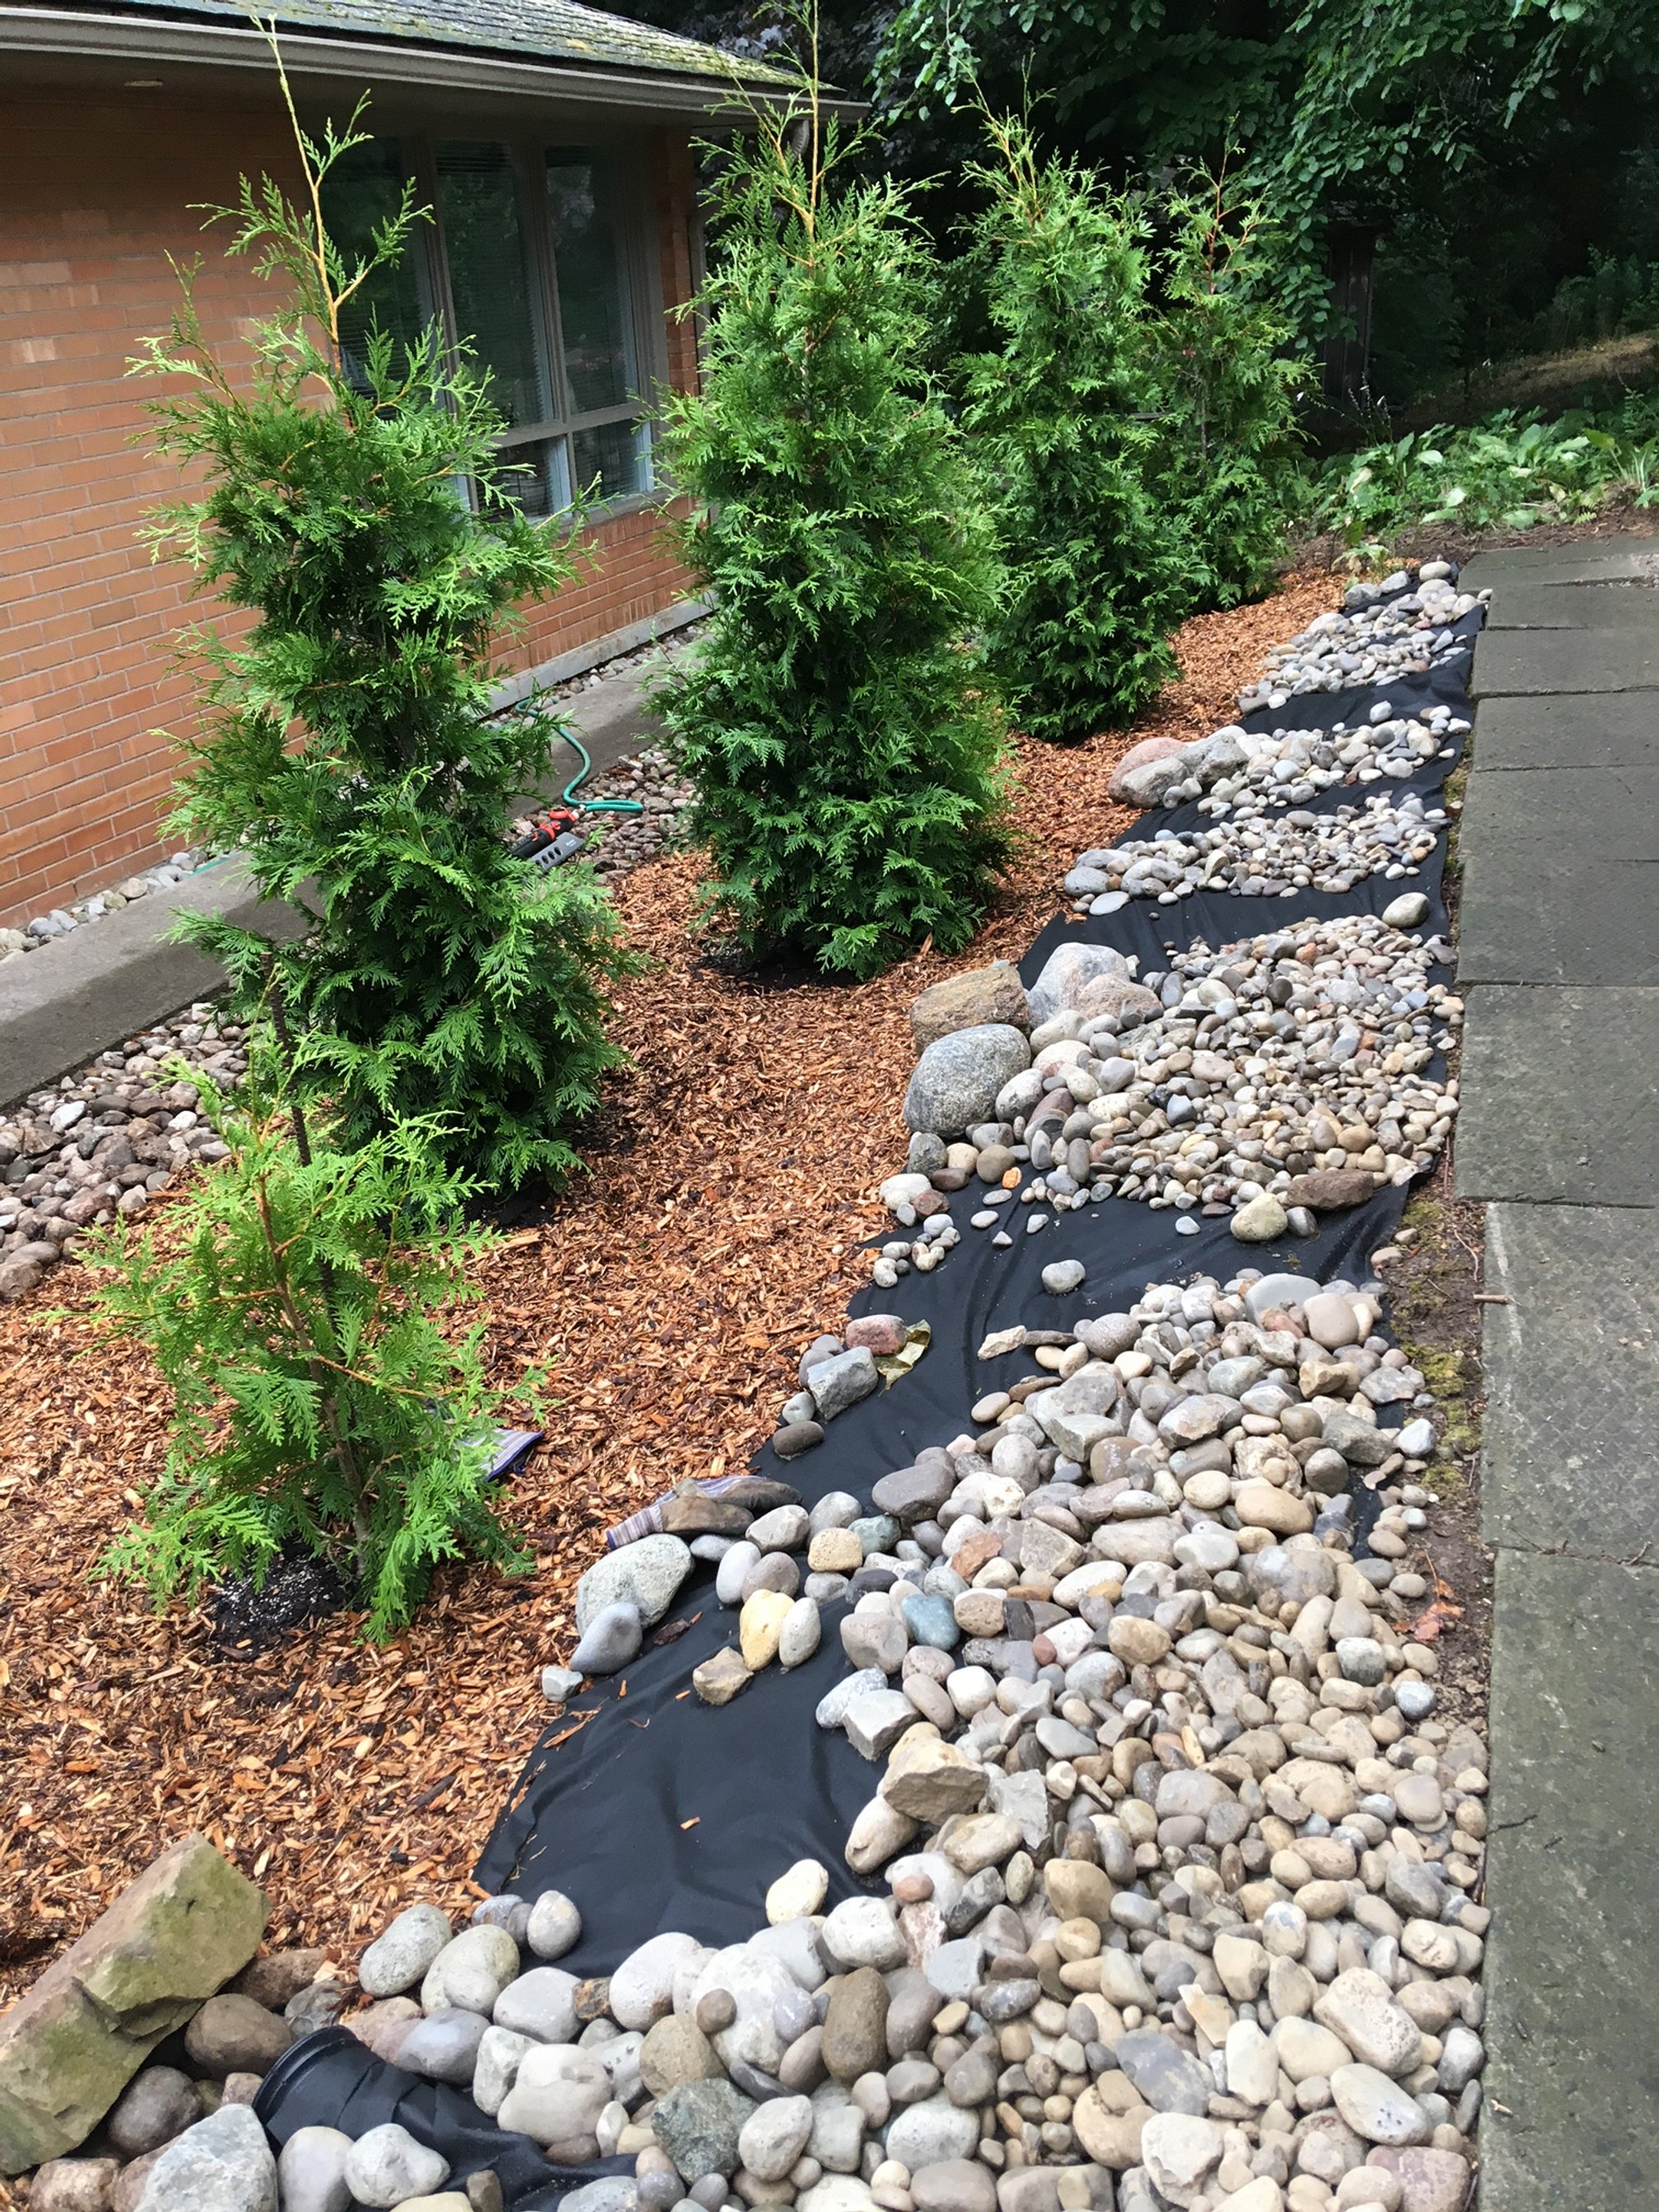
This series of images shows the making of a dry river bed around our Green Giant Cedars. Pictured here is the beginnings of the landscape project fallowed by images as the cedars being to fill out.
The cedars have filled in and are beginning to look natural. Notice the larger rock outcrops that help give it a more natural natural look.

A detailed image showing the variety of river rock that help to give a more natural look.
Massive boulders inspire Japanese-style plan
With the back landscaping under control, it was time to deal with a landscape issue in the front yard. The problem was that our home’s garage was converted into a family room years ago by previous owners, but the blacktop driveway ran right up to the front that is now the family room.
It never looked right to me but it took me several years to come up with an acceptable landscape plan.
It started when a neighbour offered me 11 massive boulders left over from a professional backyard landscaping project.
Those boulders became the inspiration for a Japanese-inspired front garden that created a natural barrier to the driveway flowing directly into our family room.
For more on this project, check out my earlier post here.
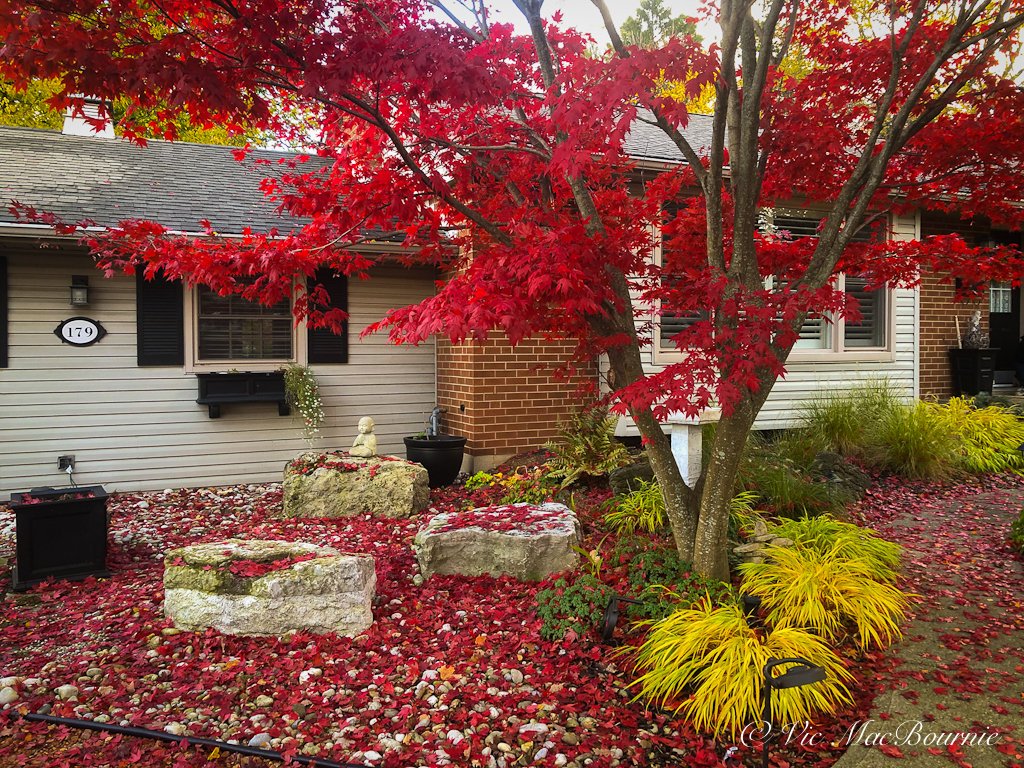
A portion of the Japanese-inspired garden in fall showing the large boulders, Japanese maple and Japanese forest grass

The Japanese-inspired garden showing a pathway through the large boulders flanked by Japanese maples.
Japanese garden landscape tips
Keep it extremely simple in the Japanese tradition
Use at least one large rock or boulder (I used four in the garden)
Incorporate natural moss if possible
Try to incorporate some form of water (I used a square bird bath)
Use stepping stones to go through the garden

The Japanese-inspired garden plan
The plan was to use eight boulders down the side of the driveway to hold back the front garden, and then carry that theme across the front of the home by using three more boulders (always work in odd numbers) to ground the Japanese-inspired garden.
The boulders were carefully placed across the front of the driveway in a ratio of two to one. The concept was to create a canyon-like feel with two boulders on one side and another by itself on the other. A pathway – once again made of blue flagstone stepping stones set in analgesic??? screenings – ran through the middle of the canyon created by the placement of boulders.
Pea gravel and river rock created a dry-river feel but with a more formal look. Moss grows between the flagstones under a massive Japanese Maple on one side and a smaller, weeping Japanese maple helping to balance the single boulder on the other side.

To finish off the landscape plan, all the blacktop was removed from the front 3/4 of the driveway and replaced with red crushed gravel. The gravel was used for several reasons: First, its porous nature allowed rain water to more easily penetrate into the soil and feed the large maples whose roots ran under the driveway. Second; the red gravel offered a nice break from the predictable black top driveways and finally, it was a cheaper alternative that works in our semi-urban neighbourhood.

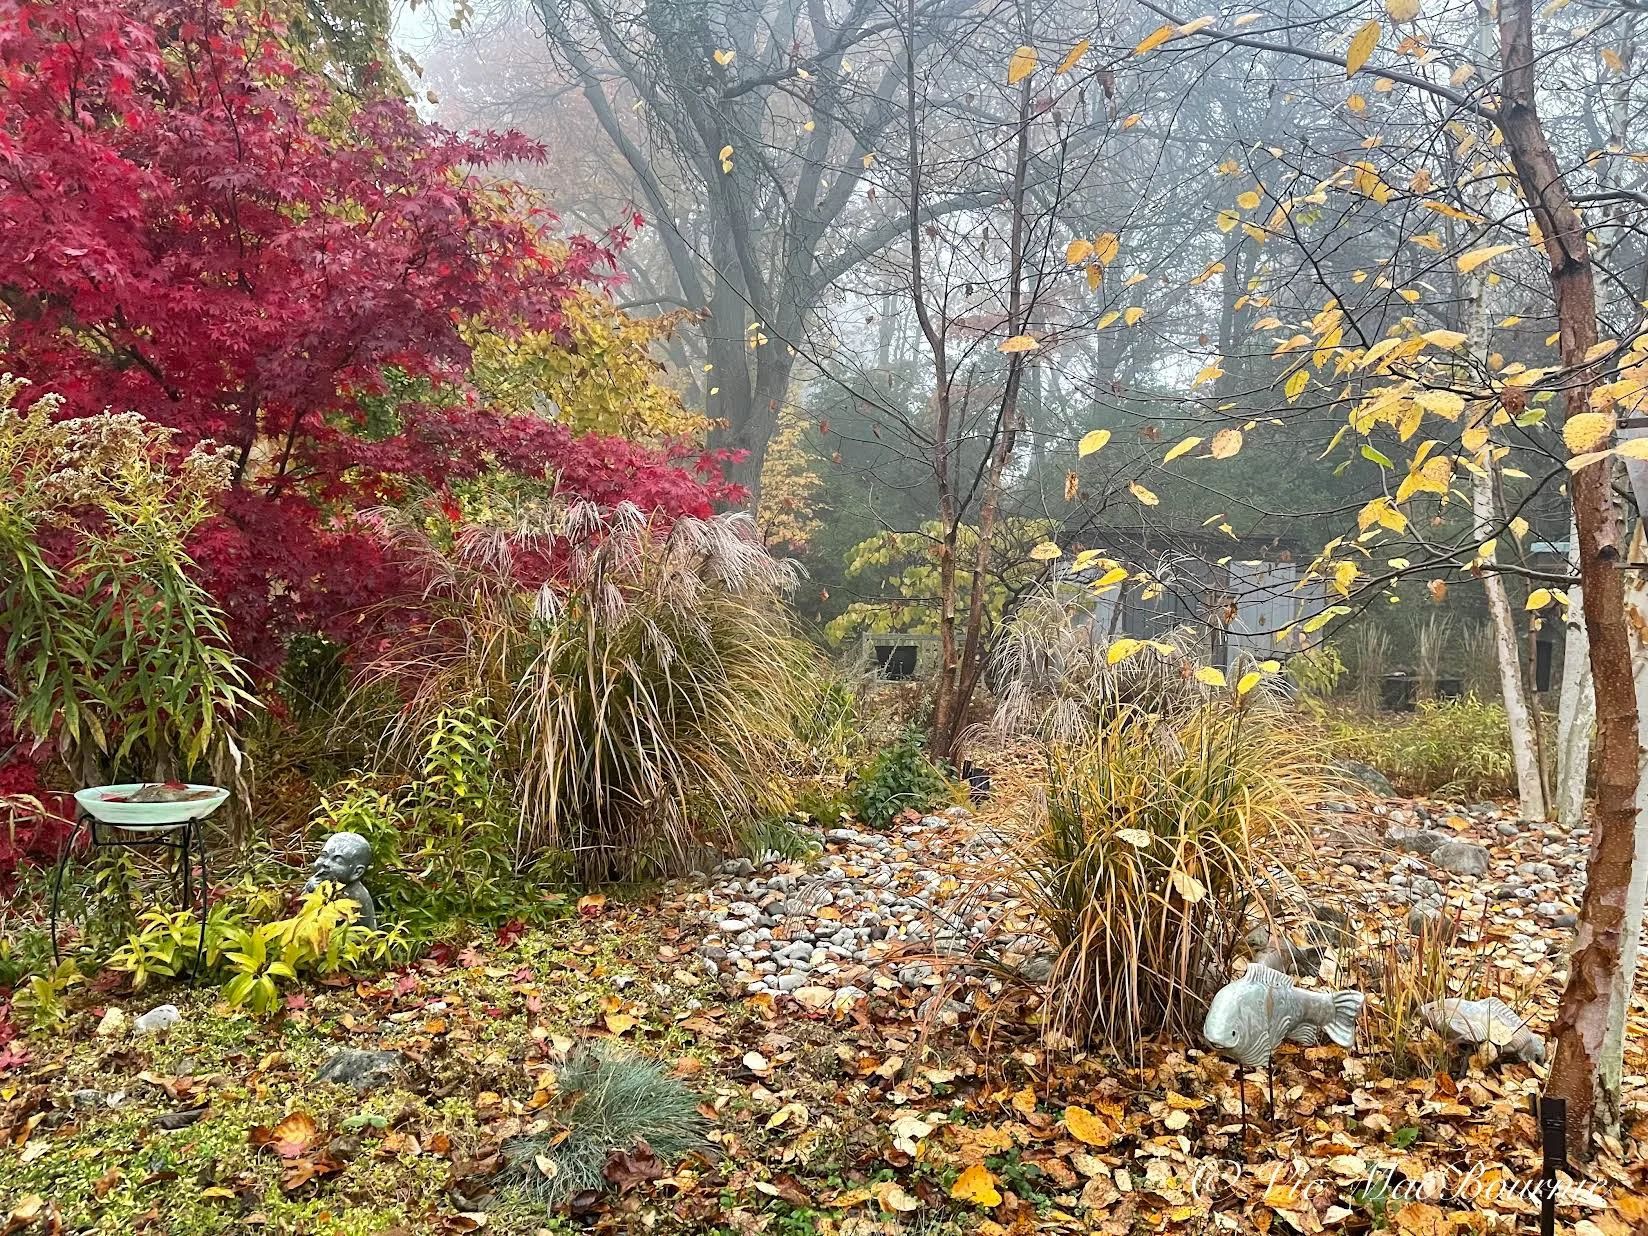
These ceramic Fish in the Garden add a splash of colour and help to create movement in the Japanese-inspired garden
Be sure to check out my earlier post, for more on our Japanese-inspired front garden.
Removing turf the easy way
If there is one thing I dislike in a landscape, it’s grass. You can read all about my dislike of turfgrass here.
Even worse than having too much grass, however, is having to remove it before beginning a new landscape project.
The majority of projects at our home have not called for the removal of grass. Instead we have been lucky enough to be able to just kill it by either using newspapers and cardboard to smother it, or landscape fabric and mulch.
Quick tips to remove grass
use several layers of newspapers (preferably only B&W parts)
Cardboard is a good choice because it does not break down as readily as newspaper
Use a thick coating of mulch (shredded bark) to cover the newspaper or carboard. A think layer will just blow off exposing the newspaper and causing it to break down too quickly resulting in weeds etc.
After laying down a three- to four-inch layer of mulch, water it down regularly to weigh it down and ensure it does not blow away exposing the newspaper or cardboard.
If you need to remove large areas of grass, you can rent gas-powered machines to remove it, or manually operated sod removers, but if it’s possible simply cover the grass with newspaper and or cardboard and then heavily mulch it with shredded cedar mulch. This “sheet mulching” method simply starves the turf grass of light and kills it over the course of time (usually one full year.)
Once the grass is killed, you can begin your project, whether that is planting into the area or more major landscaping projects. By planning a year ahead, you can save yourself a lot of work, time and money.
Many gardeners frown on black landscape fabric as a means to kill grass. I’m not one of those people. Don’t use black plastic to kill turf, but I regularly use the breathable fabric covered by at least three inches of mulch. Once the grass is destroyed, you can pull up the fabric and begin planting. Or leave it down and cut large holes through it to begin planting.
Ideally, over time, all the fabric is removed, the soil can breath and wildlife has complete access to the entire garden.
Obviously using newspaper and or cardboard is a preferable approach but if you have huge areas to cover, you may not have enough to cover.
It’s a wrap: Landscape tips and ideas
Creating your perfect landscape should be fun and rewarding, not a pain and extremely expensive.
It’s important to realize that the landscape will likely never be fully completed and that it should be looked at as a marathon not a sprint. Tackle the most difficult and taxing projects while you are still young enough to handle the heavy lifting, but don’t be afraid to hire a professional if you think that the job is too much for you.
We hired a bobcat driver for one day to move the boulders into place along our driveway and place them in our Japanese-inspired garden. Before he arrived, however, I knew exactly where I wanted each and every boulder and guided him to the areas where the boulders were placed. With a few exceptions, the boulders fit perfectly into place and the job was done in just a few hours.
In a previous home, however, I moved similar sized boulders on my own using a series of levers. Needless to say, it was not only a lot of work but took forever to move the boulders just a few feet.
For another landscape project, I paid my nephew to build a small front patio out of flagstone and help me install front steps that looked like large natural stones.
In our most recent landscape project, we hired a student for several weeks to tackle some big projects that required little more than a big strong lad, a shovel and the willingness to get his hands dirty. The result was not only the completion of several smaller landscape projects, but feeling good about helping a young man during a summer of Covid when there were few jobs for University students. (See the full story here.)
Whether you do all the work yourself, use family friends, student help or a professional, you can save yourself time and money by developing a plan on paper or in your head depending on how you like to work, tackling one major project a summer and realizing that the goal is not to be done, but to create a landscape that pleases you, your family and the wildlife that will be by your side on this journey.
After all, it’s their home too.
Can woodland gardens be part of the solution to growing climate threats?
Are woodland gardens a solution to the world’s climate problems? If they are not the solution, they certainly can play an important role.
Until you dig a hole, you plant a tree, you water it and make it survive, you haven’t done a thing.
– Wangari Maathai
How trees cool our environment
This summer’s unbearable heat waves in most parts of the world are a stark reminder of the damage being done to our environment.
Temperatures are being smashed daily, weekly, even monthly. Parts of Spain were experiencing a heat wave that reached 45 C or 113 F in regions that were not used to dealing with this type of heat, threatening the lives of many, especially the elderly. Closer to home, Texas and other parts of the southwest are experienced unprecedented bouts of prolonged heat. Then there is flooding, forest fires and droughts.

Planting a woodland with multiple trees creating a layered effect, is not only pleasing aesthetically, but can make a huge difference in cooling the woodland micro climate.
Our world is telling us enough is enough. We need to start listening and taking action.
Are trees our only hope?
Here at home, if sitting under the shade of a tree is the only way we can be comfortable outside during these summer heat waves, it’s also a reminder of how important the thermal cooling properties of trees can be in our garden micro climates.
I am reminded of the saying, “Saving one dog will not change the world, but surely for that one dog, the world will change forever.”
It’s such a great saying that can also be applied to our gardens.
Planting one large shade tree in our garden will not change the world, but it certainly changes our world.
If everyone planted one large shade tree in their yard, think of how that might change the world.

Trees growing along the garden path, their canopies weaving together forming light shade and areas of deep shade beneath them.
However, one tree is not really enough. Think of what would happen if everyone planted ten trees on their properties and created a world of woodland gardens.
Now that would change the world for them, their families, their neighbourhoods, their cities… the world.
If you are thinking you could never plant ten trees in your small yard, think again. In a woodland, trees are planted in layers beginning with the tallest trees in the upper canopy, followed by smaller understory trees. You would be surprised how many trees can be fitted onto a typical suburban lot.

Creating a natural grove of trees in an area is the perfect way to add a mini-woodland forest of interdependent trees.
On our smallish pie-shaped front lot, we have a total of nine trees. This includes two large, mature shade trees (maples), three columnar birch trees planted in a small cluster, three Japanese maples and a native serviceberry tree. In the backyard, there are at least 20 trees that we either inherited with the property or planted ourselves. There are probably another 20-30 trees that have grown naturally across the back and on the edges of the property. These trees dominate our half-acre property and help to create the woodland environment.
Planting one large shade tree in our garden will not change the world, but it certainly changes our world.
This woodland approach is actually the thinking behind many environmental movements today, that I have wrote about on this garden website.
The woodland garden shows the layering of trees from the tallest shade trees to the mid-level canopy trees and smaller shrubs down to the ferns that create a green mulch ground cover.
Irish landscaper and environmentalist, Mary Reynolds, and her books We Are the Ark and The Garden Awakening promote the creation of “natural arks” around the world to act as corridors for wildlife, while at the same time returning our backyards to natural areas. Gardeners can even hire Ms Reynolds to provide them with a landscape plan all their own. Click here for more information on hiring her for a personal landscaping plan.
There are movements to create Pocket Forests often referred to as Miyawaki method forests (link to my story) in urban areas to restore tiny natural woodlands in a fraction of the time it would normally take Mother Nature.
And there is the work of Professor Nadina Galle and her work with the Internet of Nature (link to my story about her work).Bborn in the Netherlands and raised in Canada Dr. Galle uses her background as an ecological engineer to tap into technology to create and protect the urban forest canopy on a much larger, city-wide scale.
But, you may ask, how can I as a gardener make a difference? Does planting trees really make a significant difference, and exactly how do trees help cool the earth?

In winter, the woodland garden takes on a different appearance and lets the warmth of the suns rays through to the forest floor.
How trees make a difference in our world
This latest prolonged heat wave should also be a wake-up call to the world about the importance of our natural forests and woodlands and the need to restore our tree canopy, not just in rural areas but – even more importantly – in our urban and suburban areas.
Cooling the environment around us is not the only benefit a tree creates. There are health benefits far beyond what we can imagine. Consider the popularity of Forest bathing as just one of the movements that is focusing on the health benefits of the woodlands.
Some quick by-the-number facts in case you need more convincing:
A single tree cools temperatures by providing shade and releasing water through photosynthesis which cools temperatures from between 2-4 degrees Fahrenheight.
An Arizona State University study found that an area of a block or two made up of parking lots and buildings with no tree cover or vegetation to speak of, can be cooled by about 8 degrees Fahrenheight or 4.4 degrees Celsius naturally with a tree canopy cover of at least a 1/4 of the space.
Trees, if planted around a home properly, can save 30 per cent on air conditioning bills.
A Nature Conservancy Nature report showed that planting trees can be a cost effective way to improve public health in two important ways: First, they reduce particulate matter in the air. This potentially dangerous particulate matter, that exacerbates asthma and other respiratory diseases, settles on the leaves of the tree where it remains until it is washed to the ground during a rainstorm. Second, trees cool temperatures by providing shade and releasing water through photosynthesis which cool temperatures between 2-4 degrees F . A single tree, however, can only cool an area of about a 100-foot radius around the tree.
Consider that the largest tree on the planet, nicknamed General Sherman, is 84 metres tall and has sequestered 1400 tons of atmospheric carbon during its estimated 2500 years on earth. To put that into perspective, today, it is estimated that humanity produces 1400 tons of carbon every minute.

There is always room for wildife in the woodland garden. This racoon was at home high up in a fallen tree.
In fact, in his book The Heartbeat of Trees, Peter Wohlleben gives an example of how a study conducted by Chicago University researchers found that a single tree planted on the lawn of an urban property can increase the benefits to the homeowner by the equivalent of an annual pay increase of $10,000.
The study, conducted with thousands of Toronto, Canada, residents, also showed that two trees planted in the front could provide the health and well-being benefits equal to an annual income increase of $20,000.
This study alone should convince homeowners of the importance of planting and maintaining trees in their front and back yards.
And, although a single tree can be effective in a limited way, several trees working together can make a profound difference in the environment where they are growing.
In his book, The Heartbeat of Trees, Wohleben writes: “A tree is not a forest. On its own, a tree cannot establish a consistent local climate. It is at the mercy of wind and weather. But together, many trees create an ecosystem that moderates extremes of heat and cold, stores a great deal of water, and generates a great deal of humidity. And, in this protected environment, trees can live to be very old. To get to this point, the community must remain intact no matter what. If every tree was looking out for only itself, then quite of few of them would never reach old age.”
Wohleben is not alone in promoting the benefits of multiple trees working together, like you would find in a proper woodland garden. Unlike a traditional garden, where there might be a single tree surrounded by a few shrubs and some flowers, the woodland garden taps into the power of multiple trees, along with the layering of shrubs, native plants and groundcovers to create a vibrant, living community that is able to create its own micro environment.
Fall is an outstanding time to enjoy the rich colours of the woodland garden.
The science behind how trees cool the environment
Now that we understand the importance of temperature control, let’s delve into how trees play a crucial role in cooling the environment.
Trees act as nature’s air conditioners by providing shade and reducing the overall temperature of their surroundings.
When sunlight hits the leaves of a tree, a process called transpiration occurs, where water is released from the leaves into the atmosphere. This evaporation process helps to cool the air around the tree.
Additionally, the shade provided by trees can significantly lower surface temperatures, making the surrounding area more comfortable.
By strategically planting trees in urban areas, we can create cooler micro climates, reducing the need for excessive air conditioning and mitigating the heat island effect.
So, next time you seek refuge under a tree on a hot summer day, remember that it’s not just the shade you’re enjoying, but also the natural cooling power of these incredible living organisms.
Now that we’ve explored how trees cool the environment, let’s dive into the fascinating science behind their cooling mechanisms.
It all starts with a process called transpiration, where water is released from the leaves into the atmosphere.
As sunlight hits the leaves, the stomata, tiny openings on the leaf surface, open up to allow water vapor to escape. This evaporation process not only cools the tree itself but also the surrounding air.
In fact, a single large tree can release hundreds of gallons of water into the atmosphere each day through transpiration. This moisture-rich air then helps to lower the temperature and increase humidity in its vicinity.
Additionally, trees also provide shade, which reduces the amount of direct sunlight reaching the ground and lowers surface temperatures.
The combination of transpiration and shading creates a natural cooling effect that can significantly improve the comfort of an area. Understanding the science behind tree cooling mechanisms allows us to appreciate the incredible role that trees play in regulating temperatures and creating more pleasant environments.
Real-life examples of trees’ cooling effects
It’s not hard to see the cooling effects of trees in real life.
In urban areas, where concrete and asphalt dominate, the heat island effect can cause temperatures to soar.
However, strategically planting trees in these areas can help combat this issue.
For instance, cities like Singapore have implemented extensive tree-planting programs to create green spaces and reduce urban heat. The result is a noticeable decrease in temperature, making these areas more comfortable for residents and visitors alike.
Another example is Central Park in New York City, which acts as a natural air conditioner for the surrounding area. The vast expanse of trees provides shade, lowers surface temperatures, and creates a refreshing microclimate within the park. This not only benefits the park-goers but also has a positive impact on the nearby buildings and streets.
A layered effect in the woodland garden allows the gardeners to plant more trees in a given area.
These real-life examples are just a sampling of how trees’ powerful cooling effects can change our environment and work as nature’s air conditioners.
And yet, all over the world, governments choose to develop green space for financial profits. Where I live, for example, the Provinicial government, like many conservative governments around the world, has chosen to close its eyes to the benefits of greenspace and offer it to developers for the construction of expensive houses. These governments, despite the obvious warnings from experts, choose to not only ignore these threats, but deny that climate change even exists.
In doing so, they risk the lives and future of today’s citizens as well as the lives of future generations who will be forced to live in a world where catastrophic events are part of everyday life.
Besides doing our part to ensure these anti-environmentalists do not obtain or remain in political power, gardeners can take steps to ensure that the area around their home is doing its small part to protect the environment. Join Ms Reynolds’ ark movement, grow native plants and trees, protect wildlife and provide them with life’s necessities – water, food and shelter.
Alone we cannot change the world, but together, if we all plant a mini forest on our properties, we can make a real difference in our world, and the world around us.
Let’s start today by planting a single tree. Next year we can plant another, and another, and another.

Why you want moss in the woodland or shade garden
There should always be some mossy areas in the woodland garden, whether it’s growing on the ground or used in containers or even in a dedicated moss garden.
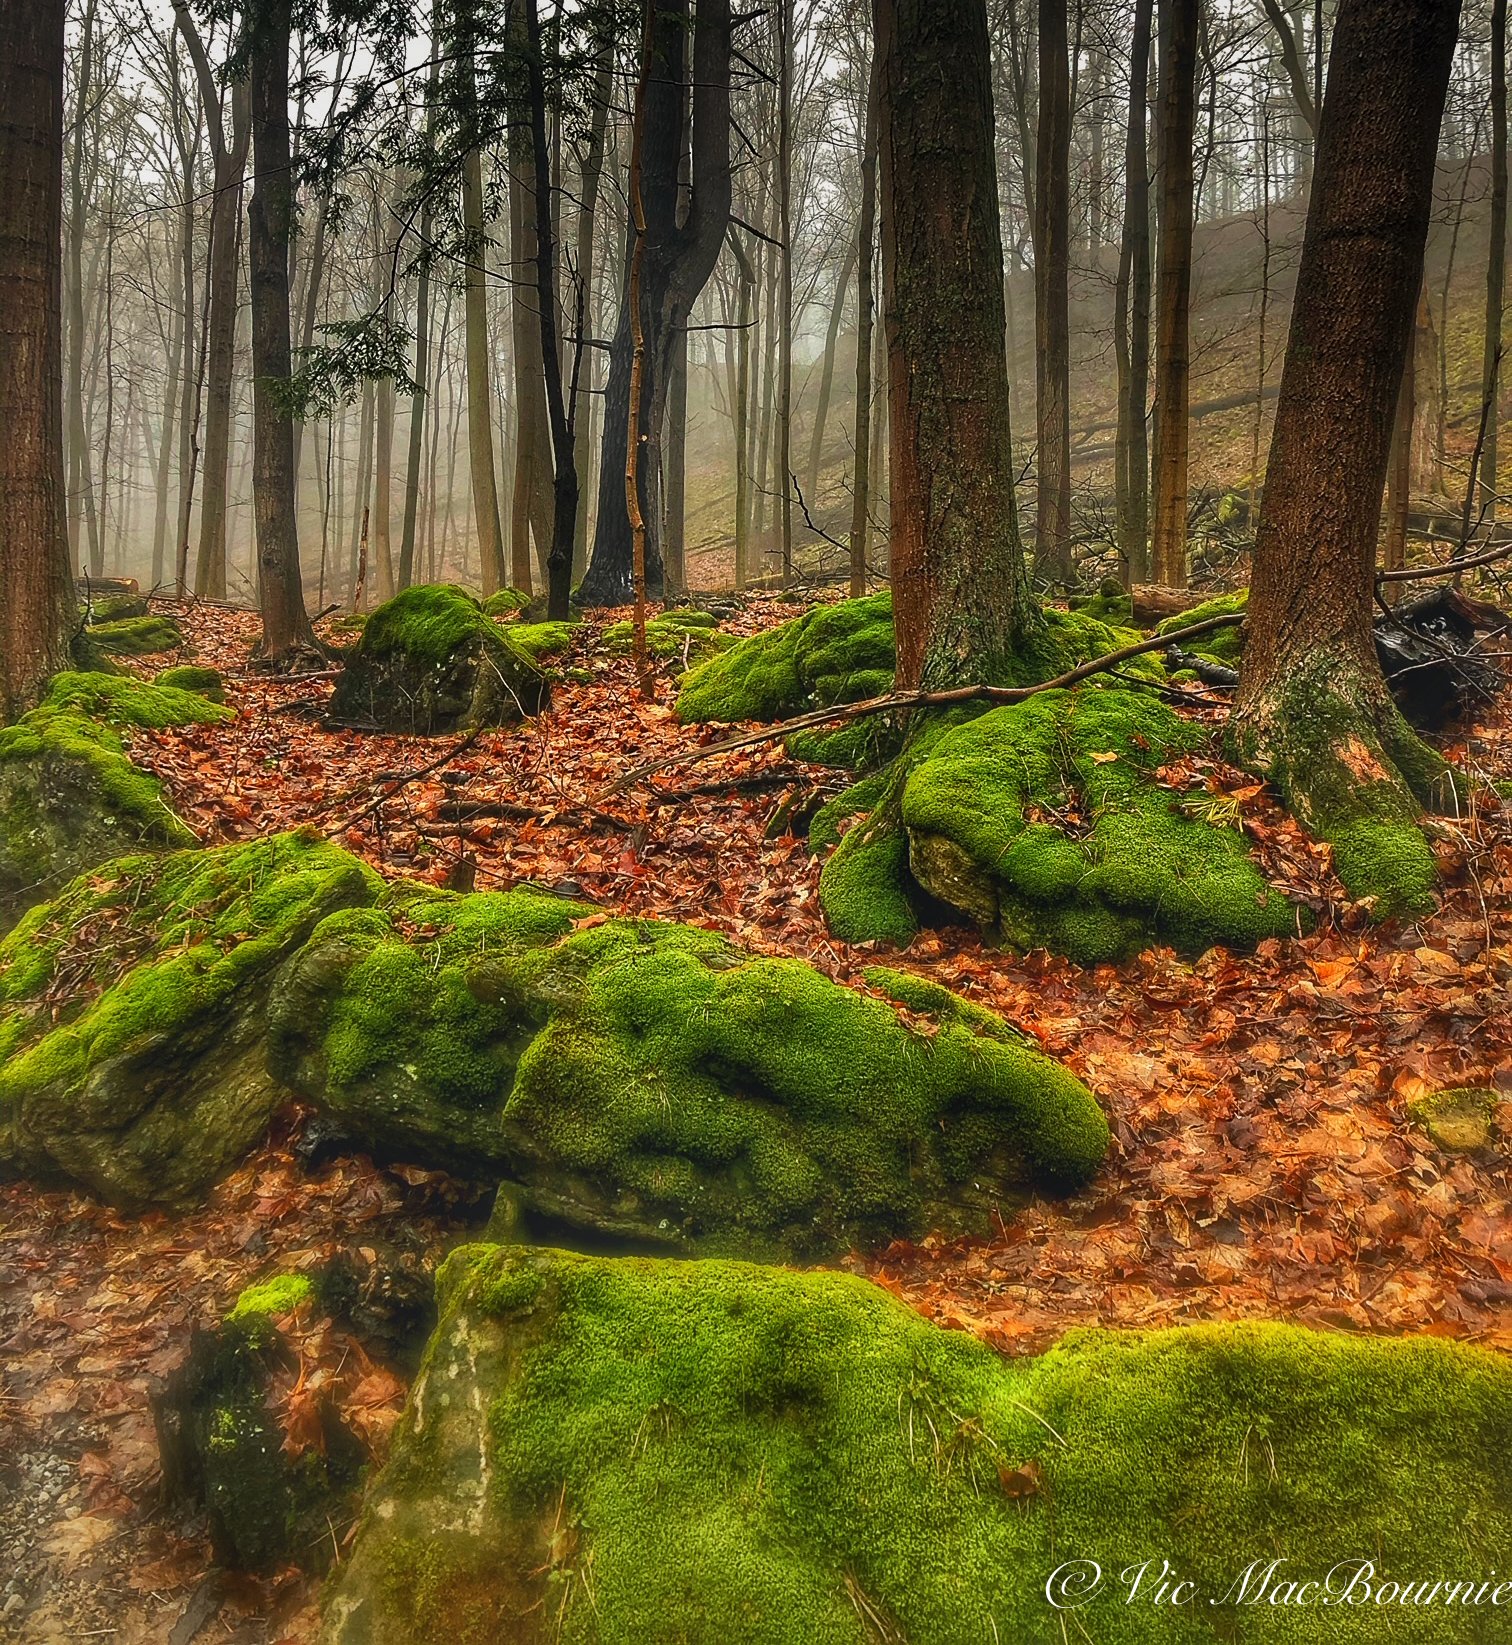
One of my favourite places not far from my home is this beautiful woodland where moss covers limestone boulders, fallen logs and tree trunks. These natural settings are ideal to use as inspiration in your own garden.
Use nature to inspire a mossy area in the garden
There are few features in a garden better than a soft cushion of beautiful moss.
Its pillowy look and tapestry of shades of green adds to its textural qualities and lends a quiet, almost soothing feel to a woodland/shade garden.
Finding an area in the garden where you can grow moss is an opportunity to create a quiet little woodland retreat that is likely to become one of your favourite spots in the garden.
The above image of moss-covered boulders is an area near my current neighbourhood that I discovered years ago, long before we even moved to our current home. We actually lived miles away in a different city when I discovered this mini-forest. I’ll never forget being there when a deer walked by me and through the forest. And, on another day, when I came across a deer asleep in a mossy area of the forest.
You can see why It has become a place of inspiration for me and the garden I am trying to create just a mile or two away.
It’s not a particularly large area, but it feels big because of the glorious moss that covers the boulders, the fallen trees and the soil. It’s part of the inspiration that we all need to create our gardens. Take a moment to read my post about Using nature as inspiration for our garden.
We are lucky to have moss growing in several areas throughout our woodland/shade garden filling in almost every crack between our flagstones and cement pavers, growing in shady areas of the grass, on our limestone boulders and in areas of the garden where I choose to encourage it.
If anything, I need to encourage more of it.
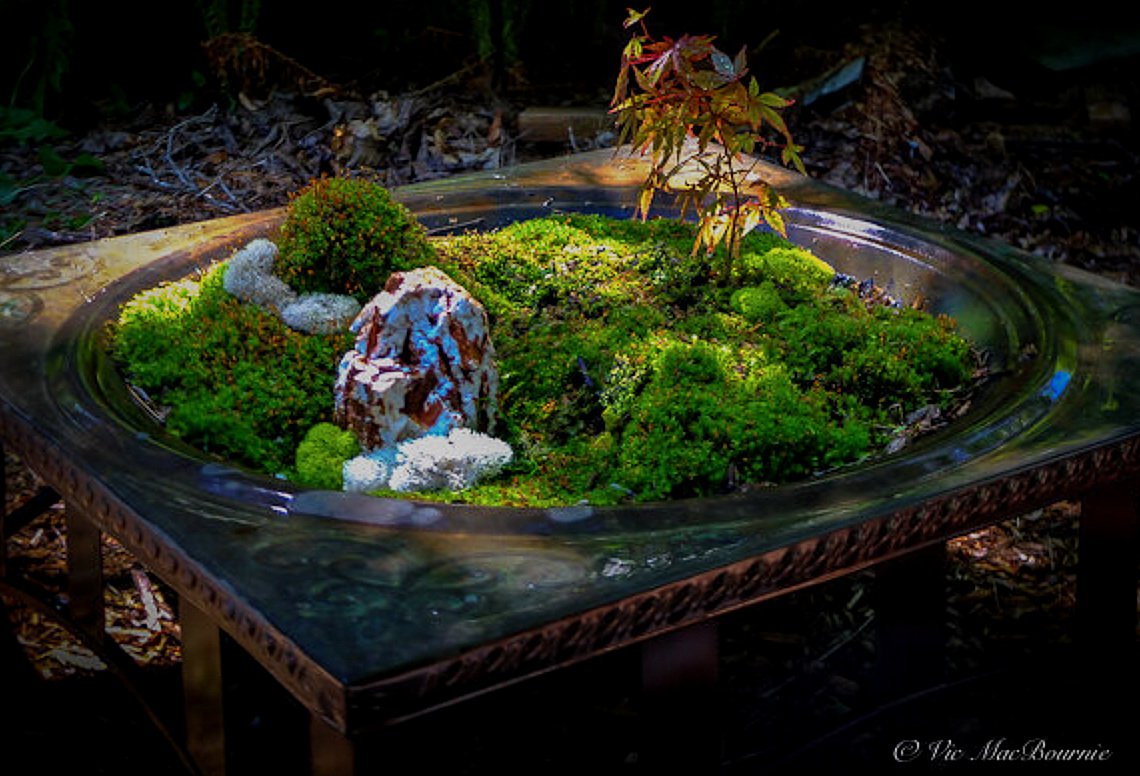
Our DIY fire pit turned moss garden is an elegant addition to the garden and a good source of moss for othere areas in the garden.
Moss is also featured in our DIY fire pit turned moss garden that I have wrote about in the past, and remains one of my favourite art elements in the garden.
The moss in the former firepit is growing primarily on a charcoal base from burned wood and is an excellent source of moss for other parts of the garden.
If I decide to add some moss elsewhere in the garden – to top off a container planting, in the Japanese-inspired garden or between pavers – it’s simple enough to peel off a little from the moss garden to get the moss started. If I need more, I can take it from other areas of the garden in small sections and encourage further growth. It all grows back quickly because it is happy where it grows.
It should comes as no surprise that moss is certainly one of my favourite features in the garden.
I know many “gardeners” do everything they can to keep moss out of their gardens and especially out of their grass. These gardeners are not only trying to fight Mother Nature, but missing out on the beauty of moss underfoot and its ability to create an aged patina that is difficult to obtain any other way.

Moss forms the background in our Japanese-inspired garden where these delicate epimediums add a spot of colour in early spring.
In our garden, nothing would make me happier than to remove what little grass we have in our backyard and replace it with a large expanse of pillowy moss. Unfortunately, at least for now, most of our small grassy area is in a very sunny location and I doubt moss would grow well there.
Growing moss in a hot sunny area
In a hot, sunny area you are unlikely to have much success growing moss. In this case, use a moss alternative like Irish or Scotch moss (link to my earlier post) which are actually perennial plants that look like moss but do well in sunnier areas.
You should get away with an area that gets morning sun if you are willing to keep the moss moist by gently misting it on an almost daily basis. Also, be sure to keep it as free of debris as possible for best results.
It’s important to understand that moss can dry out and turn crispy brown and still be alive.
If you see moss that appears dried out, give it a good misting and it should bounce back. Also, if the moss dries up and begins to curl up, ensure that the moss is pressed down on the surface where it is growing, whether it’s on the ground, a concrete planter or between flagstones. Simply press it down firmly onto its growing surface until it catches and stays put on its own.
Water moss with misting or gentle rain setting
One of the modern hose nozzles that includes a misting setting is a great asset if you are growing moss. Try to refrain with hitting the moss with a strong stream of water from the hose.
The mist setting or the gentle rain setting are ideal ones to keep your moss looking its best.
Under the right conditions, moss is not difficult to grow.
How to grow moss in the garden
Mosses are not your normal garden plants. Their unusual classification as bryophytes can create problems for gardeners who want to treat moss like a normal garden plant.
Moss – and there are up to 25,000 different species – are non-vascular plants, meaning they lack most of traditional parts of a typical garden plant. Most importantly, moss lacks roots that traditionally give our plants stability along with a highway to move the nutrients they need to survive up into the plants, shrubs and trees.
Instead of roots, mosses have rhizoids, which are small hairlike structures. Their main function, much like roots, is to anchor the plant to a surface whether it’s soil, rock, tree bark, concrete….
Many mosses will suck nutrients up through the rhizoids and others draw in moisture and minerals from rain and the water around them through the moss’s highly absorbent surfaces.
Moss specializes in finding other ways to absorb water and nutrients. As a result the moss family are often found in shady, damp areas whether they are grow directly on the ground, on rocks, garden furniture or cement structures.
If you want to grow moss on the ground on top of the soil, it’s best to have slightly acidic soil that is fairly compacted with good drainage.
We are blessed with a sandy soil that seems perfectly suited to growing moss, but it also grows readily on screenings that we use between our flagstones.
Growing moss in the garden
There are plenty of recipes on the internet – including on this site here – on how to create moss on, for example, statuary and clay or cement planters.
By combining some existing moss in a slew with buttermilk and maybe some beer, and then painting this brew on to your statuary or planters, placing them in a shaded damp area and gently misting them regularly, you should be able to grow some moss on the garden elements.
It doesn’t always work as planned but, with a little experimentation, you should be able to grow your own glorious moss and begin to create a special place in your garden.

The making of a meadow
Landscape designer Angela den Hoed shares how she creating an impressive meadow garden in the side yard of her Pennsylvania home to be used a show garden for her landscape design clients. The result is a stunning garden that will slowly evolve each year to become a beautiful meadow garden teeming with insects, bees and other wildlife.

Angela den Hoed in front of her impressive meadow garden at her Pensylvannia home.
Landscape designer shares how she made her meadow garden
Removing sod and replacing it with a meadow is slowly taking root with progressive gardeners looking for a more natural approach to their landscape.
These gardeners are building meadows in the front, back and side yards to welcome wildlife that has had to make due with small islands of native and non-native plants and flowers for so many years.
Landscaper Angela den Hoed is one of these gardeners who have recognized the importance of meadow and prairie gardens and have taken the challenge of converting a large swath of turf in the front/side of her Carlisle, Pennsylvania home into a meadow.
It was a project that certainly came with its challenges. She chose to go with the most labour-intensive approach and, although the results after the first year appears incredibly successful, she admits it was a real learning process.
It just so happens, that was actually one of the key points of the entire project.
• If you are looking for ideas on using low-growing ornamental grasses, be sure to check out my post on Five low-growing ornamental grasses for the garden.
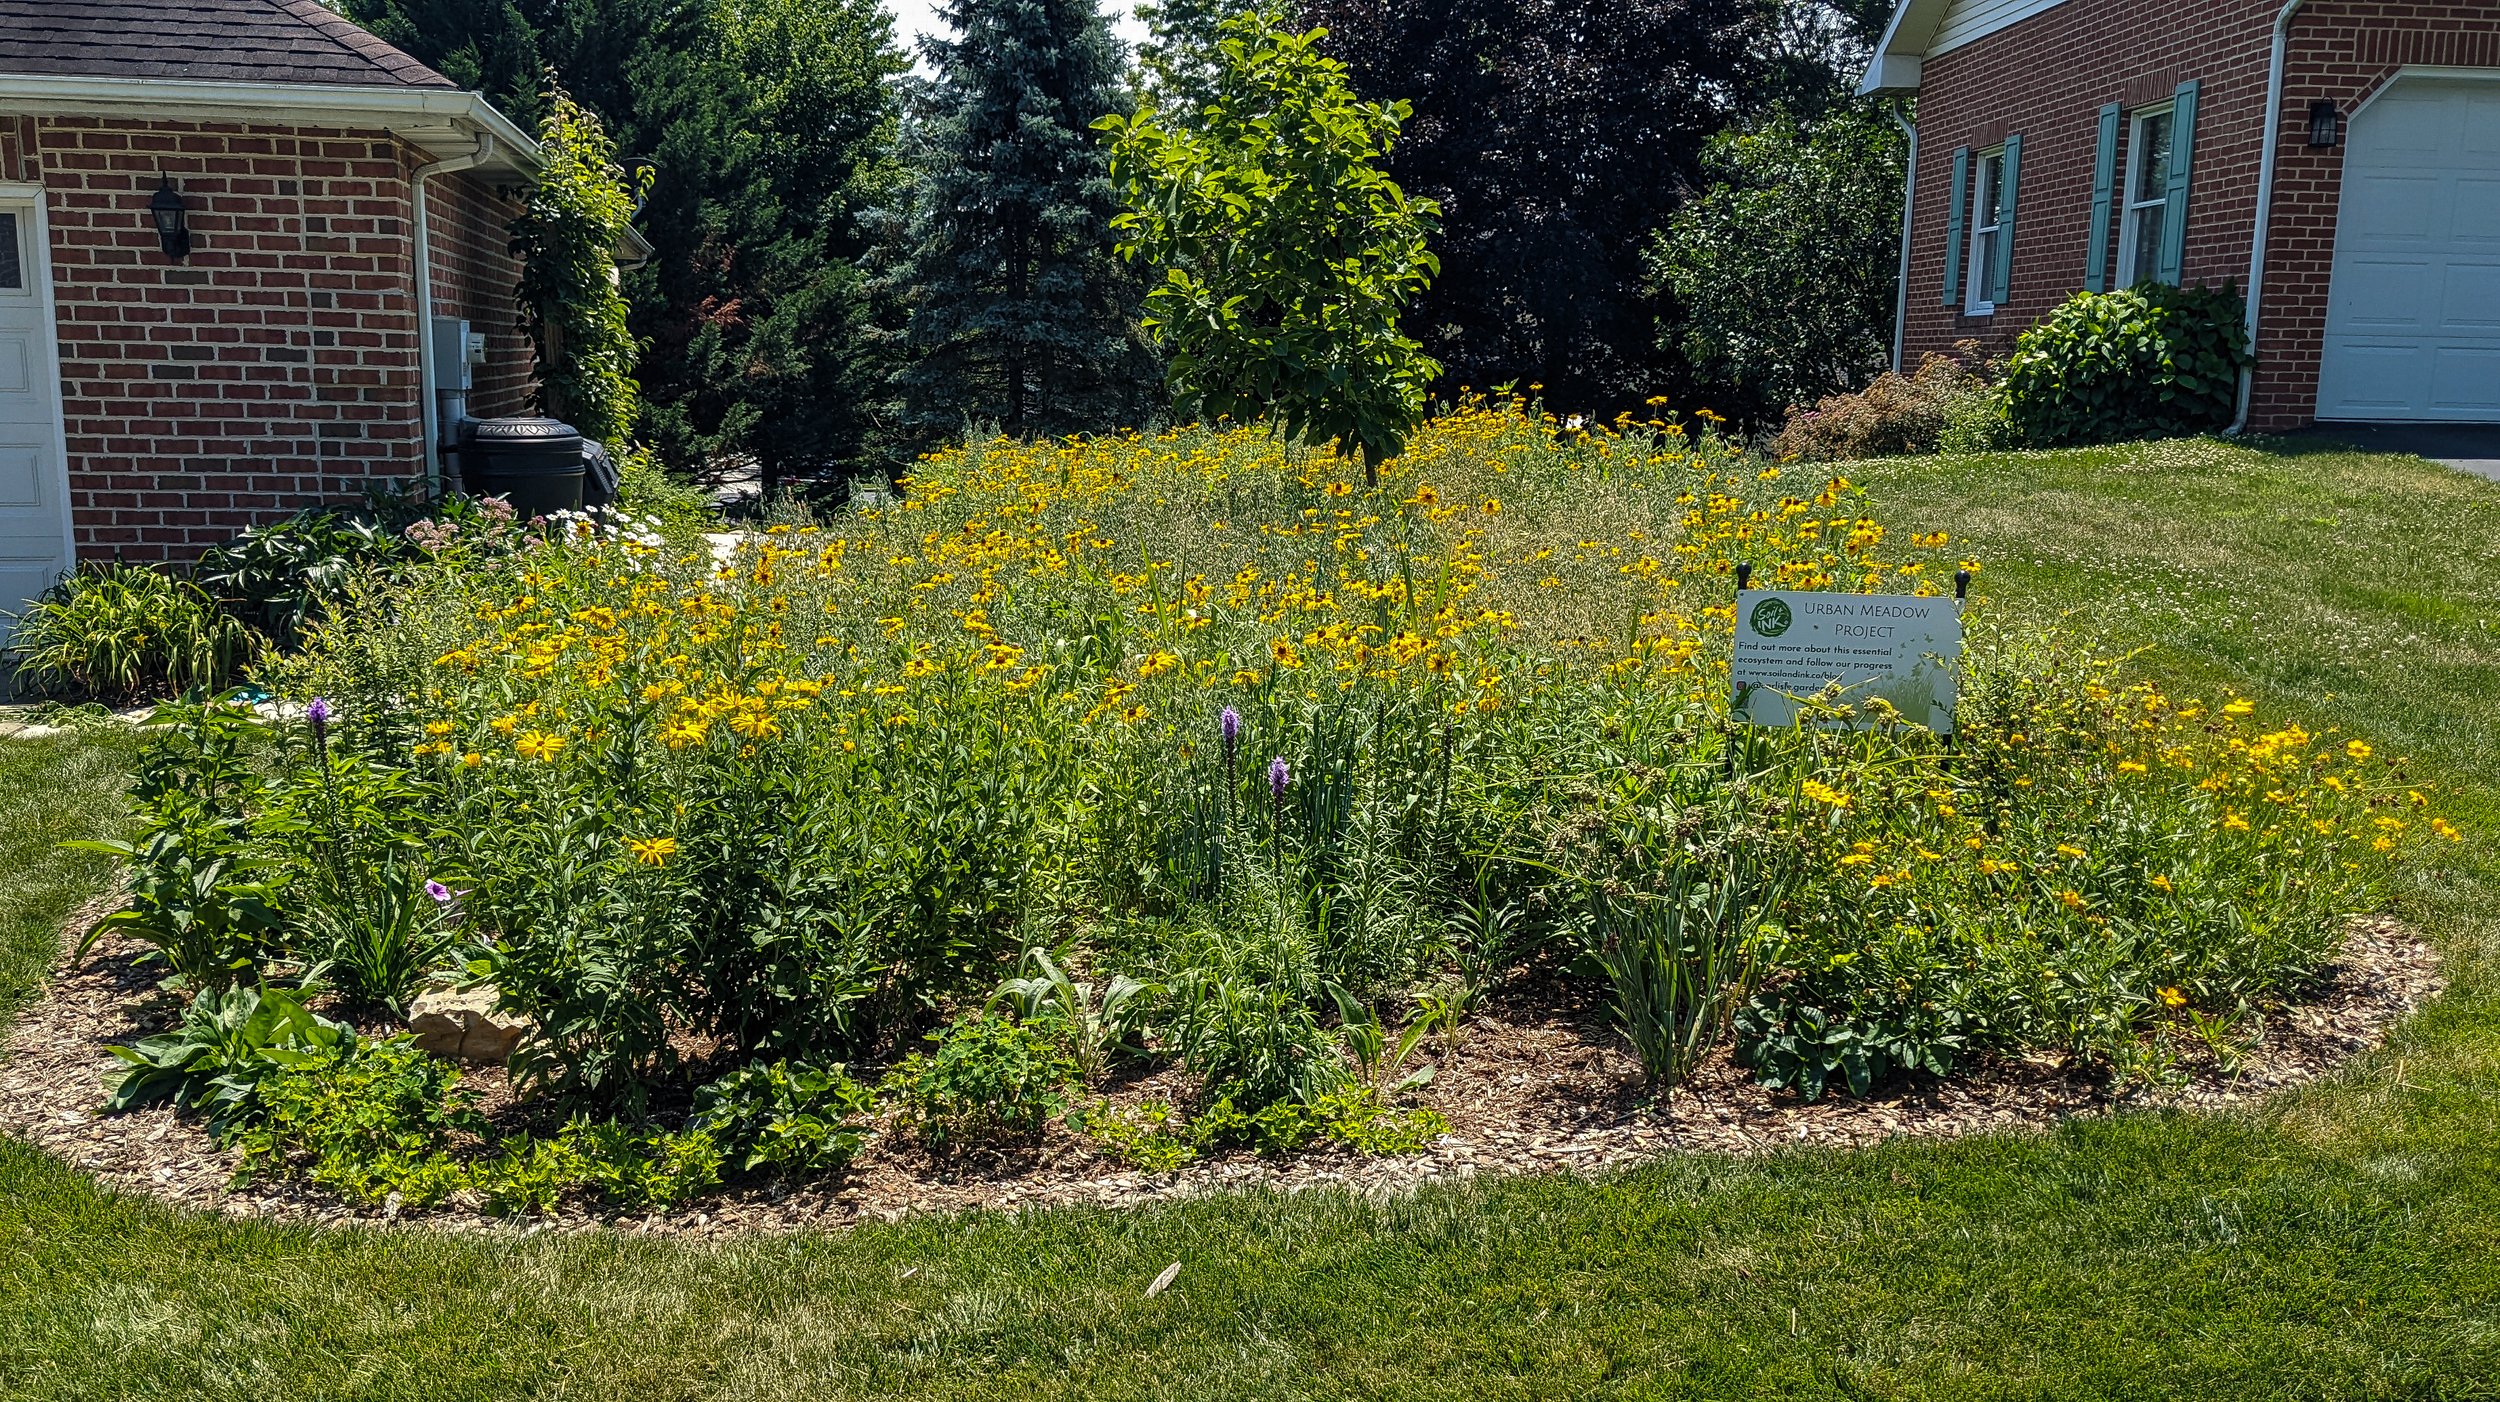
The meadow garden in Angela’s side yard with Black-eyed Susan, Blazing star, grasses and Purple coneflower just to name a few.
• More on Angela’s move from Engineering to Landscape designer here.
• More on Angela’s Woodland Garden design here.
Angela explains that installing the meadow was an important learning opportunity which she hopes to be able to take advantage of in future work with her landscaping clients, many of whom are beginning to ask about removing some or all of their grass in areas of their landscape to create a meadow garden.
In their book, Garden Revolution, How our Landscapes can be a source of Environmental Change, Larry Weaner and Thomas Christopher, write: “Native meadow is likely the best answer to North America’s over reliance on lawn, a means of saving the enormous quantities of water, fertilizer, herbicides, pesticides, and fossil fuels annually invested in the cultivation of turf. Unlike shrublands and forests, meadows can be established from seed in a relatively short time to gravitate toward open space and expansive views, attributes not common in a forest or shrubland.”
The authors ask why, then, does grass continue to dominate our landscapes?
They point to the quality of seed that has been sold in the past to create these meadows and the desire by homeowners to have an instant meadow in a single season.
For more on meadow gardening, check out my post: Fields of Gold: Sunflowers and Goldfinches.

“Meadows can work, but only if the gardener selects plants and uses techniques that reflect the local habitats and ecological processes that will affect their survival and proliferation. This is why successful meadow will look quite different in different regions.”
Their approach to creating a successful meadow is a fascinating look at working with nature using native plants and a more ecological approach. Although it is aimed at creating and maintaining large meadows with the least amount of work, their approach is certainly one that works in a mini meadow-inspired garden.
If you have visions for a larger meadow, Garden Revolution is a must read gardening guide to creating meadows and other inspirational gardens by working with native plants.
If you are interested in exploring this approach in greater detail, check out my more extensive post on Garden Revolution here.
Back to Angela’s experience installing her meadow garden. I could try to explain the process in my own words, but I think it’s best to allow Angela to tell her story in her own words.
The following is a series of questions and answers for Angela about her experience.

Stairs leading to the back yard provide visitors with an impressive view of the side meadow garden.
1) What are your short- and long-term goals with the creation of your meadow garden?
My immediate goal with the meadow project is to gain experience in meadow making that I can share with my clients and followers. My clients are starting to ask for seeded meadows, and I felt the best way to really understand it was to do it myself on my own property, using materials available to regular homeowners rather than landscape companies. Long-term I want the meadow to be an example for my clients, neighbours, and the general public to see what is possible in a typical residential site. I hope it shows the ecological and economic advantages of a native planting vs. mowed lawn.
2) I have been following your progress on Instagram an it showed that the creation of the meadow seemed like a lot of work. Would you recommend it for the average do-it-yourselfer or do you think it is better left to professionals like yourself?
The average do-it-yourselfer is totally capable of planting a seeded meadow on this scale. Once you get to maybe 1/2 acre or more, it may be better to hire a trained landscape crew. We did go with the most labour-intensive method of site prep, which I would definitely NOT recommend.
Our options for sod removal were to solarize, use herbicide, or cut it out with a sod cutter. We missed our window of sunny summer months for solarization and didn’t want to spray glyphosate on 1000 ft² of lawn. So, the sod cutter was an experiment. Rolling up and hauling away the sod was the labor-intensive part, and we still ended up needing to spot spray with glyphosate anyway.
The other site prep methods take a lot less hands-on time.
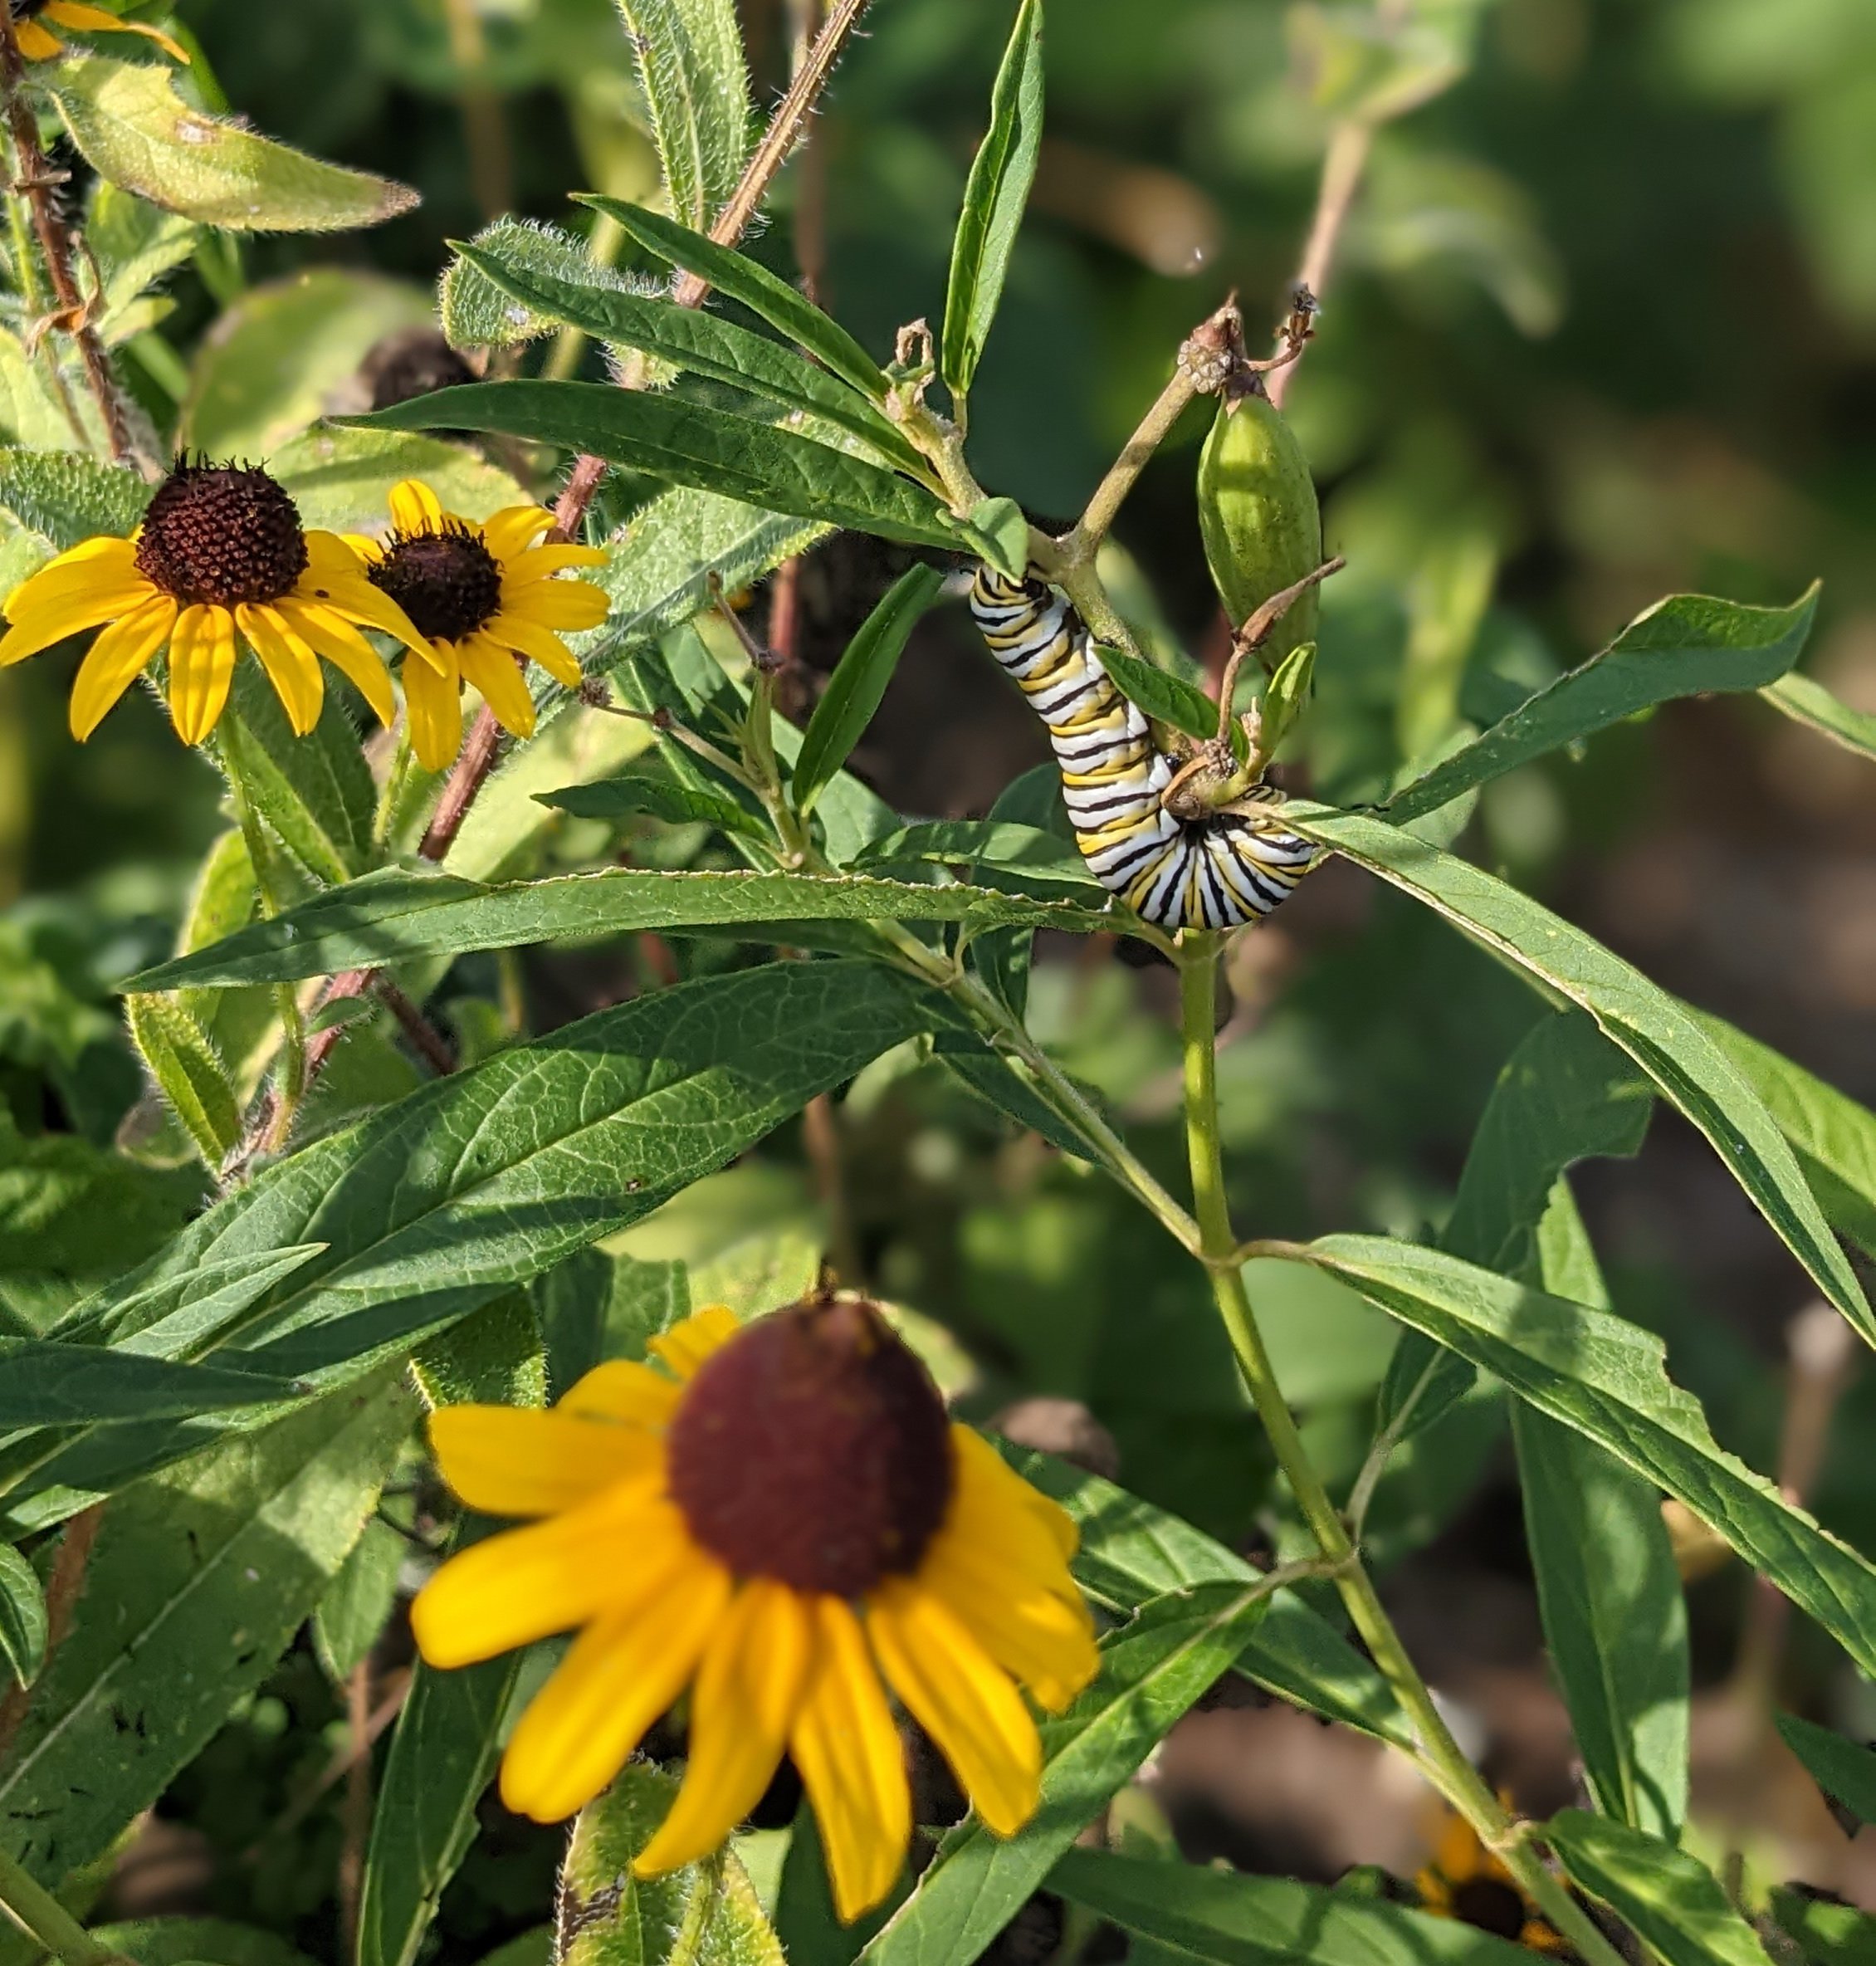
A monarch caterpillar at the milkweed in the newly created meadow garden.
Is there a lot of maintenance in a new meadow garden?
3) How about up-keep since you put it in. Has it taken up a lot of your time keeping weeds etc under control?
With the sod cutter, I was hoping to not only cut out the grass, but any weed seeds as well. Unfortunately, here in the Mid-Atlantic we have centuries of weed seed deposits in the soil (the seed bank) and they can remain viable for a very long time. I was shocked at how many weeds came up, both before and after we seeded the meadow plants.
Afterall, this area had been lawn grass for 25 years. Weeds are generally a problem if they interfere with the meadow plants germinating (blocking their light) so I wanted a clean slate for seeding. I used the scuffle hoe at first, but eventually I resorted to glyphosate.
After planting, more weeds germinated. Most of these were benign albeit surprising (petunias?). Once the meadow plants germinate, they can generally outcompete the weeds, but a few more thuggish ones needed to be removed like mugwort, thistle, morning glory, mulberry trees, even a butterfly bush.
The biggest problem is the yellow nutsedge, which I will need to stay on top of for a few years. Weeding actually doesn’t take much time at all. I'm out there all the time checking out what’s going on, but only go after the weeds maybe twice a month. Most of them would not have had the chance to germinate if we had used a different site prep method. I anticipate a lot less problematic weeds in year two.
4) Where did you get your inspiration to create the meadow?
I’m not sure there was just one point of inspiration to create the meadow. It was probably a combination of naturalistic design books and classes that I’ve taken – I’m inspired by the work of Claudia West, Benjamin Vogt, Kelly Norris, Roy Diblik, Adam Woodruff, Noel Kingsbury, James Hitchmough, and others.
Naturalistic design and science-based ecologically beneficial plantings are where my heart is but are a pretty foreign concept for most homeowners. It’s a hard sell to clients when there’s no local example to refer them to. My garden has always been my experimental space, and now it's becoming demonstration space as well. A seeded meadow is at the far end of the “wildness” scale in terms of garden design. I hope to do a more intentionally designed plug-planted perennial “meadow” garden in the future, which I think bridges the gap between a seeded meadow and a traditionally planted garden with larger groupings of plants.
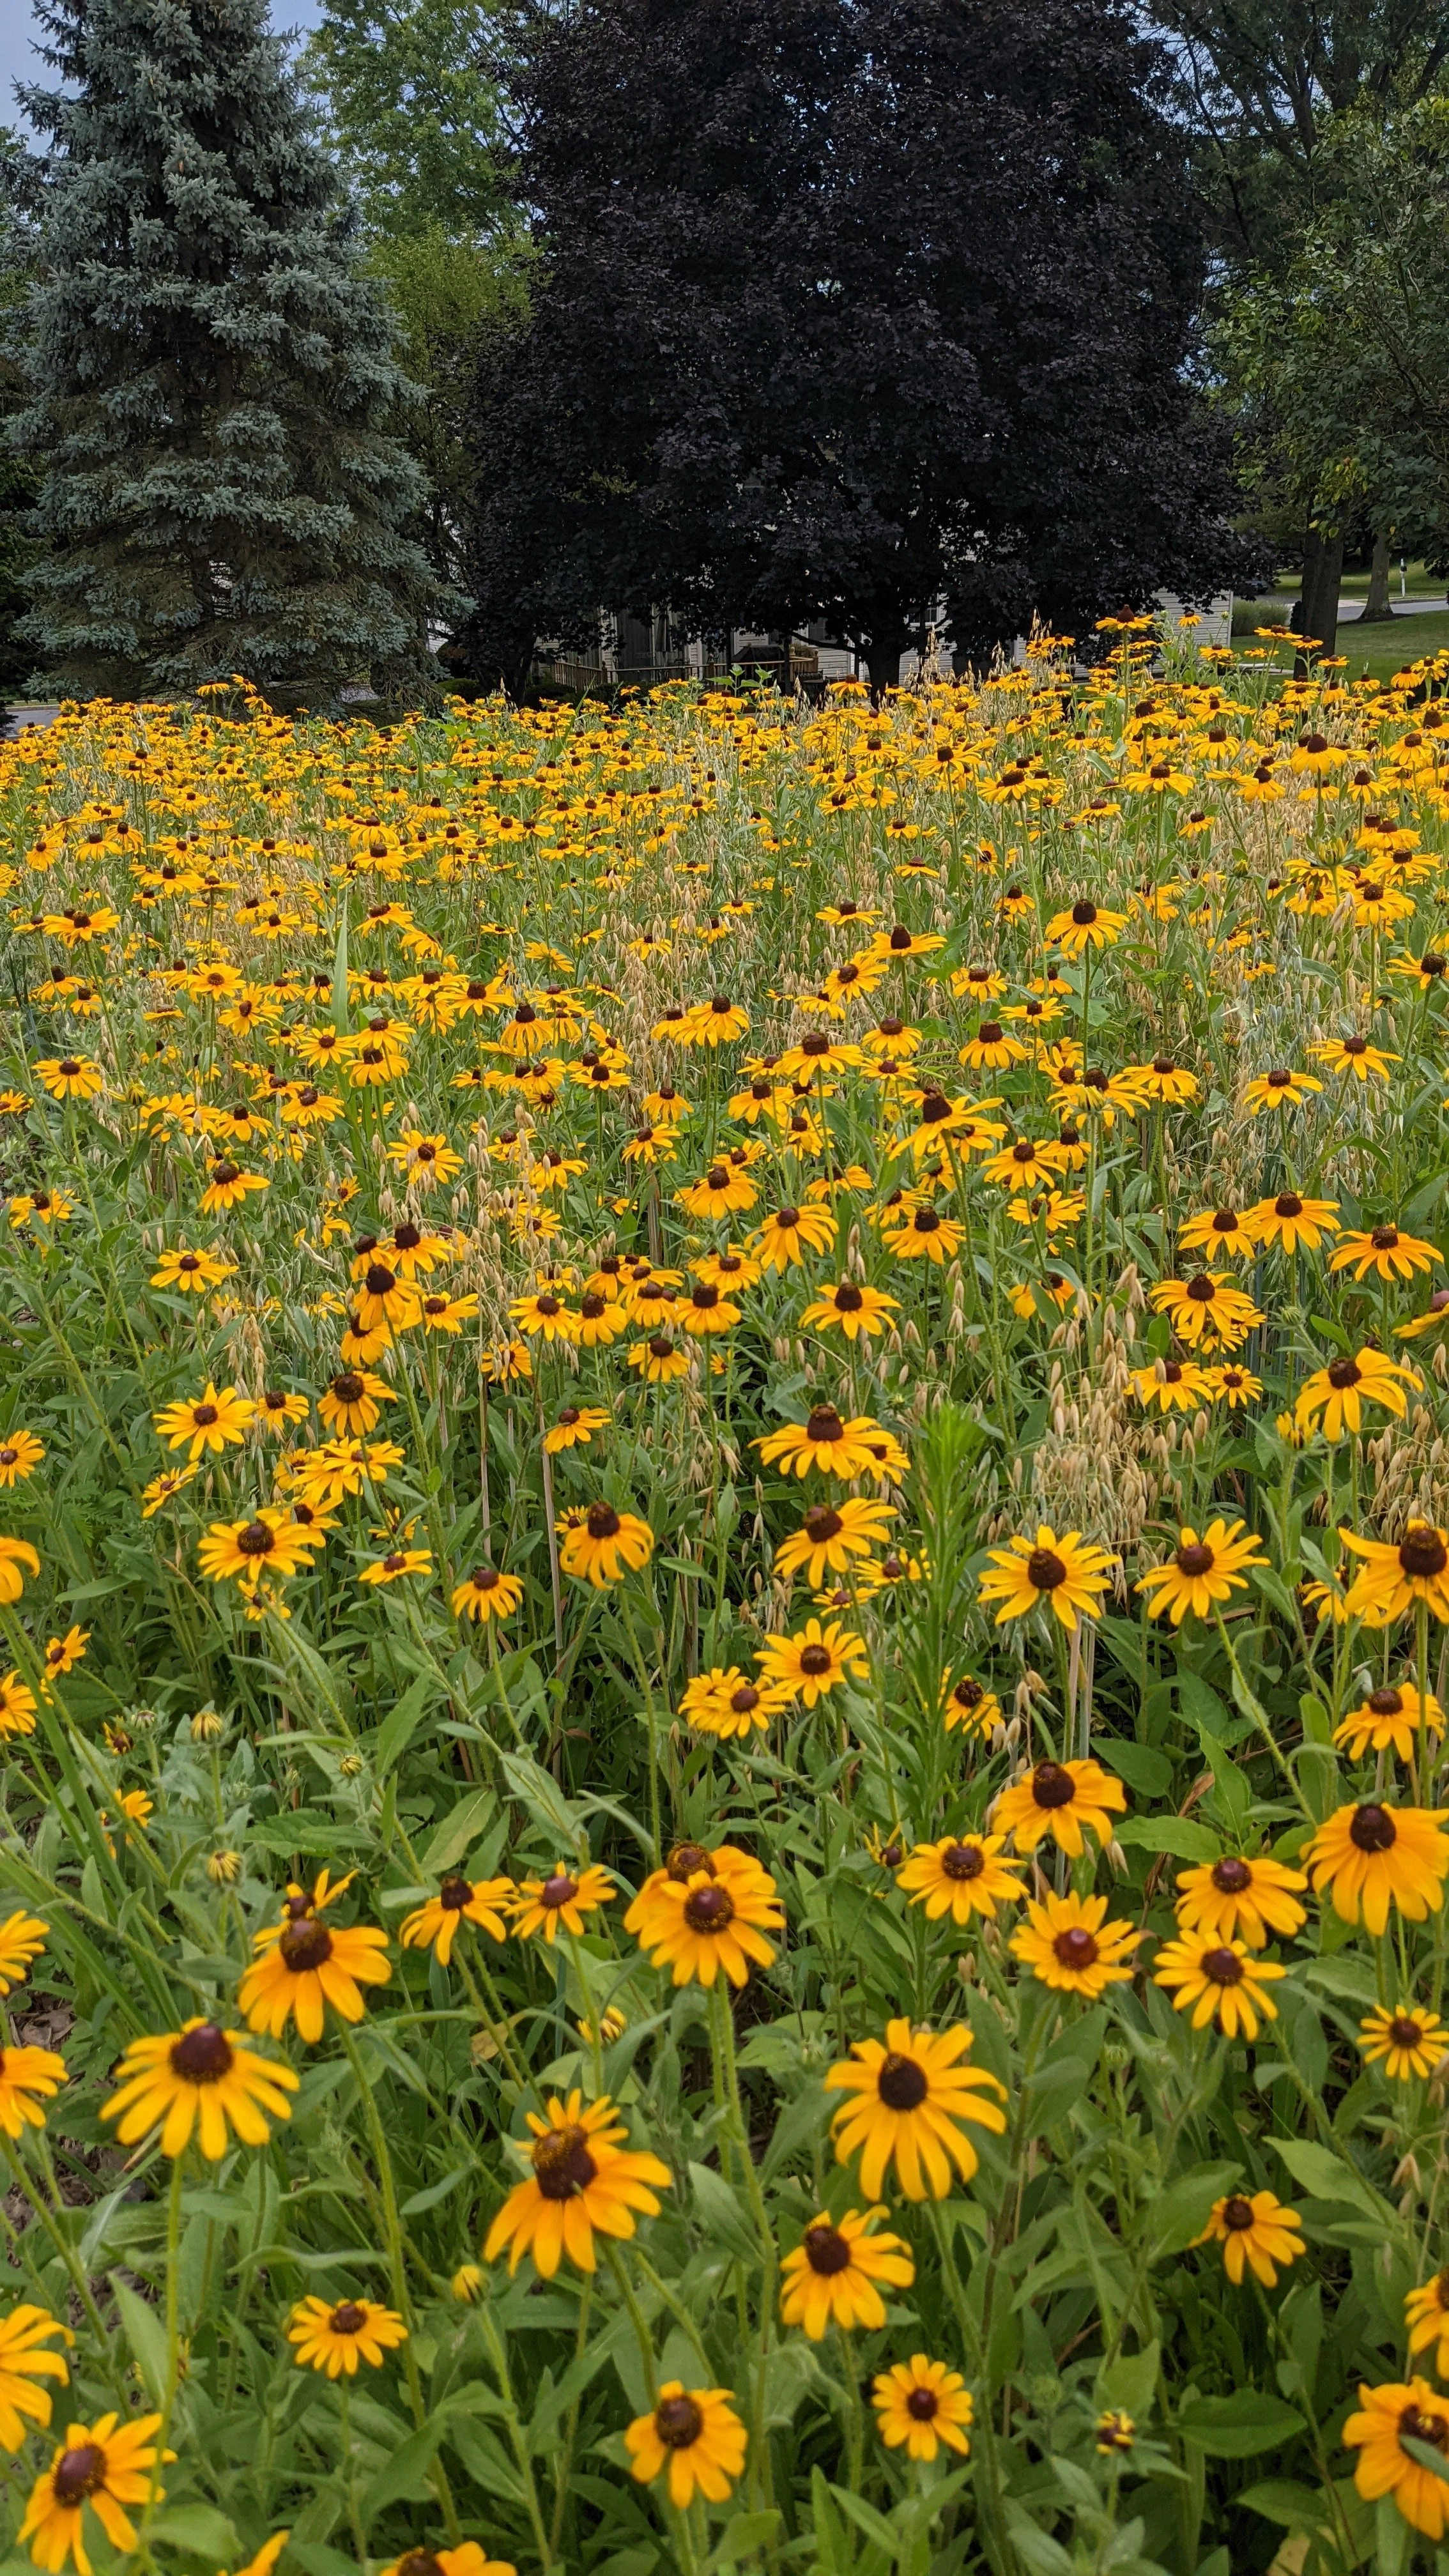
Black Eyed Susans dominate the meadow in the first year of growth. Angela expects a greater variety of blooms in the second year in the garden.
5) What are your plans for the meadow this year. Any additions, plant removals?
This will be year two for the meadow. In the first year the most visible plants were the nurse crop of oats and the mass of Rudbeckia. These will be significantly less prominent as more perennials and grasses start to take hold and bloom.
The first thing we will do this year is the cutback in late March, along with spot-spraying the clumps of lawn grass that came back up in year one. The front street-facing edge of the meadow was planted with potted plants in a more traditional garden arrangement to indicate intentionality. This part of the garden may get rearranged a bit this year, I am still holding space for a bit of artwork to be added there as well.
How long before wildlife show up in a meadow garden?
6) What wildlife did you see in the meadow this year?
I think it takes a while for the wildlife to find your new native plants. At least in the rest of my property that seems to be the case. However, there was a small flock of birds that were always hanging out at the bottom of the hill during the summer; they would all fly out when I walked by. There were plenty of bees, and a handful of monarch caterpillars on the milkweed. We also saw a hawk sitting on the roof looking over the meadow, he must think it’s a good place to hunt. I imagine a lot of the neighborhood rabbits will be moving in this spring.
7) What has been the reaction of neighbours on the street about the meadow.
The reaction has been positive. I’m sure they all thought we were crazy when we removed the sod last fall and it looked like a giant swath of bare soil until the seeds germinated in May. One neighbour said she wished she was brave enough to do the same thing. I have noticed a lot more walkers on our street since plants started blooming.
8) Is there anything you would have done differently if you could design and install it again. Tips for people thinking about creating one of their own.
I would definitely have used solarization as my site prep method. This requires more planning and patience. Basically, you must scalp the grass and then cover with black or clear plastic starting in June when the weather heats up, then leave it in place until just before you seed. This kills both the grass and the seeds in the very top layer of soil, and you can seed in the fall, winter, or spring. Giant sheets of plastic are not super neighbour-friendly though, so if doing this in a very visible area, glyphosate may be a better option. It also depends on the size of the meadow, as sheets of plastic will end up in the landfill. It’s a balance of size and your priorities. A few applications of glyphosate in the months before planting will also do the job, but many are uncomfortable with that.
I also should have eliminated the nutsedge ahead of time. The nutlets live 8+ inches below the surface and can prevent other seeds from germinating.
It will be a while before I know if I’m happy with my seed selection. I decided to not complicate it too much with a totally custom seed mix. I started with a readily available mix from Ernst Seeds and had them modify it by upping the percentage of perennials and lowering that of grasses. That’s primarily to get a heavier floral display in the meadow and help the neighbours see it as more of a garden. I also put in some plugs of Echinacea pallida (pale purple coneflower) and Eryngium yuccifolium (rattlesnake master) in small groupings for a little added interest. Hopefully the rabbits didn’t eat all of them! I can always add in a few other species in the future.
Five favourite plants for the meadow garden
9) What agricultural zone are you growing it in and what are the top 5 plants in your meadow?
I am in USDA growing zone 6b, in the Ridge and Valley ecoregion.
I would say the top most recognizable plants in the meadow would be:
• Echinacea purpurea (purple coneflower)
• Rudbeckia hirta (Blackeyed Susan)
• Asclepias syriaca (common milkweed)
• Aster novae-angliae (New England Aster)
• Monarda fistula (wild bergamot).
Why is a meadow is so important to the ecosystem?
10) Why is creating a meadow so important for gardeners and lovers of the natural world?
A meadow is an alternative style of garden that more accurately mimics how plants grow in nature. There is a much higher plant density than you find in a traditional garden setting, and consequently opportunity for much higher diversity – both in the plant species and the wildlife it can serve.
Even a tiny micro-meadow can pack in a lot of diversity.
There are 23 different plants in my seed mix plus the two plants added as plugs. With a seed mix, you can plant any size of garden with that much diversity in it. You are also hedging your bets against plant failure – if one or two plants don’t thrive in your specific conditions, there are plenty of other species that will fill in the gaps.
The obvious benefits of planting natives include providing food and habitat for local wildlife and supporting the local food web (hawks included!).
Beyond these are the reductions in fertilizer, fossil fuels, and noise and air pollution generated by lawn maintenance. We also get the additions of better stormwater absorption, improved soil health, and much higher carbon sequestration. These are ecosystem services that have been stripped from the original landscape and need to be restored as best we are able.

A Natural Garden: Bringing nature back to the landscape
In 1989 Ken Druse wrote The Natural Garden. Was it a groundbreaking book that changed the way we garden today?
Is the Natural garden a growing trend?
Call it a woodland garden, a shade garden, maybe even a meadow garden – if it has a natural feel to it and is based on more native than imported and hybrid plants – chances are you are one of the many who are choosing the Natural Garden over the traditional garden style.
In his groundbreaking 1989 garden book, The Natural Garden, author Ken Druse introduces readers to what he calls the New American Landscape. Back in the 1980s, a natural garden certainly was not the norm.
Even today, most landscapes are typically dominated by large swaths of grass with tiny gardens hugging the foundation and maybe a lone tree trying its best to survive surrounded in a sea of grass.
More on eliminating grass in our landscapes in my earlier story.
Go to my earlier pot on the difficulties a lone tree in the landscape faces .
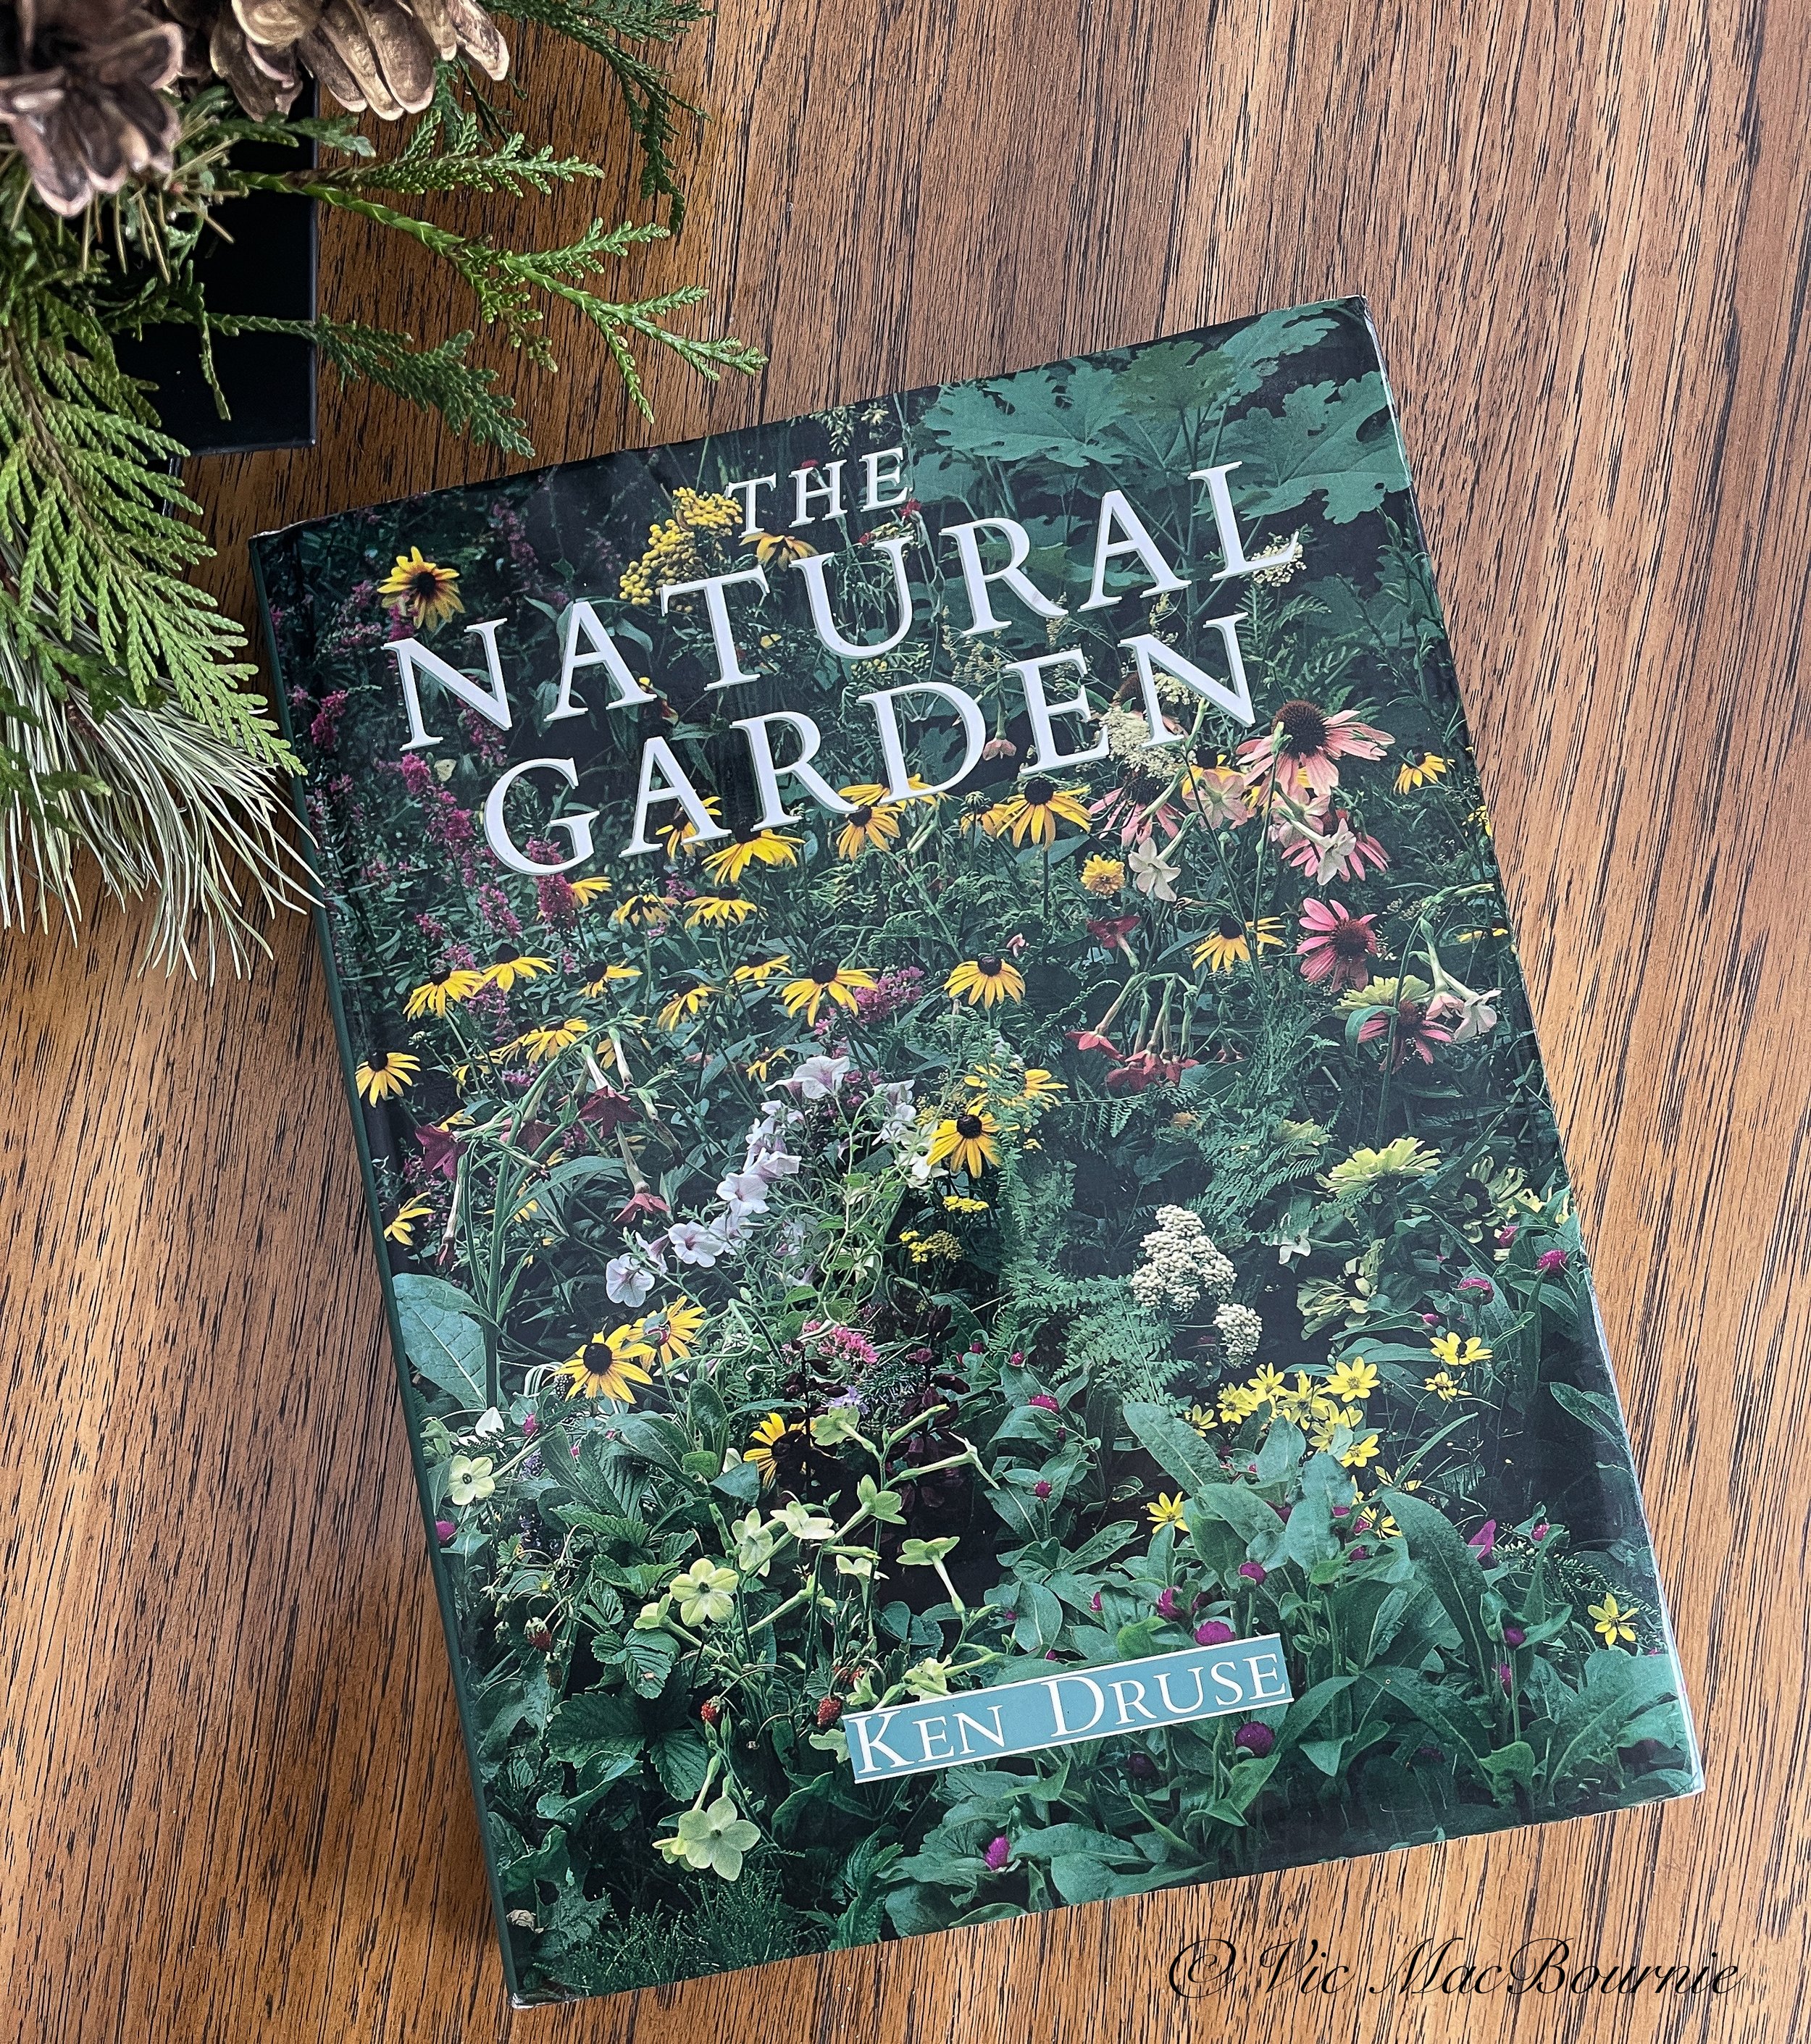
The Natural Garden by Ken Druse continues to be an important book for gardeners young and old looking for a more environmental approach to gardening.
But A Natural Garden helped change the minds of enough North American gardeners that the concept of moving to a more natural stylized garden began to take shape. That concept is still struggling to take root in subdivisions all over the United States and Canada, but the onslaught of climate change, the decline of native plants and resulting birds and pollinators are forcing us to look at our garden practises in a new way.
I’ll never forget my first introduction to the book and the concept of natural gardening.
For more gardening books by Ken Druse, check out Amazon’s listings.
At the time I was putting together several Home and Garden supplements for the daily newspaper I worked at, and one of the owners of the local landscaping companies told me that his main source of inspiration was The Natural Landscape by Ken Druse.
I remember the cover was a combination of Black Eyed Susans and Purple Coneflower growing wild among Nicotiana and other plants. (see above)
It looked and felt natural. There was no single specimen plant sitting all by itself surrounded by dirt or mulch. There was no grass. The fact I loved Black Eyed Susans and Coneflowers sold me instantly.
Landscaper Koos, yes he was Dutch, was obviously ahead of his time. When he offered to take me around to some of the properties his landscaping company had worked on, I jumped at the opportunity.
This was before Instagram, Facebook and Twitter bombarded us with beautiful images of garden designs, and, to say I was blown away would be an understatement.
I will never forget going into the backyard of a new home with a typically-sized small backyard and being transformed to a northern landscape. Moss-covered, limestone rocks native to the area formed the structure of a waterfalls in one corner of the yard. It was backed by three beautiful 12-foot White Pine trees and formed the focal point of the suburban yard.
I couldn’t believe that a tiny backyard in the middle of a new subdivision could take on the look of being in a forest glade surrounded by native pine trees.
It wasn’t just the natural look that was inspirational, it was the combination of the sound of the moving water and the woodsy smells rising up from the earth and the pine trees. I was transported to northern Ontario’s Algonquin Park, where I spent time most summers immersed in nature.
That was an eye-awakening experience for me and one that I have never forgot on my journey to create our own woodland garden.
Although his book The Natural Garden played an instrumental role in shaping my concept of gardening, it wasn’t until recently – more than 30 years later – that I actually purchased the book. (It was not an inexpensive book in its day and although I do remember getting it out of the library at least once, I had never actually purchased it. That was before I discovered a mint copy on Alibris (used book seller) for only a few dollars – less than $4 to be exact. See image link below of The Natural Shade Garden for a similar price from Alibris. In addition, Alibris has The Natural Habitat Garden – a follow up book – used for a great price.)
I’m now a proud owner.

The Natural Garden explores many aspects of gardening including the natural woodland-style garden
Is it as groundbreaking today as it was when it was first published?
There is no question that some of the plants suggested in the book would not sit well with native plant purists today, but the basic concept of the book is as fresh today as it was in 1989.
Let’s dig in a little deeper into this 296-page garden treasure.
The Natural Garden opens up by describing the author’s approach explaining that: “Essentially, the Natural Garden is a garden planted with species that are natural to their environments, species that would grow wild. Plants are chosen with an entire year, or years, in mind – they are not expected to work for just one season – and the garden design makes use of long-lasting natural materials. Thus the garden is beautiful year-round as well as being easy to maintain. Lawn is reduced to the minimum needed for recreation.”
A perfect description of what many of today’s natural/woodland gardeners are striving for in the their gardens today.
Druse writes about using nature as the primary source of inspiration while at the same time acknowledging that most of the true natural wilderness has almost disappeared.
“Think of wilderness simply as those places where plants grow unattended: California coastal highway meadows, Rocky Mountain glens of aspen, New England Woodlands, southwestern deserts, perhaps even the vacant lot at the end of your street.”
Druse goes on to say that the first step of any natural gardener should be to take a walk in nearby wild places and carefully noting what is growing naturally in the area. This inspiration should be the starting point in your pathway to your own natural garden.
Check out my earlier post on using natural areas as inspiration.
In his book, Druse offers a portfolio of natural gardens starting with an outstanding example of a New England woodland garden highlighted by Flowering dogwoods (Cornus florida) forming the understory with trilliums, Jack-in-the-pulpit (Arisaema atrorubens), Forget-me-nots (Myosotis alpestris) combining in an impressive riot of colour that manages to combine the beauty of a woodland garden with a hint of an English border garden in the sunnier areas.
It’s not just vast woodland gardens that can get a taste of a more natural style of gardening. The Natural Garden explores a small garden in a big city providing tips on how to fill the space in a small garden with native plants, grasses and vines to maximize the space.
A seaside garden making use of ornamental grasses, a more natural English cottage garden and a California cliffside garden give readers a taste of how varied a natural-style garden can be and introduces them to the elements of garden design.

Everything from woodland to pond gardens is included in The Natural Garden.
Five design elements for the natural garden
The Natural Garden focuses on how plants form the foundation of the design rather than paving, steps and walls made of hard-surface materials often associated with today’s traditional gardens.
1) Ground covers as the foundational design element. While lawns can’t be ignored. The Natural Garden prefers to focus on lawn aternatives that still rely on living ground covers. Native plants such as wild ginger, native mosses, ferns and even something like low-growing blueberry bushes can work in the right stiuations.
So too will wooly thyme, astilbe, and epimediums, just to name a few that have found their way into my garden. Druse also suggests a couple of plants that have long been used as ground covers but are not recommended today because of their invasive tendancies in certain growing zones, periwinkle (Vinca minor).
It’s important to do some research into plants – especially aggressive ground covers – before planting them.
For more on groundcovers in the woodland gardens, check out my posts here: Three great groundcovers for the woodland garden; Snow: Perfect groundcover for hot sunny areas; Three mosses for woodland groundcovers
2) Bulbs as early spring design elements: Bulbs are our spring time stars in the garden starting with snowdrops (Galanthus nivalis), Daffodils and tulips, but other bulbs can be used that put on their shows later in the season right through to fall. It’s important, however, not to plants them in straight rows. It’s much better to naturalize them in the garden beds or even in your grass and in with other groundcovers, letting them rise up in clumps in random areas of the garden.
Only bulbs that have the ability to spread and multiply can be naturalized; therefore, hybrid tulips do not work well. “Naturalized planting of bulbs, once established, are nearly maintenance free,” writes Druse.
A few to consider include: spring crocuses, dog-tooth violet (Erythronium dens-canis), grape hyacinths (Muscari) wood hyacinths ((Endymion hispanicus), Wind flower (Anemone blanda) and Ornamental onion (Allium giganteum). Lilies to consider include Canada lily (Lilium canadense) and Turk’s-cap lily (Lilium tigrinum) and tiger lily (Lilium tigrinum).
3) Perennials: While The Natural Garden does not focus entirely on natives, it’s a good idea to include only native plants when we are planting perennials in today’s gardens. That’s not to say we can’t enjoy what we have in our existing gardens providing they are not considered invasive. Plant that hybrid perennial if you want, but be sure to include the native species too to ensure insects and birds also find our gardens welcoming.
4) Ornamental grasses: Many modern gardeners might think ornamental grasses are a new trend in garden designs but The Natural Garden includes them as a key elements in the design process. For more on using ornamental grasses in the natural/woodland garden, be sure to check out my post here: Three ornamental grasses for the woodland garden
5) Vines in the garden design: Don’t overlook the value of vines to create texture and vertical cover in your garden, especially if it’s a small space. The Natural Garden describes vines as “something extra, a luxurious accessory” if you will. “While ground covers, or trees, or shrubs have practical uses, vines are more purely ornamental. Like necklaces, lace, icing, or gingerbread molding, they provide the perfect finishing touch,” Druse writes.
I’m not sure I agree with that conclusion, knowing that vines can provide needed habitat for birds as well as fall and winter fruit. Some like honeysuckles will attract hummingbirds, moths and butterflies as well as pollinators and other desirable insects and spiders.
But there is no question that they can add real beauty to a garden whether they are purely for looks or offer more to our wildlife. Once again, look for native vines to include in your landscape. Virginia Creeper is a great vine that has earned a spot in our garden and provides birds with berries in winter and late fall. Annual morning glories are also a staple in our garden,
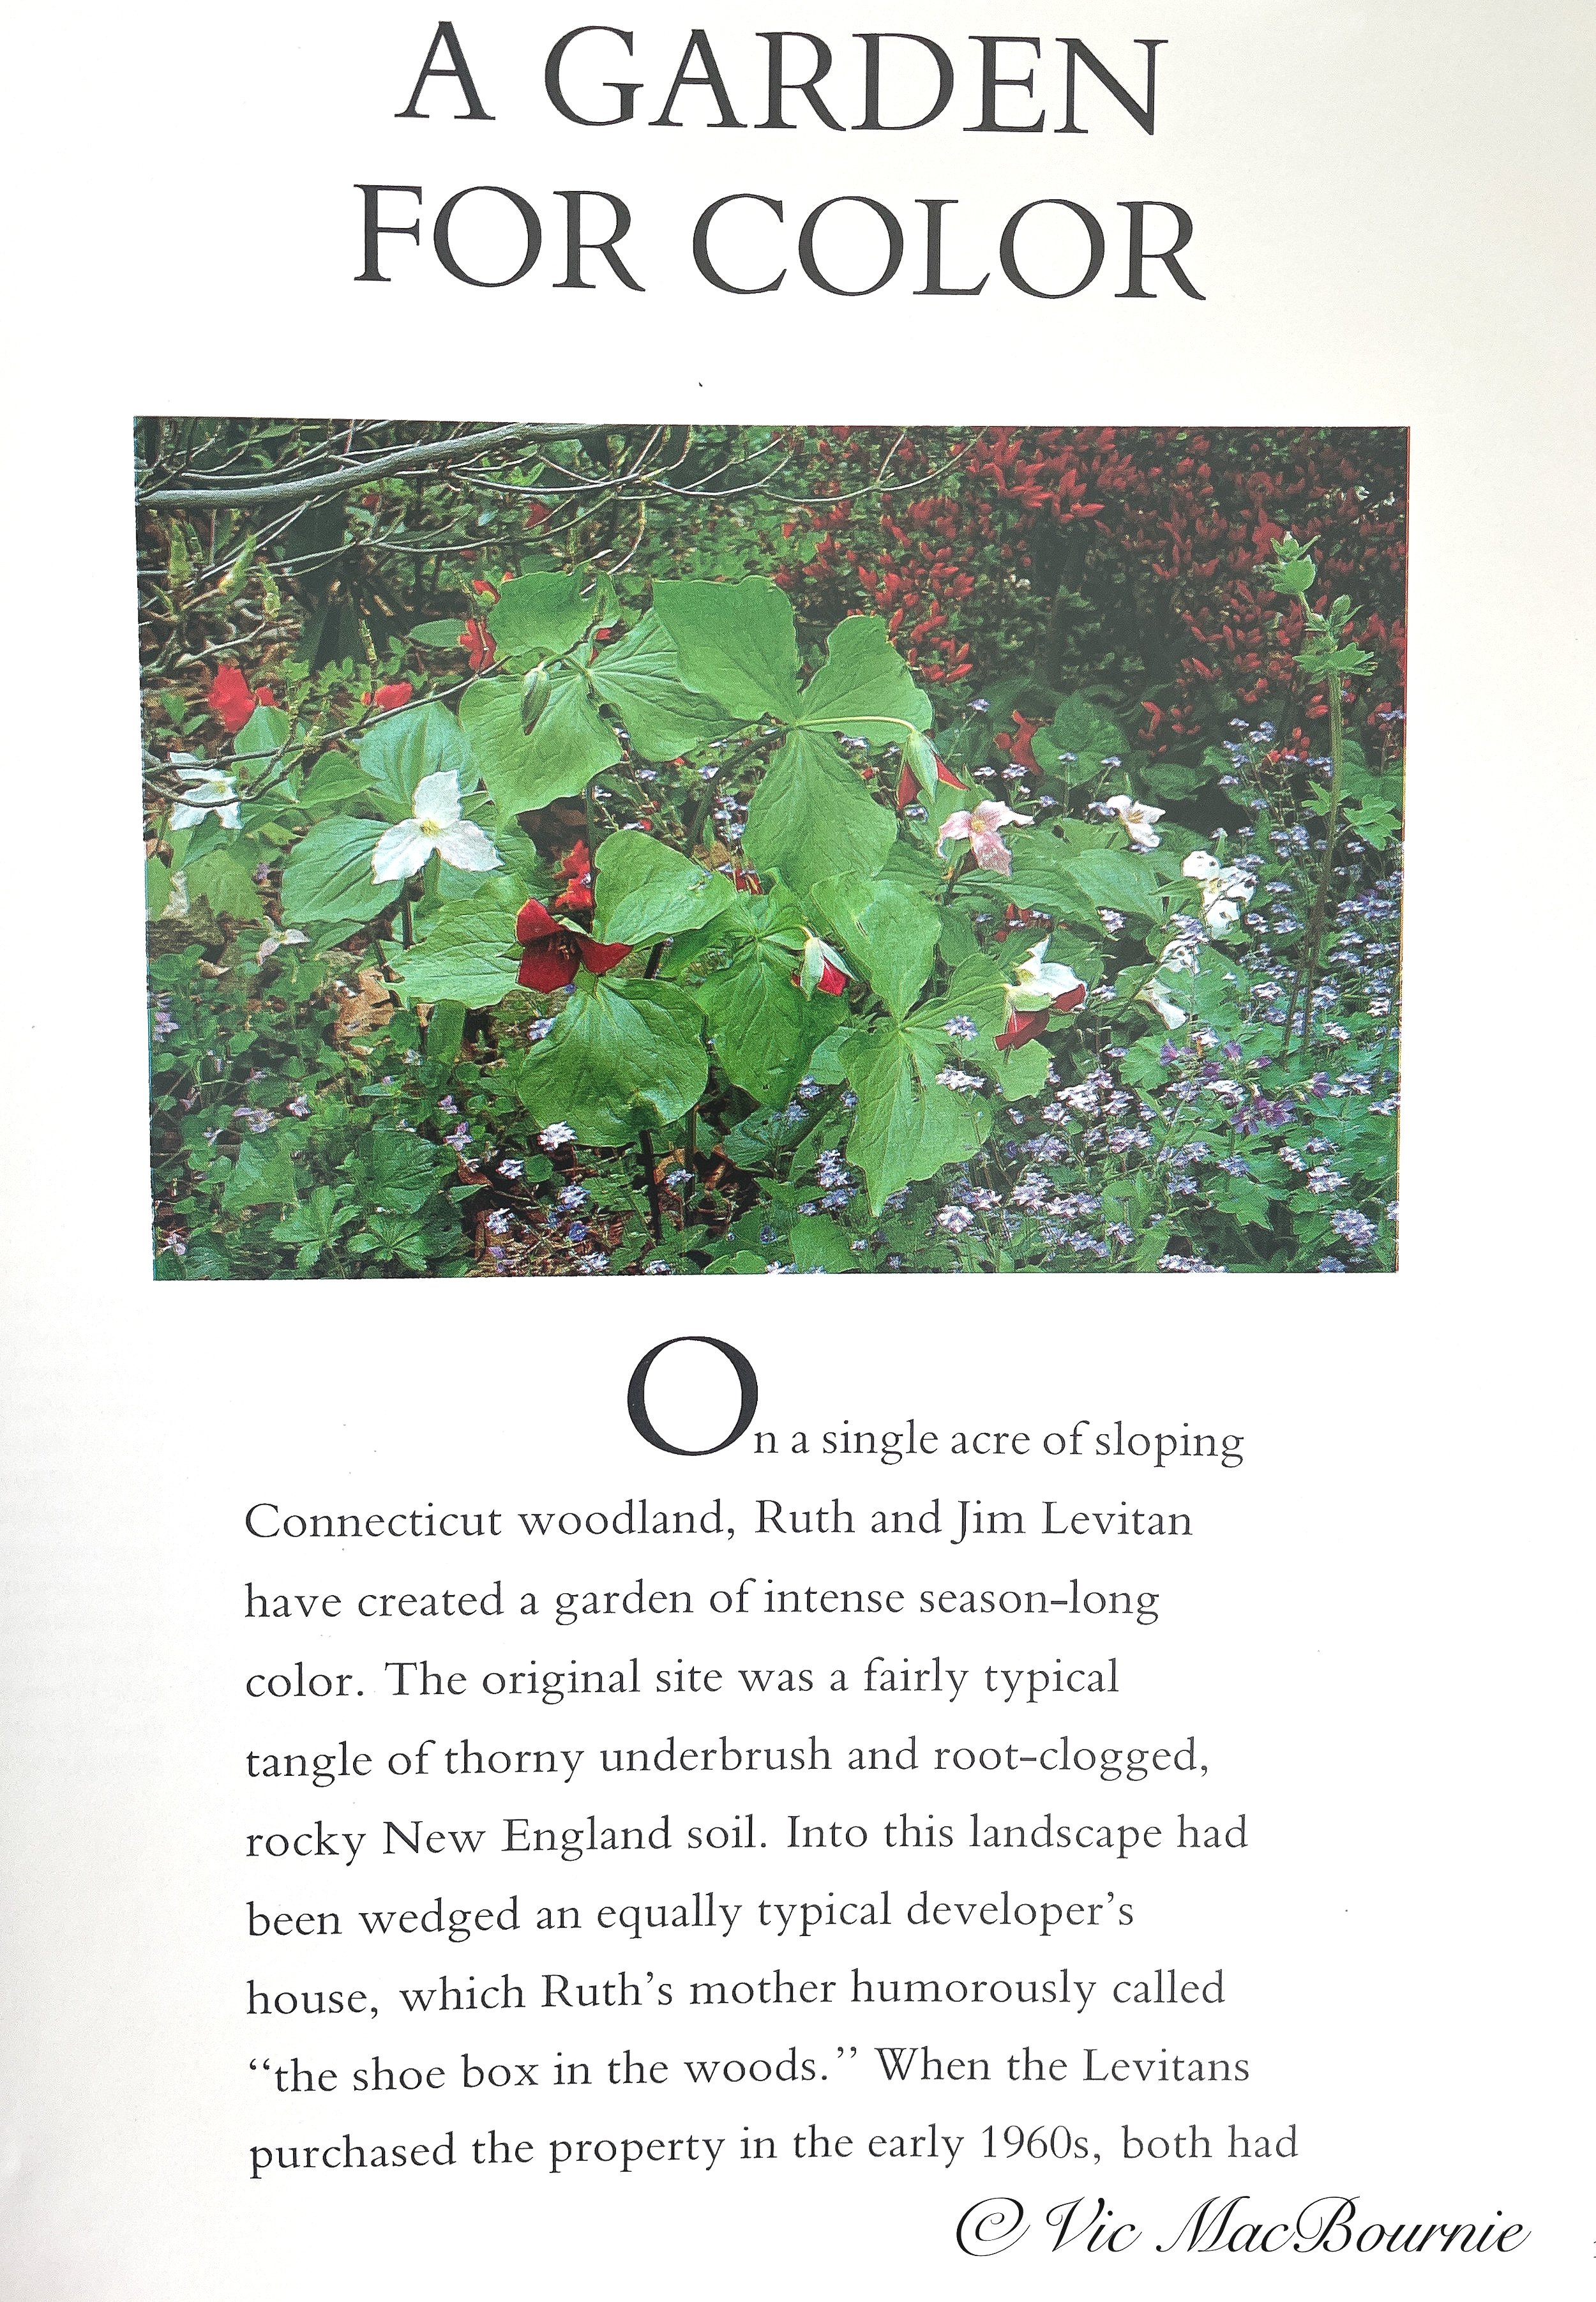
The Natural Garden and why it’s more important than ever
As I wrote earlier, I am now the proud owner of Ken Druse’s book, The Natural Garden. I only wish I bought it back in the early ‘90s when the gardening bug first bit me. But, the beauty of gardening is that it’s never too late – never too late to plant the tree you always wanted, your favourite perennial or native wildflower.
Today, The Natural Garden is a little dated in some of its suggestions, but it’s also inspirational, especially in the middle of winter when the snow is falling outside and we need to dream about spring and the many projects we have planned.
Pull out the garden guides, the seed catalogues and our garden journals, but first get your hands on The Natural Garden and get inspired.
Heck, maybe for the price of a couple seed packets, you can find a mint copy of the book that changed my life and maybe yours too.

Exploring the art of flower photography
Flower photography is always rewarding, but it is especially so when you are photographing flowers in your own backyard that you planted and nurtured over the years.

An Iris photographed up close shows details that we may not normally notice. The image is more documentary and would need to be photographed with a tripod to maintain sharpness and detail.
Plant the seeds for creative flower photography in your garden
Flower photography offers us gardeners the perfect opportunity to combine our passion for flowers, with an outlet for creative expression.
Imagine the satisfaction of capturing a striking image of a flower that you actually started from seed in spring, or a drift of black-eyed-Susans that you planted two years earlier. The combinations of flowers we can plant in your garden opens up endless possibilities to create beautiful tapestries for selective focus experiments or simply colourful backgrounds for our favourite flowers
Besides, the thrill of creating beautiful images, the process of documenting your garden from year to year certainly has much value for off-season garden design planning.

This image of a tulip is an example of a more creative approach to flower photography. The soft background and delicate lines as well as the off-centre composition captures the viewers attention.
We already know that we love our subjects, so it’s a small step to focus on a deeper exploration of those same flowers to guide us along the road to discover the art of flower photography.
You don’t need to be an expert photographer with the latest camera gear to get great flower photographs.
This post is aimed at gardeners who take photos rather than photographers who photograph flowers.
We’ll try not to get too technical here – there’s no need to dig deep into the details about megapixels, zoom ratios and the benefits of shooting RAW vs jpeg. There are plenty of photography blogs that you can explore if you are wanting to “dig deeper” into the technical details of capturing flowers.
Be sure to check out my other posts on flower photography including: Macro photography in the garden, Best camera and lens for garden photography, Why Goldenrod is one of my favourite wildflowers to photograph, Ten tips for great flower photography.
Let’s break this post into two parts: Starting with how to take flower portraits or documentary images, followed by how to take creative flower photography.
Before we get into the details, let’s discuss the two most asked questions about flower photography.

These tiny woodland Hepatica need a close approach with either a true macro lens or a macro feature on a compact camera.
What the best lens for flower photography?
The best lens for flower photography is a dedicated macro lens available usually as a 50mm macro, a 100mm macro lens or one approaching 200millimeters (in 35mm talk). These are usually f2.8 lenses that allow a very close approach and the ability to create a beautiful soft background in your image.
If I could have only one lens for wildlife and birds in the garden, it would be my F* 300mm F4.5. Check out my full story on the lens by clicking the link.
If you are using a compact, single-lens camera with built-in close-up capability, then that lens is more than capable of getting striking flower images with careful technique and a little ingenuity.

This tulip, photographed in selective focus, illustrates how the delicate colours surrounding the flower creates a lovely feeling to the image.
What’s the best aperture to use for flower photography?
This is a little more difficult to define, but F8 and F11 are excellent starting points if you are looking for a sharp image using a dedicated macro lens. Moving to F16 will create an even larger depth of field, giving the appearance of a sharper overall image.
If you are using a compact, single-lens camera, F8 may be the highest number (smallest aperture) you can use. Because these cameras inherently have a larger depth of field, F4 -F8 should be good starting points.

This “portrait” of a columbine shows a narrow depth of field but is sharp where it needs to be sharp.
Tips to capture a flower portrait
First, let’s explore what we need and how to capture flower portraits in our garden.
Expensive camera equipment is really not necessary, although the right equipment can open a world of creativity that is sometimes more difficult to achieve with standard point-and-shoot cameras.
In saying that, however, one of the goals of Ferns & Feathers is to show gardeners that the camera they likely already own has the capabilities of creating outstanding images. It shouldn’t matter if that camera is a smartphone, high-end ten-year-old cameras like the Fujifilm X10, Canon PowerShot Elph 500, or a more expensive travel camera like the Panasonic Lumix DMC-LS50 (all of which I have written about in the links provided). These cameras are all capable of outstanding images providing you are not afraid to explore the cameras’ and your own creative possibilities.

This portrait image of a woodland Jack-in-the-pulpit shows a beautiful soft background while the subject itself is sharp and shows close up details of the plant.
Joy of flower photography begins in your garden’s outdoor studio
One of the joys of flower photography for gardeners is knowing that you can step out into your backyard at any time to capture flower images. Of course, not all flower photography has to take place in your own garden, but it sure provides the perfect outdoor studio and creative outlet full of endless possibilities.
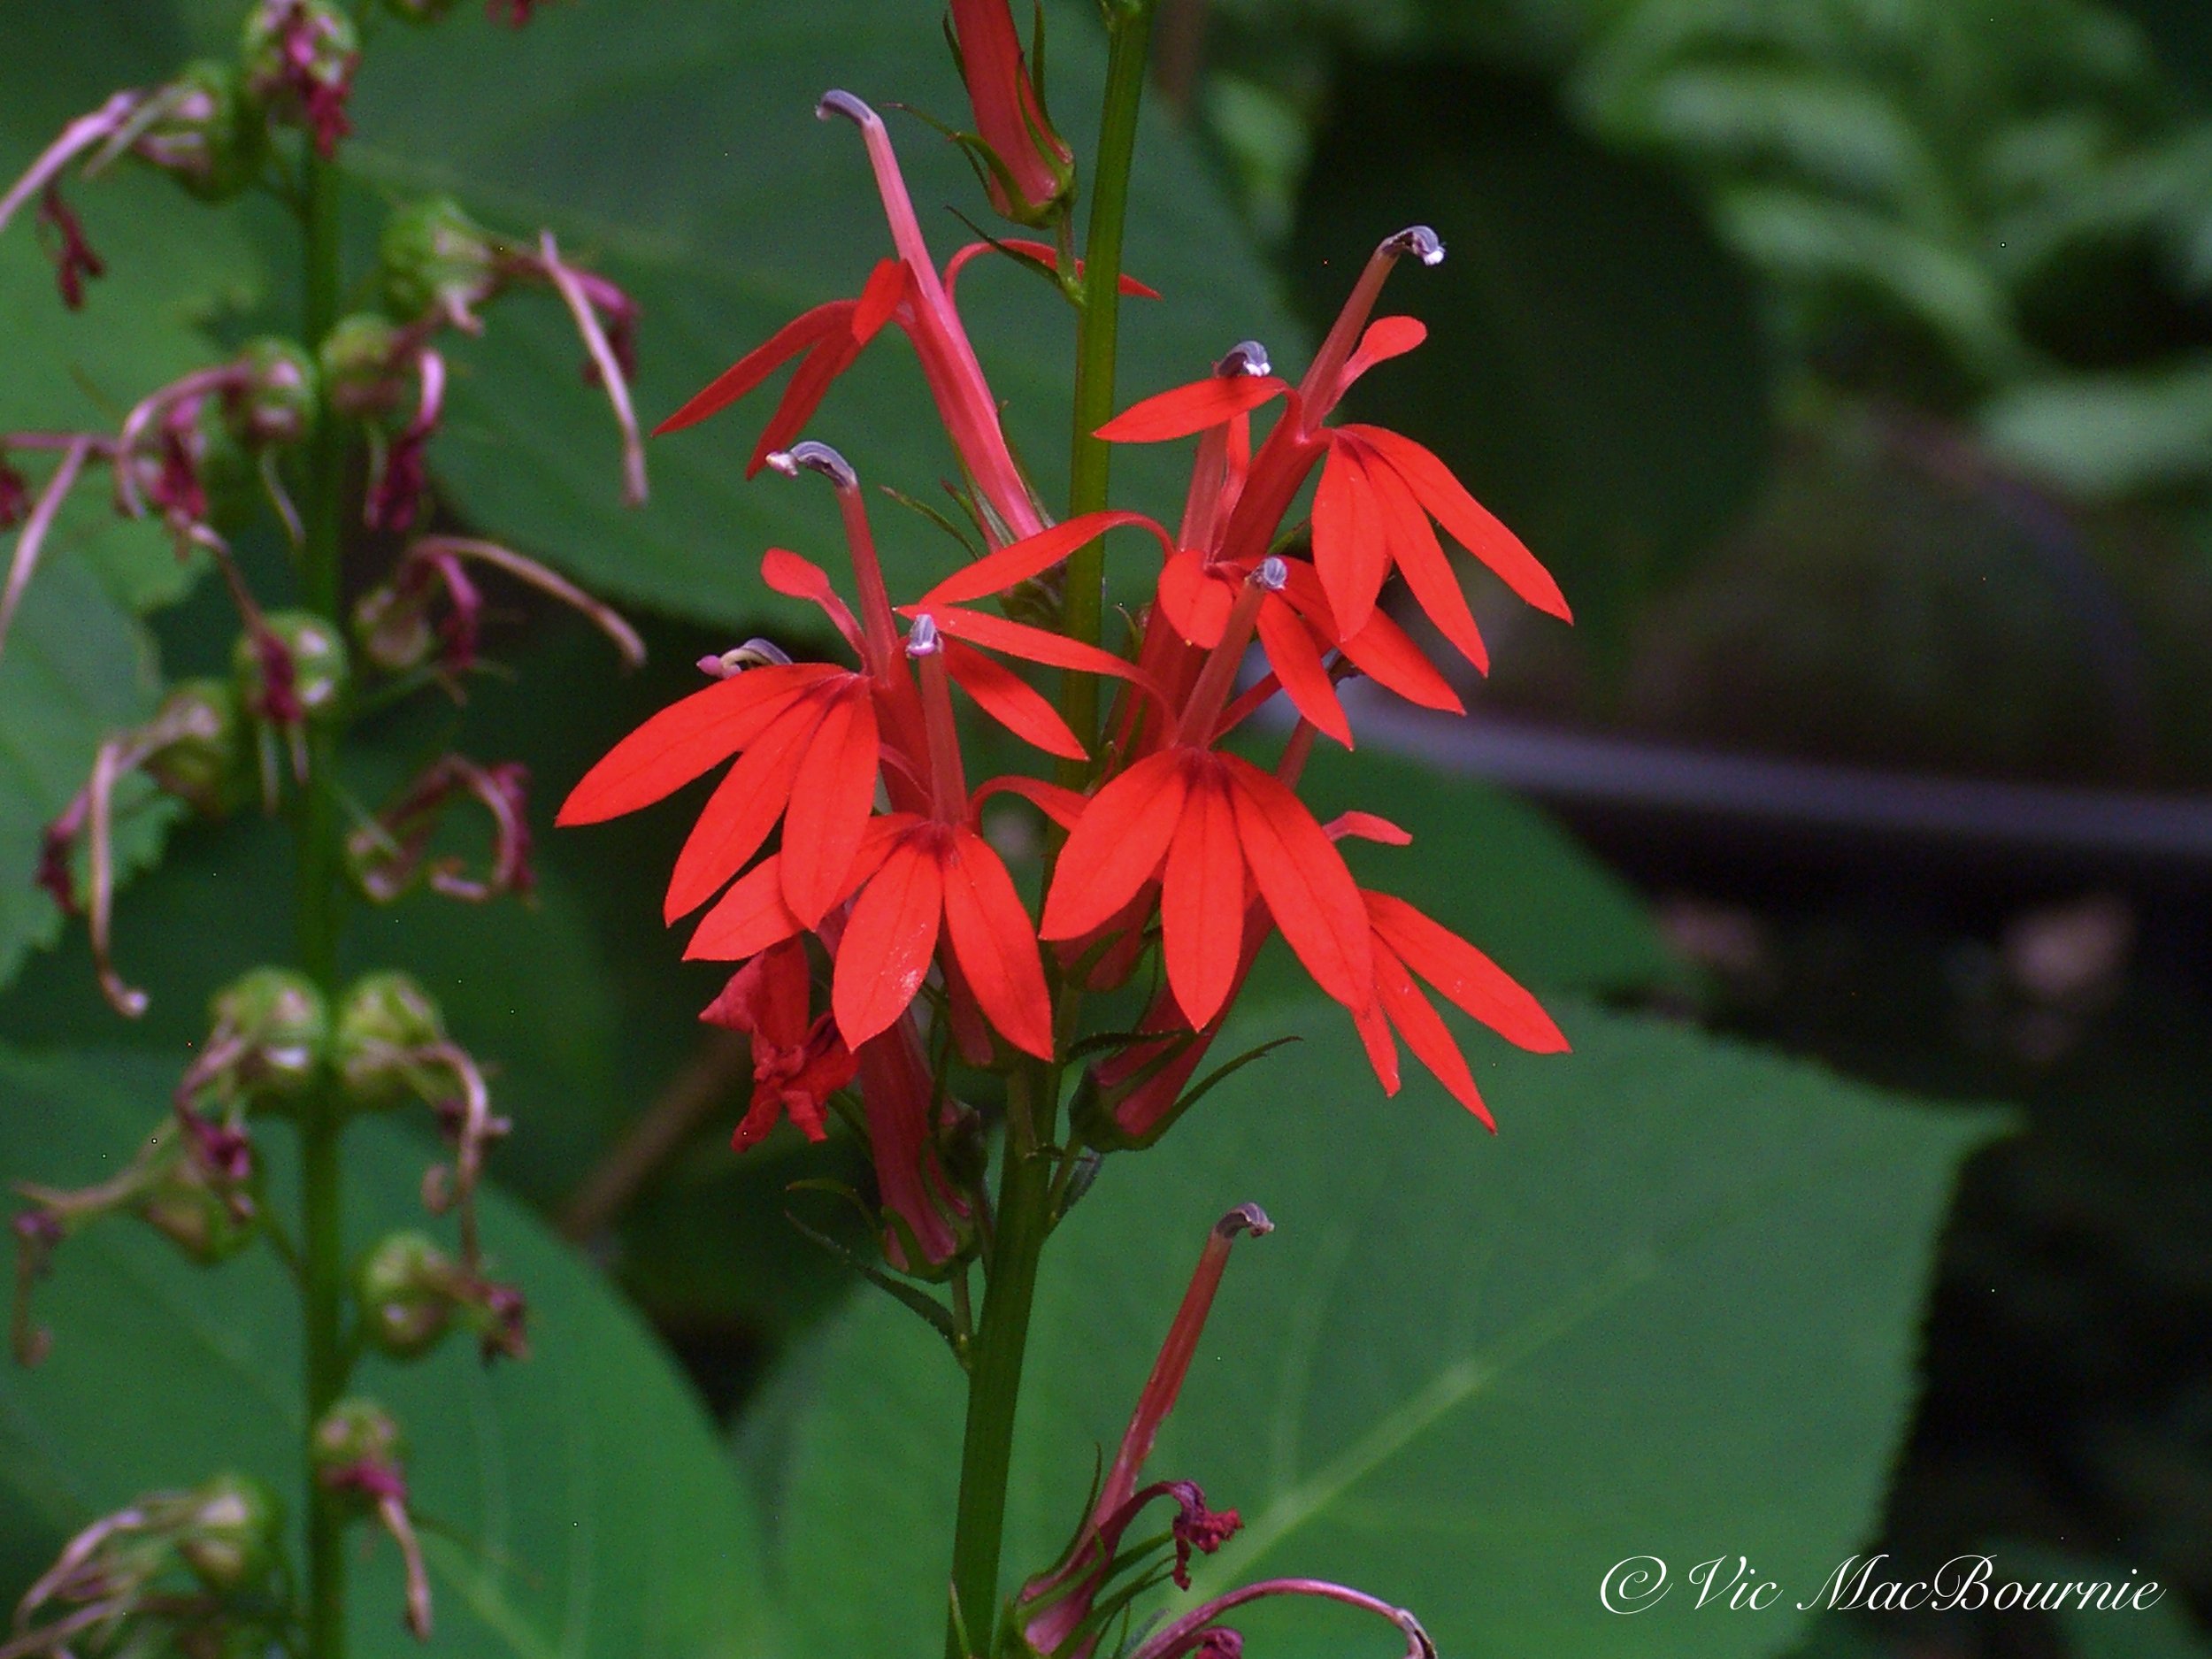
The above image shows a Cardinal flower with a stem of spent flowers to the right.

Just by moving the camera a few inches, we were able to eliminate the distracting spent flowers and find a more pleasing background.
I cut my teeth with flower photography when I worked with the Royal Botanical Gardens in Hamilton, Ontario to create greeting cards, posters and slide shows to promote their wonderful public gardens. I spent hours wandering through the botanical gardens capturing images in all sorts of light. This was way back during my film photography days when capturing images of flowers was much more difficult. Today’s cameras have eliminated much of the difficulty of good flower photography.
But, using your own home-grown flowers enables you to both choose the type of flowers you want to photograph and pick the best times to create images. Choosing the best light, being able to move the flowers, even cut them to move them to more favourable backgrounds ensures a higher degree of success.
In spring, search for annuals that you know will offer photographic possibilities throughout the summer. Whether grown from seed or purchased in cell packs, a little planning with a photographic eye in mind can create stunning pairings that offer photographic possibilities both as individual flowers, as well as in a group setting.
Focus on garden flower portraiture
Being able to create good documentary portraits of flowers in the garden is a good first step. These are usually images that are sharp where they need to be, have good colour and show the flower in a positive light. These images are perfect for sharing on our social media feeds and, when done well, are worthy of hanging on your wall.

This selective focus image of a delicate white flower (Snow in Summer) works beautifully when shot with a dedicated macro lens at F2.8, which is wide open. The foreground and background flowers are out of focus and help to create the dreamy effect in the image. It’s important to overexpose an image like this to keep the whites clean in the image. For my full article on shooting Snow in Summer and selective focus click here.
5 tips for great flower photography
If you have a compact, point-and-shoot style camera set it to close-up mode. There are often two close-up modes to choose from with one allowing a closer approach than the other. If your flower is large, you can probably use the general close-up mode, but if it is small, you may need to use the second macro mode that allows an extremely close approach.
Now, with your camera in AV (aperture value) mode, choose an F-stop that is a higher number rather than a lower one. Try F8 or F16 if your camera allows. These higher F number will create more of depth of field than the smaller F numbers like 2.8 or F4, and the image will appear sharper. Lower F-stop numbers create a shallow depth of field leaving only a very small part of the flower in focus. The same approach works if you are using a dedicated macro lens on a DSLR or mirrorless camera with interchangeable lenses.
Because we are working with high F-stop numbers that actually let less light pass through to the sensor, a tripod or bean bag will help ensure the final image is sharp. Using a tripod is always a good idea. I have a small Culmann Tripod (Amazon link) that collapses to the ground that I have used for years as a travel tripod, but I also use a larger Manfrotto tripod (Adorama link). Today’s modern cameras with shake reduction and the ability to increase ISO settings makes handheld images more possible. The alternative to using a tripod is to go into the camera settings and increase the ISO. Although this may allow you to reduce camera shake, the higher the ISO seting the more likely the image will be degraded by “noise.” If you are using a compact camera, you need to take advantage of every tool available to maximize the quality of your images. A tripod together with an electronic or wireless release will go a long way to improve your documentary images. If you have neither an electronic, nor a wireless release, you can just use the camera’s 2-10-second self-timer.
A flash can really improve your images by providing plenty of light that reduces camera movement while allowing for a high F-stop to create a large depth of field. Most photographers, however, don’t want to have to learn the complexities of using flash even though today’s digital cameras make using a flash much easier. Simply take some test pictures with the flash until you get the lighting where you want it. Off-camera flash creates more pleasing results than the small on-camera flashes built in to today’s cameras, especially if reflectors or an umbrella is used to further soften the light. If you don’t want to use flash, a reflector simplifies the situation allowing the photographer to see exactly the effect of using reflected light from the sky to light up the flower. An even better option is to purchase small led lights (Amazon link) like the Aputure MC RGBWW Mini LED light (Adorama link) that are perfect for shining a constant, controllable light onto your flower.
Managing the background in your flower photography is also extremely important. In the ideal world, you want to isolate your flower with a soft, blurry background that does not compete with your main subject. If you are using a true macro lens on a DSLR/mirrorless camera, achieving this desired end is a little easier. Compact, point-and-shoot cameras make this more difficult for a number of reasons we don’t need to explore. By positioning the flower so that the background is several feet away, you may be able to blur the background sufficiently. Using an off-camera flash can light the flower and darken the background, which can also work. But it might be easier to create your own soft, muted background on a piece of cardboard that can be slipped in behind your flower but far enough away that it looks natural. By making up several different backgrounds, you can achieve different looks for various flowers.

Another selective focus image of the small white flowers of the Snow in Summer, shot in a high-key effect.
Focus on creative flower photography from B&W to selective focus
Once we begin to master documenting flowers, it’s time to open our minds and transform those same flowers into artistic expressions that go well beyond seeing them for what they are and, instead, seeing the colours, shapes and textures that draw us to them.

This tapestry of flowers offers plenty of creative opportunity by moving in close on individual flowers or using selective focus to give a soft, ethereal look to the image.
If you are like me, a good selective focus image of a flower or flowers is always far more inspiring than a typical flower portrait. Creative flower photography involves throwing away almost everything you have learned do in flower portraiture.
We are no longer trying to create a sharp image of our subject. In fact, a dreamy soft image is most often more effective.
For more images showing a more creative approach to flower photography, check out my page on creative photography.

This extreme close-up image of a woodland Hepatica flower shows the extremely small depth of field that a macro lens provides.
Here are five steps to make creative images of flowers
Use a long lens (ideally 300mm or more). Open the F-stop to its widest aperture F4, F5.6 … and shoot through a grouping of flowers but focus on one in the middle of the grouping that stands out from the crowd. Let the flowers in front of the subject and behind the subject go out of focus. The technique is often referred to as “selective focus” and it can be very effective if you have a meadow-style garden or a large drift of flower you can shoot through. The same technique can be used with a good macro lens, especially a 100mm macro. This effect will be more difficult to achieve with a point and shoot camera, but not impossible. These cameras have a greater depth of field which makes it more difficult to capture an image with the surrounding flowers out of focus. For more on creating selective focus photography, check out my earlier article here.
Don’t be afraid to experiment with filters: Modern digital cameras offer a series of filters or modes that can be a source of inspiration for creative flower photography. I especially like the “soft focus” mode, or one marked “creative” (depending on the camera). Experimentation with the filters and modes is important to get a feel for the effect.
Experiment with high-key photography can be very effective under the right conditions. Many cameras have a filter to help create this effect, but the subject has to lend itself to using the technique for it to usually work well. Look for light-coloured flowers in whites or soft pinks against an overcast sky to create the light airy feel you are trying to achieve. Try over exposing the image to keep it light and airy. (You can use the exposure compensation dial in your camera to overexpose the image by one, two or even three F stops.
Use post processing to create delicate painterly images. Photoshop or another post-processing photography program can be used to manipulate flower images after you have taken them. I like to use a free program called Gimp to give images a painterly look, and flower photography offers perfect subjects for the technique. For more information on the process, go to my post on creating painterly images.
Shoot flowers from different angles. It’s easy to get caught taking photos from directly in front of the flower at eye level or slightly above it. It’s important, however, to use different angles to get less obvious views of the flowers. This is where a articulating LED screen on your camera can come in handy if, for example, you are shooting very low at ground level. One of my favourite approaches is to shoot the flower from behind. It’s a view that can be quite interesting and one that often focuses on design rather than the flower itself. Try shooting a flower from the rear with a soft focus filter. For more on shooting flowers from different angles, and with a variety of filters, go to my recent post on photographing sunflowers creatively.
Try photographing the flower in B&W. It may sound odd to photograph a colourful flower in B&W considering it was likely the colour itself that inspired you to photograph the flower in the first place. But by shooting the flower in B&W, you are focusing on the flower’s design rather than letting colour influence you. If nothing else, it will help you concentrate on the inherent graphic elements of the flower – the lead in lines, the subtle curves, the play of light on the petals. Check out my earlier post on shooting your garden in B&W.
Take advantage of the wind. Unlike traditional flower photography, when we wait for the wind to subside and any motion to stop, take advantage of a windy day by shooting flowers blowing in the wind. Set the shutter to a longer exposure and let the wind help to create the image. Experiment with longer and longer shutter speeds until you get the image you are seeking.
Use multiple exposures. If your camera is capable of multiple exposures, experiment with the feature to create some memorable creative flower images.
Traditional filters can be fun. Don’t forget about using traditional filters to make creative flower images. There are many filter companies such as Cokin that continue to offer interesting filter effects that can be used for creative flower photography. Soft focus effects, pastel filters, and coloured polarizers are just a few that come to mind. Try combining them for unique effects. These filters are particularly effective for those who do not like to use post-processing computer programs to create effects. The square filters can be attached to the front lens, or, if there is no filter thread to mount the holder to, just held up in front of the lens while the photo is being taken.
Visit public gardens for inspiration. Using our own gardens is always a good starting point but, if you need inspiration, plan a visit to your local botanical gardens or even a friend’s garden. You’ll experience new flowers and flower combinations that will inspire you to continue to make creative flower images. Be sure to read my earlier posts on some of the best woodland gardens to visit in the United States and Canada.
Create a photo book with your flower photography
Creating beautiful garden flower photography is a great way to document your garden over a growing season or over the course of many growing seasons. Sharing them on social media or with friends and family is also rewarding, but there is nothing like putting them into your own personal photography book.
Last year I created my first garden photography book and I was stunned how impressed I was with the quality of the book when it was delivered. Now it sits on our coffee table and I can look at it, or share it with friends whenever I like. If you have never looked into creating your own book, take a moment to check out my article on the experience. I think you’ll find it helpful, and gathering your best flower photographs might be the perfect excuse to create your first photo book.

Pocket forests: A growing idea finds a home in urban settings
Catherine Cleary and partner Ashe Conrad-Jones of Pocket Forests are dressed for action. The team is giving Ireland a taste of what life could be if there was more nature.
Akira Miyawaki is original creator of mini forest
Why plant a tree when you can plant a miyawaki forest?
It’s a concept that I have always thought made a lot of sense and there is actually a movement taking root, especially in parts of Europe and North America, that encourages planting an intensive mini forest.
This process of creating a small, native forest in a fraction of the time it would normally take in nature, goes by several names: including “micro forest” or “Miyawaki Forest.” In Ireland, a group of young women are even creating a business focusing on what they call a “Pocket Forest.” (But more on their efforts later in the article.)
The mini forest has its roots in the 1970s with the work of a Japanese botanist named Dr. Akira Miyawaki, hence the original name “Miyawaki Forest.” It’s a method he perfected and one that has since been adopted by a number of people looking for a way to recreate a natural forest in a very short period of time – primarily with the aim of restoring native flora and fauna as well as sequestering carbon in an attempt to save the environment from global warming.
Since Dr. Miyawaki discovered the benefits of this method it is estimated that more than 40 million trees have been planted using the Miyawaki Method.
If you are interested in exploring the world of shade gardening further, you might like my recent post on The Natural Shade garden.

Pocket Forests are becoming an important factor in helping rejuvenate nature in Dublin, Ireland.
So what is the Miyawaki method?
It is a scientifically proven method of growing a very small (in some cases tiny) urban forest of native trees and plants in the span of 20 to 30 years – a process that normally would take 200-300 years if left to nature.
A traditional forest grows in three stages: primary, secondary and finally the climax stage. The Miyawaki method skips the first two stages and moves directly to planting a very intensive climax-stage forest and climax community that is planted so dense that the trees, (a variety of native trees and shrubs) skyrocket up competing with one another for light. The result is a miniature, well-balanced ecosystem that works together above and below ground to create the miniature forest. The fact that everything is native, means that the miniature forest is able to maintain balance, is tolerant of the conditions and attracts a myriad of native plant and animal life. A study even showed that one forest attracted 600 species of plants and animals.
Miyawaki mini forest compared to commercially grown plantation
You may say that we have been growing forests for years, replanting forested areas that have been harvested for old growth trees, so why would this method be any different?
Here are some interesting comparisons between the growth of a commercially-grown plantation and a pocket forest.
The trees grow ten times faster in the pocket forest and are 30 times more dense than the trees in a commercial plantation.
Studies have also shown that the pocket forest boasts 100 times more biodiversity and is 100 times more organic than the commercially grown plantation.
Conventional forest compared to mini forests
If that’s not enough, compared to a conventional forest, the pocket forest boasts 30 times or more carbon-dioxide absorption.
If planted properly, it has a guaranteed growth of at least one meter per year and after the initial few years is completely maintenance free.
In as few as three years you have the beginning of a native forest that is completely chemical and fertilizer free with little to no maintenance after two years.

Catherine Cleary and business partner Ashe Conrad-Jones ready for another day of creating Pocket Forests.
How small can the forests be?
These forests can be incredibly small. In fact, in urban centres it is not uncommon to create a forest the size of a typical parking spot at a mall parking lot. One forest was created inside a large, steel, garbage container in an urban/industrialized area.
“We can fit our smallest one into 6 square metres. That’s about the size of a single car parking space. So they can go lots of places… In that small space we plant 11 different species,” explains Catherine Cleary, a co-owner of Pocket Forests in Dublin Ireland.
Catherine, a journalist who was writing about food and reviewing restaurants when Covid hit in February 2020 and her business partner Ashe Conrad-Jones, who runs a small events design business, decided to team up in 2020 and create “pocket forests” based on the Miyawaki method.
“Together we decided that the shutting down of restaurants and events was an opportunity to explore an idea we thought would be perfect for our area of Dublin – a part of Ireland that has the least amount of green space per person in the country. We contacted Afforest in India and IVN in the Netherlands about the Tiny Forests they were planting in urban areas and set up our social enterprise in the summer of 2020 to bring the idea to Irish towns and cities,” explains Cleary.
“No one will protect what they don’t care about; and no one will care about what they have never experienced.”
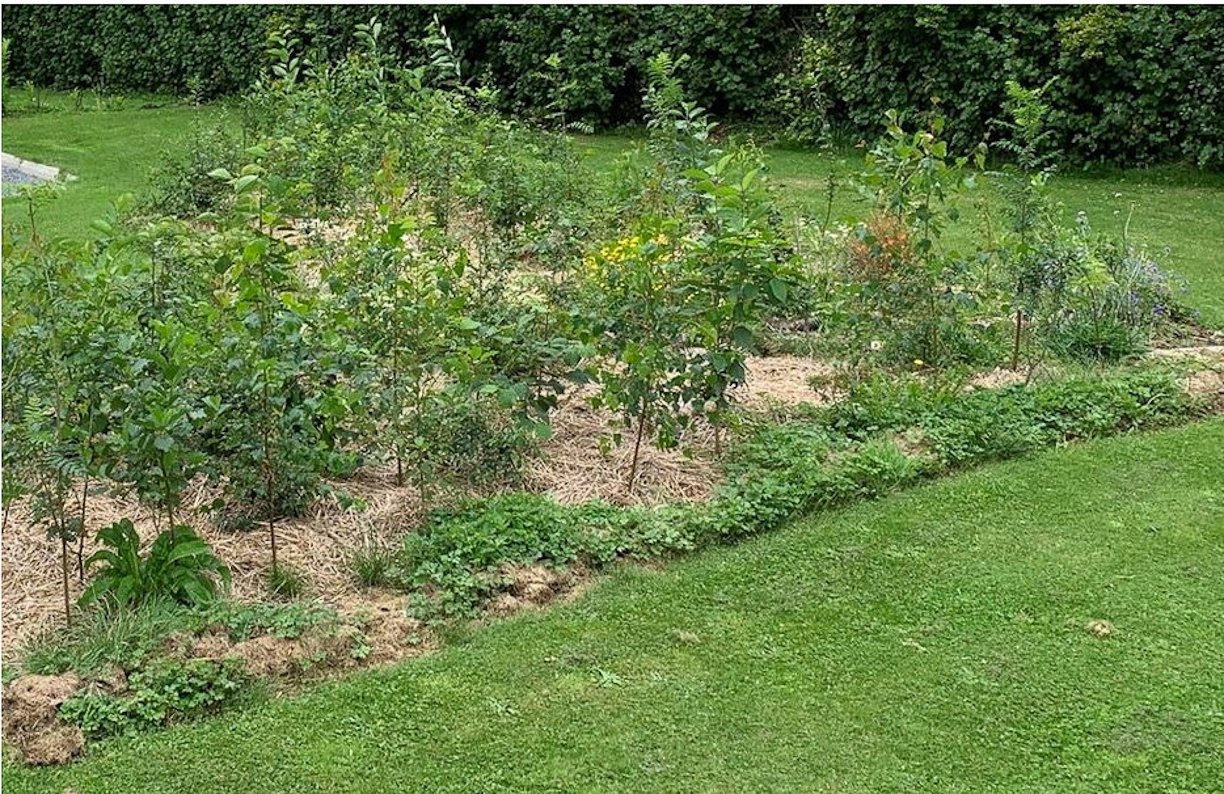
A Pocket Forest beginning to put on growth. Notice how closely the trees are planted together.
It hasn’t been easy but the team has now grown to three with Amy joining Catherine and Ashe in January 2022. She had been working with another local social enterprise, the Dublin Food Co-Op for a decade and wanted to make a change.
How many Pocket forests have been planted?
It’s still early, but Clearly says the company has planted nearly 50 pocket forests since they started, ranging in size from six square metres to 100 square metres.
“We have faced lots of challenges, launching a business while trying to maintain our other “jobs/gigs,” explains Cleary in an email to Ferns & Feathers.
“We had to learn a lot about how to do this. It is not a conventional form of forestry or horticulture but a space all of its own,” explains Cleary. “We have struggled, until very recently, to find native plants grown organically but that is improving and in our first season we had to find temporary homes for hundreds of trees so we could use them in the next bare-root season. (We built a raised bed in my front garden and borrowed a patch of land from a cousin.)”
Part of the companys challenges is convincing local authorities that native trees and shrubs actually belong in the urban areas.
“There is a growing movement to move toward hardier, drought-tolerant, non-native trees that the horticulture industry claims will cope with climate changes and the hostility of city conditions, Cleary explains. “We argue that we should change those conditions by planting pocket forests rather than lone trees as they are incredibly resilient ecosystems, help reverse biodiversity loss and maintain our connections with native trees and shrubs.”
Their arguments get a lot of support from Peter Wohlleben, author of the 288-page, New York Times best seller The Hidden Life of Trees. In his writings, Wohlleben focusses on the importance of a community of trees working together rather than a single tree in an urban environment all on its own. He compares these lone urban trees with “street kids” trying to survive in harsh conditions on their own. These trees have a much shorter lifespan, do not grow as large and are in a daily battle for food, water and a source of healthy soil amidst the concrete of big city life.
How important is soil to Pocket Forests?
Soil, Cleary admits, is vital for the success of a Pocket forest.
“Increasingly we are fascinated by soil health and involving people who live or work or go to the school near the forests in making them so that they can become forest keepers and get all the benefits of those connections with the natural world,” Cleary explains.
“That is our mission: reconnecting people with the natural world, regenerating soil and THEN planting trees, in that order,” Cleary explains
“We love the first forest we worked on, in the grounds of a local school. It is still our largest forest and it is breathtaking to see how the plants are thriving. It is teeming with life both above and below ground and it is just in its second growing season. My own pocket forest in my garden gives me joy every day. I look closely at everything that's happening in it from day to day and season to season and it feels like a vital part of my day to do that.”
Presently, the Pocket Forest team, is working with five schools to plant larger forests this season and are just beginning to prepare the soil this month with two of them.
But their work is constantly growing and sometimes takes them into unusual places.
“We have established a small nursery in an open prison about an hour from the city and will be holding a workshop on their family day to talk to people about the trees, our obsession with worms and soil. We carry out compost workshops in our partner The Digital Hub, a local Government campus where tech start ups and other small companies are based. We are hoping to plant a balcony forest outside a neonatal unit in our local Children's Hospital.”
Currently, the women don’t work outside Ireland, but have done a cross-border project in Newry in Northern Ireland.

Super fertile soil plays a vital role in the success of the Pocket Forest.
Pocket Forest team Q&A
Ferns & Feathers sent Catherine and the Pocket Forest group a series of questions about their work, including how their system might benefit existing woodland gardeners or, if there Pocket Forests could be used for a typical new home here in North America. The following are their highly informative and inspirational answers to the questions.
1) Why did you get involved in creating these forests and do you feel they are an important factor in dealing with climate change into the future.
Cleary: “It was a very personal decision about using my time in the climate and biodiversity crises to try to help alleviate problems.
There’s a quote from David Attenborough that we kept returning to in early presentations: “No one will protect what they don't care about; and no one will care about what they have never experienced.”
“Native Irish forests account for less than 2 per cent of our land habitats and many of them are inaccessible to people, growing in remote areas. Putting a version of them into places where most people live (towns and cities) links up the more wide-scale reforestation project that is going to be vital in the years ahead. We learned very quickly how positively everyone responds to the work of putting spades or forks in the ground, mulching soil with healthy compost, worms, leaf mulch and woody material to begin to try to create the conditions naturally found on a healthy forest floor. We've learned so much from the new science revealing the collaborations between plants and soil life to create thriving ecosystems. Healthy forests can be a huge help in sequestering carbon but we don't see pocket forests as a carbon-offset idea. We need to stop emitting carbon, protect existing forests and create new ones. We need to restore the reverence that Irish people used to have towards trees, the sense that the natural world is more powerfully in control of the system than we are and our efforts to impose our ideas of what looks good or extract resources without protecting the soil life all have to change. Forests are the healthiest systems and have so much to teach us about what it is that the land longs for, and how putting “forest-thinking” into how we produce food or plan cities or teach children about the world will only make things better.”
2) What are the responses of your clients 1-2-3 years down the road as the forests thicken?
Cleary: “Some of them wonder about the wildness of what they have - aphids regularly attack some plants and we've had some clients wonder about them. We give them an information booklet and for people with restricted space there are pruning instructions to keep the trees from growing to their full size. In bigger sites we are advising people to let the trees do their thing, and so far they are.”
3) Are there lessons that can be learned from Pocket forests that can be used in regular forests and woodlands to move them along more quickly or are the steps so precise that they do not translate well to traditional woodlots or forests?
Cleary: “The healthiest forest creation is done by forests. Given the chance (fencing land from grazing or mowing or spraying) a field surrounded by a native hedgerow will become a forest as the trees and shrubs seed themselves. Some management may be needed to keep invasive species out but that is really all anyone needs to do. So we take all our lessons from that. Soil management could be better done than it is at the moment in mainstream forest-creation. Foresters are still using herbicides to spray off competing vegetation after they plant young trees. This is counterproductive and we would definitely love to see mainstream forestry taking a more regenerative approach. We still clear-fell tree plantations for timber and that has to change. Continuous cover forestry is far more sustainable and ancient practices like coppicing could be rediscovered using pocket forests in schools as they grow and become established.”

The team behind Pocket Forests preparing to install yet another of their hard-working miniature forests.
4) How important is it to use native trees and plants in the creation of the Pocket Forests.
Cleary: “It's very important that the core of a pocket forest is native trees and shrubs. We don't mind if people also want to add in fruit trees and shrubs and add flowering plants to the edges of a pocket forest but the majority of it must be native.”
5) Is there anything homeowners who have their own woodland/wildlife gardens can take away from the success of the Pocket Forests?
Cleary: “Spend time enjoying your woodland or wildlife garden, see how its circular system - cycling leaf fall and branches into soil, creates a maintenance free ecosystem. It doesn't need watering, weeding or feeding. Then apply that forest thinking in your vegetable garden or flower beds. Mulch, don't dig, allow what arrives in your garden to take its space before you try to carve out all the space for your idea of what it should be.”
6) For new homeowners looking to create a woodland garden in their typical suburban backyards, would a Pocket Forest work, or would it be too intensive to be successful in a typical urban garden…?
Cleary: “We choose species that can be pruned to stay small in my very small back garden - it is a version of a forest, almost a specimen forest, a form of large-scale bonsai where the closeness of the roots and some gentle pruning in winter keeps the trees from growing to their full size. This can prolong the life of a tree ( a laid hedge can grow for 1,000 years) and also gives garden birds, soil life and insects so much habitat.”
7) Cleary: “What other words of advice might you give to those wanting more information on establishing a Pocket Forest whether it’s in their own backyard or schoolyard…”
8) Cleary: “Can the same approach be used to create a food forest that might be useful to help feed families in need etc.?
Cleary: “Community food forests have wonderful potential to reconnect families with where food comes from. Unlike an allotment where much time and skill is needed with the right planting a food forest can do much of the hard work itself and people can interact with it for enjoyment rather than the constant battling against weeds that happens in bare-soil allotment gardening. A food forest would take time to establish and it would be a stretch to say they could solve food poverty. But fruit and nuts from a food forest will be higher in nutrients and vegetable growing can be incorporated into food forests. The abundance of a food forest also lends itself to community kitchen operations where fruit or vegetable gluts can be cooked or preserved and shared.”
9) You have put in Pocket Forests in schools. What are the children’s reaction to the almost instant forests you have helped them create.?
Cleary: “They love the forests but they also love the work of creating them. Many of the children we work with have no gardens, not even balcony space to grow things and get their hands in the soil and have contact with its health benefits. One girl talked about her trees being her legacy to the school. That made us very happy (and tearful). The children who need it the most are the ones that we see blossoming when we go in to work on a pocket forest project. We would love to grow the enterprise to be able to offer training and jobs to these young people, to train an army of pocket foresters for the future.”
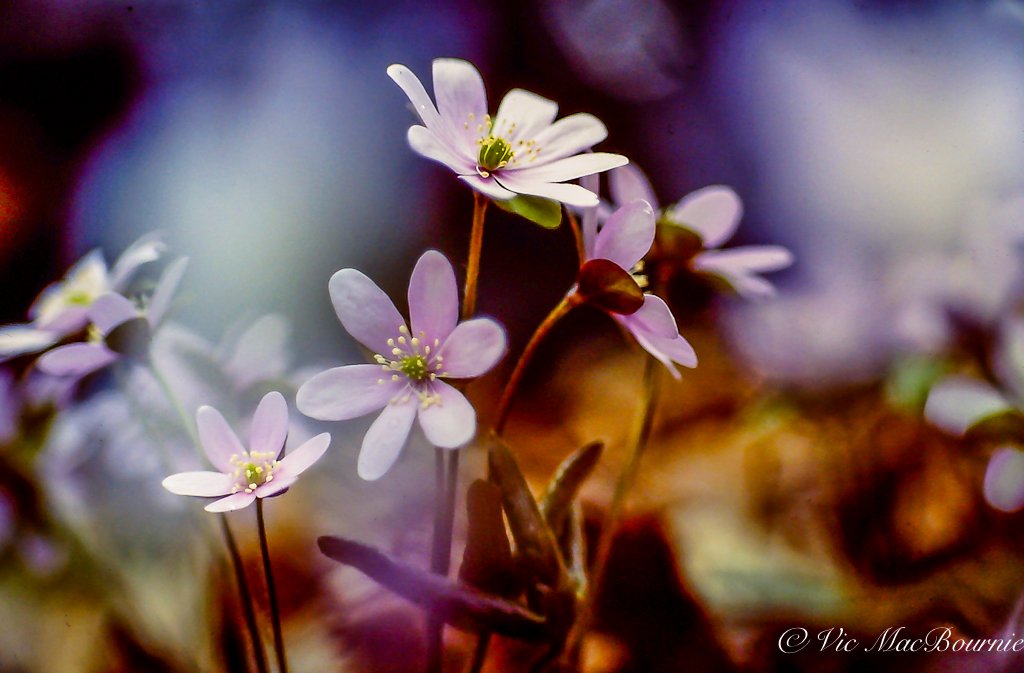
35 native wildflowers for the woodland/shade garden
Spring ephemerals are an important part to any woodland garden both for their early colour and value to native wildlife. Here are 35 woodland wildflowers you will want to consider for your shade/woodland garden.
What flowers grow in a woodland garden: Spring ephemerals are not the only flowers for a shade garden
Many gardeners considering designing a woodland garden or forced to work in the shade of mature trees ask: What flowers can I grow in a woodland or shade garden?
Well, there is something magical about a woodland in the early spring. Flowers you may never have noticed emerge from the fallen leaves adding a carpet of colour on the forest floor. In other areas, a small drift or clump of wildflowers create a woodland vignette that instantly captures your attention.
What flowers are found on the forest floor?
That carpet of colour on the forest floor begins with a plan to plant our native wildflowers (detailed below) in drifts that meld into one another to create magical carpet of colour.
That same magic can be captured in our woodland gardens with just a little imagination and planning. Look for areas of your garden where a colony of white trilliums would appear in spring later replaced with the delicate fronds of a select grouping of maidenhair ferns or Solomon’s Seal.
We have several drifts of Mayapple in various spots in the garden that provide cover and shade for small mammals, reptiles and amphibians that search the forest floor for food. The drift of Mayapple just outside our French door welcomes spring and shares space with wild geranium, wild ginger and a few colourful native columbine.
These, however, are just a few of the native woodland wildflowers that deserve prominent spots in our gardens both for the delicate beauty they bring and for the benefits to local wildlife.
Most of these plants, although native to Ontario, are also native to Northeastern United States and beyond. If you are looking for more detailed information about individual plants go to the North American Native Plant Society for a list local native plant societies. For a list of native plants, shrubs and trees for Britain, check out this informative post by the Royal Horticultural Society.
It is critical that we do not go into a local woodlands and dig up these native wildflowers. Although many of them are difficult to find at your local nursery, with a little effort these wildflowers or their seeds are available through local native plant societies (above.) If you are intent on going into the wild to collect specimens, please take a few minutes to read my posting on why we should not dig up wildflowers from public lands.
Here are quick facts on 35 plants relatively common in woodlands, but are also often widespread throughout North America, including the Eastern United States and parts of Europe
This extremely informative photographic composition was created and provided to Ferns and Feathers by Justin Lewis who runs an exceptional Facebook page on native plants of Ontario.
Be sure to check out my article on Wild Bergamot.
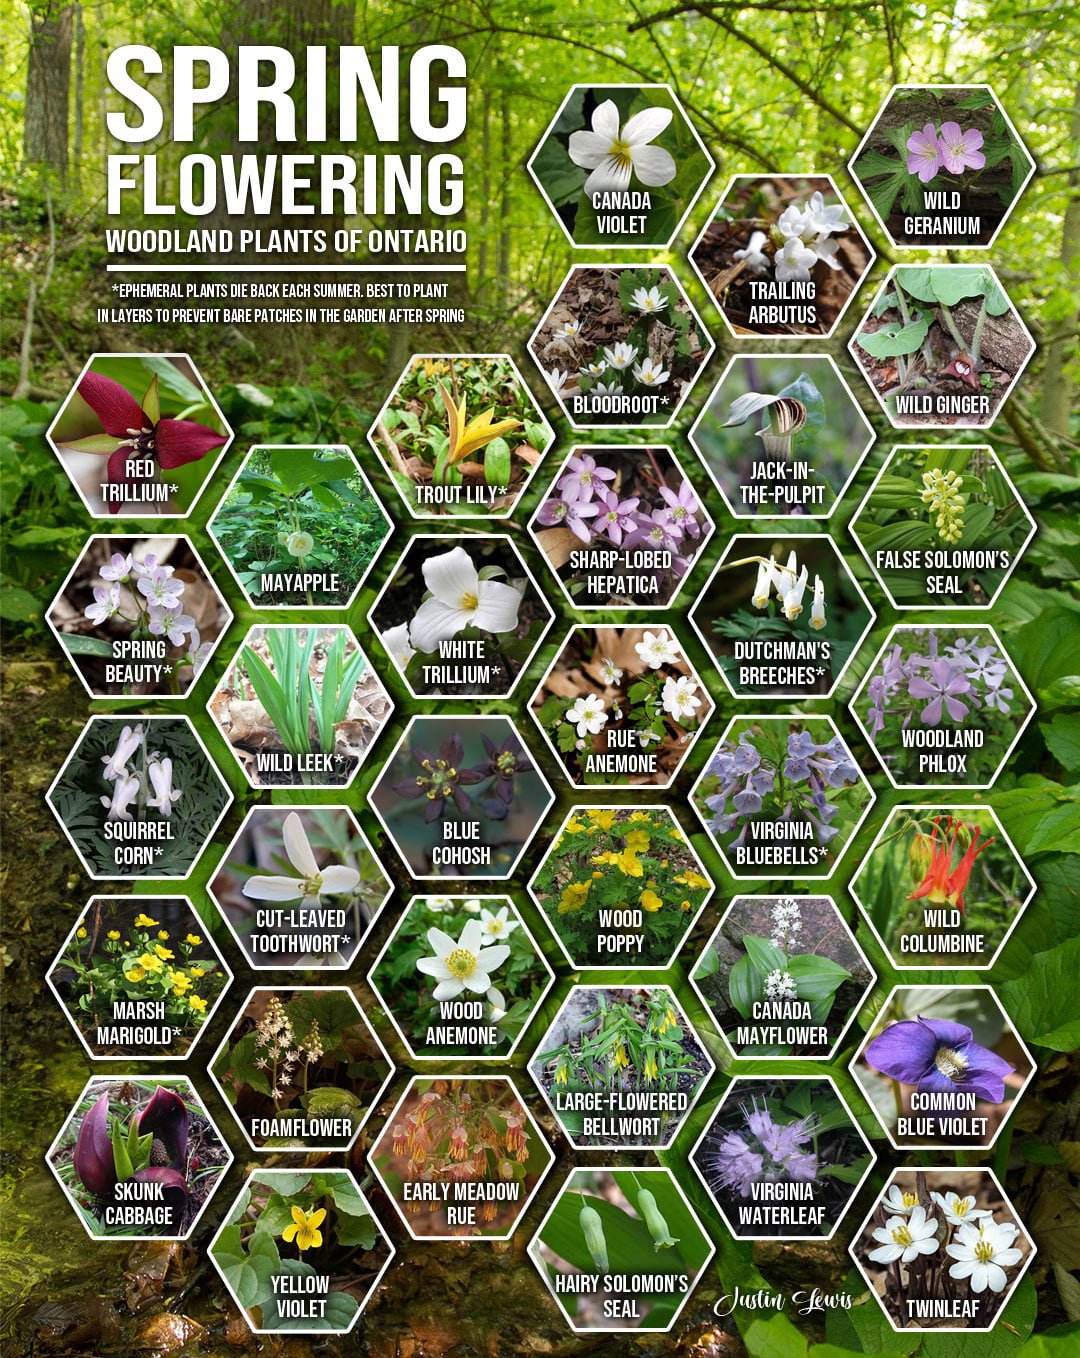
This informative photographic collage was created by the talented Justin Lewis. if you are on Facebook and would like to see more of his work, please take a moment to visit the Facebook page on Ontario Native Plant Gardening where Justin shares his work.
35 Spring Ephemerals to get to know
Red Trillium: (Trillium erectum) Blooms April, May and June in parts of the United States and Canada. It likes humus-rich soil in part shade but where it gets ample sun in early spring before the leaves have emerged. Also goes by the names Red Wakerobin, Stinking Benjamin Wet Dog Trillium, Purple Trillium and Wakerobin. This single, nodding crimson flower with three petals has an unpleasant odour and is one of the most common eastern Trilliums. Its foul odour attracts carrion flies that act as pollinators.
Spring Beauty: (Claytonia lanceolata) Blooms April, May, June July. This quite small, low-growing delicate white and pink flower likes moist soils in spring and sunny conditions.
Squirrel Corn: (Dicentra canadensis) Blooms April, May and is native to Ontario, Quebec, Nova Scotia to Minnesota and through Northeastern United States. It is found in open deciduous woods in humus-rich soil and part shade conditions. Our native bleeding heart sends up a spray of creamy bleeding-heart-style flowers that are attractive to chipmunks and mice. These are poisonous in large quantities and can cause minor skin irritation when touched.
Marsh Marigold: (Caltha palustris) This cheery, vibrant yellow early spring bloomer from the Buttercup family, likes a medium to wet, Loam (sandy-clay) soil, making it perfect for wet areas of the woodland garden. Plants form large clumps and create attractive mounded clumps about a foot in height. Dark waxy leaves are the perfect backdrop for the emerging yellow flowers. Although they do best in marshy areas where they are often found growing naturally along stream banks and edges of ponds. Flowers attract pollinators and plants are generally deer and rabbit resistant.
Skunk Cabbage: (Symplocarpus foetidus) Blooms as early as February in some areas but March and April in most locations. This large (1-3 ft) plant grows in swampy, muddy locations in shady, humus-rich soil from Nova Scotia through to Ontario and Northeastern United States as far south as Georgia. This massive plant has large green leaves and a yellow-green flowering body. Bruised leaves give off a foul odour which gives the skunk cabbage its name. All parts of the plant are poisonous. Best planted in large swampy areas at the back of properties.
Mayapple: (Podophyllum peltatum) Blooms March, April and May with a large, mostly hidden 2-inch white flower (sometimes pinkish or purplish flowers). Prefers part-shade to shady locations in moist, humus-rich soil. The plants are drought-tolerant to some degree in its eastern deciduous forest range. Does not like a lot of competition with other plants. For more on the Mayapple, see my full story here.
Wild Leek: (Allium tricoccum) Blooms May June and July throughout parts of the United States and Canada in moist, rich, deciduous upland and floodplain woodlands. Small creamy-white flowers appear in May, June and July. Like many spring woodland species they grow best in locations where they get sun in early spring and shade throughout the heat of summer.
Cut-Leaved Toothwort: (Cardamine concatenata) This perennial woodland wildflower that blooms in March, April and May with lovely little white to pinkish flowers held above the foliage in a spike, is considered a spring ephemeral. It grows from a horizontal segmented rhizome which spreads producing colonies of plants and can be found growing naturally in rich woodlands, limestone outcrops, rocky banks and bluffs.
Foamflower: (Tiarella cordifolia) a member of the Saxifrage family, blooms in April, May, June and July, throughout parts of Eastern United States and Canada. The plants like to grow in cool, moist, deciduous woods and along stream banks in shady moist, well-drained, humus-rich soils. The white flowers grow on stalks that can reach between 1 and 3 feet in large drifts.
Yellow Violet: (Viola pubescens) Blooms in May and June in Rich, dry woods in part shade. It’s a common native plant throughout parts of Canada and the United States

Trout Lilly in the woodland garden.
Trout Lilly: (Erythronium americanum) Also goes by the name Adder's tongue and Dogtooth violet. They can be found in moist, fertile woods and meadows throughout Ontario, Quebec, New Brunswich and Nova Scotia into north eastern U.S. This low-growing, yellow flowered woodland wildflower forms large colonies primarily through its underground root system (corms) as opposed to extensive seed reproduction which is carried out by ants.
White Trillium: (Trillium grandiflorum) Blooms May and June in rich, mixed woods, thickets and swamps, in full sun, part to full shade. Trilliums like a rich hummusy soil made up of rotted or shredded leaves. More on the Trillium in my article here on spring ephemerals.
Blue Cohosh: (Caulophyllum thalictroides) A member of the Barberry Family, blooming April and May in shady, rich, moist, and well-drained soils. Blue cohosh is a large, multi-stemmed perennial that can grow between 1-3 ft. tall with a purplish-brown to yellow-green flower clusters that are followed by bright-blue berries. Solitary bees are regular visitors to these plants.
Wood Anemone: (Anemone quinquefolia) This early spring white wildlflower grows low to the ground easily forming its own drifts, in dappled spring sunshine in a woodland setting. They prefer moist spring soil often left behind by melting snow and plenty of leaf litter. The flowers can, at times give an impression of being pale lilac or even pinkish as they begin to fade. The daisy like flowers open in daylight and can follow the sun, but will close during rain, heavy cloud or as nightfall sets in.
Early Meadow Rue: (Thalictrum dioocum) This elegant perennial in the buttercup family, is grown primarily for its fine-textured foliage but blooms in early spring (April-May) as its name suggests. Native to Canada and the United States. The flowers are petal-less with yellow stamens that hang down. The female blossoms are purple and appear on separate plants. Grows 1-3 feet in moist, rich average soils in part shade.
Canada Violet: (viola rugulosa) These lovely little white flowers with yellow throats marked with purple stripes bloom from May through July in shady areas with rich, moist soils in open wooded areas. Ideal for woodlands or naturalized areas where they easily spread by seed. They often have a second bloom in late summer.
Bloodroot: (Sanguine canadensis) Blooms in early spring (April May) in rich, moist woodlands. Its cheery white flower with yellow centre emerges as a bud wrapped inside a leaf. The flower and leaf open simultaneously providing native bees and flies with early pollination possibilities. I have a more extensive article on Bloodroot here.

A lovely clump of Hepatica growing on the forest floor in the woodland garden.
Sharp-Lobed Hepatica More on the Hepatica in my story on spring ephemerals
Rue Anemone: (Thalictrum thalictroides) Blooms in early spring and is similar to the wood anemone but with different leaves. These are well suited to woodland gardens or rock gardens. A member of the buttercup family, it grows in clusters and spreads through its tuberous root system.
Wood Poppy: (Stylophorum diphyllum) These intense yellow flowers bloom in May to early June but is considered an endangered species in Ontario. It can be found in rich, mixed deciduous woodlands, often along wooded streams where it grows in full shade. The seeds are dispersed in late June when the greyish-green fruit splits open.
Large-flowered Bellwort: (Uvulaire grandiflore) These 1-2” long yellow flowers bloom mid-spring and lasts about two weeks. They prefer dappled sunlight during the spring and light shade during the summer when the tree canopy has filled in. Not unlike most woodland flowers, they prefer moderately moist, loamy soil with a generous layer of decaying leaves. The plants are pollinated by Bumblebees, Mason bees, Halictid bees and Andrenid bees and the seeds are distributed by ants. They are a favourite of deer and therefore in severe decline where deer are heavily populated.
Hairy Solomon’s Seal (Polygonatum pubescens) (check out my earlier article for more information on Solomon’s Seal
Trailing Arbutus (Epigaea repens) also goes by the name Mayflower and Plymouth Mayflower. White and pink flowers bloom on this shrubby perennial in March, April and May in sandy to peaty woodlands or open clearings in shade to part shade in moist acidic , well-drained, humus-rich, acidic soils. Of particular note is that this plant is very difficult to establish. It is slow growing, does not like to be disturbed and is susceptible to both drought and flooding conditions.
Jack in the Pulpit: Check out my more extensive article on Jack in the Pulpit.
Dutchman’s Breeches: (Dicentra cucullaria) these small white flowers produced in early spring are native to woodlands of eastern North America. These spring ephemerals are pollinated by bumblebees and their seeds spread by ants. The perennial that grows from a cluster of white teardrop-shaped bulblets, got its common name from their white flowers that resemble white breeches.
Virginia Bluebells: (Mertensia virginica) is another spring ephemeral native to eastern North America. The bell-shaped, sky blue flowers sit atop rounded, gray-green leaves on stems up to 24” (60 cm) and bloom in mid-spring in nodding, spiral shaped flowers that are usually blue, but can be white or pink. Most often pollinated by butterflies that perch on the flowers’ edges to sip nectar.
Canada Mayflower (Melanthemum canadense) also goes by the name false lily-of-the-valley, Canadian lily-of-the-valley, two-leaved Solomon’s seal. The plant is widespread throughout Canada and the Northeastern United States into the Applalachian Mountains. Flowers are produced from spring to mid summer followed by a mottled red berries in early summer that turn a deep red by mid summer. Grows naturally in moist woods but can also be found in sandy pine woods in more northern regions.
Virginia Waterleaf (Hydrophyllum virginianum) Blue, white or purple flowers appear in late spring. This herbaceous perennial native to Eastern North america spreads by rhizomes where it can form large colonies in woodland areas. Also spreads by seeds.
Wild Geranium: (Geranium macultum) These tender spring-blooming pinkish-purple blooms prefer shade or part shade in medium to wet sandy loam, but can survive in full sun. They grow to about 1 foot in height, forming very manageable clumps that flower profusely.Their dissected leaves take on a reddish-orange colour in the fall. The spring flowers are pollinated by both bees and butterflies.
Wild Ginger: (Asarum canadense) This attractive, low-growing ground cover really doesn’t have much of a bloom to speak of. A dark red-purple flower blooms under the plant for a short period in early spring but it takes real effort to get a look at the bloom. Lift one of the 6-inch heart-shaped leaves in spring and you’re likely to see it. The shade-loving plant grows to about 6-inches tall in a woodsy, sandy loam with medium moisture.
False Solomon’s Seal: (Maianthemum racemosum) Another impressive, native woodland ground cover that blooms in masses of creamy white flowers in late spring followed by edible pink berries that ripen in the fall. These plants can often be found growing along streams or ponds in a woodland setting, preferring moist acidic and highly organic soil in part shade. the six-inch- long leaves turn lovely shade of yellow in fall. Spreads through underground rhizomes.
Woodland Phlox: (Phlox divaricata) These impressive, spring-blooming blue flowers grow in loose clusters at the tips of stems, (zones 3-8) and are the perfect addition to a woodland garden. They prefer partial shade, in well-drained, medium moisture in partial to full shade.spread slowly. The flowers are fragrant and attract a host of pollinators, including bumblebees, tiger swallowtails, skippers, hummingbird clearwing and sphinx moths. The plants roots form a loose mat of foliage that grows about a foot high (31 cm)
Wild Columbine: Please go to my more extensive post on the native columbine here.
Common Blue Violet: (Viola Sororia) Blooms April-August throughout the eastern halp of the United States, Canada through to parts of Mexico. They grow happily in rich, moist, well-drained woodland areas, but will easily make themselves at home in lawns and weedy areas. They are host plants for the caterpillars of fritillary butterflies that feed on the plants which are also food for wild turkeys, rabbits, deer, mourning dove and white-footed mice, just to name a few. They are pollinated by mostly native bee including the Mining bee as well as Mason and Halictid bees.
Twinleaf: (Jeffersonia diphylla) Flowers from early to late May in most areas. The flowers are solitary, white and born on leafless stems. The plants are quite rare in Ontario but more common in the United States where they are found from Wisconsin south to Alabama and east to the coast, but not up into New England. Minnesota in the northwestern edge of the plant’s range where it is native to counties at the very SE corner of the state.
Solomon’s Seal: Please go to my more extensive post on the Solomon’s Seal.
More links to my articles on native plants
Why picking native wildflowers is wrong
Serviceberry the perfect native tree for the garden
The Mayapple: Native plant worth exploring
Three spring native wildflowers for the garden
A western source for native plants
Native plants source in Ontario
The Eastern columbine native plant for spring
Three native understory trees for Carolinian zone gardeners
Ecological gardening and native plants
Eastern White Pine is for the birds
Native viburnums are ideal to attract birds
The Carolinian Zone in Canada and the United States
Dogwoods for the woodland wildlife garden

Wildlife Rescue: Volunteers are lifeblood for Rescue and Rehabilitation Centres
Rescuing and rehabilitating wildlife is critically important for the survival of so many of our backyard birds, animals, reptiles and amphibians. The dedication and commitment of volunteers is what keeps these wildlife centers working hard to save local wildlife.
Wildlife is such an important part of our gardening experience that we need to do everything we can to not only provide them with the basic necessities of food, water and good habitat to raise their young, there are times we also need to protect them and even save them from dangerous situations that threaten their lives. While we, as Woodland/Wildlife gardeners, can provide assistance in some ways, we often need professionals to provide care for the most sick and injured we come across in our gardens.
This article is part of a series on Wildlife Rescuers/Rehabilitators and the important part they play in saving our woodland friends, whether these little friends are an injured bird, a sick fox, fawn, raccoon, snake, turtle, squirrel, even a mouse.
If you require the assistance of a wildlife expert, please take a moment to check out the resources provided throughout the article, but especially at the end of this article to get help from a caring wildlife rescuer/rehabilitator. And, if possible, consider donating to your local wildlife center.
It’s important to note that Humane Societies and Animal Control locations are not geared for wildlife and will likely put the animals down if you take them there or call them for assistance. While Humane Societies may provide homeowners with a list of rehabilitators (as seen by the links at the end of this article) they are not the first stop in your road to rescue wildlife in need.

Jennifer Howard, a wildlife rescue and rehab volunteer, works with an injured hawk at the Procyon Wildlife Center in Beeton Ontario.
New beginnings and broken hearts: A wildlife rescuer’s story
All photos courtesy Jennifer Howard
It all began seven years ago with a young raccoon curled up on her neighbour’s front lawn.
The little raccoon’s death was the first time her heart would be left broken, but as a dedicated, volunteer wildlife rescuer and rehabilitator, it certainly wasn’t going to be her last.
“A raccoon curled up in the middle of the day, unafraid, most likely has distemper,” explains Jennifer Howard. “It has a bad headache and doesn’t know what to do. It’s so sad.”
At that time, Howard spent most of her time capturing local wildlife on film as a wildlife photographer, but the encounter with the sick raccoon and the volunteers at Procyon Wildlife Centre in Beeton, north of Toronto, changed her life’s direction and set her on a road leading to some of her most memorable experiences, rewards and satisfaction as a volunteer wildlife rescuer and rehabilitator.
This same dedication and commitment to helping local wildlife is what drives the estimated countless thousands of volunteer wildlife rescuers and rehabilitators in the United States, Canada, the United Kingdom and around the world.
Although paid positions in the United States average about $50,000 annually and can go up to $80,000+, there are countless volunteers who work for little to no pay just for the joy of helping wildlife.
“Your releases make everything worthwhile. That special day they go home, run free. Some back home after sickness or injury and those little orphans seeing the world for the first time. Exploring, sniffing around, romping with each other in excitement. That is what we wait for and work so hard for. That makes it all worthwhile.”
— Jennifer Howard
Wildlife Centres count on volunteers and donations
In Ontario, for example, the government does not fund wildlife centres and most are heavily dependent on volunteers. Ontario Wildlife Rescue, an umbrella group for the province’s approximately 50 wildlife centres, urges everyone who can donate time or funds to help the wildlife centres to step forward.
“If you are able to donate even a few hours a week, it can make a big difference. There are a lot of ways you can help out at a wildlife centre. Do you have a skill or a trade? Do you have a car? Can you help with administration, animal care, maintenance or fund raising? There are lots of jobs necessary to keep a wildlife centre running, so volunteer,” the website urges readers. Just some of the jobs listed include: In-centre volunteers, drivers, public relations, foster parents, building and maintenance.
The Ontario groups are just an example of what similar centres around the world face in their quest to help wildlife.
What is the point of wildlife rescue and rehabilitation?
Wildlife rescue and rehabilitation plays a critically important part in preserving and monitoring the health of our local wildlife and are often the ones on the front lines that are able to provide the initial early warning signals that a local animal species is at risk from disease such as mange or rabies. Obviously, they also provide care for injured animals that are able to be eventually re-released to live their lives in the wild.
Young volunteers are on the rise
The good news is that young people have recognized the important work these groups do and are offering to help the movement.
In the U.K. alone, there are an estimated 4,800 people volunteering with wildlife rehabilitation and a new base of younger volunteers has emerged with 66% of volunteers under 35, and 34% under 25-years-old.

Jennifer assists with Scout, a rescued fox, at the wildlife center.
“But even the ones you lose you still helped. Even though you have bad days, you just have to enter into one animal’s room, you look at it, it looks at you. Right there, you know you need to keep going, to save the lives you can, which way outweigh the numbers you can’t. It changes your life forever. And animals are the best therapy a human can ever have.”
— Jennifer Howard
Respect: Key to helping wildlife
Rescuing and rehabilitating wildlife has more than its share of heartbreak. In fact, heartbreak can be a weekly even a daily experience, but it’s always tempered by the knowledge that, when the time comes to put the animal down, the sick or injured little life the rehabilitator rescued was not alone, left to die in freezing temperatures or in severe pain. It doesn’t matter if it was a deer fawn, a young fox, raccoon, bird or even a mouse – all wildlife get treated with the utmost of respect.
Jennifer will never forget the little raccoon that lost its life, but in turn, set her on a path to become a volunteer wildlife rehabilitator.
“This little raccoon was so young it just broke my heart. One of the many,” she admits.
The wildlife centre where Jennifer works is similar to the thousands of centres spread across the United States, Canada, the United Kingdom and other countries around the world.
Toronto Wildlife Centre handles up to 30,000 calls a year
Some are large, like the Toronto Wildlife Centre whose skilled wildlife rehabilitation staff provide supportive care to thousands of animals a year representing more than 270 different species, including many listed as species-at-risk.
The Toronto Centre states that it is the busiest Wildlife Hotline service of its kind in Canada and handles approximately 30,000 calls per year. The Toronto Centre currently includes three expert rescue staff and even have two rescue vehicles. “Providing medical care for wildlife requires skill and innovation: repairing a crushed turtle shell, diagnosing lead poisoning in a loon and stitching a fox’s wounds is just a day in the life of Toronto Wildlife Centre’s expert veterinary team.”
Hope For Wildlife raised the awareness of wildlife rescue and rehabilitators
Hope for Wildlife, a rehabilitation centre in Seaforth, Nova Scotia Canada since 1997, has gained a huge following from its successful television show that went a long way to raise the awareness of the work wildlife rescuers and rehabilitators face every day. The documentary series has aired in more than 100 countries. Even with a successful television show, however, Hope for Wildlife has to work hard to keep up with its wildlife needs. At last count, Hope For Wildlife takes in more that 4,500 wild animals into their care each year.
“Since 1997, we have rescued, rehabilitated, and released over 50,000 injured and orphaned wild animals representing over 250 species,” their website states.
Take a few minutes to check out Hope For Wildlife’s story.
In the United States, the National Wildlife Rehabilitators Association acts as an umbrella group and a voice for the profession providing a job board for wildlife rehabilitators, as well as events such as seminars, workshops and symposiums. Their site also includes a helpful link to wildlife rehabilitators across the United States.
Its stated purposes are:
To foster continued improvement of the profession of wildlife rehabilitation through the development of high standards of ethics and conduct
To encourage networking and to disseminate knowledge
To engender cooperation among public and private agencies and individuals in support of our mission
To foster respect for wildlife and natural ecosystems
While the Toronto Wildlife Centre and other major metropolis centres benefit from a larger donor base, most are tiny organizations relying on a handful of volunteers to get them through from one week to another on donations from the public and, if they are lucky, some local businesses.

Jennifer Howard with a rescued fox prior to taking it back to the wildlife center for care.
“At Procyon Wildlife Rehabilitation and Education Centre, we take everything in from tiny baby mice to white tail deer fawns,” Jennifer explains. “As a rehabilitation centre you do everything in your power to save each and every life. But that is not always possible. But even the ones you lose you still helped. Even though you have bad days, you just have to enter into one animal’s room, you look at it, it looks back at you. Right there, you know you need to keep going – to save the lives you can – which far outweigh the numbers you can’t save. It changes your life forever. And animals are the best therapy a human can ever have.”
Jennifer says that at the wildlife centre where she works they “are all volunteers and it’s hard work,” she adds. As a phone volunteer, she and other volunteers work from home one, six-hour shift a week, “taking messages and admitting the animals after checking to make sure we can. Sometimes we are full. But we will always take emergencies.”
How do wildlife rescuers deal with animals dying?
“I had to teach myself that when an animal I rescued didn’t make it in spite of everything the rehabbers and or veterinarians did, I still saved that animal from any more suffering, from starving or freezing to death, from pain or worse,” Jennifer says.
“It takes some practice. I’ll tell you, when you lose an animal, to deal with it in these terms. But becoming part of a rehabilitation team you learn you must or it can literally eat you up. And trust me, some hit you way harder than others. And it’s tough. And we do shed tears. But you need to remember, they were not alone, they were warm and comfortable and pain free, and with loving caring people. That’s what gets you through your losses.”
According to the National Wildlife Rehabilitators Association based in Minnesota: “Wildlife rehabilitation is the treatment and temporary care of injured, diseased, and displaced indigenous animals, and the subsequent release of healthy animals to appropriate habitats in the wild. As such, wildlife rehabilitation is generally done to help an injured animal. However, through wildlife rehabilitation, individuals make an impact far beyond that one animal.”
Jennifer’s roots in wildlife rescue actually go back before the little raccoon on her neighbour’s lawn.

A group of foxes hanging out at a playground. The foxes are harmless and will likely disappear once humans come to use the park.
Parents play key role in teaching children respect for wildlife
In fact, Jennifer can trace her love of animals back to her parents and grandparents.
“I was destined to be who I am today even way back then. And I have my parents to thank,” she explains.
“The biggest thing we were taught was respect. Always respect that animal’s space, and keep them wild. I have helped save habitat for wildlife along with species at risk. Monitoring as a team member and working with species-at-risk through a family conservation club (Six Mile Lake Conservationists Club) my sister founded, run by my three sisters and my son.”
The club has since disbanded, but during its time it did some great work for wildlife, she adds.
More related articles from Ferns & Feathers you might be interested in exploring:
Before her experience with the young raccoon on her neighbour’s lawn, Jennifer “dealt with a couple other wildlife rehabs… I became good friends with a rescuer … who helped me and taught me and became my mentor, I guess you could say. Working alongside him was amazing. He helped me get swans, geese, foxes, etc. and we still get the occasion to work together. I love it,” she adds.
Jennifer has even been able to use her photography skills as a volunteer.
“I did a bit of animal care at the beginning, but … we started doing photo shoot fundraisers about 5 years ago and it took off amazingly well,” she explains.
People loved getting their pet pictures taken with Santa, and the Easter Bunny and, the year before Covid hit, a fall photo theme.
“It was a lot of fun. We had turtles, snakes, miniature horses, hamsters, dogs and cats and even just families. Just an overwhelmingly amazing response. Then Covid hit us and that was it for fundraisers, until this Christmas” when they took the photo shoot outdoors.
“I still do a bit of animal care when needed, and I’m always learning. I assist with some animals and their treatment and care, and sit in on some vet checks and surgical procedures to photograph for ourselves and our viewers to give them updates,” she explains.
Jennifer, who is also an award winning author, also puts her skills to work writing an article every month for the wildlife centre’s online newsletter. Sometimes the articles are purely educational for readers and other times she writes about and provides update on the animals the Centre is caring for at that time.
Jennifer’s dedication to helping wildlife has earned her two education awards – one from Lake Simcoe Region Conservation Authority in 2011, and another from Ontario Nature in 2016.
Jennifer Howard with her children's book It's a Turtle's Life available at the Toronto Zoo.
She has also written a children’s book on Ontario’s native turtles called: It’s a Shell’s Life. The book was published by the Toronto Zoo’s Adopt a Pond program in 2019 and can be ordered from from the Toronto Zoo @ [email protected]
“The books are geared to children, but I have had adults getting back to me saying they love it and learned a lot from reading it,” she says. “Part of the proceeds go back into the Adopt a Pond program to help them continue on with the good work they do with our turtles. It’s a win, win,” she adds.
Whether rescuing wildlife from dangerous situations, working to rehabilitate them or using her extensive skills to raise funds for or the profile of the Procyon Wildlife and Education Center, there is nothing that gives her and other wildlife rescuers the joy and sense of accomplishment quite like releasing one of their patients back to the wild.
“Your releases make everything worthwhile, Jennifer says. “That special day they go home, run free. Some back home after sickness or injury and those little orphans seeing the world for the first time. Exploring, sniffing around, romping with each other in excitement. That is what we wait for and work so hard for. That makes it all worthwhile.”
In conclusion
It’s impossible to tackle the world of wildlife rescuers and rehabilitators in a single article — the work they do is so far reaching and inspirational.
Today, some of their stories are beginning to be told around the world. YouTube, for example, is full of short videos of incredible rescues that warm our hearts. Many involve dogs and cats and other pets, but others simply tell the story about a local hero wandering out onto the ice to save a stranded young moose or a deer that cannot find its way back to shore across the treacherous ice.
While YouTube has brought these rescues to the masses, wildlife rescuers and rehabilitators have been saving animals for years quietly behind the scenes with no cameras rolling. In fact, they continue to carry out these rescues and incredible rehabilitations everyday.
They do it quietly, without fanfare and with only the joy they get in their hearts and the knowledge that — despite the many heartbreaks they experience — the animals are counting on them in times of need.
The following are helpful Resources for homeowners looking for wildlife rescue and rehabilitation assistance
Worldwide
In Canada
https://www.nwrfcanada.org/what-we-do
http://www.ontariowildliferescue.ca/contact.php
https://www.ontario.ca/page/find-wildlife-rehabilitator
In the United States
• Here is an extensive state-by-state listing from the Humane Society of the United States on how to find a wildlife rehabilitator
https://www.humanesociety.org/resources/how-find-wildlife-rehabilitator
In the United Kingdom
https://www.rspca.org.uk/adviceandwelfare/wildlife/findarehabilitator
• The British Wildlife Rehabilitation Council includes a clickable download of UK rehabilitators
http://www.bwrc.org.uk/FindaRehabilitator
• Here is an extensive list of UK Animal Rescuers from Animal Rescuers.co.uk

Native plants key to attracting birds and other predators
The relationship between our garden predators, including backyard birds, and the use of native plants is tied together by the insect herbivores that depend on native plants as a food source. Together the predators, prey and native plants work to keep our gardens in harmony.
Birds need insects and caterpillars to survive
When we think of predators in our Woodland Wildlife gardens the first thing that comes to mind are larger animals – coyotes, foxes, hawks, owls maybe even snakes large and small.
In other words, we often think of predators with a little trepidation that almost always involve animals with big, sharp teeth, or large and powerful claws.
But the reality is that most of our garden predators are either our favourite birds – chickadees, warblers, cardinals and indigo buntings – or tiny creatures often referred to as beneficial insects that we might not even know live in our gardens.
What do they all have in common? They all require a source of protein that is mostly derived in some part by insect herbivores able to convert specific plants into food for predators.
But not all plants – almost always those plants are native plants, shrubs and trees.
A three-tier approach to predators
These predators can be broken into three tiers: Dominant ones like foxes, hawks and owls, followed by second-tier predators (birds, smaller mammals, amphibians and reptiles) and finally third-tier predators made up mostly of predatory insects and larvae.
So many homeowners have serious pest problems because their gardens are not welcoming to the predators and parasites that in natural ecosystems help keep infestations in check. It’s important to note that if we want to encourage a garden in harmony – critical to keep our gardens from getting overrun with caterpillars, mice and rats – we need to focus on providing a food source for all predators and their prey.
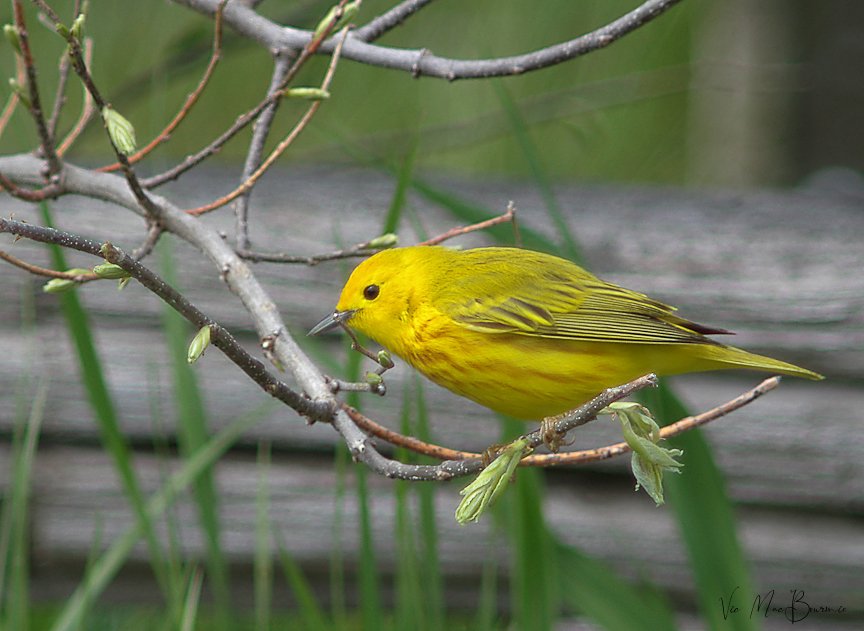
A yellow warbler searches tall grass in search of prey. Backyard birds are among the most voracious of predators in our woodland wildlife gardens.
To put it simply, if a natural area is working in harmony, it’s the predators that are keeping everything in check.
For example, the bottom tier of predators (insects, spiders) are often eaten by the middle-tier predators (birds reptiles) who are often eaten by the top-tier predators. But all the predators are dependent in some way on the herbivores that primarily get their sustenance from plants.
Without these multi-tier predators, our gardens would quickly be over run with insect herbivores, but without them, we would have no predators and that includes birds.
Let’s call it the garden food chain.
The bottom tier of predators is where it begins
So what makes up the bottom tier and how can we invite these predators like beneficial insects into our gardens?
Think the larvae of the delicate green lacewing, a host of beetles, daddy longlegs, small parasitical wasps and tachinid flies, dragonflies and a host of garden spiders that either spin webs or hide out on our flowers ready to pounce on smaller insects all the while helping to keep our plants free from destructive infestations. Many of the best garden predators are actually larvae of larger insects, others are parasitical larvae that develop on or within a victim, ultimately killing it.
As a bonus, these lower-tier predators can also be a fascinating new world of insects to discover and photograph in your garden.
Ask yourself if you are eliminating the lowest tier predators and their prey (caterpillars and other insect herbivores) through the use of pesticides? Or is our overly tidy garden leaving little room for these predators and prey to complete their life cycles? Both can be a death sentence for predator and prey.
“I cannot overemphasize how important insect herbivores are to the health of all terrestrial ecosystems. Worldwide, 37 per cent of animal species are herbivorous insects. These species are collectively very good at converting plant tissue to all types of insect tissue, and as a consequence they also excel at providing food – in the form of themselves – for other species. In fact, a large percentage of the world’s fauna depends entirely on insects to access the energy stored in plants. Birds are a particularly good example of such organisms,”
Just last spring, I was visited from an ill-informed young fellow representing a company saying it would spray around our home to eliminate insects. When I pushed back, he added with great conviction that they would also kill all the spiders around the home’s foundation to ensure a spider-free home. That only raised my blood pressure another notch.
He also assured me many of my neighbours had already purchased the service. A sad commentary on the lack of awareness among so many homeowners.
Please, lay off the pesticides. You may have to tolerate some minor infestations if you turn to beneficial insects and parasites to keep your garden in check, but remember that normal populations of “bad guys” are a necessary food source for the beneficials and help keep them in your yard.
It’s a small price to pay for a healthy garden.
Native plants are food for both prey and predators
Once we eliminate pesticides and an overly tidy garden, it’s important to focus on providing the prey with food to attract them to the garden and, in turn, provide predators with a healthy source of food.
The best way to achieve this is through the use of as many native plants as possible. These are plants that have been part of our natural ecosystem for centuries, and plants that our indigenous insects and animals have grown up with for thousands of years.
Unfortunately, many of these plants have become known as weeds to gardeners and lawn companies who turn to herbicides at the first sign of them.
If you are looking to purchase native plants, don’t be fooled by some of the signs at nurseries. Native plants are neither hybridized versions of the the original genus, nor are they plants originally from Asia or countries that share similar growing agricultural zones as ours.
In addition, even plants that may be native to other distant parts of the country we live in, may not be a food source to local prey animals, insects and larvae. A flower that is native to Western United States or Canada, may not provide the necessary traits that local fauna in our garden require.
Why do we need this third-tier predator prey relationship? Without these often overlooked prey species, there is no future for medium-sized predators like our song birds that depend on many of these third-tier predators and prey for protein, especially when rearing their young.
Here are constructive steps courtesy of the National Wildlife Federation that we can take to attract these third-tier predators into our gardens.
• Consider growing as many herbs and wildflowers native to your region. Look for plants that are ideally suited to beneficial insects. These plants often include daisy-like flowers including asters, black-eyed Susans and coneflowers as well as tickseed, goldenrod varieties, sunflowers and milkweeds.
• Work these flowers favoured by predators into your existing planting beds, or mass them into islands throughout the yard to focus both predator and prey to specific areas of the garden.
• Look for native plants that flower at different times. Spring ephemerals will get the woodland going early and provide potential food sources for birds migrating back into your area, while asters and other fall blooming natives will keep the predator-prey relationship going late into fall. This is especially important for birds migrating back to their wintering grounds.
• Combine predator-friendly plants of various heights to create a structurally diverse habitat.
• Don’t remove the fallen leaves from your planting beds. A healthy layer of leaf litter provides habitat for beetles, spiders and other important predators.
• Refrain from killing any insect or larva. You might be surprised what many quite scary-looking larvae become. Consider doing some on-line research into beneficial insects and larvae. Cornell University’s Biological Control: A Guide to Natural Enemies in North America is an excellent resource.
Middle-tier predators: Songbirds, chipmunks and toads…
Finally, let’s take a quick look at the middle-tier predators.
Many in this group may come as a surprise to gardeners who think of them as more prey than predators. Songbirds are probably the most recognizable of these animals we prefer not to recognize as predators. But don’t tell that to the millions of caterpillars, insects and spiders, that make up most of their diet during spring, summer and fall.
Well known entomologist Douglas Tallamy, in his book Bringing Nature Home, How You Can Sustain Wildlife with Native Plants, outlines the importance of these prey animals in his New York Times best seller.
“I cannot overemphasize how important insect herbivores are to the health of all terrestrial ecosystems. Worldwide, 37 per cent of animal species are herbivorous insects. These species are collectively very good at converting plant tissue to all types of insect tissue, and as a consequence they also excel at providing food – in the form of themselves – for other species. In fact, a large percentage of the world’s fauna depends entirely on insects to access the energy stored in plants. Birds are a particularly good example of such organisms,” he writes adding that 96 per cent of birds depend on insects to survive.
Just as an example, Tallamy’s research states that Chickadee parents need to find, depending on the number of chicks they are raising, as many as 570 caterpillars every day to sustain their family. If it takes 16 to 18 days before the babies fledge, that daily figure jumps to between 6,000 and 9,000 caterpillars to bring a clutch of chickadees to maturity.
Providing this amount of food in or around our gardens is necessary to sustain our chickadee population. Multiply this a thousand fold to account for all of the bird species competing for the same food in spring, not to mention frogs, toads, skunks, possums and even tier-one predators like foxes who dine on insects to the count of up to 26 per cent of their diet.
Bats, too, depend on insects eating as many as 1,000 in a single night as well as moths and other flying insects.
It doesn’t take long to realize that our gardens need to produce hundreds of thousands of insects, caterpillars and larvae to sustain only the first and second tier of predators that we hope call our gardens home.
But providing predators with enough food to sustain them and their offspring is not enough. We need a high percentage of these prey animals to escape predation to evolve into adult stage to allow the process to start all over again.
We need a world filled with butterflies, moths, dragonflies, spiders, birds, frogs, hawks, owls, foxes and even coyotes.
If we hope to have success, we have to smart small, and there is no better place to begin than in our gardens.
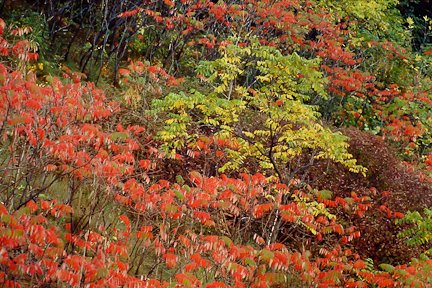
Celebrate autumn: Six of the best fall colour trees for your woodland
Here are six of the best trees for fall colour in your woodland garden. Three are for the upper canopy and three are understory trees. Among the best trees for fall colour include the Sugar Maple, The Oaks and the Tulip Tree, as well as trees in the Dogwood family, serviceberries, and Japanese Maples.
Best upper canopy trees and understory trees for your garden
The thousands of yellow fern-like fronds that fall from our massive Locust trees create a natural ground cover much nicer than any cedar mulch.
Even on their short journey down, they become magical filling the air with yellow butterfly-like leaflets before gently reaching their destinations where, for a few short weeks, they form that natural ground cover.
It’s the magic of fall in the woodland garden.
Upper story trees like the Sugar Maple, Red Oak, Locust and Tulip Trees are excellent starting points. Under story trees like Dogwoods, Japanese Maples and serviceberries are perfect understory trees along with Hawthorns and Crabapples.
At our home we embrace the joy of fall colour.
The reds and burnt oranges of the Sugar Maples, the delicate orange of a lovely Japanese Maple alongside the deep rich reds of another Acer on the path leading to our front door. In the back, the yellow of the Birch trees begin early along with the Locusts followed a little later by our mature Linden tree that drops such a profusion of leaves that the ground is almost completely hidden.
Fall can either be a time of celebration, or a dreaded month’s long period where your only goal is to pick up every last leaf that dares to fall on your property.
Make it a celebration.

A woodland of Sugar Maple in full bloom can be breathtaking, but so too can a single tree in a woodland garden.
Embrace the fall colours on the trees, and when the leaves fall to the ground, celebrate them.
Leave them be on the ground for the insects, birds and other garden critters to celebrate. Enjoy the crunch under your feet and breathe in the damp, musty fall air as the leaves begin to break down into the hummus that feeds our woodlands.
As a woodland gardener, Fall should be one of the best times in your garden.
If it falls a little short, it might be because you are missing out of some of the best fall colour trees.

Our Bloodgood Japanese Maple’s bright red leaves cover the ground in the japanese-inspired garden.
Best trees for fall colour in your garden
I’ve put together a grouping of our best trees for fall colour. Three trees that will form the upper canopy of your shade or woodland garden.
These are the big boys that grow tall and form the backbone of your woodland, providing shade for the understory trees, the shrubs and groundcovers all the while providing much needed shade for us gardeners.
Then, we’ll take a look at some of my favourite under story trees that give us a punch of colour closer to eye level.
The Sugar Maple (acer saccharum)
If you are lucky enough to live in the north east United States or Canada or any area where you can grow a sugar maple, your fall-colour dreams are complete.
We are fortunate to have a mature Sugar Maple at the front of our home arching over the driveway. Yes there are a lot of leaves to lug into the back gardens but the show is worth it my friends.
These are large, upper canopy trees that grow best in zones 3 through 7 but can be grown in zone 8 as well. Where they are happy, they can grow upwards of 75 feet tall with a spread of 30 to 50 feet.
In the bright autumn sun, their fall colour can be electric ranging from yellow to gold, burnt orange and red. During the fall rains the colours shine, especially against the almost black of the tree’s trunk and branches.
The Red Oak (Quercus rubra)
Yes, the best native wildlife tree is also one of the top performers when it comes to fall colours. (See my earlier story on why the Oak is the best tree to plant in your garden)
Here is another impressive, upper canopy tree that can also shoot up to 75 feet in zones 3-7, with a similar spread.
The leaves of the Red Oak fall a little short in vibrancy compared to the the Sugar Maple but still sport lovely shades of crimson, red and redish-brown colours in the fall that eventually fade to brown toward the end of fall.
The Pin oak (Quercus palustris), popular in urban landscapes, has similar fall colours to the Red Oak.
The Oaks wait until the maples have finished their fall show before adding a little more colour to our landscapes.
Anyone who has an oak, or one nearby, knows that their spent leaves can be problematic in the sense that they don’t break down in the same way as maples and most other trees. The tough leathery leaves don’t make the best mulch unless they are shredded and they take a long time to break down in a composter, so it’s best to move most of them into a corner of the yard where they can break down in time. This is also best for many forms of wildlife that depend on the oak leaves to overwinter.
In our garden, we are lucky that the oak tree is in a wilder part of the woodland in the back of the yard and the leaves are simply left to fall where they may.
Tulip Tree (liriodendron tulipifera)
In our yard, the tulip tree certainly has its moment in the spotlight.
This towering, fast growing native tree of the Carolinian Forest is native to the eastern United States and hardy to zone 5. It also needs to be on every woodland gardener’s radar, not only for its bright green spring foliage and lovely large, but subtle spring flowers, but for its dazzling golden yellow fall show.
These trees can easily become the largest tree in your landscape skyrocketing quickly to such heights as 70-90 feet and over time, in the right conditions, reaching up to even greater heights of 150 feet or more with a width of between 30 to 50 feet wide.
If you are looking for a fast grower to block an eyesore, the tulip tree is certainly one to consider. Keep in mind, however, that the tree will eventually require space in the landscape.
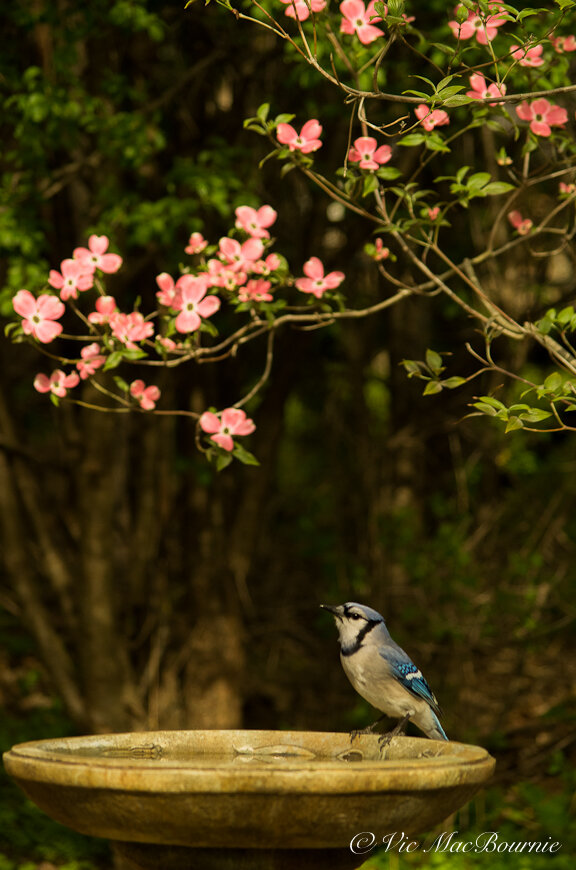
The Flowering Dogwood in its spring flowering regalia is matched only by its beautiful fall colour.
The Dogwoods (Cornus Florida and Cornus Kousa)
Some gardener may ask: Do Dogwoods even have fall color?
Given that these understory trees are so prized for their spring flowers and fall berries along with their elegant horizontal branching habit, they can’t possibly provide fall colour too can they?
Absolutely, and it’s magnificent.
The green ovate leaves of the dogwoods take on an attractive almost stunning reddish-purple in fall putting on a show that comes close to matching their spectacular spring show.
The combination of red leaves, often sporting hints of lingering greens, combined with its bright berries makes the flowering dogwood a must in any fall landscape. When the blue jays and cardinals come to snack on the berries. it’s hard not to admit the trees’ near perfection.
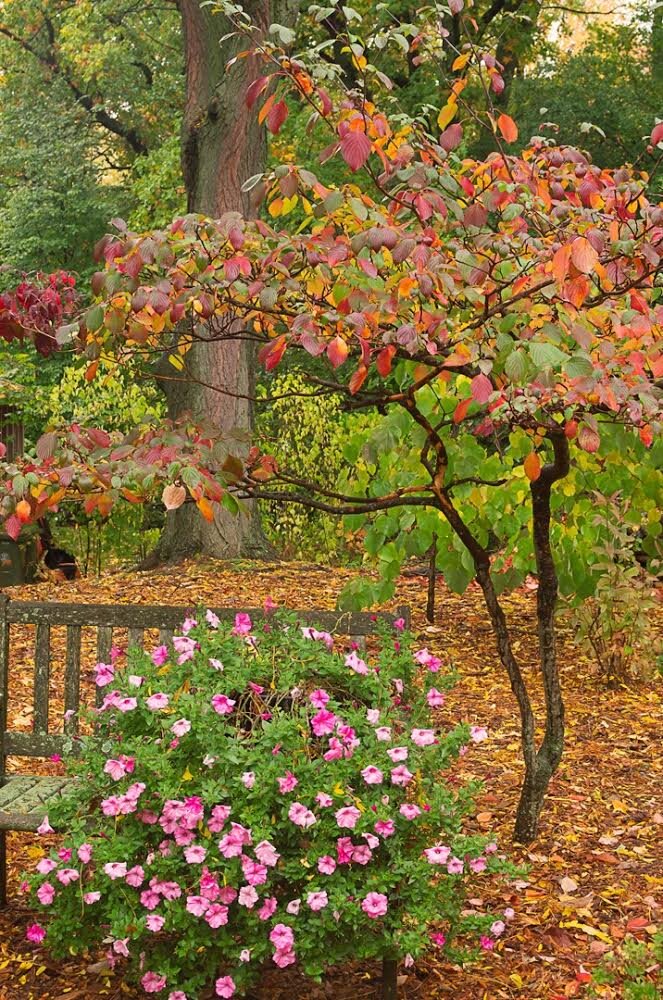
Another native dogwood, The Pagoda Dogwood (cornus alternifolia) is a small dogwood with exceptional fall colour.
The Flowering Dogood can be grown either as a large shrub or small tree in shady, moist rich woodsy soil in hardiness zones from 5-9. It grows to between 15-30 ft. tall and wide with elegant horizontal branching.
It’s considered native from around Maine into southern Ontario’s Carolinian zone and south into illinois and Kansans, and as far south to Florida and Texas.
The non-native Kousa Dogwoods fire up slowly in the fall with the rims of the leaves giving way to a pinkish almost peachy colour that transforms over time into bright red leaves overpowering the remaining green. The result can be spectacular.
All the while, the bright red raspberry-sized fruit continues to cling to the trees if the birds and squirrels have not yet got to them. In any case, the leaves can cling to the trees well into the fall, providing a spot of colour in what may otherwise be a stark landscape.

A collage of our Japanese Maples showing off their fall colours.
Japanese Maples (Acer palmatum)
For pure year-round colour in the landscape, there is no denying that Japanese Maples are at the top of any list.
In our front yard, our mature Bloodgood and delicate Beni Schichihenge compete with the Sugar Maple and a mature serviceberry and, quite frankly, steal the show. They are at their prime later in the season when their competition have completed their fall cycles.
The Beni Schichihenge that features summer foliage of blue-green with cream and rose variegation is as beautiful in its fall show as it is in its summer greens. The soft orange glow of its delicate leaves is a favourite that transforms before our eyes from the comfort of our front picture window. (See my article about creating a window into your woodland)
In the backyard, Japanese Maples take a back stage to other trees for most of the year, but still put on quite a show when the dark burgundy leaves of our Bloodgood Japanese Maple turn fire-engine red right before they drop.
There are too many Japanese Maples to list here, but rest assured that most are excellent fall performers worth investigating.
The serviceberry for fall colour
Even if the serviceberry had little to no fall colour, it would be a star in your landscape. Its value to wildlife (primarily its large purplish berries) and its compact growth habit makes it a highly prized understory tree in today’s urban areas.
That’s to make no mention of the clouds of pollinator-friendly white blooms that cover the tree in early spring. (See my earlier story on the Serviceberry here).
This tough little tree that grows up to 20 feet with a width of between 4 and 15 feet is drought tolerant and grows best in zones 2 through 9.
Fall would not be the same without this lovely tree sparkling in our yards. I consider it such a key component of our woodland wildlife garden that we have several specimens in the backyard and one large mature single-stem tree in the front yard.
Fall colour can vary from yellow to orange to red and everything in between. Often it’s the in between that can be the most striking, when the red leaves are still rimmed with yellows and oranges helping to give the trees a lovely glow in the fall rains or misty mornings.
Tying it all together
In a woodland garden, where, for the most part, shades of greens and textures dominate the summer season, it’s fall that can become the most dramatic season of the year. It’s the time the subtle textures are combined with the bright, vibrant colours of our Maples and the more delicate leaves of the oaks, serviceberries and dogwoods. These combine with the delicate, straw hues of ornamental grasses to create a texture unmatched in so many other garden styles.
Embrace fall. Get out into the garden to admire your natural surroundings and take note of combinations that work so that you can duplicate it in other areas of the garden.
And finally, take a drive into the country. Look for roads that meander through natural forests and woodlands to appreciate – and take notes – how mother nature chooses to celebrate fall.

Different stages of the Sumac in its fall colours showing the greens and yellows transforming into vibrant oranges and reds. If you have a corner of your yard you don’t mind letting Sumac colonize, you won’t be disappointed.
Sumacs provide fall colour and food for birds
Finally we can’t forget about the Sumacs, (staghorn and velvet) which not only provide excellent fall colour in a range of oranges, reds and greens, they are also an important source of food for birds that feast on their berries in late fall through winter.
These small, colony-forming shrubs or small trees and velvety twigs are as much standouts along roadways as they are in your garden. The female sumacs sport yellowish-green flowers in summer that come to life as fuzzy red berries in erect, pyramidal clusters in fall and persist throughout the winter providing a good food sourcefor birds.
In the garden, these native plants need to be kept in check from their wondering and colonizing habits.
More links of interest
Finding inspiration in the natural woodlands.

How to get your backyard wildlife habitat designation
Getting your yard designated a wildlife habitat, or pollinator-friendly yard is a worthwhile endeavour and one that will inspire gardeners to create more an better habitat to help birds, mammals, bugs and butterflies in our gardens. This article provides a resource for anyone thinking about having their gardens designated a wildlife habitat.
Any Garden Can Provide Wildlife-friendly Habitat
Creating a garden for wildlife is a lifelong endeavour, but getting your backyard designated a wildlife habitat can be accomplished in a relatively short period.
For some, qualifying for the Wildlife-friendly habitat designation may be nothing more than listing what they have already accomplished in their gardens; for others, achieving the designation may involve adding specific elements to their yard – a water source, nesting habitat or more natural food sources. Working toward that designation can lead you down a path of discovery not only about creating the right conditions for the natural world around you to thrive, but the importance of those actions in the natural world.
Gardeners looking to obtain their backyard wildlife habitat designation can use this website as an excellent resource. Many of the articles on our site focus on creating natural habitat, using native plants to attract birds and other wildlife, providing sources of water, and taking steps to ensure a safe environment for our backyard visitors. For more, check out the links at the bottom of this article.

The top half of the Canadian Wildlife Certified backyard aluminum sign.
For me, achieving a wildlife-friendly-yard designation was a catalyst to explore a deeper understanding and appreciation of the needs of wildlife – from the largest mammals to the smallest insects.
All good reasons to begin the process to have your property designated wildlife friendly.
“Rapid and large-scale changes to our lands and waters mean wildlife are losing the habitats they once knew. Every habitat garden is a step toward replenishing resources for wildlife such as bees, butterflies, birds, and amphibians—both locally and along migratory corridors. By adding pollinator-friendly and monarch-friendly plants when you certify, your garden also counts toward the Million Pollinator Garden Challenge.”
It’s important to remember that there are actually several different designations available from many wildlife groups around the world that are all worth pursuing. I will list some of the more well known later in the article.
Although mine is based in Canada, the National Wildlife Federation certification program, based in the United States, provides the same program for its residents.
The National Wildlife Federation also provides a program for those interested in attracting butterflies to their yards called Butterfly Heroes. It also operates an extremely useful Native Plant Finder on-line tool that helps identify native plants in your area.
For those who may not be familiar with the National Wildlife Federation, its website describes it as “America’s largest and most trusted conservation organization, work(ing) across the country to unite Americans from all walks of life in giving wildlife a voice. We’ve been on the front lines for wildlife since 1936, fighting for the conservation values that are woven into the fabric of our nation’s collective heritage.
If you are looking for specific information regarding pollinators, I highly recommend Pollinator Partnership, an online resource for all information regarding pollinator friendly yards. One of their programs, Project Wingspan, is focused on monarch butterflies.
A quick search on the internet should help you locate other programs in your area.
“By joining Canadians who make their gardens wildlife-friendly, you help increase suitable habitat for local and migratory wildlife, some of which may be species at risk. As more land is developed for human activities, each wildlife-friendly garden is a haven that can act as a stepping stone between larger areas of habitat, essential for many species’ survival.”
If you have children or grandchildren, pursuing this designation is both a learning opportunity for them as well as a message from you that the environment and the creatures we share our yards with need our help and protection. It’s an outdoor education lesson that could change their lives, send them toward a certain career path or, at simply give them a greater appreciation for all forms of life.

It’s been several years since I went through the process of having our backyard designated a wildlife-friendly habitat. Since then, our woodland/wildlife garden has grown along with a greater knowledge and appreciation of the importance of natural habitat, native plants, water sources and respect for all forms of life. At the time I applied for certification, our garden was already well on its way toward meeting many of the requirements, so it was not difficult to obtain the certificate.
For you, depending on how wildlife friendly your garden already is, the process could be as simple as filling out a questionnaire listing the features your garden already offers. If those features meet enough of the criteria, your garden can get immediate designation. If, on the other hand, you fall short in certain areas, you will know the steps you need to take to complete the process and obtain the designation.
It does not even have to be your garden. According to the guidelines: “The Canadian Wildlife Federation’s Garden Habitat Certification recognizes Canadians who make their home, school, business or community gardens suitable for wildlife by certifying their outdoor space as a “Wildlife-friendly Habitat”.
The organization describes a garden as: “any outdoor space that is influenced by a green (or not so green!) thumb. Everything from veggie gardens to water gardens, acres of land to containers on a patio, a meadow maintained for butterflies to a curated perennial bed, shoreline properties to urban plots – all outdoor spaces can help wildlife. No matter your location, level of experience, garden style or budget, your garden can be beautiful and beneficial for wildlife.”
If you have children or grandchildren, pursuing this designation is both a learning opportunity for them as well as a message from you that the environment and the creatures we share our yards with need our help and protection. It’s an outdoor education lesson that could change their lives, send them toward a certain career path or, at simply give them a greater appreciation for all forms of life.
It’s been several years since I went through the process of having our backyard designated a wildlife-friendly habitat. Since then, our woodland/wildlife garden has grown along with a greater knowledge and appreciation of the importance of natural habitat, native plants, water sources and respect for all forms of life. At the time I applied for certification, our garden was already well on its way toward meeting many of the requirements, so it was not difficult to obtain the certificate.
For you, depending on how wildlife friendly your garden already is, the process could be as simple as filling out a questionnaire listing the features your garden already offers. If those features meet enough of the criteria, your garden can get immediate designation. If, on the other hand, you fall short in certain areas, you will know the steps you need to take to complete the process and obtain the designation.
It does not even have to be your garden. According to the guidelines: “The Canadian Wildlife Federation’s Garden Habitat Certification recognizes Canadians who make their home, school, business or community gardens suitable for wildlife by certifying their outdoor space as a “Wildlife-friendly Habitat”.
The organization describes a garden as: “any outdoor space that is influenced by a green (or not so green!) thumb. Everything from veggie gardens to water gardens, acres of land to containers on a patio, a meadow maintained for butterflies to a curated perennial bed, shoreline properties to urban plots – all outdoor spaces can help wildlife. No matter your location, level of experience, garden style or budget, your garden can be beautiful and beneficial for wildlife.”
So, let’s take a look at some of the requirements needed for the designation.
The National Wildlife Federation Garden for Wildlife Program asks applicants to confirm they’ve provided the required number of elements for each of the following categories:
• Food
• Water
• Cover
• Places to Raise their Young
• Sustainable Practises
Before applying, you are asked to download a checklist to ensure you have met all the requirements for your wildlife garden.
When you get the certification you will become a member of the National Wildlife Federation’s Garden for Wildlife community and receive the following benefits
Personalized certificate
A one-year membership in the National Wildlife Federation and subscription to National Wildlife® magazine
10% off the National Wildlife Federation catalogue merchandise, including nesting boxes, feeders, birdbaths, and other items to enhance your wildlife garden
Subscription to monthly Garden for Wildlife e-newsletter with gardening tips, wildlife stories, and other resources
Exclusive option to purchase attractive garden signs designating your garden as a Certified Wildlife Habitat with the National Wildlife Federation
The following is a list of just a few important links on this website that will help you achieve your Backyard Wildlife designation. Links within these articles will take you to more stories you can explore to help you reach your wildlife designation goals.
• Creating a Woodland Wildlife garden (a complete landscape design plan).
• Why you need to use more native plants in your wildlife garden.
• How to attract birds naturally and save money.
• Creating a Wildlife friendly garden (7 simple steps)
• The Humane Gardener: Nurturing a Backyard habitat for wildlife
• Building a brush pile for your Woodland Wildlife.
This page contains affiliate links. If you purchase a product through one of them, I will receive a commission (at no additional cost to you) I try to only endorse products I have either used, have complete confidence in, or have experience with the manufacturer. Thank you for your support.

Why should we use native plants in our gardens?
Why should we use native trees, shrubs and plants in our landscapes is an important question many gardeners ask. Native plants are vital for the survival of our birds, pollinators and other animals that depend on the food these plants provide. It’s never been more important for gardeners use more native plants and save our environment one garden at a time.
Native plants trees and shrubs vital to our environment
Why is it so important to grow native plants?
It’s a question many gardeners are asking as the pleas to use native (trees, shrubs and plants) grow louder throughout social media circles, environmental gardeners and even traditional garden clubs.
This move toward native plants has grown steadily as an increasing amount of evidence has come forward to show a direct relationship between native plants and the survival (and abundance) of our native insects and caterpillars.
Why does this matter?
Using native plants matters because insect larvae, caterpillars even egg masses are key to the survival of so many of our birds, reptiles, amphibians and mammals that depend, not just on the existence of these insects, but on an abundance of them in spring to raise their young.
It’s not just the protein the emerging insects provide.
Insects depend on these plants for food and pollinators depend on the flowers their ancestors have visited for thousands of years to raise their young (see Our Native Bees). The pollination of those flowers in spring lead to berries and nuts that provide sustenance for birds, mammals even more insects, which, in turn, provide food for larger predators such as fox, coyotes, owls…
It’s the circle of life in action, but that circle most often starts with the single seed of a native plant.
Native plants are, thankfully becoming more mainstream as more informed gardeners realize the how important these native plants, shrubs and trees are for native wildlife. The proof is that Little Bluestem native grass has been chosen the Top Perennial for 2022. Choosing a grass, rather than a colourful flower is reason enough to think we are making good progress. Be sure to check out my complete article on Little Bluestem.

A combination of milkweed, Black-Eyed Susans and columbines beneath a mature serviceberry tree combine with grasses and ferns welcome native fauna in our front garden.
Experts on the importance of using native plants
I particularly like this line from the website of the Halton Regions Master Gardener’s website talking about the growing popularity of native plant gardening.
“This is an exciting trend as it offers homeowners and gardeners the ability to build a landscape legacy for future generations. The status quo of landscaping solely to ‘decorate your home’ for your own benefit now seems rather empty because of course we share our space with creatures of all kinds. How can we create landscapes only for ‘us’?”
Well said. Indeed, how can we carry on like we have in the past worshipping great swaths of lawn that offer nothing of value to any of our native wildlife.
In her groundbreaking book Grow Wild: Native Plant Gardening in Canada, Lorraine Johnson describes yards she has visited planted with native flowers.
“For starters, the birds are squawking up a riot – an exuberant contrast to the silence next door, where no seedpods or berries or brush exist to lure them. And in the aural spaces between the drone of traffic, you catch a different kind of rhythm: the hum of insects, some losing the battle and becoming bird dinner, others making their way into flowers, drinking captured rainwater, picking up pollen.”
Johnson goes on to describe what she sees growing in the garden: “The winged diversity of this yard has its parallel on the ground too. Instead of the handful of plant choices offered throughout the neighbourhood, there are dozens of different plantings: colorful native meadow plants in the sunny center, and the subdued cooling greens of shady woodlanders in the darker corners. You count 50 species, and those are just the ones immediately identifiable.”
Entomologist Douglas Tallamy, in his book Bringing Nature Home: How You can Sustain Wildlife With Native Plants, (see my earlier story) explains the vital role gardeners are being asked to take on: “Like it or not, gardeners have become important players in the management of our nation’s wildlife. It is now within the power of individual gardeners to do something that we all dream of doing to make a difference. In this case, the “difference” will be the future of biodiversity, to the native plants and animals of North America and the ecosystems that sustain them.”
Native plants are the ecological basis upon which life depends. Without them and the insects that co-evolved with them, local birds cannot survive. For example, Tallamy’s research has shown that native oak trees support more than 500 species of caterpillars.
And what some gardeners might see as a pest is life-giving food to the birds that call our neighbourhoods home.
Chickadees, for example, need from 4,000 to 7,000 caterpillars to raise just one clutch of young, and those caterpillars need to be close to the nest – about 50 feet – otherwise the parent chickadees use too much energy finding the caterpillars.
If it takes more than 6,000 caterpillars to raise one brood of chickadees, the presence of important native trees such oaks, birch and maples are critical to the survival of our birds and other animals.

This outstanding poster created by Justin Lewis shows how native plants help our birds.
Why native plants matter
So this harsh reality begs the question: Why do the plants have to be native to our area?
The fauna (insects, birds, mammals, reptiles, amphibians) have depended on these plants for thousands of years. Their digestive systems, even specific body parts, have developed to take advantage of these plants.
In fact, some fauna are linked directly to a single native plant.
The monarch butterfly is a perfect example of the symbiosis between a plant species and fauna. Monarchs depend on milkweeds to raise their young. They lay their eggs only on the milkweed plants where they hatch into tiny caterpillars that feed exclusively on that plant and take up enough of the poisonous milky resin in the plant to make them poisonous to birds and help them to survive as they transform into beautiful monarch butterflies. Without the native milkweed plants, monarchs would not survive.
Time to battle the aliens
Tallamy does not sugar-coat the damage that has already been done by our dedication to growing often invasive, non-native plants.
“My argument for using native plant species moves beyond debatable values and ethics into the world of scientific fact,” he writes. “We can no longer hope to coexist with the other animals if we continue to wage war on their homes and food supplies. This simple tenet provides an imperative, particularly for the bird and butterfly lovers among us, to fight invasive aliens as if it really matters and to reevaluate our centuries-old love affair with alien ornamentals.”
What many gardeners and garden nurseries fail to understand is that, in most situations, only the native species of a plant provide the full benefits to native fauna. Cultivars of our favourite plants promise to solve one problem (mildew powder for example) but in doing so breed out many of the benefits the native species provide. It’s not uncommon, for example, for these cultivars to be sterile or “resistant” to the vary species that are attracted to and dependent on, the native species of that plant.
We all want the perfect plant in our gardens, but do we ever think that those holes in the plant are there because one of our native beetles depend on that plant as a food source? By making the plant indigestible to that beetle, we are denying it a valuable food source for the sake of garden aesthetics and, in doing so, signing its death notice over time.
These cultivars might look great in the garden but many do little to nothing to help the species that depend on them.
I love our beautiful Cornus Kousa dogwood trees in our garden. Unfortunately, they are an example of plants that have been introduced to our area from Asia that offer very little to local wildlife. Although these dogwoods act much the same as our native Florida Dogwood species by putting out a profusion of flowers that last well into the summer, followed by strawberry-sized red fruit, very few, if any of our local wildlife benefit from these trees.
The native dogwoods, however, are magnets for a range of insects, caterpillars, birds and mammals that have grown up with them over centuries and depend on them for sustenance. (see article on best dogwoods)
The sad fact is that the introduced Cornus Kousa dogwoods may well have brought with them a disease that is killing our native dogwood. Anthracnose, a disease that attacks native dogwoods (cornus florida) and eventually kills them, is suspected to have come into North America in the 1970s with the importation of the Kousa dogwoods which do not suffer from the bacteria.
“It is highly likely that dogwood anthracnose was imported into the United States on kousa dogwoods from Asia because it escaped detection at quarantine facilities.” Tallamy writes.
In our garden, we have both native and non-native dogwoods.
We are delighted to have the spring azure butterfly in our garden, thanks to the presence of our Florida Dogwood. It’s certainly not thanks to the impressive Kousa Dogwoods in our yard.
Tellamy writes: “The diminutive spring azure (Celastrina ladon), one of the first butterflies to become active as the days warm up in spring, may become a resident of your yard if you plant flowering dogwood (Cornus florida) or any of our native Viburnum species. They won’t appear if you insist on kousa dogwood (C. kousa) from Asia. Azures will have nothing to do with that alien.”
The Canadian Wildlife Federation website points out that the Karner Blue butterfly is endangered because its larval host plant, the wild lupine, is increasingly rare. Today’s abundant, non-native lupines do not offer the Karner Blue butterfly the source of food it’s caterpillar needs to survive.
“While all plants can provide shelter, and ornamentals with berries can provide some food, native plants offer the greatest benefit because they also support a wide variety of insects that provide a source of protein for many animals. These insects are especially necessary for local bird populations when they are raising young. Many people use bird feeders to attract birds. Another way of attracting birds is by utilizing native plants in the landscape.”
Native trees, shrubs and plants (zones 5-6)
The following are just a few of the more popular native trees, shrubs and flowering plants and grasses in Ontario and N.E. United States.
The list was compiled by landscape designer Angela den Hoed for the Woodland Wildlife garden design she created for Ferns & Feathers and lists the number of species the plant supports.
These trees provide both habitat and food in the form of caterpillars and insects for birds.
Oak – Willow (Quercus phellos), Pin (Q. palustris), or Bur (Q. macrocarpa): Oak trees support the highest quantity of wildlife of any plant in the region including 519 species. Their acorns also provide food for other wildlife.
Maple – Red (Acer rubrum) or Sugar (A. saccharum): Support 293 species. It may be easier to find a maple the appropriate size for a small garden.
Understory Trees
Crabapple – American/Sweet (Malus coronaria): Flowers in spring and provides fruit in the fall and throughout the winter. Supports 287 species.
Dogwood – Flowering (Cornus florida) or Pagoda (C. alternifolia): Flowers in spring and supports 124 species.
Plum - American (Prunus americana) or Chokecherry (P. virginiana): Plums are #2 on the list of trees in terms of the number of butterflies and moths they support (435). These will flower in the spring and provide berries for birds in the fall.
Serviceberry – Canadian Serviceberry (Amelanchier canadensis) or Allegheny Serviceberry (A. laevis): These also bloom in late spring, support 135 species and provide birds food in the form of berries in the fall.
Magnolia – Sweetbay Magnolia (Magnolia virginiana): Supports 20 species including a few that can only live on Magnolias.
Shrubs to consider
Arrowwood Viburnum (Viburnum dentatum): Spring flowers lead to blue-black berry like drupes that are an ideal fuel for bird migration. 111 species supported
Inkberry Holly (Ilex glabra) ‘Gembox’: 44 species supported
Red Osier Dogwood (Cornus sericea) – ‘Arctic Fire’: White flower, blue drupes in summer, red fall color, bright red branches in winter. Like the dogwood tree, supports 44 species
Pinxterbloom Azalea (Rhododendron periclymenoides): Pink flowers in spring, supports 53 species
Oakleaf Hydrangea (Hydrangea quercifolia) ‘Ruby Slippers’ or ‘Munchkind’: Supports 10 species.
New Jersey Tea (Ceanothus americana): White flowers in spring, supports 44 species.
Summersweet/Sweet Pepperbush (Clethra alnifolia) ‘Ruby Slippers’: Fragrant pink flowers in summer, attracts hummingbirds and pollinators.
Perennials to consider
• White Wood Aster (Aster divaricatus): White flowers late summer, supports 115 species
• Columbine (Aquilegia canadensis): Red flowers in spring, Supports 12 species.
• Cinnamon Fern (Osmunda cinnamomea): Cinnamon red new growth, supports 7 species.
• Virginia Bluebells (Mertensia virginica): Blue flowers in spring, supports 3 species.
• Early Meadow Rue (Thalictrum dioicum): Greenish yellow flowers in spring, supports 15 species.
• Short’s Aster (Symphyotrichum shortii): Blue-violet flowers in fall, supports 11 species.
• Goat’s Beard (Aruncus dioicus): Tall white flowers in May.
• Coral Bells (Heuchera villosa) ‘Autumn Bride’: White flowers late summer.
• Tall Thimbleweed (Anemone virginiana): White flowers in summer, supports 2 species.
• Foamflower (Tiarella cordifolia): White or pink flowers in May.
Ground covers to consider
• Dwarf Crested Iris (Iris cristata): Blue-violet flowers in April, supports 13 species.
• Wild Ginger (Asarum canadense): Burgundy flowers in spring at the ground.
• Wild Blue Phlox (Phlox divaricate): Blue flowers in spring, supports 3 species.
• Wild Geranium (Geranium maculatum): white, pink, or purple flowers in spring, supports 27 species.
Other reasons to grow native plants
Of course there are lot of good reasons to grow native plants that are not related to the protection of our native flora and fauna.
The U.S. Forest Service points out some of the benefits on its website.
• They are adapted to the local climate and soil conditions.
• They do not require fertilizers and require fewer pesticides than lawns.
• Their deep-root systems increase the soil’s capacity to store water and can signinficantly reduce water runoff and, consequently, flooding.
• Native plants help reduce air pollution. (Not only do they not require mowing and the resulting carbon from the burning of fossil fuels, the plants actually sequester, or remove, carbon from the air.
• Native plants provide shelter and food for wildlife.
• Native plants promote biodiversity and stewardship of our natural heritage
What is a native plant?
The question is often asked: What exactly makes up a native plant?
The simple answer is that a native plant is one that has not been introduced by humans. One that has grown naturally for centuries and in doing so has become uniquely adapted to local environmental conditions.
Lorraine Johnson defines native plants as “a species that has evolved in association with all the features of a place and developed specific and important functional relationships and interactions that contribute to the specificity and identity of that place.”
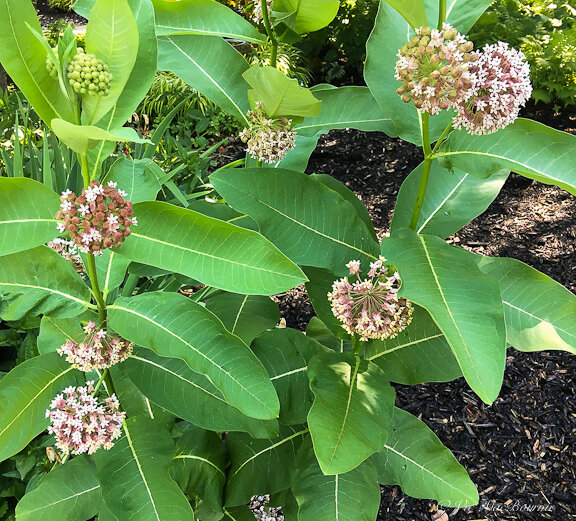
Milkweed, the only food source for the caterpillars of Monarch butterfly, growing happily in our front garden alongside black-eyed Susans.
A native plant versus a naturalized plant
Many gardeners mistake native plants with naturalized plants. Just because they may freely reproduce and are abundant in the zone we live in does not mean they are native. Some may have been around for decades or even longer but they are still not natives.
Naturalized plants are often described as an exotic plant that manages to reproduce naturally in a specific environment.
A good example that we are all familiar with is the common dandelion. They have surely been around forever and we all know how easily they reproduce from seed.
So dandelions are naturalized plants that actually have some benefit to local fauna.
Other common plants, let’s say the daylily, cannot spread to new areas without human intervention. The daylily can grow in size through rhizomous growth but if you find it growing in a wild area, it got there not by seed but through the transplanting of its rhizome.
Invasive plants are defined by their spreading habit that actually results in an altering of the natural ecosystems around them, where they often dominate natural species crowding them out and eventually resulting in their death. The Norway maple, purple loosestrife, buckthorn and giant hogweed are just a few examples of invasive exotic species.
Many of these invasive, naturalized non-native flora species can still have benefits to local fauna, but in general, they do more harm than good. The use of a native plant as an alternate would be preferable.
In her 1998 groundbreaking book, Johnson writes of the importance of gardeners adopting a more environmental, native based style of gardening.
“You don’t need acres and acres of “pristine” wilderness to have a positive impact; indeed, it’s probably in those areas most stressed by urban pressures – denuded, defoliated and in decline – that we can make the biggest difference.
“By gardening with native plants, you are taking a giant leap toward ecological balance. she writes.
Have her words struck a chord with gardeners since she wrote the book in 1998?
Most definitely.
Is there more work to do?
Absolutely.
“We’ve got more than enough anyplaces already,” she wrote. …What we need are more landscapes, more gardens, that truly reflect the variety and vitality of each community’s character – and by community, I mean not just the human inhabitants but the communities of plants and animals which contribute so much to our identity our sense of where exactly it is that we call home.”
“With native-plant gardening, we become what the bioregional philosophers call dwellers in the land – partners, not parasites; participants, not parallel players; dwellers; not dictators.”
Certainly, a goal worth pursuing.
More information on native plants.
North American Native Plants Societies (find one near you)
Audubon: Why native plants matter.
Carolinian Canada Invasive Species list
More links to my articles on native plants
Why picking native wildflowers is wrong
Serviceberry the perfect native tree for the garden
The Mayapple: Native plant worth exploring
Three spring native wildflowers for the garden
A western source for native plants
Native plants source in Ontario
The Eastern columbine native plant for spring
Three native understory trees for Carolinian zone gardeners
Ecological gardening and native plants
Eastern White Pine is for the birds
Native viburnums are ideal to attract birds
The Carolinian Zone in Canada and the United States
Dogwoods for the woodland wildlife garden
Bringing Nature Home by Douglas Tellamy
A little Love for the Black-Eyed Susan
Native moss in our gardens

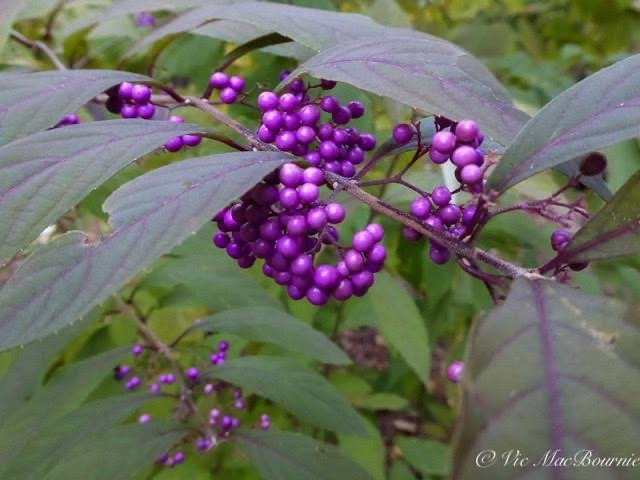


Creating woodland wildlife garden is simple with this design plan
A woodland wildlife garden is the best environmental choice for garden design. Ecologically, a woodland garden using native plants will help to restore native flora and fauna in our urban and suburban areas that are being over run with non-native, exotic plants that are damaging our environment. Here is a design plan complete with a plant list so that everyone can help to save our environment one garden at a time.
Woodland wildlife garden is ideal ecological choice
For many of us, the most difficult part of creating a backyard garden is deciding on the design and the style.
In an effort to simplify the process and help to put readers on the road to success, Ferns & Feathers teamed up with garden designer extraordinaire Angela den Hoed of Soil&Ink in Carlisle, Pennsylvania to offer readers a blueprint for their own Woodland Wildlife garden design.
What’s the most ecological style of garden?
A woodland wildlife garden is one of the most ecological garden choices and one that, if more gardeners created one in their backyards, would be a giant step forward to rewild our urban and rural landscapes and create environmental green spaces that will go a long way in rejuvenating our native flora and fauna.
By following the design plan and the attached planting guide (zones 5-6) it is possible to create the Woodland Wildlife garden you may have only dreamed about. Use the plans to create the garden over several years as a DIY project, or hire professionals to create the garden for you. You may already have some of the elements in your garden or you may want to start from scratch. Either way, there is no reason not to get started on the garden of your dreams.
Angela has created an impressive Meadow garden. If you are interested in seeing how she created a meadow garden, go here.
If you are interested in exploring the world of shade gardening further, you might like my recent post on The Natural Shade garden.
For more on Angela’s outstanding work, check out her meadow garden and her five favourite plants for the meadow garden.
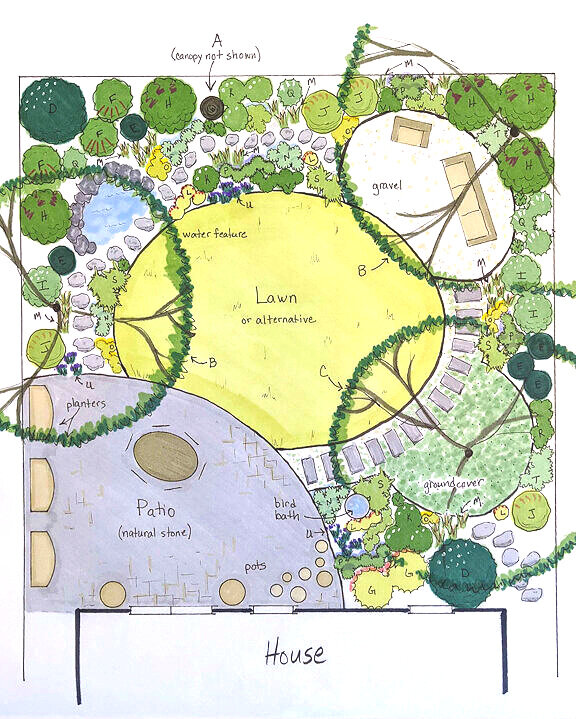
In addition to providing readers with this detailed landscape plan, we have written a comprehensive post on creating a Woodland/wildlife garden for a small yard. You can find this article here.
By joining our woodland garden community newsletter, you will receive a downloadable ebook with the complete design plan. To sign up for the newsletter, go to our home page here, scroll to the bottom and complete the newsletter form.
Professional woodland design using native plants
The highly detailed plan is scaled for today’s typical backyard, but can be scaled up or down depending on the size of your lot. In addition, if you have a large property, this plan can be used for a corner of your yard or an area that might already have many of the elements already in place.
Special thanks to garden designer Angela who has put together a tremendous resource for readers by providing them with the Woodland garden design. The complete, detailed design was originally unveiled in a series of newsletters in 2020, adding specific tree, shrub, flower and ground cover suggestions for a Zones 5-6 garden design.
This article presents the finished product, including the planting scheme for readers.
Angela has used a traditional woodland multi-layered approach in the design, leaving room for entertaining but also incorporating a water feature, a grassed area for children to play on as well as a separate sitting area to bring you into the garden and have an opportunity to view the garden from a different angle.
Angela recommends the use of many native plants in her final design. Native plants and trees are vital in a woodland garden not only to attract birds with seeds and berries, but by encouraging more insects and caterpillars into the garden that, in turn, provide protein for the early growth of nestlings and insect-eating birds like warblers.
It is often asked: What tree should I plant in my backyard? The answer is most often an Oak tree. To find out why the Oak tree is my tree of choice, check out my article here, about what tree you should consider first when it comes to planting your first tree.
To contact Angela or to see more of her work, please take a few moments to go to her website @ www.soilandink
The following valuable information has been provided by Garden Designer Angela den Hoed
Welcome to our woodland garden.
The plants chosen for this garden are all native, suited to Eastern North America, in growing zones 5 & 6. They are all chosen to support and attract wildlife, particularly birds.
A quick tour of the garden design
We start on a natural stone patio in the sunniest portion of the garden. Here there is ample space for entertaining, a grill, and for planters filled with plants that prefer sunnier conditions. You can choose to include lots of plants that will attract pollinators and hummingbirds, perhaps even adding a trellis to the planters for a flowering vine.
In the center of the garden is a lawn. Not everyone needs a lawn, but if you do, you have one. In the next newsletter we will give you options for alternatives to using grass in this space.
There is a bird bath located within the perennial garden next to the house. You may use a simple solar bubbler here if you like or install a larger fountain. As you walk around the garden to the right, you will follow a stepping-stone path, passing under a multi-stem tree underplanted with one solid groundcover. We have left the choice of groundcover up to you but choose just one species. This is a place for a special, interesting tree.
In the back corner you will come to a seating area. This will become a cozy place when the plants have grown up around it. If you like you may continue down a more intimate path within the woodland garden and pass by a larger water feature. This could be a waterfall, a pool, or a combination. The small path continues back around to the patio again.
A detailed plants list
Plants are listed along with the number of butterfly and moth species (caterpillars = bird food!) they support. Many other insects and pollinators are also supported by these plants.
Upper Story Tree Options (1)
Try to find a variety that won’t get too outsized for this small garden – 30-40’. These trees provide both habitat and food in the form of caterpillars and insects for birds.
Oak – Willow (Quercus phellos), Pin (Q. palustris), or Bur (Q. macrocarpa): Oak trees support the highest quantity of wildlife of any plant in the region including 519 species. Their acorns also provide food for other wildlife.
Maple – Red (Acer rubrum) or Sugar (A. saccharum): Support 293 species. It may be easier to find a maple the appropriate size for a small garden.
Understory Tree Options (3)
• Flowering Trees (2) – choose 2 of the same variety, or mix them up:
Crabapple – American/Sweet (Malus coronaria): Flowers in spring and provides fruit in the fall and throughout the winter. Supports 287 species.
Dogwood – Flowering (Cornus florida) or Pagoda (C. alternifolia): Flowers in spring and supports 124 species.
• Multi-stem Tree (1):
Plum - American (Prunus americana) or Chokecherry (P. virginiana): Plums are #2 on the list of trees in terms of the number of butterflies and moths they support (435). These will flower in the spring and provide berries for birds in the fall.
Serviceberry – Canadian Serviceberry (Amelanchier canadensis) or Allegheny Serviceberry (A. laevis): These also bloom in late spring, support 135 species and provide birds food in the form of berries in the fall.
Magnolia – Sweetbay Magnolia (Magnolia virginiana): Supports 20 species including a few that can only live on Magnolias.
Shrubs to consider
Arrowwood Viburnum (Viburnum dentatum): Spring flowers lead to blue-black berry like drupes that are an ideal fuel for bird migration. 111 species supported
Inkberry Holly (Ilex glabra) ‘Gembox’: 44 species supported
Red Osier Dogwood (Cornus sericea) – ‘Arctic Fire’: White flower, blue drupes in summer, red fall color, bright red branches in winter. Like the dogwood tree, supports 44 species
Pinxterbloom Azalea (Rhododendron periclymenoides): Pink flowers in spring, supports 53 species
Oakleaf Hydrangea (Hydrangea quercifolia) ‘Ruby Slippers’ or ‘Munchkind’: Supports 10 species.
New Jersey Tea (Ceanothus americana): White flowers in spring, supports 44 species.
Summersweet/Sweet Pepperbush (Clethra alnifolia) ‘Ruby Slippers’: Fragrant pink flowers in summer, attracts hummingbirds and pollinators.
Perennials to consider
• White Wood Aster (Aster divaricatus): White flowers late summer, supports 115 species
• Columbine (Aquilegia canadensis): Red flowers in spring, Supports 12 species.
• Cinnamon Fern (Osmunda cinnamomea): Cinnamon red new growth, supports 7 species.
• Virginia Bluebells (Mertensia virginica): Blue flowers in spring, supports 3 species.
• Early Meadow Rue (Thalictrum dioicum): Greenish yellow flowers in spring, supports 15 species.
• Short’s Aster (Symphyotrichum shortii): Blue-violet flowers in fall, supports 11 species.
• Goat’s Beard (Aruncus dioicus): Tall white flowers in May.
• Coral Bells (Heuchera villosa) ‘Autumn Bride’: White flowers late summer.
• Tall Thimbleweed (Anemone virginiana): White flowers in summer, supports 2 species.
• Foamflower (Tiarella cordifolia): White or pink flowers in May.
Ground covers to consider
Choose one of the varieties below for the groundcover under the multi-stem tree
• Dwarf Crested Iris (Iris cristata): Blue-violet flowers in April, supports 13 species.
• Wild Ginger (Asarum canadense): Burgundy flowers in spring at the ground.
• Wild Blue Phlox (Phlox divaricate): Blue flowers in spring, supports 3 species.
• Wild Geranium (Geranium maculatum): white, pink, or purple flowers in spring, supports 27 species.
If you like what you see here but would like more guidance consider using the on-line services Angela offers at Soil&Ink. She can create specific plans for your backyard or offer plants that might be more suitable for your particular zone or style you are trying to achieve. Contact her through her website @ Soil&ink
Other important links for Woodland/Wildlife gardeners
• Chelsea Award winning garden designer Mary Reynolds. See my earlier post about her book here. Go to Mary’s popular website here where she promotes land stewards to create natural Arks to help protect and restore our natural environments.
• Earlier post on Garden mulch: organic vs non-organic. Link here to my earlier post.
• Earlier post to my favourite ground covers for the woodland garden. Link here to my earlier post
• Earlier post on using a local woodland as inspiration for the woodland garden design. Link here to my earlier post.
As an affiliate marketer with Amazon or other marketing companies, I earn money from qualifying purchases.
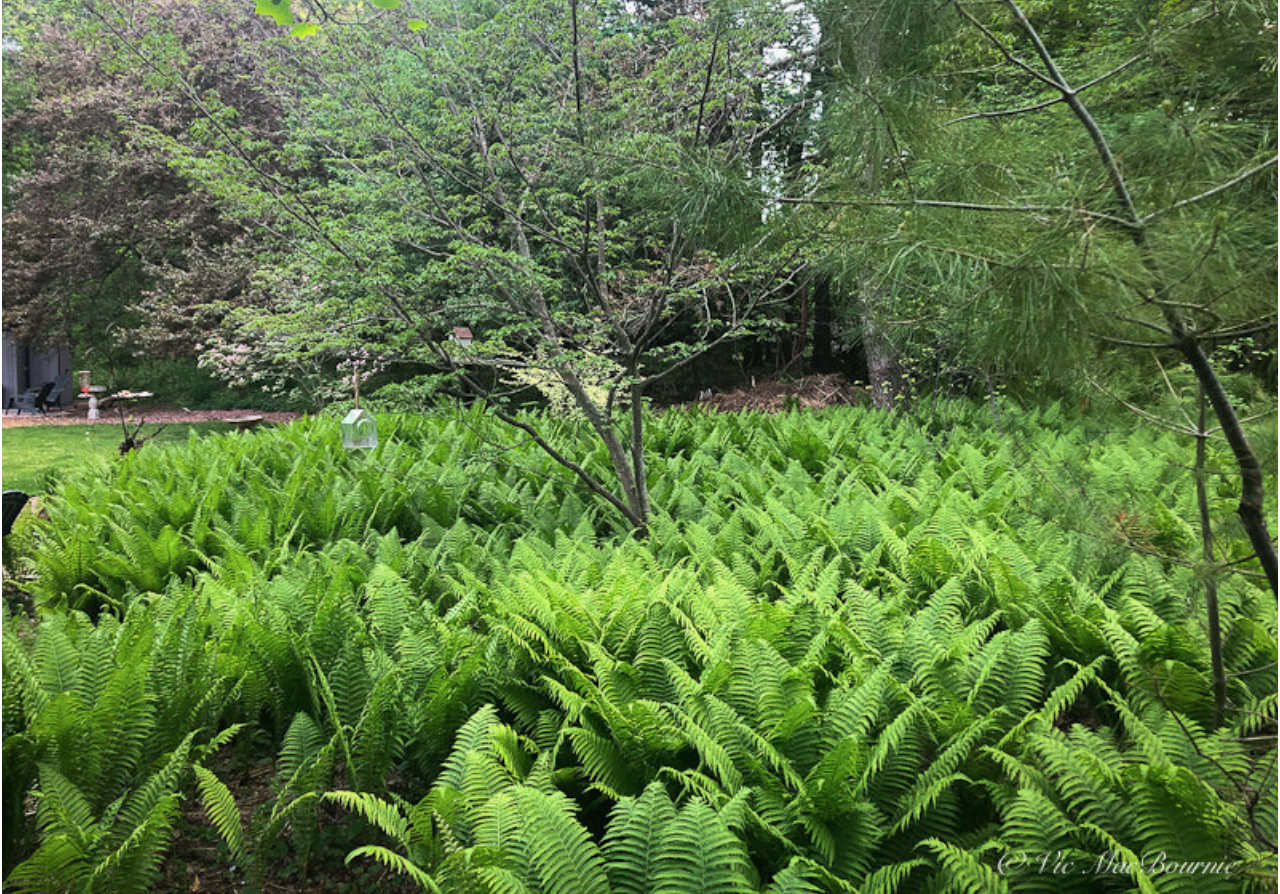
How to create a woodland fern garden (in big and small yards)
Even today's smaller backyards have room to create a native fern garden. Whether you have a small or large backyard, a fern garden will bring a sense of solitude to your woodland wildlife garden. These garden tips and ideas will help beginners and experienced gardeners plan, design and create the perfect fern garden in a corner of their yard to attract birds and other backyard wildlife.
How to use a variety of ferns to create a tranquil garden
It all started with a few ferns from a friend at work and a warning about how fast they can take over.
Today those ferns have grown into a massive backyard fern glen and I have tapped into the huge variety of ferns that are available to gardeners. The number of fern varieties is endless, from tiny ones that go unnoticed in the landscape to huge tree ferns that grow in more temperate climates.
(More on the variety of ferns available lower down in this post.)
Back to the ostrich ferns given to me by a co-worker. Knowing that I had a large expanse of grass on one side of our pie-shaped lot that could use a nice little garden of wildflowers, ferns and shrubs, I went to work.
That was maybe 15 years ago.
Little did I know then that this little garden would, in relatively short order, become the focal point of our woodland wildlife garden, providing endless joy in spring and summer not only for me, but for the myriad of wildlife that can easily get lost in its hundreds, heck maybe thousands, of massive ostrich ferns.
If you are interested in exploring the world of shade gardening further, you might like my recent post on The Natural Shade garden.
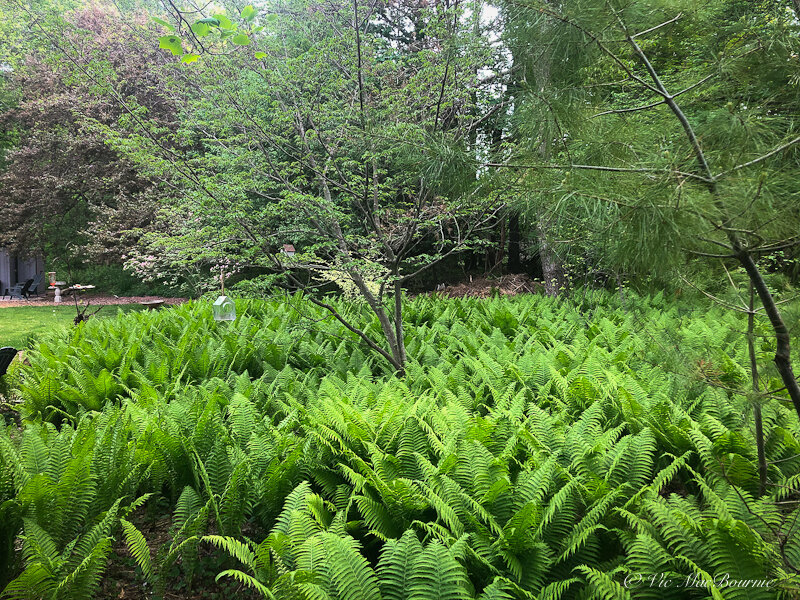
Our native fern glen is an impressive site in spring as the fresh green fronds unfurl over a massive area of the garden providing a three-foot-high ground cover where dogwoods, serviceberries, native white pine, and other shrubs grow up and through. The shady fern glen is a favourite place for does to leave their fawns for the day.
Why create a Fern Garden?
The fern garden has become a favourite place for deer to hide their youngsters during hot summer days. I know the resident fox has used it as a secret roadway into the main garden emerging, as she often does, from the middle of the fern glen. I have come across shedded snake skins among the spent ferns in the fall and watched countless chipmunks scamper into the cool surroundings of the ferns on hot days. It’s a home for toads and salamanders seeking deep shade during the heat of the day and creates the perfect backdrop for the under story trees and shrubs that grow up through the ferns in our woodland wildlife garden.
One day I even decided to get down low and crawl through the maze of ferns to get the same view as the animals that call it home.
To say it’s a whole new world in there is a huge understatement, and I can only imagine the young fawns thinking they are giants in a miniature, prehistoric forest.
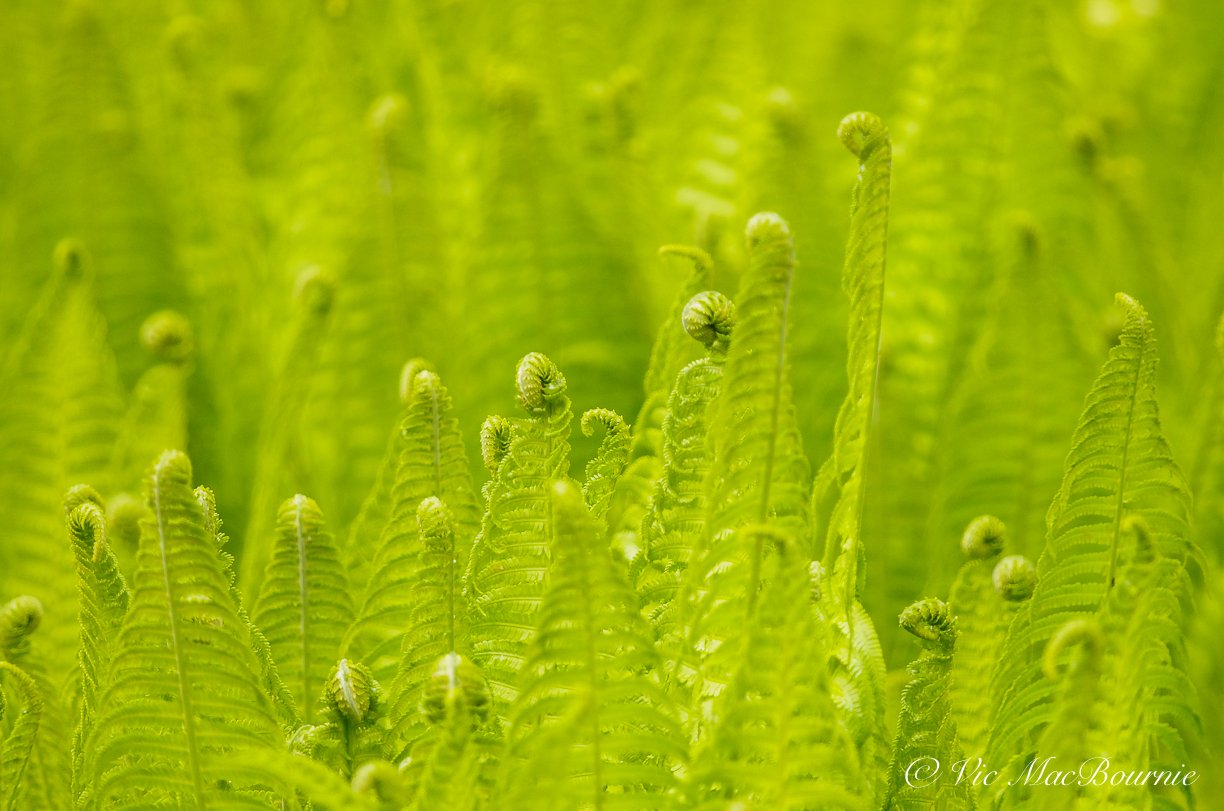
Hundreds of Ostrich ferns just finishing unfurling in early spring in our fern garden.
How do ferns help wildlife?
Anne Owen, an Audubon at Home Ambassador with the Loudoun Wildlife Conservancy, in her article Native Ferns Have a Place in Our Plantings for Wildlife writes that “From a wildlife point of view, ferns can give structure that provides foraging space and shelter for ground-feeding birds, while other critters, for example frogs and turtles, like to hide in them. Ferns are generally resistant to browsing by rabbits.” (For the complete post go here.)
Oh, and let’s not forget the best reason for many of us to grow a fern garden: Deer leave ferns alone. Anything deer prefer to leave OFF their dinner diets is definitely worth growing in a woodland garden.
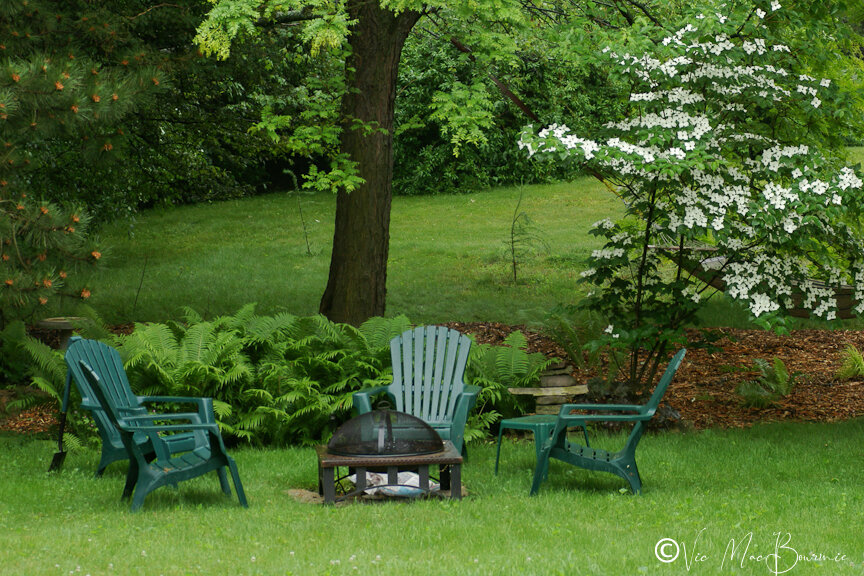
This image shows the beginnings of the fern garden. Several years later and the ferns cover about a third of the backyard but feature a large number of small understory trees that grow up through them, including Flowering dogwood, Cornelian Cherry, Serviceberry and Redbuds jut to name a few.
We are blessed with a good-sized property and are able to set aside a large portion of it for the establishment of a fern glen. I realize many gardeners either don’t have the space, or don’t want to donate that amount of space to create such a huge expanse of ferns in their backyard.
That’s no problem. A more compact fern garden in the understory can be just as rewarding.
How to create a fern garden in smaller yard
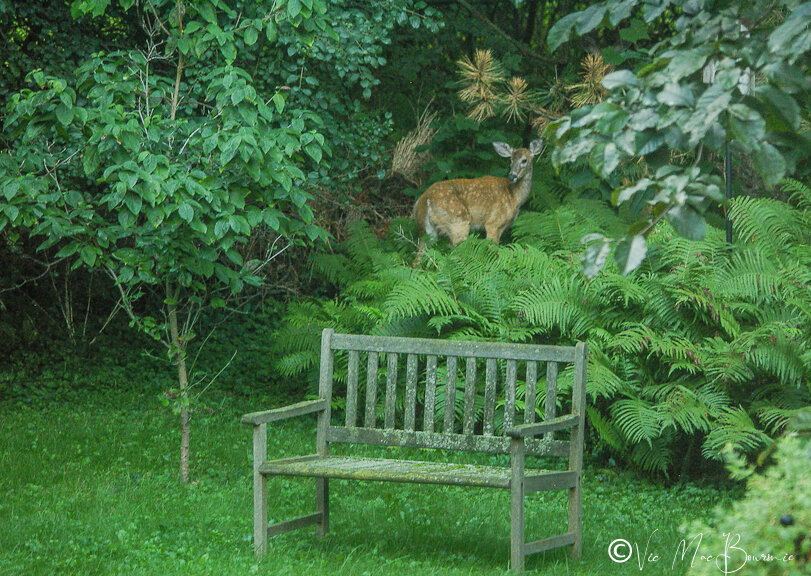
Deer use the fern garden to hide their youngsters during the day. This young fawn eventually walked into the ferns and literally disappeared.
Obviously, in a smaller backyard the fern garden could be downsized to better fit into the proportions of the garden.
The quiet serenity that a fern garden can create is certainly incentive enough to begin planning for an area in the garden you can retreat to on hot summer days.
Building the right soil for ferns
If you can start with a rich, moist, earthy soil with plenty of decayed or decaying material in it, you are off to a good start. You can, however, build this soil over time by using the fern garden as a destination for all those leaves you collect in the fall and spring. Over time, the soil will build up an earthy layer of forest duff, perfect for growing woodland ferns.
Our fern garden is the primary dumping ground for most of the fall leaves I pick up from the front yard. Each year it gets 5-10 bags of leaves dumped in various spots throughout the fern garden. In some areas the leaves are several inches thick, but that doesn’t stop the ostrich fern fiddleheads from popping up through them every spring.
I originally used the newspaper layering technique to give our fern garden a good start. My neighbour had at least ten bags of leaves that he had not put out by the curb in the fall. By the time spring rolled around they were a soggy mess of paper bags and partially decomposed leaves.
Perfect to give the fern garden a good start.
He happily accepted my request to take them off his hands and the project began.
A thick layering of newspapers to block the light and ensure a quick end to the grass, followed by a bags of fresh soil, ten bags of partially composted leaves and a handful (I think somewhere in the neighbourhood of 10-15 ferns) all nicely covered by several bags of cedar mulch, and the project was complete.
Or so I thought. Since then, the ferns have spread out from all directions multiplying each year to form the massive fern garden incorporating hundreds if not thousands of ferns.
How to use ferns as a ground cover
In the beginning days, the compact fern garden, (maybe 6-feet by 12 feet) centred around a young Cornus Kousa dogwood that I had planted that same year.
Today, 20 years later, that same Kousa dogwood is a spectacular mature specimen that stretches two-, maybe three-storeys high and probably 16-feet wide. Most years it puts on a show of creamy-white blooms that is simply breathtaking and the huge, red, strawberry-like fruit that follows are a favourite of local wildlife. (Check out my earlier post on six great dogwoods for the Woodland garden here.)
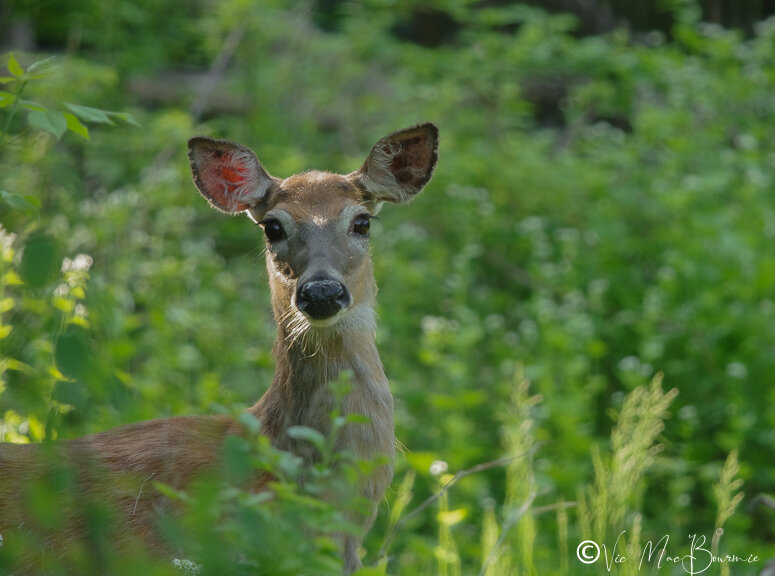
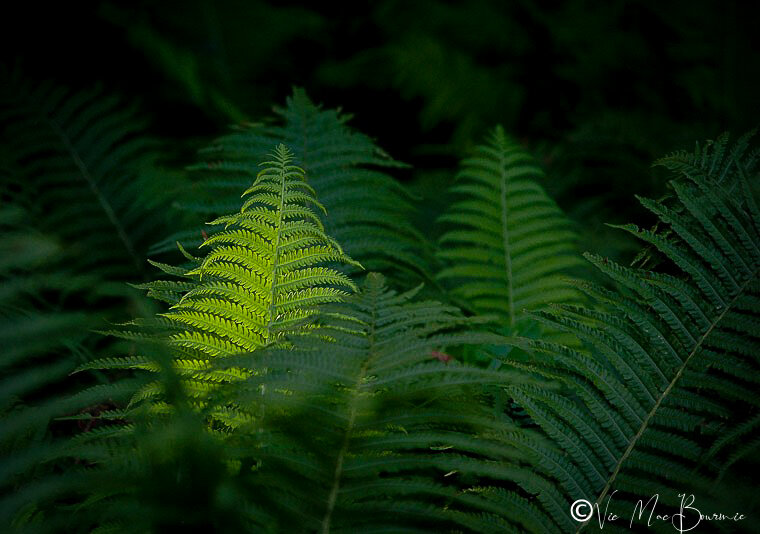
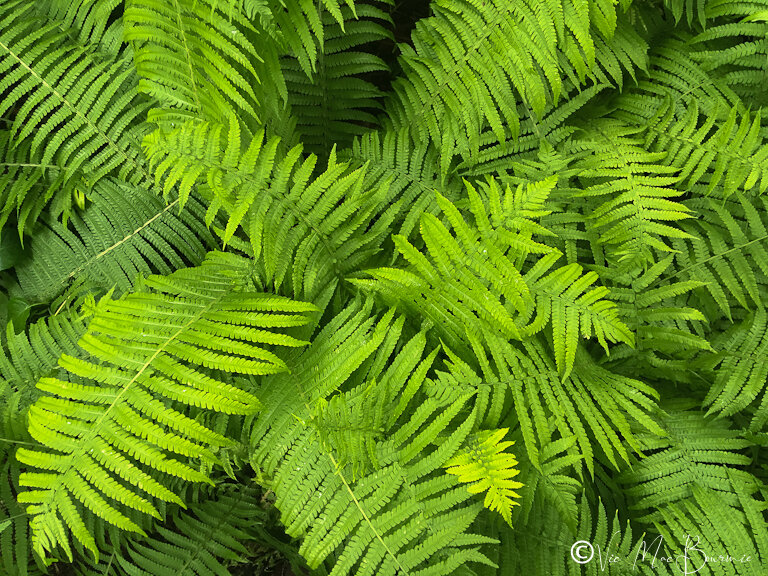
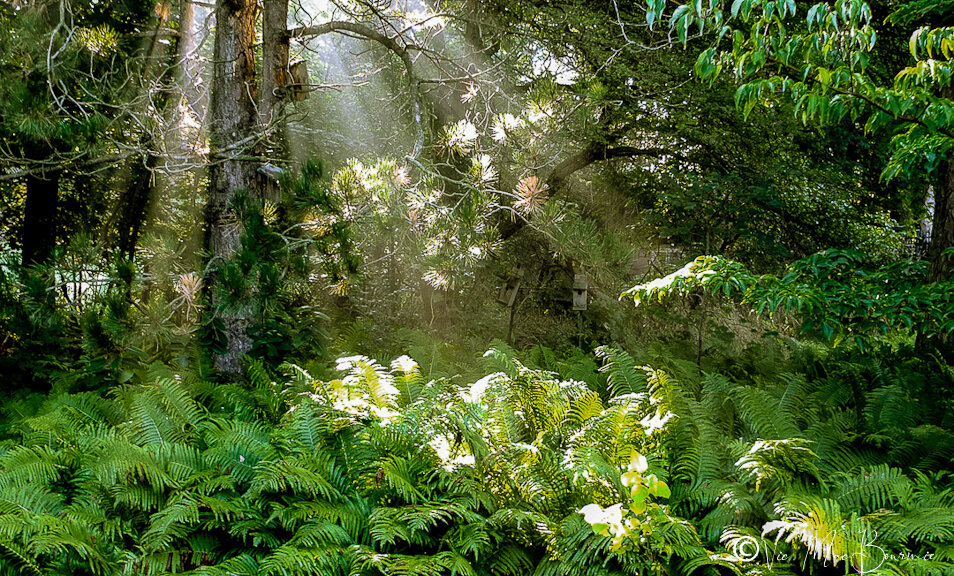
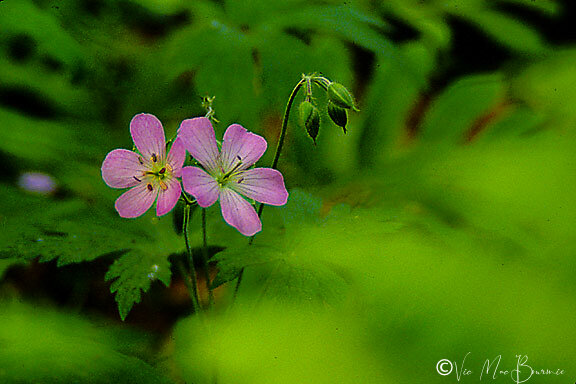
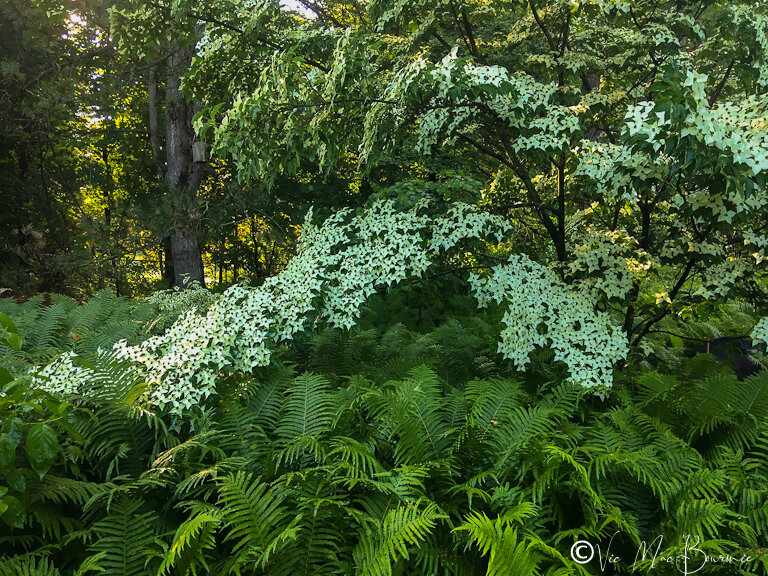
A quick note: In a smaller garden the Kousa dogwood can be kept pruned to some degree to keep it more compact. I am a big believer that, for the most part, trees should be allowed to grow into their natural shape. As a result, the Kousa dogwood, not unlike most dogwoods, takes on a very horizontal branching shape that I think gives it a Japanese-style look.
By simply taking a scaled-down approach in your smaller garden you can create a similar effect.
A few dozen of the more compact-style ferns scattered around a couple of your favourite understory trees such as a native flowering dogwood, or pagoda dogwood (see earlier post on three great Carolinian zone under story trees), or a native redbud tree (See earlier Redbud tree post here) can evoke that same peaceful feeling on a smaller scale and provide you with spring blooms and berries.
How ferns spread in the garden
It’s important to note that ferns have two basic forms of growth: creeping (which includes our ostrich ferns) and crown-forming.
The creeping forms can spread through the garden at times aggressively from trailing rhizomes or stolons.
The crown forming ferns (such as maidenhair ferns) grow much in the same way as traditional perenials grow by expanding from the centre.
These ferns grow from upright rhizomes and carry their fronds in a tight circle.
These are important points when considering your choice of ferns and how much you want the garden to grow or the work you are willing to tackle to keep it contained.
Fern varieties to consider in a smaller garden
Ferns are available in such a variety of shapes and sizes, colours and textures that the selection is almost endless.
Consider using a combination of native and non-native ferns to create your fern glen. The following is a list of several native ferns that deserve top consideration in your garden. We use many of these ferns in our front woodland garden where there is less competition from the larger Ostrich ferns that dominate the back fern garden.
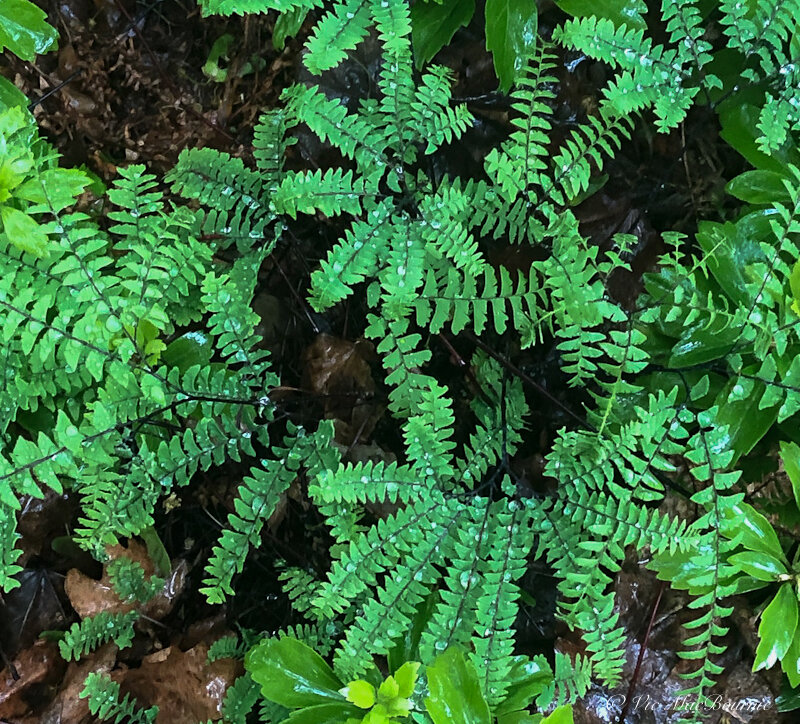
Northern maidenhair fern in spring with its dark stems and whorl of delicate fronds is a highlight in any garden.
Maidenhair ferns: A hardy, yet delicate and graceful fern that is at home in any woodland setting with its charming whorl of light, gray-green feathery foliage that spreads in clump form and is at home in a range of soil conditions including growing near or even on rocks and areas with acidic soil. There are a number of maidenhair species (Northern, Southern, Rosy, Western and Silver dollar) to consider depending on the zone where you garden.
Wood Fern: (Dryopteris marginalis) This non-spreading fern sports graceful, arching gray-green fronds that form a vase-shaped clump. Expect about 24 inches in height and similar spread in this long-lived plant with dense foliage extending right to the ground. Enjoys part shade to full shade in a medium to wet organic loam and grows to about 2 feet.
Sensitive Fern: (Onoclea sensibilis) this interesting looking fern with its tender leaflets that close to your touch (hence the name) is readily propagated by spores and grows in large colonies in the wild. This light green fern is considered short-lived (10 years) but is quick to naturalize in woodland gardens and boggy areas with a definite preference for acidic soils.
Autumn fern: (Dryopteris erythrosora) a semi-evergreen fern (zone 5-9) with year-round interest. It’s attractive glossy ferny compound leaves emerge coral-pink in spring turning green with prominent coppery-bronze tips for the remainder of the year.
Growing to about 18 inches tall at maturity with a similar size spread, the Autumn fern is one of the few ferns that performs well in both full sun and full shade.
It prefers average to wet conditions and can even be grown in very wet areas tolerating some standing water. Grow it in rich, acidic soils in mass plantings, rock/alpine gardens or naturalized in a woodland garden.
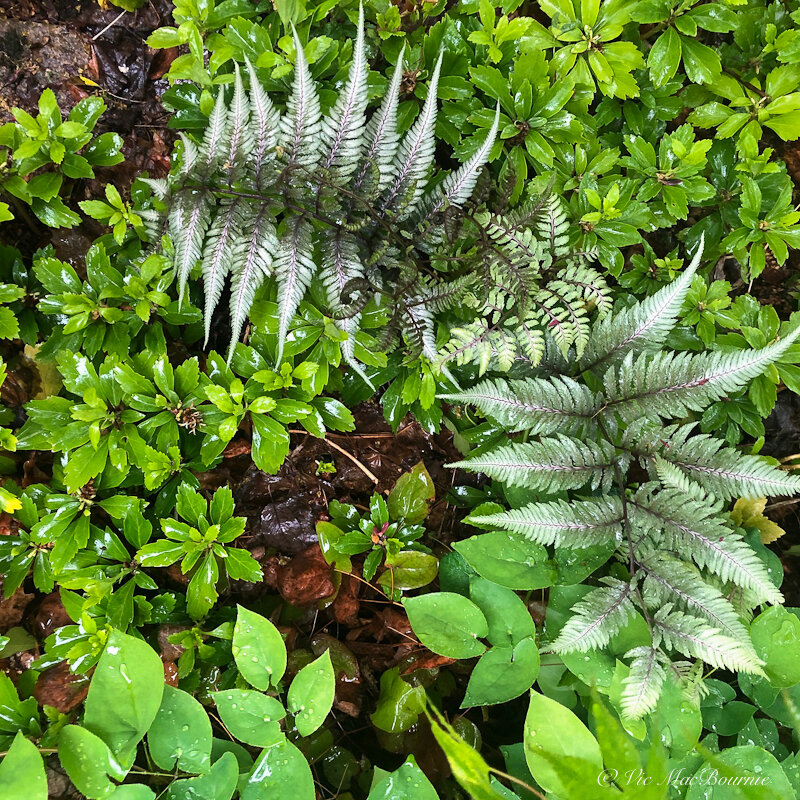
The silvery foliage of the Japanese Painted fern stands out in stark contrast to the darker green foliage pachysandra and the lighter leaves of epimedium.
Non-native ferns worth considering
While it’s always best to use native plants, it’s hard not to include a few non-native ferns for the fern garden, especially the Japanese painted fern with it’s delicate silvery fronds that really is a showstopper in a shady area.
Japanese painted fern: Athyrium nipponicum ‘Pictum’ and its many hybrids (zones 4-8) shines in the woodland with its silvery, purple and burgundy foliage. Japanese painted ferns are among the best silver-leaved plants for the garden with the added bonus of creating a dense, fine-texture with their interesting colour patterns that look almost hand-painted.
Use them in mass planting, as a dense ground cover or naturalized in the woodland garden.
The main stems are an eye-catching burgundy colour that spills out into the silvery-gray fronds.
Like most ferns, they prefer a shady location, but because of its silvery fronds, the Japanese painted ferns can handle more sun than many other ferns.
Expect growth of about 18 inches in height with a spread of 24 inches. It’s a slow grower but can live up to 15 years in our cold climates.
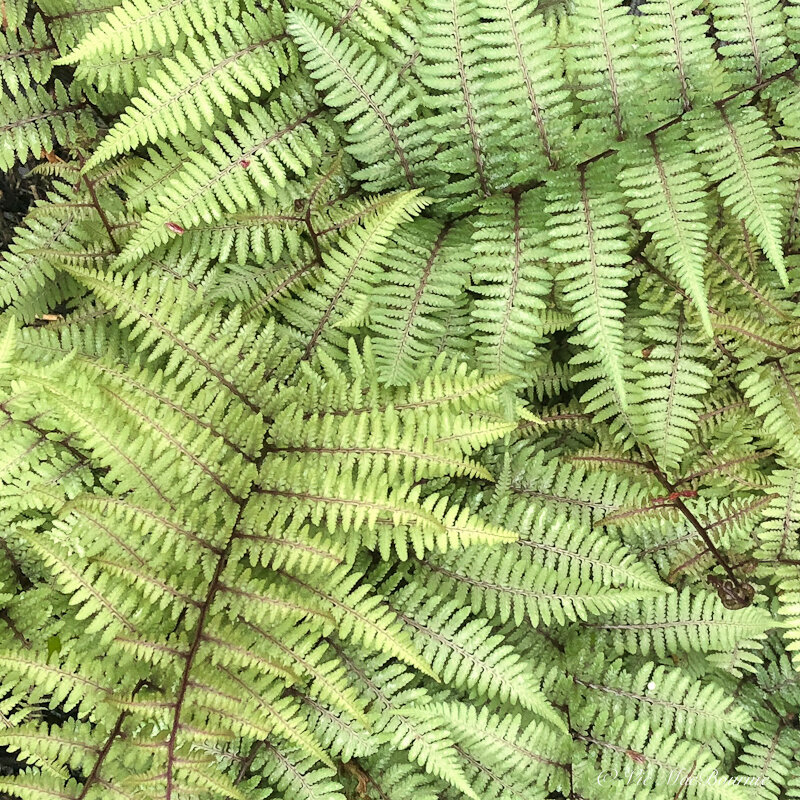
This image shows the frosty-green spring foliage of the incredibly beautiful ghost fern.
Ghost fern: Athrium ‘Ghost’ is another fern to consider, and one that is actually related to the Japanese painted fern. This larger fern, hardy in zones 3-8, can grow to about 2 feet tall and is a combination of the best qualities of a Japanese painted and a Lady fern.
The fronds of the ghost fern are stunning in a shaded location with fronds that give off an almost frosty-white appearance to their rigidly upright look. It does best in partial shade with a moist, neutral to moderately acidic PH soil.
A little sun helps to bring out its best colouring and it can survive in drier soil than many other ferns.
Lady Fern: (Atthyrium felix-femina) is a favourite for those with sandy loam or clay loam where this tough fern will grow quite willingly to about 3 feet in height.
Ground covers to highlight your fern collection
Ferns can work both as a ground cover or as the focal point in the fern garden.
In my fern garden they work more as a very tall ground cover and form the backdrop for the dogwood, serviceberries, redbud, white pine, spruce trees trees and shrubs that grow up through them.
In a smaller garden, consider using the ferns as your focal points with more delicate and lower-growing ground covers.
Natural moss is the perfect companion for a variety of ferns preferring the same slightly acid soil that many ferns enjoy.
Perennial moss-like ground covers such as Irish and Scotch moss are excellent substitutes as well as the many thyme varieties. (For a closer look at some of my favourite moss-like ground covers go here.)
Other plants to consider growing alongside ferns include hostas that, although a non-native, work extremely well with ferns.
The hostas’ bold foliage is set off nicely by the delicate foliage of most ferns. Just pay attention to the ultimate size of both the hostas and the ferns. The larger ferns can quickly bury the smaller hostas. Choose a hosta large enough to compete happily with the chosen ferns.
In her inspirational book, Foliage and Garden Design, Canadian gardening author Marjorie Harris describes her love for combining ferns and hostas in the garden.
“Hostas and ferns are two families of plants that are so versatile you can work them in with shrubs and under trees, providing you add lots of humus and water regularly if it’s dry shade. These two perennials are among my favourites and I’ve tried to incorporate plenty of them.”
Other plants that work well with ferns include: ornamental grasses, spring ephemerals like trilliums, dog-tooth violet and columbine.
Spring bulbs can also be grown to add a little colour early in the season before the ferns have fully emerged.
Black-eyed Susans are also a showstopper growing in drifts through the ferns.
In our front garden, I have a lovely group of columbine surrounded by maidenhair ferns growing next to a large mossy limestone boulder. The combination is a nice late spring vignette that catches my attention every time I pass by.
Some final thoughts on ferns
I’m not sure what it is about ferns that always catch my attention, whether they are growing wild in the woodlands, in the spring garden as they unfurl their delicate fronds, or in the garden centre where I am confronted by a host of must-have specimens.
At first glance they appear to have very little to offer. Maybe this is the reason ferns are sometimes overlooked by gardeners, especially beginner gardeners often focused on bright-coloured and showy flowers or similarly-coloured foliage.
Ferns will have none of that.
It’s all about shades of green, texture and a rugged hardiness when it comes to ferns. Sure, there are the silvery fronds of the Japanese painted fern, but they just can’t compete with those massive dinner-plate-sized dahlias, the bright reds of big-box geraniums or even the neon-like colours of today’s coleus.
Instead, ferns take a backstage and work hard to create a quiet, cool resting place for our eyes and our minds.
However, even in a fern garden, there is alsway room for a ‘pop’ of colour.
In fact, it is the ferns that will take the pop of colour to a whole other level.
Try adding a hanging basket or a raised container of brightly-coloured fuchsia to your fern garden to create a simple focal point and maybe create a natural area for your hummingbirds or butterflies to visit reguarly.
The hummers will enjoy the cool, quiet of the fern garden along with the added benefit of a free meal.
Be sure to include a perch either natural or store bought for the hummingbirds to rest above the ferns
Nearby, include a bench for you to sit and enjoy the solitude of the fern garden with the occasional visit from the hummingbirds.
Ferns enjoy a long history
If time is any indicator, there is little doubt that the fern garden will be a recipe for long-term success.
Ferns, in fact, can be traced back through fossil records to a time more than 100 million years before dinosaurs walked the earth. Ferns actually grew before any flowering plants even existed on earth. Today there are thousands of species of ferns, from the tiniest that grow just inches off the ground to massive tree ferns.
Thinking back, maybe there was something to that day I decided to crawl through our fern garden to get the feel for what animals experience on their daily jaunts through the ferns.
Maybe just a reminder that our gardens are not that far from those prehistoric times when dinosaurs roamed the earth.
And, a reminder that the ferns are among the few living things left of those times.
As an affiliate marketer with Amazon or other marketing companies, I earn money from qualifying purchases.
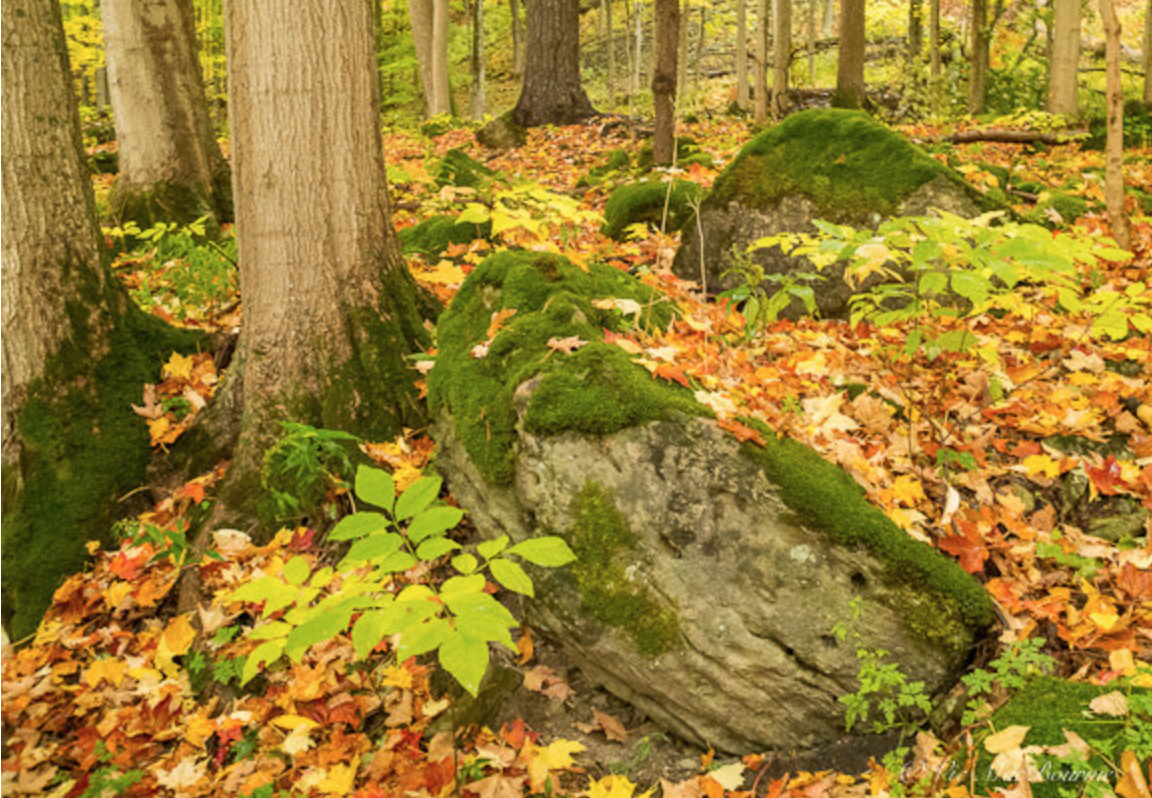
Why digging up or picking wild flowers threatens our natural areas
Is picking or digging up wildflowers and other plants from the wild wrong. According to experts in the field, it is almost always the wrong thing to do. Even collecting seed from rare plants can be a bad decision, especially if approval is not sought from the landowners in advance. Ferns and Feathers asks the experts what they think about collecting plants from the wild and what are alternatives.
Is it illegal? It’s certainly almost always unethical
We all like to save money, but digging up wildflowers is not the way to do it.
Not only is digging up plants on public property including parks and conservation areas likely illegal in most states and provinces, more importantly it’s an attack on our natural ecosystem that is already facing threats to its survival.
Even if it’s not illegal, in most situations, it is not the ethical thing to do.
You might ask: ‘what’s the harm of taking one or two plants from acres and acres of plants?’
Consider that every year more and more people discover the joys of being outdoors and experiencing nature. In fact, more than 500 million people visit public lands each year in the United States alone.
Imagine the devastation to the national forests if just a fraction of these people choose to dig up small trees, shrubs and rare flowers to take back home with them for their gardens, where the flora most likely die a slow death in the wrong soil, in the wrong lighting conditions and without the forest ecosystem that played an important role in their survival.
Public lands provide us with places to relax and unwind and offer incredible inspiration for our own woodland gardens. (For my full article about using natural woodlands as inspiration for our woodland gardens, click here.)
If you are interested in exploring the world of shade gardening further, you might like my recent post on The Natural Shade garden.
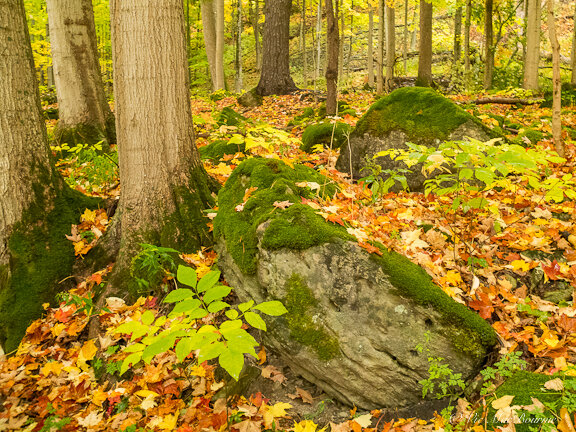
Respect wild areas and leave any wildflowers where they grow. Harvesting a tiny amount of seeds can sometimes be acceptable if approval is first obtained from the landowners.
It’s important to remember, however, that the real purpose of the plants, trees and shrubs in our parks, forests and public lands is not to provide a beautiful landscape. The prime purpose of these landscapes is to provide and sustain life in many forms – from the smallest insects to the largest mammals, from lichens and mosses and rare plants to monster-size redwoods.
Ontario’s 36 Conservation Authorities main purpose, for example, is not to provide outdoor areas for the public to go for walks and enjoy nature (although they are very successful in this endeavour), their real purpose is to maintain the vitality of our watersheds and protect peoples’ lives and property from natural hazards such as flooding and erosion. Click here to go to the Ontario Conservation Act.
“Sometimes this drive to do the right thing is met with some knowledge gaps, especially when we are new to gardening with native species. Our actions need to be viewed collectively, and we must ask ourselves: If everyone did this, would this action be okay. ever it is, the way you tell your story online can make all the difference.”
These public lands play an important part in helping to clean our air and water and provide some of the last habitat for the protection not only of our endangered wildlife but the plants that are often intertwined with the survival of this very wildlife. They provide homes for rare host plants for threatened butterflies, nesting habitat or food for endangered birds or vital to the survival of native bees.
Every time a visitor digs up a plant, a small tree or a shrub they threaten this ecological web and weaken an already fragile ecosystem.
If that’s not enough of a reason, consider that stealing from nature can land you in big trouble.
Removing anything from Canada’s national park is strictly forbidden. Technically, you are not even allowed to pick flowers.
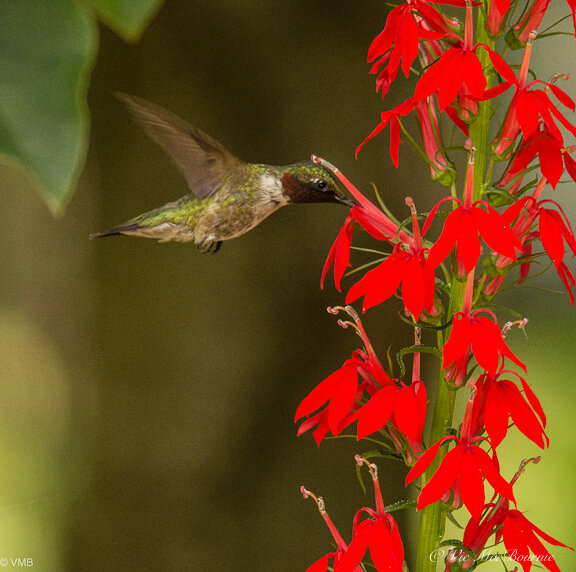
Hummingbird on Cardinal flower.
The following is taken from the National Park’s system general regulations:
10. No person shall remove, deface, damage or destroy any flora or natural objects in a Park except in accordance with a permit issued under subsection 11(1) or 12(1).
11. (1) A Director-general may issue a permit to any person authorizing the person to take flora or natural objects for scientific purposes from a Park or to remove natural objects for construction purposes within a Park.
(2) A permit issued by the Director-general under subsection (1) shall specify the kind and amount of and the location from which flora or natural objects may be removed and the conditions applicable to the permit.
(3) Where natural objects are removed for the purpose of constructing other than a public work within a Park, every person on removal of such natural objects shall pay to the superintendent the sum of twenty-five cents for each cubic yard of such natural objects or fraction thereof.
12. (1) The superintendent may issue a permit to any person authorizing the person to remove, deface, damage or destroy any flora or natural objects in a Park for purposes of Park management.
(2) A permit issued by the superintendent under subsection (1) shall specify the kind and amount of and the location from which flora or natural objects may be removed, defaced, damaged or destroyed and the conditions applicable to the permit.
But let’s face it, not all situations are the same. It can be a very complex discussion, especially when you get out of national parks and other public lands.
Is it okay to dig plants, collect seed and remove small trees and shrubs from areas that are threatened by increased farming, planned subdivisions or urban areas that are being taken over by non-native vegetation and being destroyed by neighbourhood teens using them as their own playgrounds? Maybe a small woodlot is being taken over by a group of dog owners using them as their personal dog park. As a result, the dogs are ripping up areas of endangered wildflowers, maybe even rare orchids or wild lupines.
Action to save these plants, it could be argued, certainly needs to be considered.
Ferns and Feathers tapped into experts in the field for their opinions on this important discussion.
Kristen Miskelly, a biologist with specialty in the botany and ecology of southeastern Vancouver Island and a co-founder of Saanich Native Plants, is quick to point out the dangers we face as the environment continues to be threatened by climate change and other, man-made, highly destructive actions.
“The natural world needs our help more than ever and people are trying to do their part by growing native plants,” explains Miskelly, who teaches at the University of Victoria.
“Sometimes this drive to do the right thing is met with some knowledge gaps, especially when we are new to gardening with native species.
“Our actions need to be viewed collectively, and we must ask ourselves: “If everyone did this, would this action be okay.
“Digging up wildflowers is almost always not the best approach and, in fact, can be very harmful. Some of the negative side effects to ecosystems include disruption of soil leading to colonization of non-native invasive species and reducing prospective generations of the given plant by reducing propagules reaching the soil.
“Furthermore, hand dug plants from the wild are not as successfully transplanted as nursery- grown.
Most ecosystems are already seriously degraded and often just shadows of their remnant range and species abundance and diversity. It would be difficult to rationalize depriving them more for our personal gains in a garden setting.
“With so many serious threats to the natural world associated with harvesting or digging up plants, there are very few cases where this approach is warranted.
Are there times where plants can be salvaged?
According to Miskelly there are times when digging plants to save them from destruction makes sense.
“Inherent Indigenous harvesting rights and salvaging from an organized plant salvage from a development site are good examples of when plant collecting is okay,” she explains.
“So, what is the best approach?
“There is an array of native plant growers who are growing in a sustainable and ethical way. Support these growers, by purchasing your plants or seeds from them.” she explains.
“You can go a step further by questioning nurseries about their growing protocols and what steps they take in making sure their methods are sustainable. When you initiate or grow your garden in this way, you can not only benefit nature, but also lend your support to a green economy.”
Reyna Matties from Ontario Native Plants echoes similar concerns over the harvesting of native plants.
“Rescuing plants from sites makes sense when an area is getting developed or altered. In other cases, it is much better to grow your own plants or support a local nursery that is sustainably sourcing seeds and growing local species (like Ontario Native Plants),” she explains.
“Harvesting plants from wild places is quite taboo to any ecologically minded individual due to the potential damage it can do to the habitat for the plants and wildlife that call it home. It is like someone coming to your yard and pulling up your plants. They are not yours, so better to not take them. There are so many other ways to get plants.”
Reyna explains that anyone who harvests seed should always follow sustainable seed practices by taking only a small peercentage of a parent plant’s seed. Even if you are taking just a few seeds, she explains that you “also want to make sure you have permission from the land owner to be taking seed from that specific location.”
“By sustainably collecting seed, you are actually helping plants proliferate, which is a great thing,” she explains.
In conclusion
Taking plants from national parks, nature reserves and conservation areas is absolutely the wrong approach. Rescuing plants from threatened areas can be done under the guidance of experts through a local wildflower group or conservation group. Taking a small percentage of seeds with the approval of a land owner can be a legitimate approach, as well.
The best, method of collecting rare or highly sought after flora is to purchase it through a reputable native wildflower seller. These outlets exist throughout the United States and Canada, and can be found either through the World Wide Web or, better yet, through local wildflower associations or your local garden club.
As an affiliate marketer with Amazon or other marketing companies, I earn money from qualifying purchases.

Beginners guide to backyard wildlife photography
A beginners guide to backyard wildlife photography exploring how to attract birds and animals to your woodland garden, how to use get close to them and what camera systems to consider to capture images of birds, insects, butterflies, and mammals.
Tips to creating a backyard photo studio
Photographing wildlife in your backyard can be one of the most rewarding experiences imaginable. Forget about travelling to far off places to get exceptional images, with a little planning outstanding images are possible right in your own backyard.
Colourful birds and butterflies, fascinating insects, amphibians and reptiles are just a sampling of some subjects just waiting to be exposed.
I am lucky enough to have encouraged and photographed a wide range of mammals like rabbits, raccoons, chipmunks, squirrels, foxes, coyotes and, of course, deer to my garden.
The photographic possibilities are endless. And, even if you are an experienced photographer, using your backyard as a photographic studio will give you the opportunity to hone your skills so that you can take advantage of situations in the field or on expeditions to far-away locations.
So, the first task is to get subjects in front of the camera lens?
By creating an environment in our yards that attracts a wide variety of wildlife; closely observing their habits and movements around the yard; learning how the light plays on our garden throughout the day; and finally, purchasing the best camera, lenses and other photographic equipment to help us get the images, it is possible to capture images you may never have thought possible.

A close approach to this fawn was possible because of the animal’s inherent sense to stay perfectly still counting on its ability to blend into the natural surroundings.
Create the environment for successful photography
The goal of creating a backyard wildlife studio is to attract as many different species as possible and to present them in their most natural environment.
We have been regular proponents of using native plants (to your region) in the garden. In fact, this website is filled with articles extolling the virtues of using native plants. They are vital to native pollinators, birds depend on their seeds and berries for food as well as the insects and caterpillars native plants attract. Native plants are critical for the survival of so many of our native butterfly larvae…
Here is another important benefit to using native plants in your garden – photographs of the insects, butterflies and birds that depend on these plants appear much more natural when photographed on a native plant species than they are on a hybridized version of the plant or, even worse, one that they would most likely never feed on in the wild.
So how do we create these mini backyard studios?
Start by creating islands of native flowering plants. If you are just starting to create your backyard photo studio, try to choose a sunny site for the best flowering opportunities. A butterfly garden is always a good place to start, especially if you have children. A butterfly garden provides a perfect opportunity to encourage children to begin exploring the natural world in a fun way. Just make sure you provide both host plants for the caterpillars as well as nectar producers for the adults.
“Even if your yard is more or less barren, there are steps you can take to begin landscaping it for wildlife. Rewilding an existing backyard by planting islands of native plants will encourage a huge number of insects, pollinators and birds. Add a pond, even a small one, to encourage an even greater abundance of fauna.”
Good host plants for a butterfly garden include milkweed for our beloved monarch butterflies; plants of the carrot family including dill, fennel and Queen Anne’s Lace for the Black Swallowtail; violets are the host plant for the Great Spangled frittilary, and legumes are host plants for spring and summer Azure and other blue butterflies in addition to silver spotted skippers. Other host plants of note include Black-eyed Susans and Asters (Silvery Checkerspot, Northern Pearl Crescent), Pussytoes and Pearly Everlasting (Painted Lady butterflies).
Another area of the garden could be focused on heavy berry producers that attract insects in the spring- and summer-flowering periods followed by birds later in the season feeding on the berries.
Remember to consider the sun when situating these plants. If you enjoy photographing birds in the morning while you are enjoying your cup of coffee, you will need to locate the berry-producing bushes in an area that gets morning sun. If you prefer more dramatic lighting in your images, such as back lighting, use the morning sun to create a backlit image. The evening sun will then provide a warm, more direct light on the berries and the birds feeding on them.
In shady areas, consider planting woodland natives and spring ephemerals.
Even if your yard is more or less barren, there are steps you can take to begin landscaping it for wildlife. Rewilding an existing backyard by planting islands of native plants will encourage a huge number of insects, pollinators and birds. Add a pond, even a small one, to encourage an even greater abundance of fauna.
Creating these wildlife island plantings will help you to focus on more manageable, smaller areas of the garden rather than being overwhelmed trying to decide how to design the entire backyard. These garden islands are not so large that they could not be created in a single weekend. Creating your gardens in this fashion is also an ideal way to garden on a budget.
My wife and I are blessed to live close to a natural conservation area with acres of woodlands, streams and ponds, but we have worked hard to create a natural environment in our backyard to take advantage of the abundance of fauna and flora that already exists around us.

A good example of creating a mini photo studio by attracting backyard birds with a birdbath to capture interesting close up images. In this instance, I was set up in the Tragopan blind just a few feet from the blue jay. However, once the birds get accustomed to your presence, this type of imagecould have just as easily been taken without the blind. Consider setting up at least one birdbath near where you regularly enjoy your morning coffee.
The value of water in your wildlife studio
Everyone loves the idea of a pond in the backyard, but not everyone wants the potential work that they can bring.
When it comes to photographic opportunities, even a small pond and waterfalls is difficult to beat. Not only will birds regularly visit the location, but a host of insects, reptiles and amphibians will either be regular visitors or decide to make it their home.
All this makes a backyard pond and mini-waterfalls the ideal outdoor photographic studio.
A small pond is not difficult to install and can easily be accomplished in a weekend with a helper. Making it look natural is more difficult and requires research and preferably plenty of large rocks, even boulders to create a natural looking pond you will be happy with in the long term.
I installed a pond and a small waterfalls in another home we owned and it was truly an enjoyable experience watching it mature. Frogs, tadpoles and even a small contingent of fish called it home and caring for it was relatively simple. I would highly recommend considering a pond if you think it’s right for you and your family.
In our current home, we have chosen to install a small bubbling rock around a dry river bed. The solar-powered bubbling rock is not as successful in bringing in a variety of wildlife as a naturalized pond, but the running water attracts birds and mammals who use it use it as one of their many water sources in the garden.

A red squirrel gets a drink in the DIY reflection pond made from a rubber shoe tray.
Consider creating a reflection pond
There is an option, however, for those who feel they don’t have the time or desire for a backyard pond, but still want to capitalize on the tremendous photographic opportunities that water brings.
Consider creating a reflection pond in your yard.
A small, natural-looking reflection pond may not encourage reptiles and amphibians to your yard, but it could provide a natural studio to photograph them if they already exist in your yard.
These simple-to-construct reflection ponds can be the source of some of your best backyard images. They are usually built as shallow (a few inches deep) large tray-like structures on legs or even placed on a table with natural materials such as stones, pine needles and moss at one end where birds, squirrels and chipmunks are encouraged to go so that the photographer can capture both the animal and its reflection in a natural scene.
Natural material such as mosses, stone and even delicate wildflowers can be added to create the ultimate photo studio. If the reflection ponds are kept small, they can be moved around the garden to take advantage of lighting conditions. They can also be redesigned regularly to take advantage of seasonal changes. In spring, for example, a flowering tree branch can become the focus of the reflection pond. In fall, viburnum berries and colourful leaves add a splash of colour.
By tucking bird seed in various crevices, you can attract a variety of backyard birds, squirrels and chipmunks. A small toad would look perfectly natural tucked up against the moss and even a friendly snake would look good among the rocks reflecting in the water.

A natural, lichen-covered tree branch on the bird feeding pole entices a nuthatch to pose for the photographer
A simple set-up for birds
It should come as no surprise that a lot of the great backyard bird photographs you see on instagram and elsewhere are actually carefully set-up involving props, possibly lighting techniques and food to entice the birds.
That’s not to say the images are not great and getting them is easy. Most often, a lot of preparation and care have gone into the creation of these photographs.
It goes without saying that a very important part of your backyard bird and wildlife studio involves bird feeding stations.
It’s a good idea to have several placed in strategic locations throughout the yard set up for different types of birds, different lighting conditions and backgrounds.
I primarily use a single bird feeding station that can accommodate several styles of feeders as well as perches. The feeders change, depending on the season and type of birds expected to be visiting at any one time. Other feeders around the yard are dedicated to specific species such as hummingbirds and orioles, but the main feeding station is the primary focus when it comes to bird feeding and photography.
It’s located in an area where it gets morning back lighting or side lighting (depending where I am set up) and afternoon direct sun. I can choose my background depending on where I choose to set up – it can be blue sky, the soft-focus of distant trees or the more focused look of nearby crabapple trees. All the backgrounds can work depending on lighting conditions.
The feeding station is built around a Wild Birds Unlimited single pole system with two steel hooks for hanging the main feeders; a spike on the top to accommodate seed cylinders; several smaller clip-on feeders for meal worms; berries and special treats; a tray to catch seed and provide a feeding platform for birds who prefer to eat off platforms; a steel stylized perch perfect for hanging smaller feeders; and an attachment that can accommodate a small branch to be used as a natural perch.
The natural branch attachment makes the bird-feeding station particularly valuable to the photographer. The simple cylinder that slides into the main pole is large enough to accommodate any branch you want to use whether that is flower-laden from the Crabapples or Redbuds when they are in bloom, an evergreen bough left over from Christmas decorations or a branch covered in clumps of berries in the fall.
DIY branch and suet feeder
One of my favourite photographic stages is using a branch that has been drilled out in several places to accommodate suet or bark butter. It can be hung on the pole to create a very natural perch and feeder for woodpeckers, nuthatches, chickadees and other backyard favourites.
These suggestions are just a few of the many possibilities you can experiment with in your backyard wildlife studio. Some photographers, for example, enjoy setting up old garden tools as perches for bird photography to create memorable garden images. I am currently working on getting a series of images of birds on a peace sign as my ode to hippies, love and peace in the garden. Use your imagination and have some fun creating natural, or simply fun garden images of the wildlife in your garden.
Tools of the trade to capture striking images
Photography can become a very rewarding hobby allowing you to unleash your creative expression or simply a tool to document your garden and share an image or two on with friends on Facebook or Instagram.
One thing is sure, however, photography as a hobby can be addicting and making the wrong decisions can get costly, fast.
The number one mistake most photo enthusiasts make is to think the only way to get the images they want is to invest in longer and more expensive telephoto lenses and cameras that can fire off 100s of photos in seconds.
Nothing could be further from the truth, but longer lenses and faster motor drives in the hands of an experienced photographer can make all the difference.
Chasing elusive birds and animals in the field is likely to require the best lenses and cameras to capture memorable images, but setting up in your backyard for a photo shoot of birds and mammals that are more or less familiar with you and don’t see you as a threat, requires a different set of tools many of which are simpler and certainly less expensive.

My Tragopan Photographic blind set up in the garden.
The secret behind some of the best images
One tool that has improved my backyard photography and, more importantly the enjoyment of it, is not a camera or a long lens. It’s not a flash or even a high-priced tripod.
It’s a photographic blind.
In my case, it’s a dedicated photographic blind made by Tragopan. The U.S.-based company is making outstanding, high-quality products specifically for photographers. This is not a hunting blind that can be used by photographers, it’s designed and built for serious photographers. In fact their whole line of blinds and products are built for photographers and bird watchers in mind.
So what makes the photographic blind so valuable to backyard birders and photographers?
My one-person blind allows me to get extremely close to wildlife without disturbing their natural habits. It allows me to get outstanding images on a regular basis without investing in expensive cameras and extreme telephoto lenses. This close approach means that an inexpensive 80-200mm zoom can do much of the work that would normally require the use of a much more expensive 400mm lens valued upwards of $8,000 Cdn..
But allowing the photographer a close approach is not the only benefit a photographic blind offers.
Sitting in a blind has to be one of my most enjoyable experiences in the garden. By quietly sitting and simply observing my surroundings, I am able to get a much deeper appreciation of the animal and bird interaction in the garden. The red squirrels carry on as if not a care in the world. They may even know or, at least suspect, that I am in the blind, but their defences come down and they begin to act more natural, allowing me photographic opportunities that probably are not possible if it were not for the blind.
More timid birds and animals are much more likely to accept the blind than they would if I were sitting in a chair nearby. Photographing larger, or more skittish animals like fox, deer and even rabbits can really be improved with the use of a blind.
By no means do you need to go out and purchase a photographic blind. A garden shed can stand in as a shed, or even a window overlooking your garden can become a working blind much in the same way as a dedicated photographic blind.
However, the convenience of being able to move the blind around the yard to take advantage of the lighting conditions and the subjects you want to photograph is a real bonus of the dedicated blind. In addition, the fact the blind offers 360 degrees of photographic possibilities and the ease of setting it up and taking it down, should make a dedicated photographic blind high on the list of more serious backyard photographers.
The tools of the trade: Cameras, lenses and other necessities
The discussion around what camera and lenses should I buy is, as you may have guessed, very much dependent on budget and skill level, and your commitment to photography as a serious hobby.
I can speak with authority only on the cameras I use on a regular basis and the tools I use to capture backyard images. Among the tools I highly recommend is a good tripod and monopod as well as a polarizer to cut glare on water and off of leaves.
Rather than discuss the ultimate camera lens combination, it’s probably more helpful to break it down generally to beginner, intermediate and advanced camera systems that can be used to capture garden wildlife images, from the smallest insect to larger mammals that wander into your yard.
I like to consider myself an advanced amateur when it comes to photography. My current equipment consists of four cameras plus a very heavily used smart phone.
Two of the cameras are digital 35mm SLRs (DSLR) (one old model and the other an even older model), a high-end point and shoot model with limited lens coverage (approximately 28mm-105mm ), and a more recent purchase of a “bridge camera” that straddles the compact point-and-shoot market and the DSLR market.
The “bridge camera” looks and feels like a 35mm camera accept that it does not have interchangeable lenses. Instead, the lens that comes with it is designed for the camera body and offers a wide ranging yet powerful 26X zoom (the equivalent zoom for 35mm of about a 22mm wide angle to a 580mm extreme telephoto.) It also has a very good macro feature that allows for closeups of flowers, friendly insects, amphibians and reptiles.
The bridge camera sounds perfect for all levels, right? Well not really, but more on that later.
Go with what you’ve got
The best camera, so the saying goes, is the camera you have with you. A valid statement but on many occasions that’s my iphone. It’s always in my pocket and gets pulled out regularly for plenty of images. However, it’s definitely not my first choice when it comes to wildlife photography unless I want to show the animal in its environment.
Most smartphones do allow you to zoom in closer to your subject if necessary, but the more the image is magnified the more it is degraded. A simple finger pinch on the screen is often all it takes to move in closer. If it’s all you have, it can be used to capture a usable image.
Pros and cons of the high-end point and shoot
First up is my much-loved Fujifilm X10. It’s a very compact camera that fits nicely in my pocket. It’s the camera I usually take with me if I’m going out expecting to take typical images where I want high-quality and convenience without the need to magnify a subject whether it’s wildlife or a distant scene.
This mid-priced point-and-shoot, like most in its class, takes exceptional images including closeups, but does not have a long enough zoom range to make it effective as a wildlife camera. It is certainly more useful than the smartphone when it comes to these types of images, but not quite enough range to get close to birds and smaller animals. Butterflies and other insects are easily within its macro-range capabilities.
Until this spring, it would have been the camera I choose to carry with me when I was going out in the backyard for my morning coffee. It’s capable of capturing lovely garden scenes, larger mammals in their environment and excellent closeups. It also has numerous capabilities including creating lovely black and white images or dialing in classic Fuji films such as Provia for portraits or Velvia for nature shots with a punch of colour.
Point and shoot: In conclusion
If you already own a good point-and-shoot camera try to master the features it offers. The convenience of its compact size and the quality of images it is capable of providing make them a useful addition to your camera bag. A useful camera for capturing garden scenes, butterflies, friendly birds and possibly insects, but not one you would want to count on to capture more distant birds and mammals.
Using a photographic blind to get in close will certainly help to get usable images, but there are better choices.
If you have one, use it. If not, I would not purchase one with wildlife photography in mind.
Pros and cons of the Bridge Camera
The “bridge camera” (in my case the older model Pentax X5) has many of the bells and whistles necessary to get exceptional images of wildlife both in their environment, if shot with the wide angle lens, and close-ups with the extreme telephoto part of the lens.
If macro is your thing, it will focus extremely close to capture the smallest insects, butterflies or flowers. It also has a screen that pivots so that you can use the camera close to the ground without having to lay flat on the ground to get the image.
It’s an important feature now found on more and more higher-end cameras and is particularly helpful for older folks who are no longer able to get up easily from the prone position, or for just shooting close to ground level.
All of the major camera manufacturers and many of the lesser-know manufacturers offer Bridge camera models.
Bridge cameras’ secret weapon is their lens, which exceeds almost anything you could purchase for a DSLR with interchangeable lenses.
To get the equivalent lens on a DSLR would be extremely costly and heavy. Most bridge cameras offer at least a 20-times zoom range and some go up to 50 times zoom. At the maximum zoom, the magnification on a typical bridge camera zoom lens is equivalent to a 500mm or more on a DSLR, with the longest extending to more than 1000mm.
Although the cameras come with impressive anti-shake features, hand holding any lens with such a high magnification would require a tripod or monopod to guarantee a sharp image.

This image compares the compact Fujifilm on the left, the DSLR with 300mm lens in the centre and the bridge camera on the right.
Sounds perfect right? So what’s the problem?
If the quality of the image is a critical factor for you, the bridge camera results might fall short. Essentially, a bridge camera is actually a compact camera in a bigger, more full-featured camera body with an impressive zoom lens.
What does this mean? It means the sensor in a bridge camera is usually the same size as a typical compact camera’s sensor. As a result, high-quality enlargements, or excessive cropping of the digital image would compromise the image quality.

DSLR with 50mm lens compared to the bridge camera with its massive wide angle to telephoto zoom shows the extreme compactness of the bridge camera considering its ability to get in close to subjects.
Like so much in life, it’s all just another compromise.
In addition, most cameras that rely on an electronic viewfinder can be frustrating to use because of the delay between pressing the shutter and the photographer regaining use of the camera’s viewfinder (offically referred to as shutter lag.) This is not problematic in many photographic circumstances if the subject is more or less still in the frame, but if the subject is moving, the delay makes capturing successful images more difficult.
I am sure that some bridge cameras are better than others and admit that I have no experience with other camera manufacturers, so I suggest you give the camera a good workout in the store before purchasing it. Ask if you can take it outside and try photographing moving targets before you sink a lot of money in a camera that may be more frustrating than useful.
That said, my Pentax X5 bridge camera will be my go-to camera this year when it comes to coffee on the patio most mornings. It will also join me in the camera blind as my second camera to photograph birds and animals at a distance. Its convenient size, wide zoom range and capability of shooting multiple frames per second will make it an invaluable tool to in the photographic blind.
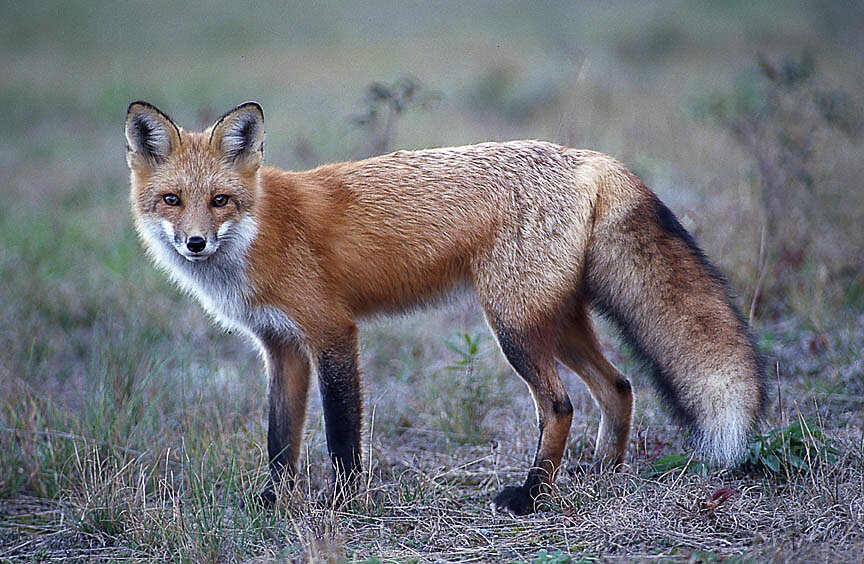
This fox image was taken with a 400mm lens without a blind.
The DSLR for the discriminating photographer
For years, the DSLR has been the mainstay for serious wildlife photography. A full-featured DSLR with a couple of high quality telephoto zoom lenses will result in the highest quality images possible.
Once some basic skills are mastered, the intelligence packed into these cameras combined with excellent autofocus capabilites, means capturing impressive images of wildlife in your backyard is almost a guarantee.
More recently, very high-quality mirrorless DSLRs are proving to be the camera’s of choice for wildlife photographers. Sony and Olympus have become players in the mirrorless models. Be sure to check out these offerings if you are serious about getting into backyard wildlife photography.
Getting into the DSLR or high-end mirrorless camera models all come with a hefty price tag and a camera/lens combination that many casual photographers would agree is too large and too heavy to carry around – even if it is only in our backyard.
There are alternatives to investing heavily in a high-priced, fully featured DSLR with long, fast telephoto lenses or expensive zooms.
Remember the benefits of the photographic blind? By creating the ability to get in close to wildlife, the blind will enable photographers to get high-quality results without the expense of purchasing long, fast expensive lenses.
Consider purchasing a used DSLR. There are many available as photographers upgrade to full-sensor, feature-packed models. In addition, used zoom lenses are also readily available.
A 70-200mm zoom is a good starting point, but a zoom that gets to the 300mm range is a better option for bird photography.
If you think backyard wildlife photography is something you might want to explore at a higher level, consider investing in a 300mm F4 lens combined with an autofocusing 1.4 teleconverter. The combination will give you a relatively fast 420mm lens (actually more like a 600mm lens if the crop factor is taken into consideration).
Without going into great detail, it’s a very nice combination that gives you all the magnification you are likely to need to capture birds in your garden.
It’s a combination that I feel extremely lucky to have in my arsenal. The older style Pentax 300mm autofocus lens with a Tamron 1.4 converter is a combination that works nicely whether I’m sitting in my photographic blind or just enjoying a coffee in the backyard with my camera beside me on a tripod.
The combinations are endless in the DSLR market. You could, for example, invest in a 400mm F2.8 for about $8,000, but I’m thinking that might be better invested in the installation of a pond and waterfalls, a photographic blind or any number of more inexpensive lens-camera combinations.
But that’s just me.
In conclusion
This article is aimed primarily at beginner photographers who want to capture images of backyard wildlife, primarily birds and small mammals.
While photographing backyard wildlife has its challenges, they are no where near as challenging as capturing images in the field. By creating mini photo studios, like natural habitats that attract large numbers of wildlife to specific areas of your garden, reflections ponds and well-thought-out bird-feeding stations with photographic perches, the backyard photographer can create a favourable photographic environment. By using photographic blinds – either existing sheds or commercial blinds – a close approach to backyard wildlife is easily achieved.
In addition, with patience backyard wildlife can be trained to accept our close approach. By regularly sitting quietly in favourite photographic areas throughout the garden, intimate wildlife images are attainable.
Taking advantage of these opportunities allows backyard photographers to focus on capturing wildlife images without having to purchase the most expensive equipment available. For some, who are not interested in capturing award winning wildlife images on a regular basis, a good point and shoot camera may be all they need.
It’s more likely, however, most of us want to capture high-quality images that we can share with our friends on social media like Facebook, Instagram and Twitter. This is where a bridge camera can really deliver. Images will be missed as a result of the camera’s inability to deliver in all circumstances. With patience and practise, impressive images are certainly possible with these cameras. In fact, improvements are making these cameras more desirable with each new model release.
In conclusion, the bridge camera is an excellent choice for beginner photographers looking to explore wildlife in their backyards. If, in the future, you want to step up to a DSLR, the bridge camera becomes a good backup camera for the times you don’t want to bring out the larger and heavier glass.
Finally, photographers who want to take their hobby to new heights, can consider investing in a starter DSLR that provides all the necessary features of an SLR without the added expense of a fully-featured model. A good zoom lens in the 100-300mm will give you access to the majority of images in the backyard environment.
If photography becomes a passion, you can always trade up to better cameras and a fast 300mm or 400mm telephoto lens.
As an Amazon Associate I earn from qualifying purchases. This page contains affiliate links. If you purchase a product through one of them, I will receive a commission (at no additional cost to you) I try to only endorse products I have either used, have complete confidence in, or have experience with the manufacturer. Thank you for your support. This blog would not be possible without your continued support.
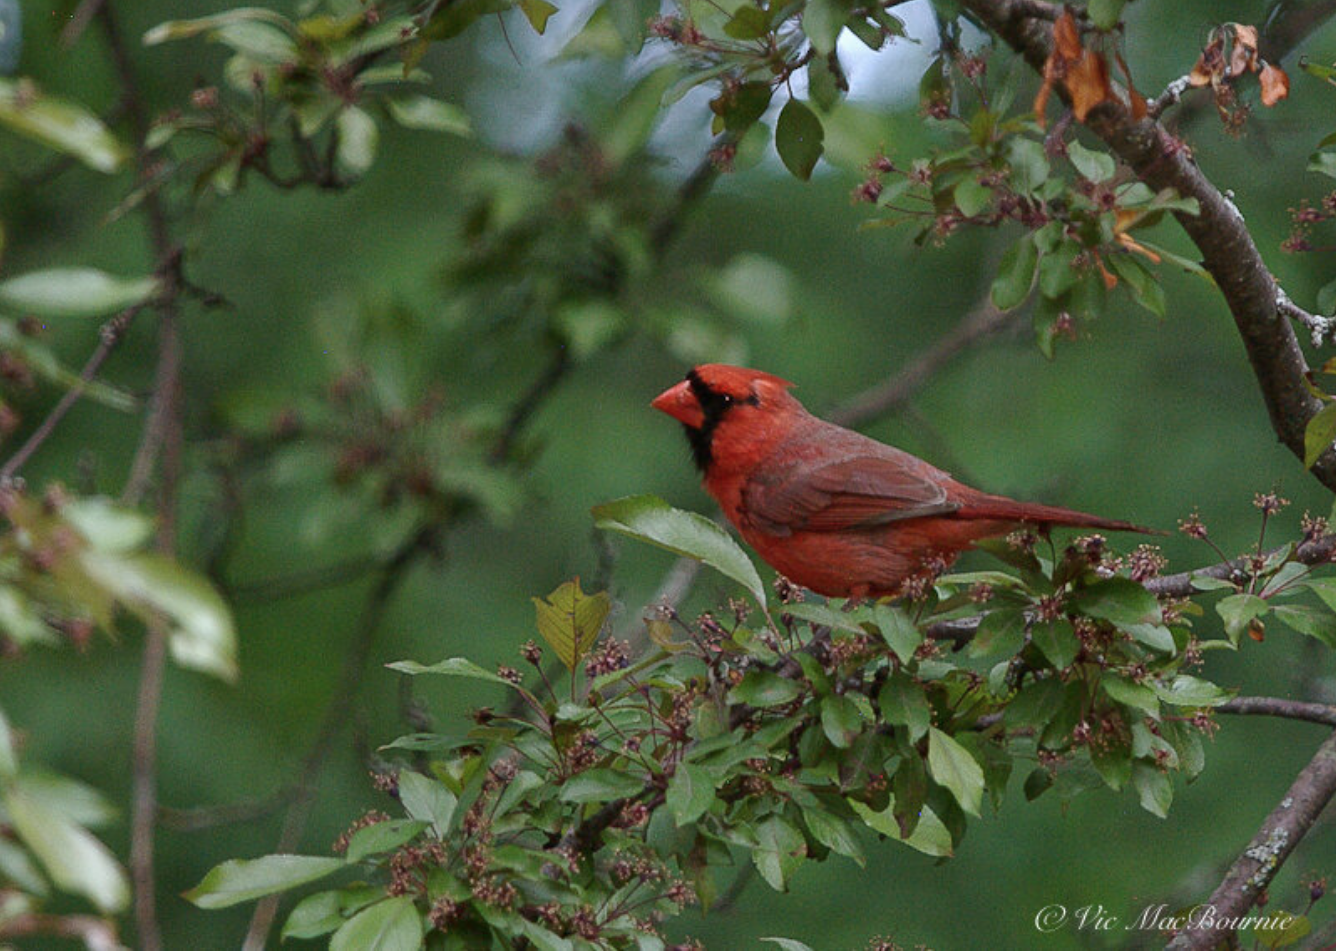
Best plants and shrubs to attract birds naturally and save money
Putting up a bird feeder and hoping for the best might not be the most successful approach to attracting the greatest varieties of birds to our yards. Many birds are primarily insect- or berry-eating birds and will not readily come to your feeders. Consider adding these native plants, shrubs and trees to ramp up your birds.
Beyond the Bird feeder: Best plants to feeds birds naturally
Attracting birds to your yard with a host of feeders is a great way to experience our feathered friends, but the ultimate goal is to create a natural backyard bird-feeding garden that attracts a greater variety of birds and does it more efficiently and for less cost.
That’s not to say we put away the feeders completely. Our feeding station, for example, provides countless hours of enjoyment. It’s daily entertainment I can’t imagine ever living without.
But, let’s face it, feeding backyard birds with commercial seed gets expensive, fast.
If you’re like me, both the look of the feeders and their quality are significant factors in the decision to make a purchase. But the real cost of feeding birds is the weekly or monthly seed costs that keep adding up. Specialty seed, suet, meal worms … the choices are endless.
These concentrated locations where the birds feed can also be a magnet for unwanted visitors to our garden such as an abundance of rats and mice. Best to keep them at bay.
And, let’s not forget the troubling fact that seed-eating birds make up only a small percentage of the bird species that might visit our yards. Despite the high costs and great troubles we go through to feed the birds, we are really missing out on a large segment of the bird species who put seeds lower on their list of favourite foods. A garden or areas of the garden dedicated to attracting birds naturally is an excellent way to experience a greater variety of birds in their natural habitat.

Cardinal in crabapple tree on the lookout for a caterpillar to bring back to the nest.
Ten simple steps to attract birds naturally
Design food islands throughout your garden
Plant native, berry producing shrubs and trees that provide food in summer, fall and winter
Ensure you have a selection of native flowers that attract insects and supply birds with seeds
Eliminate pesticides to save insects for insect-eating birds
Build a wood or brush pile in a corner of your yard
Ensure there are several sources of water available including on-ground pools
Create safe habitat for nesting birds with evergreen and thorny shrubs
Allow areas of the garden to go wild to maximize foraging areas for insect-eating birds
Allow fruit to rot to encourage more insects for birds
Slowly move away from a reliance on commercial feeders and bird seed.
In this post, I’ll take a deep dive into how we can create a natural, backyard bird-feeding garden, to keep the birds exploring our backyard long after most of the store-bought bird feeders and expensive seed are gone.

This excellent poster was created by Justin Lewis and is best viewed on a tablet or desktop.
Convincing birds to come to our yards for reasons other than a large cylinder of sunflower seeds involves a multi-faceted approach that may require several years of garden design planning focusing on creating natural habitat, including islands of fruit, nut and seed producing trees, shrubs and flowers that serve a variety of bird species from warblers to woodpeckers. Fruit-bearing shrubs such as viburnums and serviceberries can be supplemented with seed-bearing flowers such as Black-eyed Susans, sunflowers and Asters. Of course there is an oak tree, dogwoods and evergreens in the mix for nuts, berries and nesting habitat.
Deciding on the best trees, shrubs and flowers for our natural backyard bird-feeding garden will depend a lot on where you live, the size of your backyard and how dedicated you are to creating a natural backyard bird feeder.
This post, however, will help to get you started by listing many of the best trees, shrubs, vines and flowers birds use as food sources, and what birds depend on these sources for food.
Ten best shrubs and trees to attract birds
Serviceberry (Amelanchier) Zones 4-8, Every natural bird feeding garden needs a serviceberry. Two or three are even better. I think at last count I had four growing throughout our woodland garden. What makes the serviceberry so important for birds is its early summer yield of delicious deep red almost purple berries. These provide an early feast for birds either just before or during the nesting period. A favourite in our garden of robins waxwings, orioles, woodpeckers, chickadees, cardinals, jays mourning doves, vireos and finches as well as red squirrels and chipmunks. The early spring flowers (early May in our area) attract an abundance of insects which birds are also attracted to as a food source. For more information on serviceberries, check out my earlier story here.
Beautyberry Bushes (Callicarpa Americana) Zones 5-8, If these shrubs provided no value to the birds, I would still grow them in my garden, they are that nice. But it’s their incredible purple berries that grow in clusters close to the stem of branches that make them such attractive little shrubs and is the draw for birds to your garden. These bright purple fruits are attractive to several birds that might not be regulars to your feeders including Mockingbirds, Robins, Brown Thrashers and Northern Bobwhites.
Chokecherry (Prunus virginiana) Zones 2-7 is a suckering shrub or small tree that grows to between 3 and 19 feet and produces flowers in racemes followed by its fruit that can range from bright red to black. It is found naturally in the northern half of the United States and across southern Canada. Although the shrub plays host to tent caterpillars, it remains an important food source for native birds. For bird lovers, the tent caterpillars are an added bonus. The fruit of the chokeberry ripens from July through to October but doesn’t drop to the groun, instead remaining on the branches throughout winter providing a winter food source for up to 70 species of birds.
American Cranberry Bush (Viburnum Trilobum) and other viburnums zones 2-7 The American cranberry is a mid-size shrub (8-10 feet tall and wide) with its white clusters of spring flowers and stunning rusty red fall foliage is impressive in itself, but it’s the berries on this viburnum that make it shine. Viburnums can be grown as a shrub or small trees and is available in a number of species. Watch for, among others, robins, bluebirds, thrushes, catbirds, cardinals, finches, waxwings to visit your viburnums.
Blackberries (Rubus spp) If you have a corner of the yard you don’t mind giving over to the birds, the blackberry (although considered invasive in some areas) is an excellent choice. The thorny plants provide some protection for nesting birds and because blackberries begin fruiting in late spring and early summer, they provide a good food source during the breeding season. You can expect various warblers, orioles, tanagers, thrashers, mockingbirds,, catbirds and robins, among others to visit your blackberry bushes.

The Flowering Dogwood is a beautiful native addition to any garden but its real superpower is how many birds love to eat its berries, including Eastern Bluebirds.
Dogwood (various Cornus species) zones 5-9 Dogwoods are an obvious choice when it comes to feeding birds naturally. Although they are best known to humans for their early spring blooms, the birds are drawn to the many varieties for their abundance of high-fat content. Popular choices include the pagoda dogwood (Cornus Alternifolia), Flowering dogwood (Cornus Florida), and red twigged dogwood (Cornus Baileyi.) It is said that more than 40 types of birds feed on dogwood berries including bluebirds and other members of the thrush family, woodpeckers, catbirds, thrashers and mockingbirds.
Elderberry Sambucus zones 4-9 This fast-growing deciduous shrub is favourite in our garden for the abundance of purplish-blue summer berries that follow the plant’s clusters of white flowers in spring. The flowers also attract pollinating insects which also provide a food source for birds in early spring. The berries are a favourite of a number of birds including those hard-to-attract warblers, orioles, colourful tanagers, catbirds, thrashers, mockingbirds and waxwings. Although the native species are always best to plant, Proven Winners Black Lace and Lemony Lace hybrids are outstanding editions to any garden and can easily substitute for Japanese maples.
Proven Winners describe their Black Lace elderberry as having “intense purple black foliage that is finely cut like lace, giving it an effect similar to that of Japanese maple. Pink flowers in early summer contrast with the dark leaves for a stunning effect and give way to black berries if a compatible pollinator is planted nearby.”
It’s their Lemony Lace version that I enjoy the most in our garden. The same finely cut foliage is here but in a golden or chartreuse colour to lighten up your landscape. The large clusters of white flowers in early spring before the foliage emerges are followed by berries. And they are deer resistant.
Juniper Juniperus Zones 3-9 Junipers are key sources of food and habitat for wintering birds. Their thick foliage provides ideal places for birds to escape cold winds and offer both nesting habitat and fruit for many birds. They can be grown as a shrub or tree and attract everything from warblers, grosbeaks, jays, sapsuckers, woodpeckers, waxwings bluebirds, robins, thrashers bobwhites and even wild turkeys.
Chokeberry Aronia Arbutfolia zones 4-9 Is a favourite of many birds. Its rather unimpressive spring blooms give way to bright red berries in summer and into fall when winter birds such as Cardinals and woodpeckers
Holly including Winterberry Ilex Verticillata zones 3-9 Holly is an ideal plant to attract birds with its colourful fruit ranging from red to yellow, orange to black and white. Of the more than 400 species that range from shrubs to large trees, hollies are primarily evergreen. Some, however, like winterberry, are deciduous. These are excellent sources of winter food for birds. The fruit ripens in the fall and can last all winter into early spring where they can provide a source of food for migrating birds or new arrivals. You can count on the red berries in the fall and winter to provide a natural food source for birds such as Bluebirds, woodpeckers, catbirds, thrashers and mockingbirds to name just a few.

Pagoda dogwood flowers in spring before giving way to an abundance of black fruit that the birds can't get enough of in the summer.
Best flowers to attract birds
It’s easy to see the direct relationship between birds and the many shrubs and small trees discussed above. The birds are obviously attracted to the fruit and sometimes the seeds of shrubs and trees. Indirectly, the insects that might be attracted to the fruits also serve as food for the birds foraging in our gardens.
That relationship is often not quite as obvious when it comes to the flowers we plant in our gardens. Aesthetics is usually the driving force behind planting a particular type of flower in our garden. Their attractiveness to pollinators and, perhaps, hummingbirds is sometimes the motivating factor behind planting flowers, but rarely do we give a lot of thought to the birds the flowers may attract. Here are a selection of flowers that will bring birds into your yard in search of the food they provide in one form or another. Let’s examine them in more detail.
Aster: The New England Aster, often seen growing on roadsides and in open fields in scrub land, is a good example of an important food source for birds in our backyard. This herbaceous perennial that can range anywhere between 3 feet to 6 feet in height puts out its colourful blooms in late summer into fall making it an important food source for migrating birds.
Its yellow centre surrounded in purple rays makes it a colourful addition to any garden at a time when most other flowers are disappearing. That’s the secret to the flowers’ importance for our native birds. This late bloom provides many insect species with vital autumn nectar creating an abundance of activity around the flowers, in turn providing an important food source for insectivorous birds right before or during migration.
Don’t be surprised to find an intensity of bird activity in your yard right at the time you think the birds are heading south. If that does not convince you to plant this hardy plant, consider that the seeds of New England Aster are also a food source for many birds including the White-Breasted Nuthatch (see earlier post here on attracting nuthatches), Black-Capped chickadees and American Goldfinches. Other backyard birds that may feed on Asters or the insects attracted to them are Blue Jays, Juncos, Indigo Buntings, Cardinals, Eastern Towhee, Ruby-Throated Hummingbirds and the Titmouse.
Black-Eyed Susans: Similar to the Aster, the Black-Eyed Susan is a late summer/fall bloomer that is a magnet for insects and, therefore, a good food source for insect-eating birds. Ranging from 2 to 3 feet in height, the Black-Eyed Susan and its many cultivars, also provide birds – especially American Goldfinches – with a source of food throughout the winter months. It’s important not to cut the stems of these plants down in fall. Leaving them standing provides both interest in the garden as snow builds up on them as well as an easily attainable food source for birds foraging in winter when there are fewer sources available to them. Many of the same birds that are attracted to Asters also depend on Black-Eyed Susans for a late fall and winter food source.
Coneflower: Falls into the same category as the Aster and Black-Eyed Susans when it comes to a food source for birds. The Purple Coneflower, with its prickly centre disk, is a favourite of many butterflies which, in turn are favoured by insect-eating birds. In addition to many of the birds mentioned above, Purple Coneflowers also attract Pine Siskins and Mourning Doves.
Columbine: Our native columbine is a woodland favourite that we know is especially attractive to hummingbirds. The red and yellow coloured flowers of our native columbine (see earlier post here) are rich with nectar and an obvious choice for lovers of hummingbirds. This same nectar also attracts a host of insects in early spring and so provides another food source for insect-eating birds from warblers to hummingbirds themselves. The seeds of the columbine may also attract various finches, including the Purple Finch.
Sunflowers: It’s no secret that the best flower you could plant in your garden as a food source for a host of birds is the mighty sunflower. Considering it’s the number one seed in our feeders, it only makes sense that we put it on our list of must-haves in our bird garden.
When one thinks of sunflowers, however, the first ones that come to mind are the massive Russian mammoths that can easily grow to 10 feet in height with their enormous flowers giving off an almost magical feel to our gardens.
These big boys are a great food source, make the perfect landing spots to photograph the birds, and a fun addition to the garden, but consider planting the native perennial varieties of Sunflower as well.
The native perennial Sunflowers, often referred to as the Woodland Sunflower, is much smaller, attracts bees and other insects, including many butterfly species including Checkerspot and Painted Ladies. It grows to between 2.5- and 6-feet tall with a central stem that becomes branched where the flowerheads occur. The blooms can last up to two months in mid-summer into early fall.
These long-rhizomatous plants often grow in large colonies in the wild where they grow in full or partial sun. It can spread aggressively if left unchecked and seems to be happy in most soils including loamy, sandy or rocky areas. It is pollinated by a host of native bees and is host plant to a number caterpillars to native butterflies making it an important source of food for insect-eating birds. Plant it along your woodland edges in full sun alongside Black-Eyed Susans and Bee-Balms for a stunning display and an insect/bird magnet.
The list of birds attracted to sunflowers is too long to list but includes Downy Woodpeckers, Indigo Buntings, Pine siskins, Purple Finches and Rose-Breasted Grosbeaks.
Don’t forget vines
Vines can be an important addition to a woodland wildlife garden providing nesting habitat as well as a food source for birds in the form of berries and the insects that are often attracted to these berries. One of the most important native vines for birds is Virginia Creeper.
Virginia Creeper: If you do nothing in your garden, there is a good chance that you will eventually have some Virginia Creeper in your garden. We have it in several spots in our woodland garden either growing along the ground or creeping up large trees. There is a reason why Virginia Creeper is so prevalent – birds love its fruit and are quick to spread the seeds either in the wild or in our gardens. That’s a good sign and one that this is an important native plant to attract birds to our gardens.
This deciduous vine grows between 30 to 50 feet with a spread of between 5 to 10 feet. It blooms from May to August, but its magnet is the berries it produces in the fall. The berries are a favourite of a long list of birds but most notable are the American Robin, Brown Thrasher, Cape May Warbler, Cedar Waxwing, Eastern Bluebird, Hermit Thrush, Eastern Phoebe, Scarlet Tanager, Yelow-Rumped Warbler, Pine Warbler, Red-Bellied Woodpecker, to name just a few.
Perhaps where many of us fall short in our attempt to attract the more unusual birds to our backyard is that we rely to heavily on providing food sources for our feathered friends, whether that is through commercial bird feeders or by planting an extensive array of native trees, shrubs, vines and flowers.
While food is a key ingredient to success, it’s important not to forget that birds are looking for a number of factors before they decide to raise their young in a particular area or backyard. By meeting as many of these needs as possible, we will be able to attract a greater variety of birds including those that are not normally common in backyards. Most of these more uncommon birds are primarily the insect eaters.
The following are important steps that, in addition to commercial feeders and planting native flora, will drive these birds into our yards.
I will not go into great detail here but, instead, urge you to explore my other posts on these important topics.
Build a wood or brush pile to attract wildlife
Build a brush or woodpile: Creating a brush pile in a corner of your yard can be a real draw for backyard wildlife ranging from small mammals, reptiles, amphibians and, of course insects. This in turn attracts the attention of birds, including raptors such as hawks and owls, in search of mice and other rodents – think rats - that might want to take up residence in your garden. I have two separate brush piles in our garden.
One is similar to an open compost of garden debris – branches, dried ornamental grasses, some fall leaves, mixed with spend soil from last year’s containers and hanging baskets – that is now well over 6-feet high and at least 12 feet in diameter. It is home to snakes, mice, chipmunks and who knows what else. I have seen a Cooper’s hawk in one of the branches above the pile just waiting for its dinner.
The other is more a traditional, very open wood pile made up of branches trimmed from out mature trees. I see it as a perfect home for a fox, groundhog or even a skunk although I have not seen any of those animals use it in that way to date. I do know that the top of the wood pile is a favourite spot for our red squirrels to sit and watch over the garden for predators.
For more on creating a wood/brush pile for a wildlife garden go here.
Adding several water sources is key for birds
It’s not enough to add a single bird bath to your backyard and think you’ve met the needs of every bird that might want a drink or bathe in your backyard. Birds can be fussy when it comes to bird baths and water sources.
A natural pond is always the best way to bring in a variety of birds, especially if there are no other natural bodies of water in the area, but many of us don’t want to get involved in setting up and maintaining a natural pond.
Instead, try setting up a series of water sources in your garden combining various styles of bird baths from traditional ones, to on-ground water sources and hanging bird baths.
Remember, though, not all bird baths are created equal.
I have written a comprehensive article on the best bird baths for your backyard. You can read it here.
Some are deep and preferred by larger birds, others are shallow and need to be filled daily but provide safe wading for smaller birds. Other bird baths can include a solar-powered pump to provide moving water.
On-ground water sources are often preferred by birds. We have a concrete leaf that gets tucked into pea gravel and is used constantly by everything from chipping sparrows to chickadees, but is a favourite of our resident chipmunks.
A solar-powered bubbling rock at the head of a dry-river bed provides moving water that birds, squirrels and chipmunks like to use daily.
We have even had a large hawk use one of our three large waterbowls as a bird bath.
By providing a host of water sources, birds can choose the one that they feel most safe. Taking a bath or even taking a drink can be a dangerous time for birds if predators are about. Providing a safe perching area nearby will allow them to case the area before committing to the bird bath as well as provide them an escape hatch if that is necessary.
For my earlier post on providing water for birds in your backyard, go here.
By combining some or all of these suggestions over time, I’m confident a greater variety of birds will find your backyard woodland/wildlife garden and choose to make it their home. Others will use it as one of their many stops on their daily routine and still others will drop down during migration to spend time in an area that meets their needs and helps them restore the energy they need for safe passage on their migration route.
Godspeed little buddies.
As an affiliate marketer with Amazon or other marketing companies, I earn money from qualifying purchases.
Staghorn Sumac is an excellent addition to the garden both to add architectural interest and provide a food source for birds and animals.