
Exploring the art of flower photography

An Iris photographed up close shows details that we may not normally notice. The image is more documentary and would need to be photographed with a tripod to maintain sharpness and detail.
Plant the seeds for creative flower photography in your garden
Flower photography offers us gardeners the perfect opportunity to combine our passion for flowers, with an outlet for creative expression.
Imagine the satisfaction of capturing a striking image of a flower that you actually started from seed in spring, or a drift of black-eyed-Susans that you planted two years earlier. The combinations of flowers we can plant in your garden opens up endless possibilities to create beautiful tapestries for selective focus experiments or simply colourful backgrounds for our favourite flowers
Besides, the thrill of creating beautiful images, the process of documenting your garden from year to year certainly has much value for off-season garden design planning.

This image of a tulip is an example of a more creative approach to flower photography. The soft background and delicate lines as well as the off-centre composition captures the viewers attention.
We already know that we love our subjects, so it’s a small step to focus on a deeper exploration of those same flowers to guide us along the road to discover the art of flower photography.
You don’t need to be an expert photographer with the latest camera gear to get great flower photographs.
This post is aimed at gardeners who take photos rather than photographers who photograph flowers.
We’ll try not to get too technical here – there’s no need to dig deep into the details about megapixels, zoom ratios and the benefits of shooting RAW vs jpeg. There are plenty of photography blogs that you can explore if you are wanting to “dig deeper” into the technical details of capturing flowers.
Be sure to check out my other posts on flower photography including: Macro photography in the garden, Best camera and lens for garden photography, Why Goldenrod is one of my favourite wildflowers to photograph, Ten tips for great flower photography.
Let’s break this post into two parts: Starting with how to take flower portraits or documentary images, followed by how to take creative flower photography.
Before we get into the details, let’s discuss the two most asked questions about flower photography.

These tiny woodland Hepatica need a close approach with either a true macro lens or a macro feature on a compact camera.
What the best lens for flower photography?
The best lens for flower photography is a dedicated macro lens available usually as a 50mm macro, a 100mm macro lens or one approaching 200millimeters (in 35mm talk). These are usually f2.8 lenses that allow a very close approach and the ability to create a beautiful soft background in your image.
If I could have only one lens for wildlife and birds in the garden, it would be my F* 300mm F4.5. Check out my full story on the lens by clicking the link.
If you are using a compact, single-lens camera with built-in close-up capability, then that lens is more than capable of getting striking flower images with careful technique and a little ingenuity.
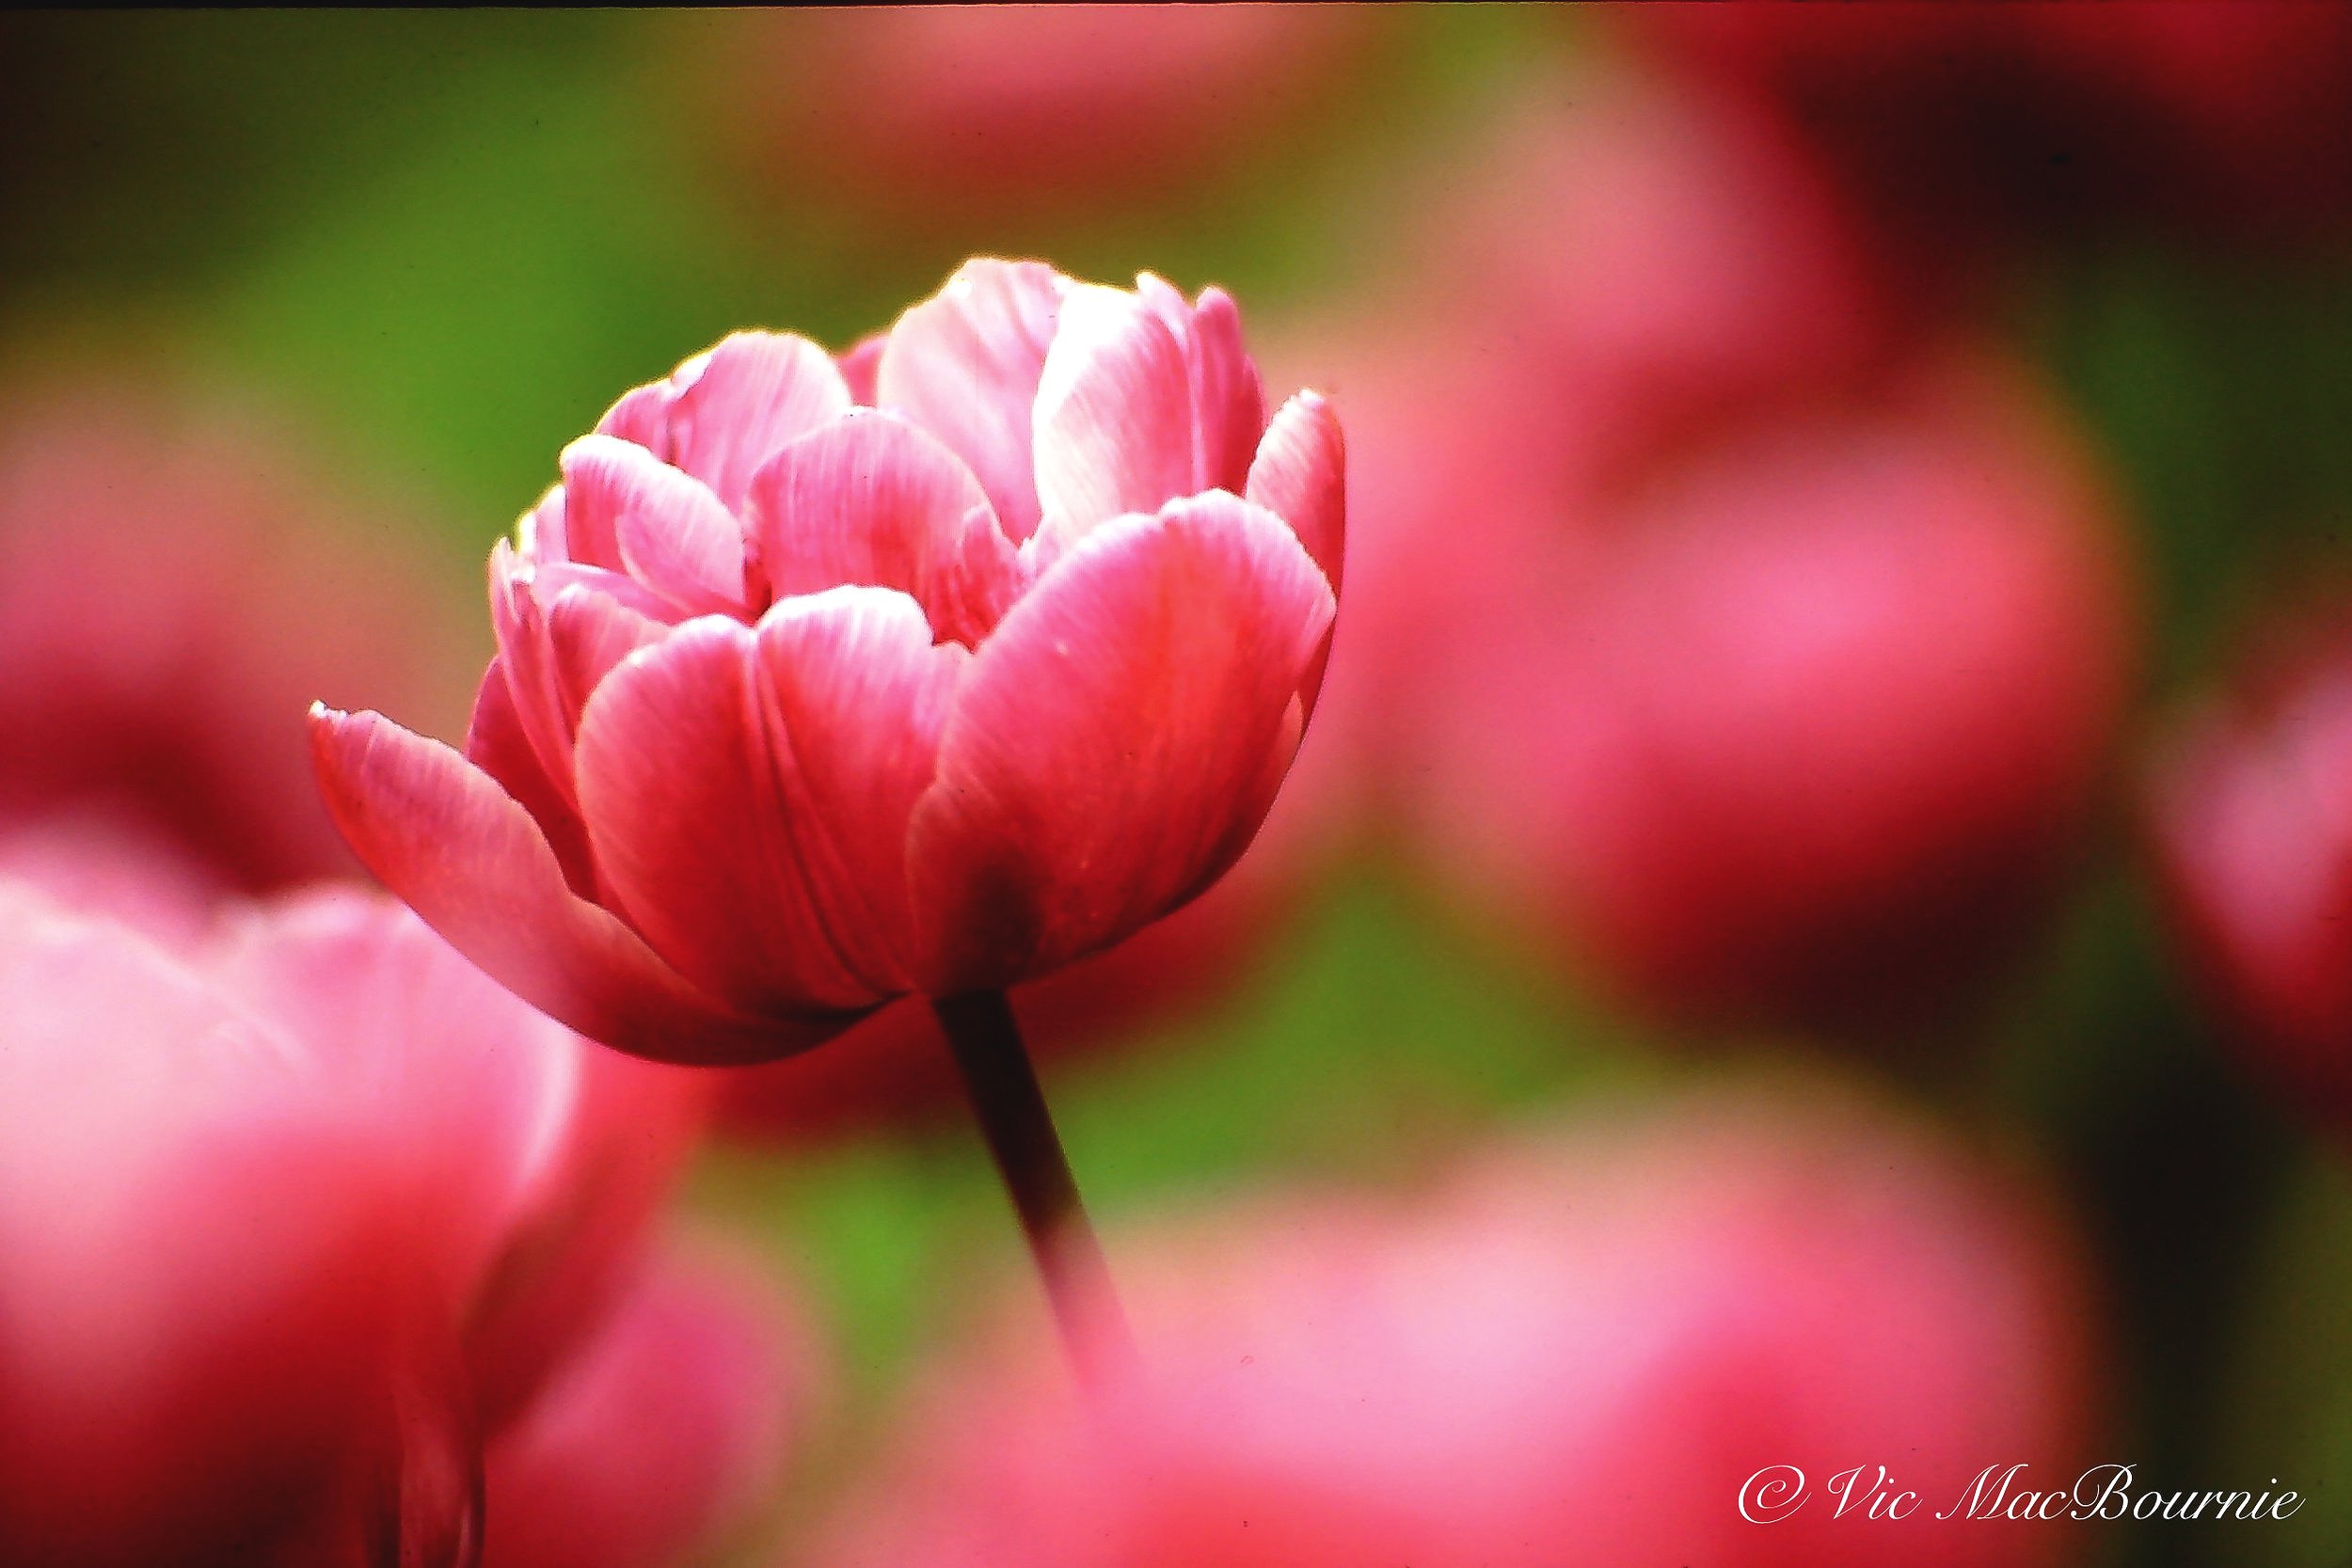
This tulip, photographed in selective focus, illustrates how the delicate colours surrounding the flower creates a lovely feeling to the image.
What’s the best aperture to use for flower photography?
This is a little more difficult to define, but F8 and F11 are excellent starting points if you are looking for a sharp image using a dedicated macro lens. Moving to F16 will create an even larger depth of field, giving the appearance of a sharper overall image.
If you are using a compact, single-lens camera, F8 may be the highest number (smallest aperture) you can use. Because these cameras inherently have a larger depth of field, F4 -F8 should be good starting points.

This “portrait” of a columbine shows a narrow depth of field but is sharp where it needs to be sharp.
Tips to capture a flower portrait
First, let’s explore what we need and how to capture flower portraits in our garden.
Expensive camera equipment is really not necessary, although the right equipment can open a world of creativity that is sometimes more difficult to achieve with standard point-and-shoot cameras.
In saying that, however, one of the goals of Ferns & Feathers is to show gardeners that the camera they likely already own has the capabilities of creating outstanding images. It shouldn’t matter if that camera is a smartphone, high-end ten-year-old cameras like the Fujifilm X10, Canon PowerShot Elph 500, or a more expensive travel camera like the Panasonic Lumix DMC-LS50 (all of which I have written about in the links provided). These cameras are all capable of outstanding images providing you are not afraid to explore the cameras’ and your own creative possibilities.

This portrait image of a woodland Jack-in-the-pulpit shows a beautiful soft background while the subject itself is sharp and shows close up details of the plant.
Joy of flower photography begins in your garden’s outdoor studio
One of the joys of flower photography for gardeners is knowing that you can step out into your backyard at any time to capture flower images. Of course, not all flower photography has to take place in your own garden, but it sure provides the perfect outdoor studio and creative outlet full of endless possibilities.
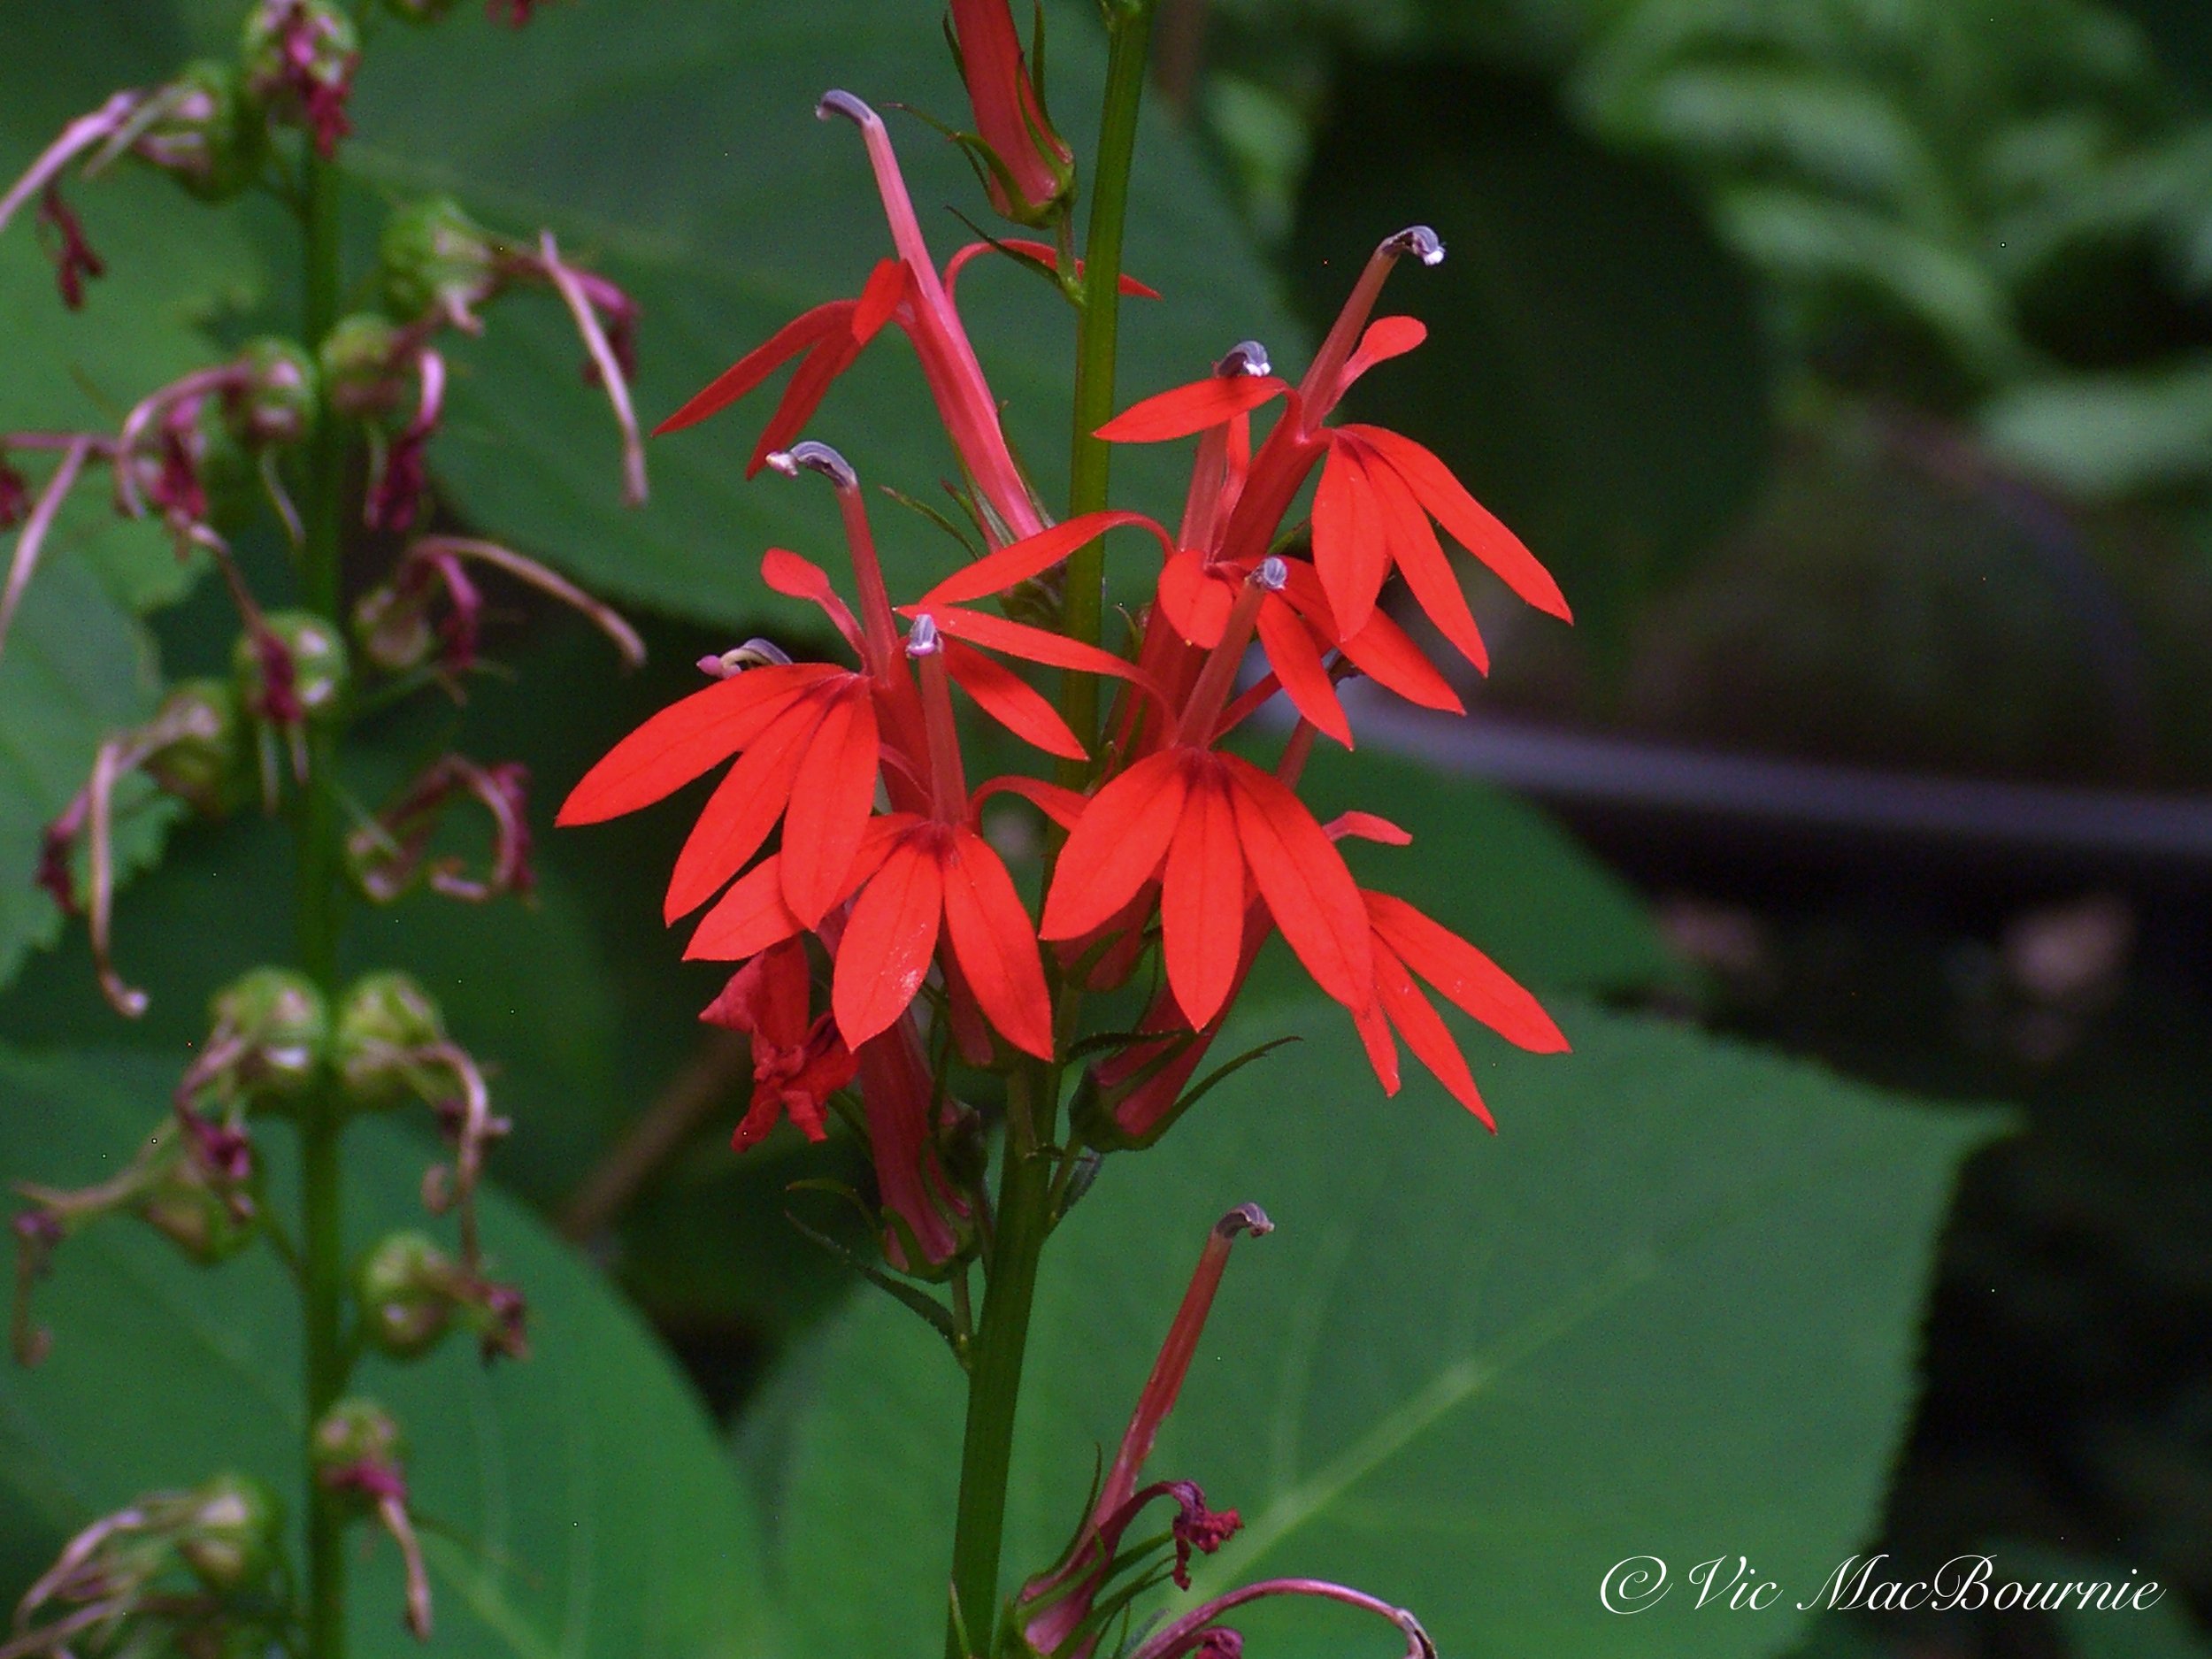
The above image shows a Cardinal flower with a stem of spent flowers to the right.

Just by moving the camera a few inches, we were able to eliminate the distracting spent flowers and find a more pleasing background.
I cut my teeth with flower photography when I worked with the Royal Botanical Gardens in Hamilton, Ontario to create greeting cards, posters and slide shows to promote their wonderful public gardens. I spent hours wandering through the botanical gardens capturing images in all sorts of light. This was way back during my film photography days when capturing images of flowers was much more difficult. Today’s cameras have eliminated much of the difficulty of good flower photography.
But, using your own home-grown flowers enables you to both choose the type of flowers you want to photograph and pick the best times to create images. Choosing the best light, being able to move the flowers, even cut them to move them to more favourable backgrounds ensures a higher degree of success.
In spring, search for annuals that you know will offer photographic possibilities throughout the summer. Whether grown from seed or purchased in cell packs, a little planning with a photographic eye in mind can create stunning pairings that offer photographic possibilities both as individual flowers, as well as in a group setting.
Focus on garden flower portraiture
Being able to create good documentary portraits of flowers in the garden is a good first step. These are usually images that are sharp where they need to be, have good colour and show the flower in a positive light. These images are perfect for sharing on our social media feeds and, when done well, are worthy of hanging on your wall.

This selective focus image of a delicate white flower (Snow in Summer) works beautifully when shot with a dedicated macro lens at F2.8, which is wide open. The foreground and background flowers are out of focus and help to create the dreamy effect in the image. It’s important to overexpose an image like this to keep the whites clean in the image. For my full article on shooting Snow in Summer and selective focus click here.
5 tips for great flower photography
If you have a compact, point-and-shoot style camera set it to close-up mode. There are often two close-up modes to choose from with one allowing a closer approach than the other. If your flower is large, you can probably use the general close-up mode, but if it is small, you may need to use the second macro mode that allows an extremely close approach.
Now, with your camera in AV (aperture value) mode, choose an F-stop that is a higher number rather than a lower one. Try F8 or F16 if your camera allows. These higher F number will create more of depth of field than the smaller F numbers like 2.8 or F4, and the image will appear sharper. Lower F-stop numbers create a shallow depth of field leaving only a very small part of the flower in focus. The same approach works if you are using a dedicated macro lens on a DSLR or mirrorless camera with interchangeable lenses.
Because we are working with high F-stop numbers that actually let less light pass through to the sensor, a tripod or bean bag will help ensure the final image is sharp. Using a tripod is always a good idea. I have a small Culmann Tripod (Amazon link) that collapses to the ground that I have used for years as a travel tripod, but I also use a larger Manfrotto tripod (Adorama link). Today’s modern cameras with shake reduction and the ability to increase ISO settings makes handheld images more possible. The alternative to using a tripod is to go into the camera settings and increase the ISO. Although this may allow you to reduce camera shake, the higher the ISO seting the more likely the image will be degraded by “noise.” If you are using a compact camera, you need to take advantage of every tool available to maximize the quality of your images. A tripod together with an electronic or wireless release will go a long way to improve your documentary images. If you have neither an electronic, nor a wireless release, you can just use the camera’s 2-10-second self-timer.
A flash can really improve your images by providing plenty of light that reduces camera movement while allowing for a high F-stop to create a large depth of field. Most photographers, however, don’t want to have to learn the complexities of using flash even though today’s digital cameras make using a flash much easier. Simply take some test pictures with the flash until you get the lighting where you want it. Off-camera flash creates more pleasing results than the small on-camera flashes built in to today’s cameras, especially if reflectors or an umbrella is used to further soften the light. If you don’t want to use flash, a reflector simplifies the situation allowing the photographer to see exactly the effect of using reflected light from the sky to light up the flower. An even better option is to purchase small led lights (Amazon link) like the Aputure MC RGBWW Mini LED light (Adorama link) that are perfect for shining a constant, controllable light onto your flower.
Managing the background in your flower photography is also extremely important. In the ideal world, you want to isolate your flower with a soft, blurry background that does not compete with your main subject. If you are using a true macro lens on a DSLR/mirrorless camera, achieving this desired end is a little easier. Compact, point-and-shoot cameras make this more difficult for a number of reasons we don’t need to explore. By positioning the flower so that the background is several feet away, you may be able to blur the background sufficiently. Using an off-camera flash can light the flower and darken the background, which can also work. But it might be easier to create your own soft, muted background on a piece of cardboard that can be slipped in behind your flower but far enough away that it looks natural. By making up several different backgrounds, you can achieve different looks for various flowers.

Another selective focus image of the small white flowers of the Snow in Summer, shot in a high-key effect.
Focus on creative flower photography from B&W to selective focus
Once we begin to master documenting flowers, it’s time to open our minds and transform those same flowers into artistic expressions that go well beyond seeing them for what they are and, instead, seeing the colours, shapes and textures that draw us to them.

This tapestry of flowers offers plenty of creative opportunity by moving in close on individual flowers or using selective focus to give a soft, ethereal look to the image.
If you are like me, a good selective focus image of a flower or flowers is always far more inspiring than a typical flower portrait. Creative flower photography involves throwing away almost everything you have learned do in flower portraiture.
We are no longer trying to create a sharp image of our subject. In fact, a dreamy soft image is most often more effective.
For more images showing a more creative approach to flower photography, check out my page on creative photography.

This extreme close-up image of a woodland Hepatica flower shows the extremely small depth of field that a macro lens provides.
Here are five steps to make creative images of flowers
Use a long lens (ideally 300mm or more). Open the F-stop to its widest aperture F4, F5.6 … and shoot through a grouping of flowers but focus on one in the middle of the grouping that stands out from the crowd. Let the flowers in front of the subject and behind the subject go out of focus. The technique is often referred to as “selective focus” and it can be very effective if you have a meadow-style garden or a large drift of flower you can shoot through. The same technique can be used with a good macro lens, especially a 100mm macro. This effect will be more difficult to achieve with a point and shoot camera, but not impossible. These cameras have a greater depth of field which makes it more difficult to capture an image with the surrounding flowers out of focus. For more on creating selective focus photography, check out my earlier article here.
Don’t be afraid to experiment with filters: Modern digital cameras offer a series of filters or modes that can be a source of inspiration for creative flower photography. I especially like the “soft focus” mode, or one marked “creative” (depending on the camera). Experimentation with the filters and modes is important to get a feel for the effect.
Experiment with high-key photography can be very effective under the right conditions. Many cameras have a filter to help create this effect, but the subject has to lend itself to using the technique for it to usually work well. Look for light-coloured flowers in whites or soft pinks against an overcast sky to create the light airy feel you are trying to achieve. Try over exposing the image to keep it light and airy. (You can use the exposure compensation dial in your camera to overexpose the image by one, two or even three F stops.
Use post processing to create delicate painterly images. Photoshop or another post-processing photography program can be used to manipulate flower images after you have taken them. I like to use a free program called Gimp to give images a painterly look, and flower photography offers perfect subjects for the technique. For more information on the process, go to my post on creating painterly images.
Shoot flowers from different angles. It’s easy to get caught taking photos from directly in front of the flower at eye level or slightly above it. It’s important, however, to use different angles to get less obvious views of the flowers. This is where a articulating LED screen on your camera can come in handy if, for example, you are shooting very low at ground level. One of my favourite approaches is to shoot the flower from behind. It’s a view that can be quite interesting and one that often focuses on design rather than the flower itself. Try shooting a flower from the rear with a soft focus filter. For more on shooting flowers from different angles, and with a variety of filters, go to my recent post on photographing sunflowers creatively.
Try photographing the flower in B&W. It may sound odd to photograph a colourful flower in B&W considering it was likely the colour itself that inspired you to photograph the flower in the first place. But by shooting the flower in B&W, you are focusing on the flower’s design rather than letting colour influence you. If nothing else, it will help you concentrate on the inherent graphic elements of the flower – the lead in lines, the subtle curves, the play of light on the petals. Check out my earlier post on shooting your garden in B&W.
Take advantage of the wind. Unlike traditional flower photography, when we wait for the wind to subside and any motion to stop, take advantage of a windy day by shooting flowers blowing in the wind. Set the shutter to a longer exposure and let the wind help to create the image. Experiment with longer and longer shutter speeds until you get the image you are seeking.
Use multiple exposures. If your camera is capable of multiple exposures, experiment with the feature to create some memorable creative flower images.
Traditional filters can be fun. Don’t forget about using traditional filters to make creative flower images. There are many filter companies such as Cokin that continue to offer interesting filter effects that can be used for creative flower photography. Soft focus effects, pastel filters, and coloured polarizers are just a few that come to mind. Try combining them for unique effects. These filters are particularly effective for those who do not like to use post-processing computer programs to create effects. The square filters can be attached to the front lens, or, if there is no filter thread to mount the holder to, just held up in front of the lens while the photo is being taken.
Visit public gardens for inspiration. Using our own gardens is always a good starting point but, if you need inspiration, plan a visit to your local botanical gardens or even a friend’s garden. You’ll experience new flowers and flower combinations that will inspire you to continue to make creative flower images. Be sure to read my earlier posts on some of the best woodland gardens to visit in the United States and Canada.
Create a photo book with your flower photography
Creating beautiful garden flower photography is a great way to document your garden over a growing season or over the course of many growing seasons. Sharing them on social media or with friends and family is also rewarding, but there is nothing like putting them into your own personal photography book.
Last year I created my first garden photography book and I was stunned how impressed I was with the quality of the book when it was delivered. Now it sits on our coffee table and I can look at it, or share it with friends whenever I like. If you have never looked into creating your own book, take a moment to check out my article on the experience. I think you’ll find it helpful, and gathering your best flower photographs might be the perfect excuse to create your first photo book.