
Beginners guide to backyard wildlife photography
Tips to creating a backyard photo studio
Photographing wildlife in your backyard can be one of the most rewarding experiences imaginable. Forget about travelling to far off places to get exceptional images, with a little planning outstanding images are possible right in your own backyard.
Colourful birds and butterflies, fascinating insects, amphibians and reptiles are just a sampling of some subjects just waiting to be exposed.
I am lucky enough to have encouraged and photographed a wide range of mammals like rabbits, raccoons, chipmunks, squirrels, foxes, coyotes and, of course, deer to my garden.
The photographic possibilities are endless. And, even if you are an experienced photographer, using your backyard as a photographic studio will give you the opportunity to hone your skills so that you can take advantage of situations in the field or on expeditions to far-away locations.
So, the first task is to get subjects in front of the camera lens?
By creating an environment in our yards that attracts a wide variety of wildlife; closely observing their habits and movements around the yard; learning how the light plays on our garden throughout the day; and finally, purchasing the best camera, lenses and other photographic equipment to help us get the images, it is possible to capture images you may never have thought possible.

A close approach to this fawn was possible because of the animal’s inherent sense to stay perfectly still counting on its ability to blend into the natural surroundings.
Create the environment for successful photography
The goal of creating a backyard wildlife studio is to attract as many different species as possible and to present them in their most natural environment.
We have been regular proponents of using native plants (to your region) in the garden. In fact, this website is filled with articles extolling the virtues of using native plants. They are vital to native pollinators, birds depend on their seeds and berries for food as well as the insects and caterpillars native plants attract. Native plants are critical for the survival of so many of our native butterfly larvae…
Here is another important benefit to using native plants in your garden – photographs of the insects, butterflies and birds that depend on these plants appear much more natural when photographed on a native plant species than they are on a hybridized version of the plant or, even worse, one that they would most likely never feed on in the wild.
So how do we create these mini backyard studios?
Start by creating islands of native flowering plants. If you are just starting to create your backyard photo studio, try to choose a sunny site for the best flowering opportunities. A butterfly garden is always a good place to start, especially if you have children. A butterfly garden provides a perfect opportunity to encourage children to begin exploring the natural world in a fun way. Just make sure you provide both host plants for the caterpillars as well as nectar producers for the adults.
“Even if your yard is more or less barren, there are steps you can take to begin landscaping it for wildlife. Rewilding an existing backyard by planting islands of native plants will encourage a huge number of insects, pollinators and birds. Add a pond, even a small one, to encourage an even greater abundance of fauna.”
Good host plants for a butterfly garden include milkweed for our beloved monarch butterflies; plants of the carrot family including dill, fennel and Queen Anne’s Lace for the Black Swallowtail; violets are the host plant for the Great Spangled frittilary, and legumes are host plants for spring and summer Azure and other blue butterflies in addition to silver spotted skippers. Other host plants of note include Black-eyed Susans and Asters (Silvery Checkerspot, Northern Pearl Crescent), Pussytoes and Pearly Everlasting (Painted Lady butterflies).
Another area of the garden could be focused on heavy berry producers that attract insects in the spring- and summer-flowering periods followed by birds later in the season feeding on the berries.
Remember to consider the sun when situating these plants. If you enjoy photographing birds in the morning while you are enjoying your cup of coffee, you will need to locate the berry-producing bushes in an area that gets morning sun. If you prefer more dramatic lighting in your images, such as back lighting, use the morning sun to create a backlit image. The evening sun will then provide a warm, more direct light on the berries and the birds feeding on them.
In shady areas, consider planting woodland natives and spring ephemerals.
Even if your yard is more or less barren, there are steps you can take to begin landscaping it for wildlife. Rewilding an existing backyard by planting islands of native plants will encourage a huge number of insects, pollinators and birds. Add a pond, even a small one, to encourage an even greater abundance of fauna.
Creating these wildlife island plantings will help you to focus on more manageable, smaller areas of the garden rather than being overwhelmed trying to decide how to design the entire backyard. These garden islands are not so large that they could not be created in a single weekend. Creating your gardens in this fashion is also an ideal way to garden on a budget.
My wife and I are blessed to live close to a natural conservation area with acres of woodlands, streams and ponds, but we have worked hard to create a natural environment in our backyard to take advantage of the abundance of fauna and flora that already exists around us.

A good example of creating a mini photo studio by attracting backyard birds with a birdbath to capture interesting close up images. In this instance, I was set up in the Tragopan blind just a few feet from the blue jay. However, once the birds get accustomed to your presence, this type of imagecould have just as easily been taken without the blind. Consider setting up at least one birdbath near where you regularly enjoy your morning coffee.
The value of water in your wildlife studio
Everyone loves the idea of a pond in the backyard, but not everyone wants the potential work that they can bring.
When it comes to photographic opportunities, even a small pond and waterfalls is difficult to beat. Not only will birds regularly visit the location, but a host of insects, reptiles and amphibians will either be regular visitors or decide to make it their home.
All this makes a backyard pond and mini-waterfalls the ideal outdoor photographic studio.
A small pond is not difficult to install and can easily be accomplished in a weekend with a helper. Making it look natural is more difficult and requires research and preferably plenty of large rocks, even boulders to create a natural looking pond you will be happy with in the long term.
I installed a pond and a small waterfalls in another home we owned and it was truly an enjoyable experience watching it mature. Frogs, tadpoles and even a small contingent of fish called it home and caring for it was relatively simple. I would highly recommend considering a pond if you think it’s right for you and your family.
In our current home, we have chosen to install a small bubbling rock around a dry river bed. The solar-powered bubbling rock is not as successful in bringing in a variety of wildlife as a naturalized pond, but the running water attracts birds and mammals who use it use it as one of their many water sources in the garden.

A red squirrel gets a drink in the DIY reflection pond made from a rubber shoe tray.
Consider creating a reflection pond
There is an option, however, for those who feel they don’t have the time or desire for a backyard pond, but still want to capitalize on the tremendous photographic opportunities that water brings.
Consider creating a reflection pond in your yard.
A small, natural-looking reflection pond may not encourage reptiles and amphibians to your yard, but it could provide a natural studio to photograph them if they already exist in your yard.
These simple-to-construct reflection ponds can be the source of some of your best backyard images. They are usually built as shallow (a few inches deep) large tray-like structures on legs or even placed on a table with natural materials such as stones, pine needles and moss at one end where birds, squirrels and chipmunks are encouraged to go so that the photographer can capture both the animal and its reflection in a natural scene.
Natural material such as mosses, stone and even delicate wildflowers can be added to create the ultimate photo studio. If the reflection ponds are kept small, they can be moved around the garden to take advantage of lighting conditions. They can also be redesigned regularly to take advantage of seasonal changes. In spring, for example, a flowering tree branch can become the focus of the reflection pond. In fall, viburnum berries and colourful leaves add a splash of colour.
By tucking bird seed in various crevices, you can attract a variety of backyard birds, squirrels and chipmunks. A small toad would look perfectly natural tucked up against the moss and even a friendly snake would look good among the rocks reflecting in the water.

A natural, lichen-covered tree branch on the bird feeding pole entices a nuthatch to pose for the photographer
A simple set-up for birds
It should come as no surprise that a lot of the great backyard bird photographs you see on instagram and elsewhere are actually carefully set-up involving props, possibly lighting techniques and food to entice the birds.
That’s not to say the images are not great and getting them is easy. Most often, a lot of preparation and care have gone into the creation of these photographs.
It goes without saying that a very important part of your backyard bird and wildlife studio involves bird feeding stations.
It’s a good idea to have several placed in strategic locations throughout the yard set up for different types of birds, different lighting conditions and backgrounds.
I primarily use a single bird feeding station that can accommodate several styles of feeders as well as perches. The feeders change, depending on the season and type of birds expected to be visiting at any one time. Other feeders around the yard are dedicated to specific species such as hummingbirds and orioles, but the main feeding station is the primary focus when it comes to bird feeding and photography.
It’s located in an area where it gets morning back lighting or side lighting (depending where I am set up) and afternoon direct sun. I can choose my background depending on where I choose to set up – it can be blue sky, the soft-focus of distant trees or the more focused look of nearby crabapple trees. All the backgrounds can work depending on lighting conditions.
The feeding station is built around a Wild Birds Unlimited single pole system with two steel hooks for hanging the main feeders; a spike on the top to accommodate seed cylinders; several smaller clip-on feeders for meal worms; berries and special treats; a tray to catch seed and provide a feeding platform for birds who prefer to eat off platforms; a steel stylized perch perfect for hanging smaller feeders; and an attachment that can accommodate a small branch to be used as a natural perch.
The natural branch attachment makes the bird-feeding station particularly valuable to the photographer. The simple cylinder that slides into the main pole is large enough to accommodate any branch you want to use whether that is flower-laden from the Crabapples or Redbuds when they are in bloom, an evergreen bough left over from Christmas decorations or a branch covered in clumps of berries in the fall.
DIY branch and suet feeder
One of my favourite photographic stages is using a branch that has been drilled out in several places to accommodate suet or bark butter. It can be hung on the pole to create a very natural perch and feeder for woodpeckers, nuthatches, chickadees and other backyard favourites.
These suggestions are just a few of the many possibilities you can experiment with in your backyard wildlife studio. Some photographers, for example, enjoy setting up old garden tools as perches for bird photography to create memorable garden images. I am currently working on getting a series of images of birds on a peace sign as my ode to hippies, love and peace in the garden. Use your imagination and have some fun creating natural, or simply fun garden images of the wildlife in your garden.
Tools of the trade to capture striking images
Photography can become a very rewarding hobby allowing you to unleash your creative expression or simply a tool to document your garden and share an image or two on with friends on Facebook or Instagram.
One thing is sure, however, photography as a hobby can be addicting and making the wrong decisions can get costly, fast.
The number one mistake most photo enthusiasts make is to think the only way to get the images they want is to invest in longer and more expensive telephoto lenses and cameras that can fire off 100s of photos in seconds.
Nothing could be further from the truth, but longer lenses and faster motor drives in the hands of an experienced photographer can make all the difference.
Chasing elusive birds and animals in the field is likely to require the best lenses and cameras to capture memorable images, but setting up in your backyard for a photo shoot of birds and mammals that are more or less familiar with you and don’t see you as a threat, requires a different set of tools many of which are simpler and certainly less expensive.

My Tragopan Photographic blind set up in the garden.
The secret behind some of the best images
One tool that has improved my backyard photography and, more importantly the enjoyment of it, is not a camera or a long lens. It’s not a flash or even a high-priced tripod.
It’s a photographic blind.
In my case, it’s a dedicated photographic blind made by Tragopan. The U.S.-based company is making outstanding, high-quality products specifically for photographers. This is not a hunting blind that can be used by photographers, it’s designed and built for serious photographers. In fact their whole line of blinds and products are built for photographers and bird watchers in mind.
So what makes the photographic blind so valuable to backyard birders and photographers?
My one-person blind allows me to get extremely close to wildlife without disturbing their natural habits. It allows me to get outstanding images on a regular basis without investing in expensive cameras and extreme telephoto lenses. This close approach means that an inexpensive 80-200mm zoom can do much of the work that would normally require the use of a much more expensive 400mm lens valued upwards of $8,000 Cdn..
But allowing the photographer a close approach is not the only benefit a photographic blind offers.
Sitting in a blind has to be one of my most enjoyable experiences in the garden. By quietly sitting and simply observing my surroundings, I am able to get a much deeper appreciation of the animal and bird interaction in the garden. The red squirrels carry on as if not a care in the world. They may even know or, at least suspect, that I am in the blind, but their defences come down and they begin to act more natural, allowing me photographic opportunities that probably are not possible if it were not for the blind.
More timid birds and animals are much more likely to accept the blind than they would if I were sitting in a chair nearby. Photographing larger, or more skittish animals like fox, deer and even rabbits can really be improved with the use of a blind.
By no means do you need to go out and purchase a photographic blind. A garden shed can stand in as a shed, or even a window overlooking your garden can become a working blind much in the same way as a dedicated photographic blind.
However, the convenience of being able to move the blind around the yard to take advantage of the lighting conditions and the subjects you want to photograph is a real bonus of the dedicated blind. In addition, the fact the blind offers 360 degrees of photographic possibilities and the ease of setting it up and taking it down, should make a dedicated photographic blind high on the list of more serious backyard photographers.
The tools of the trade: Cameras, lenses and other necessities
The discussion around what camera and lenses should I buy is, as you may have guessed, very much dependent on budget and skill level, and your commitment to photography as a serious hobby.
I can speak with authority only on the cameras I use on a regular basis and the tools I use to capture backyard images. Among the tools I highly recommend is a good tripod and monopod as well as a polarizer to cut glare on water and off of leaves.
Rather than discuss the ultimate camera lens combination, it’s probably more helpful to break it down generally to beginner, intermediate and advanced camera systems that can be used to capture garden wildlife images, from the smallest insect to larger mammals that wander into your yard.
I like to consider myself an advanced amateur when it comes to photography. My current equipment consists of four cameras plus a very heavily used smart phone.
Two of the cameras are digital 35mm SLRs (DSLR) (one old model and the other an even older model), a high-end point and shoot model with limited lens coverage (approximately 28mm-105mm ), and a more recent purchase of a “bridge camera” that straddles the compact point-and-shoot market and the DSLR market.
The “bridge camera” looks and feels like a 35mm camera accept that it does not have interchangeable lenses. Instead, the lens that comes with it is designed for the camera body and offers a wide ranging yet powerful 26X zoom (the equivalent zoom for 35mm of about a 22mm wide angle to a 580mm extreme telephoto.) It also has a very good macro feature that allows for closeups of flowers, friendly insects, amphibians and reptiles.
The bridge camera sounds perfect for all levels, right? Well not really, but more on that later.
Go with what you’ve got
The best camera, so the saying goes, is the camera you have with you. A valid statement but on many occasions that’s my iphone. It’s always in my pocket and gets pulled out regularly for plenty of images. However, it’s definitely not my first choice when it comes to wildlife photography unless I want to show the animal in its environment.
Most smartphones do allow you to zoom in closer to your subject if necessary, but the more the image is magnified the more it is degraded. A simple finger pinch on the screen is often all it takes to move in closer. If it’s all you have, it can be used to capture a usable image.
Pros and cons of the high-end point and shoot
First up is my much-loved Fujifilm X10. It’s a very compact camera that fits nicely in my pocket. It’s the camera I usually take with me if I’m going out expecting to take typical images where I want high-quality and convenience without the need to magnify a subject whether it’s wildlife or a distant scene.
This mid-priced point-and-shoot, like most in its class, takes exceptional images including closeups, but does not have a long enough zoom range to make it effective as a wildlife camera. It is certainly more useful than the smartphone when it comes to these types of images, but not quite enough range to get close to birds and smaller animals. Butterflies and other insects are easily within its macro-range capabilities.
Until this spring, it would have been the camera I choose to carry with me when I was going out in the backyard for my morning coffee. It’s capable of capturing lovely garden scenes, larger mammals in their environment and excellent closeups. It also has numerous capabilities including creating lovely black and white images or dialing in classic Fuji films such as Provia for portraits or Velvia for nature shots with a punch of colour.
Point and shoot: In conclusion
If you already own a good point-and-shoot camera try to master the features it offers. The convenience of its compact size and the quality of images it is capable of providing make them a useful addition to your camera bag. A useful camera for capturing garden scenes, butterflies, friendly birds and possibly insects, but not one you would want to count on to capture more distant birds and mammals.
Using a photographic blind to get in close will certainly help to get usable images, but there are better choices.
If you have one, use it. If not, I would not purchase one with wildlife photography in mind.
Pros and cons of the Bridge Camera
The “bridge camera” (in my case the older model Pentax X5) has many of the bells and whistles necessary to get exceptional images of wildlife both in their environment, if shot with the wide angle lens, and close-ups with the extreme telephoto part of the lens.
If macro is your thing, it will focus extremely close to capture the smallest insects, butterflies or flowers. It also has a screen that pivots so that you can use the camera close to the ground without having to lay flat on the ground to get the image.
It’s an important feature now found on more and more higher-end cameras and is particularly helpful for older folks who are no longer able to get up easily from the prone position, or for just shooting close to ground level.
All of the major camera manufacturers and many of the lesser-know manufacturers offer Bridge camera models.
Bridge cameras’ secret weapon is their lens, which exceeds almost anything you could purchase for a DSLR with interchangeable lenses.
To get the equivalent lens on a DSLR would be extremely costly and heavy. Most bridge cameras offer at least a 20-times zoom range and some go up to 50 times zoom. At the maximum zoom, the magnification on a typical bridge camera zoom lens is equivalent to a 500mm or more on a DSLR, with the longest extending to more than 1000mm.
Although the cameras come with impressive anti-shake features, hand holding any lens with such a high magnification would require a tripod or monopod to guarantee a sharp image.

This image compares the compact Fujifilm on the left, the DSLR with 300mm lens in the centre and the bridge camera on the right.
Sounds perfect right? So what’s the problem?
If the quality of the image is a critical factor for you, the bridge camera results might fall short. Essentially, a bridge camera is actually a compact camera in a bigger, more full-featured camera body with an impressive zoom lens.
What does this mean? It means the sensor in a bridge camera is usually the same size as a typical compact camera’s sensor. As a result, high-quality enlargements, or excessive cropping of the digital image would compromise the image quality.

DSLR with 50mm lens compared to the bridge camera with its massive wide angle to telephoto zoom shows the extreme compactness of the bridge camera considering its ability to get in close to subjects.
Like so much in life, it’s all just another compromise.
In addition, most cameras that rely on an electronic viewfinder can be frustrating to use because of the delay between pressing the shutter and the photographer regaining use of the camera’s viewfinder (offically referred to as shutter lag.) This is not problematic in many photographic circumstances if the subject is more or less still in the frame, but if the subject is moving, the delay makes capturing successful images more difficult.
I am sure that some bridge cameras are better than others and admit that I have no experience with other camera manufacturers, so I suggest you give the camera a good workout in the store before purchasing it. Ask if you can take it outside and try photographing moving targets before you sink a lot of money in a camera that may be more frustrating than useful.
That said, my Pentax X5 bridge camera will be my go-to camera this year when it comes to coffee on the patio most mornings. It will also join me in the camera blind as my second camera to photograph birds and animals at a distance. Its convenient size, wide zoom range and capability of shooting multiple frames per second will make it an invaluable tool to in the photographic blind.
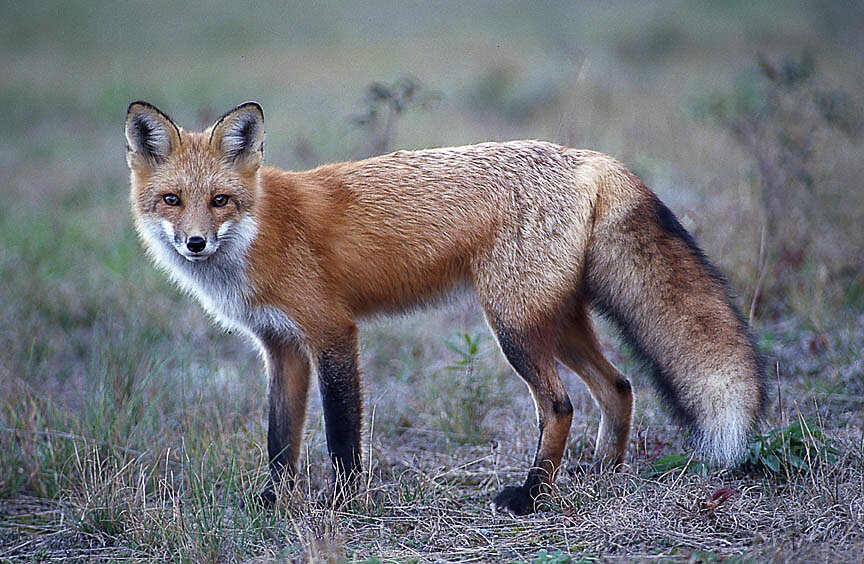
This fox image was taken with a 400mm lens without a blind.
The DSLR for the discriminating photographer
For years, the DSLR has been the mainstay for serious wildlife photography. A full-featured DSLR with a couple of high quality telephoto zoom lenses will result in the highest quality images possible.
Once some basic skills are mastered, the intelligence packed into these cameras combined with excellent autofocus capabilites, means capturing impressive images of wildlife in your backyard is almost a guarantee.
More recently, very high-quality mirrorless DSLRs are proving to be the camera’s of choice for wildlife photographers. Sony and Olympus have become players in the mirrorless models. Be sure to check out these offerings if you are serious about getting into backyard wildlife photography.
Getting into the DSLR or high-end mirrorless camera models all come with a hefty price tag and a camera/lens combination that many casual photographers would agree is too large and too heavy to carry around – even if it is only in our backyard.
There are alternatives to investing heavily in a high-priced, fully featured DSLR with long, fast telephoto lenses or expensive zooms.
Remember the benefits of the photographic blind? By creating the ability to get in close to wildlife, the blind will enable photographers to get high-quality results without the expense of purchasing long, fast expensive lenses.
Consider purchasing a used DSLR. There are many available as photographers upgrade to full-sensor, feature-packed models. In addition, used zoom lenses are also readily available.
A 70-200mm zoom is a good starting point, but a zoom that gets to the 300mm range is a better option for bird photography.
If you think backyard wildlife photography is something you might want to explore at a higher level, consider investing in a 300mm F4 lens combined with an autofocusing 1.4 teleconverter. The combination will give you a relatively fast 420mm lens (actually more like a 600mm lens if the crop factor is taken into consideration).
Without going into great detail, it’s a very nice combination that gives you all the magnification you are likely to need to capture birds in your garden.
It’s a combination that I feel extremely lucky to have in my arsenal. The older style Pentax 300mm autofocus lens with a Tamron 1.4 converter is a combination that works nicely whether I’m sitting in my photographic blind or just enjoying a coffee in the backyard with my camera beside me on a tripod.
The combinations are endless in the DSLR market. You could, for example, invest in a 400mm F2.8 for about $8,000, but I’m thinking that might be better invested in the installation of a pond and waterfalls, a photographic blind or any number of more inexpensive lens-camera combinations.
But that’s just me.
In conclusion
This article is aimed primarily at beginner photographers who want to capture images of backyard wildlife, primarily birds and small mammals.
While photographing backyard wildlife has its challenges, they are no where near as challenging as capturing images in the field. By creating mini photo studios, like natural habitats that attract large numbers of wildlife to specific areas of your garden, reflections ponds and well-thought-out bird-feeding stations with photographic perches, the backyard photographer can create a favourable photographic environment. By using photographic blinds – either existing sheds or commercial blinds – a close approach to backyard wildlife is easily achieved.
In addition, with patience backyard wildlife can be trained to accept our close approach. By regularly sitting quietly in favourite photographic areas throughout the garden, intimate wildlife images are attainable.
Taking advantage of these opportunities allows backyard photographers to focus on capturing wildlife images without having to purchase the most expensive equipment available. For some, who are not interested in capturing award winning wildlife images on a regular basis, a good point and shoot camera may be all they need.
It’s more likely, however, most of us want to capture high-quality images that we can share with our friends on social media like Facebook, Instagram and Twitter. This is where a bridge camera can really deliver. Images will be missed as a result of the camera’s inability to deliver in all circumstances. With patience and practise, impressive images are certainly possible with these cameras. In fact, improvements are making these cameras more desirable with each new model release.
In conclusion, the bridge camera is an excellent choice for beginner photographers looking to explore wildlife in their backyards. If, in the future, you want to step up to a DSLR, the bridge camera becomes a good backup camera for the times you don’t want to bring out the larger and heavier glass.
Finally, photographers who want to take their hobby to new heights, can consider investing in a starter DSLR that provides all the necessary features of an SLR without the added expense of a fully-featured model. A good zoom lens in the 100-300mm will give you access to the majority of images in the backyard environment.
If photography becomes a passion, you can always trade up to better cameras and a fast 300mm or 400mm telephoto lens.
As an Amazon Associate I earn from qualifying purchases. This page contains affiliate links. If you purchase a product through one of them, I will receive a commission (at no additional cost to you) I try to only endorse products I have either used, have complete confidence in, or have experience with the manufacturer. Thank you for your support. This blog would not be possible without your continued support.