

External viewfinders compared: TTArtisan vs Lichifit
External optional viewfinders compared. From the exquisite TTArtisan finder to the inexpensive version from Lichifit. Both have their place.
You get what you pay for with tiny Lichifit external viewfinders
When it comes to the tiny Lichifit external optical viewfinders, you definitely get what you pay for.
For the cost of a couple of fancy coffees from your favourite barista, you can have the tiny, all-plastic optical viewfinder on your favourite digicam setup.
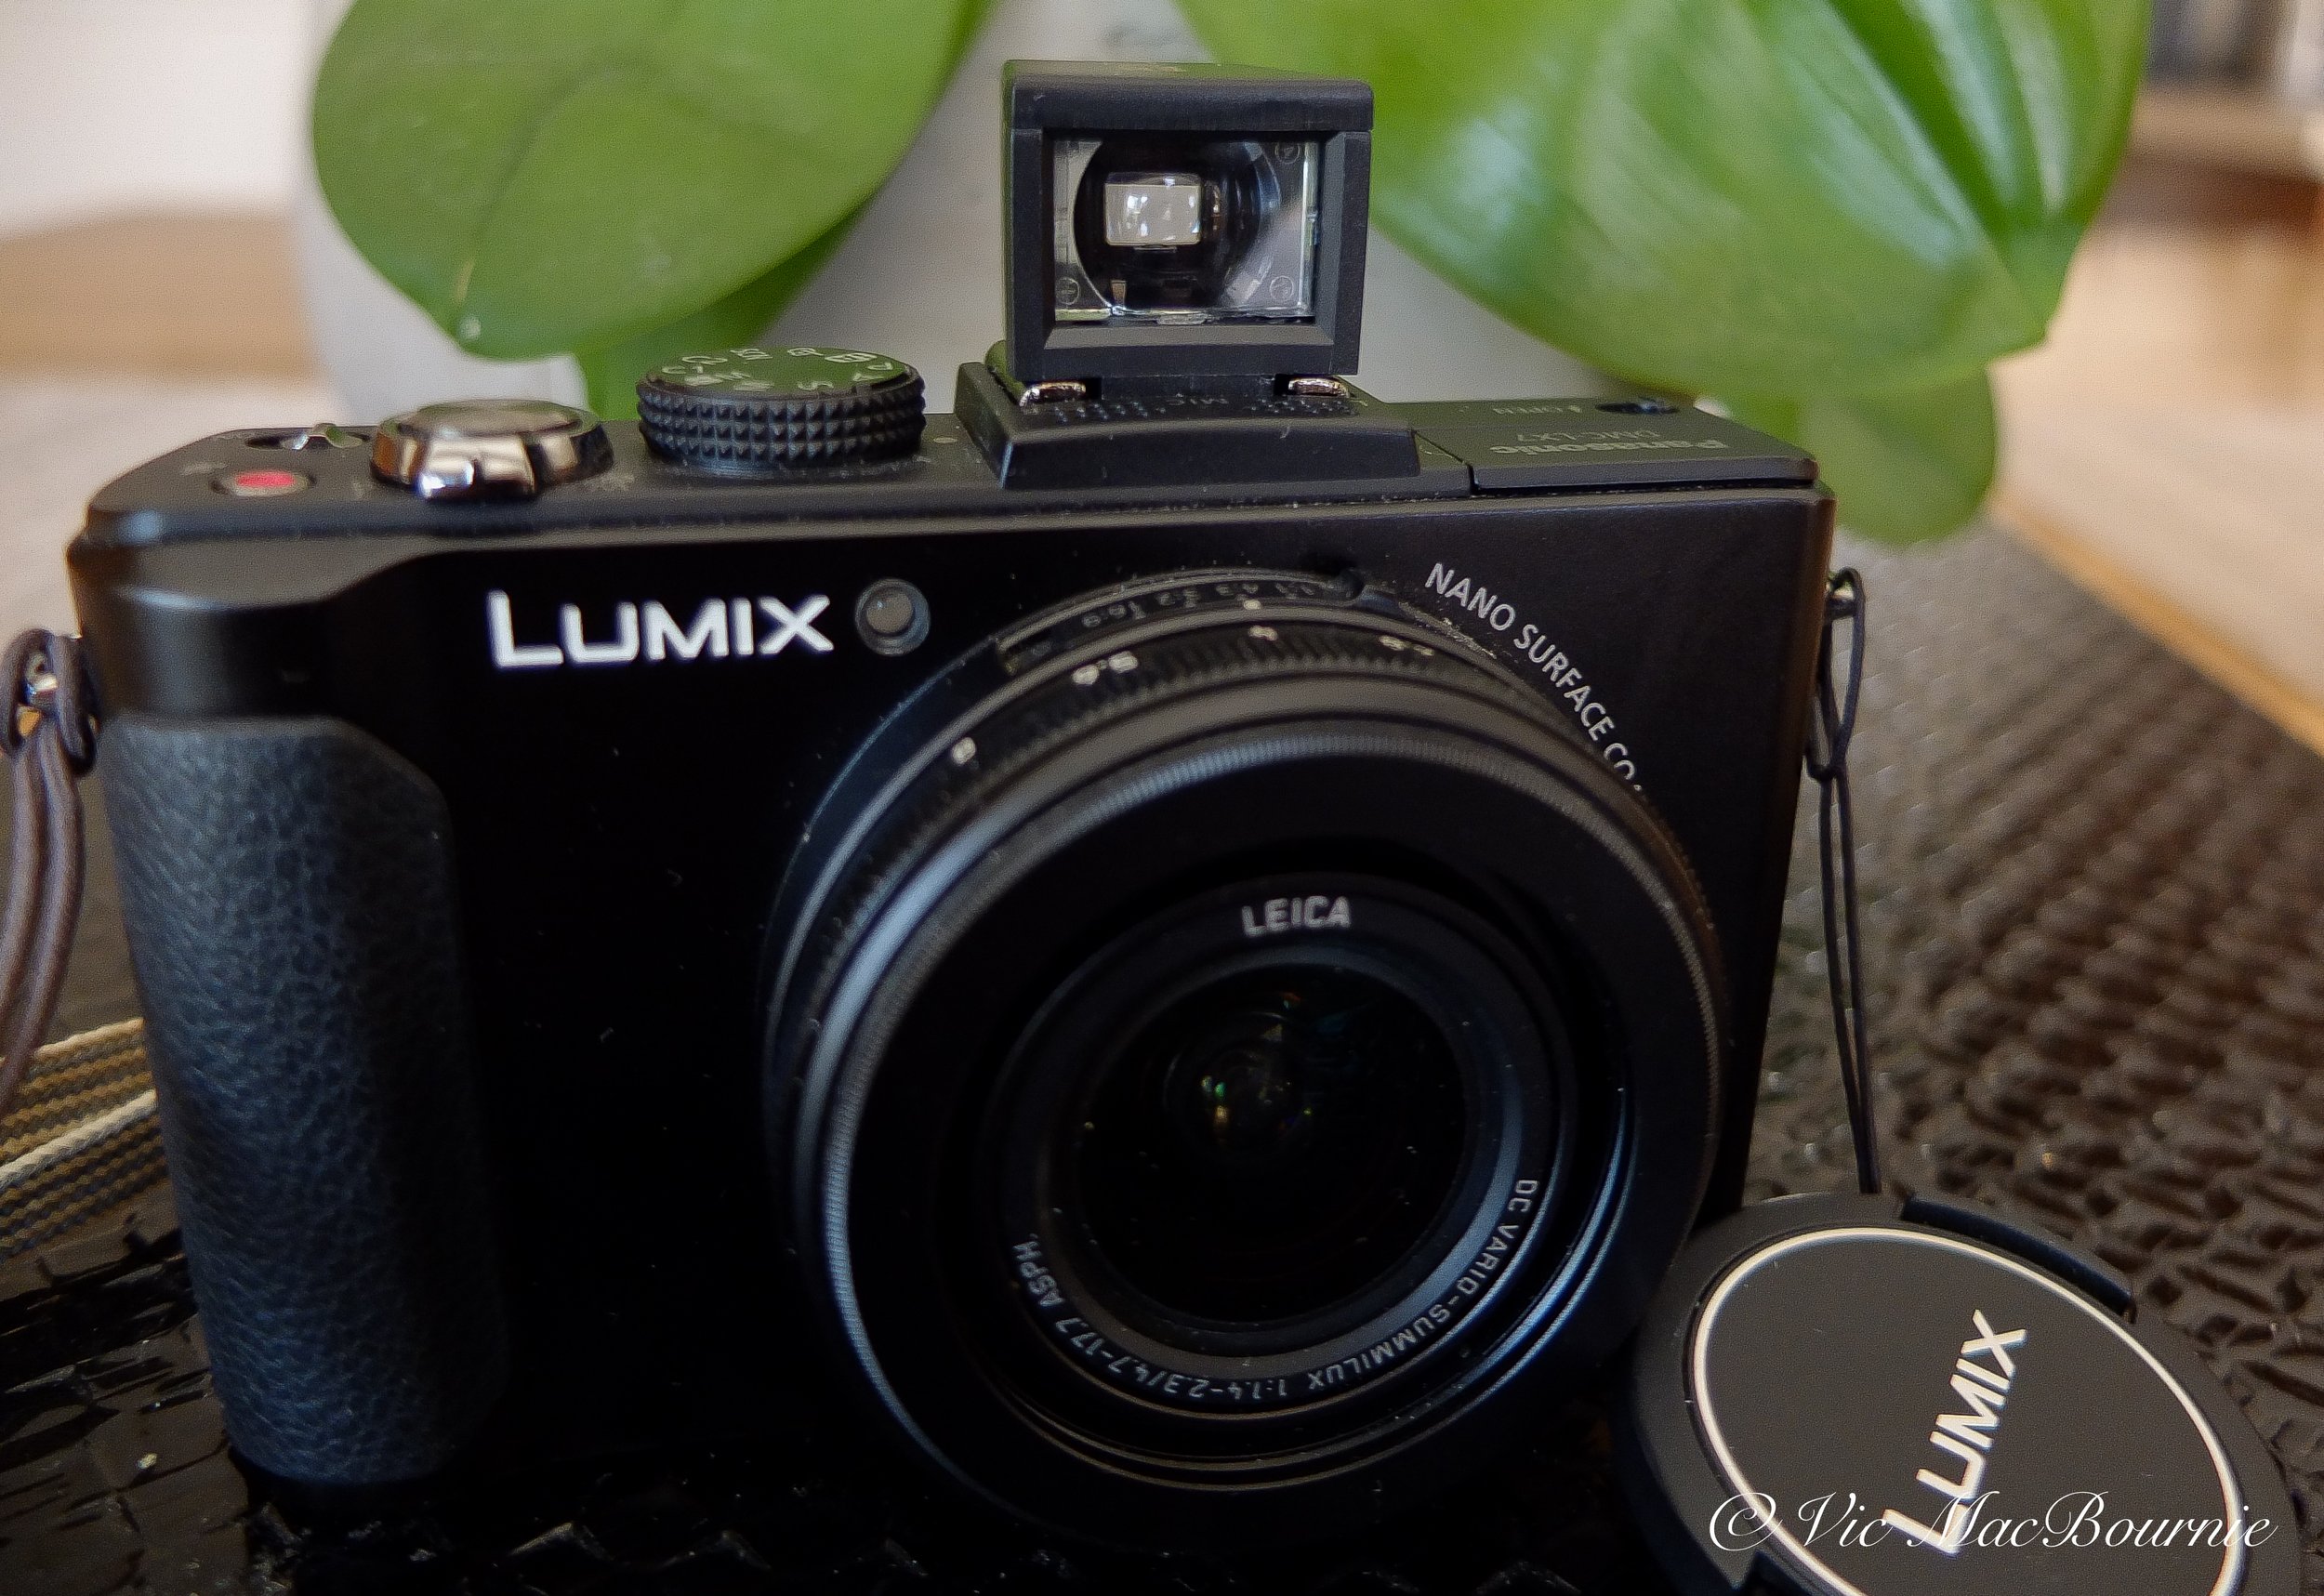
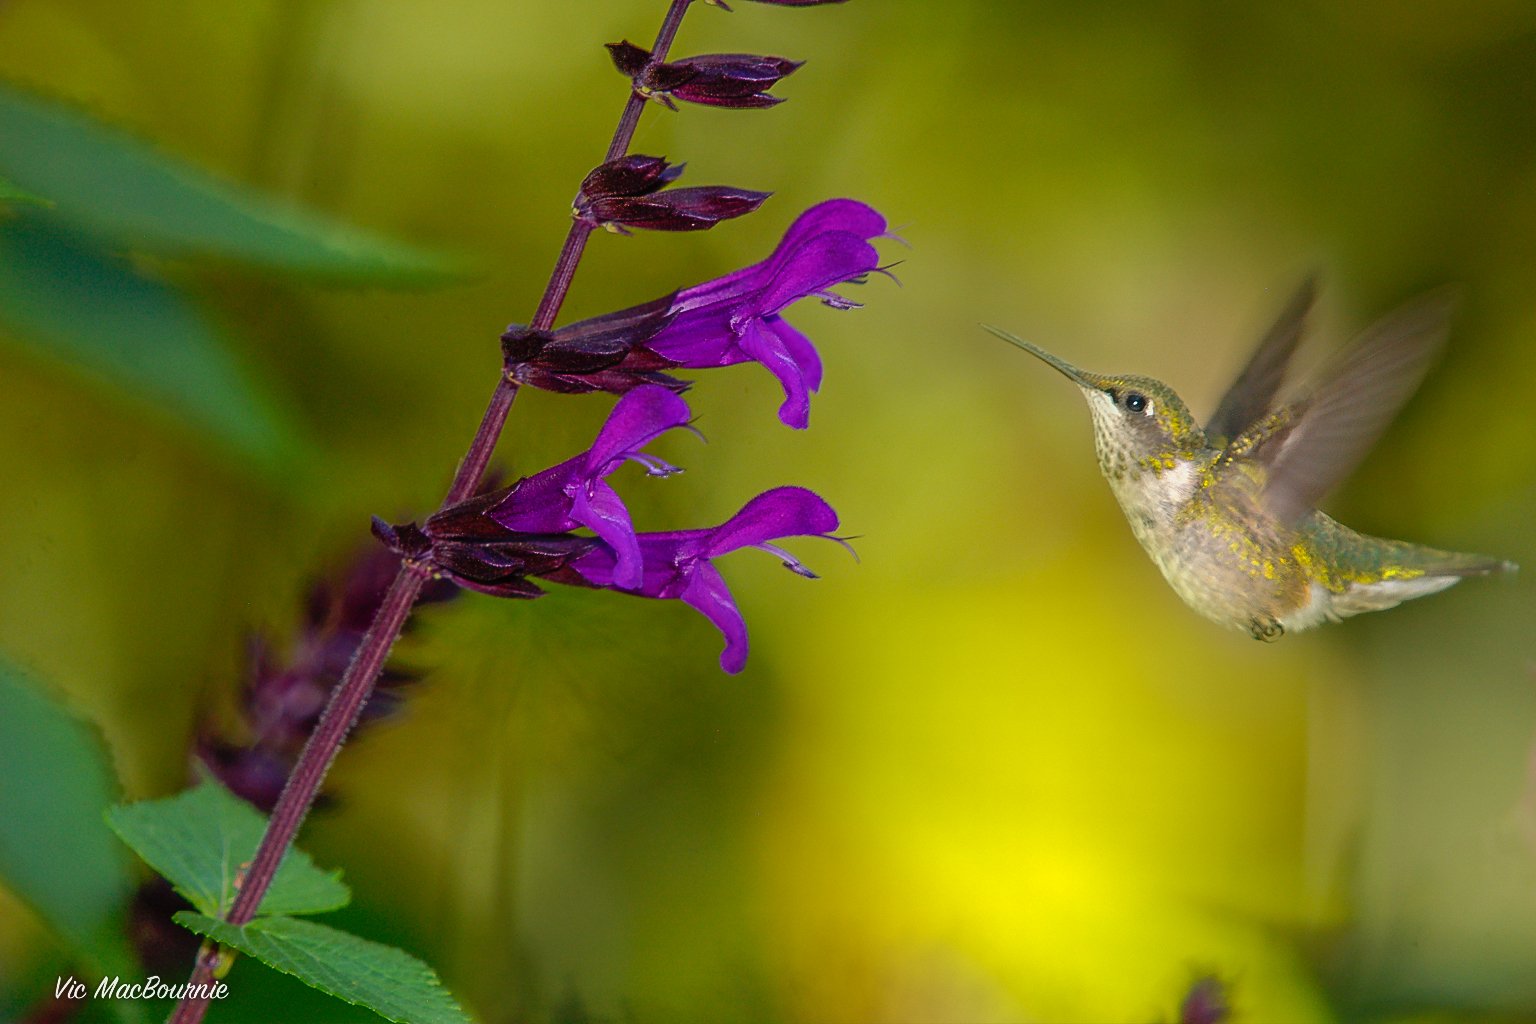
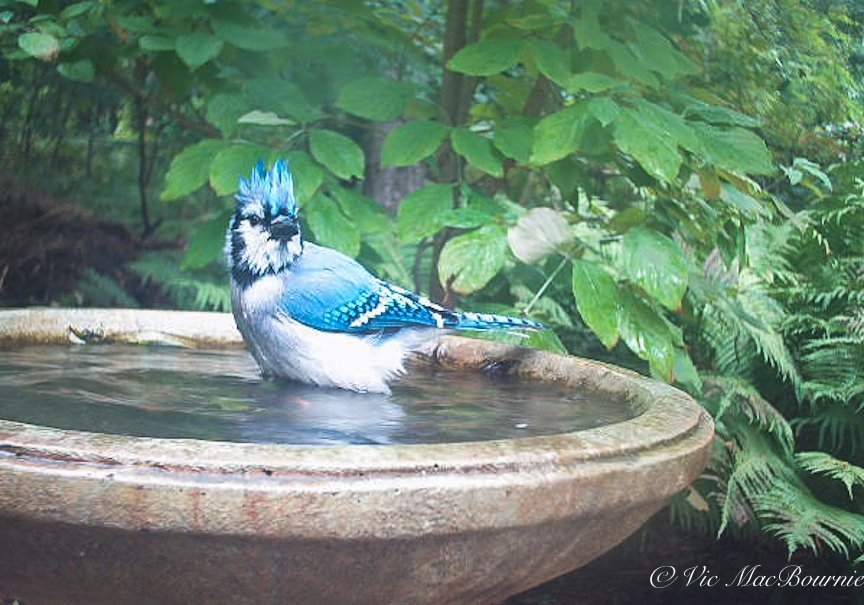
The tiny Lichifit external optical viewfinder looks at home on the compact Lumix LX7.
Some photographers will definitely prefer to save their money to buy the fancy coffees rather than fork out the money for this viewfinder, but there will be plenty of photographers who are satisfied with this inexpensive accessory that fits into the hotshoe of their favourite camera.
Judging from the number of street photographers using these inexpensive finders on YouTube, the viewfinders’ quality levels are not a limiting factor to their usage.
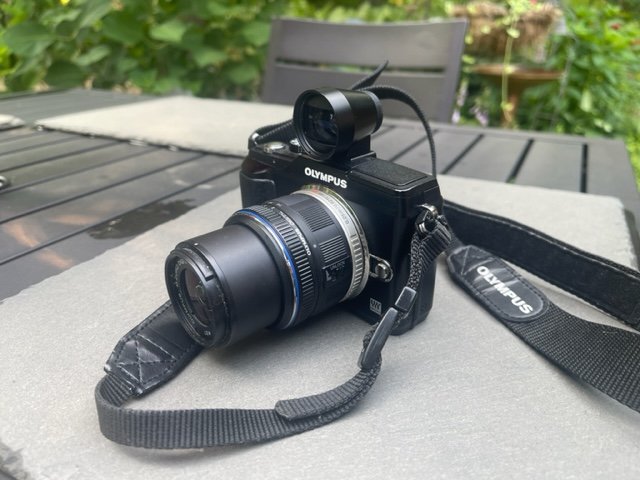
The Olympus Pen E-PL2 with the TT Artisan viewfinder.
For more on using external viewfinders, check out my post on the Olympus PEN series of cameras. Go to the Olympus camera website for more information.
Their popularity may be the result of street photographers not needing the highest resolution in a viewfinder. Let’s face it, many of the images they create are shot from the hip and are not even seen until the photographers review their images at the end of the day.
It’s all about speed and getting the shot rather than taking the time to examine the details in the image.
These viewfinders are perfect, stealth accessories that work well if you are just grabbing a shot and need a quick framing of the scene.
Click on the link for my comprehensive post on the high-quality, TTArtisan 28mm viewfinder pictured below on the left.

The external optional viewfinders on these Pentax Q cameras show the significant difference between the TTArtisan 28mm viewfinder and the tiny Lichifit 28mm viewfinder.
How small are they?
These things are extremely small and super light.
The good news is that they are so small that you can easily slip a digicam with one of these viewfinders attached into a camera bag or the pocket of a jacket. The viewfinder itself (or several viewfinders for other prime lenses) could also be tucked into a pocket of your camera bag or pocket and pulled out when you need one.
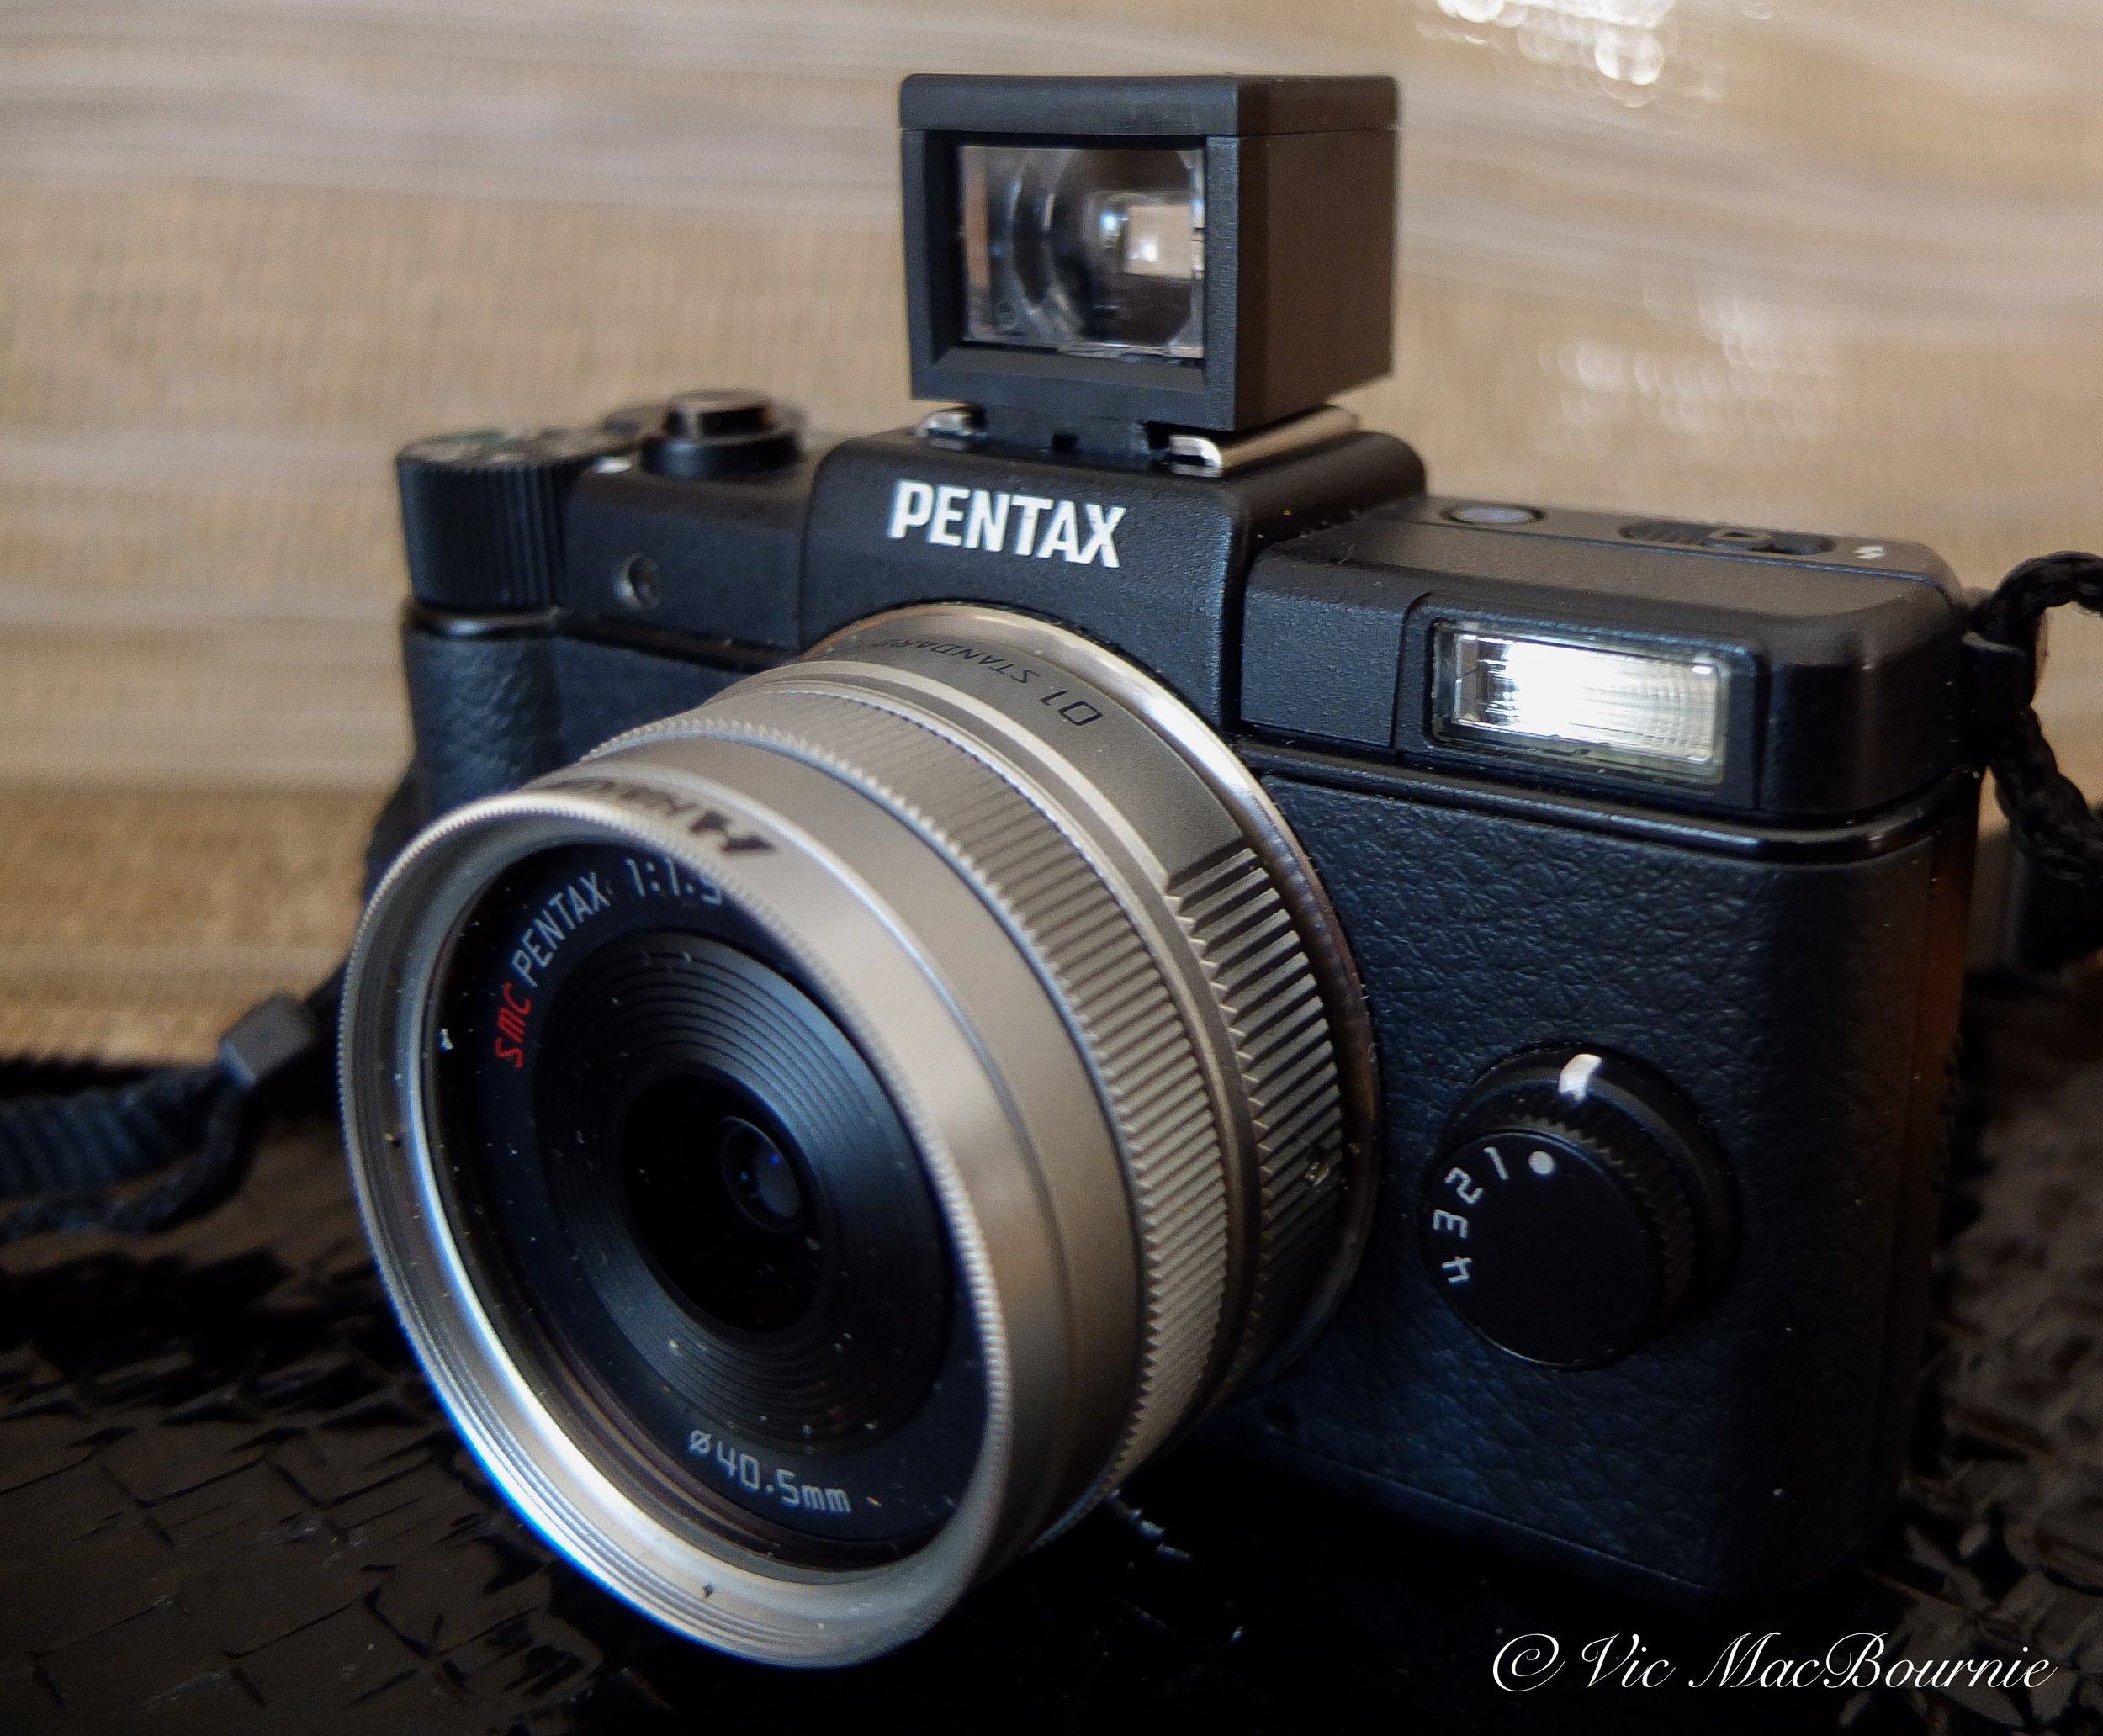
The tiny Lichifit 28mm external viewfinder fits nicely on the miniature Pentax Q line of cameras.
It’s hard to imagine how small these viewfinders actually are.
In fact, I ordered the 28mm TTArtisan finder at the same time as I ordered the 28mm Lichifit finder. When the package came, I didn’t even know that the lightweight Lichifit finder was even included in a separate padded bag.
It wasn’t until I went to throw out the packaging that I noticed the tiny viewfinder tucked away in an envelope in bubble wrap.
Small and lightweight is an understatement.

A rear view looking through the viewfinder of the tiny Lichifit 28mm external viewfinder fitted atop the Pentax Q.
Are they good for landscape and garden photography?
I’m not sure these viewfinders work as well with landscape or garden photographers as they do for street photographers. Landscape photographers need to see a higher level of detail through the viewfinder than, say, a street photographer.
The slightly blurry image and distortion that these finders deliver would be, I believe, frustrating for some landscape, garden and travel photographers.
If given the choice, I would rather save my money and purchase the TTArtisan viewfinder even if it is probably triple the cost of these cheap, mini, plastic viewfinders.
For these photographers, investing in a higher quality viewfinder like the TTArtisan is something you may want to consider.
The good news is that the Lichifit finders are so inexpensive to purchase, that it might be worth it to try one out and decide for yourself if you can live with the slight blur and distortion caused by the plastic in the viewfinders.
If you are looking to add a camera or lens to your arsenal, be sure to check out KEH Camera Exchange. You can replace your older equipment and trade in some of your equipment to help fund your new gear.

This image shows the Olympus Pen system with the viewfinder attached.
Why you might want a Lichifit viewfinder
• If having an inexpensive, quick look is more important than seeing a crystal clear image through the finder, then one of these may work for you.
• If you are looking for a tiny, extremely lightweight viewfinder, then you might like this accessory.
• Or, if you need a large selection of viewfinders to match up with your many prime lenses, a set of these inexpensive finders may just work well for you.
• They are available in a range of funky colours that might work with your camera, especially if you are the owner of one of the Pentax Q custom coloured cameras.
It’s important to note that, like the TTArtisan viewfinders, no information is transmitted from the camera to the viewfinder. There is no f-stop, shutter speed or focus confirmation in these viewfinders. They are used to get a view of the image at times where you either don’t want to use the camera’s LCD or are unable to use it because of excessive glare on it from the sun.
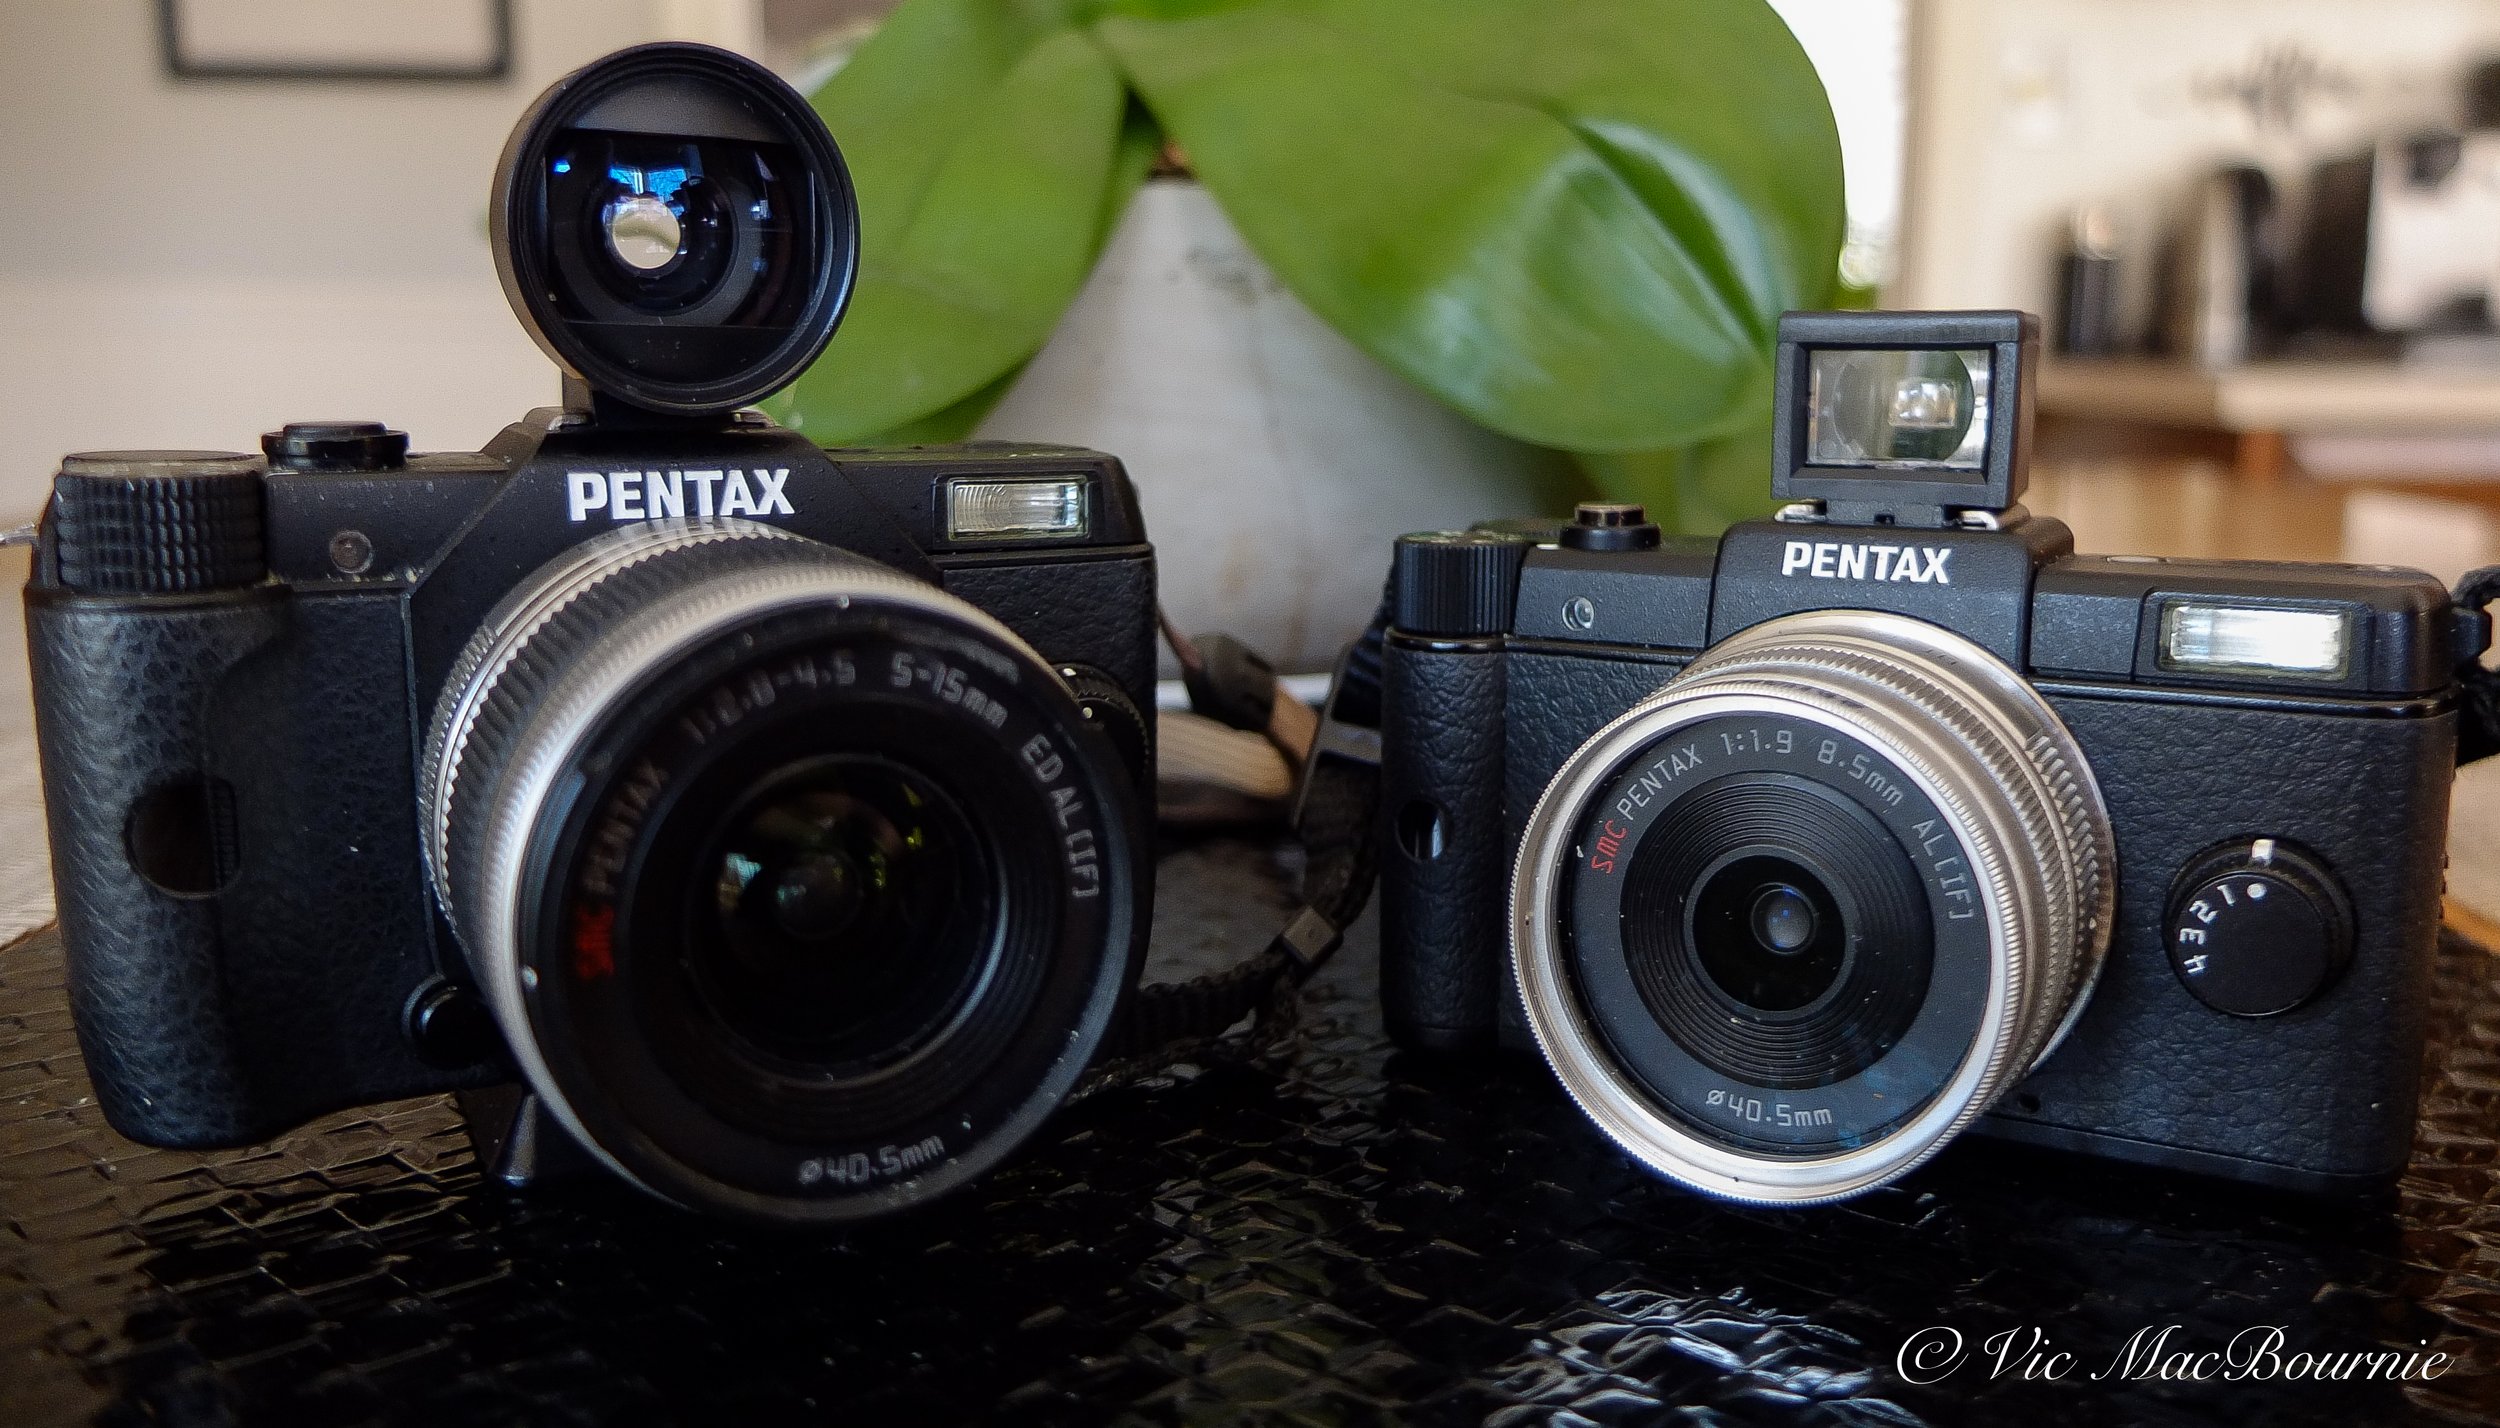
Two Pentax Qs show the size and style differences of the optional external viewfinders.
If the TTArtisan line of optical viewfinders are exquisitely made, stylish accessories with high-quality optical glass, these Lichifit finders can almost be described as the exact opposite.
In other words, the Lichifit finders are tiny, cheap and not very sharp.
They also lack the highly-desirable vintage look that the TTArtisan finders exude with confidence.
Add to that, there is much less of a coolness factor using one of these whether you are out in the field or at the coffee shop reviewing your images.
I do like the tiny footprint, especially when I use it on my miniature Pentax Qs and the equally small Lumix LX7. They look good on these cameras and I can live with any parallax problems that might occur.
The company says the viewfinders are “small transparent and bright, and are very coordinated to install on various side axis cameras.”
They advertise the finders, which come in 28mm, 35mm and 40mm options, are good to “replace an old, broken or non-working optical side axis viewfinder, easy to use and stable performance.”
The company does not recommend they be used with high SLR cameras because of the potential for parallax problems.
Unfortunately, where these quick-and-dirty viewfinders fall far too short are the optical qualities. Looking through the viewfinder’s results in a slightly blurry image that is probably just a little too soft for my liking, even considering the price.
Does that mean I can’t or won’t use the little 28mm? No, not by a long shot. It’s usable, but it won’t be anywhere near as enjoyable to use as the TTArtisan viewfinders.
If given the choice, I would rather save my money and purchase the TTArtisan viewfinder even if it is probably triple the cost of these cheap, mini, plastic viewfinders.
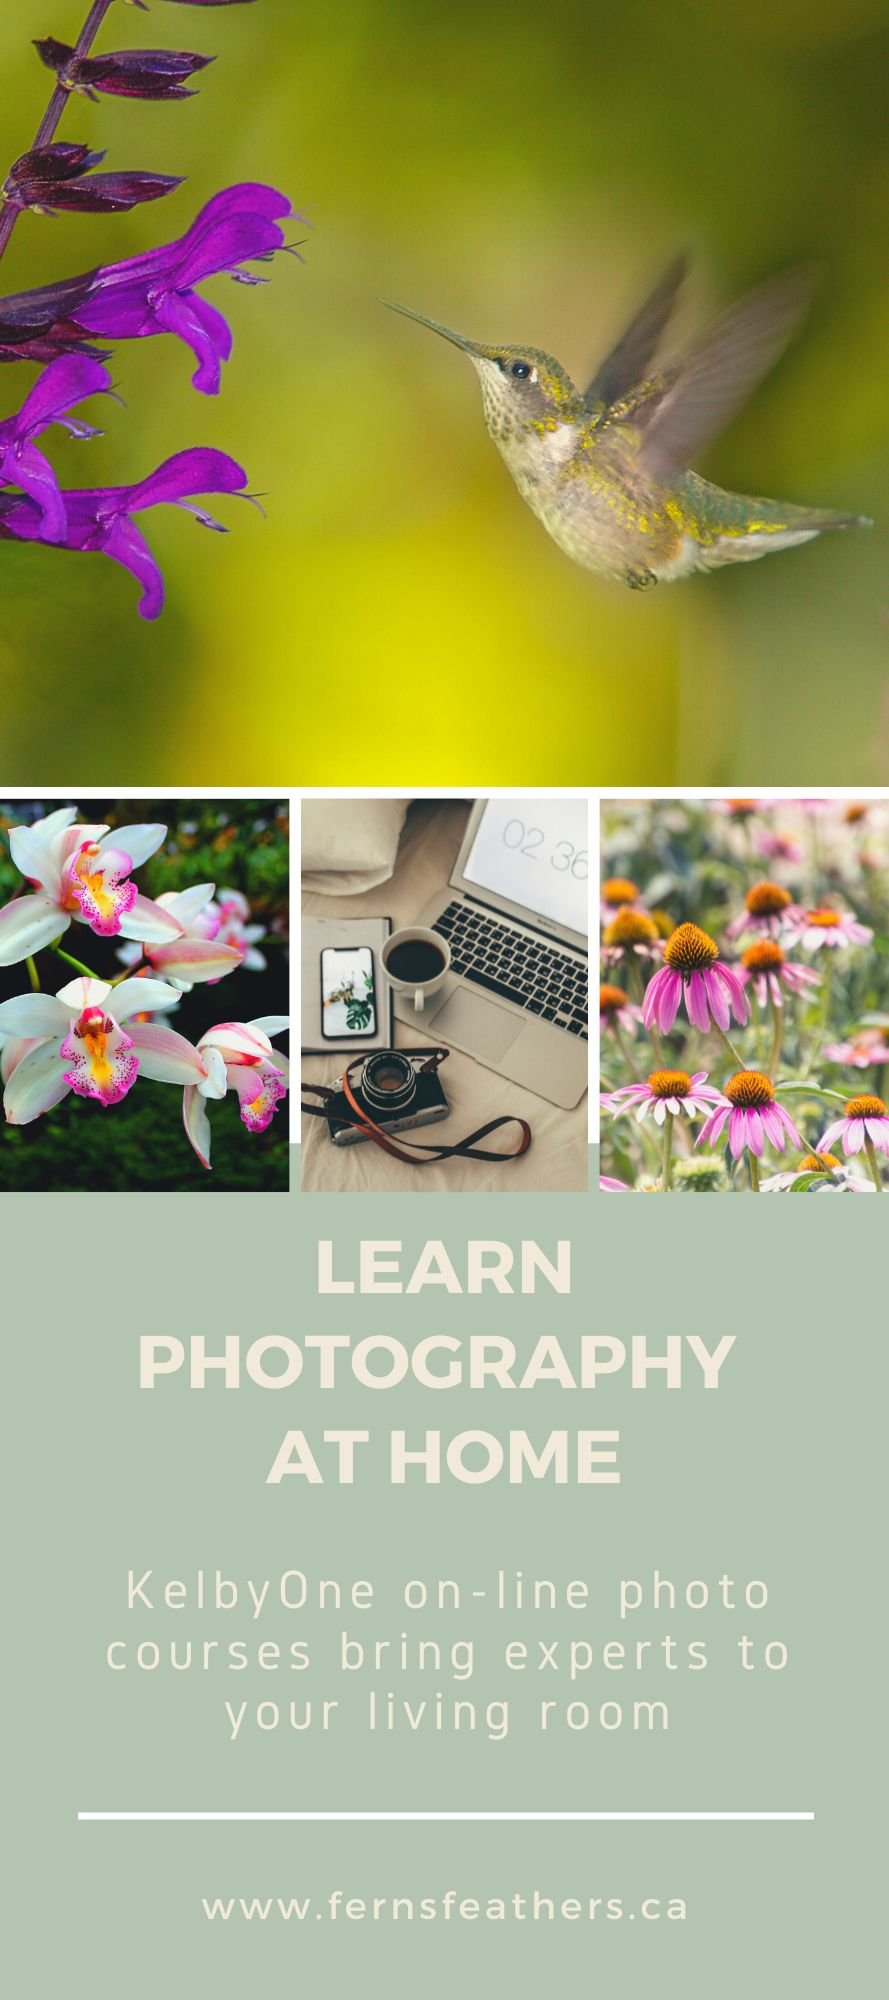
Mastering photography in the garden, on vacation and at the computer
The KelbyOne photographic on-line program is an excellent way to learn about your new camera and improve your photography right in the comfort of your own home.
Cashing in on KelbyOne’s photographic expertise
Let’s face it, our smartphones are great, but to capture truly memorable images of our gardens, vacations, pets or our kids and grandchildren, we are going to need a decent camera.
And we are going to have to learn at least the basics before we begin using our camera with any real confidence.
That’s where KelbyOne comes into the picture.
This on-line treasure trove of how-to videos has not only made learning to use our cameras extremely simple, it offers the budding photographer the opportunity to grow their skills and knowledge at your own pace in the comfort of your own home. Need to be part of a community for one-on-one interaction and problem solving? They’ve got that too, as well as a regular newsletter to help photographers take their images to higher levels through the use of Photoshop, Lightroom and other valuable photo software.
And it’s fun.
Heck, it’s a lot of fun. Just the idea of sitting at home with a tea or coffee – being able to call up one of the more than 900 videos on the laptop and getting help from expert instructors – is almost unimaginable to this grizzled old photographer who cut his teeth on Kodachrome slide film and grainy B&W film.

How times have changed.
It was a few years ago that I purchased my first 35mm camera right out of university and went to work learning everything I could about it and the art of photography.
I still have many of the original books that I poured over to learn about the master photographers and outstanding photojournalists of their day – Margaret Bourke-White, Robert Capa, Ansel Adams and the like. The impressive, but completely out of date, Time Life series of books still sit on one of our shelves collecting dust.
Yes, times have certainly changed.

KelbyOne offers a terrific close-up course or macro photography course.
What type of photo courses are offered at KelbyOne
I still love my old photography books, but they just can’t compare to the ease and enjoyment of on-line learning from some of the best photographers in the industry. Experts in their field coming straight into the comfort of your home to give you a course on macro photography, capturing backyard birds, travel photography, photographing children, toddlers, pets, portraiture, architecture and, of course, perfecting landscapes, just to name a few.
Speaking from experience: On-line courses are valuable resource
I have been lucky enough to take two of the KelbyOne courses recently.
The first – Fujifilm ambassador Karen Hutton’s informative close-up and macro photography course – proved to be truly inspirational. Although the detailed information she imparted on equipment was useful, it was her approach to using close-up and macro photography as a means to create a photographic story that inspired me to take a new approach to my own close-up and macro photography.
Click on the link for my full story on Karen Hutton’s close-up photography course.
Hutton encourages photographers to take multiple images of a subject, showing it in its natural environment before moving in closer to capture finer and finer details. The resulting photo essay provides a more complete picture than a photographer could hope to create with any single image.
This approach gives both the photographer and the viewer a much greater understanding of the subject.
Hutton’s enthusiasm for her work adds to her inspirational approach and creates a friendly feel to the whole experience. Watching her video is more akin to hanging out in the field with a photo friend, than it is about an hour of photography instruction.
I highly recommend enrolling in her close-up and macro photography course if you have any interest in documenting your garden and its inhabitants up close, or if you have stayed away from close-up photography because you have been uncomfortable with the traditional tools needed to be successful.
Rick Sammon's course on photographing backyard birds is an excellent way to learn about photographing birds.
Photographing backyard birds with Rick Sammon
The second on-line course I was lucky enough to take was from Rick Sammon.
His course, like Karen’s, is not designed for expert bird photographers with the longest, most expensive lenses.
I would recommend this course for anyone looking to use their existing lenses to capture backyard birds as well as birds at sanctuaries and parks where they are accustomed to people. If you are simply looking for tips or to brush up on your skills, this course will set you on the right path.
Rick loves to share his knowledge almost as much as he enjoys sharing his work.
Click on the link for more on Rick Sammon’s course on photographing backyard birds.
That includes, at last count, more than 50 books on photography, regular monthly articles in Outdoor Photography and an envious portfolio of more than 25 instructional courses on KelbyOne, The Ultimate Source for Photography Education. In fact, Photographing Backyard Birds is his 25th course offered on KelbyOne.
The one-hour course features a total of 250 slides to help illustrate his talks and keep viewers focused on capturing great photographs. Many of the images include tips on post processing in both Lightroom and Photoshop, including examples of images that many of us would discard. Rick also shows us how most can be saved through post processing.
Rick starts with the basics and progresses through photographing around garden ponds and lakes. He offers tips on ISO settings, anticipating action, creating controlled backyard sessions, and tips to learn from your mistakes.
He kicks off the video with 11 tips every bird photographer needs to know. The tips provide an ideal starting point for viewers and helps to set the tone for what to expect.
For those of us thinking about getting into backyard bird photography, Rick’s course is an ideal starting point. For those who have some experience shooting backyard birds but want to take it to the next level, Rick’s expertise is worth tapping into for just a few dollars.
Since, we have already spent a lot of money on cameras, lenses and accessories, it makes sense to spend a little more to learn from Rick’s expertise.
What is the KelbyOne photography program?
Before I explain the KelbyOne on-line photography program, let’s take a look at the founder of the program, Scott Kelby.
I was introduced to his work many years ago when I purchased one of his incredibly informative Photoshop books from my local Costco. Since then, he has gone on to write a plethora of books and articles on everything from Lightroom and Photoshop to getting the most out of your iphone camera.
Scott is the brains behind KelbyOne, the extensive on-line photography educational program boasting more than 100 of the world’s best and most entertaining photographers sharing their knowledge and expertise with the photographic community and anyone looking to expand their knowledge about their hobby or their chosen profession.
It’s all online and can be accessed from your computer, tablet or even from your phone. There is no need to leave the comfort of your home to gain a wealth of knowledge.
There are courses on everything from iphone photography to travel photography, portraiture, creative landscapes and Black & White photography to name a few of the more than 900 on-line courses available. There are several courses on using and mastering Lightroom and Photoshop
Students can purchase courses individually for as low as $9.95 or by monthly subscriptions for less than $20.00. There is also a yearly membership for those looking for the ultimate learning experience. The courses offer something for everyone whether your are a beginner, hobby photographer, or a seasoned professional.
“Our goal here is to make learning something that you look forward to. This way you, our community of photographers, can move past the hurdles and bring to life the images that are stuck inside of you. We feel like the content has to be fun, cinematic, and inspiring, and taught by the most personable and experienced photographers in the industry,” states the KelbyOne site.

Focus on 2022 success stories in the garden and behind the lens
The year 2022 was a good one in the woodland garden both for plants and photographing birds and mammals.
Proven Winners’ Rockin’ Deep Purple salvia steal the show
The beginning of the new year is the perfect time to look back over the past year in your garden.
Focusing on your successes can be an eye-opening experience and go a long way to help you better understand the direction you may want to go in the future.
On that same note, if you had your share of losses, it’s a good opportunity to learn from them and possibly go in another direction.
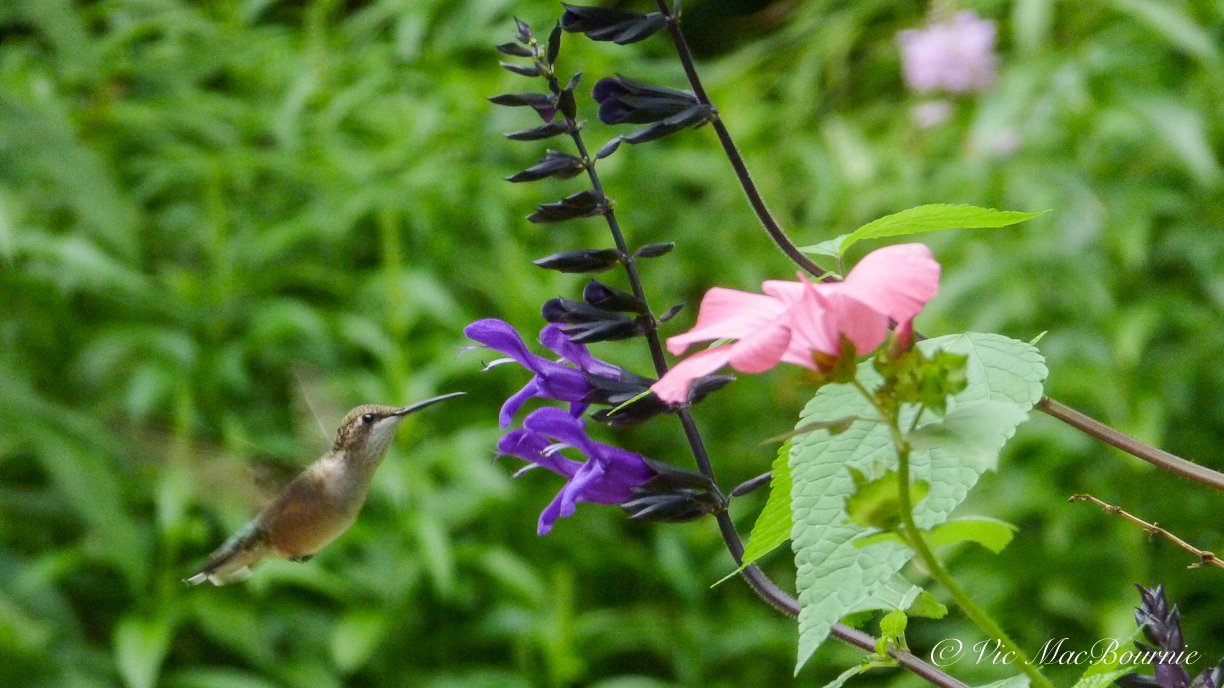
Deep Purple Salvia stole the show in 2022
This year, for example, I had great success with Proven Winners’ Rocking Deep Purple Salvia.
Not only did it perform beautifully in our two containers – blooming profusely throughout the summer and lasting well into the fall – but more importantly it was a magnet for the native bumble bees and hummingbirds.
Every morning the containers would be buzzing with native bumble bees and they became my focus while I was out enjoying coffee with our dog, Holly.
It didn’t take long for the hummingbirds to include these containers with the Rockin’ Deep Purple Salvia on their daily rounds, adding to my morning coffee enjoyment.
It was a small step to simply grab a camera and photograph the bees and hummingbirds as part of my morning and afternoon routines.
The situation created an ideal opportunity to test out a number of older digicams and lenses to review for Ferns & Feathers readers. If you have not had a chance to check out any of the reviews, most focus on the cameras’ usability in garden and garden wildlife photography. A sampling of reviews are highlighted here: Pentax Q, Canon Powershot Elph 500, Lumix-DMC ZS8, Pentax 300mm F4.5 lens.
Being out in the yard regularly also made it easier to watch how the light moved across the patio and identify the best times to photograph the flowers and their many visitors.
The following are a few images taken using Rockin’ Deep Purple Salvia as the magnet for wildlife. Go to the 2022 Photo Gallery for more images.
Rockin’ Deep Purple Salvia offers garden photographers a great opportunity to capture outstanding images of hummingbirds, bees and pollinators.
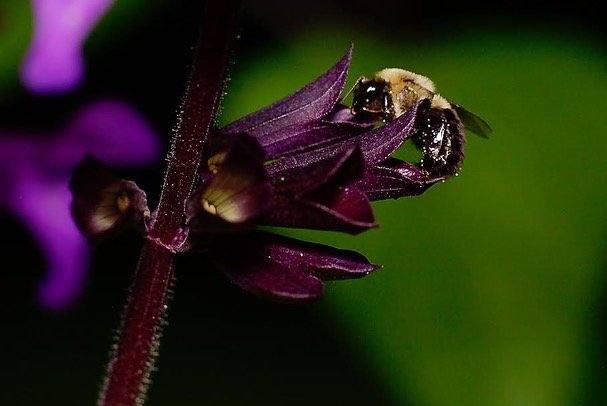
A macro shot of a bumble bee on a spent salvia flower.

An extreme macro image of a small fly feeding on a salvia flower.
Monarda proved to be another success in the garden
Another hit in 2022 was the performance of our Monarda, which I moved from the back of the yard to beside our patio where I could keep an eye on it more easily and photograph the hummingbirds as they moved back and forth between the Monarda and Cardinal flower.
(More reading here on the combination of the Monarda and Cardinal flower.)
Together, they are a splash of red that is just irresistible to hummingbirds and other pollinators.
Again, by watching how the light played on the Monarda, I was able to focus on capturing images primarily of hummingbirds.
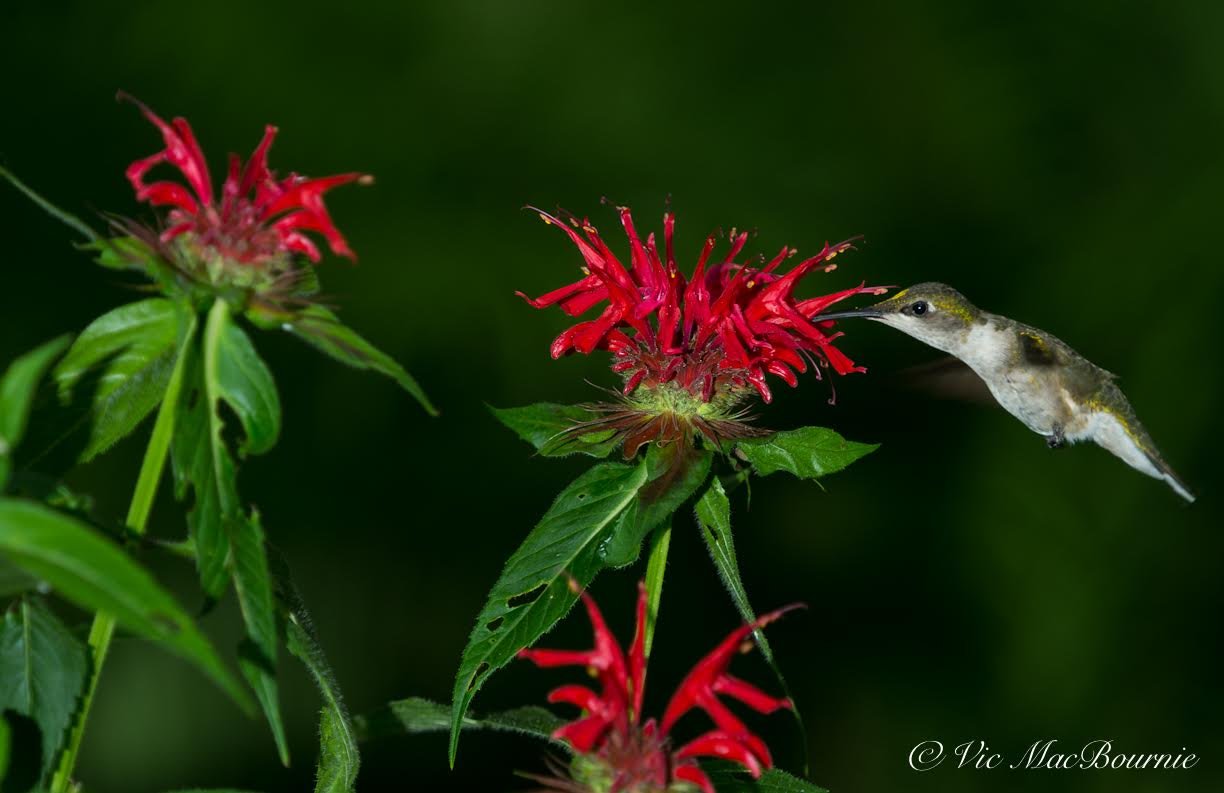
A hummingbird is captured here feeding on Monarda. Flash was used along with a diffuser to help stop the motion and provide a nice catchlight in the hummingbird’s eye.
Native Blue Lobelia is another winner in the woodland
Another combination that worked for me in 2022 was the native duo of Black Eyed Susans and blue lobelia.
The Black Eyed Susans had been growing in place for a few years, but adding the native blue lobelia into the mix created a combination that worked both visually and for local pollinators who visited the area regularly. I’m particularly looking forward to next year’s results after the lobelia has had a year to establish itself.
More reading: For the full story on the native wildflower Blue Lobelia.
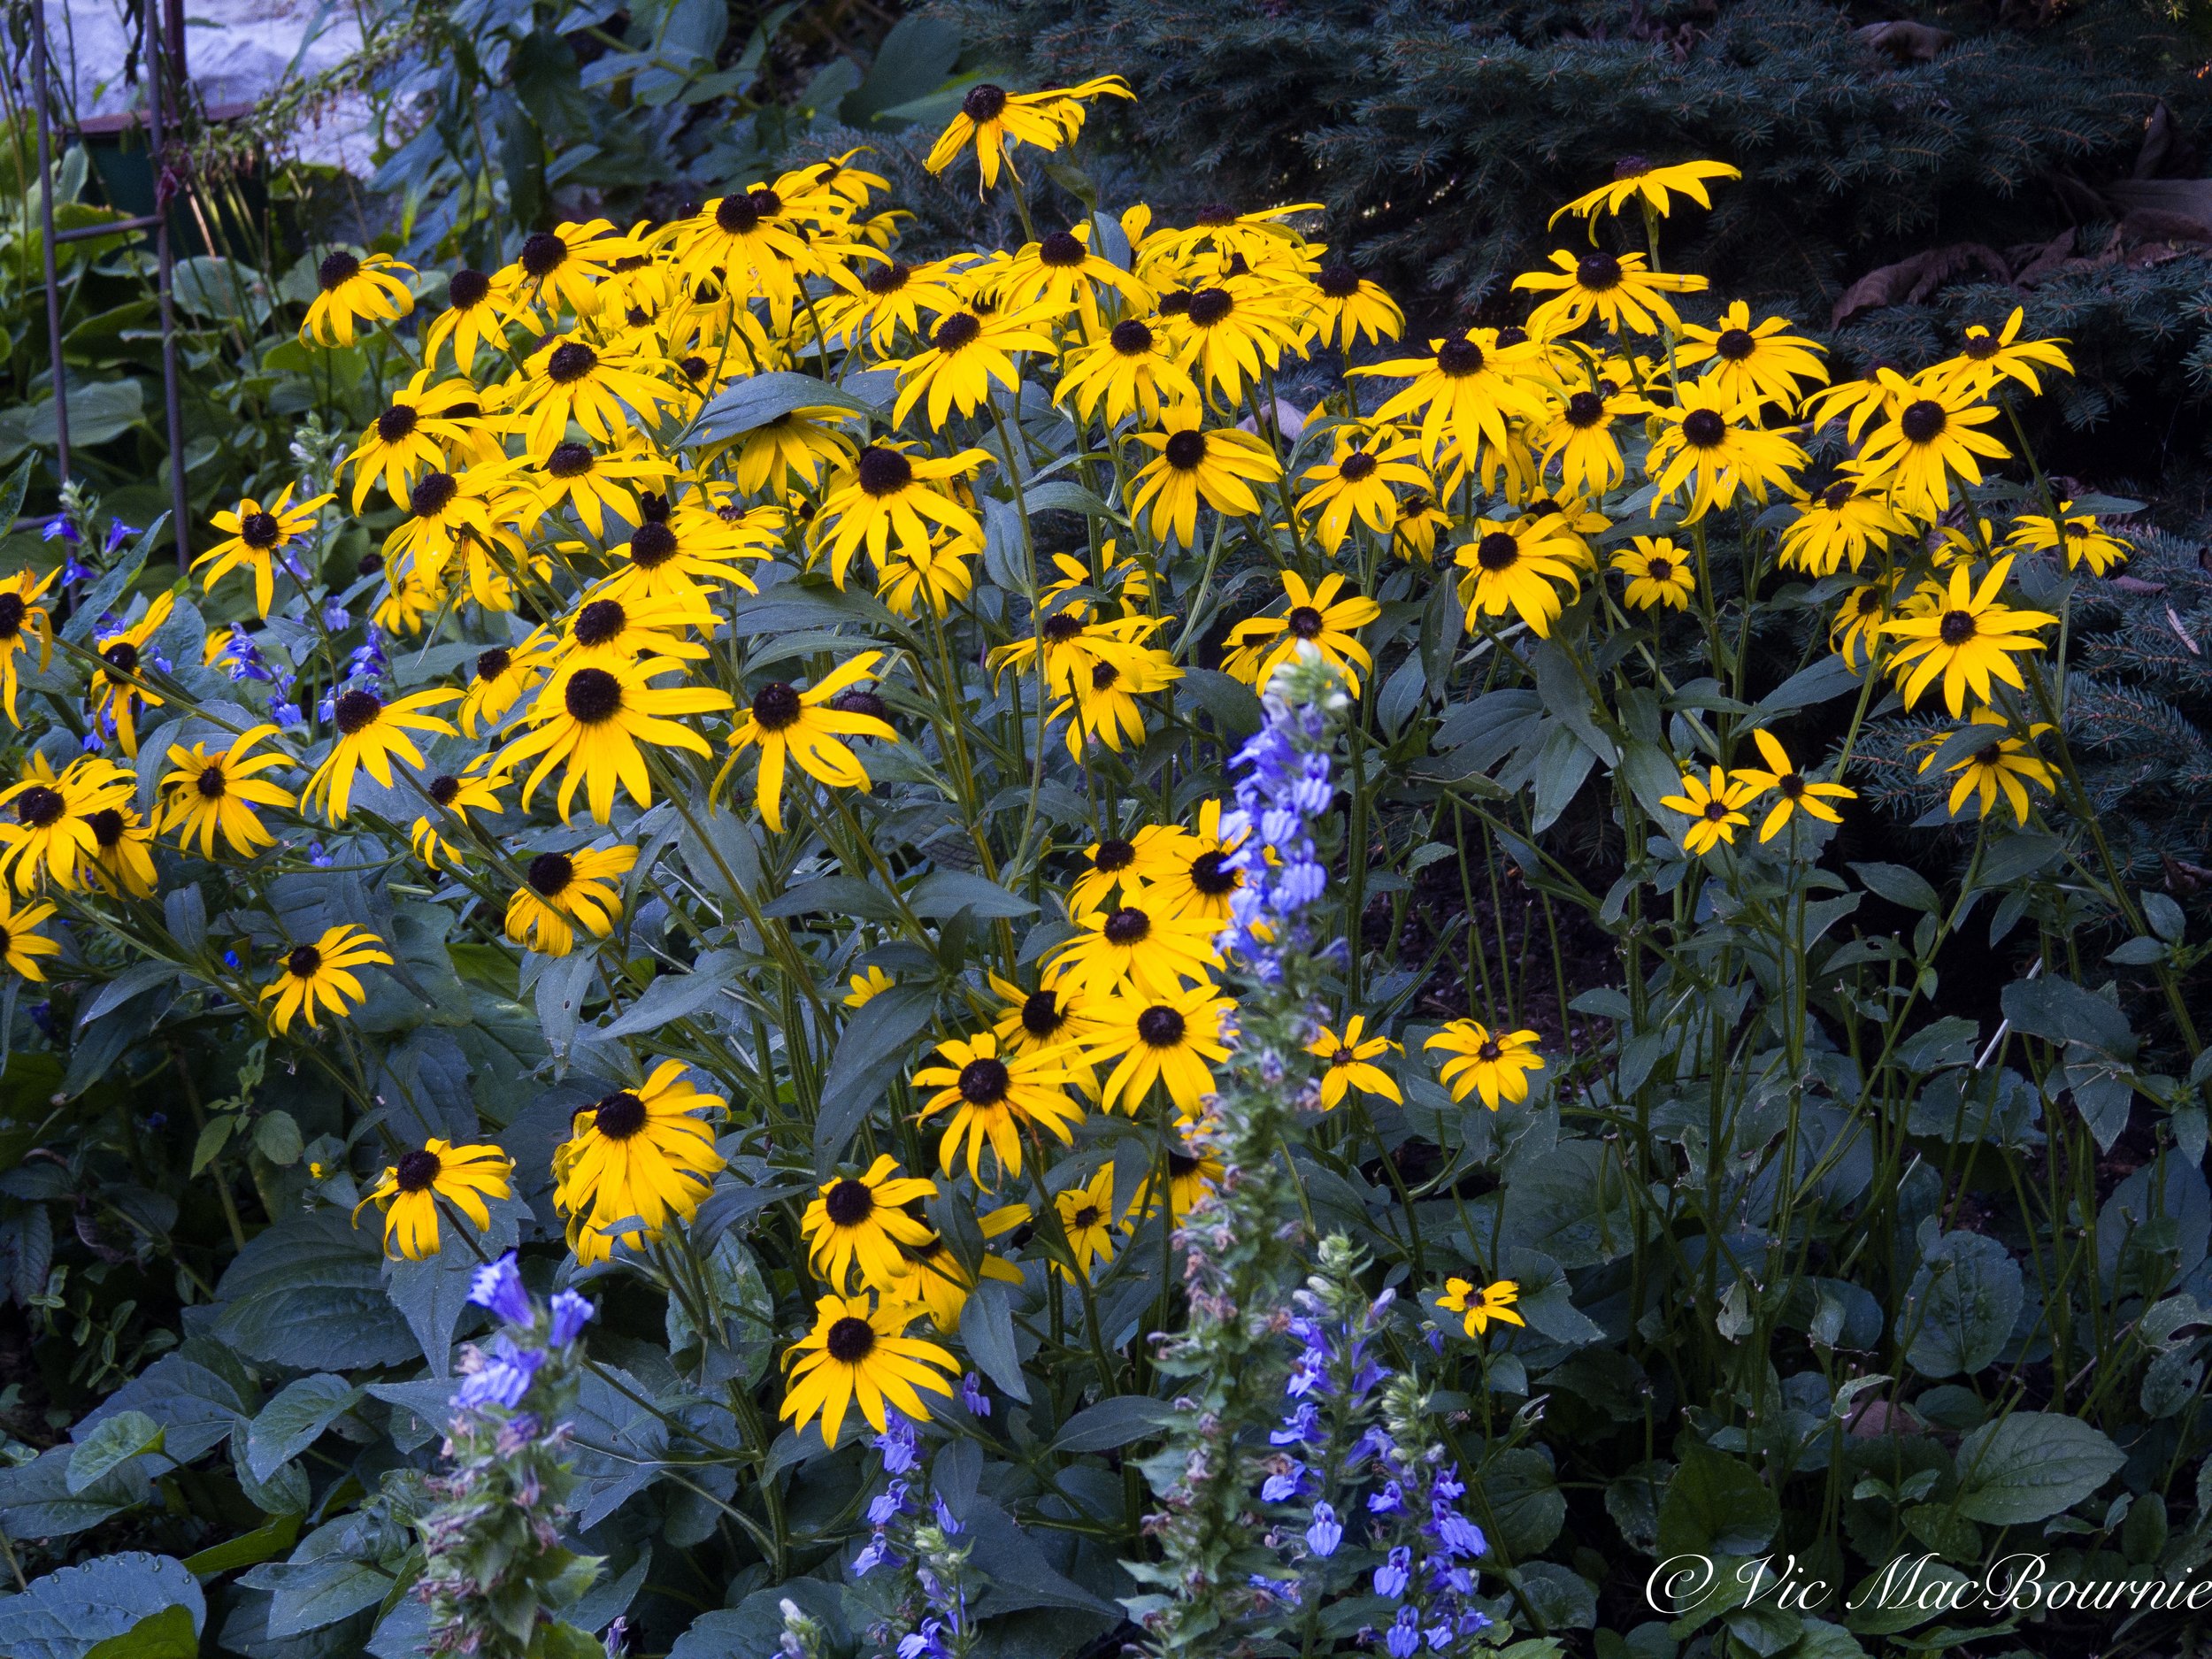
A combination of black Eyed Susans and native blue lobelia.
Gardening lessons to take away from this year’s success
By planting the monarda, blue lobelia and salvias close to the patio, I was better able to enjoy not only the plants but the birds and the pollinators that visit them regularly.
It was also much easier to care for the plants rather than try to keep them properly watered when they were located at the far end of the yard.
Next year, I plan to add more plants around the patio including searching out more Proven Winners’ salvias from their Rockin’ series. There are four different salvias in their Rockin’ line including two blue salvias and a fuchsia. (Link to Proven Winners Rockin’ series.)
More reading: on Proven Winners free booklets here (2022) and here (2021).
Animals in the landscape
When it comes to visitors to the garden this year, I was fortunate enough to have several memorable moments.
The highlight this past garden season was capturing a number of photographs of our resident fox. The foxes have been around for the past few years, but capturing good images of them is not always easy.
Another benefit of being out in the garden trying to photograph the foxes, resulted in my best images of a skunk in early evening light light.
Both of these animals can be quite elusive if you are not prepared to photograph them and do your homework before hand.
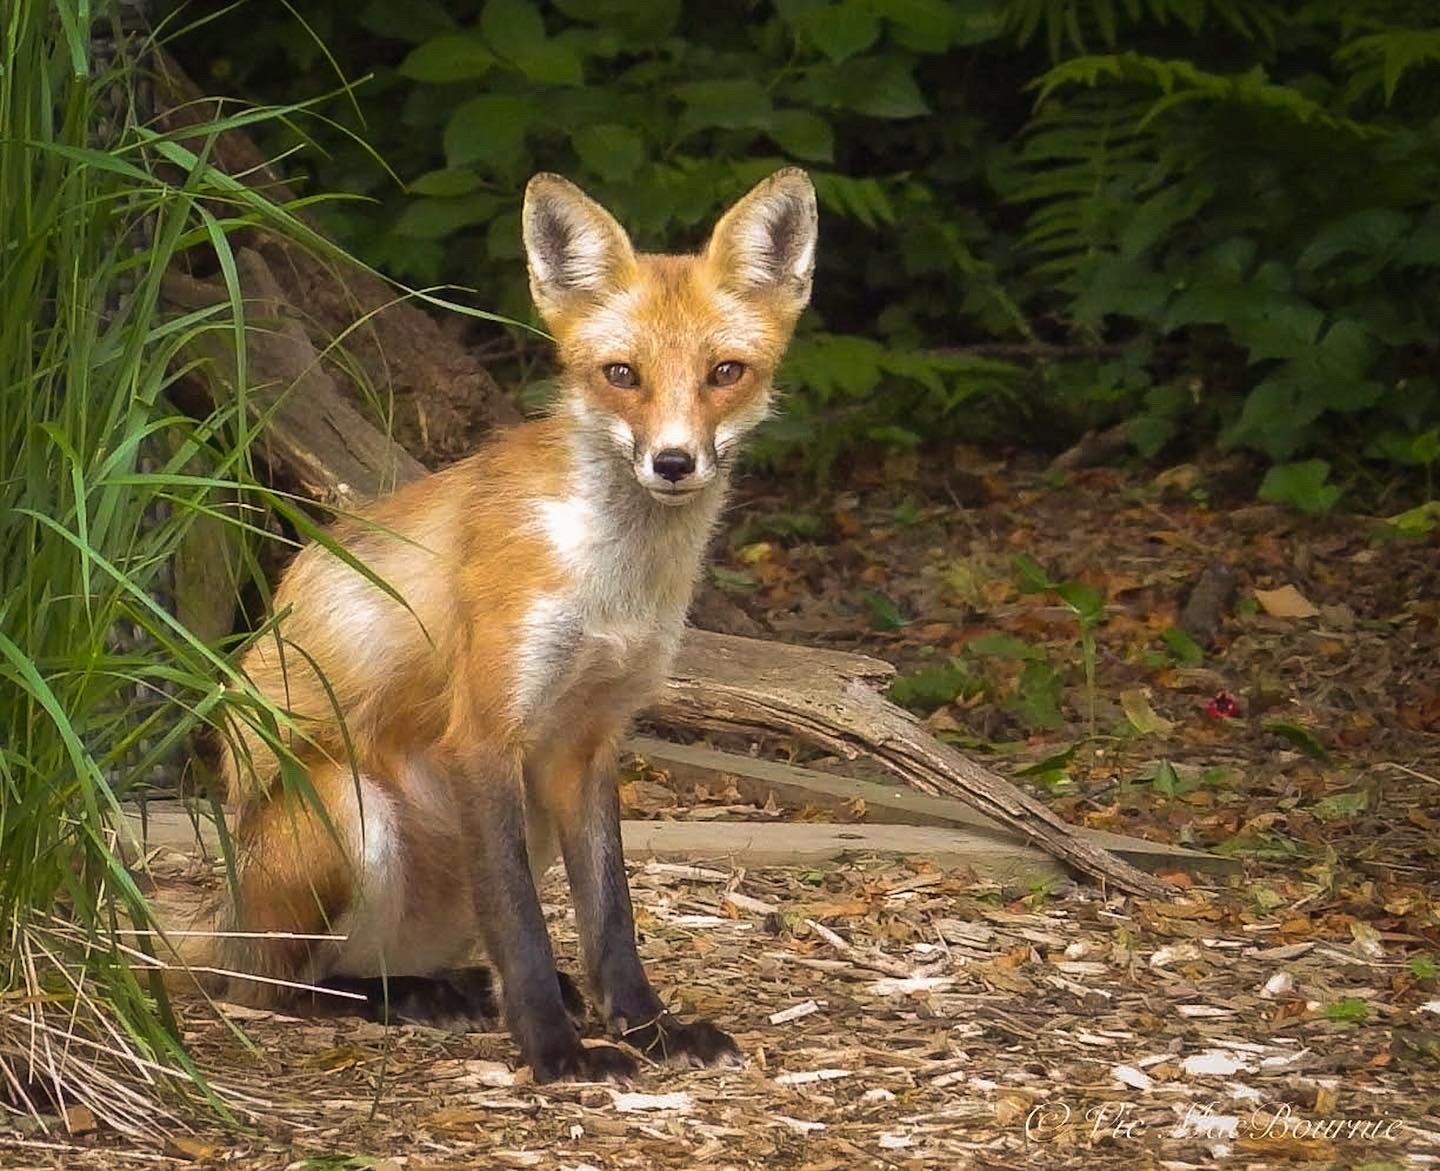
The neighbourhood fox was photographed in my Tragopan photographic blind with a 300mm F4.5 lens.
By using a trail camera in the backyard, I was able to establish that both the fox and the skunk regularly came to an area in the garden near our open compost. From there, it was as simple as setting up my Tragopan blind and waiting for the animals to come along.
More reading: For my post on using a trail camera in the backyard
More reading : For my post on using a Tragopan photo blind in the garden.
I knew the fox came in late afternoon on its regular rounds, but getting the skunk around the same time and in good light was a pure bonus.

A neighbourhood fox was photographed while it posed for a trail camera in the back garden. If you want to see the video of the fox from the Trail camera be sure to click the link above on using the trail camera in the backyard.
Being set up and prepared was, of course, the key to capturing more than just a grab shot of the animals as they made their way through the yard.
The Tragopan blind is important to help the animals feel unthreatened and act more naturally with a human in such close proximity.
While I used the blind for the fox, I did not need to use it for the skunk. Skunks don’t have good eyesight so, for the most part, it did not even know I was there. In fact, at one point it made a B-line across the yard right toward me until I gave it a hand signal that I was there. The hand signal was all it took for the little guy to head in a different direction.
I especially like the image of the fox (above) posing in front of the trail camera as it was capturing video and images of the fox.
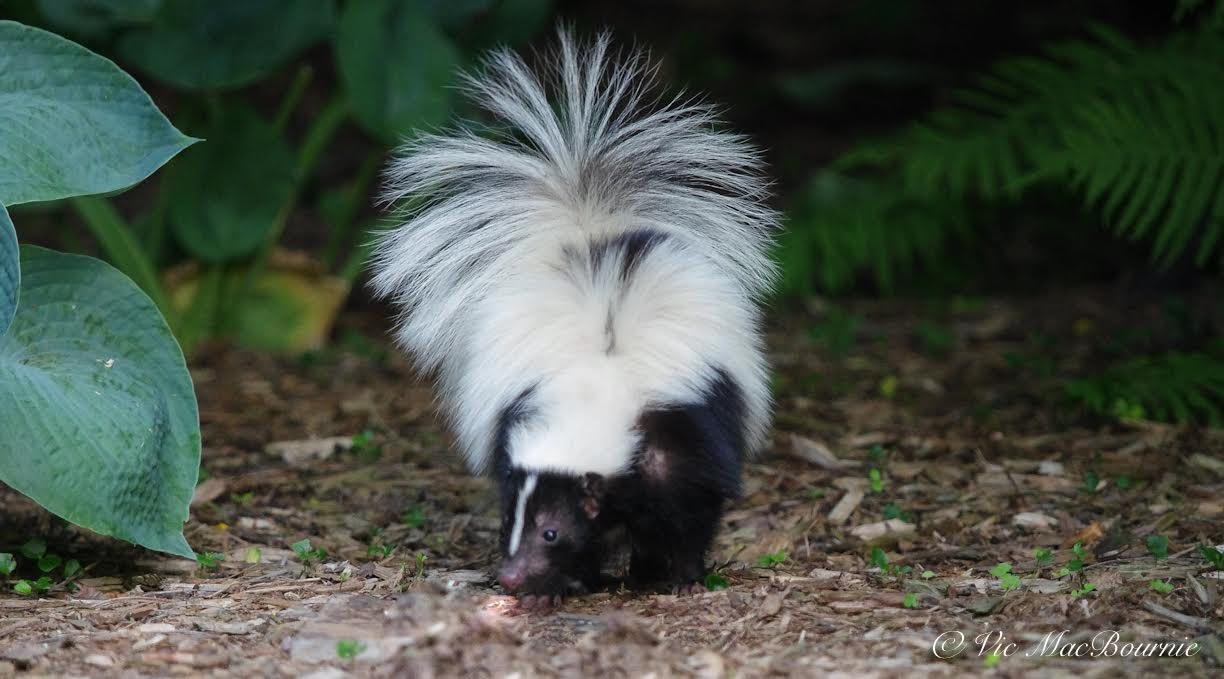
This image shows a beautiful skunk roaming through the garden.
The image of the cute little skunk involved a little luck. It came out of some tall grasses right beside me after I set up my camera in the garden. It walked over to a corner of the garden allowing for a more comfortable working distance.
Photographic lessons we can take away from a year in the garden
Observation is critical when you are trying to photograph birds, mammals and other backyard wildlife. Learning their habits and recognizing the times they are most likely to appear in the garden will greatly improve your chances.
There is nothing like spending more time in the garden and simply observing the goings on, but when that is difficult, the trail camera can do the job while you are away.
Most trail cameras will document any animals that come into your yard right down to the minute. If you notice a pattern, simply set up your camera and be prepared to capture images of your subject.
I’m planning to use the trail camera more over the coming winter through to spring and summer to help me capture more fox images this winter when the animals’ coats are in their prime.
Although the images from the trail camera are useable, it’s always better to capture the subjects with a real photographic camera to get the best results.
Looking forward to a new year
The coming year will present us with more challenges in the garden. But, by using our success stories from this past season and building on them, we can meet these challenges head on and come out a winner.
I had hoped to have real success with annual sunflowers (link to my post) this year and, although I did have some success with the native sunflowers, (link to my post) many of my seedlings and young plants were attacked by squirrels and other animals before they could mature and perform at their best. I did learn a few things, though, and next year my sunflower experiments will be much better.
Here’s to a new year.
Get the most out of your compact camera: Ten tips to better photos
Getting the most out of your compact camera involves getting acquainted with the camera’s features, many of which can be hidden in menus.
Beginners should focus on scene modes for best results
Getting the most out of your compact camera is the first step to creating your best photographic images.
Hidden in the depths of many compact cameras are a host of creative filters, scene modes and special effects that most photographers either never explore in any meaningful way, or don’t even know their little camera offers these capabilities. Beginning photographers will benefit from learning how to take advantage of these filters and scene modes to get the most out of the camera.
Reconsider leaving your camera on automatic and explore the scene modes to maximize your results.
For more on Photographing your garden, be sure to check out my comprehensive post on Flower Photography in your Garden.

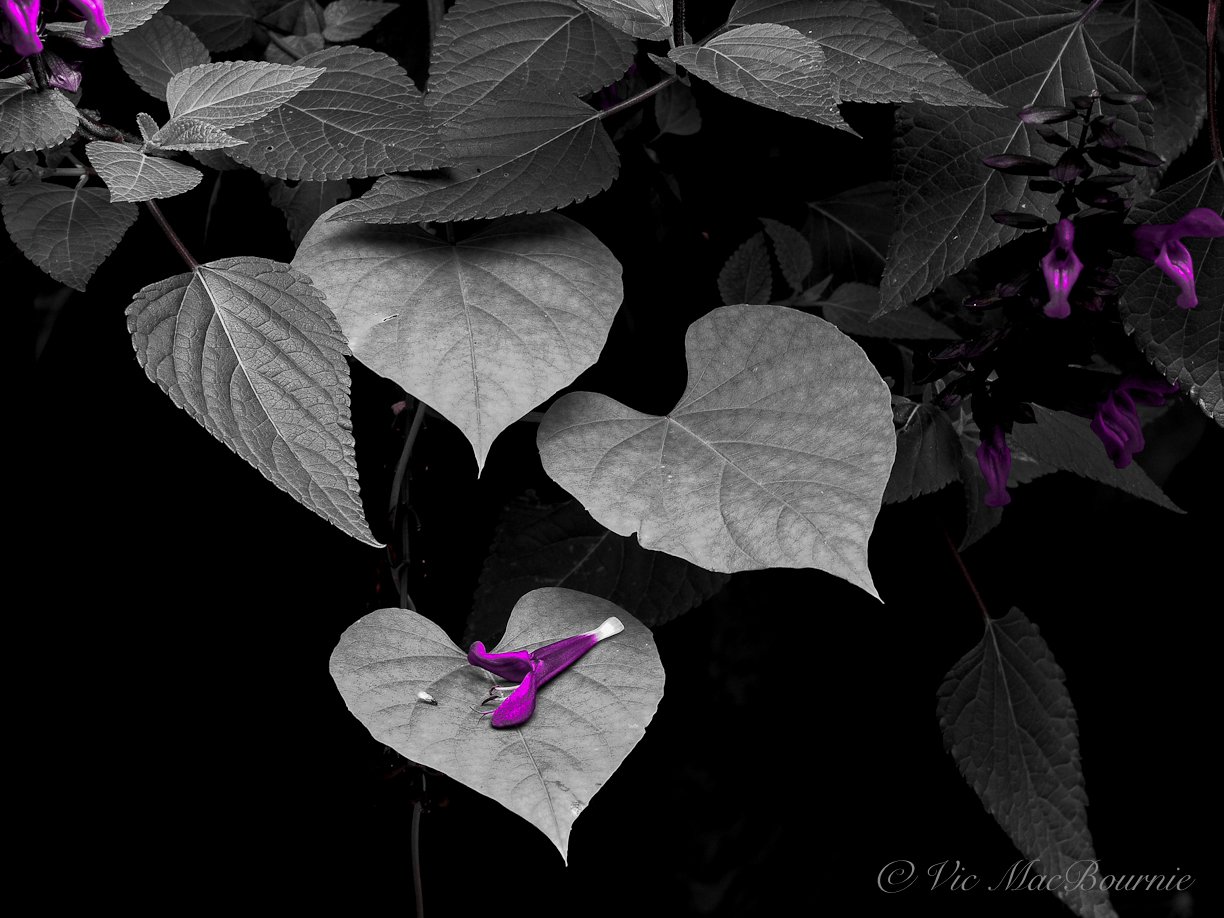
In this image, I used a in-camera filter available in most digital cameras that takes a B&W photo of the image but lets the user choose a colour or two colours that are displayed. In this case, the dark purple salvia flower was highlighted.
The best advice I can give is to:
Place your camera manual on the table beside your favourite couch and read it – several times. If it’s a digital manual, download it to your computer and keep your computer nearby. Keep it handy for the first two or three months until you believe you know every part of the camera and its features. (I like to flip through the manual while watching television.)
Leave the camera in the same spot beside the couch. Pick it up regularly and go through the menus learning the features and how to quickly access them.
Now go out regularly with the intent of using these features, filters and scene modes. Get comfortable with them to the point that you can access them quickly and efficiently even if they are buried deep in the menus.
Don’t believe what you read that you have to use manual modes like aperture and shutter priority. There is a time to use these modes, but often the scene modes will serve you better, especially if you understand what is happening to your camera when you use these specialized modes. Many camera manuals will actually provide a brief explanation of what settings are used on the camera in the various modes.

The macro mode in the Fujifilm X10 was used to capture this image of the forest floor. Photographing images like this is a great way to experiment with using the various features and modes in the camera.
Eleven tips to improved photography with compact cameras
Know your compact camera and how to quickly access menus and features.
Keep the ISO as low as possible. You are dealing with a small sensor that will get noisy (grainy) quickly in high-ISO settings
Use in-camera stabilization to help keep ISO levels low and images sharp.
Treat the camera like a DSLR and put it on a tripod if you are shooting landscapes to get the sharpest images possible with low ISO and a high aperture. Use the self-timer feature to set the shutter without touching the camera.
If you are using a tripod, turn off in-camera stabilization.
If you are using in-camera stabilization, use proven traditional methods to hold the camera steady, including bracing yourself against a wall or tree, pushing the viewfinder up to your eye to help brace the camera or using a monopod, say at a sporting event. No need to turn off the in-camera stabilization if you are using a monopod.
Gently press the shutter button rather than jamming at it to take the picture. Pressing the shutter quickly and with force may cause camera shake and make the photo look out of focus.
Use the burst feature to shoot multiple images of a scene to ensure one of the images is sharp. Use side-by-side comparisons in post processing to pick the sharpest image.
Consider setting the in-camera bracketing feature to ensure you obtain the best exposure. Obtaining perfect exposure is more important on a compact camera than it is on a larger sensored camera, because the smaller files cannot handle as much post processing.
Shoot in RAW whenever possible and if you are comfortable doing post processing in programs like Lightroom or Photoshop. If you don’t like processing RAW images, consider using the Raw plus jpeg setting to ensure you have the opportunity to post process an important image if necessary but still retain the more convenient jpeg image.
Take advantage of the scene modes provided by most compact cameras, but also take the time to learn what the camera is doing in these scene modes so you can make adjustments if necessary.

Here, a combination of macro mode and B&W mode is used to capture this image of the forest floor. Fujifilm’s X10 enables the photographer to experiment with B&W digital film including the use of B&W filters that darken skies or lighten foliage. Experimenting with these features helps to prepare you for the time when you need them.
What compact camera features should I focus on?
Focus on the camera features you use the most and get totally comfortable using them.
Garden photographers, for example, might want to get acquainted with, macro mode, sports /action mode, portrait mode, and pet mode. These are obvious features that come to mind but night-shooting mode including night portraits are shooting modes that you might want to get familiar with before you are forced to use them.
Macro mode is obviously a feature for garden photographers to get comfortable using. Just set the camera on the macro mode and go out into the garden to experiment getting up close to flowers and insects. Don’t wait until you come across a beautiful butterfly to learn how macro mode works. By experimenting with the macro feature, you will get comfortable, for example, with how close you can get to the subject.
You’ll also learn how far away you can be while using the zoom feature to get in as close as possible. This is particularly useful to get images of butterflies from a distance.
Don’t be afraid to experiment. There is no cost to this exercise accept your time.
Try shooting with and without flash to see how the results change and how your camera handles flash up close.
The macro feature is just one of many camera features to focus on.
If, for example, you are going to watch your childs’ ball game, take the camera and use the opportunity to experiment with the action or sports mode. Set the camera on “action mode” and fire away.
Feel free to use the manual modes to capture game action, but unless you are very comfortable setting the aperture and shutter speeds setting the ISO and turning on burst modes, let the camera’s technology do most of the work for you.
Afterall, camera manufacturers have put a lot of thought into coming up with the best camera settings for the various modes.
One of my favourite cameras for creative modes is the Pentax Q. For my comprehensive post on this tiny camera, check out my post on The Pentax Q, and why you need one in 2022.
What are the best compact and micro 4/3rd cameras for 2022?
If you are wondering what the best compact cameras for 2022 are, here is a short list of some of the top compact cameras Fuji, Sony, Lumix, Canon and Leica.
The Fujifilm X100V, boasts an APS-C sensor and 24.3 megapixels along with its 23mm, fast f2 lens. It’s got a hybrid optical electronic viewfinder and a 3-inch fixed LCD screen. This is for more serious photographers who are looking for fine craftmanship and are happy with using a prime lens rather than a more versatile zoom lens. I’ve included a few links from various locations if you are interested in purchasing the camera.
Fuji X100V (Adorama)
Fuji X100V (B&H)
Fuji X100V (Amazon)
Sony ZV1 boasts 20.1 megapixels in in 1-inch sensor. It sports a fast 24-70mm zoom lens and a 3-inch screen. This enthusiast camera has very fast auto focus and a screen that can be moved to multiple views. This camera lacks a viewfinder but is a very capable camera for video.
Sony ZV-1 (Adorama)
Sony ZV-1 (B&H)
Sony ZV-1 (Amazon)
Not quite a “compact” camera but the Panasonic Lumix G9 is a mirrorless, 20.3 megapixel camera with a 3-inch LCD and interchangeable lenses in the micro 4/3rds category. It is a professional photo and video camera that has class leading dual image stabilization and outstanding video.
The Panasonic DMC-ZS 100K is a compact point and shoot 20megapixel camera with a 10X optical zoom ranging from 25-250mm (35mm equivalent). Like your phone, it has a touch screen on the back and is fully equipped to handle any challenge you may face.
Panasonic DMC-ZS100K (Henry’s Cda)
Panasonic DMC-ZS100K (Adorama)
Panasonic Lumix G9 (B&H)
Panasonic Lumix G9 (Amazon)

Adding punch of colour to images can be done with in-camera filters. Here, “vivid film” was chosen to add a punch of colour to the photograph of the container pond along side containers of flowers.
How does “sports/action mode” work on a compact camera?
Let’s examine what happens to the camera when you set it on “sports/action mode.”
Most cameras, when set on “action mode” will make a series of alterations to your camera settings to best capture fast-moving subjects.
First, the ISO setting on the camera will set the ISO to a high number to give the camera it’s best chance of stopping any action.
Second, it will set the shutter speed to a higher level to reduce the blur caused by the action on the field.
Third, it will set the aperture to provide as much light as possible so that the shutter can fire at a rate fast enough to stop the action. As a result, the depth of field will be limited.
The camera will likely choose continuous-focus mode as well as burst mode or continuous shooting mode.
The camera may choose other features to enable your best action photos, such as turning off the flash and turning on anti-shake mode if it is not already in use.

This Panasonic Lumix camera’s mode dial shows the various modes available to the photographer including a custom mode (CUST), scene mode (SCN), two my scene modes (MS1-2), a movie mode, intelligent mode, program mode as well as aperture, shutter and full manual mode.
All of these actions are turned on in a fraction of a second and the camera is ready for capturing the big game.
Knowing what the camera is doing in sports mode, should also give you ideas of how to use this mode for other subjects.
If I see a fox trotting through the garden, “sports/action mode” is the first mode I go to to capture the scene. With only seconds to capture the fox as it trots through the garden, there is no time to make the changes necessary to capture the scene.
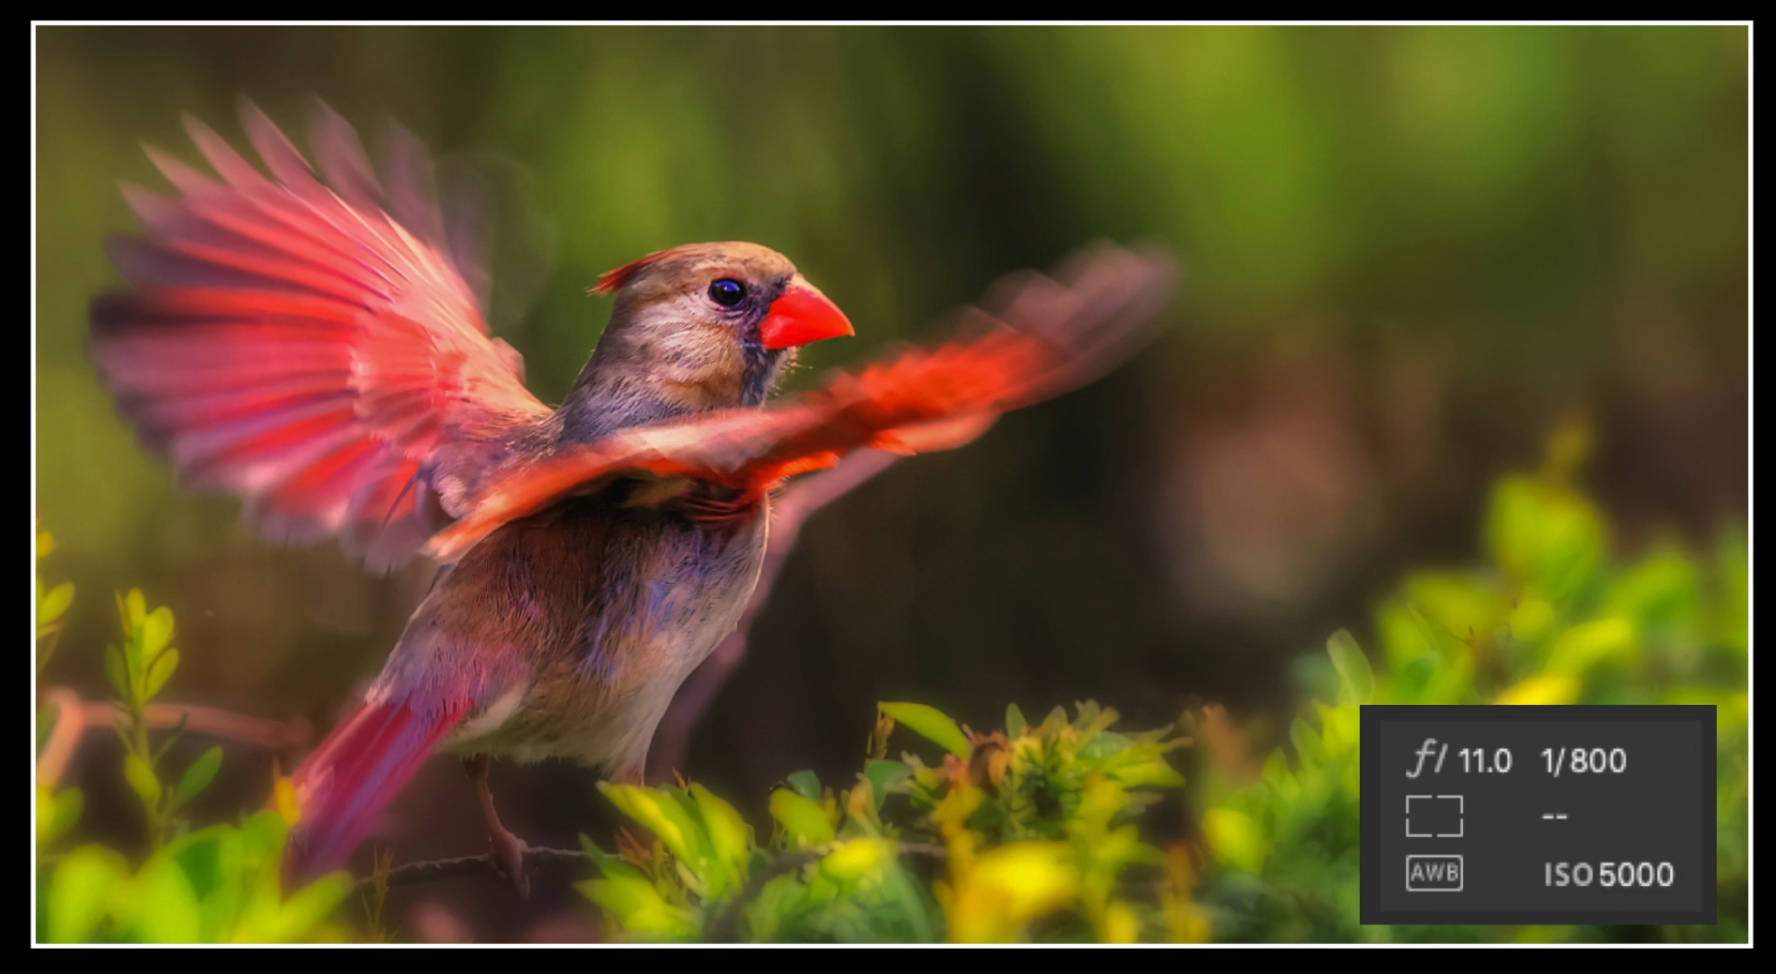
A fast shutter speed was used to help stop the motion of this hummingbird. Using action or sports mode will help you capture images of birds and animals in the garden. Using TV or time value will also help you capture the action if you choose a shutter speed of 500/sec or faster. Finding a compromise between a high shutter speed and setting a high ISO is key to capturing good, usable images.
The action mode is likely the one I would choose to capture kids playing at the park, or the dog having a great time in her pool or the hummingbird working the flowers while I sip my morning coffee.
Why use the custom features over scene modes?
Many high-end compact cameras also have custom modes that enable you to set the camera for your most-used situations such as portrait, B&W images or action photography.
Custom modes are excellent alternatives to using scene modes because they allow you to dial in all the settings you need to create the desired effects. For example, action mode may allow your camera to automatically pick an ISO setting higher than 1600, but you know that the resulting image is not very good. The custom setting would allow you to limit the ISO to say 800 or 1000 ISO.
How does portrait mode make better people photos?
We’ve discussed some of the camera settings in action mode, let’s look at what goes on in portrait mode. There is more to the portrait mode than you might think. Although each camera manufacturer will set their portrait mode differently, the number of changes might surprise you.
Consider the following possibilities:
Change the f-stop to wide open to create a pleasing background
Take several images at once in and out of focus to help create a lovely soft background
Change the colour calibrations to create a warmer, more pleasant skin tone for portraiture. Some camera manufacturers – including Fujifilm cameras – have included the colour parameters of their former portraiture films so that users can experience classic portrait film in digital form.
Add a softening filter or effect to create the illusion of softer, blemish-free skin.
Lower the ISO for a less grainy or noisy effect.
Turn the flash on or off. If the flash is on, add red-eye reduction. (My Fujifilm X10 even has a handy feature where the camera takes the portrait with and without flash. The photographer can then choose the image they like best.
I’m sure there are other changes depending on the camera manufacturer, but these changes to the camera settings should give you a good idea how much thought goes into creating the best settings for successful images using the scene modes and why you should consider using them.

These two images show how effective using the HDR mode can be. The above image shows the non-HDR image where the lighting between the hi-lights and shadows is extreme. By using the HDR mode, the PentaxQ took two fast images exposing for the hi-lights and shadows and then combining them into one image (see below).

The final HDR image finds a middle ground between the highlights and shadows. HDR can be used effectively in a number of situations where the lighting extremes call for it.
Other modes, such as HDR (see above), combine several photos taken in quick succession to remove the extreme highlights and shadows and give you a properly exposed image. (Useful when shooting a cityscape from inside your condo when you want to balance the indoor light with the outdoor light.
Other modes and what they do:
Scenic modes often enhance blue skies and add punch to green foliage.
Kid modes enhance skin tones while capturing fast-moving subjects.
Pet modes allow you to capture fast-moving subjects.
Food modes (popular for instagram) enhance colour to create more appetizing food.
Sunset modes enhance warm colours creating more dramatic sunrise and sunset effects.
Fireworks mode uses long exposures to capture the fireworks.
There are many more modes that are set up to help photographers get good images in unusual or difficult situations. Once again, experiment with the modes that you expect to use regularly.
When is the best time to use manual modes
So far, we have discussed the benefit of using scene modes rather than the manual modes such as aperture priority mode (AV), or shutter priority mode (TV) or full manual mode (M).
Once you become more comfortable with the camera, using manual modes gives you more control of the camera. The scene modes are very good most of the time, especially in difficult or unusual situations, but there are times when you want full control of the camera settings.
In these situations you can set your aperture and shutter speed and let the ISO change automatically to create the proper exposure. It’s a good idea to restrict the ISO to a specific range (depending on the camera) so that the ISO levels do not go so high that they degrade the image.
By controlling the aperture, you gain control over the depth of field in the image including the perceived sharpness of the subject and/or the softness of the background.
By controlling the shutter, you gain control over the ability to stop movement or create movement in the image. You would want to stop the motion of a flower getting blown in a gentle breeze, but show the movement of a stream cascading over rocks creating the effect of soft, moving water.
Although there are scene modes in many cameras that help you create the effect of flowing water, having complete control allows you to change the look of the water in greater detail.
Final thoughts on maximizing your compact camera
For most beginning photographers, the compact camera is often the first and the best camera to purchase. Becoming familiar with the features and getting comfortable with the camera menus helps to quickly access the features when you need to and takes much of the thinking out of using the camera whether in the garden or on vacation.
By making use of the scene modes and the various filters built-in to these cameras, you can take professional looking images that just might surprise you and your friends.
As you get more comfortable with the camera, learning when to use the scene modes and filters will probably be the most difficult part of getting great photos.
Finally, when you are comfortable with the camera and understand its inner workings, you can move to more manual control and take your pictures to another level.
Over time, getting great images and developing a good eye will become second nature and you will know you have discovered the joy of photography.
Can Canon’s PowerShot Elph 500 hold its own in the garden with flower photography
Eleven years after its introduction the Canon PowerShot Elph 500 HS continues to shine when it comes to garden photography.
Garden Elph is great for flower photography a decade after introduction
It was 2011 and Canon released its PowerShot Elph 500 HS complete with a modern touch screen to help combat the popularity of the emerging smartphones equipped with some pretty decent built-in cameras. About two years earlier, Apple had unleashed its iphone and it was gaining popularity in the world of point-and-shoot cameras. Something had to be done.
It was also the year of uprisings in Egypt, Libya, Syria, a devastating tsunami in Japan and the death of Osama bin Laden. On a lighter note, The King’s Speech and Toy Story Three were big hits, the St. Louis Cardinals won the World Series and the Bruins won the Stanley Cup.
It was also the year we bought our daughter a Canon PowerShot Elph 500 HS. For the next couple of years, that camera would travel the world with her throughout Europe, the United States and Canada taking thousands and thousands of pictures of her synchronized skating adventures, concerts, vacations and who knows what else.
Be sure to go to the end of this article for links on Canon’s refurbished items as well as cameras that competed with the PowerShot 500 back in its day. Also, at the end of the article are new cameras you might want to consider purchasing if a used camera is not what you want or you cannot locate a good used camera.
It served her well during those first few years but eventually the iphone more or less made it obsolete. The camera wasn’t actually obsolete at all, but it was no longer cool for young people to carry a point-and-shoot camera around when a phone made sharing on social media so much easier.
Be sure to check out my comprehensive post on Getting the Most out of Your Compact Camera.
If you want to see more garden images taken with the Canon Powershot, please check out my Canon Elph 500 Gallery of images.
For more on photographing flowers, check out my post on Flower Photography in your Garden.

The impressive back screen of the Canon PowerShot Elph 500 HS showing its menu.

The Canon Elph with its simple yet elegant front face.

Looking down from above on the Canon Elph’s top plate.
So it was tucked away in a drawer and almost forgotten.
Camera is ideal for flower photography
Fast forward 11 years and this little point-and-shoot that cost my wife and I more than $400 from Costco way back then, is a high performing part of my garden camera arsenal and a stellar performer when it comes to flower photography.

The tiny Canon Powershot Elph 500 HS is more than capable of capturing exquisite images in the garden. It’s extremely wide 24mm equivalent lens is fast and sharp. Eperimenting with the filters including the vivid colours used here can make the images really pop, especially considering the camera is approaching 12 years of age.
Who said an 11-year-old, high quality point and shoot digital camera is no longer usable?
In fact, this little blue-grey and silver beauty with its 12.1 megapixel CMOS sensor and 4.4x optical zoom lens (equivalent of 24-105mm lens) is becoming the perfect companion for me on my morning strolls around the garden. The fact it takes a regular SD card and shoots HD movies means it continues to challenge even the most modern point and shoot cameras.

The Canon Elph’s 24-105mm lens has the pulling power to capture detailed garden vignettes in vivid colour.
Some Key Features in the Canon PowerShot Elph 500 HS
12.1MP CMOS Sensor
4.4x Optical Zoom 24-105mm Lens (35mm Equiv)
Optical Image Stabilizer
Good Low Light/High ISO capability for its age
Full 1080p HD Video complete with stereo sound
Hi-speed burst shooting that can take up to 8.2fps
Slow Motion Movie Mode – at 240fps
Effects Include Toy Camera, Monochrome, vivid, portrait and foliage settings
Smart AUTO Has 32 Scene Modes
Movie Digest Mode that automatically records a short video clip every time you shoot a still image. The camera will then combine the clips into a single video. Perfect for a day of shooting in the garden with your children or grand children.

The lens allows a close approach to fine garden details like this moss growing between stepping stones in the Japanese inspired garden.
Is this little Elph worth buying today?
A quick search on Ebay and used camera outlets puts this little gem of a camera at between $50.00 for a well used model to almost $300 for a new-in-the-box-model. Expect to pay about $100 for a good used one. You may be able to get one much cheaper if you keep your eye on Kijiji and other more local on-line marketplaces.

Capturing more intimate scenes in the garden is easy in the auto mode where you let the camera recognize the scene and provide the best settings to capture it.
That’s a lot of camera for under $100. Its performance in low light makes it great for everything from travel photography to, of course garden photography. Its multiple frame bursts and best-image-capture settings make the camera ideal for parents and grandparents to grab shots of children, pets and vacation images. Set it on auto and it’s good to go but if you want more control it’s there for the taking.
What features does the Canon Elph 500 boast?
The fast f2.0, 24mm lens is more than enough to take in long garden vistas, in early morning light, while the 105mm has enough pull to capture more intimate garden vignettes, and with a little effort some garden wildlife.
It all comes in a package so compact that it slips into my pocket so easily that I forget I have it with me at times.
But what about the pictures?

The Canon PowerShot Elph has the ability to capture garden images in fine detail.
These images should speak for themselves.
The Canon spits out sharp images, with punchy colours and features enough built-in filters to keep the creative juices going year round.
I particularly like the “vivid” setting which gives the images the look of Fuji’s Velvia film on steroids. Add to that, an impressive “foliage” setting that enhances greens and fall foliage colours, a B&W setting, Cyanotype setting (blue cast), sepia setting, colour accent and poster settings just to name a few.
It would be easy to think this camera is nothing more than a simple point and shoot with very little extras to offer.
Afterall, there are no knobs and wheels on the camera’s exterior, and very few buttons outside of the on switch and image review button. The smartphone may have made the camera obsolete in some ways, but it wasn’t because it lacked the latest touch screen technology. Hidden inside the large LCD screen on the back of the camera is a wealth of settings buried in the settings menu.

A foliage setting on the camera is perfect for capturing the subtle colours of green in the garden as well as the pop of fall colours in the woodland.
Once you get into the menus, this camera is loaded with all the settings; Program, AV aperture value, TV time value, a portrait setting, pets and children setting, a total of 32 scene settings… . It even has a smart setting where the camera automatically selects the best shooting settings for optimal quality based on subjects and environmental factors to provide point-and-shoot simplicity.
It also features optical image stabilization, hi-speed burst shooting at up to 8 frames per second and full 1080p HD video with stereo sound.
What’s not to like about the camera?
I like lots of exterior buttons and dials to control the primary functions of a camera. This camera has none of these.
In fact, there are only a total of three buttons on the exterior of the camera: one to turn the carmera on and off; the shutter button to take the picture and an auto switch that allows the user to put the camera in complete automatic mode. If you are happy letting the camera make most of the decisions, put the camera on auto and snap away.

The camera’s functions – and there are a lot of them packed into the camera – are all accessed through menus from the large screen on the back of the camera. If you are comfortable sorting through digital menus to find the settings you need, than this camera is for you. It only took me about a half hour of playing with the camera to get a good feel for where the various modes and features were hiding, but when I needed to find burst mode quickly, I struggled to find it buried in the menus.
Who should own the Canon Powershot 500 Elph?
Anyone looking for a high quality, pocketable point-and-shoot camera and are not put off by sorting through digital menus rather than using old-school dials, will enjoy this camera. If you are looking for a camera that pushes you to be more creative then you will love the camera’s extensive filter capabilities from Black & White images to vivid, toy camera effects, portrait and even a foliage feature that brings out the best in greens and fall colours.
What more could you ask for?

The vivid feature in the camera results in nice punchy colours reminiscent Fuji’s Velvia slide film.
Can’t find a good used Elph, here are some new and used alternatives
If you like what is possible with a good point-and-shoot camera, but can’t find a good used version of the Canon PowerShot Elph 500 HS, here are a few recommendations you might want to consider.
Around the same time as the Elph 500 was released, Canon released the Powershot S100. Almost instantly, the camera took on a cult following and was considered by many to be the pro photographer’s backup Point-and-shoot camera.
This was also released in 2011 and sported a 12.1 megapixel sensor, a slightly longer 5x telephoto lens ranging from 24mm up to 120mm, a better performing sensor similar to the one used in its EOS SLRs including an on-chip noise cancellation system, and microlenses that improve its light-gathering characteristics. At the time, Canon said the improved sensor results in reduced noise and increased dynamic range; improving the the maximum available ISO to 6400.
The camera is elegant wrapped in its black case and it relies much more on a host of buttons and wheels for photographers who like the old-school approach to photography. A lot of these cameras were sold so finding one used should not be that difficult. Expect to pay a premium for this fine photographic tool.
If you are looking for a good deal on a Canon camera, consider checking out the company’s refurbished models on their website.
Here is a complete review of the Canon S100, from dpreview.
Other cameras on the high end include the Fujifilm X10, (link to my earlier review) released around the same time and also sporting a 12 megapixel sensor.
In addition, here are links to earlier Photography articles you may be interested in reading
• Macro Photography in the garden
• Ten tips for great garden photography
New compact point-and-shoot cameras to consider
Fujifilm X100V (Amazon link) (Henry’s link) that looks much like the X10 and handles like a Leica rangefinder.
Olympus Tough TG-6 (Adorama Link)for those who want to take their camera underwater for some real cool shots. Known for its excellent macro capabilities. Amazon Link.
Sony Cyber-shot (Adorama link) DSC-RX100 Vll for those who like the Sony brand Amazon link.
Ricoh GR lllx (Adorama link)for those who like to shoot with a prime lens. Amazon link
Canon Powershot G7 X Mark lll (Adorama link) (Henry’s link)for those looking for a high-end point and shoot that both fits in your pocket but carries a large 1-inch sensor, a fast zoom lens and 4K video at a price under $1000. Amazon link

Macro photography: How to get up close for flower and insect photos
Garden macro photography can open up a whole new world and getting good images have never been easier. Here are some tips on capturing more intimate scenes, from flower closeups to butterflies and other insects that call your garden home.

This image of Aphids on a milkweed plant is a fascinating study in nature. If you look close you can see ants “farming” the aphids while two lady bugs wait in the wings to devour the aphids. These are the fascinating images that macro photography offers photographers.
You don’t need expensive equipment to get great garden and flower close-up shots
Getting up close and personal to flowers and insects in the garden can be an eye opening experience.
Even on the worst of days, when the flowers look spent, the trees are tired and the unbearable heat saps the energy out of any hopes of capturing a beautiful image, there is always macro or closeup photography.
Somewhere out there in the garden – probably very close by – is an insect, a butterfly, a tiny flower, maybe a mushroom just begging to be photographed. And, depending on your expectations, capturing these images is not really difficult. Close-up images are available with almost every camera including more inexpensive compact, point-and-shoot cameras. If you have never used the closeup/macro mode, I encourage you to give it a try.
Closeup photography will open an entire new world to you that maybe you never knew even existed in your garden. The impressive colours in a beetle, the incredible detail of the wings on the butterfly, the daily life-and-death-struggle that largely goes unnoticed in the garden – all open up to us as we move in close.
For more on photographing flowers in your garden, check out my comprehensive post on flower photography in your garden.
For more on garden photography, be sure to check out my Ten tips for Great Garden Photography.
If you are looking to purchase a new or used camera, Check out my article on The Best Camera and Lens for garden photography.
If you are looking to upgrade your equipment, be sure to check out KEH Camera Exchange for excellent prices on used gear. You can also trade in your old gear to help you purchase new gear.
And, if you are wondering how a point-and-shoot digital camera that’s more than 10 years old can perform in the garden, be sure to check out my post on the Canon PowerShot Elph 500 HS.
If most of your garden images are pictorial approaches showing wide vistas of flower beds probably taken with a wide angle lens, or, even more intimate vignettes of groupings of flowers and maybe a birdbath, you owe it to yourself to experiment with macro or closeup photography.
Macro/closeup photography enables you to tell a whole new story in your garden. If you think there are no more images to be taken in the garden, think again.
If you are looking for more information on taking closeup or macro images in the garden, be sure to check out Kelbyone’s many online photography courses.

This native Bumble Bee on salvia was photographed with a manual focus 105mm macro lens on a 20-year-old DSLR camera with a flash equipped with a small, inexpensive flash mini softbox.
The image of aphids and ladybugs on the milkweed is a perfect example of the everyday struggle in our gardens that is easy to overlook. I was on my hands and knees trying to find a monarch caterpillar to photograph when I saw the scene playing out under the leaves of the milkweed. The scene would have gone completely unnoticed if I was not looking for close-up images down low in the garden.
What equipment is needed to shoot garden macro photography
Don’t get confused by the terms macro or closeup photography. Macro technically means getting so close that you photograph your subject at lifesize or 1:1. Closeup photography is simply getting in close enough to your subject to create an image that satisfies you. For example, neither a monarch butterfly, nor a large dahlia, need to be shot at life size for an effective closeup image.
For true macro, a specialized lens or accessories are needed. Most of today’s compact cameras come equipped with a closeup setting that allows you to photograph flowers, butterflies and insects up close.

A macro lens shot wide open probably at f2.8 creates this lovely soft background in this flower photography image. This effect would be difficult to achieve with a compact lens set on close focus.
In the image of the ladybugs and aphids, it certainly helped that I had my macro setup with me that included a DSLR, a manual focus 105mm manual focus macro lens and a flash equipped with a mini-softbox attached to soften the light. Although I consider this setup my more “serious” macro setup, the DSLR is 20 years old, the lens is at least 22 years old and even the flash is an older model. I shoot it all on manual – manual exposure, manual focus. Nothing fancy here.

This is an example of the images that are possible with a high-end point-and-shoot on macro mode. This Bee balm was photographed using the FujiX10 compact camera with a 28mm-110mm (in 35mm terms). Notice the soft background that is made possible by the speed of this outstanding lens.
Garden photographers may not want to invest in a more “serious” macro setup like this. No problem. Chances are you already have a perfectly useable closeup or macro lens on your compact point-and-shoot, travel, or bridge camera. Even your smartphone has the capability of getting up close to most subjects you will want to photograph.
Check out this link for my ten-year-review of the Fujifilm X10 that I used to take the Bee balm image above.
If you are looking to upgrade your camera equipment, be sure to check out the excellent equipment at KEH Camera Exchange. You can also trade in your gear to make the upgrade even less expensive.
The important factor is getting comfortable with using these features on your camera and learning to work with light to capture interesting images. Macro photography is no different than any other types of photography in that light is the key component to capturing interesting images. Harsh, mid-day light may not be the best time to photograph.

This Iris was again shot with a 100mm macro lens to give an extreme closeup. The size of the flower means it could have been photographed with many close focusing compact cameras possibly equipped with a closeup filter accessory.
Digital has changed the world of macro photography
If you are like me and struggled to obtain usable macro images during the film years, you might be surprised how digital has completely changed the approach to macro or closeup photography.
In my film years, I would not have thought of shooting closeup or macro images without the use of a tripod. The combination of wind blowing the subject around and film sporting ISO settings of 25 (Kodachrome), 50 (Velvia), made getting good macro images a real challenge.
Impossible without a tripod.

A monarch feeds on a thistle in late summer. Capturing these images takes time and patience but are beautiful natural snapshots in time.
Today’s modern cameras allow you to pump up the ISO to astronomical levels and still get excellent results without lugging around a tripod.
In fact, if you are shooting with a Fuji camera, you can shoot the digital equivalent of Fuji Velvia at pretty much any ISO you like. Even “Kodachrome”, which Fuji calls classic chrome, can be photographed at pretty much any ISO you like. That’s a far cry from using the ridiculously low ISO settings of ISO 50-64 for the original slide films.
ISO levels of between 1600-3200 would be unthinkable during the Kodachrome and Fujichrome years. Today, these ISO levels can be starting points for many of today’s modern cameras, especially if you use software like On1 NoNoise to reduce the noise in your images.
I like to stay below ISO 1000, but shoot as low as 200 ISO if given the opportunity and when I use flash.
What does all this mean to the garden photographer?
It means you can grab your compact camera, set it on closeup mode and get excellent hand-held images of a butterfly, or a closeup of your favourite flower in full bloom.
With a little more planning, you can set up a tripod beside your favourite flower, move in close and wait for a butterfly or insect to come land on it.

In this macro image you can see the extremely limited depth of field resulting from using the lens wide open (f2.8) with only the eyes being in focus. Today’s modern cameras offer “focus-stacking” which allows the maker to take several images focusing in different areas of the subject and then blending them together to make the entire subject tack sharp.
Modern technology has even made firing the camera from a distance with a wireless remote a whole lot easier. Heck, with some cameras, (a Lumix for example) you can even trigger it with an app on your cell phone while you’re sipping on a glass of wine or your morning coffee 10 feet away from the camera.
Times have certainly changed for today’s photographers wanting to add macro or closeup photography to their arsenal. All we gardeners need to do is take advantage of what today’s modern cameras and lenses offer us.
What accessories are good for garden macro photography?
As noted above, excellent macro images can be taken on anything from a good compact point-and-shoot camera with its built-in lens, to a modern high-end DSLR or mirrorless camera equipped with an expensive macro lens that enables extremely fine detail and close approach.
The quality of the image and your success rate will generally increase in direct proportion to the amount of money you invest in the equipment, but don’t let that stop you from getting the most out of the equipment you already have in your bag.
There are, however, accessories you can add to improve your results significantly no matter what equipment you are using.
• A good off-camera flash, for example, goes a long way to opening up possibilities in the macro world. I’ve added an attachment from Fotodiox that goes over the flash to create a mini soft box. This combination has certainly improved my macro images.
• Small LED lights, like this one from B&H Photo are another example of how technology has changed the world of macro photography. These small, battery powered lights that fit in the palm of your hand, provides a continuous light source that is easily manipulated around the subject even as you are looking through the camera.
• Similar to the LED lights mentioned above, is the Godox RING48 Macro Ring LED Light that fits around most lenses a provides perfect, but controllable light.
• Collapsible reflectors, like these from B&H photo, are available in gold, silver and white, and allow you to reflect light into dark areas of the image.
• Closeup lenses, like this kit made by Lensbaby at B&H Photo that thread on to the front of your lens are an easy way to turn any lens into a close focusing lens. I like to use one of these on the Fujifilm X10 which, although the camera already has an excellent close-focusing capability, only gets better with the Nikon close-up filter.
• Extension tubes can only be used on cameras with interchangeable lenses. Extension tubes like these at Adorama photography have no glass elements inside of them, are inexpensive and do not degrade image quality. Their prime duty is to allow any lens to focus more closely. That makes them a useful addition whether you are using a 50mm or a longer telephoto lens. Using them with a telephoto lens is exceptionally helpful to allow you to get images of small subjects from a distance.
An up close macro image of this native bloodroot provides details that easily go unnoticed by the naked eye.
Just get out in the garden and give macro a try
There was a time when macro was a specialized area of photography. It involved expensive lenses and approaches that required meticulous attention to detail and exposure. That’s no longer the case. Getting great shots of your garden up close has never been easier with today’s modern cameras and accessories.
Take a few mornings to wander through the garden and catch the light skipping across your favourite flowers. Move in on the insect waiting for the sun to raise the temperature enough for it to begin its day.
Focus on what you want to capture up close in your garden and consider adding accessories that make it possible to capture those images. Close-up photography can open up a new world for you and hep you become much more intimate with your garden and the critters who call it home.

Trail camera turns garden photography into backyard safari
The Wingscapes BirdCam Pro is a unique Trail Camera that allows extremely close focus to capture birds and mammals at feeders, birdbaths, bird houses and in the garden. Trail cameras, originally designed for hunters, are now becoming popular for homeowners and gardeners wanting to document the wildlife in their backyards.
Wingscape models capture birds and mammals up close
It’s like a baby cam but instead of keeping an eye and ear out for a little one, it watches over your backyard for wildlife wandering through your garden.
For anyone who wants to know what is passing through or hanging out in their backyard night and day, one of the popular trail cameras is essential.
Trail cameras for home security and to document backyard wildlife
Woodland/wildlife gardeners may not know too much about these popular cameras, originally designed to allow hunters to document the wildlife using a particular trail out in the field.
While they continue to be a tool for hunters, more and more the cameras are finding their way into backyards not only to document the wildlife that are using the yard throughout the day and, especially, throughout the night, but also to act as a security camera to capture any potential security threats in the backyard.
Place one on your deck, for example, for security and to monitor wildlife. Realize, however, unless they are secured, they can be stolen or the digital cards removed by knowledgeable thieves. They will also put out light to capture images and video. Animals are not bothered by the lights but humans will notice it.
(If you are interested in exploring garden photography at a higher level, be sure to check out my comprehensive post on the Best camera and lens for Garden Photography.)

The benefit of the Wingscape Bird and Trail camera (pictured above) is that you can get up close and personal with backyard wildlife.
For more suggestions and some of my favourite garden things, be sure to check out my Favourite Things post.
Quality and features of the cameras and images vary widely, but most capture high-quality images and video both night and day. Some of the higher-end models even send the images to your smart phone to allow you real-time monitoring of the camera.
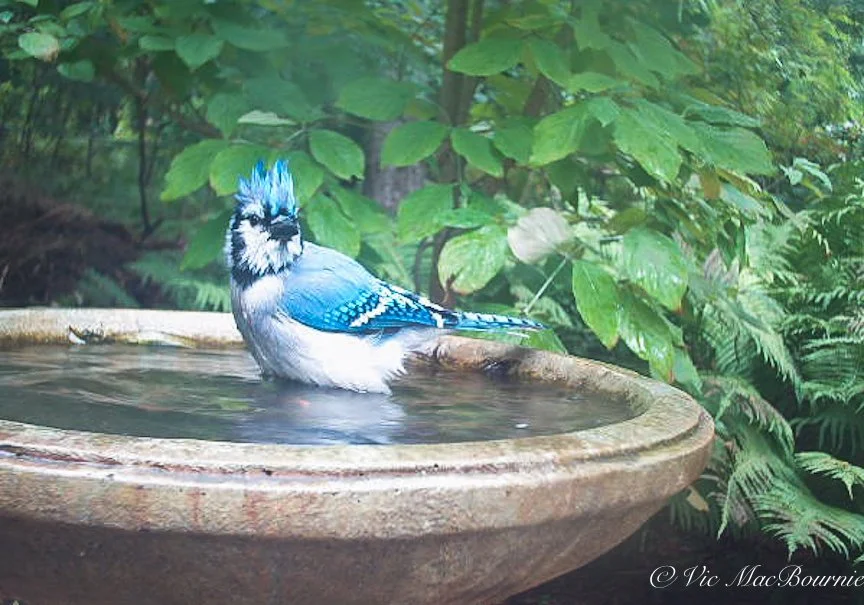
This photo of a Blue Jay at the bird bath was captured by the specialized bird camera. Imagine if it was a more rare bird or even a raptor that visited?
I’m not here to give readers a review of the best and worst trail cameras because I don’t own them all. I will, however, provide readers with some of the better cameras recommended by those who have tested the various models and tell you about my experience with my hybrid trail/bird camera.
Top five trail cameras from Bestreviews.guide
My hope is that this article simply introduces Woodland/wildlife gardeners to the possibilities these cameras offer them.
(I was fortunate enough to purchase a highly specialized trail camera (the Wingscapes BirdCam Pro) designed to capture birds and other wildlife images up close. More on that later in the article.)

Blue Jay at the BirdCam. The trail camera can be set up to show date and time, helpful if you are documenting times that wildlife appear.
Back to the Trail cameras. The cameras, that primarily run off of batteries, are meant to be left out in the field for months on a trail through any type of weather documenting the wildlife in the area. Some are available with supplementary solar power panels to give batteries a longer life, others use solar powered batteries to keep them going in the field for months. Most come with straps and other methods of attaching them to trees. They also have tripod attachments that enable the cameras to be used with a tripod or device that uses tripod-style attachments.
Woodland/wildlife gardeners can mount them to a tree, a pole or just place them on a tripod and move them around the yard to capture the fox, the skunk maybe the coyote or deer that you suspect are wandering through your yard while you sleep. Unlike hunters who have to worry about the expensive cameras possibly being stolen or damaged out in the field, gardeners can leave the camera out without any real fears of the camera being stolen or damaged.
If you are lucky enough to have a den in the yard, set the camera up near the den to document the life of your new little neighbours. Maybe you will be lucky enough to capture the babies as they emerge into the world and discover your garden.
The possibilities are endless.

The BirdCam is perfect to use at an outdoor photo studio that is specifically set up to photograph wildlife. Here a red squirrel is photographed up close and personal.
If you are still curious about what these trail cameras are capable of, check out a few of the thousands of Youtube videos that have been put up from all corners of the earth. My favourites are videos documenting wildlife in national parks ranging from the Florida Everglades to videos from Algonquin Park in Northern Ontario, Canada. Here is a good one from a small watering hole in Arizona.

This deer was caught on our trail camera in the middle of the night. These cameras are a great way to monitor what animals are roaming your property at night.
A few months ago I decided I needed a trailcam after watching our neighbourhood fox regularly wander through the yard. I have seen several deer, racoons and a few possums, but I suspected we probably had more wildlife visitors than I realized, including the odd coyote.

Another image of a wren caught on the BirdCam Pro at the birdbath.
The Wingscapes BirdCam Pro a hybrid trail camera
Regular visits to Kijiji where there are always several used trailcam models of varying quality and price points available, led me to the Wingscapes BirdCam Pro.
Although it can operate as a regular trail camera, the Wingscapes BirdCam Pro has the ability to focus very closely to capture birds and wildlife up close – very close – like 6-inches to infinity.

Trail cameras are a great way to see what animals are roaming your gardens at night. Here, a friendly skunk skitters across the frame in front of the camera. Night images are not always the best but they can be used to verify what animals are in the yard.
The BirdCam Pro is a weatherproof, motion-activated with an 8MP camera that includes an adjustable flash for nighttime photos and videos. It also includes a timelapse setting for recording non-animal subjectslike weather and plants emerging from bud over a period of time. It also features a 2-inch color preview screen and can also send images directly to your computer with an optional Wi-Fi SD card. Here is the bad new, the item is discontinued from Moultrie. The good news is that a later version is still available. (see below).
Traditional Trail cameras are not really designed to capture images or video that close to the camera. Most are simply trying to capture larger wildlife (deer, bears, moose) from a distance of 10-20 feet or more. They do an excellent job capturing these images.
Birdwatching Bliss, another blog site did an extensive comparison between the Wingscapes BirdCam and traditional trail cameras. You can read the full review here.
The Wingscape BirdCam Pro (which is no longer available from Moultrie) has the ability to manually focus the wideangle lens to capture small birds up close, for example, at a feeder or on a birdbath. Although this model is no longer available (I purchased mine from Kijiji used but in an unopened box), another later version, the Time Lapse Pro is still available, at least on Amazon. It may also be available at specialty stores. The Wingscapes TimelapseCam Pro produces 20MP pictures, has a focus range from 6 inches to infinity and a flash range to 25 feet. It also shoots HD video at 1080P with sound.
It’s important to note the the TimelapseCam Pro lacks the motion sensor that enables you to capture birds or animals that move into the scene. The Timelapse model, therefore, is of less value to those hoping to capture images of wildlife. It can be set up near a feeder or bird bath and programmed to take an image every 15 seconds for example. This would leave you with a lot of empty images.
I would recommend looking for a used BirdCam Pro model.
My BirdCam Pro has caught images and video of wildlife and birds in the backyard, including the video of a bluejay at one of my bird baths featured on this page.
I often set it up in the morning at one of my bird baths and let it to its thing for the entire day. Earlier this year I was able to catch a surprising image. I usually have several families of Baltimore Orioles living in and around our garden and visiting regularly, but this year none stayed around past a few days in the spring. I was convinced that none were around until I checked my SD card following a day of shooting at the bird bath.
Sure enough, a young oriole was photographed at the birdbath. It told me that at least they were still around.
In one evening it caught video of two skunks, a racoon and a possum at my woodpile. It’s night video capture is only B&W and not always publishable because of uneven lighting, but it does give you a good indication of the wildlife in your backyard.
Newer trail cameras are more than able to capture high quality video in B&W.
Wingscapes AutoFeeder for the birds
Related to the Wingscapes BirdCam is another interesting tool for bird lovers. The Wingscapes WSBF02-00132 AutoFeeder, is an automatic bird feeder that spills out a set amount of bird feeder at the same time of day. The battery operated digital timer can program up to 4 feed times a day, releasing food from its 1-gallon seed hopper from 1 to 10 seconds each feeding.
In conclusion
Trail cameras have been used for years by hunters and have only recently been discovered by homeowners, gardeners and wildlife lovers as a way to track what lives or passes through their gardens.
Besides the fun of downloading your SD card to see what visited over night, the cameras are a great resource to chart the different animals as well as learn about their movements. As a wildlife photographer, learning that the neighbourhood fox trots through the yard every morning between 6 a.m. and 7a.m and takes a very specific route every day, is incredibly valueable information if I want to photograph it with my high-end camera. The images from the TrailCam can be quite good, but it still won’t compare with a photograph made with a DSLR and a long lens from a photographic blind.
These cameras are great tools but take some getting used to before you are rewarded with good images. Realize that they work when the camera sees movement and therefore can be fooled by foliage blowing in the wind. Don’t expect miracles over night. Work with the camera and experiment with it in different locations, at different times of year and in different situations until you are getting successful images.
Once you master them, you will be rewarded time and time again.
Set the table for great garden photography with backyard wildlife studio
A backyard bird and wildlife studio combining food and water can be a magnet to attract a variety of birds and backyard wildlife and put them in a picturesque setting. Getting great photographs is easy, especially if you add a Tragopan Photographic blind to allow a close approach.
Create your own DIY backyard bird studio
How do you get great garden photography of backyard birds and other wildlife?
Capturing great images of birds and other wildlife begins with welcoming them into your yard by planting a natural landscape using native plants, shrubs and trees whenever possible.
Nothing, however, beats your own backyard wildlife photo studio designed to not only attract your favourite birds and wildlife species, but to put them into an environment conducive to great photography. Simple answer, provide a backyard dinner table where lunch is always being served. And, don’t forget to give your feathered friends and wildlife something to drink to go along with dinner. This need for birds and wildlife to obtain food and drink resulted in my latest backyard project – a combined food table and reflection pond.
My latest project combines a dinner table on one side with a small reflection pond on the other side to bring in the greatest variety of birds and wildlife. This combination makes action at the backyard photo studio hectic with activity at times, especially when you have fiesty red squirrels claiming the entire dinner table to themselves.
The combination allows me to photograph a woodpecker working a tree stump one minute, while a chipmunk gets a drink of water in a reflection pool less than a foot away.
What more can a backyard wildlife photographer ask for in life?

A blue jay visits the photo studio. Shot with a 300mm F4.5
Simple steps to building a compact, portable studio
Neither the wildlife table, nor the reflection pond take up much room. Both are designed to be portable and easily broken down.
The feeding table is nothing more than an old, black Ikea end table that was headed to the thrift store. The reflection pond (see my earlier story on how to build it a DIY reflection pond) is made from a simple rubber boot tray placed on an outdoor end table. Both, of course, are embellished with natural materials.

A red squirrel stops for a drink at the reflection pond.
Even with the two tables set up side-by-side, the whole studio takes up no more than 3-ft by 4-ft and is hidden away in the back of the yard near my bird feeding pole.
By placing the studio near the traditional bird feeding station (See my earlier story here), the wildlife is already familiar and comfortable feeding in the area.
(If you are interested in exploring garden photography at a higher level, be sure to check out my comprehensive post on the Best camera and lens for Garden Photography.)
If I could have only one lens for wildlife and birds in the garden, it would be my F* 300mm F4.5. Check out my full story on the lens by clicking the link.
I situated the wildlife studio so that it receives side lighting during the morning followed by front lighting into the afternoon and evening. I’m lucky to have a large, light grey shed (see my earlier story on the Keter Artisan shed) just a few feet from the studio that acts like a huge light reflector, especially in the morning light. The reflected light from the shed helps to soften the overall light that falls on the backyard studio.
Behind the studio, a small hill provides a natural backdrop of wildflowers and fall colours, but because the tables are only about 18 inches high, adding different background plants in pots is simple. In the past, I have used Northern Sea Oats from another area of the garden as a natural backdrop.
By experimenting with different natural elements either on the table tops or as a backdrop, the photographic combinations and possibilities are endless.

A combination of a feeding station on the left made out of an old Ikea end table is combined with a reflection pond made from a rubber boot tray on the right adds a lot of fun to backyard bird and wildlife photography. The natural materials were all found around the yard and can be replaced regularly to create different photographic possibilities.
Building a backyard studio
Building a backyard wildlife studio can be as simple as putting up a couple of bird feeders near a branch where the birds land on their way to the bird feeders, or as elaborate as designing the tabletop of natural props that allow you to photograph a variety of wildlife in different settings.
A moss-covered tree stump is perfect for hiding a handful of seeds. Add a mossy rock or two and provide a natural perch just above the tabletop to give birds a place to survey the dinner table before dropping down to feed. The natural elements can change regularly to keep the photography exciting and to ensure that not all the images have the same look.
if you are looking to upgrade your photography equipment, be it a new camera or lens, consider checking out KEH Camera Exchange. They offer a huge variety of used lenses and cameras to choose from and, you can trade in your old equipment to further reduce the already great prices.
Add seasonal elements as you find them. Acorns, pinecones, pine needles and colourful fall leaves are just a start. Cut some branches from your best berry-producing shrubs to add colour and a natural food source. I use a clamp that can be hidden to hold the branches in place. It helps to put the stems in a vase or water source to keep them from wilting too quickly.
The reflection pond uses many of the same natural elements and by using a black boot tray, the pond is literally made for you. An inch of water is all that is necessary to create the reflection, but the angle you photograph at plays an important part on how well the reflection works. The camera angle needs to be just above the level of the pond to get the best reflection.
I am experimenting with a small mirror under the water to give maximum reflective properties.
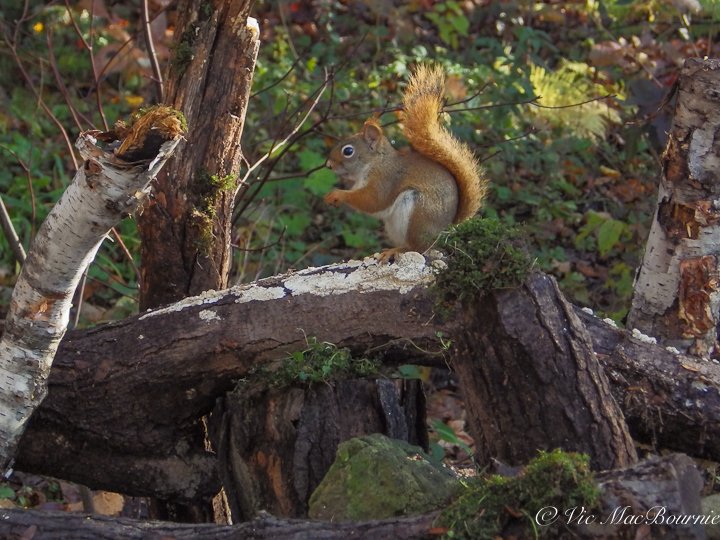
One of our resident red squirrels enjoys seeds set out in the crevices of the old logs that make up the feeding station half of the photo studio.
Tragopan photo blind brings it all together
Adding a Tragopan V6 photographic blind is really the final ingredient to successful bird and wildlife images. It allows a very close approach to both birds and wildlife in the garden, where wildlife is already familiar with human activity.
The photo blind is set up about 10 feet from the photo studio. This close approach lets me use a 300mm lens (420mm equivalent for cropped sensor) for a frame-filling image of birds and small wildlife. A simple 70-200mm lens works nicely as well.
The blind not only provides a certain comfort level for the birds and animals, it also keeps the photographer out of the elements – be it hot sun in summer, or the rain, snow and chilling winds of fall and winter.
By using a photographic blind, the need for expensive photographic lenses to get backyard images is reduced significantly. A consumer brand 70-200mm lens on a DSLR will get you high quality images. Even high quality travel camera (Lumix DSC50) or bridge camera (Pentax K5) which I am using will give you memorable images or video.
No photo blind, no problem
If you don’t have a photo blind you can still get great images, but you are going to have to work a little harder fot them.
Place a chair and a tripod where you want to sit to take your photographs and make it a habit to go out and sit there even if you are not taking pictures. The birds and wildlife will eventually get used to you being around and accept your presence. Even if they accept your presence, you need to move slowly at all times. That’s not always easy when a new bird lands just a few feet in front of you on your favourite perch.
What birds allow a close approach
There is no question that some birds allow a more close approach than others.
These are the birds you can often, with a little patience, encourage to eat right out of your hand.
These are also the birds that you are most likely photograph without the need of a photo blind.
I find chickadees, woodpeckers, nuthatches, blue jays and even Juncos to be quite approachable and accepting of photographers.
Cardinals are more elusive as are other backyard birds like Indigo buntings and, of course, raptors.
To capture images of these birds, a blind is more critical. Even with a blind, these birds can be skittish and fly off with even the slightest motion inside the blind.
In conclusion
A dedicated backyard bird and wildlife photo studio with a photographic blind may not be everyone’s cup of tea, but I guarantee that if you take a few moments to create this feeding station/reflection pond setup, you will be blessed with memorable images in no time.
It’s a great way to spend some time in the garden and put your camera to use on a weekend afternoon.
A word of caution. Don’t leave food on the table over night. Because it is low to the ground and there are no baffles or other deterrents to keep animals from feeding, it could be a magnet for unwanted visitors. I try to only put out enough food for the day. A handful or two of strategically placed food will go a long way and you can always replace it easily if the action at the studio is particularly busy.
My studio is set up right beside the shed and allows me to quickly refill the dinner table as necessary.
Happy shooting and please let me know if you build your own backyard studio. I would love to see some pictures.
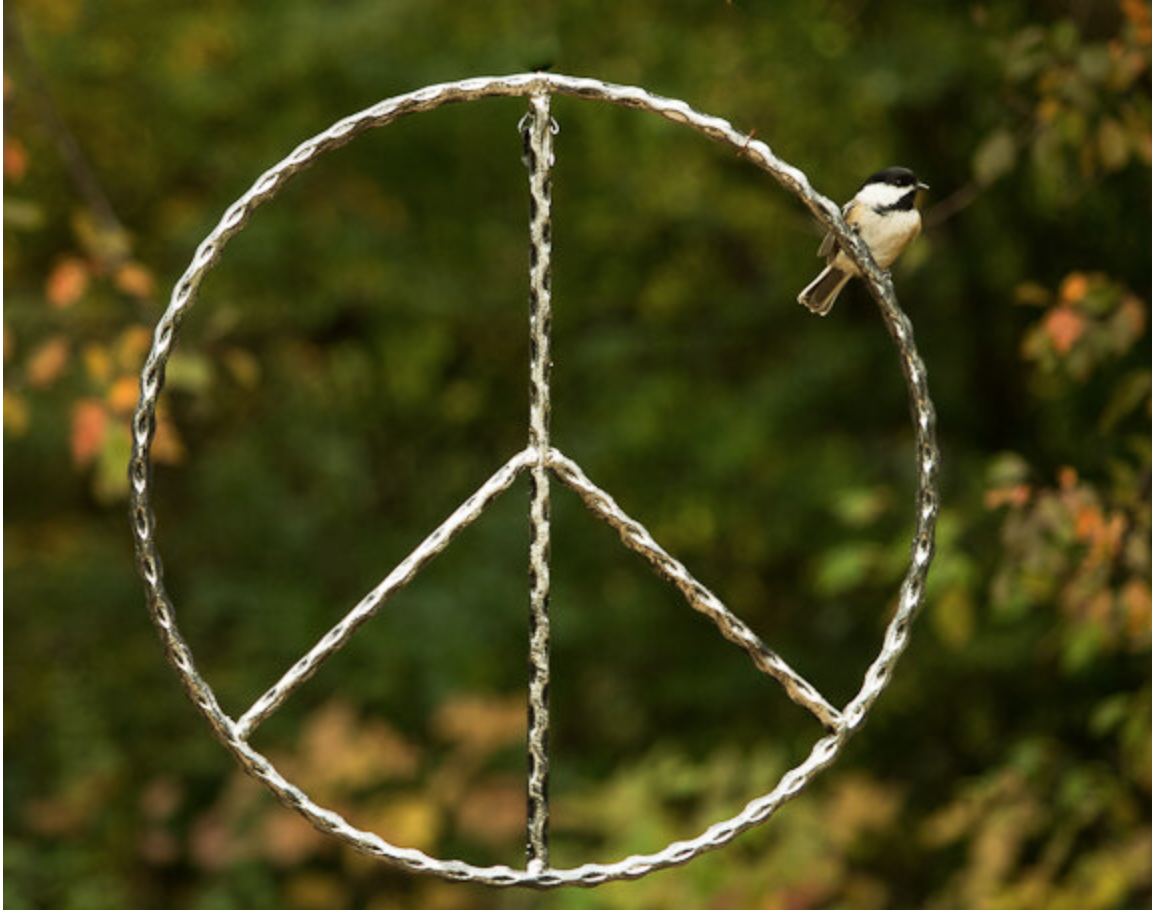
Garden photography: How to use props to photograph backyard birds
Capturing a little peace in the garden isn’t always about flower power. Try adding photographic props for birds to perch on to add a little whimsy to both your garden and your photographs. A peace sign is a “cool” prop that birds flock to like beatniks as free pot party.
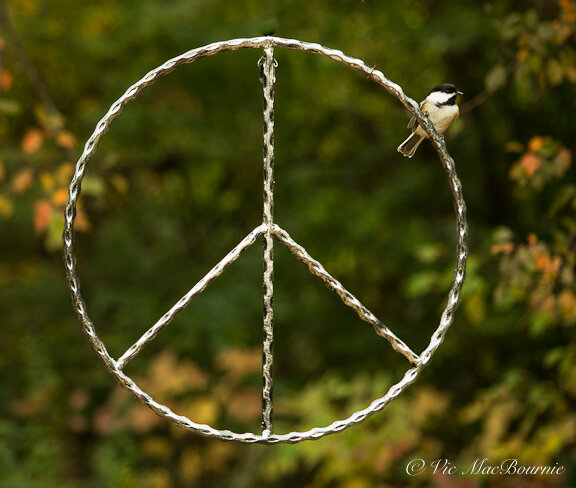
Using garden props for backyard bird photography is a great way to add a little fun and whimsy to your garden photography and with the right props, the results might just “blow your mind.”
Cool peace sign prop for backyard bird photos
Flower power takes a back seat in this garden photography project.
All summer our focus has been on capturing the beauty of garden flowers, but that changes as fall approaches and we begin to focus more on birds and other areas of garden photography.
Fall is the perfect time to add a little fun to our photographic projects and using garden statuary, tools and even props can result in many memorable backyard bird images. While capturing a backyard bird in its natural environment is usually our ultimate goal, no one says we can’t have a little fun and create a backyard photo studio that includes using props much like a professional photographer would use to capture images of children, families and even our pets.
This wanna-be-hippie came up with an idea to combine a love of all things 1960s with a passion for birds, photography and gardening.
So what could be better than a metal peace sign – the “coolest” bird perch ever.
Even the birds are groovin’ it.
“If everyone demanded peace instead of another television set, then there would be peace.”
The peace sign is all part of my search for fun landing spots to photograph backyard birds. By placing props around the garden and near bird feeders, there is no end to the fun photographs available to us. Great bird photographs don’t have to reflect pure nature in our gardens.
If I could have only one lens for wildlife and birds in the garden, it would be my F* 300mm F4.5. Check out my full story on the lens by clicking the link.
Some of the best photographs I’ve seen celebrate the garden experience and welcome our forest friends to enjoy the garden – and its man-made ornaments – along with us.
By moving in close the peace sign is still recognizable but the focus changes to the bird rather than the prop. A soft backyground adds to te simplicity of the image.
So it’s really a small step from photographing them on our existing garden tools, ornaments and patio accoutrements, to setting up fun props to catch them in entertaining poses.
“No one is free, even the birds are chained to the sky.”
The “Peace sign” just seemed too perfect to pass up.
A quick search on Amazon brought up the coolest “Peace sign” – the perfect landing spot for backyard birds waiting for their turn at the bird feeder.
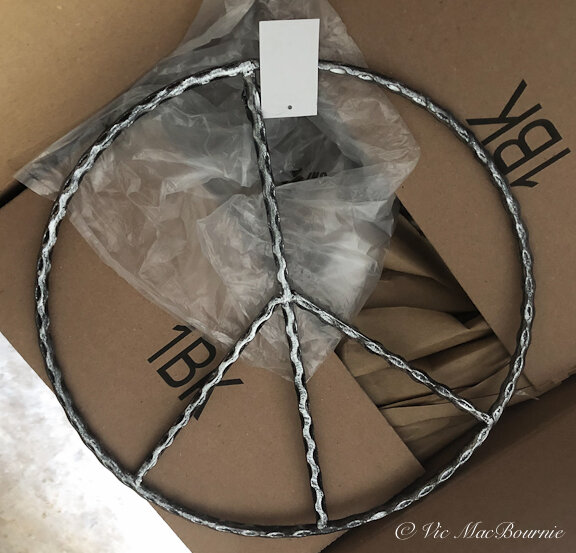
A couple days later and my Peace sign arrived all packed up and ready to become the latest perch for our backyard birds. After wrapping some copper wire around the perch to attach to the bird feeder pole, all that was left to do was to hang it and wait a few days so the birds can get acquainted to their cool new perch.
They took to it like beatniks would to free pot at a poetry reading party.
The peace sign perch is actually just one of many sprinkled throughout the garden.

This image was taken with a Fujifilm X10 equipped with a 28-112mm lens and shows what can be accomplished with a little planning. It helps to gain the trust of the wildlife in your garden. For more on the Fujifilm X10, go to my complete review here.
Setting up perches for an outdoor studio
It helps to keep the perches close to where you normally relax with your coffee and camera.
Eventually, one of our garden critters, whether it’s a backyard bird, chipmunk or friendly red squirrel, will explore the man-made garden perch. By keeping an eye on the spot, and watching how the light plays on the perch, it’s easy to capture it in the best light.
By hiding a handful of sunflower seeds on or near the perch, you can encourage the backyard models to the area much easier.

Most animals in our backyards like to get up high to keep an eye out for potential predators. I mounted this native bee and butterfly house on a pole and it didn’t take long for our local red squirrels to claim it as a lookout.
The simple grey background of the backyard shed helps the subject stand out and certainly does not hide the fact that the image was taken in a backyard. I was lucky enough to be in a photographic blind working the nearby feeder, when I noticed the squirrel watching me from the bee house. Although the Tragopan blind made getting the shot a little easier, these guys are friendly enough to photograph without a blind.
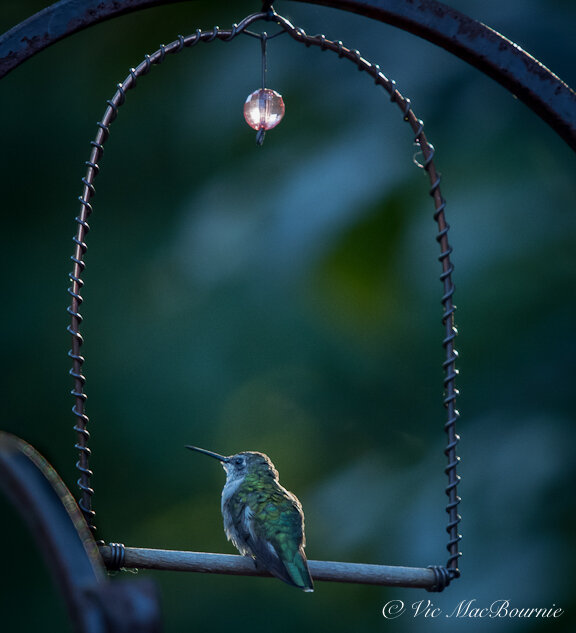
Focus on hummingbirds: Swinging in style
One of my favourite photography props is our elegant little hummingbird perch, a favourite spot for the local hummers to hang out.
I mount it just a few inches above a feeder where they like to perch and defend their food source.
Knowing that morning light creates a nice backlit situation made catching this rim light on the hummingbird as simple as setting up the tripod over several mornings until the bird landed in the perfect spot with just the right light.
If you are looking to upgrade your photography, consider checking out KEH Camera Exchange for excellent deals in used camera equipment from the latest camera bodies to a wide assortment of lenses.
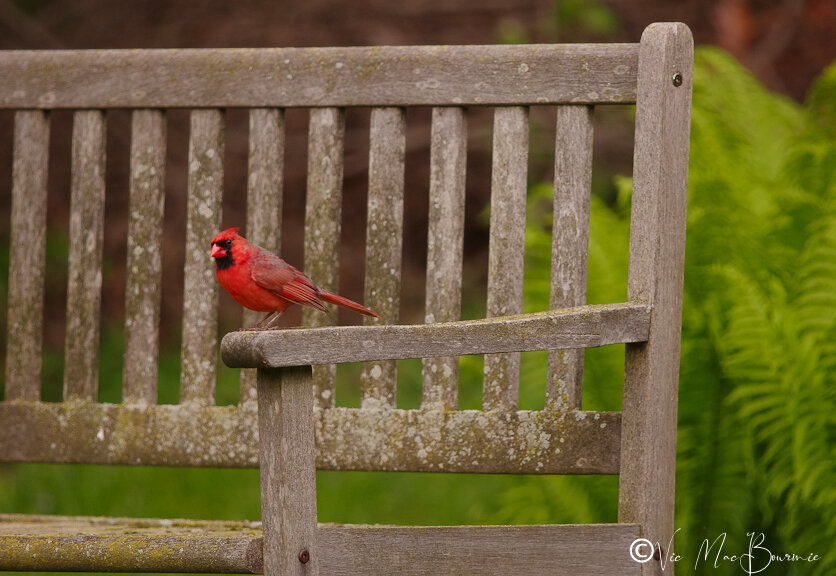
This Cardinal gives our garden bench the perfect pop of colour. There’s no need to move in close in this case, better to show the bird in its environment.
The garden bench makes the perfect prop
A garden bench is another excellent perch for backyard birds. Waiting for the male cardinal to get into the perfect spot took some patience but the pop of colour on the aged wooden bench makes for a classic garden photograph.
I decided it was best to stay back and not move in too close in this instance. Photographers often try to move in too close to birds, when a more environmental portrait actually works better.
In the image below, a closer approach seemed appropriate to catch the Chipmunk in the lovely evening light on the edge of the bench. The close approach was, at least in part, thanks to working from within my Tragopan Photographic blind. (For more on using the blind for backyard photography, check out my full report here.)

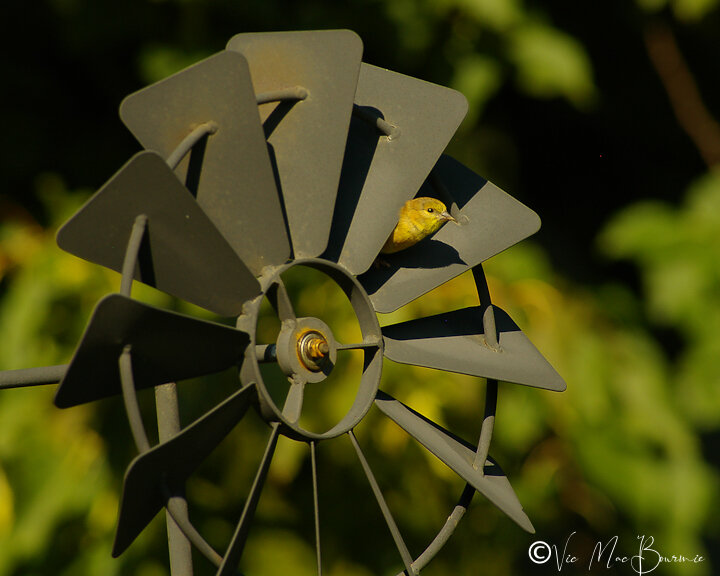
Goldfinch on windmill.
Catching the critical moment
It pays to have your camera by your side at all times in the garden. This little goldfinch was having a terrific time on the garden windmill. I was lucky enough to capture the image just when it popped its head out to have a look around.
Seconds later it was off to explore another part of the garden.
Chipmunk takes a quick break on garden ornament.
We’re are blessed in our yard with an abundance of curious chipmunks who never fail to amuse. This little guy was caught eating his lunch while I enjoyed a glass of wine on the nearby patio.