

Garden Inspiration: Exploring the gardens of Niagara On The Lake
Throughout Canada, the United States and Europe there are special cities, towns and neighbourhoods dedicated to beautiful gardens. Niagara-on-the-Lake is one of those inspirational towns.

Alliums are a popular choice for the gardeners of Niagara On The Lake. Hear a lucky situation with the alliums protruding from the fence into the public sidewalk. A Lensbaby lens helped provide a dreamy look to the image.
Lensbaby optics add a romantic flavour to garden images
There are cities and towns all over Canada, the United States and especially Europe worth exploring just for their gardens. Even within large cities, there are neighbourhoods that offer the same inspiration in just a few square blocks.
One of these places, located not too far from where I live, is the small tourist town of Niagara-on-the-Lake. Not to be confused with nearby tourist Mecca Niagara Falls that has its own lovely public parks, but offers nothing near the private gardens of Niagara-on-the Lake.
Walking the residential areas just off the main commercial street has probably been one of my main inspirational points of my garden life. For years, my wife and I have visited this little gem where the Niagara River meets Lake Ontario, My wife tours the little quaint shops on main street while I take my camera and explore the garden scene.
Both are actually quite sensational – quaint with a serious spoonful of sophistication that is often missing in many neighbourhoods where money and the size of the house takes precedence over the gardens.
Here, it’s almost as if the gardens take centre stage around equally beautifully historic homes.

This soft, romantic image was taken with a Lensbaby Composer creating the dreamy effect and capturing the mood of the scene. Touring public or private gardens provides the ideal opportunity to practise creative photographic techniques.
Mackinac Island in Michigan is another community that comes to mind where gardeners can go to be truly inspired. I’m sure readers know more places of inspiration. Please leave a comment telling readers what your inspirational garden cities, towns or neighbourhoods are in the comment section at the bottom of the page.
It’s here, in Niagara-on-the-Lake, where I got the idea that driveways don’t have to be asphalt or concrete. A simple crushed red stone is not only acceptable but preferred for even the most sophisticated of homes.
It was here where I fell in love with Japanese Forest Grass after seeing it used in large clumps to welcome visitors in the front yard of an elegant home.
It was here, in neighbourhoods dominated by large trees, that I realized woodland gardens can take on a sophisticated look with trees and plants growing up through the ground cover.
And, it was here where I realized that garden art can take the form of a gorgeous bubbling rock, a simple garden swing or a natural moss-covered boulder greeting visitors.

A beautiful bench provides a little nostalgia to the garden especially when it is taken with a Lensbaby lens, giving it a soft, romantic look.
Although a visit to Victoria B.C. introduced me to the glory of Japanese Maples, it was their exquisite use in the landscape as understory trees in Niagara-on-the-Lake that inspired me to use many of them in our woodland garden.
It’s hard to believe that most of these gardens – many of them tied to elegant bed-and-breakfast facilities – were not designed and maintained by professionals. But, unlike many professionally landscaped homes in areas where I live, these have a sophisticated aesthetic that gives the impression that the gardens were lovingly installed over the years by the owners themselves.
On this afternoon, I chose to photograph the gardens primarily using a Lensbaby optic to give the images a soft, romantic appearance that seems to match the feeling the gardens present to the public.
The homes themselves, even newly built homes, have that same sophisticated look.

Red flowers complement the beautiful red door photographed with a Lensbaby lens to create the dreamy look.
On this visit, I was particularly drawn to the extensive use of alliums in many of the gardens. (See top photo) The balls of purple and white add architectural interest to the gardens and seem to fit naturally into the landscapes, often dripping out between stylish fences into the more public areas.
They certainly are stealing the show during the month of May when many gardens in my area are just beginning to wake up.
The moderating affect of Lake Ontario gives Niagara-on-the-Lake a slightly earlier start to gardening season and probably allows gardeners to push the boundaries of what they can successfully grow in the area.
Obviously known for their grapes and fine Ontario wines, Niagara-on-the-Lake’s real gem and maybe best kept secret isn’t the wine, fine dining, the Shaw Festival and elegant Inns, it just may be the gardens and gardeners that make this little tourist town so special.
If you are in the area this summer, make sure to drop by for a glass of wine and a self-guided walking tour of the glorious gardens.

Romantic porches, mature trees and white picket fences combine for a romantic image. The creative effects of the Lensbaby Composer and 50mm double glass lens adds a romantic look to the image.
Get creative with your garden photography
Photographing beautiful gardens and capturing inspirational garden vignettes is an excellent way to collect ideas for our own gardens.
It’s also an opportunity to get creative and try to capture the feeling that inspired you to stop and take the picture. Maybe it was the romanticism of the wisteria vine over the arbour, or the white picket fence covered in delicate white flowers.
Maybe the garden swing hanging from the tree branch brought back nostalgic moments of when you were a child.
does that clematis growing over the arbour, or the chair on the large front porch remin you of mornings at your grandparents?
On my most recent visit to Niagara-on-the-Lake, I used a Lensbaby Composer and 50mm double glass optic to capture many of the garden scenes. The soft, selective focus qualities of the Lensbaby lenses provide the perfect effects to capture the romantic garden scenes I came across on my short walk.
For more on Lensbaby optics and effects, check out my post on Lensbaby flower photography here.
All of the images were shot with the original Lensbaby Composer and 50mm double glass optic using the F4 disc on an Olympus micro 4/3 camera. I only mention the specific F-stop because the it has a major influence on the selective softness of the images.
Below are a few more images of the gardens taken with the Lensbaby. If you are looking for creative inspiration for your flower and garden photography, why not take a look at the American-based Lensbaby line of lenses and accessories?

White flowers cover this picket fence creating a truly romantic scene made even more special by the creative properties of a Lensbaby Composer and 50mm double glass lens.

A massive art installation inspired by nature works perfectly in this front yard.

The pastel colours make the perfect backdrop for garden containers and the perfect place to sit out overlooking the garden.
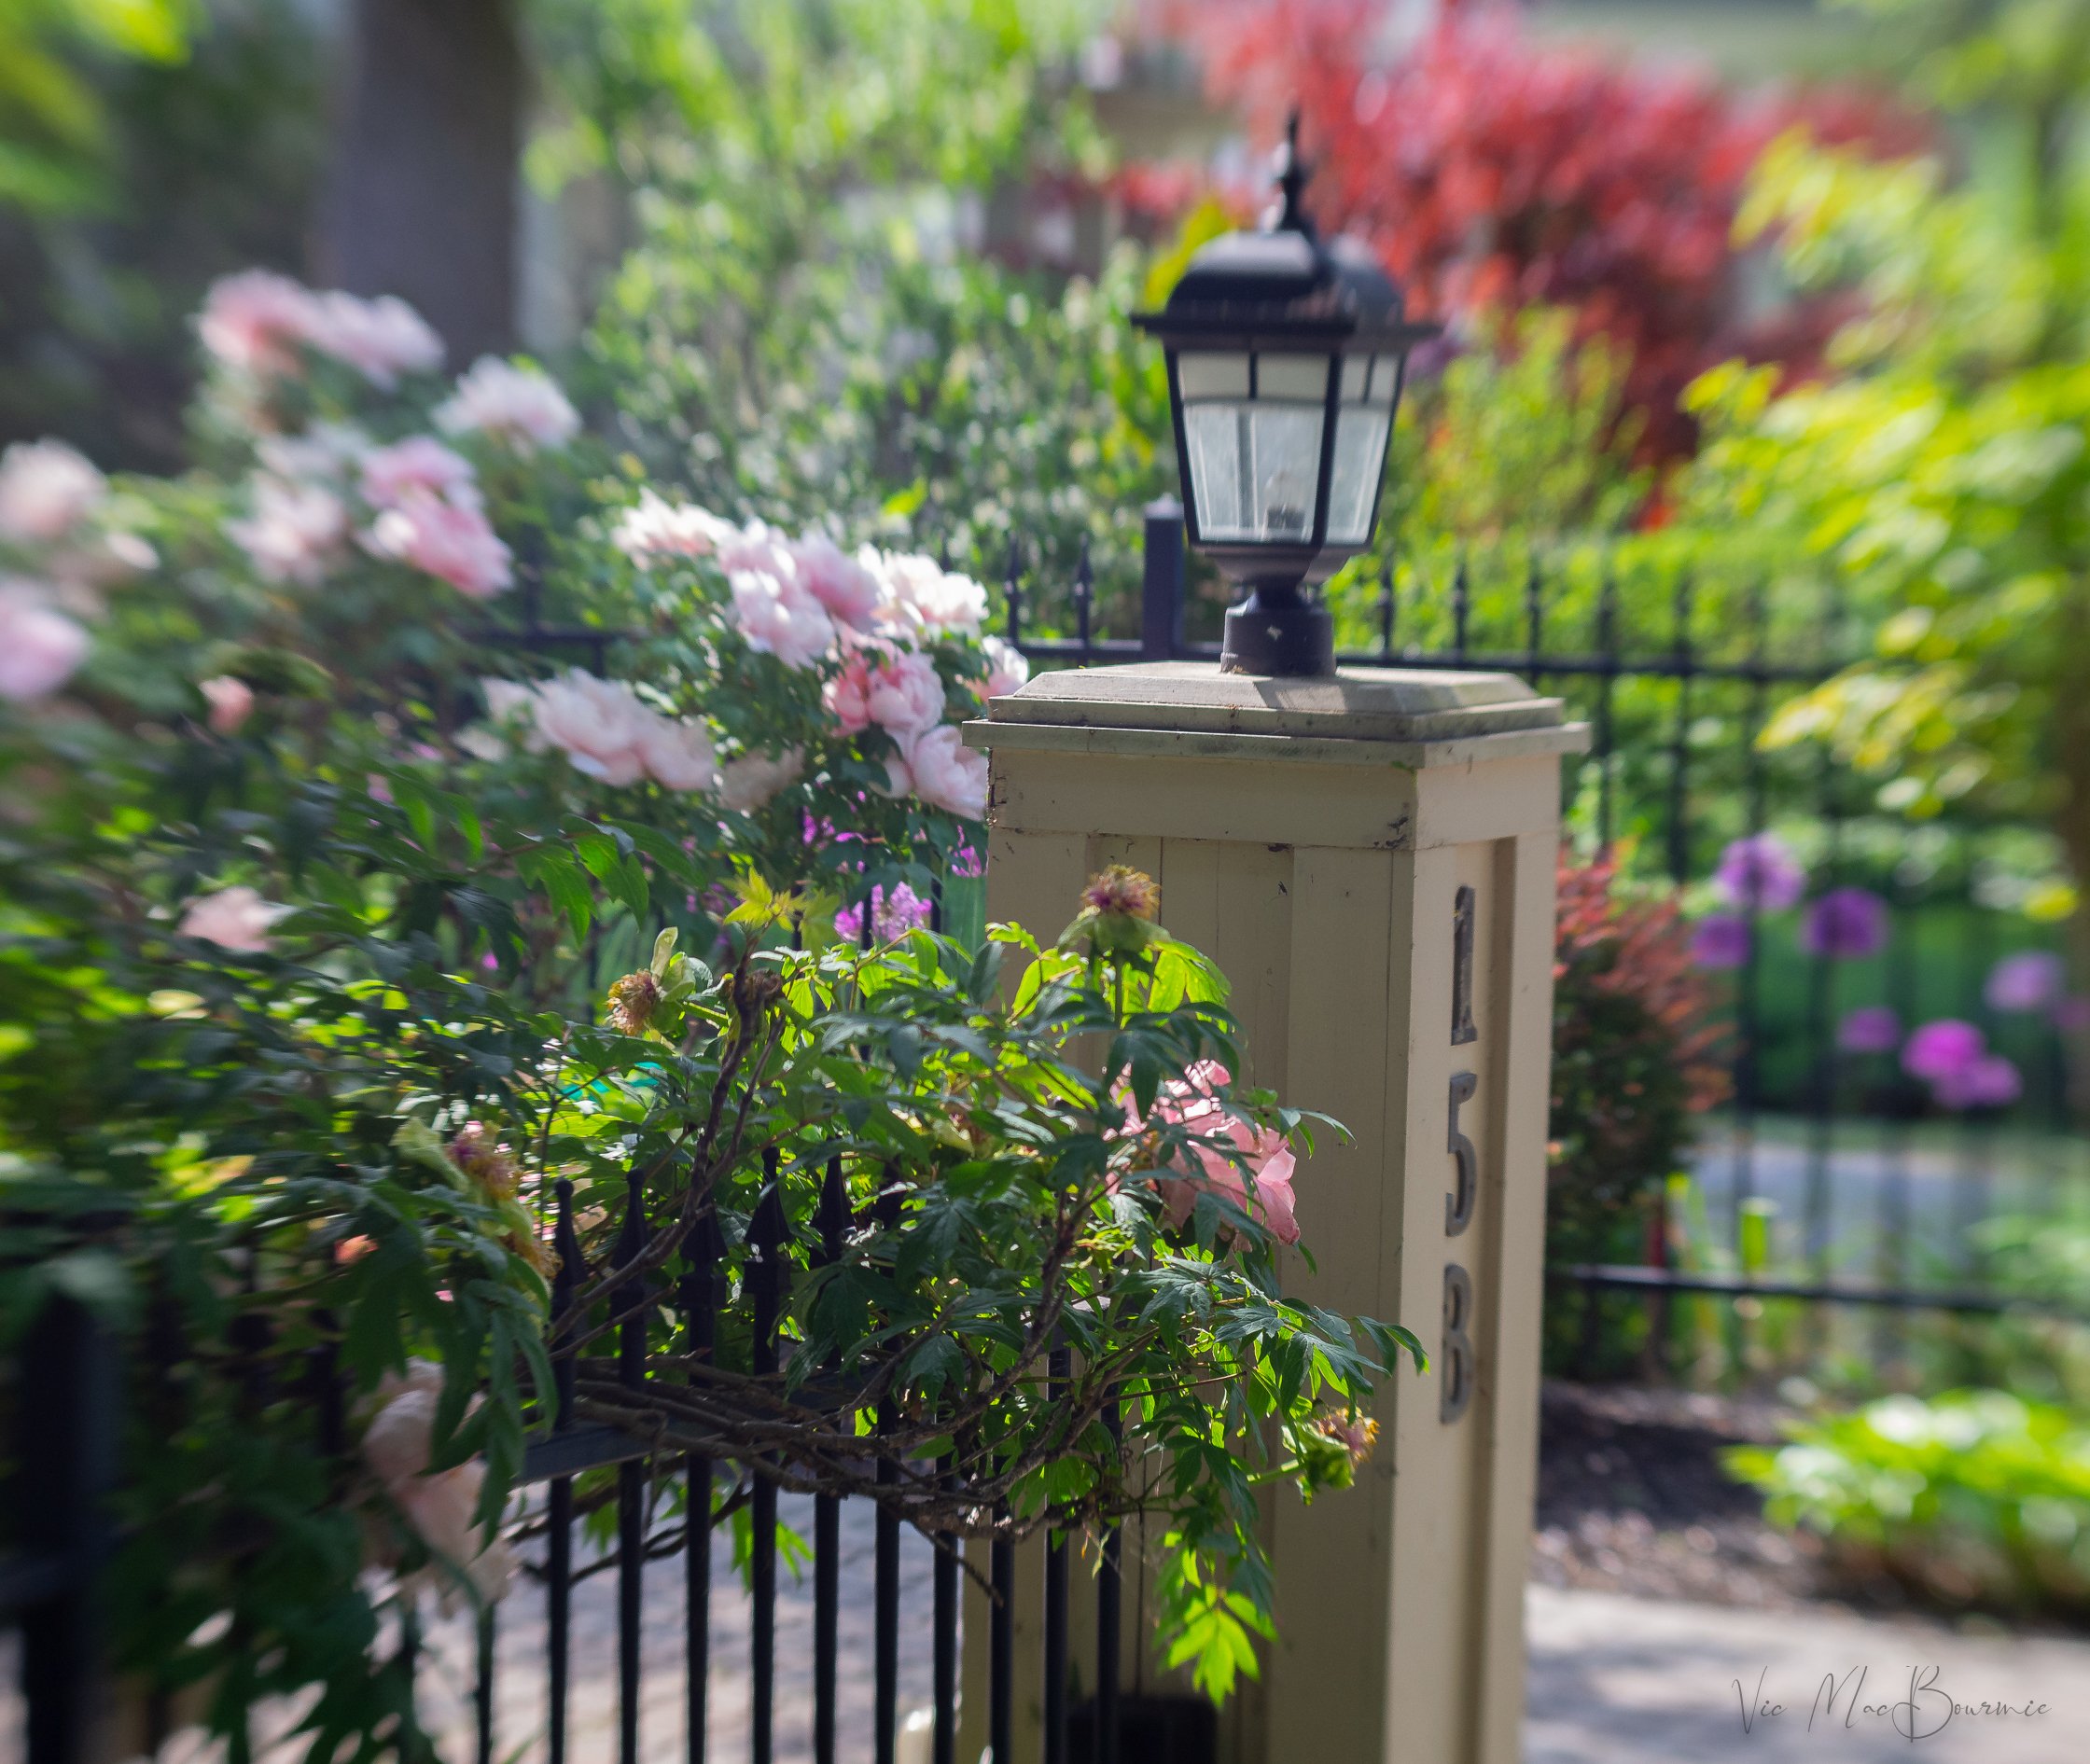
Soft pink roses surround a lamp post leading into the garden.

Allium is a popular choice among the gardeners in Niagara-on-the-Lake.

Front and backyard landscaping with rocks, gravel and mulch
Rocks, whether they are massive boulders, smaller rocks, river rock or pea gravel, all have their place in a natural woodland garden. Placing them properly can be tricky. Here are some tips to help gardeners feel confident using them as a landscape feature.
Look to nature to create a natural, rockin’ landscape

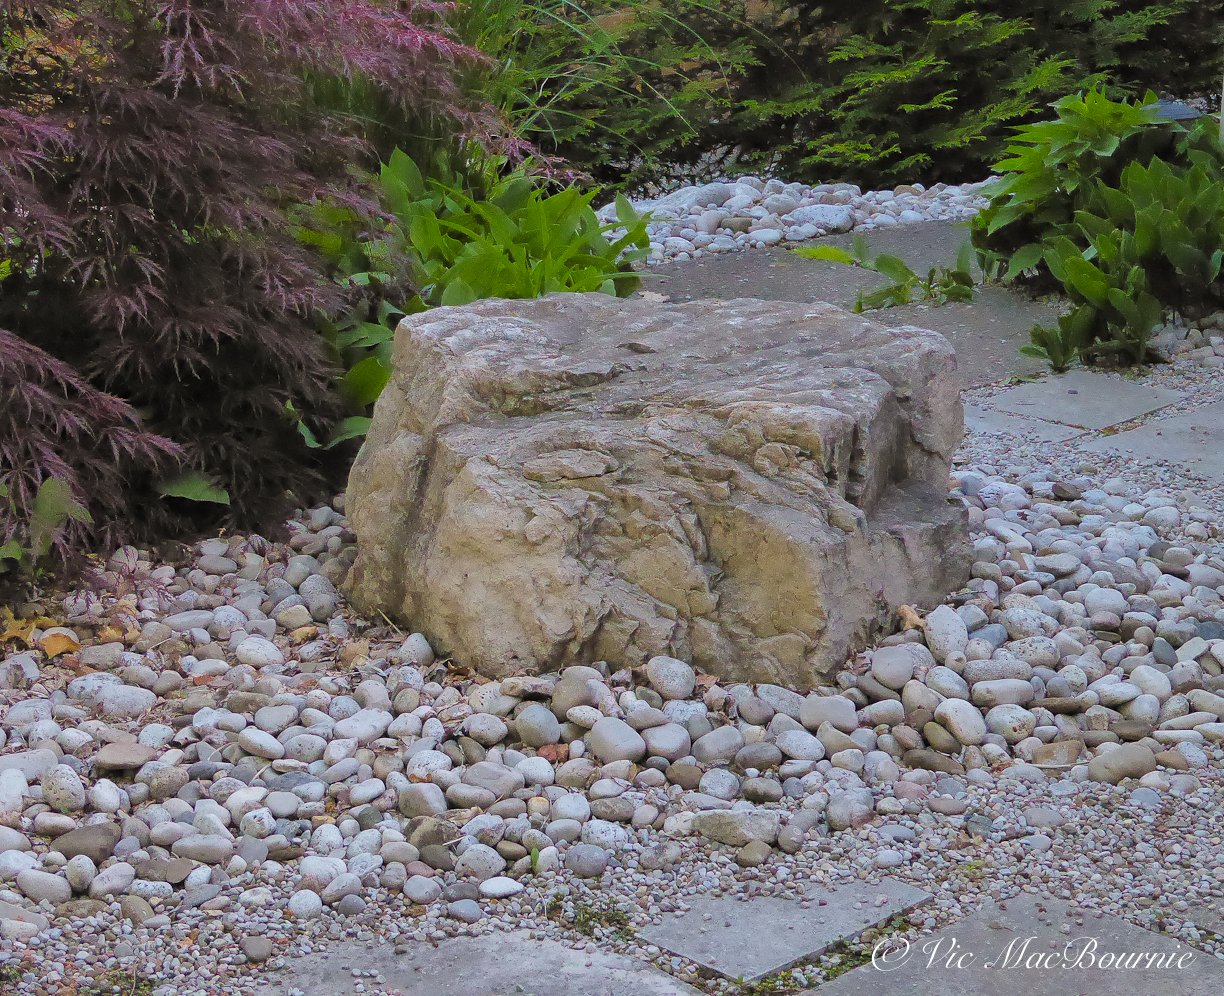
This large boulder creates a beautiful backdrop for fall’s stunning colour. It sits in our Japanese-inspired garden along with several other large boulders, pea gravel and large river rock.
There is nothing like a moss-covered rock placed perfectly in a garden to create a natural focal point.
But take that same moss-covered rock and place it improperly in the garden and it quickly creates an unnatural look that suggests the gardener or landscaper was decorating with stone rather than using it to create a natural feeling in the garden.
Decorating with stone is the single biggest mistake gardeners and landscapers make when using boulders, rocks and stone in the landscape. If your goal is to create a natural-looking garden, try not to get caught in the decorating mode.

An example from my garden on how not to place a rock. Notice that it is sitting on top of the mulch (Chipmunks have appeared to even have burrowed under it). In addition, the rock is standing on its end in an attempt to maximize its size. Much better to let it lie on its side while using it to hold back a little soil. (I have some digging to do.)
Always take your cues from nature. In fact, it never hurts to find some rock moss to grow on the rocks to help with the natural look.
There are many reasons to use rock and stone in the garden: for utility purposes such as a retaining wall to hold back soil; to create garden design elements such as a dry river bed or a natural stone pathway; or as a focal point such as large moss-covered boulders rising out of the ground.
“The job of the natural gardener is to place elements in the garden as nature does. The site of every object in the garden should answer the question “why is that there?” We may choose to place a boulder where it might have ended up had it rolled sown a hill to our garden. Or where it may have emerged from a glacial till as the surrounding soil was washed away by 10,000 seasons.””
All of the above projects can be made to look natural to some degree or more decorative if the wrong choices are made such as using a type of stone or rock that is not indigenous to the area. Bright white quartz rarely has a place in a natural landscape.

Using boulders, rocks and pea gravel in a natural landscape creates wonderful opportunities to capture stunning moments in the garden.
A walk through most neighbourhoods reveal the “decorating” mistakes. There are those who place small rocks meticulously around the edge of a border; or those who place river rock in a half circle to replicate a dry river bed; or, the worst sin of all, placing boulders on top of the soil rather than digging them into the landscape. To make matters worse, these boulders sitting atop of the landscape are often placed on sloped ground making it look like our beautiful boulder is about to roll down the hill.
Placing stones to look natural in the landscape
So what’s the secret to placing stones properly?
Jeff Cox, in his book Landscape with Nature provides this solid explanation: “The job of the natural gardener is to place elements in the garden as nature does. The site of every object in the garden should answer the question “why is that there?” We may choose to place a boulder where it might have ended up had it rolled sown a hill to our garden. Or where it may have emerged from a glacial till as the surrounding soil was washed away by 10,000 seasons.”
He asks readers if they can “feel the presence of large boulders somewhere down under the earth? Can you feel them slowly rising toward the surface or rather the surface slowly descending toward them? Look at your site. Where would one of these boulders emerge? Get a feel for it. Then bury the bottom 2/3 of the boulder to make it look like its coming out of rather than going into the ground,” says Cox.
“Take any three objects such as three different rocks and arrange them anyway that seems balanced,” he adds. '“An evenly spaced straight line seems very static and unsubtle. A much more satisfying arrangement is for the two smallest rocks to be relatively close together and the third larger rock at sOme distance, their masses balancing on an unseen focal point somewhere between them.”
“In a natural garden try to use plants as nature might. The goal is not to border our beds with bright colours but to pay homage to natural beauty with artistic interpretations of it,” Cox concludes.

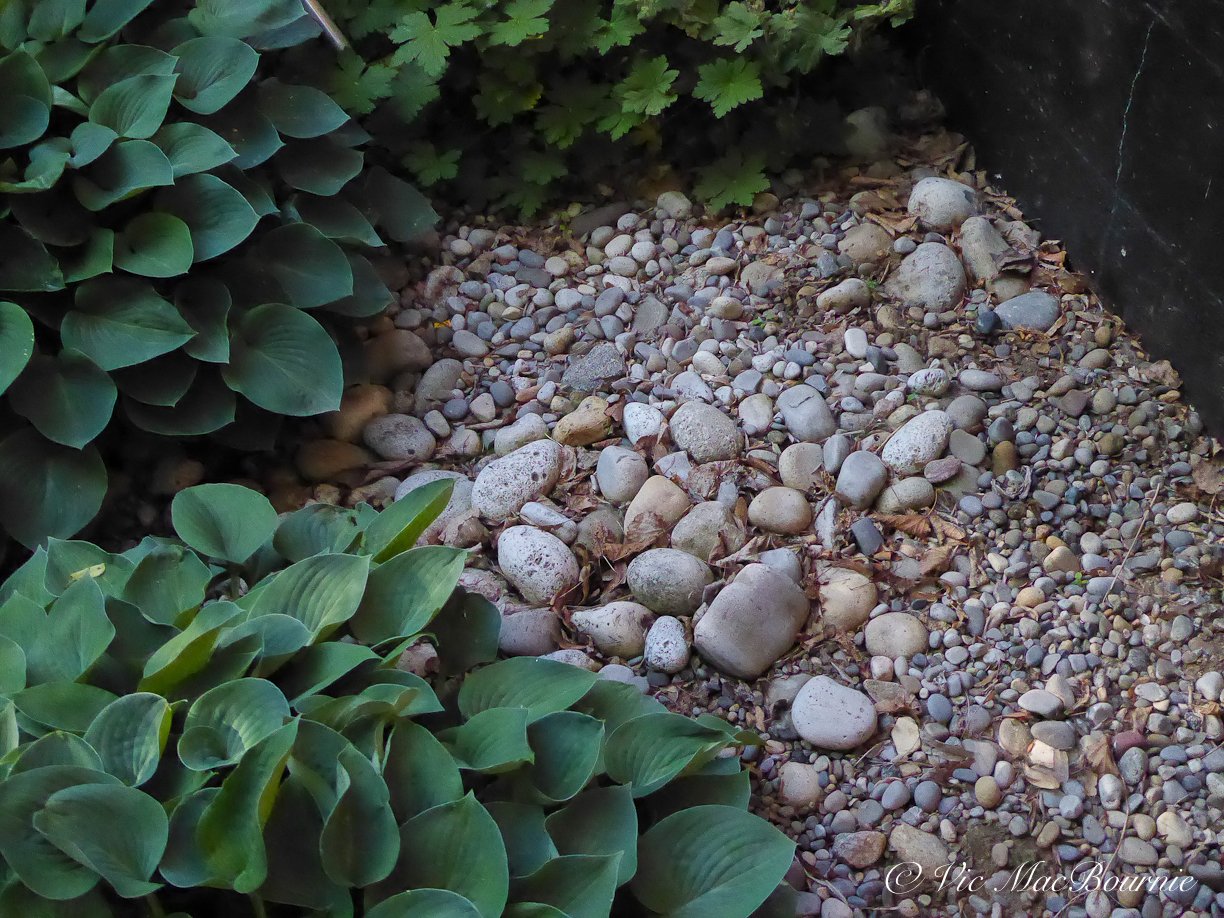
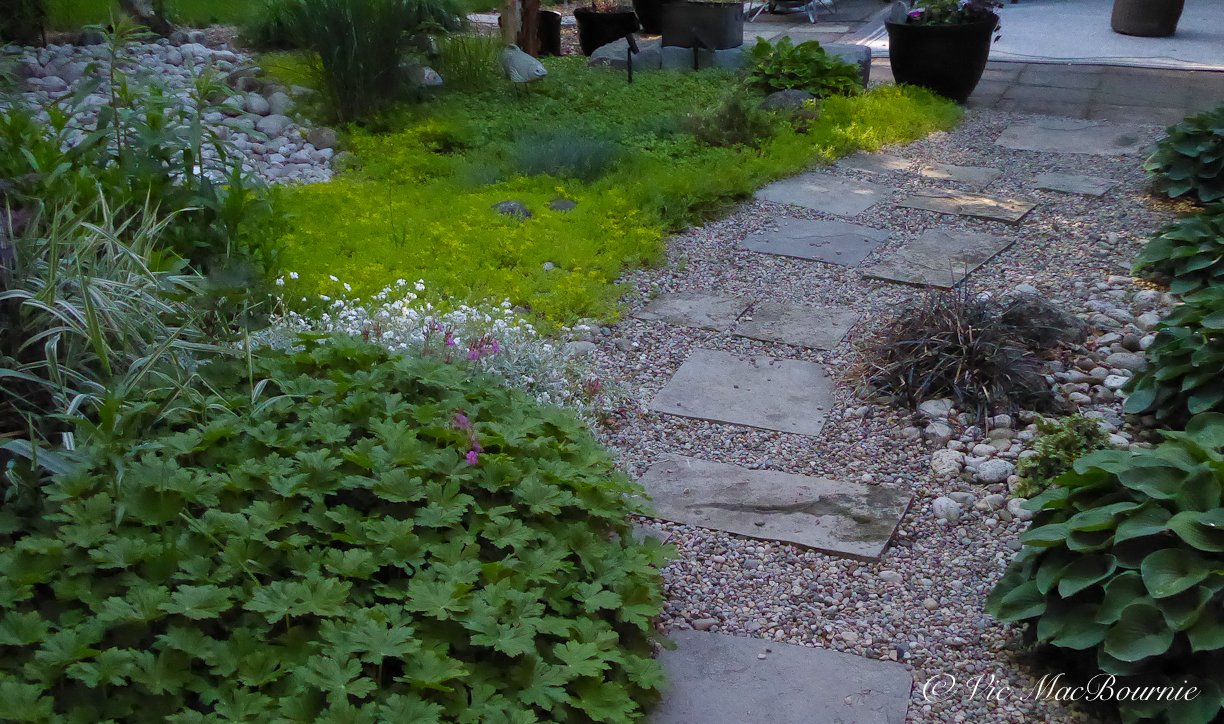
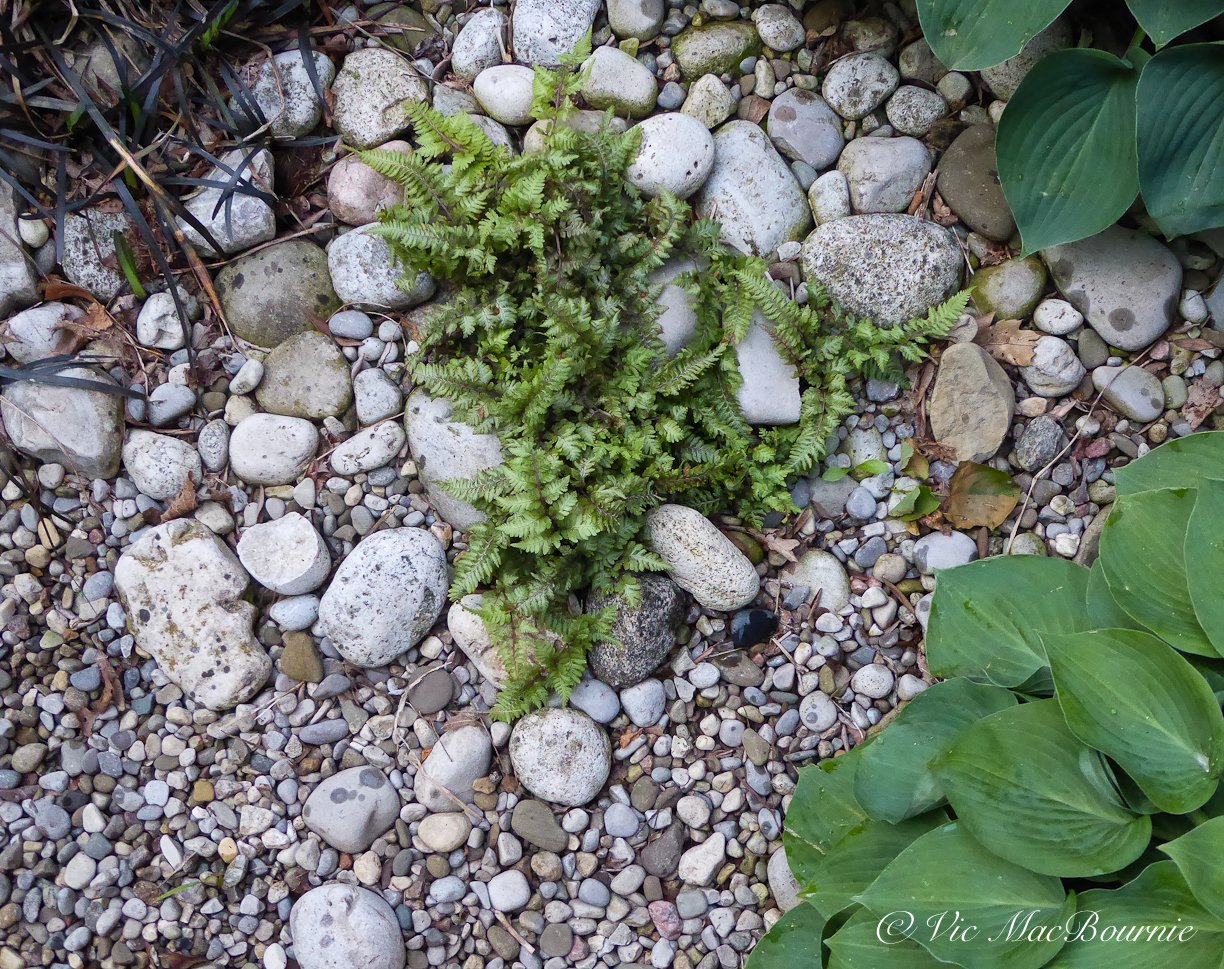
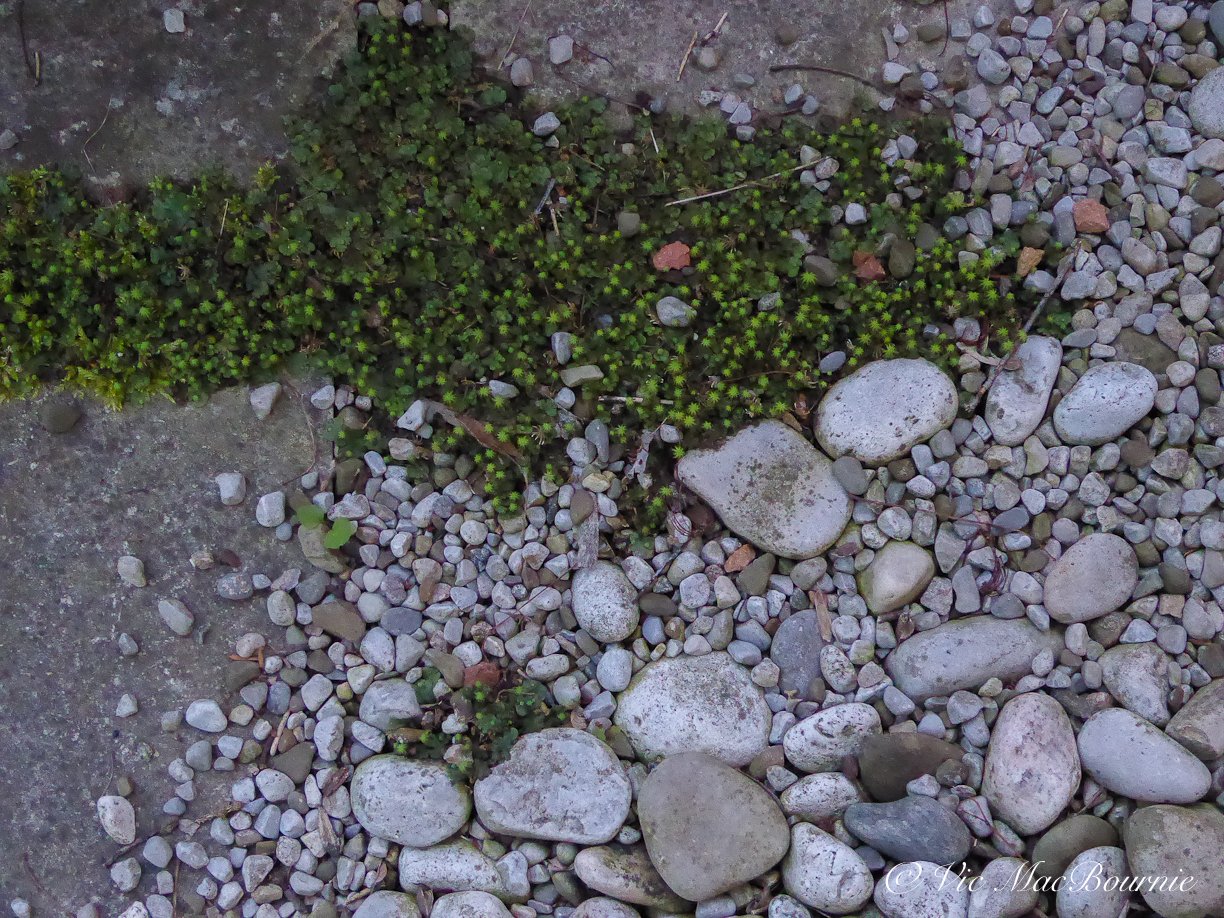
Here is an example of using different-sized river rocks and pea gravel along a dry-stream-look path that looks to nature to give the garden vignette a natural feel. In nature, a black mondo grass seed may have gotten caught up in the rocks and began growing. The natural vignette helps create interest to slow the visitor along the pathway. I used black mondo grass so that the plant blended in to the more or less black and white scene. A brightly coloured flower would have spoiled the lovely monochrome garden vignette.

The simple answer: try to place the stones as they would appear in nature.
Not sure how they would appear in nature?
Learning from nature’s rock placement
Take an afternoon to visit a natural stream and study how Mother Nature places the rocks and stones with the larger ones anchoring the stream, smaller ones closer to the edge of the stream and pea gravel and or sand filling in the edges suggesting areas where the water has a gentler flow. Notice how, in nature, not all the river rock is the same size. There are boulders, large rocks and smaller rocks. Often there will be several sizes of river rock as well as pea gravel and sand.
(Looking for inspiration, check out my post on using local woodlands as inspiration for your garden.)


To create a realistic dry river bed, you don’t need to include all the sizes, but using only one size of river rock for the entire stream bed, is unlikely to look natural. When you are ordering from the rockery, include at least two sizes of river rock, some larger boulders and pea gravel.
The result will have a more natural look and allow you to transition down from the larger rocks to the smaller ones right down to the pea gravel on the edges of the stream filling in any holes between the larger rocks.

Placing larger boulders in the landscape
When it comes to placing large boulders, plan to do some digging.
In nature, boulders sit in the landscape, not on top of it. Even if a piece of a large boulder has broken off another boulder, it will in time be absorbed into the landscape through a combination of sinking into the soil through regular freezing and thawing, and soil building up around the boulder as leaves and forest detritus gets blown around the base of the boulder.
You may have thought you purchased a large boulder for your garden, but if I said you may have to bury a quarter to a half of the boulder underground for it to look right, it doesn’t take long to realize that boulder you purchased is not going to make as big a statement in the landscape as you might have thought. Most boulders need to be buried deep in the ground to look natural in the landscape. Boulders should look like they are rising out of the landscape.


Depending on the boulder, you may get away with sinking it just a couple of inches into the ground. Just make sure that the boulder looks like it was always part of the landscape.
If you are placing boulders, it’s best to think odd numbers. Not unlike planting flowers in groups of 1-3-5, using the same way of thinking also works for placing rocks.
In our Japanese-inspired garden, I was lucky enough to scoop up a number of massive boulders from a neighbour's backyard project.
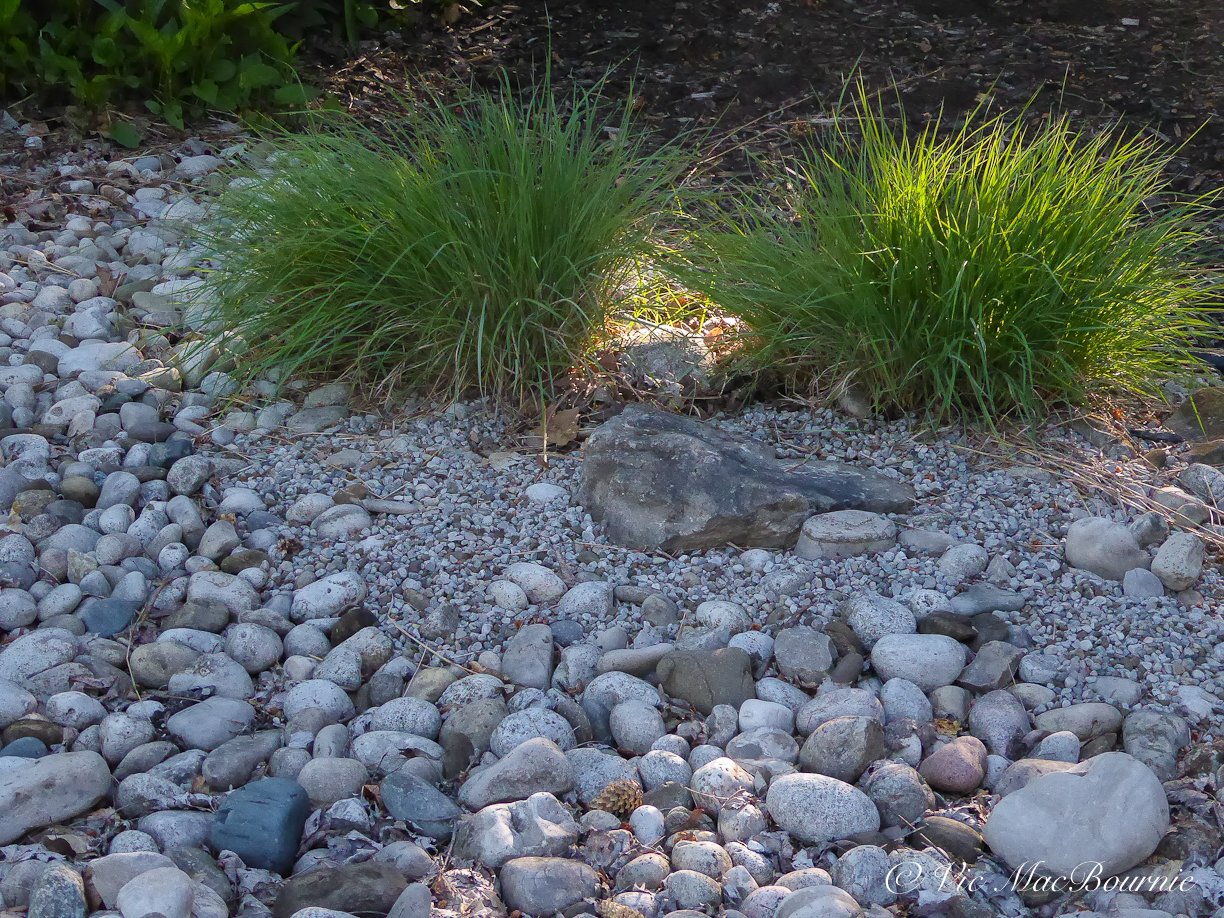
The trick was how to use them effectively. By using three of them in one grouping and a single one on the other side of the Japanese-inspired garden, I was able to keep the groupings to odd numbers. The boulder sitting by itself on the one side is teamed with large grasses and a weeping Japanese Maple providing visual balance between the two groups of boulders.
Staying with the Japanese-inspired garden and placement of the large boulders. In true Japanese style, a single boulder may be all that is in the garden surrounded by sand or fine pea gravel that is meticulously raked to give the appearance of waves surrounding the boulder.
In our design, I chose to use the boulders as if they represented mountains. Around the outside of the boulders I placed river rock in two sizes and then used pea gravel to fill in any holes and tie into the pea gravel throughout the garden and around the square-cut flagstone that take visitors through the garden into the backyard.

Using rocks along a pathway between houses
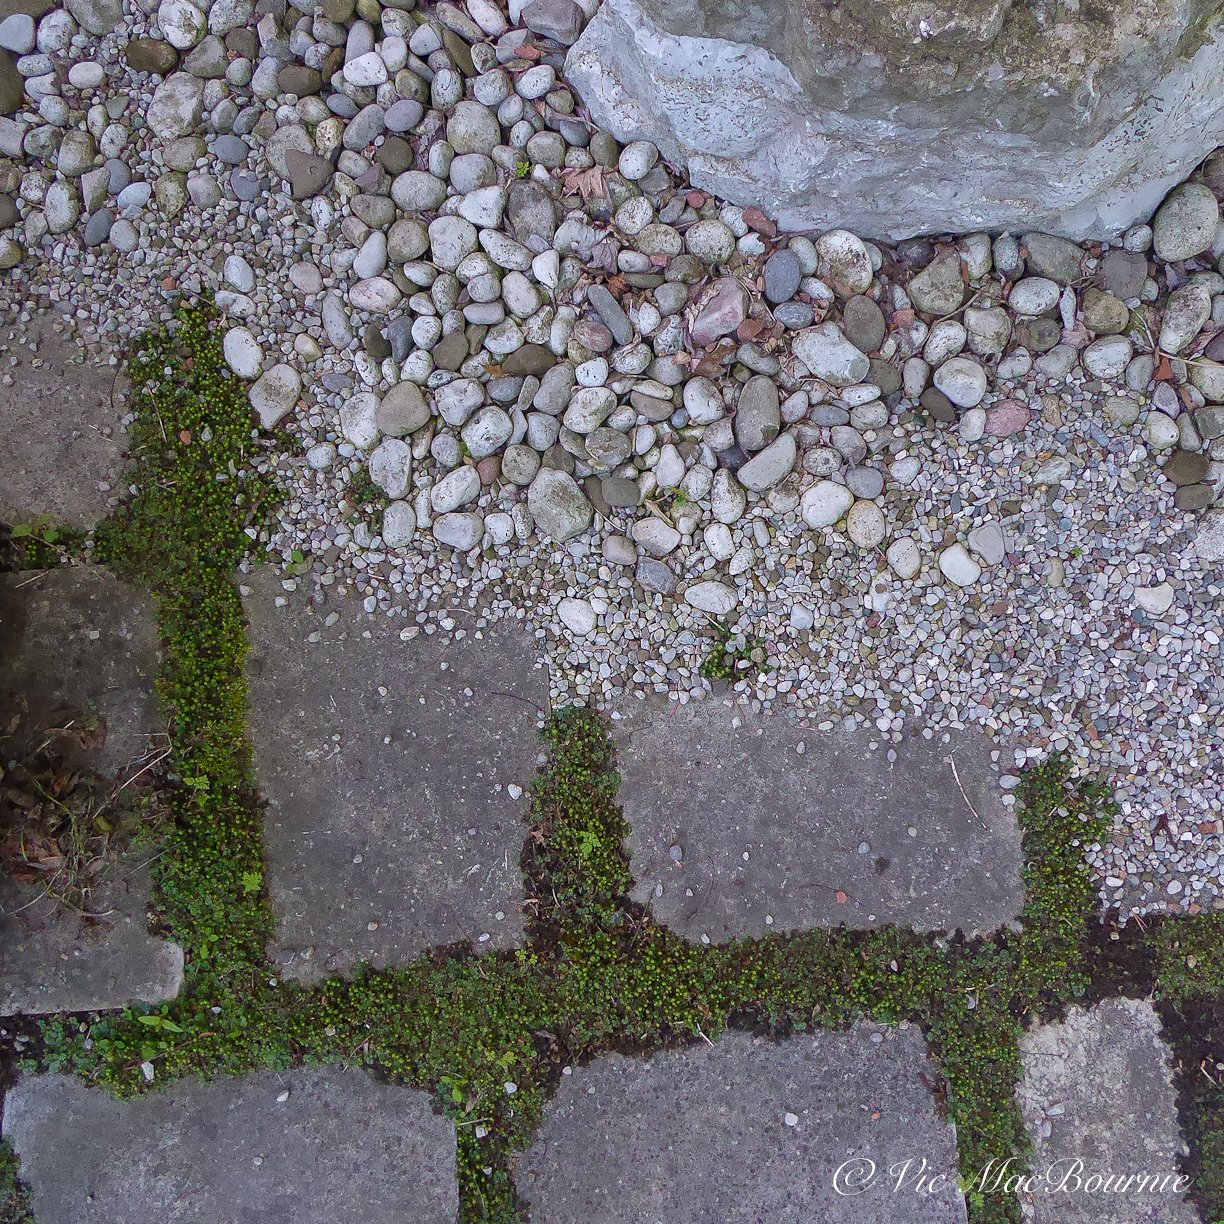
Our Japanese-inspired garden runs across the front of our home with a pathway leading through it to another pathway that leads into the backyard. By continuing the use of stone from the Japanese garden along the pathway leading to the back yard, the two spaces work together to create a natural flow.
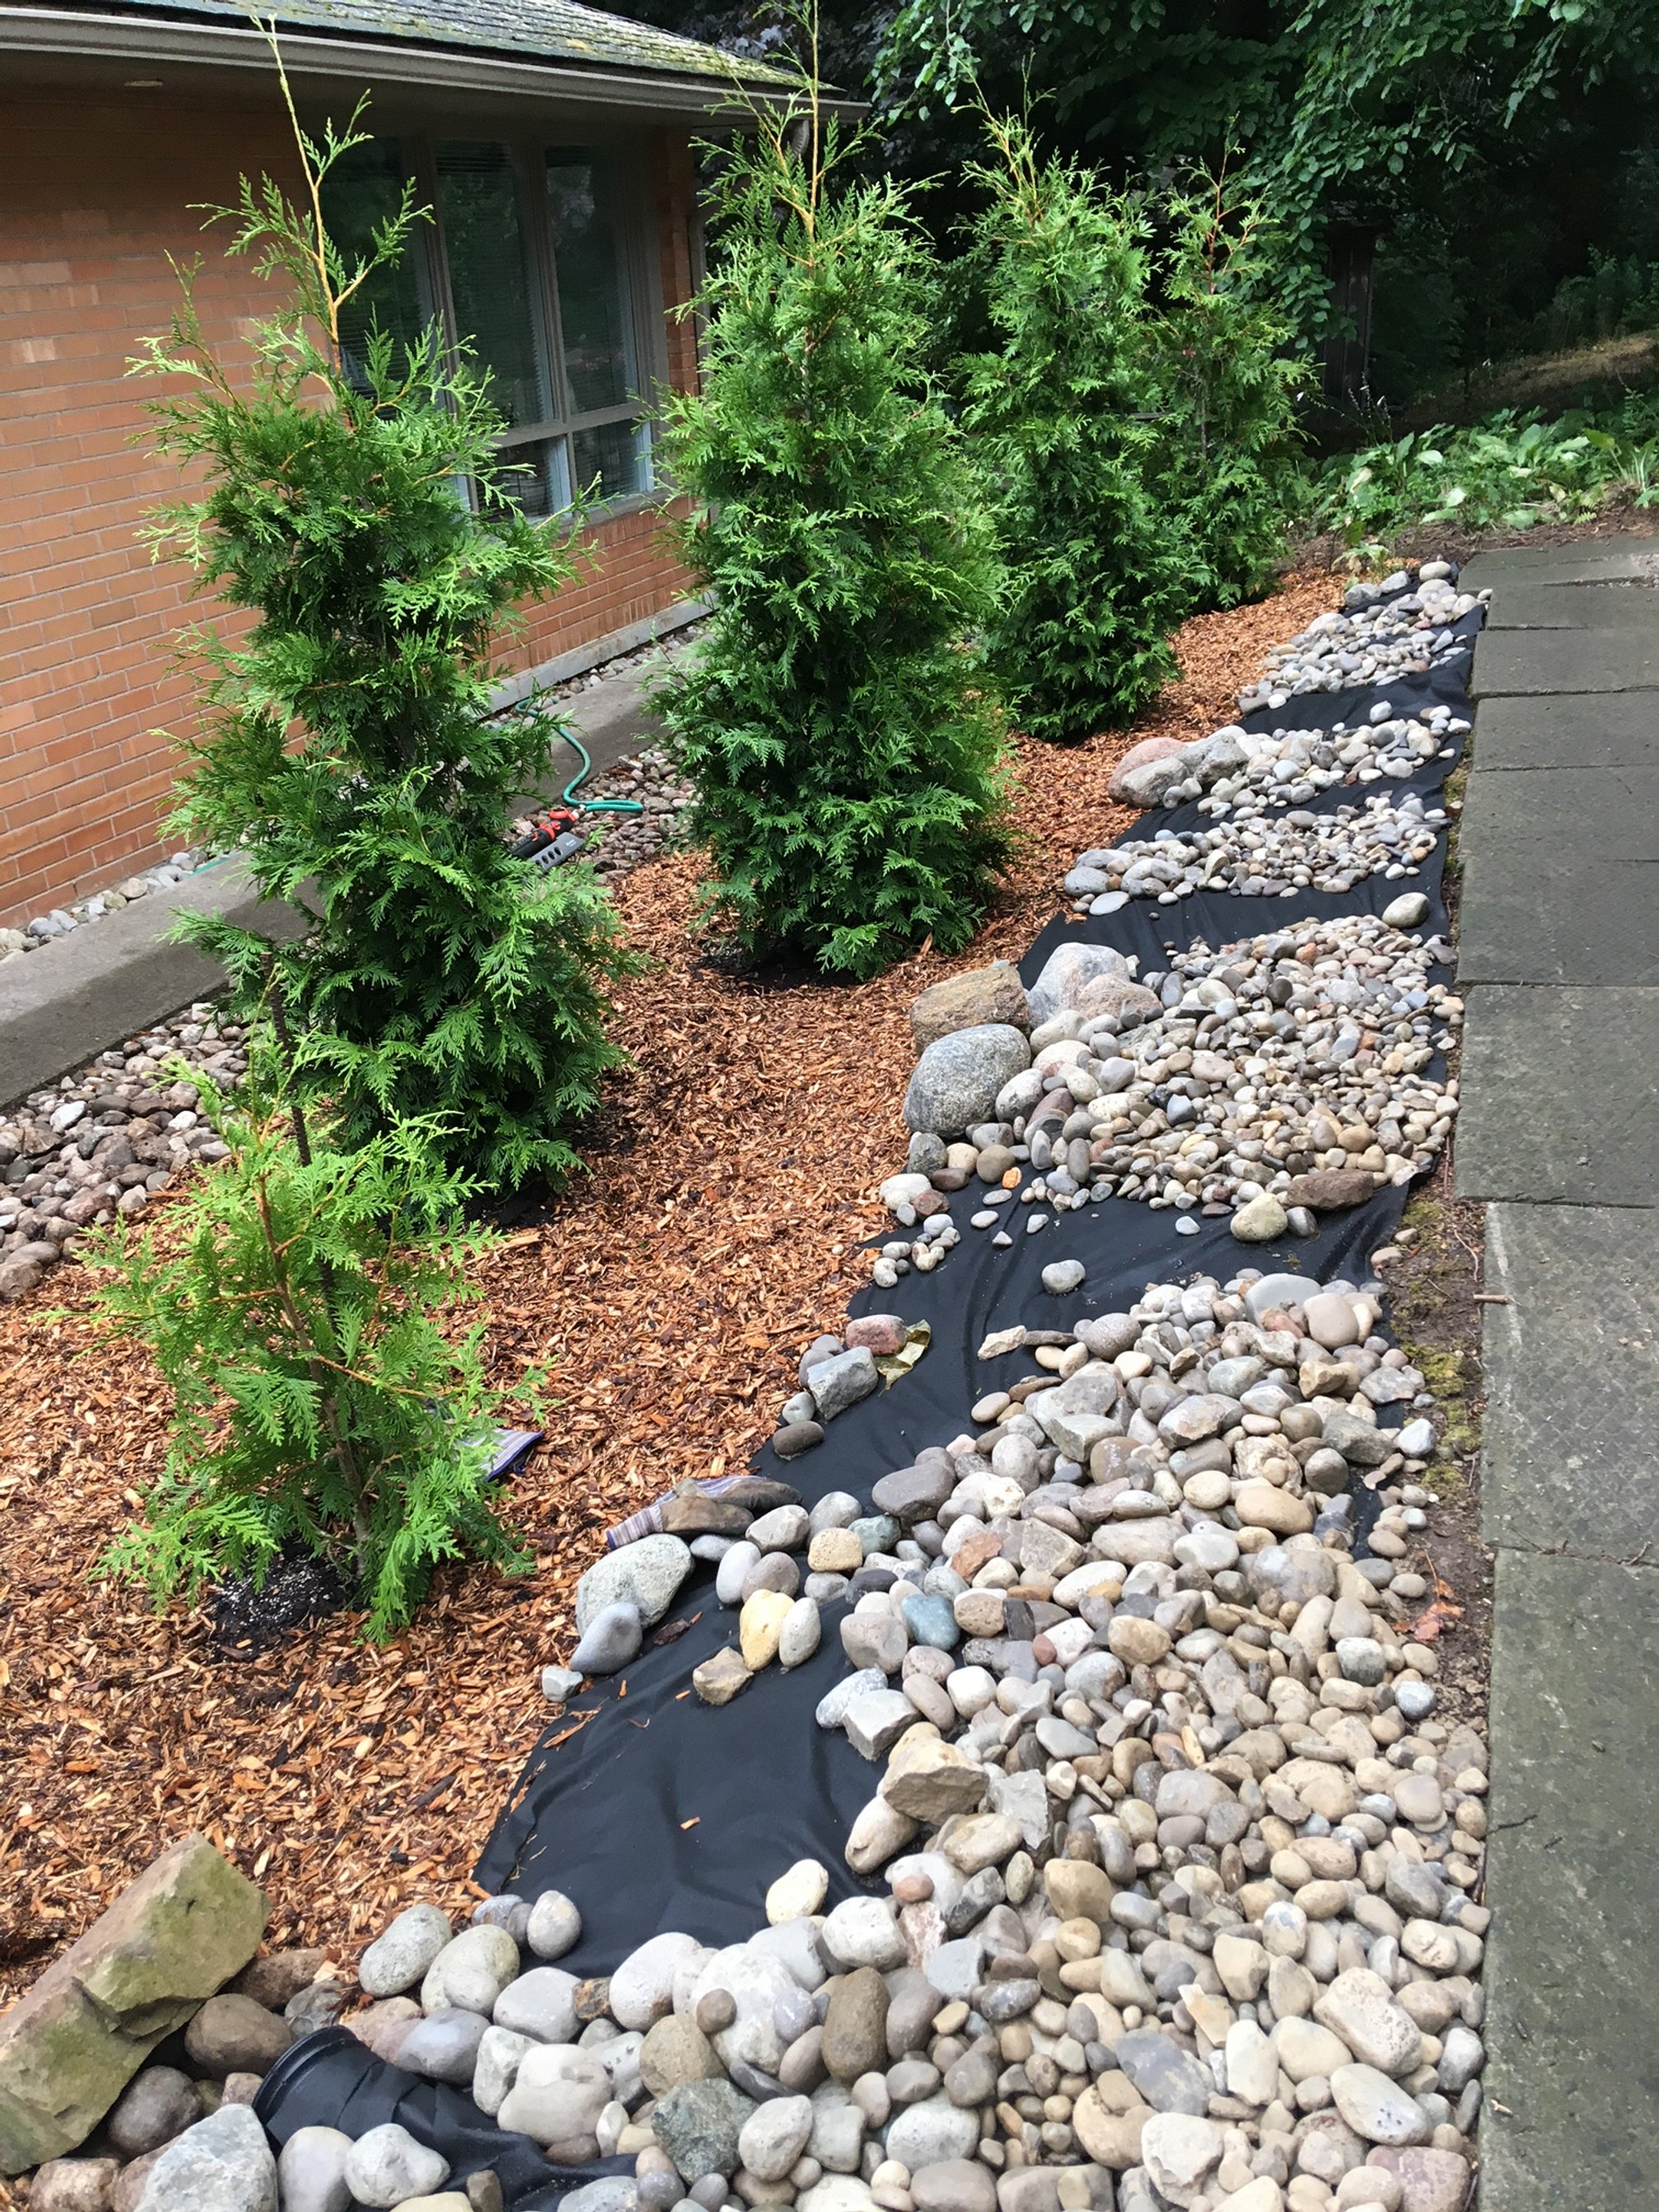
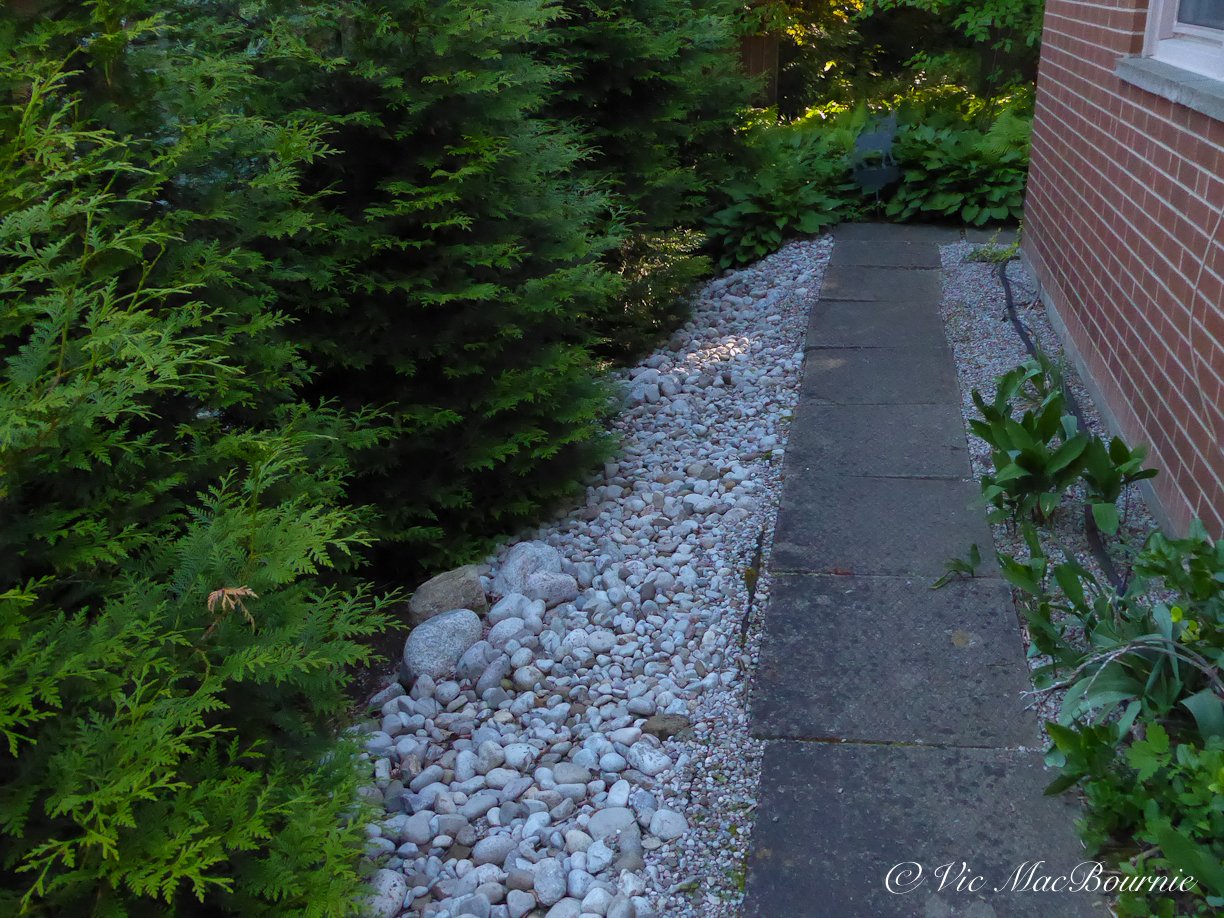
Green Giant cedars separate our property from our neighbours creating privacy and a beautiful green backdrop that opens up at the end of the pathway into a view of our neighbour’s lovely yard and our woodland garden. (The three pictures above show how we installed the river rocks between the path and the Giant Green cedars using a combination of three sizes of river rocks and finishing with pea gravel. The pictures also show how much the cedars have grown in just four years.
On both sides of this pathway we have used stone as a mulch to tie in the back and front gardens. The same dry-river pathway is picked up across the back of the home helping to tie the entire garden from front to back.
Along the side pathway, several layers of black landscaping cloth were laid down to keep weeds at bay. This was followed up by using large river rocks (hand picked at the rockery) to form small rockfalls along the pathway just to add interest rather than having all the same size river rocks. Once the larger rocks were in place, we began adding wheelbarrows full of river rock followed by shovel fulls of pea gravel to fill in any holes between rocks and add more texture to the vignette. Closer to the trees’ roots, we laid down a thick layer of natural shredded cedar bark.
The result is a completely maintenance free landscape that looks natural and makes walking down the path a lovely experience.

Author Profile: Vic MacBournie is a former journalist and author/owner of Ferns & Feathers. He writes about his woodland wildlife garden that he has created over the past 25 years and shares his photography with readers.
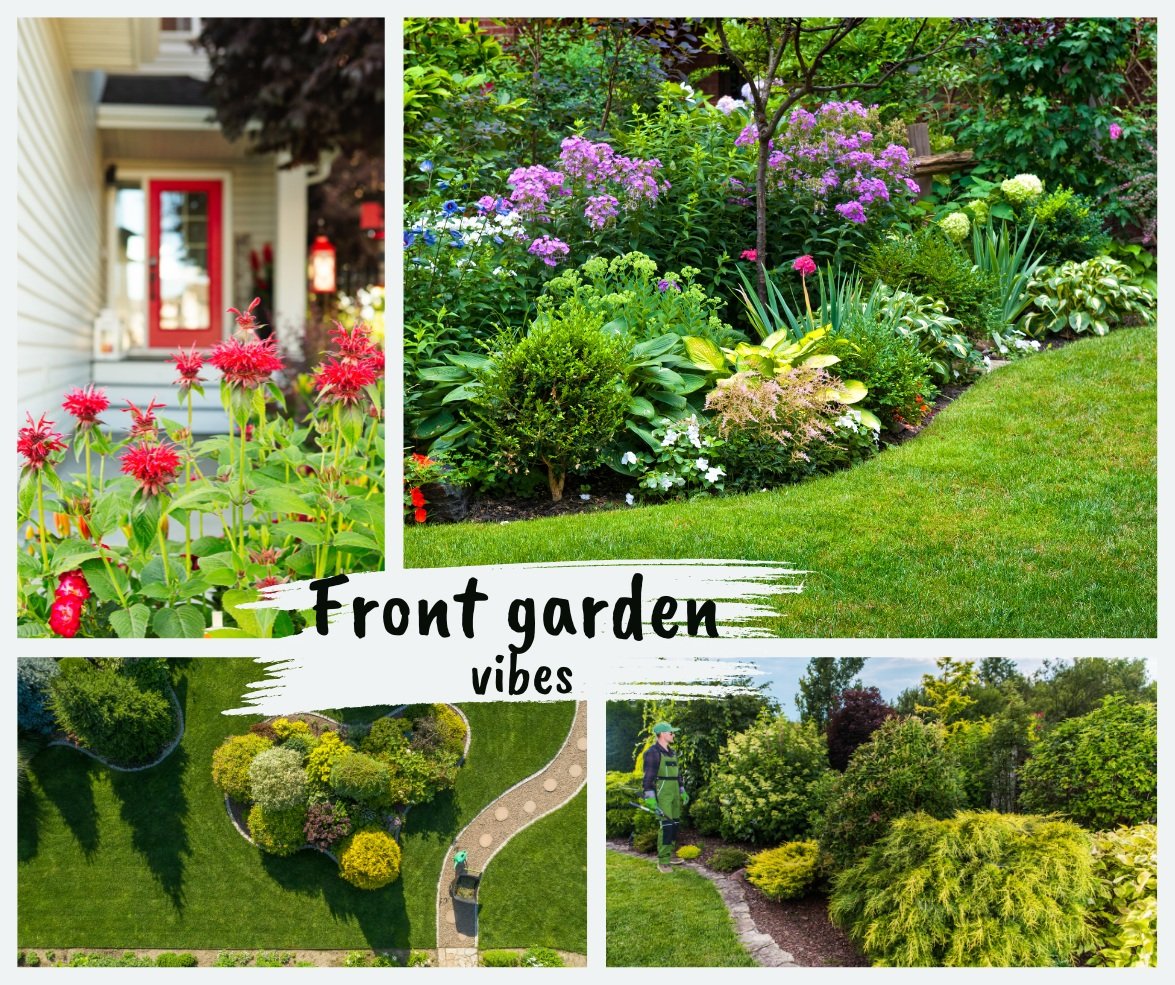
Front yard ideas: Embrace your garden style
Create a front garden that pleases you rather than your neighbours.

The Japanese-inspired garden in late fall blends seemlessly with the front woodland garden where the two adirondack chairs add a punch of colour and centre of focus in all four seasons.
Be bold not boring in your front garden
Front yards don’t have to be boring, but fear of being different often results in front yards conforming to every other yard on the street.
And that almost always leads to a street full of boring front yards. Typically, a sea of grass, small foundation garden beds and maybe a small single tree in the middle of the yard.
It’s much better to be bold, make a statement and create a front landscape that reflects a style that makes YOU happy rather than the neighbours.
In our rather small front yard, we have worked to create a very casual woodland garden in the main area leading with a Japanese-inspired woodland garden in another part of the front yard.

Adding interesting garden elements such as the Adirondack chairs, bird bath and ceramic “Fish in the Garden” creates points of interest that do not over power the garden plants.
In this “small front garden” all grass has been removed. Instead, there is a total of nine trees, a variety of ground covers including ferns, pachysandra, epimediums, moss, creeping phlox, foamflower and bloodroot, just to name a few. It also has several drifts of black-eyed-susans and ornamental grasses big and small, as well as many more native plants, several massive boulders, a dry river bed, two bird baths and two very prominent yellow Adirondack chairs on a small flagstone patio.
Yes, that’s a lot to pack into a smallish front yard, but it’s an example of what is possible once you remove the grass and open up your vision to a front yard that does not conform to what most homeowners consider acceptable. My immediate neighbour also removed all of their front grass and created an oasis of native, non-native plants, trees and shrubs that, together, create an exceptional habitat for a host of wildlife from mammals to reptiles, from a variety of birds to pollinators too numerous to name here.
Unfortunately, we are the minority on a street of orphaned trees growing in a sea of never ending lawns and boring foundation plantings. And, this is in an area surrounded by conservation lands and massive natural forests.
Time to rethink our front landscapes
I recognize, however, that our front woodland garden landscape design might not be for everyone. Maybe a less aggressive approach that includes some grass and sweeping gardens with a variety of tidy perennials, might suit you better. Maybe a more contemporary garden made up primarily of evergreens is something that would appeal to you more.
To enhance the overall appeal of your front yard, here are five landscaping ideas that will help transform your outdoor space into a more welcoming one.
Create a Welcoming Pathway: A well-designed pathway leading to your front door not only adds visual interest but also guides visitors to your home. Consider using natural stone pavers or colourful tiles to create a unique and inviting pathway.
Incorporate Colourful Flower Beds: Add vibrancy and charm to your front yard by planting colourful flower beds. Choose a variety of flowers that bloom at different times of the year to ensure year-round beauty. Be sure to incorporate native plants to attract local wildlife and promote biodiversity.
Install Outdoor Lighting: Softly illuminate your front yard with strategically placed outdoor lighting. Not only does it enhance the safety and security of your home, but it also adds a warm and inviting ambiance. Use path lights to highlight the pathway and accent lights to showcase architectural features or focal points. Don’t use bright lights that disrupt the lives of animals and insects that depend on darkness to survive.
Add a Water Feature: Incorporating a water feature, such as a small fountain or a pond, can create a soothing and tranquil atmosphere in your front yard. The sound of running water adds a sense of serenity and can mask unwanted noise from the street.
Utilize Vertical Space: Make the most of limited space by utilizing vertical elements. Install trellises or arbors and grow climbing plants. This not only adds visual interest but also creates privacy and shade.
This professional garden design (below) created for a Pacific Northwest garden, (see full story here) is a perfect example of what can be done when a bold approach is taken.

A landscape design or a middle-size front garden shows intensive planting including several trees, shrubs and plantings. Notice the lack of grass in the plan.
Try designing around a focal point in the garden
Once you embrace your style with courage and commitment, try to settle on a focal point in your garden.
The focus of our front yard are actually the two very yellow Adirondack chairs that, more than anything, make a statement that this is meant to be a casual place – almost our cottage in the city.
I like to think that a woodland garden, by its very nature, is a casual unpretentious landscape that conveys a message that the people who live here care about the environment, wildlife and native plants more than impressing others, including the neighbours.
More on the Environmental Benefits of a Woodland Garden.

A dry river bed and creeping phlox combine for a colourful spring display.

A Natural Approach
Allowing the creeping phlox to flow over the large boulders creates a natural feel in the front garden rather than a traditional over-manicured front garden.
It is also a front yard that is not wild and out-of-control and possibly seen as an eyesore on a street of very, very traditional front landscapes.
Our front garden is also in constant change – from the native plants in the main garden, to the annuals that fill our two window boxes.
Birds make nests in the trees, visit the bird baths on a regular basis and devour the fruit of our native serviceberry tree in early summer. Deer visit the garden to sample the plants and even the local foxes often use the area to hunt.

Our front garden in late fall showing the Japanese-inspired garden with large boulders on the left, together with the middle canopy Japanese maples, grasses black-eyed-susans and cottage-style adirondack chairs.
It may not, however, be a front yard that appeals to everyone.
So, let’s take a look at a variety of front landscapes that lie between our grassless woodland garden and a traditional front yard.

A few different examples of tiny garden design styles.
More front yard ideas: The tiny front yard
Whether it’s a cottage garden, a contemporary garden or something in between, the important thing is to embrace your style and move forward.
If you are short of space, embrace that vibe.
• Remove the grass
• Use paving or mulch to cover the entire space
• Consider using containers to grow your favourite plants
• Create one centre of interest – a bistro table and two small chairs or a small water fountain for the birds.
• Don’t be afraid to use at least a few large-leaved plants like hosta, elephant ears or a large fern to create visual interest.
• Try to keep the space simple and use natural elements as much as possible.
• The goal is not to make the garden pretty by using too much colour or unnatural materials. Bright white quartz stone rarely looks right in a garden, but pea gravel or river rock can work well. Better yet, large moss-covered boulders can be a perfect statement piece for even a tiny garden.
One of the most common situations I am asked about is what to do with a very small inner-city front garden with an existing mature tree where grass struggles to grow. The key to success here and in most difficult situations is to work with, rather than against, what nature is offering you.
In a tiny garden
My suggestion: Remove all the grass. Bring in some large boulders (not mid-size rocks) and bury them in the landscape. Please don’t let them lay on top of the soil. Boulders need to be dug in so that at least one-third is under the ground. This gives the impression that the boulders are rising out of the ground rather than placed on top of it.
Add some native ground covers, or mulch the area heavily with a pea gravel or bark mulch. Include a simple flagstone pathway, a bird bath – maybe one carved out of one of the boulders – and a small tree or large multi-stemmed shrub (maybe a serviceberry) that is trimmed up like a small multi-stemmed tree. The bird bath could be replaced over time with a bubbling rock or natural looking fountain. The moving water will help attract more birds and other wildlife.
A selection of larger garden designs using islands to create interest and variety.
Larger front yard covered in turf grass
A more typical surburban front yard offers more choice and more challenges.
Removing all the grass might not be an option or even a desired result.
The question to ask yourself is whether it is worth your time and effort to care for the grass, including lugging the lawn mower and other instruments of destruction from the back yard to the front yard on a weekly basis. If you plan to remove the grass, it might be best to do it over the course of several years rather than all at once.
By creating ever expanding garden islands in your existing turf, you can slowly migrate away from turf entirely, or just leave strips of grass that are easily mown with a single pass.
My suggestion: Consider a five year plan where most of the grass is slowly replaced by large garden islands. Individual islands can serve different purposes and allow you to experiment with different plants and even styles.
One island could be set up to attract birds with fruiting shrubs and an under-story tree like a Flowering Dogwood. Add some native purple coneflowers and black-eyed-susans to provide late-summer food sources for birds. Supplement these sources with annual sunflowers to add some whimsy and provide more food and habitat for birds. A bird bath and small bird feeder is a nice addition.
Another island might focus on plants that thrive in acidic soil. Once you have amended the soil to acidify it, you can begin to plant hydrangeas, blueberries, and other acid-loving native woodland plants that can be more easily grown together rather than trying to combine them with non-acid loving plants. Mulch the acidified soil with pine needles to enhance the soil and keep the plants healthy.
In another island you may want to turn your attention to edibles. Plant your favourite herbs, one or two tomato plants, your favourite garden vegetables and maybe a favourite fruiting tree like a peach or even an orange or lemon tree if you are in the warmer growing zones.
If you like the cottage/meadow look, a garden island allows you to create that look in a smaller scale rather than trying to manage a massive meadow garden that can easily get out of control. Grow all your favourite plants, but grow them in a manageable-sized garden where you can focus your energy into creating a wild but still-in-control cottage garden. More on meadow gardening here: Create a mini meadow; The making of a large meadow
The above collage (bottom right) shows a large garden island made entirely of evergreens. This is perfect to create winter interest as well as provide year round habitat for wildlife.
In conclusion: A front garden for your enjoyment
In the end, it’s important to first create a front garden that pleases you. If you can, keep in mind that your garden should not look so out of place in the neighbourhood that you are going to draw too much negative attention. That can be difficult if you are in a very traditionally minded neighbourhood. In that case it might be wise to go all out in the backyard, while you take a slightly tamer approach in the front yard.
I have read about so many homeowners trying to do the right thing only to be forced to cut down their gardens because neighbours or home owner’s associations choose to continue living in the 1950s.
If you find yourself in this situation, create a garden that pleases you most but maintains a enough of a traditional garden appearance that it does not attract too much attention.
If you are in a more progressive area, or in one that is far from your neighbours, have some fun. Go bold and create a garden for you, your local wildlife and the natural environment.
You won’t regret it.
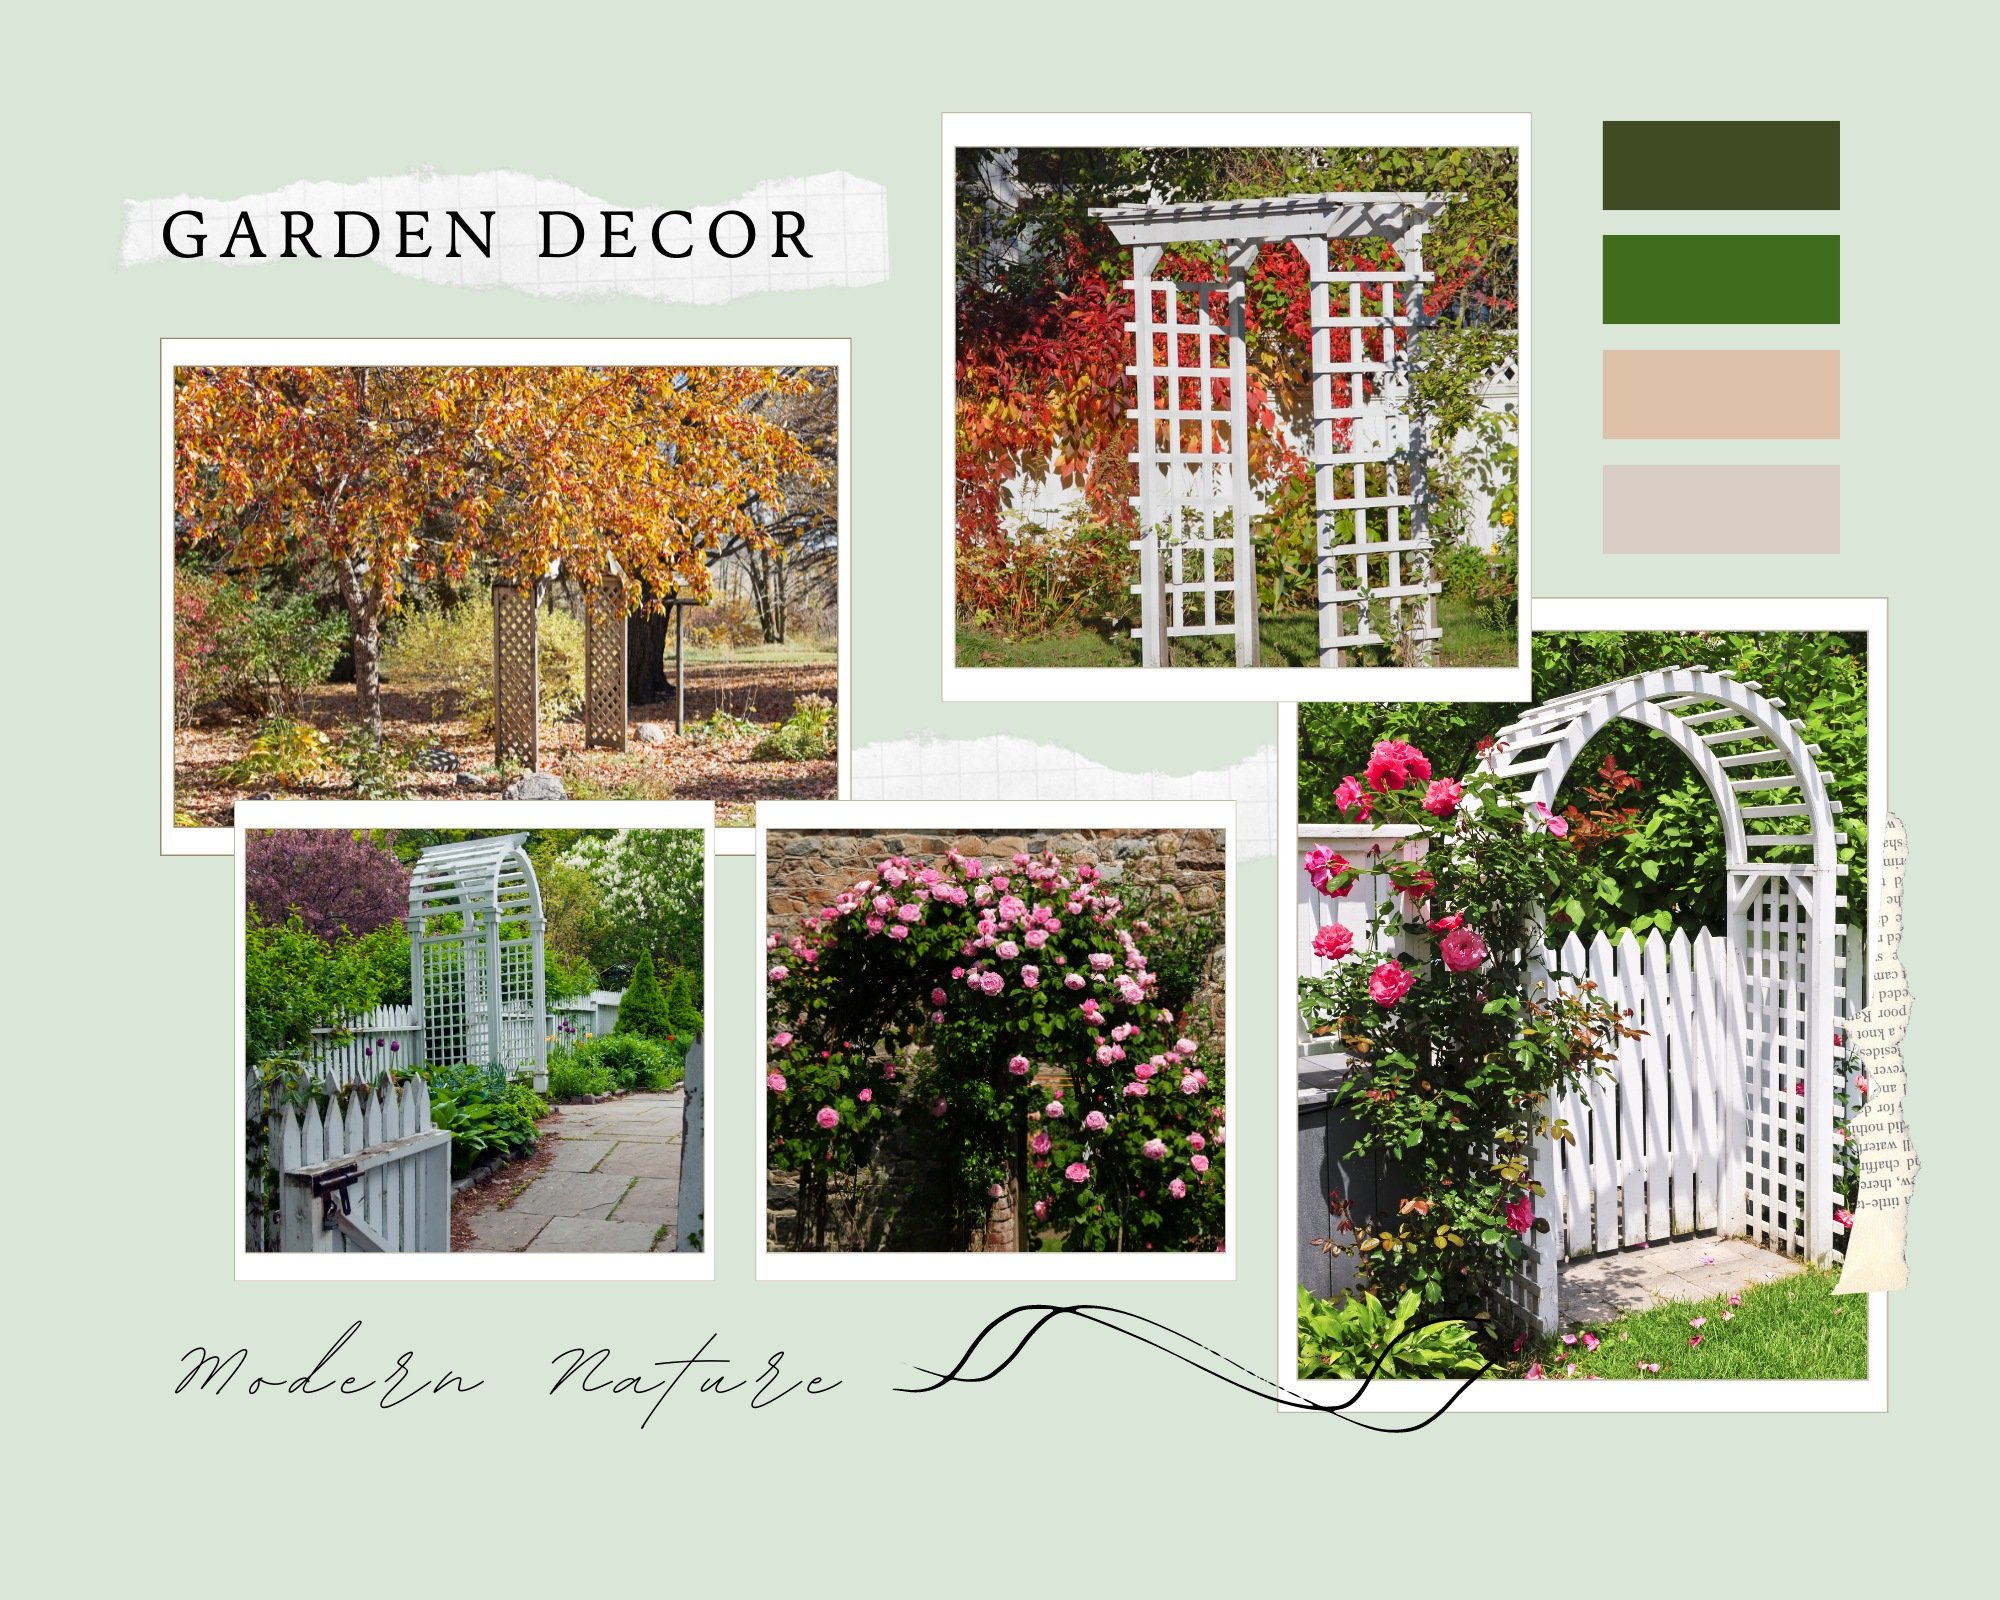
Arbour creates vertical planting space, privacy and shade
Arbours can provide vertical garden space in gardens both big and small. You don’t have to grow roses, consider planting native vines or annual vines such as Morning Glories.
Consider planting native vines to provide nesting habitat and food for wildlife
A rose arbour has been at least ten years overdue in our backyard.
I’ve never really been a fan of roses, but after a neighbourhood cat started hanging around a birdhouse in our yard, I decided a rose would help provide a safe place for the birds to raise their young. Eventually, however, the birdhouse fell apart and I removed the cedar pole leaving the rose on its own.
Fast forward to this spring when my wife and I decided it was time to add an arbour to give our old white iceberg rose the support it’s been craving for years.

These arbours are examples of the different ones available with some ideas on how you can use them in your garden decor.
It came in a tidy box. I pulled out the sections of black iron and built it in the comfort of our family room before moving it out into the garden. Four spikes – included in the box – were easily hammered into the ground to provide support and, before I knew it. our black iron arbour was taking up a prominent spot in the woodland garden.
I tied the rose canes to the arbour, being careful to gently bend the rose over the arbour, and voila.
If I knew it was going to be that easy, I would have added an arbour years ago.

Our backyard arbour provides support for our mature climbing white rose and creates a gateway into an area of the woodland garden. A garden bench nearby affords the perfect spot to relax and can be seen as a destination through the arbour and along the walkway.
I was surprised how the allure and practicality of a rose arbour helped elevate our outdoor space, adding a little romance to our surroundings, as well as provide numerous benefits beyond its aesthetic appeal.
Birds now have a safe place to land, and the thorny rose on the arbour provides an ideal spot for birds to safely build their nests tucked between the canes.
A nearby garden bench provides a quiet spot just to sit, admire the roses and the birds that feel totally safe among the branches and thorns. More on the Garden Bench as art.
Arbour creates focal point and perfect gateway to the garden
A rose arbour also serves as a stunning focal point, adding elegance and charm to any garden or patio.
In our case, it works as a gateway to an area of our garden that was often ignored because it lacked a more formal entrance. In fact, I had even built a small pathway through the area that now leads directly to our rose arbour making it look like it’s been there forever.
Its simple design and graceful arches create a sense of grandeur, instantly transforming an ordinary outdoor area into a more picturesque retreat enticing visitors to stroll along the pathway leading to the arbour.
A quick look on the internet and it’s clear that there are a host of styles to choose from. Of particular note are the arbours that create a small room like the one below.
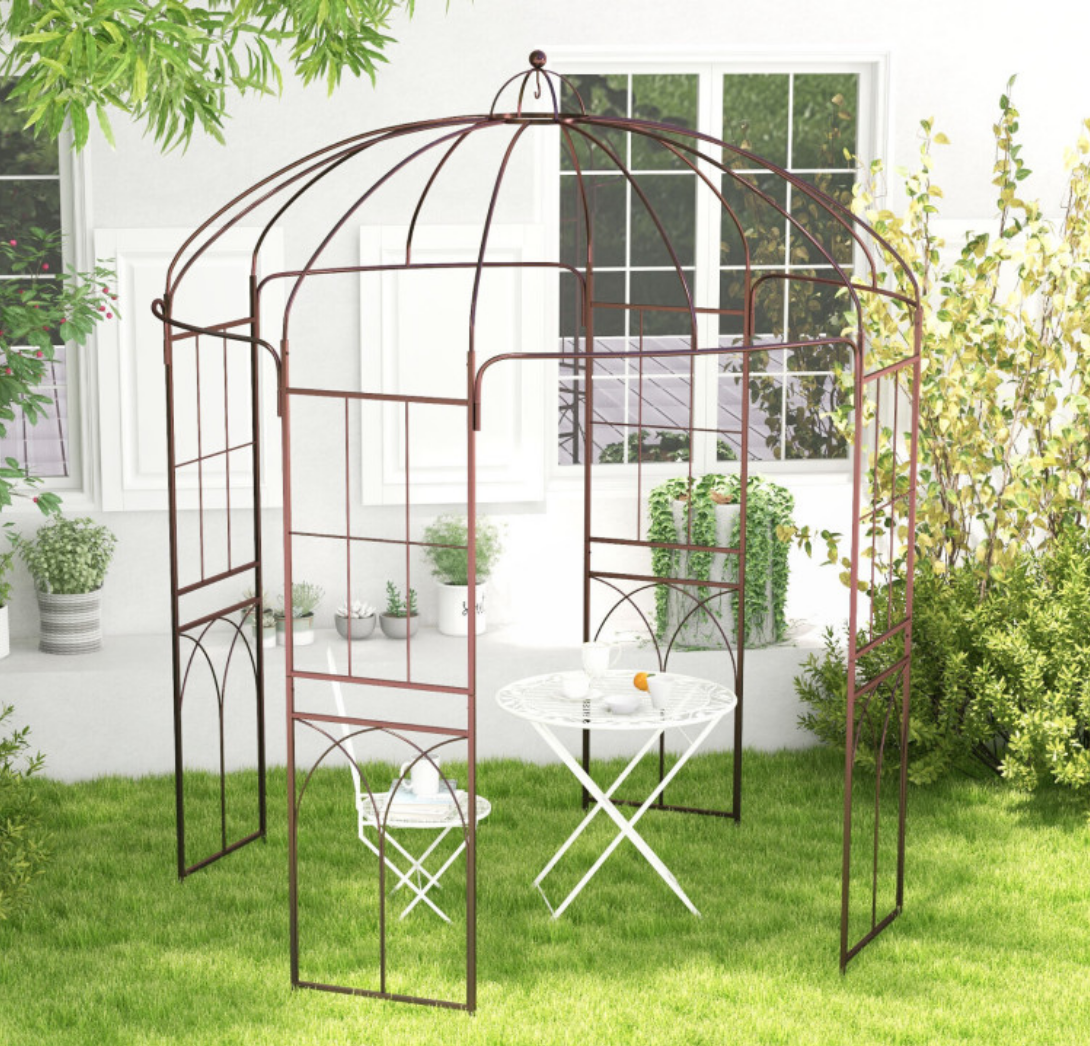
This Bird Cage arbour from Costway is the perfect way to create a small private retreat. Grow some roses or vines up and over the arches and it becomes the perfect place to relax with your morning coffee or an evening glass of wine with friends.
This birdcage arbour from Costway provides the perfect secluded spot especially if it is covered in vines and/or roses.

Amish-made bird feeder is built to last and perform in your woodland garden
The Amish crafted large gazebo vinyl birdfeeder is the perfect addition to any backyard. Include it as a finishing touch topping feeder for your bird feeding pole, or use it as a stand alone feeder on a separate pole. If you use it as a stand alone feeder, be sure to include a squirrel baffle to keep squirrels and racoons of the feeder. This handmade and handcrafted feeder includes a clear plastic, built-in seed storage container that can hold up to four pounds of bird seed.
This makes it an ideal feeder to fill-and-forget for a week or two while, at the same time, protecting the seed from the elements and providing our feathered friends with a comfortable and sheltered place to feed. The fact that the feeder is made from high quality vinyl, plastic and cedar ensures it is a long-lasting, easy-to-clean and maintain feeder.
An arbour is a perfect addition for a small yard
Whether you have a small yard or a sprawling woodland garden, an arbour can effortlessly elevate the aesthetics of your outdoor space.
There are so many different styles that can be used to fit any garden – from a romantic more formal design, to a rustic arbour design featuring metal branch-like supports that fit in beautifully in any woodland or natural garden.
Now that we’ve explored how a rose arbour can enhance an outdoor space, let’s explore the enchanting world of creating a romantic ambiance with blooming roses. Imagine strolling through your garden, surrounded by vibrant and fragrant roses in full bloom.
The sight and scent of these beautiful flowers can instantly transform any outdoor area into a captivating sanctuary.
Whether you’re planning a romantic dinner under the stars or simply seeking a serene spot to unwind, a rose arbour adorned with blooming roses sets the perfect stage for unforgettable moments with friends and loved ones.
Forget the roses, consider native vines for wildlife
Let’s not limit ourselves to roses, however.
An arbour can simply be a convenient way to add more vertical gardening space to what otherwise might be lacking in many of our garden spaces, especially in a smaller garden or a new one that lacks tall trees.

This Tree of Life Arbour is the perfect addition to a backyard woodland garden with it’s intricate details adding an artistic touch to the backyard landscape decor.
A perfect addition to a woodland or naturalized garden is this “Tree of Life” arbour that is, in itself, a beautiful work of garden art. Add a native vine growing up and over the arbour and you have the ideal entry into a back woodland garden.
Consider growing native vines on the arbour and even up through the rose to provide both a food source as well as more nesting space for birds.
Virginia creeper or wild grape are great choices, but so too are annual vines like Morning Glory to attract hummingbirds. Clematis and honeysuckle are also favourites because they tend to be less aggressive and their flowers can attract pollinators and hummingbirds. The possibilities are endless.
Sweet Autumn Clematis (C. terniflora) is a great fall performer in our area where it can be a little aggressive, but puts out a mass of beautiful tiny white flowers for the bees and other pollinators at a time when many flowering vines and shrubs have finished blooming.
There is a huge variety of garden arbours available to suit everyone’s needs. Here are just a few examples of garden arbours from Amazon to consider.

This twig-style garden arbour is ideal as garden decor in a woodland garden. For more check out this link.
The simplicity of the garden arbour with its metal branch-like look, (above) works perfectly in a woodland-style garden.
Arbour is ideal way to create privacy and shade
Now that we’ve explored how an arbour can enhance your outdoor space and create a certain romanticism in the garden, let’s delve into the practical benefits it offers beyond aesthetics.
One of the key advantages of a rose arbour is the shade it can provide especially in a yard that lacks large trees.
As the sun shines down on your garden, the arbour’s structure casts a cool and refreshing shadow, allowing you to enjoy the outdoors even on hot summer days.
Additionally, the dense foliage on the arbour can be used to create a natural privacy screen, shielding you from prying eyes and creating a secluded area in your own backyard.
Moreover, the sturdy framework of an arbour serves as excellent support for climbing plants, such as vines and ivy, giving them the opportunity to flourish and provide not only a dense shade but plenty of privacy.
So, not only does an arbour add charm and allure to a garden, it also offers practical benefits that make it a valuable addition to any outdoor setting.

Nature’s garden art (Five tips and DIY ideas)
Garden art comes in many forms in a Woodland Garden, from nature in the form of a moss-covered boulder or a fallen tree branch to a rusty buck standing watch over the garden. Garden art can be subtle or add a little whimsy to your outdoor space.

This late winter image shows how garden art like this Easter Island head, can add interest to the garden even in late winter when the garden is not at its best.
Mother nature provides its own artistic touch
If you are looking for garden art to enhance your woodland, look no further than Mother Nature – a mossy boulder, an elegant tree branch rising out from a bed of ferns. This is nature’s art at its finest.
If we take the time to really look carefully, nature often provides her art to us for free.
Fallen pine cones that “litter” the ground are works of art in themselves.
The moss-covered tree trunk works perfectly placed along the woodland pathway.
These are the gifts nature gives us if we look for them.
Look for natural materials that get better with age
But relying entirely on natural elements as art may not be enough to satisfy every gardener’s desire to inject a little sophistication and a touch of elegance into their woodland.
If you are looking to purchase artistic elements for your garden, consider investing in natural materials that age gracefully. Almost anything made with copper will improve with age.
That patina copper takes on with age is just too beautiful not to invest in if given the chance.
I think garden art works best when it is not only elegant and sophisticated, but serves a useful purpose.
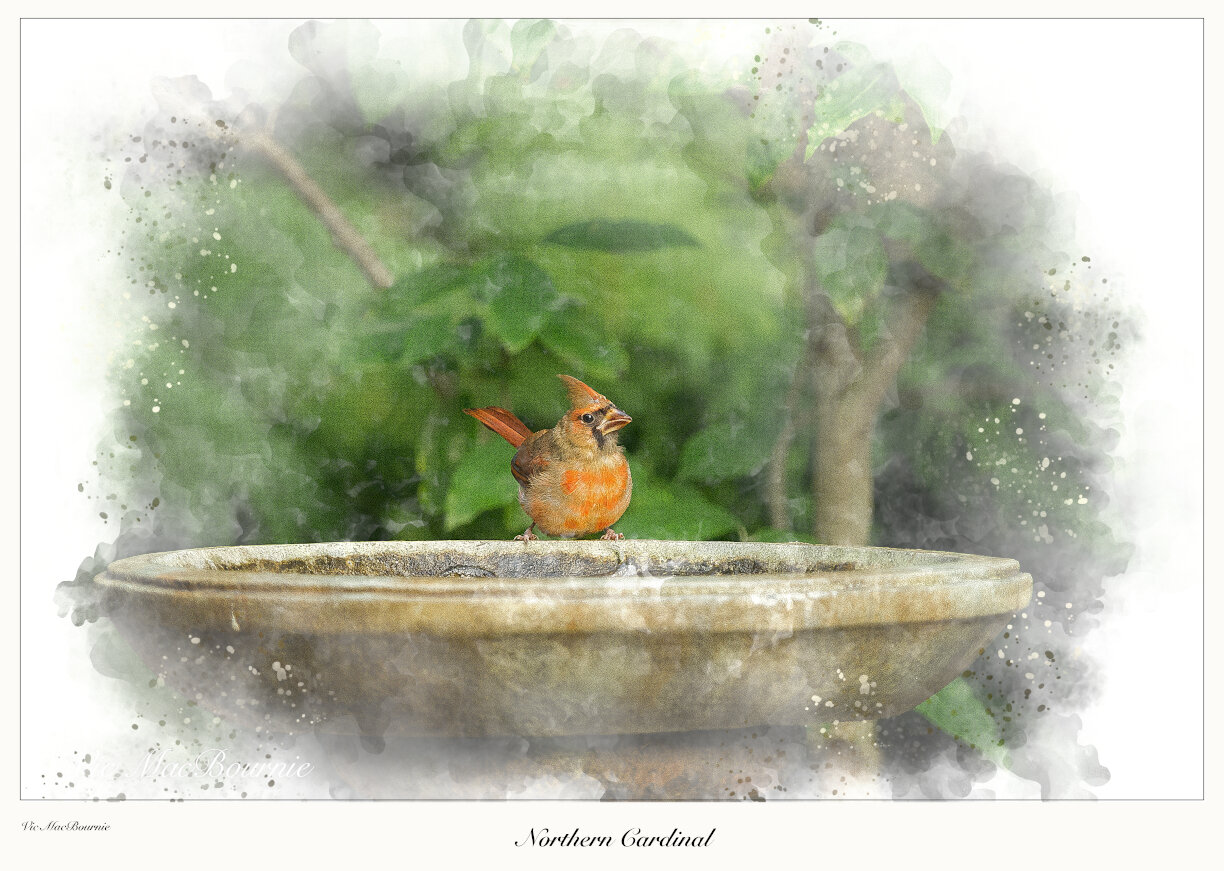
An elegant birdbath is itself a piece of garden art. But, when a cardinal is added to the scene, nature’s art truly shines.
Copper birdhouses and birdbaths ideal for the woodland
Birdhouses and birdbaths are perfect examples of garden objects that, if chosen well, can not only add sophistication to a corner of the garden, but attract our feathered friends – one of nature’s finest work. How can we resist a cardinal on a birdbath or a goldfinch at a beautiful feeder?
Many of the finest bird feeders are being made by artisans and can be found on places like Etsy. The copper-enhanced Baltimore Oriole and hummingbird feeders found on Etsy are just two examples of how artisans are recognizing the value of garden art and meeting our needs for a more sophisticated approach to garden art.
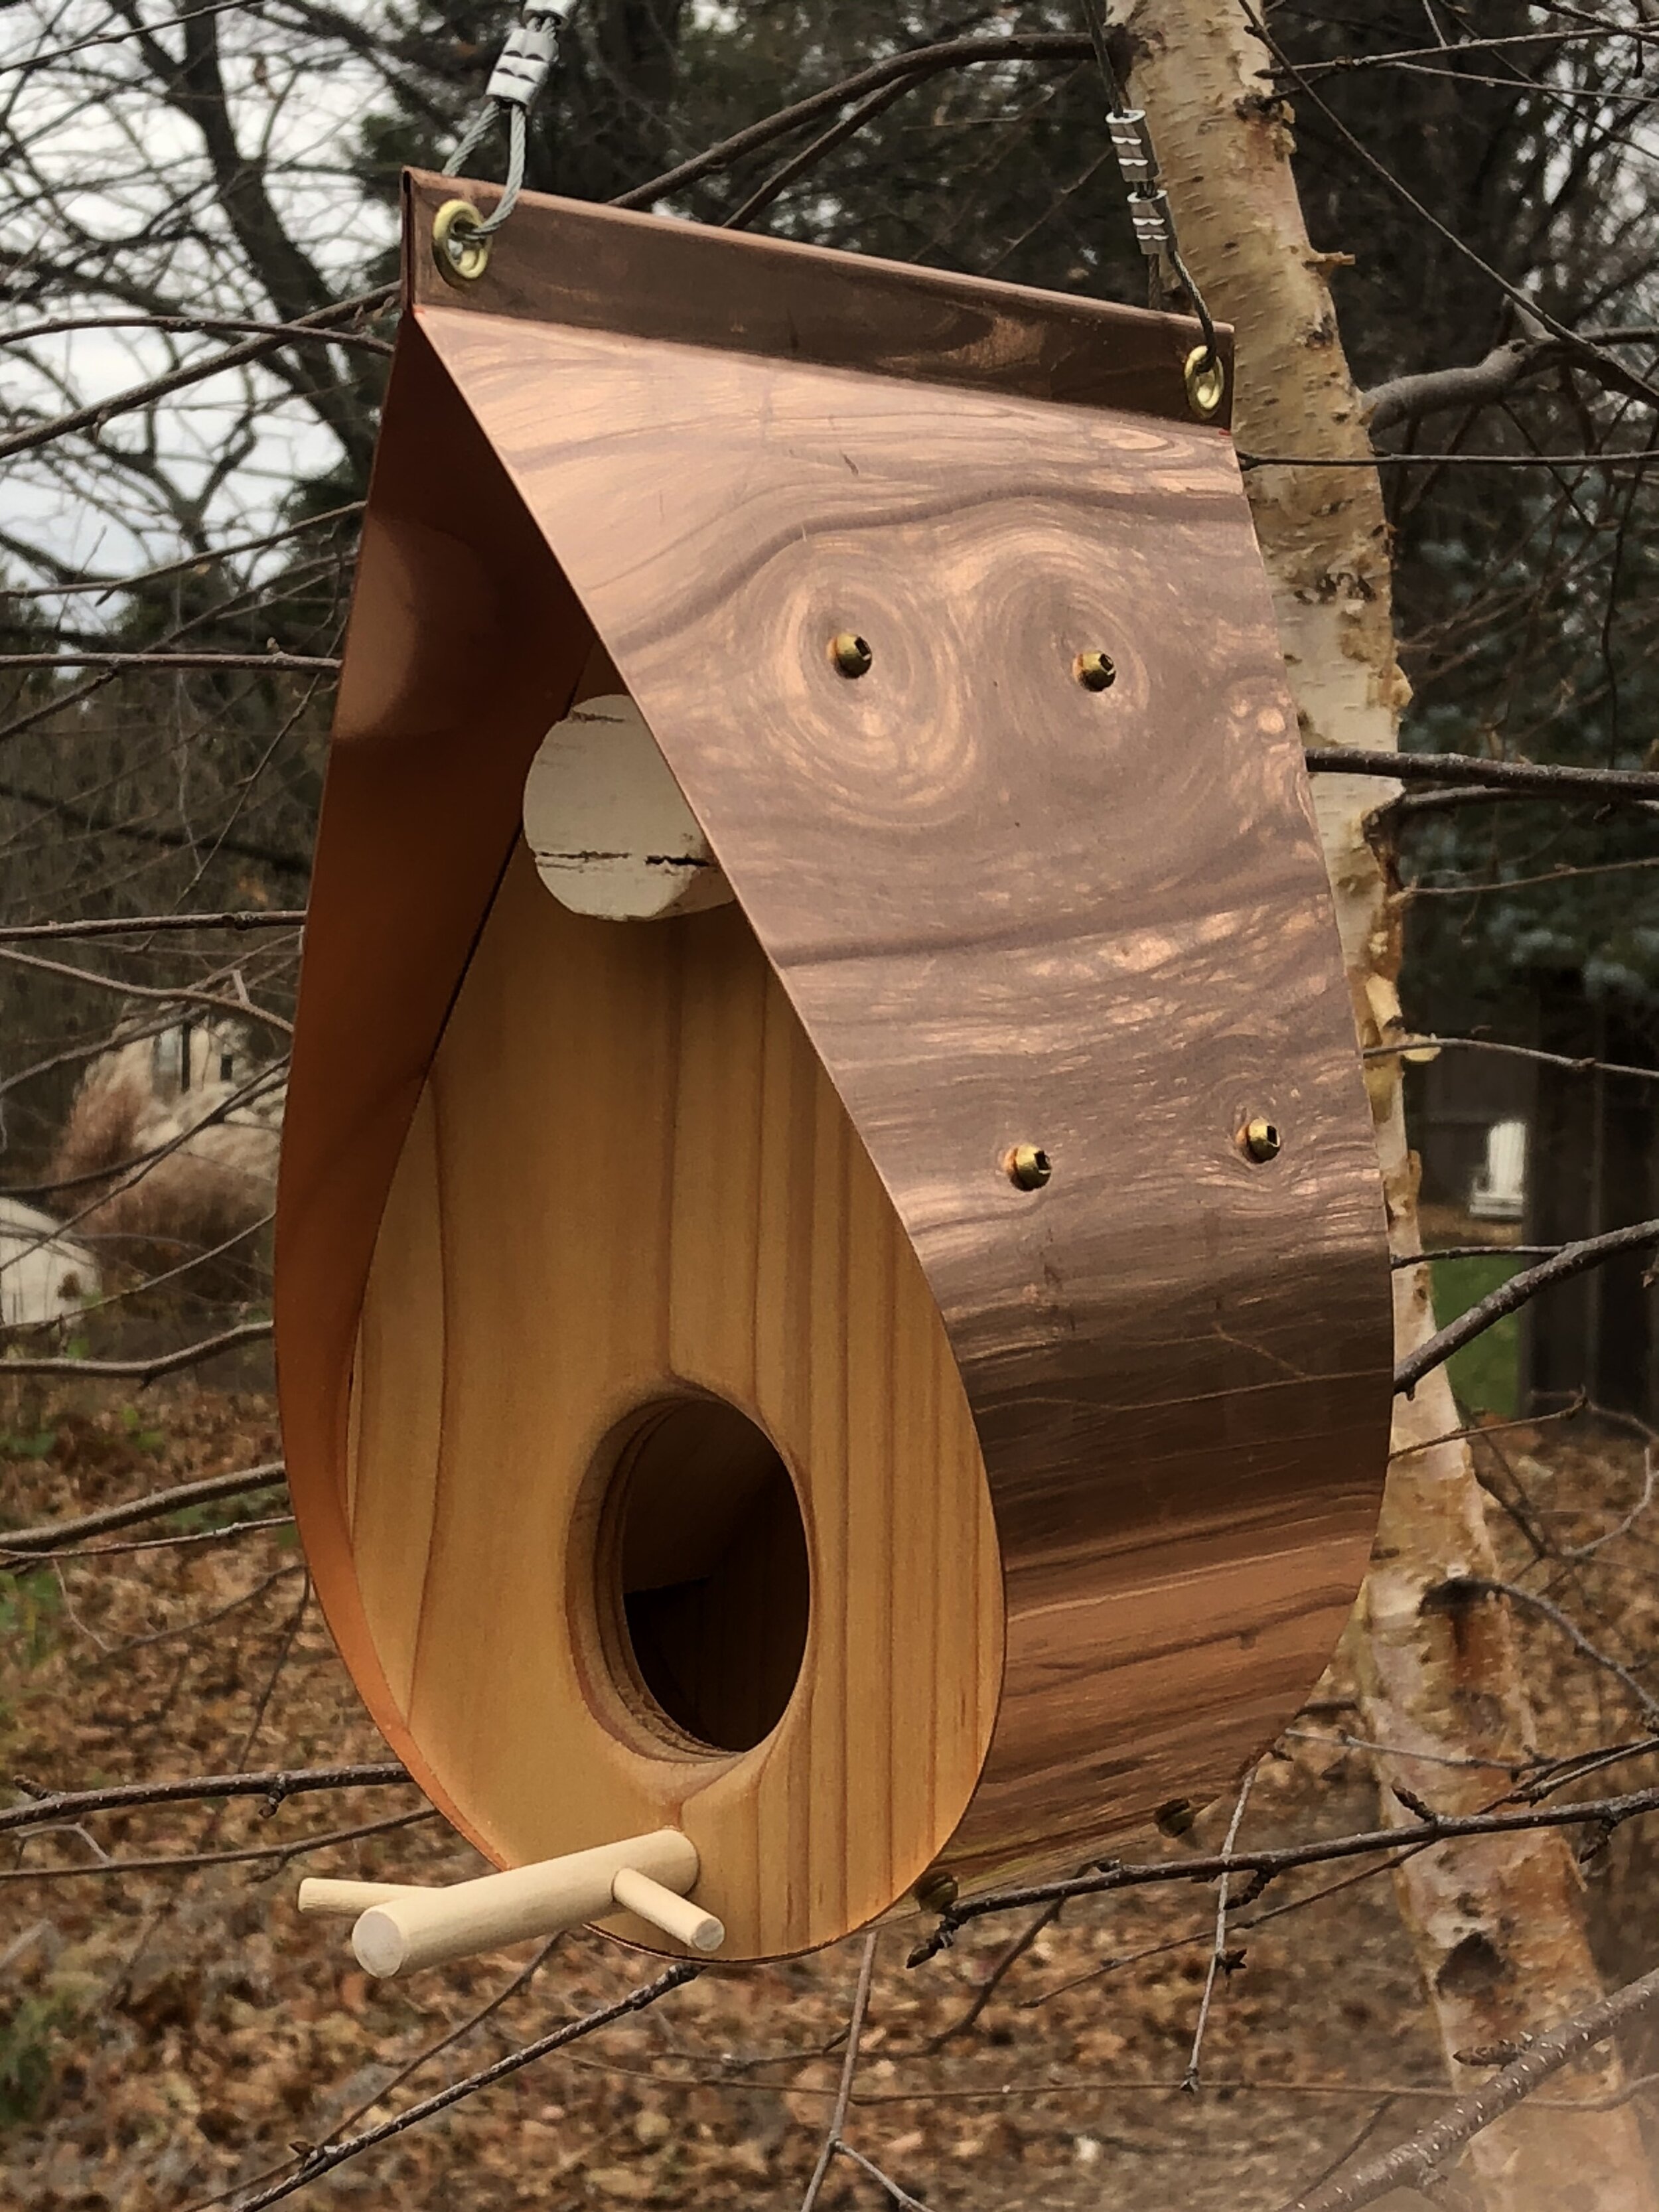
The ultimate bird feeder made with copper and cedar.
There was a time not too long ago when the only garden art available amounted to plywood cutouts of an elderly husband and wife from ‘behind’ out weeding in the garden. You remember them. Everyone had a good laugh at the couple’s expense.
But those times have changed.
I wrote a post about an architect couple from France who moved to Toronto and started a business combining their architectural skills and love of natural materials to create an exquisite bird feeder made from copper and cedar. (see picture) This feeder, although expensive, will provide a lifetime of joy and can be passed on to your children. It is available in new copper (as illustrated) or copper that has already been chemically aged with a lovely verdigras patina.
There are, of course, other bird feeders that are works of art, but don’t expect to find them at your discount store.
The copper and cedar bird feeder has aged nicely and taken on a lovely patina in only a few short years. And the birds love it too.
Although a finely aged concrete bird bath has been a staple in so many gardens, copper birdbaths not only look beautiful, they have natural microbial benefits that can make them a better choice.
I wrote about an elegant copper bird bath available at a fine garden and home boutique, but similar ones are available at many bird and home stores.
For more on growing your garden on a budget, check out my in-depth article here.
Use the iconic garden bench as art

The garden bench – especially an older, moss and lichen covered bench – can be a beautiful, yet useful addition to the garden.
Many years ago – certainly more than 20 years – I was desperate to get a garden bench. We lived in a typical subdivision and I was working diligently to create a mini woodland garden in the yard. The bench represented a destination along a simple path in this tiny garden. I wrote an earlier post on designing a woodland garden in a small yard and focused on the importance of a pathway in a small garden to help the viewer experience the garden as they walked through it.
Not only did our traditional garden bench provide a destination for the visitor, it offered the gardener a place to rest and enjoy the garden from a different perspective.
It’s another excellent example of how we can turn a utilitarian garden object into a wonderful piece of garden art.
Creating your own garden art is always the best approach.
Five tips and DIY ideas to add art to your backyard landscape
Look for naturally-aged garden objects such as birdbaths, birdhouses and garden benches that people are selling either at garage sales or at on-line sites such as Kijiji. I have picked up some of my favourite “art” pieces this way.
Use techniques (like the one described below) to age newer items rapidly so they better fit into your woodland setting
Most “artistic” elements are best discovered rather than presented for everyone to see. Consider using vegetation to hide your art, especially more whimsical pieces that, when unexpectedly discovered, will bring a smile to your visitor.
Purchase lasting pieces that incorporate natural materials like copper, cedar and even rusty steel that will add a rustic element to your garden.
Whenever possible, look to nature for its existing art forms. The beautifully coloured rock, an old cedar tree root, an elegant piece of driftwood. These are often found objects that add a natural element to the garden and be combined with bought items to create a lovely juxtaposition of old and new.
In those days garden art, even a nice garden bench was not easy to find. I did, however, find an inexpensive wooden bench at a discount department store and bought two. More than 20 years later they still form a focal point in our woodland garden. Never, however, do I actually sit on them. These inexpensive garden benches have taken on an incredible aged look, covered in lichen and mosses. After a spring rain, they more or less turn a soft green as the thick moss bursts to life from its more dormant state.
Our two benches now hold large black containers that are planted with colourful, hard-working annuals that create a hit of colour in the garden and draw attention to the beautiful wooden benches.
In another part of the garden, we have a small cement garden bench that is beginning its aging process. Letting it age naturally is a slow process. It might be time to help it along a little using the following method. It’s perfect for quickly aging cement containers, benches and garden statuary.
How to give concrete a mossy, aged patina
A quick search on the internet provides several alternatives to creating an aged look for new concrete. It works on statuary as well as concrete containers. Mother nature and time does most of the work naturally, but some simple steps help to hurry the effect along. What might take mother nature years to create, can be done in a few weeks or months by following these steps.
• Start by mixing a weak solution of water and black acrylic or water-based paint and apply it to the cement statuary. Let dry and apply a second or third coat. The effect is simply to give the statuary a ‘dirty’ look rather than the stark white one it often has when it is new.
• Mix yogurt or buttermilk in a bucket with equal amounts of water, compost or soil and even some manure. You can add in some crushed moss at this stage as well. The result should be a thick spreadable paste.
• Paint on the mixture to the cement statuary or container ensuring you cover all areas especially creases where moss would naturally take hold.
• Take a handful of moss and rub the surface of the concrete to spread the moss spores into the concrete.
• Finally, store the concrete statuary or container in a moist and shady spot to encourage the aging process and keep it moist for a number of weeks until you see the moss get established.
Our gardens need to be inspirational places and what better way to achieve that than to add a few pieces of garden art, whether they are nature’s art like the boulder or store-bought statuary.
Statuary is great addition for the woodland garden
Garden statuary has always been a part of the garden and works well as it ages, often taking on a mossy patina.
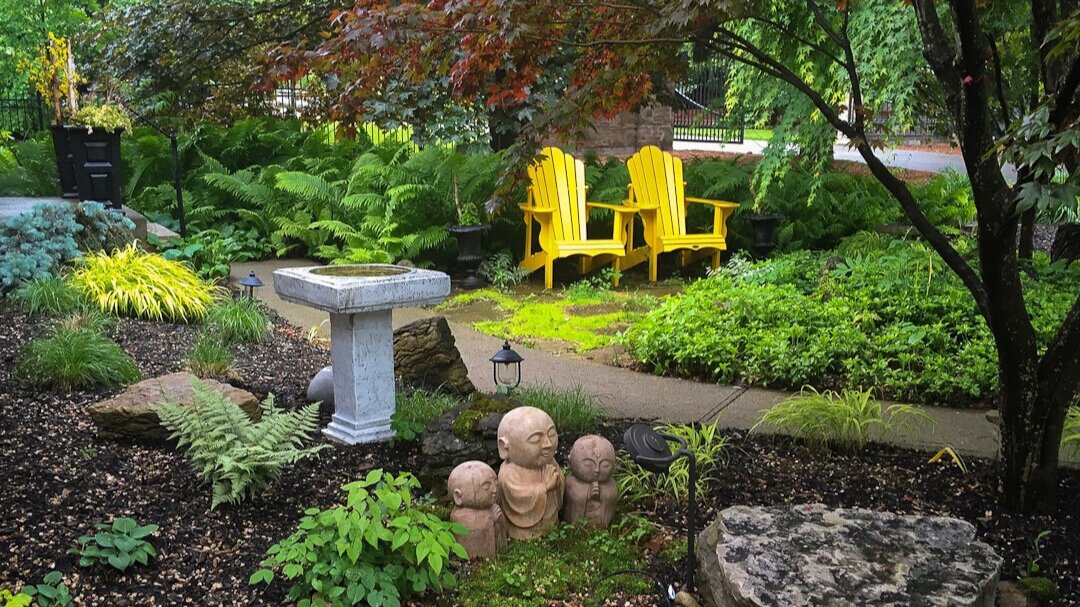
In my Japanese-inspired woodland garden, we have incorporated traditional Japanese statues praying together surrounded in a patch of moss. With a little encouragement, I am hoping they will take on a mossy appearance for a truly aged look.
In another area of the garden, a statue of Saint Francis, the patron saint of animals, would be a perfect addition.
We have a number of aging cement statues of small animals tucked away throughout the garden. For much of the growing season they are mostly hidden from view, tucked away in the vegetation. It would be easy to miss them on a walk through the garden.
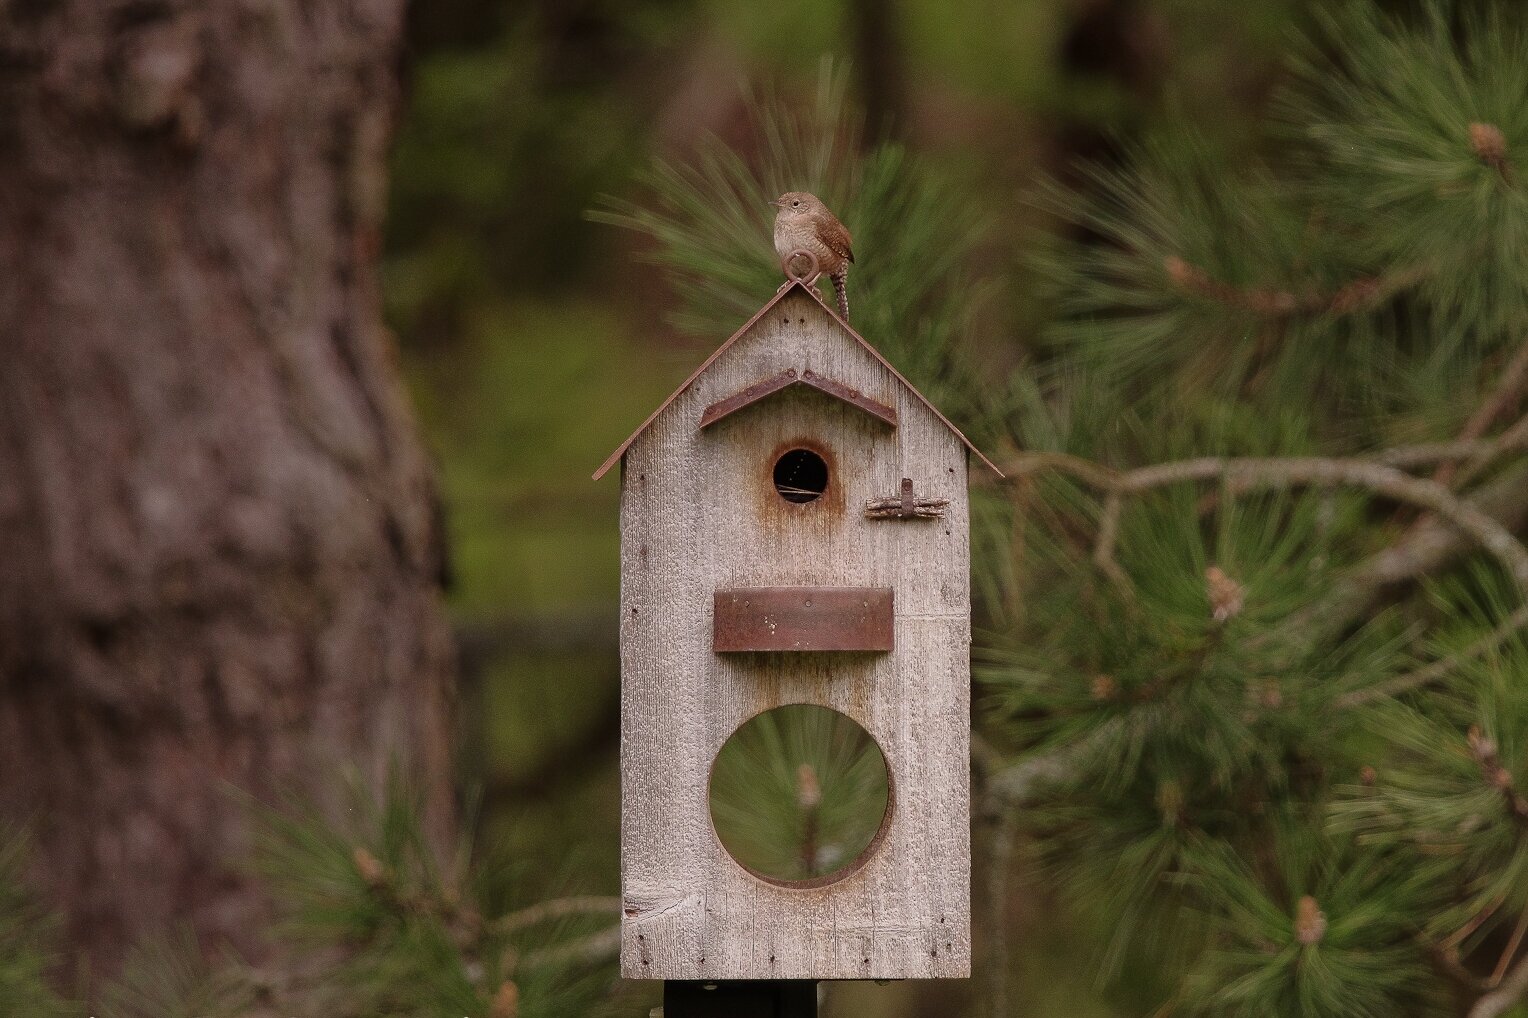
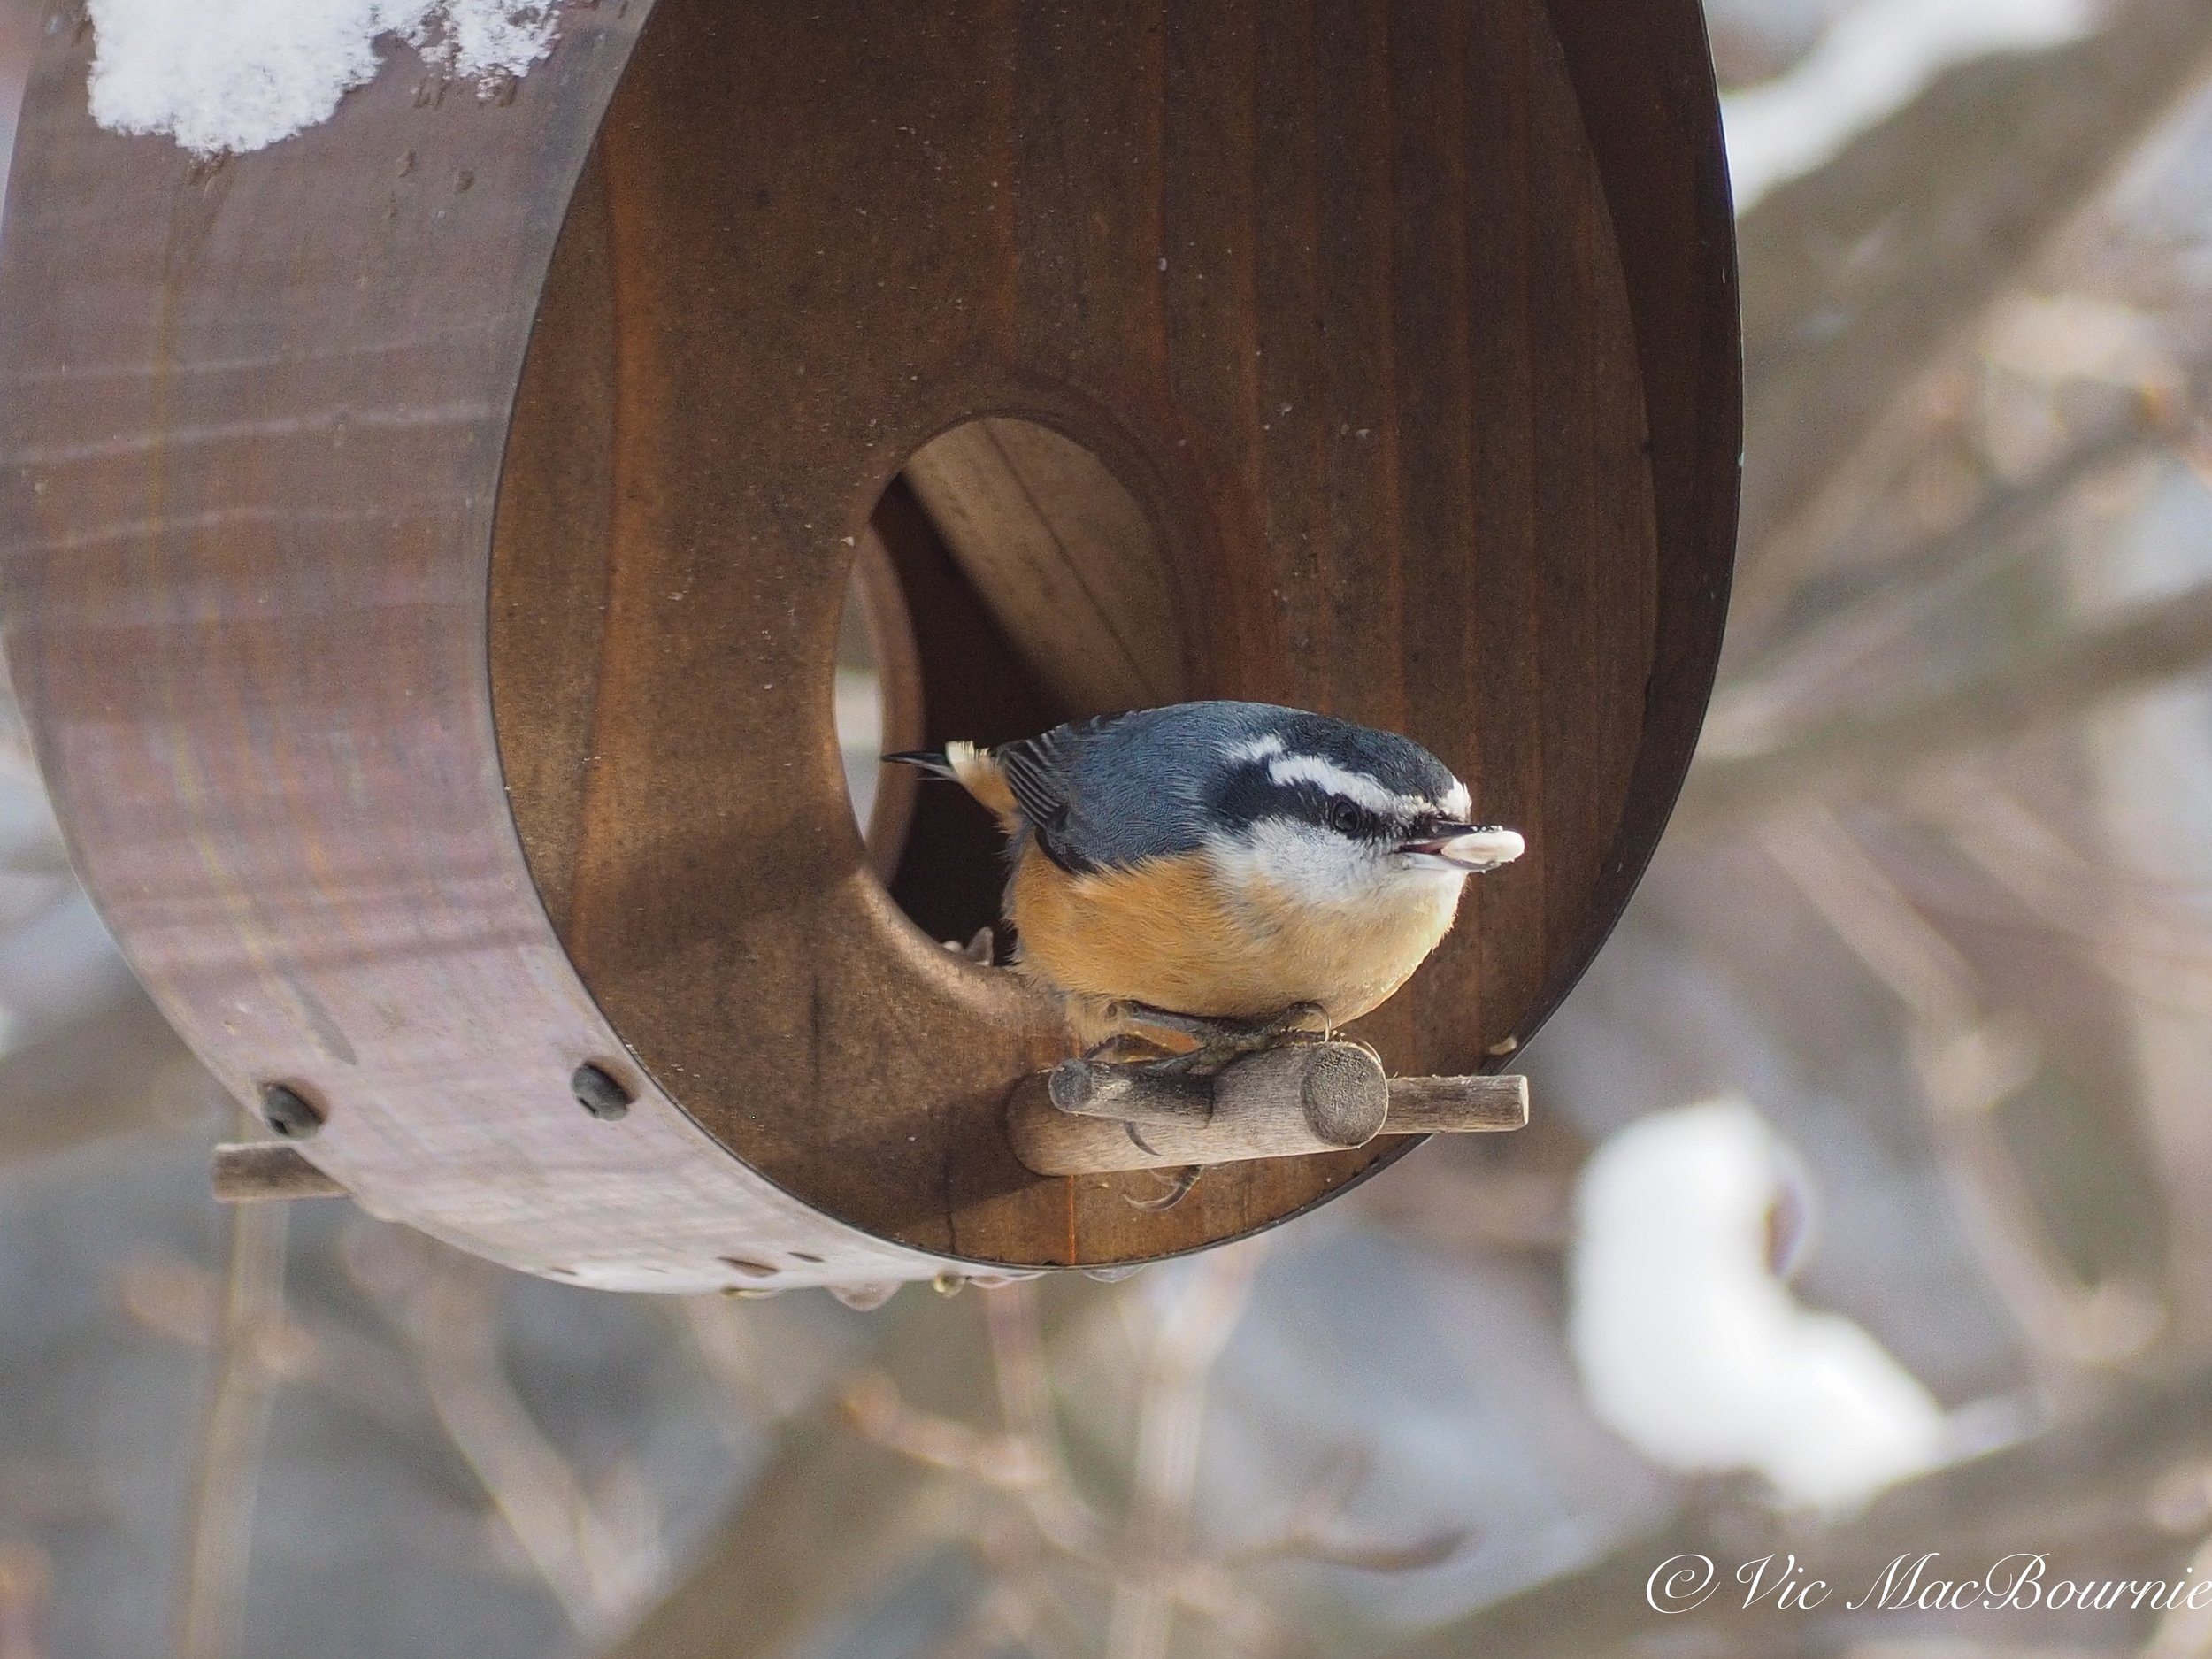
This rustic bird house and feeder fits the woodland theme and provides the ideal home for this Carolina wren.
In most woodland gardens, however, garden art should be more subtle. Consider a trip to your local nursery or rockery in the spring and scour their new moss-covered boulders to find the one that works perfectly in your woodland setting.
In another area, a gnarly branch that fell from a tree can serve as art. Place it somewhere in the garden where it’s natural beauty can age gracefully and work its way back into the soil while it provides homes for insects, small reptiles like red-backed salamanders and toads.
The moss-covered rock or twisted branch may also form the perfect natural landing spot to catch some great photographs of birds in your garden. Encourage moss and lichens to grow in the cracks but leave enough room to tuck in a few sunflower seeds to attract the birds to the exact spot you want to photograph them.
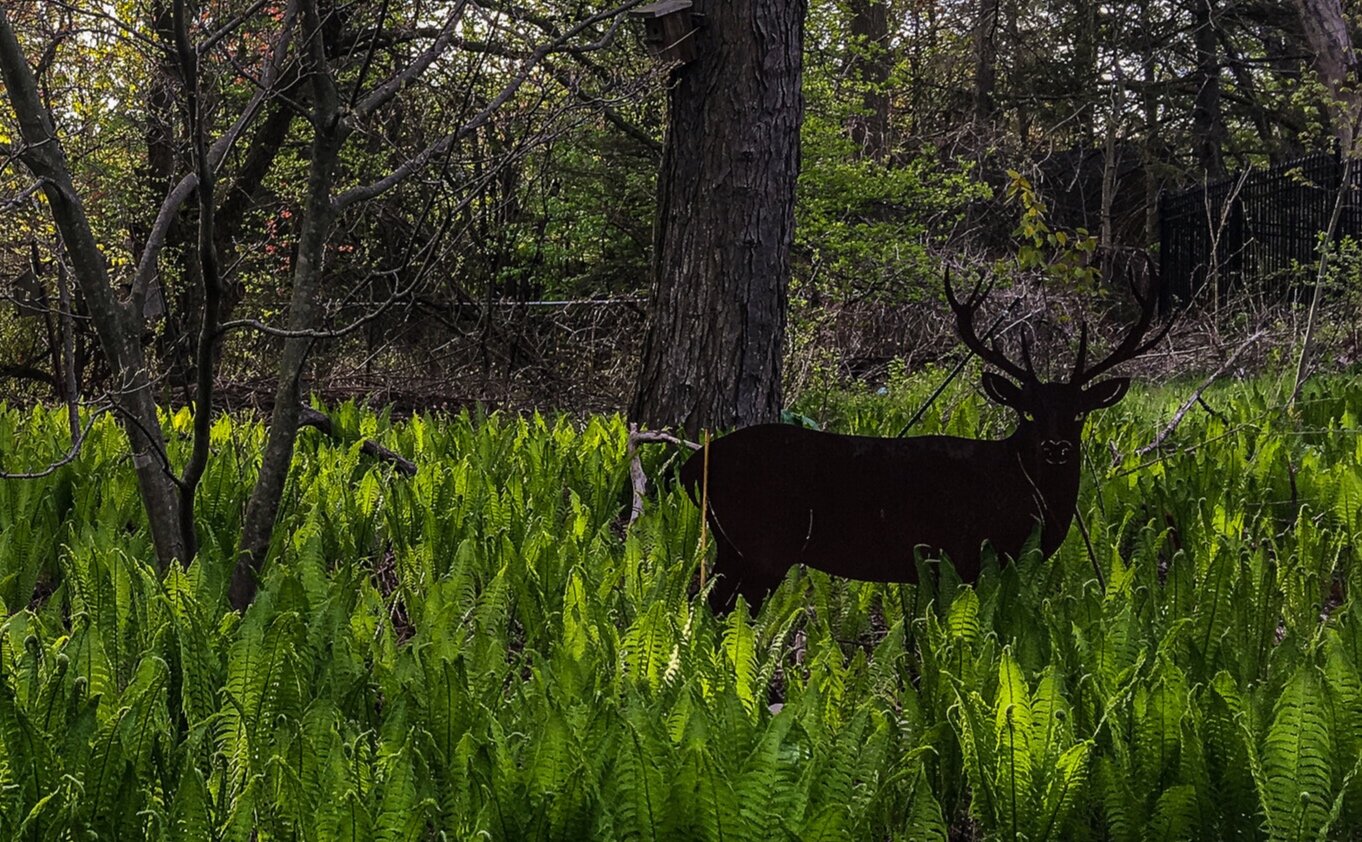
Rusty Buck standing guard in the ferns ties in to the rustic theme of the garden art in this section of the garden.
The rusty buck as garden art
Probably our favourite piece of garden art my wife and I purchased was from a boutique garden store we noticed on a day-outing. The store was tucked away in a small Mennonite community about an hour and a half drive from our home. We both noticed it as we drove by and immediately turned around to check it out. It’s another example of a piece that gets better with age. Now every time we see our rusty buck tucked in the ferns, it brings a smile to our face. Not sure what the native male deer think when they see our rusty buck, but it’s been knocked over on the ground in the morning more than once. Could be the wind, could be a jealous buck. We may never know.
Gardening on a budget links
Ten money-saving tips for the weekend gardener
DIY Bark Butter feeder for Woodpeckers
DIY reflection pond for photography
Click & Grow is ideal for Native Plants from seed
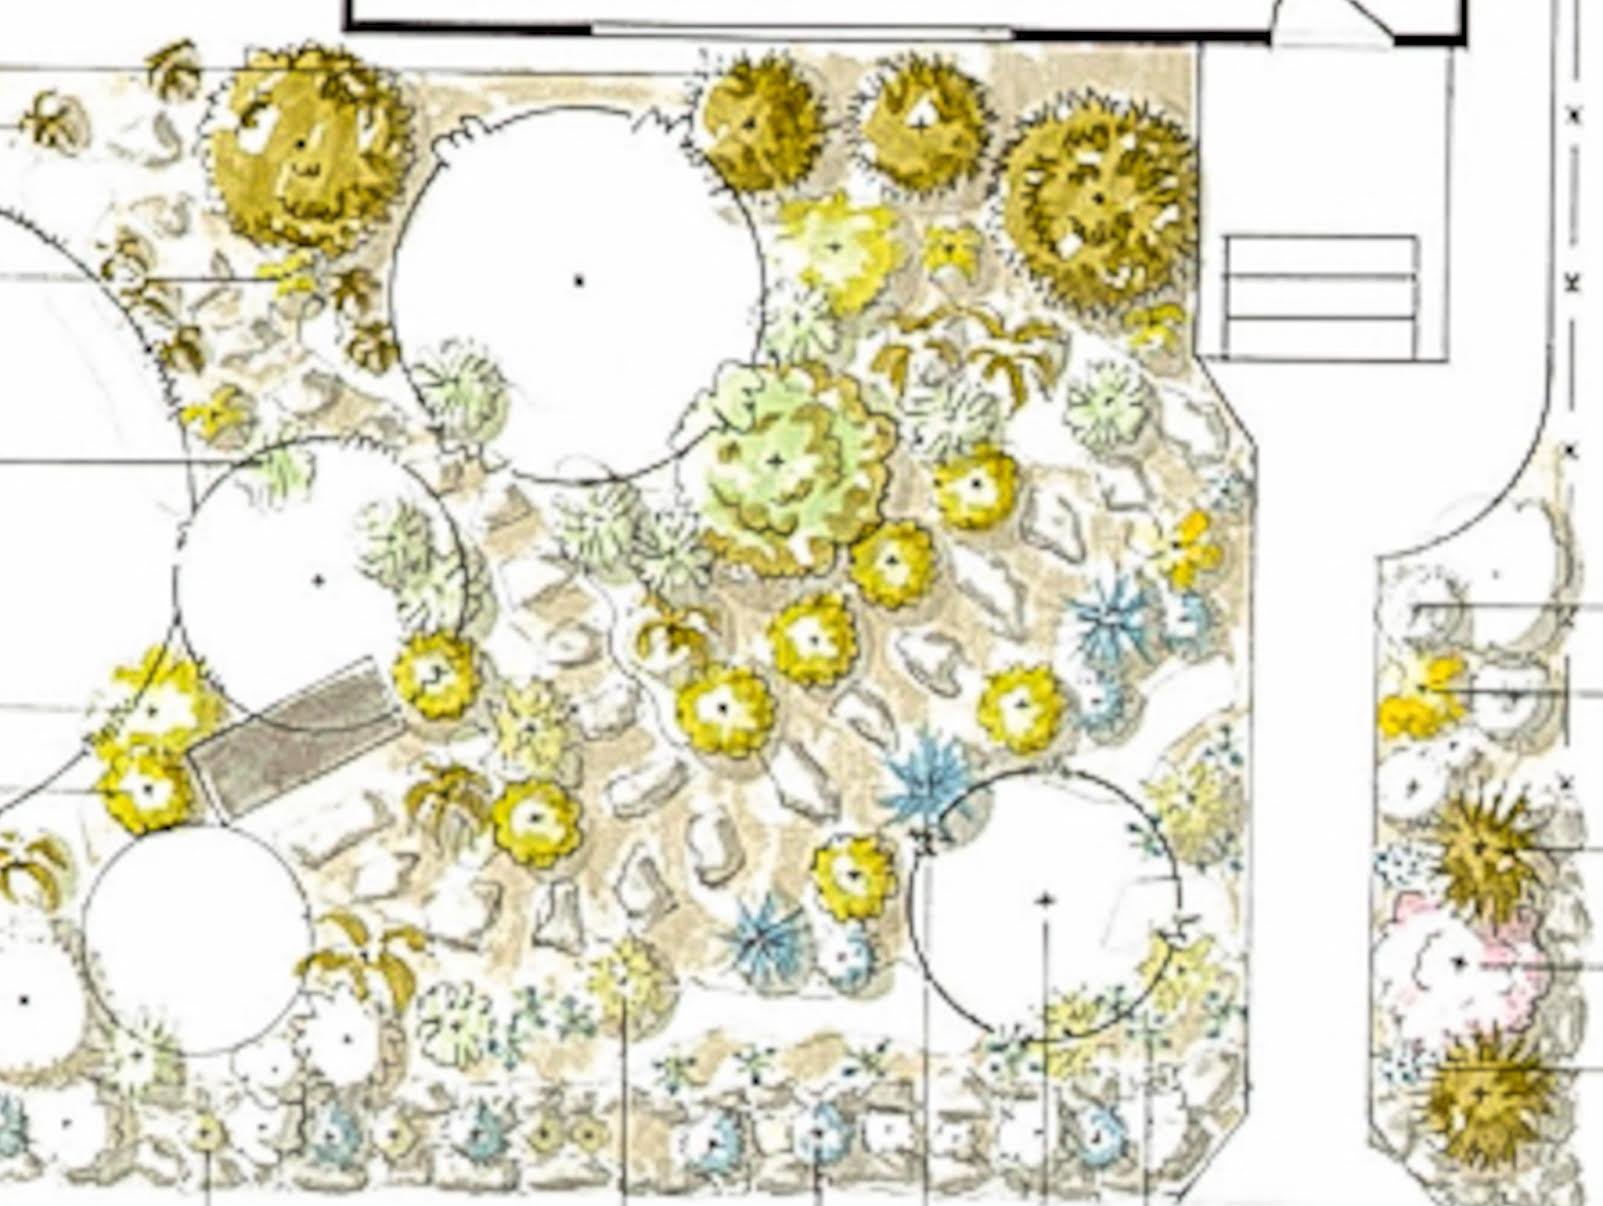
A front garden landscape design for the Pacific Northwest
Alexa DeBouef Brooks’ natural garden design complete with a plant list for this Seattle based front garden.
Acid-loving plants put to the test in small Seattle garden
This small Seattle front garden design plan by Alexa LeBouef Brooks puts native acid-loving plants to the test.
The Seattle area landscape designer first removed what was once a grass lawn and then had to deal with two very large and established cedar trees that were already on the property and had, over the years, turned the soil in the front garden acidic.
The design is installed in a neighborhood just outside of Seattle and very close to the University of Washington.
Alexa explains that the site is a small front lot with two very large and established cedar trees, one on either side of the garden.
Her goal was to create a natural, sustainable garden that both looks good year-round and is able to deal with changing environmental conditions associated with climate change in the future.
“You are limited in what you can plant underneath our Northwest conifers because they demand every drop of water available and make the soil very acidic.”

A front garden design plan of a Pacific Northwest garden in the Seattle area. Notice that there is no grass in this garden planted with native, acid-loving plants.
All the plants included in the design are acid loving plants and should establish well in the area. The House is East facing but gets adequate sunlight throughout the day.
The client wanted this garden to be an homage to a best friend who had recently died.
(Be sure to click on the link here for more on Alexa LeBouef Brooks and Understory Gardens.)
Also, if you are interested in native plants, be sure to check out my post on Gardening with Native Plants of the Pacific Northwest.
Alexa explains that for years the friends had planned on creating a native garden together.
“I feel honored to have been a part of this project, and help the clients vision come to life."
Below is a chart showing the plants Alexa used to create the garden. On the left are the number of plants and on the right is the name of the plants.
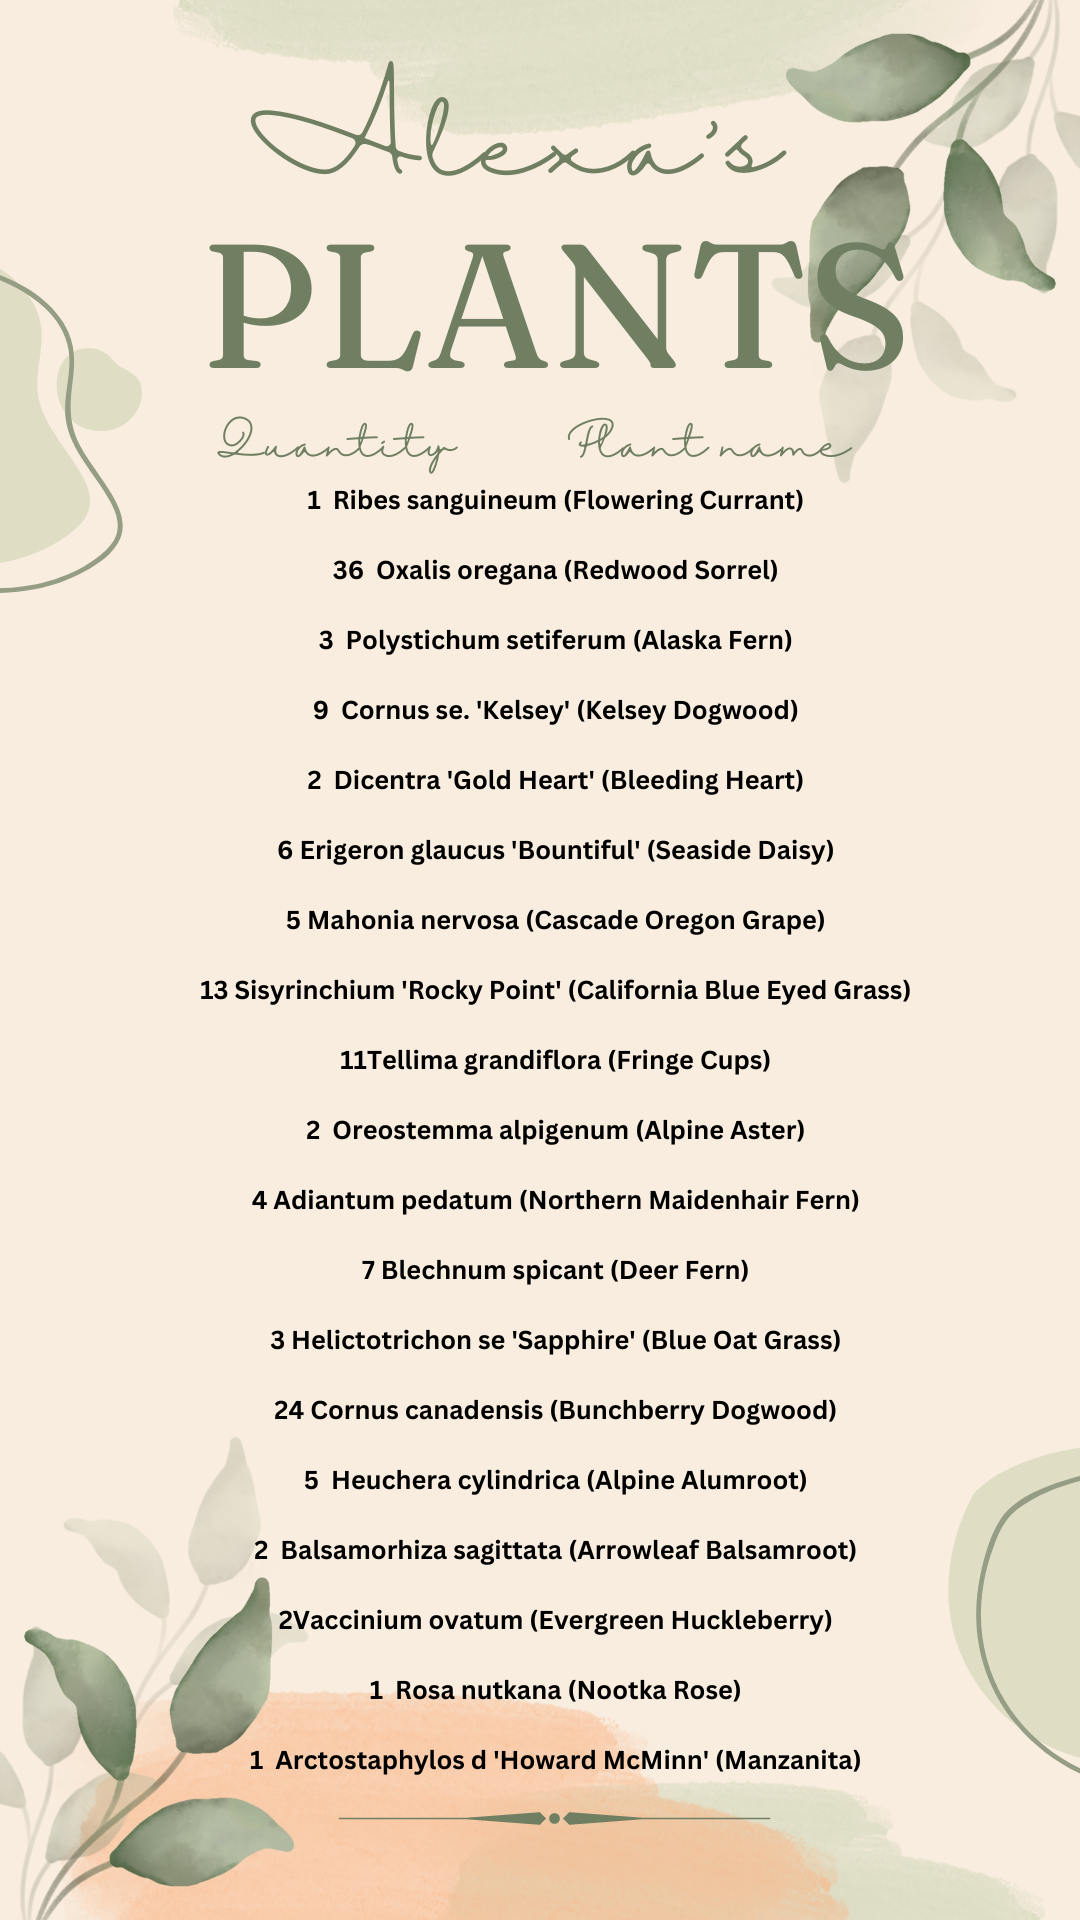
Above is a plant guide for the garden with the numbers listed to the left of the plant’s name.
Alexa LeBouef Brooks is a young landscape designer in the Seattle area who is using her passion for native plants along with her background in fine art to create exciting natural and woodland gardens.
She recently told Ferns & Feathers that the “development of my style of gardening grew from my desire to always be connected to the natural beauty I spent so much time in as a child. Although I embrace multiple garden aesthetics, the native and natural style of gardening keeps me rooted in the land I call home.”

Through the excellent work of the Seattle-based, non-profit organization called Plant Amnesty, many of Alexa’s clientele are already aware of the importance of protecting the ecology of the area.
The organization’s focus is to educate the greater Puget Sound area on proper pruning, responsible gardening and land preservation.
“I find that most clients who seek gardeners and designers through Plant Amnesty have a shared interest in maintaining the integrity of our delicate ecology and environment. Even outside of my Plant Amnesty clients, when a potential client sees my business name and website, they are anticipating a particular style of gardening from my work. Most are open to the suggestions I make when designing their gardens and plugging in additional plants to an existing design as well as garden maintenance methods,” Alexa explains.
Changing the way we garden is important to Alexa. Climate change is an ever increasing problem in the Pacific Northwest as well as elsewhere and Alexa is passionate about designing and installing gardens that will meet the future needs of her clients.
Issues around water conservation and installing plants that can not only deal with the increasingly hotter summers Seattle residents face, but the colder winters, are an important part of Alexa and Understory Gardens’ approach to the new challenges on gardening in the Pacific Northwest.
If you are on the lookout for high quality, non-GMO seed for the Pacific North West consider West Coast Seeds. The company, based in Vancouver BC says that “part of our mission to help repair the world, we place a high priority on education and community outreach. Our intent is to encourage sustainable, organic growing practices through knowledge and support. We believe in the principles of eating locally produced food whenever possible, sharing gardening wisdom, and teaching people how to grow from seed.”
Plant list for Seattle front garden design plan
Below is a list of the plants used in the garden in case the chart is difficult to read
1 Ribes sanguineum (Flowering Currant)36Oxalis oregana (Redwood Sorrel)
3 Polystichum setiferum (Alaska Fern)
9 Cornus se. 'Kelsey' (Kelsey Dogwood)
2 Dicentra 'Gold Heart' (Bleeding Heart)
6 Erigeron glaucus 'Bountiful' (Seaside Daisy)
5 Mahonia nervosa (Cascade Oregon Grape)
13 Sisyrinchium 'Rocky Point' (California Blue Eyed Grass)
11 Tellima grandiflora (Fringe Cups)
2 Oreostemma alpigenum (Alpine Aster)
4 Adiantum pedatum (Northern Maidenhair Fern)
7 Blechnum spicant (Deer Fern)
3 Helictotrichon se 'Sapphire' (Blue Oat Grass)
24 Cornus canadensis (Bunchberry Dogwood)
5 Heuchera cylindrica (Alpine Alumroot)
2 Balsamorhiza sagittata (Arrowleaf Balsamroot)
2 Vaccinium ovatum (Evergreen Huckleberry)
1 Rosa nutkana (Nootka Rose)1Arctostaphylos d 'Howard McMinn' (Manzanita)

White lights and window boxes: A warm holiday welcome
Combining white lights with window boxes creates a warm welcome during the holidays and throughout the year.
Simple Christmas decor is natural choice for front garden
There are no guarantees in life, but if it’s a White Christmas you’re dreaming of, adding the right lights will help bring the magic to your landscape during the holiday season and throughout the year.
Forget those bright LED red and green lights. And those new electric-blue LEDs, just don’t work in naturalized gardens.
If you are looking for tasteful lighting that welcomes guests during the holiday season, warm white lights work like a charm, especially in window boxes and other containers. An added bonus is that the window boxes with white lights look as good in the middle of summer as they do in winter.
In fact, we have solar-powered fairy lights on trellises in the back yard all summer. The inexpensive lights provide a romantic glow to the entrance of our back garden and welcome visitors.

Our Mayne window boxes decorated with Holiday decor complete with white lights add a warm welcome to the natural garden.
We use the warm white lights across the front of our home to add a festive yet classic look.
It starts with our two Mayne Fairfield window boxes decorated with white lights and holiday decor. The window boxes are plastic, self-watering and very well made. We added the decorative brackets as well. These solidly-built, Mayne boxes are available in several sizes in both black and white.
The look continues with our indoor tree (also in white lights) in our large picture window. Finally, the front door includes a lighted wreath flanked by two small, yet simple Christmas trees with white lights. All three are controlled by battery-operated timers making them a convenient option for the entire holiday season.
The only addition is a set of three “presents” decorated with red ribbon and white lights.
The understated decor works well in a naturalized woodland garden.
This look can begin on the exterior of the home and be easily carried into the interior with understated decor.

A Christmas tree adorned with white lights welcome visitors.
Cedar boughs covered in white fairy lights, like this example from McGee and Co., provide a perfect transition from outdoors to the interior. The greenery can be used around a doorway or on a interior or exterior railing.
By removing the obvious holiday decorations, the lights are subtle enough to leave out all winter. Certainly, they can stay out over the winter when a dusting of snow adds a magical quality to the light.
Inside the home, a natural style can be used well past the Holiday season. These contemporary wicker trees, for example, could be decorated with white lights for the holidays, and left natural for the remainder of the year.
And for the fall season, this fun rug from Anthropologie is the perfect way to greet visitors.

These Mayne window boxes add a festive mood and a warm welcome to the front garden.
Window boxes provide a classic Holiday look
One of my favourite combinations for Christmas – that lasts right through into spring – is our front Mayne Fairfield 3-ft window boxes filled with winter greens, holiday decorations and, of course, the small warm white lights.
A simple timer automatically turns the lights on and off after a chosen amount of time. The effect creates a classic holiday feeling both on the exterior of the home as well as inside the house looking out.
If window boxes are something you think you might be interested in, check out my earlier post on planting window boxes on a budget
A dusting of snow on the greenery turns the window boxes into magical wintery scenes.
Window boxes are a great addition to your home at any time of the year, but they really seem to come into their own around the holiday season where they can extend your Christmas decorating theme to a whole new level.

Small white lights in the Mayne Fairfield window boxes add a festive, but classic, look to the front garden.
We use the small twinkle lights in both window boxes, but technology has made the possibilities endless. You could place one or a group of flickering candles in the window boxes that turn on and off automatically. Tuck a grouping of lighted Christmas balls into the window boxes as an elegant thriller almost like a birdsnest.
Front door and landing offers more decorating possibilities
Our white-light theme is extended across the front of our ranch-style home and welcomes visitors with a battery-operated wreath on the front door flanked by two simple Christmas trees that are also on their own timers.
If you really want to add an interesting touch to your front decor, consider turning your porch lights into gas lanterns with these LED lights bulbs that create the illusion of soft, flickering, gas flames.
The effect is simple with an understated elegance.
Red ribbons add a touch of colour to all the greenery and simple decoration.

A window into your woodland
Our full-size Christmas tree, also adorned with white lights, sits in the large picture window over looking the front garden and completing the holiday look.
The simple aesthetics may not be for everyone, but keeping holiday decorating to soft, warm white light helps unify the look and creates a tasteful, yet warm welcome to the woodland garden.

Light pollution and wildlife
Although most wildlife is tucked away for the winter in underground burrows, we should always remember that too much light can create severe problems for some wildlife. Lighting up your landscape can cause some animals and birds to change their natural movements and their feeding habits. For some, the lights may attract prey making it easier for predators, but at the same time creating an unfavourable situation for prey animals.
Extremely bright lights, such as spotlights and other high intensity lights are simply unnecessary in a natural garden. Try to keep this in mind when designing your outdoor holiday decorating plan.
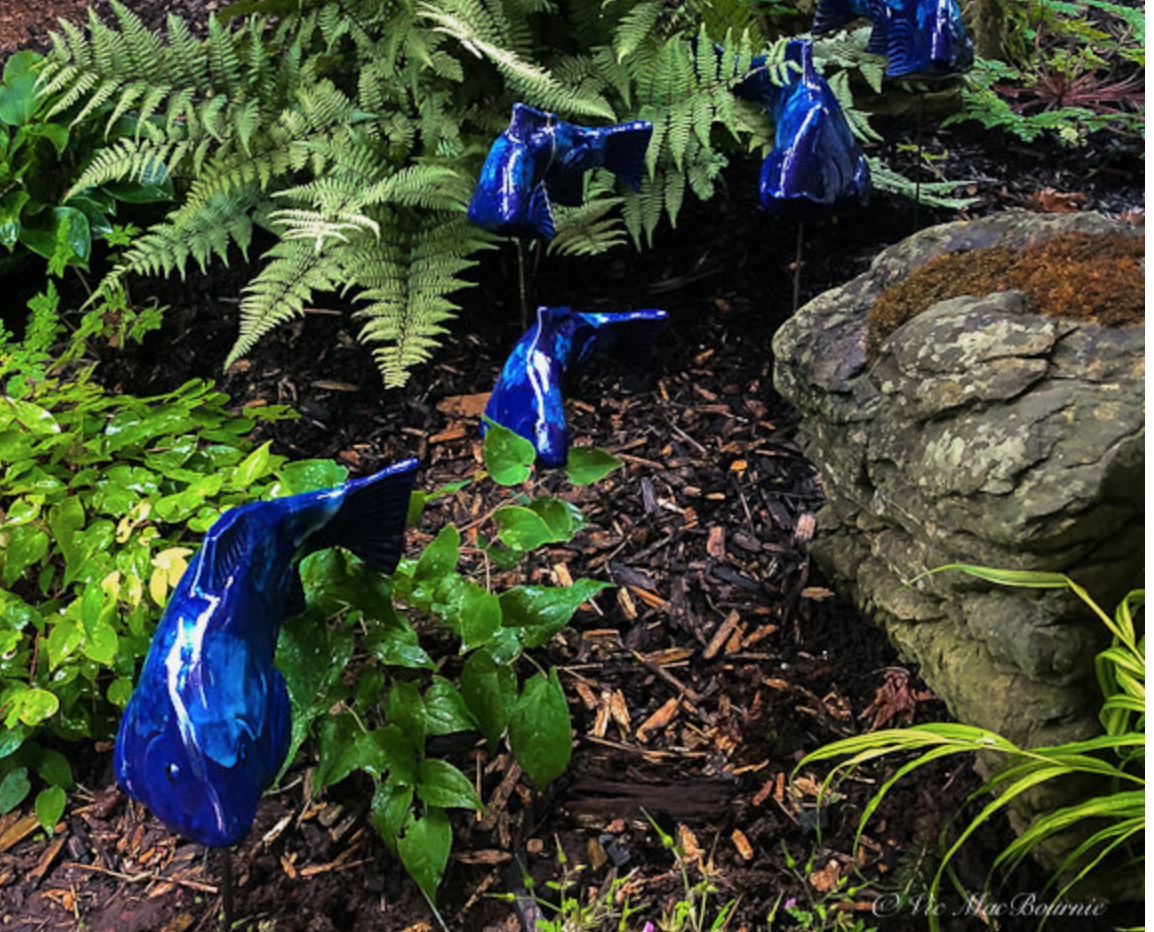
Fish In The Garden: Style, movement and a touch of whimsy
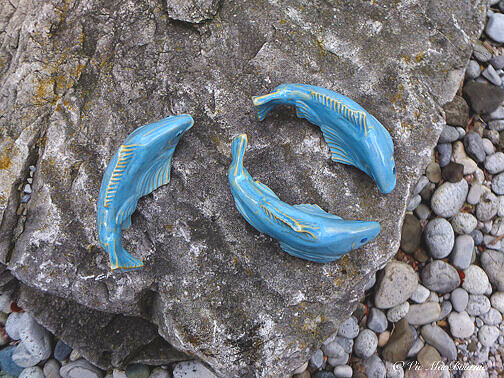
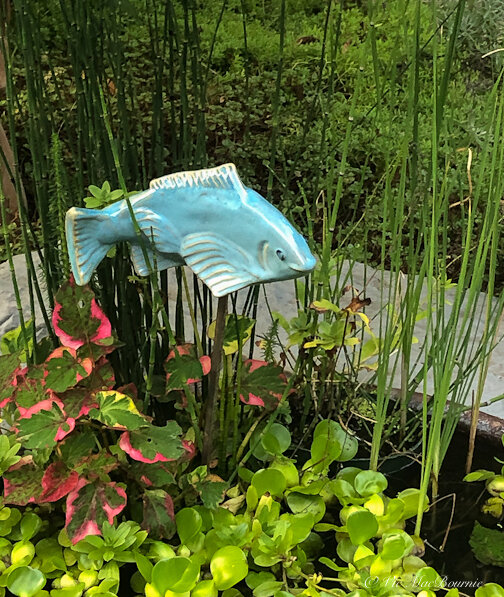
Tyson Weiss's exquisite artistic ceramic Fish In The Garden add a sense of movement and life to any garden. The cobalt and orange koi add a splash of color to your garden, while the trout can be used to add a subtle, artistic and more natural touch to your woodland garden. The fish make the perfect gift and provide gardeners with an opportunity to experiment with placing them around the garden.
Unique garden gifts: Ceramic Fish add artistic touch to any space
There’s no reason not to have Fish In The Garden, thanks to ceramic artist extraordinaire Tyson M. Weiss.
Whether you have a pond stocked with koi or not, there’s always room for these impressive, artistic fish in a multitude of colours. I’ve admired this unique form of garden art since the first time I saw a picture of them and always wondered where they would look best in my garden.
The simple answer: Almost anywhere and everywhere.
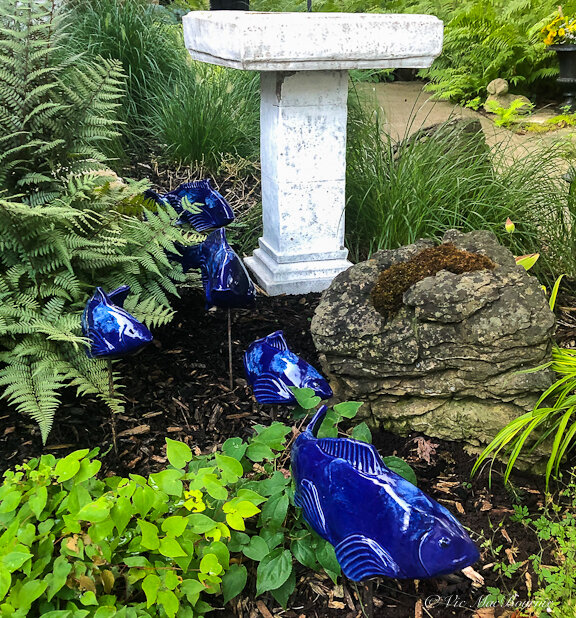
These exquisite ceramic fish, in a multitude of colours and sizes, bring your garden to life as schools roam through ornamental grasses, ferns, mosses and flowers bringing a sense of movement to the garden. Groupings of three, five, nine … weave between moss-covered rocks in the Japanese-inspired garden and can remain there throughout the winter months bringing colour and style year round. They are at home in any garden – running up a dry river bed, rising just above a pond or even submerged to create the illusion of real Koi in a pond devoid of fish.
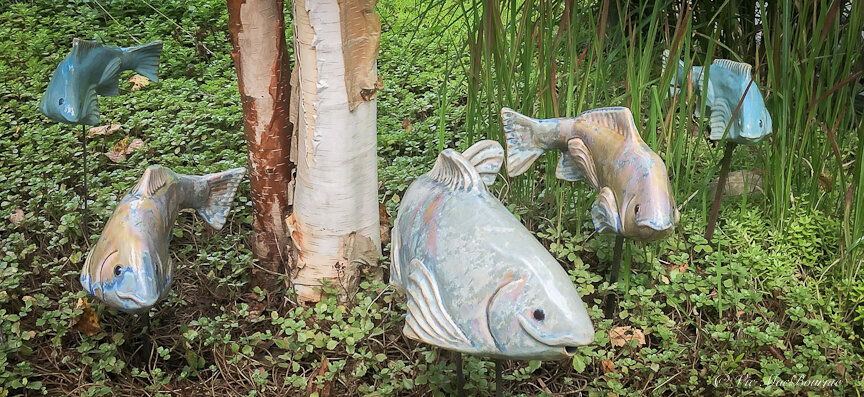
A school of fish wander through the garden over sedum around a birch clump and through the ornamental Japanese blood grasses creating movement and a sense of style in the garden.

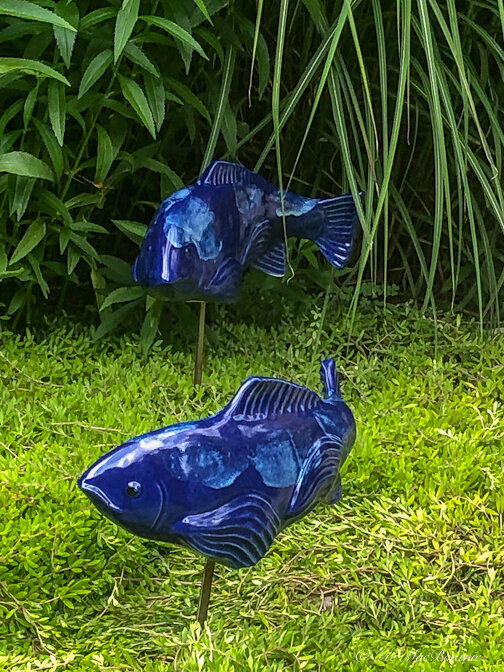
This school of cobalt-coloured fish swim through the ferns and grasses of our Japanese-inspired garden creating a flow down a small hill and around a moss-covered boulder.
Tyson refers to the “flow” created by the schools of fish as a “fluid aesthetic” created by the curves of the swimming fish as they “move” as one through a garden.
“With the multiples, we can create these curves, and with those curves, (the fish) can curve in response to an element of the landscape,” he explained in a 2012 article in the Portland Press Herald. “Around a rock, and then curve back this way around a tree, so it fits. No garden gnome or concrete bunny rabbit will ever have context like that.”
In fact, by creating schools of fish, he explains in the article, it’s possible to “perfectly match the shapes of diverse landscapes and architectural elements. Channel the fish around a rock, through plantings and back out again. Our sculptures — brushes, if you will — bring out the artist in every gardener.”
“If that means making a bazillion fish to get it right, that’s what you have to do.”

Sharing this creative process with gardeners is, without a doubt, one of the greatest benefits of his inspirational garden art.
“Our sculptures are exquisitely crafted of a variety of high‐quality materials. They are moderately priced, somewhat above low‐end polymers and plasters, and well below expensive garden sculptures of stone and metals,” Tyson explains. “They’re even more affordable than some small shrubs and trees.”
Tyson explains that every component in the “school” reflects the hand of the artist.
“The sculptures are hand‐sculpted detail and hand‐painted. No two are exactly alike. Ten years of experience has evolved a proprietary process to meet high demand and yet preserve our founding vision. There is no mass production.”
How to place the Fish In The Garden
Unlike most garden art, where homeowners are left with only the decision of where best to place it, Tyson’s ceramic fish provide gardeners with a multitude of artistic decisions ranging from where to place the school, how many fish should be included and how to organize them for best aesthetic value. This process is, in itself, both artistic and immensely satisfying when done well.
But even when it doesn’t work as well as you hoped, it’s easily changed.
Did I say the entire experience is more fun and certainly easier than planting a new garden bed or large container. Take my word for it, whether you consider yourself creative or not, experimenting with these schools of fish might be the most fun you’ve had in the garden in years.
If you are unsure about how to place the fish in your garden creatively, Tyson’s informative website at Fish In The Garden includes several videos providing examples on how to best creatively place the fish in your garden.
The impressive site provides complete details on what styles of fish are available, how to order them, prices and other details about his artistic ceramic fish. (For details on his colourful Koi ceramic fish go here.)
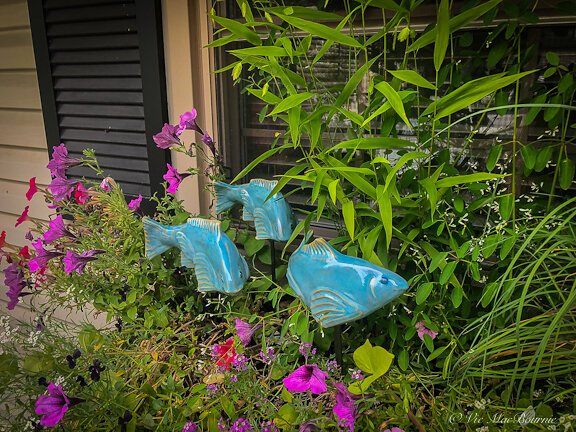
The smaller ceramic fish are perfect for container plantings. Here, three work their way around Northern Sea Grass and petunias in one of our window boxes.
Can I give Fish In The Garden as a gift?
For those who might want to give the fish as unique gifts to gardening friends and family, there are even gift cards available to purchase on the site that can be sent directly to the recipient. (Information on the gift cards is available here on his website.)
The fish are the perfect gift for homeowners, especially those who appreciate the artistic whimsy that the fish can provide. These schools of art look just as much at home in a woodland garden as they would in a small, contemporary urban garden. In fact, the splash of colour that the more colourful koi provide, might just be the punch of colour to take the small urban garden to new heights.
And, by ordering the gifts from Tyson’s website, the fish can be delivered directly to you or the recipient of the gift wherever they choose to garden. The perfect gift for a friend or family member who lives in a different country, state/province or far off city.
Fish In The Garden can be shipped worldwide
Tyson is quick to point out that they can ship to virtually any address in the world, adding that that there are restrictions on some products, and some products cannot be shipped to international destinations.
The enjoyment homeowners get from having the fish in the garden, however, does not compare with the enjoyment Tyson gets from knowing his artwork is gracing gardens in his hometown of Falmouth, Maine and in gardens around the world.
“I love it. I invented something that makes people really happy that could last indefinitely,” he says. “If you read the reviews online there are SO many stories of people meeting their neighbors and making new friends over passersby seeing these fish and asking about them.” he explains in an email to Ferns & Feathers.
“There was a long stretch where most people didn’t get it at all because there was nothing like it out there,” Tyson explains.
“The early adopters were the landscape architects, interior designers, art gallery owners: People who were both intelligent and creative that had an eye for something new. Now that people have seen them in so many shops, botanical gardens, private homes, magazine articles, social media awareness of this new idea is spreading a lot faster.”
To say his fish have made an impact worldwide is an understatement.
“Last week we shipped four orders to Australia. I've shipped to Ireland, England, Germany, Switzerland… Singapore…. Lots of people from abroad have bought them in gift shops and carried or shipped them home,” Tyson explains.
And if that is not enough, his fish are even likely gracing the home of a former American president.
“Last year a gift shop owner in Florida told me (former president) George Bush Jr. and his wife, Laura, came in and bought a bunch of fish,” Tyson writes.
Now that’s something to get excited about.
To say his clients are impressed with his work, is an understatement.
He recalls one woman who purchased 90 of his fish to give as gifts to her family.
His website is full of clients proclaiming their love for the garden art and the joy the fish have brought to them. One of his clients writes about their experience on his website:
“I had recently expanded a patch of ornamental garden this year with a Japanese theme, using traditional plants, and was searching for the most perfect and unique ornaments to add other than the typical “Buddahs” and “pagodas,” water basins and fountains that you can find anywhere,” writes one gardener.
“These fish are perfect! It looks so magical to see my koi “swimming” through my garden and have gotten many compliments on how unique and “clever” they are. If you want that little “extra” that sets your landscaping apart from your neighbors and friends... you need these fish! I am completely happy when I see them and I will most definitely be purchasing more to increase my “school.”
A grouping of fish look as good on boulders as they do in garden greenery.
Fish placement in our garden
In my garden, different schools of fish move from the front to the back gardens depending on my mood.
In the Japanese-inspired garden, a school of fish swim around our elegant ghost fern, down a small hill heading for a moss-covered rock. By adding a few more fish, the school travels past the rock over the mossy ground creating a natural curve as they head for the safety of a massive boulder.
A few small changes and the school is off in a completely different direction.
Changing the design involves nothing more than pushing a metal stake (provided with each order) into the ground.
Not far from the Japanese garden, a school of three small fish swim through the colourful and lush planting of our window box providing a little whimsy for garden visitors and one that can be seen from both outside and inside our home.
Even a single fish in the widow box or in a small container works well to add a touch of colour. They would look as good in a container on a garden patio as they would on a balcony overlooking a skyline 20-storeys high.
In the backyard, a larger school of fish work their way up past the dry river bed, over the sedum, through the blood grass and around one of our birch tree clumps. Their presence contributes to the feeling of movement in the garden. Just down along the river’s bank, a small group of fish peek out from the tall stems of native obedient plant looking to join the larger school.
In another area, I move a group of three fish to see how they look hiding in the fountain grass and provide visitors with an unexpected surprise as they walk out into the woodland garden.
As the seasons change, so too do my artistic opportunities to move the schools of fish throughout the garden.
So much fun.
No amount of traditional garden art will provide so many creative possibilities and opportunities to play with natural design in our gardens.
Certainly none will provide the same natural movement that Tyson’s fish create. Nor will they work so seamlessly into the natural landscape quite the way the fish organically fit naturally in the garden.
A single fish adds a splash of colour as it swims above the plants in the patio container water garden. It would look just as good in a window box 20-storeys up overlooking a city skyline.
What makes this garden art so special?
• The fish can stay outdoors in any climate, including freezing Maine or Canadian winters.
• The fish are in gardens from Alaska to Arizona
• They will not break in the cold or fade in the sunlight
• All fish come complete with a rod for placing them at the proper height in the garden
• They come in a tail left and tail right design. Schools of the fish look best (natural) with both tail directions being used to create flow
• The fish can be submerged in water for stunningly realistic results or simply to add to an existing stock of real pond fish.
Fish bring Woodland garden to life
For woodland gardeners, the schools of fish provide a multitude of opportunities to not only add a natural artistic element to our gardens, they are so easy to move around the gardens that they create changing possibilities throughout the seasons
These fish form the perfect garden art that so many of us have been searching for to bring our gardens to life in a stylish, yet subtle and convincing natural way.
Display ideas for Fish In The Garden in your Home and Garden
In the Garden:
Use schools of fish swimming among ornamental grasses and allow the grasses to hide parts of the fish for a truly natural look. Let your visitors discover them as they stroll through and around your garden.
• Place the fish among your ground covers to add interest and create the illusion that the ground cover is the sea floor and the fish are floating just above it.
• Place the smaller fish in window boxes and patio planters for year-round interest
• Bring your dry river beds to life with a school of large trout or koi running up through it around driftwood and boulders.
• Use the fish on a stone wall, large boulders or fountains and even in bird baths and on patio tables
• Incorporate the fish in your man-made ponds either swimming above the water or submerged with real fish.
In the Home:
• The fish look just as good in the home as a splash of colour for shelves, sitting on a table, on a fireplace mantle or even used much as they would in the garden but in house plants such as ferns, string of pearls and other exotics.
Use the fish in the garden throughout the spring, summer and fall months, but get the most out of them by bringing them indoors for inspirational decorating throughout the winter months
A school of fish make their way through our Japanese-inspired garden.
Garden fish idea hatched out of economic downturn
Although the idea to create artistic ceramic fish was hatched out of necessity, their birth was never guaranteed.
In fact, their creation was a 10-year process of trial and error that started with simple sketches on a notebook and grew over time to what they are today.
It was a long, arduous journey for Tyson and his fish with many iterations of the art form.
The idea of Fish In The Garden actually had its roots in 1998 when Tyson took a pottery class at Unity College, America’s Environmental College.
The teacher encouraged students to keep a notebook of their ideas to use as a building block and reminder for potential projects. That notebook – which he still has – filled with scribbles and photos and sketches including rough initial illustrations of his fish, was eventually the catalyst that led to the development of his art work.
But before that, Tyson had to deal with the necessities of life and started a successful landscaping business.
In 2008, after operating the landscaping company for ten years, and with an economy on the downside, Tyson decided it was time to make changes in his life.
The years of working in landscaping and experiencing gardens either devoid of, or lacking appropriate garden art at reasonable prices, convinced him to go back to the drawing board to further refine his ceramic fish and work on them until he was able to get his creations to look the way he wanted.
Tyson returned to an earlier version of the fish in his studio – a smaller, thinner fish that gardeners could manoeuvre to angle up or down.
Unique garden art discovered at first show in 2008
Everything changed in January 2008, when Tyson did his first show at Coastal Maine Botanical Gardens.
Landscape architects, garden store owners, even interior designers took notice of his artistic creations that found a place both in the garden and in the home on fireplace mantels and coffee tables. By the end of the next year, orders poured in forcing Tyson to begin considering alternate ways to create the highly-sought after fish.
It was around that time that he also decided he needed a new work space to help make creating his artwork a little easier.
“Several years ago I bought a dairy farm because the “barn” was a heated and insulated 4,000-square-foot space with running water. It took 2 months of carpenters working 7 days a week and $70k to get it where it is today. My house is 50 feet away. Its a nice spot, 20 acres of pasture and no neighbors.”
Up until then, each fish was made by hand and demand was beginning to outstrip his ability to create the fish. Creating twenty fish during a 50-hour work week, wasn’t going to cut it.
Creating the ceramic fish, made from sturdy stoneware clay fired to around 2,200 degrees Fahrenheit, can take up to two weeks. This process enables the ceramics to withstand extreme temperatures from severe heat to even the coldest climates.
But success was not guaranteed and the work needed to create the pieces of art was never easy.
“It is a very hands on process. Now we are casting them from molds made of my originals. It’s very labor intensive. The mold that makes the large fish weighs 90lbs. And 1 in 10 of all the fish breaks in the process, usually before the first firing when the clay is very brittle,” Tyson explains.
Looking back on his plan to create a successful company, Tyson told his former alma mater Unity College: “Business isn’t about being impulsive or emotional. It’s research and planning and bringing your idea to a place where it mirrors the vision in your head. If that means making a bazillion fish to get it right, that’s what you have to do.”
To see a YouTube video of Tyson in action check out this informative 2016 video from WMTW of Maine here.
The fish and the Pandemic
Like many companies, the pandemic hit the on-line sales of his artistic fish. Tyson is not one to dwell on negatives and says the pandemic has been difficult, but came with both a downside and upside for his business.
“I’d say it evened out” he explains. “Our Spring trade shows in Atlanta, Orlando, Las Vegas, Philadelphia, Seattle, San Francisco and Boston were a disaster. But then during the whole lockdown people were gardening and ordering things online, and using social media like never before so that offset the early losses.”
For instance, he explains in the email: “The Northwest flower Show opened on a Wednesday. On Thursday the fist case of Covid in the USA was announced… In Washington State. LOL! And I was happy about the lockdown and ‘compromised’ Trade show series.
“In April 2020, I remember working at ‘the farm’ on a granite retaining wall, listening to the peepers as the sunset light filtered through the pines to the west, sipping cheap box wine in 50F degree ‘hoodie’ weather, no bugs out yet, no iPhone to distract me. It was the happiest I’ve been in many Years.”
There is no denying the fall in sales, however.
“Pre pandemic we were at 1,000 fish per week,” he explains. “Now I think we are half that. Most likely 500 per week. Ninety per cent of this is to garden centers, art galleries, gift shop and botanical gardens that resell them.” he explains. “It’s basically a non-profit.”
But he is not letting this latest pitfall stop him from moving forward, and he hopes to use the slowdown as an opportunity to help others who are less fortunate or struggling in these difficult times.
“Soon I’ll go back to making one of a kind originals that are numbered and signed. I want to sell them for $1,000 a piece, but the client has to make a $1,000 donation to one of 5 charities I choose ( veterans, cancer research, conservation, feeding the homeless etc) and then I’ll make them a fish that comes with a letter of providence and everything. The goal is to make 1,000 fish and in doing so have raised $1,000,000 for good causes. I call it 1,000 for 1,000. There’s a wall in the studio where I plan to hang up all the receipts from the donations.”
What’s in store for the future?
I asked Tyson if he has plans for any new ideas for the future – new designs, colours and fish styles maybe?
“Oh yes,” he says enthusiastically. “There’s 10 other businesses I want to start, all of which offer new, colourful totally unique and creative items, but I need to stay focused on the fish for now. I’m already being copied many times over so I can’t say a lot about what lies ahead, but its going to be EPIC!!!!
Why the fish as garden art are so unique
• The schools of fish bring a fluid aesthetic to any garden space. Where there is no water they imply water.
• The more fish you have in a school the better it looks
• The fish can help to bring year-round colour to your garden space
• They provide the perfect focal point in the garden even when there are no colourful plants
• Consider creating a school that represents your family with large and smaller fish

Using Kintsugi to repair broken ceramic fish
Tyson is the first to point out his ceramic fish are tough. Leave them out in freezing temperatures, or let them bask in the Arizona sun. Either way these fish can stand up to a lot more than you might think.
But accidents do happen.
I was lucky enough to receive almost a dozen fish to create schools to photograph in my garden.
Only one of the fish that arrived via regular post in the large box was broken. I decided it was the perfect opportunity to experiment with the ancient art of Kintsugi to repair the broken ceramic.
First, let’s say this was my first attempt at Kintsugi and I am sure the masters are cringing at the result. For my purposes, however, I am more than satisfied with the results.
Kintsugi is the Japanese art of putting broken pottery pieces back together with gold — built on the idea that in embracing flaws and imperfections, you can create an even stronger, more beautiful piece of art.
I have to admit that the finished result looks totally appropriate in our Japanese-inspired garden.
Ceramic repair was simple
The break was clean so I knew the repair would be relatively easy
After researching the best glue for ceramics, I chose Gorilla Glue known to hold up well both indoors and outdoors in severe weather.
The glue calls for a clean damp surface for ceramic.
After applying a moist towel to the broken ceramic edge, I added a thin line of glue to both sides of the broken ceramic fish. (Directions state to use only a little glue to keep it from spilling out the sides and messing up the repair. I used a small amount but it still spilled out the sides a little. I was not concerned, however, knowing that I was going to use gold paint to cover the repair.)
The glue calls for clamping down the repaired object for up to two hours to allow for proper curing of the glue. Without the proper clamp, I decided to hold it for an hour until the glue dried.
With the fish repaired, I let it cure for a couple of days prior to painting the crack with a thin layer of gold-leaf paint purchased from a local arts and craft store.
The finished result adds a lovely artistic touch to an already beautifully finished piece of ceramic and allows the fish to once again take its place in our garden.
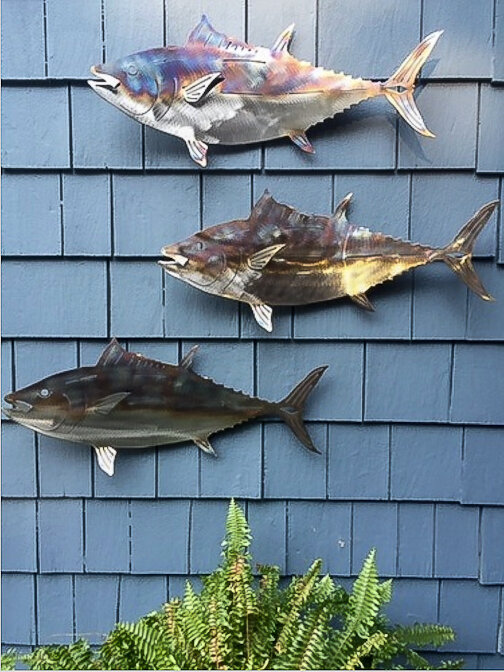
And example of Tyson’s metal Fish In The Garden adding an artistic element to a cedar shake wall.
Steel Fish In The Garden offer another option
In addition to the ceramic fish, Tyson offers a beautiful line of stainless steel fish on his website that are certainly worth checking out.
The metal fish can either be used in the garden much like the ceramic fish, or mounted to a wall as artwork. (Check out the website here to see them used in the garden.) They appeal to a different group of people and work well in the garden as well as in the home.
Tyson explains that the metal fish are made with heavy–gauge and hand–cut stainless steel that weathers the elements beautifully. In the summer, they shimmer with life and, in the winter, they form an organic partnership with the snow and ice.
“The steel people are drawn right to the steel fish,” Weiss said. “They don’t see the clay fish, and they don’t ask about them. And vice versa. So by doing the steel, I hit on this whole other customer, which tends to be more men.”

Adirondack chairs: Best choice for a woodland garden?
The classic Adirondack chair is the perfect addition to any woodland wildlife garden and signal to visitors that this is a casual place and one to relax in, rather than a stuffy, formal style of garden.
Resin, wood or steel they are all stylish additions to your garden
I don’t know when I fell in love with Adirondack chairs, but I’m sure it was on one of my early visits to Northern Ontario.
Those early recollections of sitting on a dock watching the sunset and listening to the loons are stamped in my memory. Adirondack chairs (also known as Muskoka Chairs here in Canada) are reminders of those long days camping and spending time at a lodge in the Algonquin Park area.
And then there were the days our young family spent in the Adirondacks on vacation in New York’s Finger Lakes, as well as memories of sitting back and enjoying the beautiful scenery during our week-long vacation at Lake Placid.
I’m sure similar memories are forever stamped in the minds of so many of us who have a certain fondness for these iconic chairs.
In our gardens, Adirondack chairs take centre stage in both the front- and backyard, helping to bring a little of the lake district back home. A pair of bright yellow chairs welcome visitors to our home and make a very clear statement that our gardens are clearly a place to relax.

Our yellow Adirondack chairs welcome visitors and let them know this is a casual, relaxed atmosphere rather than a stuffy, formal garden.
Adirondack chair: Perfect in a woodland setting
The casual atmosphere Adirondack chairs create make them the perfect addition to the woodland wildlife garden.
There’s a reason the iconic Adirondack is so popular.
The Adirondack chair’s rugged design belies its incredible comfort and uncanny ability to provide the perfect horizontal surface to rest your arm, let alone a glass of wine, beer bottle or can of cider. While its ability to hold a drink comfortably certainly plays a role in its popularity today, the design’s long history suggests that there’s more than convenience behind this North American wide love affair.
A short history of the Adirondack chair
The Adirondack chair traces its history back to the early 1900s in Westport, New York, where a fellow named Thomas Lee created the rudimentary beginnings of the “Westport” chair to provide his family with comfortable outdoor seating.
He passed his plans on to a friend and local carpenter, Harry Bunnell, who then ran with the basic design, added a few refinements and began manufacturing the “Westport” chair for all to enjoy. The Westport incorporated much of today’s modern Adirondack chair, but included a solid seating and back surface.
For more suggestions and some of my favourite garden things, be sure to check out my Favourite Things post.
In 1904, Bunnell submitted a patent for the chair and continued to produce the chair for 25 years.
Bunnell’s changes to Lee’s original design included a foot rest (a popular option with today’s Adirondack designs), sideboards to cover the underside of the chair and the use of Hemlock or Basswood instead of Maple.
The main difference between the original Westport Chair design and today’s Adirondack Chair is the incorporation of a slatted design both on the back and seating area of the chairs. The use of the slatted design allows for a more rounded and comfortable form that has translated well with those looking for the perfect place to rest and enjoy their favourite drink, whether that’s a morning coffee, afternoon glass of wine, or evening around the compfire with a favourite craft beer.
Polymer (resin) vs steel vs wood Adirondack chairs
There is no question that the newer, high quality moulded polymer or resin chairs are the best Adirondack chair designs available. Not the cheap plastic ones often available for less than $25 at big box stores (use them as garden accents or chairs that are rarely called on accept at large gatherings).
These high quality Adirondack chairs are seriously heavy and often made from recycled resins. Their colour is true, from the exterior that does not fade in prolonged sunlight throughout the entire piece. That means even a deep scratch is not going to show up. No need for painting – ever. They are virtually indestructible. I don’t know if they are all guaranteed for life, but the good ones might as well be.
Those two yellow Adirondacks that greet our guests are both examples of these indestructible chairs that spend the entire year in our front garden taking on all types of inclement weather. All these chairs ever need is an annual washing with a power washer. They are Canadian made by a Brantford, Ontario company Leisure Line and purchased at Costco several years ago. This company also has matching side tables and ottomans available. While you cannot order directly from the factory, they are sold at a number of locations besides Costco.

Our steel Adirondacks have stood the test of time and continue to perform at the highest level despite being left out throughout our punishing winters.
While our polymer chairs are outstanding in every way, we were also lucky enough to purchase four alloy Adirondack chairs at Costco more than 20 years ago that continue to perform flawlessly despite being left out on their own through our challenging Canadian winters.
They are finished in a lovely shade of brown sand-textured factory paint that has stood up extremely well over the years.
Again, these were high-quality chairs meant to last and have become an excellent investment over the years.
We do not have any wood Adirondack chairs in the garden.
Although wood Adirondack chairs are truly representative of the classic design, we have chosen to steer clear of them.
Our Canadian winters are just too harsh for these chairs to withstand. The wooden chairs demand too much maintenance between regular painting, tightening loose connections and dealing with the eventual rot of even the best wood products.
They are available as kits for a reasonable amount of money and with proper care can last a lifetime. I’m not interested, however, having to pack away between 6-10 chairs every fall only to have to pull them out again in the spring.
Like woodland gardening, the idea is to do as little as possible and enjoy the garden rather than become a slave to it.
What better than the comfort of a Adirondack chair to make that happen.
And did I tell you how good the bright yellow Adirondack chairs look in the middle of winter after a major snowstorm.
A reminder that summer is not too far off.
A few of the best chairs to consider
The following are just a few of the Adirondack-style chairs that come highly recommended.

The Keter Adirondack chair includes a built-in cup holder and comes in three colours: Teal, Black and White.
The Keter Adirondack chair, quality and style
If you follow this blog you know my feelings about the high quality of Keter products. I own a number of the company’s products from their impressive sheds (see complete story and review here) to their BBQ table (turned potting shed table) and storage boxes.
While I have not used their Adirondack chairs (Amazon link), I can assure buyers that Keter’s quality levels are of the highest quality.
These chairs are available in three colours: Teal, black and white. Their high-quality, rust-proof, all-weather polypropylene resin does not warp, rot or fade and even includes a convenient cup holder built into the armrest. The chairs are rated for 350 lbs. and, like all Keter products, are easy to assemble.
An Adirondack with all the options

This impressive combination will add style to any yard.
If you are looking for a nice polymer Adirondack complete with matching side tables and foot rests, the Highwood Classic Westport Adirondack chair (Amazon link) in a classic Nantucket Blue is another excellent choice.
This made in the USA chair can be left outside all year without cracking, peeling or rotting and, like all polymers, never needs sanding, staining or painting and is easy to assemble.
The optional chairs and side tables are a nice touch that are not necessarily available with other Adirondack chair manufacturers.

An exquisite lounger from Gardener’s Supply Co.
A beautiful lounger for any garden
While I’m not a huge fan of using wooden Adirondack chairs in the garden if you are leaving them out unprotected throughout the winter, there are certainly situations where nothing delivers the look of an expensive high-end lodge look like an exquisite wood lounger. These elegant hardwood Adirondack chairs with built-in ottoman (link to Gardener’s Supply Company) is the perfect addition to a covered porch, glass house or pergola.
Gardener’s Supply Company describes the chair as a plantation-grown Brazilian eucalyptus chair finished with a beautiful brown umber stain for long lasting outdoor use and exceptional durability in all climates.
“The Adirondack chair provides extra wide and curvy seat for incredible comfort! The built-in sliding ottoman can be used in multiple positions or stowed away completely under the seat.”
Will this require some upkeep, absolutely. It the upkeep worth it, absolutely.
• As an affiliate marketer with Amazon or other marketing companies, I earn money from qualifying purchases.

The Garden Bench as art, tips to placing them in the landscape
Garden art takes many forms, but nothing can have a bigger impact than a well-placed, beautifully aged garden bench. Whether it’s a traditional wooden bench or a small concrete one in the corner of the yard, they almost always form a focal point enticing visitors to explore the distant areas in the garden.
Help Mother Nature bring her patina of moss and lichen
I can probably count the number of times I’ve sat on our garden benches.
They’ve grown old along with our garden and have taken on a lovely patina that has transformed them into the perfect wildlife garden accessory art form, rather than the utilitarian pieces their creators originally had in mind for them.
I can think of no better piece of garden art than a beautifully moss- and lichen-covered ancient garden bench tucked beneath the branches of a spring flowering dogwood or serviceberry.
Imagine the vignette. At the foot, a lovely aged piece of natural flagstone with bits of lichen and moss echoing the patina of the bench that now offers birds and woodland wildlife a resting place. Beside the bench, an aging copper or concrete birdbath.
On one side of the bench, annual flowers spill out of a small group of terracotta pots where chipmunks chase one another in what seems like an endless game of tag.
The summer rains bring both nourishment for the annual flowers as well as another opportunity for the grey, weathered bench to transform into a patchwork of blue-green mosses and lichens.
This is not the time to clean these works of art, or worse, paint them some gaudy colour looking for a focal point in the garden. This is a time to let Mother Nature work her magic and create garden art that only time can buy.
If you do want to add colour to your benches or garden sitting area, let me suggest taking a look at designers like Annie Selke who has a great selection of colourful outdoor accessories like rugs, cushions and drapes.
There was a time, shortly after we purchased our two wooden benches, that they offered up a comfortable place to rest and relax in the garden.
They provided a place to sit quietly, explore the many senses of the garden; the sounds of birds, the sweet smell of honeysuckle or the earthiness after a summer rain.
After the mosses and lichens started to take over, however, the thought of sitting on them and crushing these delicate, miniature works of art was replaced with how I could best capture Mother Nature’s creations through the lens of the camera. Several attempts, in different weather and under a variety of lighting conditions have given me a deeper appreciation for the incredible beauty that time creates.
Situate a garden bench near an arbour covered in roses or native vines and enjoy not only the view but the privacy and shade the arbour throws. More on the garden arbour here.

This old garden bench covered in mosses and lichen provides the perfect landing spot for this male cardinal. Even if the bench is old and no longer useful as a place to sit, it can be used as art in the garden. I often place a container full of colourful flowers on the seat or on the ground below to draw attention to the bench.
How to create a mossy, aged patina
A quick search on the internet provides several alternatives to creating an aged look for new garden objects. Although most focus on aging concrete, the same process will also work on wood product. Mother nature and time does most of the work naturally, but some simple steps help to hurry it along. What might take mother nature years to create, can be done in a few weeks or months by following these steps.
• Start by mixing a weak solution of water and black acrylic or water-based paint and apply it to the cement statuary. Let dry and apply a second or third coat. The effect is simply to give the statuary a ‘dirty’ look rather than the stark white one it often has when it is new.
• Mix yogurt or buttermilk in a bucket with equal amounts of water, compost or soil and even some manure. You can add in some crushed moss at this stage as well. The result should be a thick spreadable paste.
• Paint on the mixture to the cement statuary or container ensuring you cover all areas especially creases where moss would naturally take hold.
• Take a handful of moss and rub the surface of the concrete to spread the moss spores into the concrete.

This small garden bench is located just outside our patio doors and is part of a vignette that includes a birdbath, flowers and groundcovers beneath a Cornus Kousa dogwood. We often place a container filled with annuals on it to add a pop of colour to the vignette.
“I often lay on that bench looking up into the tree, past the trunk and up into the branches. It was particularly fine at night with the stars above the tree.”
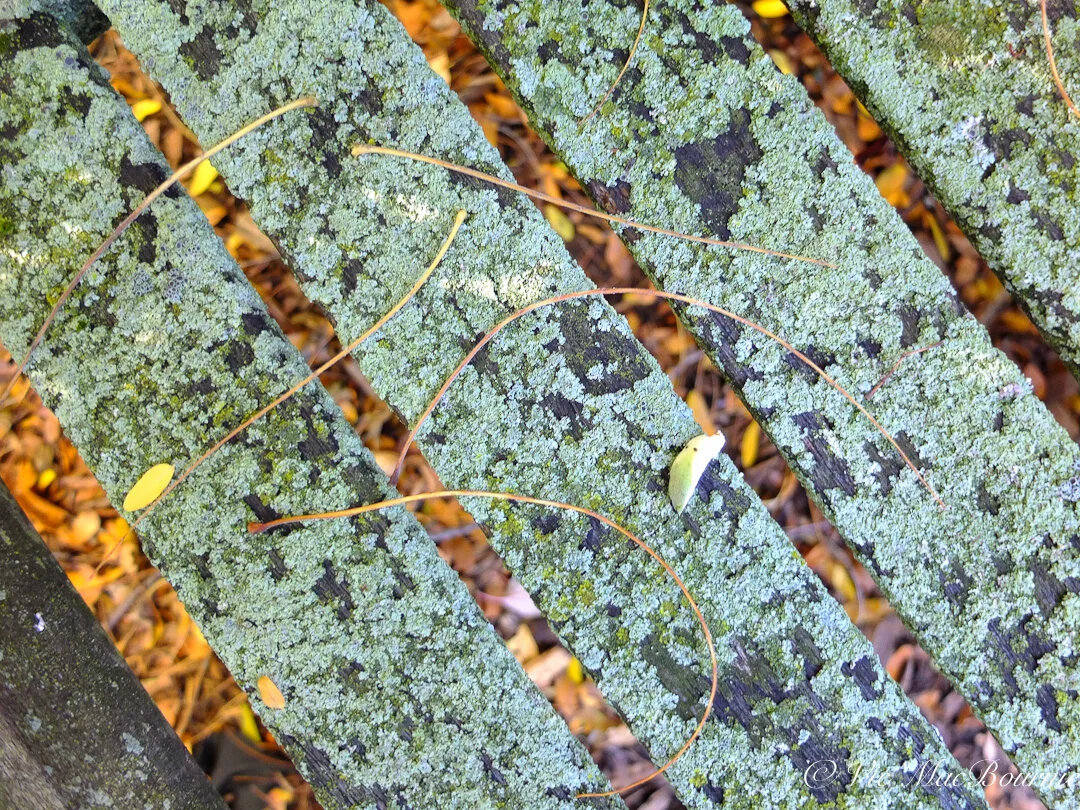
A close up of the Lichen and moss that combine to create a beautiful patina on the garden bench.
A history of the Garden Bench
The garden bench has a long history that can be traced back to the Roman age when very uncomfortable stone benches and seats were popular in hedged gardens and orchards where they fit in quite nicely with the abundance of long rows of Roman and Greek columns. In fact, the oldest surviving examples of garden furniture can be traced back to the ancient gardens of Pompeii.
Turf benches became popular in the Middle Ages.
By the 19th century, parks and gardens became more commonplace and along with it came the need for more seating. Cast iron methods of construction ramped up production and cemented the park and garden bench into the hearts and minds of gardeners.
It wasn’t until the early 18th century that wooden chairs and benches became more commonplace in gardens. In fact, the Windsor chair, so common in many of today’s homes, actually got its start in English gardens where it was known as the Forest Chair.
In North America, it is said that the oldest known surviving piece of garden furniture is a wooden bench from the late 18th century. The Almodington bench was created for the Plantation house in Somerset County, Maryland. Replicas of the large, highly detailed bench circa 1750 continue to be available. For those interested in the history of the bench or even to purchase one click here to take you to this informative Aileen Minor Garden Antiques website.
Over the years poets have praised the simple garden bench and all that it encompasses. Thomas Hardy had this to say about the garden bench.

A garden bench in a public garden situated perfectly for selfies with the colourful Iris in the background.
The Garden Seat
Its former green is blue and thin,
And its once firm legs sink in and in;
Soon it will break down unaware,
Soon it will break down unaware.
At night when reddest flowers are black
Those who once sat thereon come back;
Quite a row of them sitting there,
Quite a row of them sitting there.
With them the seat does not break down,
Nor winter freeze them, nor floods drown,
For they are as light as upper air,
They are as light as upper air!
Thomas Hardy
An old garden bench tucked away in some ferns beneath a dogwood tree makes for a perfect composition in the woodland garden.
Placing your garden bench in your backyard
Of course, garden benches don’t have to be covered in moss and lichen to be works of art. Almost any garden bench becomes a work of art if it is carefully placed in a garden. Finding the perfect spot isn’t always easy and it might take moving the bench to several spots before you find the perfect placement. Even then, most garden benches are light enough to move around the garden and experiment with placement. The ideal place in the spring, might not be the best place in the summer, fall or winter.
We have a number of garden benches, but I consider only two of them to be real “artsy” garden benches. The others include a small decorative concrete bench that is just beginning to take on the aged look with a little moss and lichen. It is placed just outside our single French/patio door where we can see it from our family room couch. Beside the bench is a copper bird bath. At its feet is a carpet of snow-in-summer ground cover and a combination of pea gravel and grey square-cut flagstone. It sits under a Cornus Kousa dogwood that is just maturing enough to put on a show involving hundreds of late spring, early summer creamy-coloured flowers.
The other is a homemade cedar bench that originally came from a hot tub enclosure. It sits beneath our large pine and is hidden for most of the year. It sits in an extremely shady location providing me an opportunity to grow shade-loving plants in a large container, or just leave it as a natural bench garden visitors may stumble upon. The squirrels regularly take advantage of its raised perspective to survey that part of the garden and work on a nut they’ve gathered or a prize they’ve discovered in the nearby compost/brush pile.
“No king has a throne more beautiful than a bench covered with the autumn leaves!”
Here are just a few more ideas for placing your garden benches.

An example of an elegant park bench in a commercial garden setting hilighted by the colourful tulips.
• Consider building or purchasing a small garden arbour as a focal point to draw visitors to your bench. Surround it with a sweet-smelling vine like honeysuckle that is particularly attractive to hummingbirds. A favourite clematis can provide a delicate and very easy-to-control vine with exquisite flowers. Or, consider a berry producing vine like Virginia Creeper for the birds and great fall colour. Better yet, combine a selection of vines to provide interest, food and nectar for the entire growing season.
•If you have a relatively small yard, placing a bench at the end of a pathway that leads you through the garden is a great way to create a destination in the garden. It can also provide you with a new seating area – one that allows you to look back at your home and garden rather than always looking out to the same view. In this instance, a colourful bench might be just the thing to add a hit of colour. If the bench leads to a wooden fence, consider using a backdrop of three to five cedars to provide a natural background and a place for birds to nest. Add planters with colourful annuals spilling onto the pathway. A small birdbath allows you to sit quietly while birds enjoy a drink or quick bath. This is a great way to, over time, get the birds used to your presence and provide you with some great photographic opportunities.
• If you have a larger garden consider placing your garden bench in an area that affords the best view in the garden. It may be overlooking a body of water, sweeping fields or an open area where deer, rabbits and other garden wildlife often wander. Walk around the garden and find areas that you don’t often visit and then imagine quietly sitting there in the morning or evening, a cup of coffee in hand or maybe even a glass of fine wine. It may not have the perfect backdrop at the moment, but some strategically placed cedars, Eastern White Pine or even well-placed large shrubs can provide privacy for you and the wildlife that will also enjoy the open view that this area of the garden provides. Don’t forget the birdbath and maybe a birdhouse to welcome your garden friends to what will become your favourite spot in the garden.
A spot you might not yet realize even exists in your garden.
There is nothing like a garden bench to bring beauty and, at the same time, experience it, in your woodland wildlife refuge.