
Attract birds all winter with DIY heated birdbath
Providing a reliable winter water source for backyard birds begins with an electric water heater. But it does not have to end there. Check out the DIY outdoor photo studio and reflection pond that birds are flocking to as winter approaches.
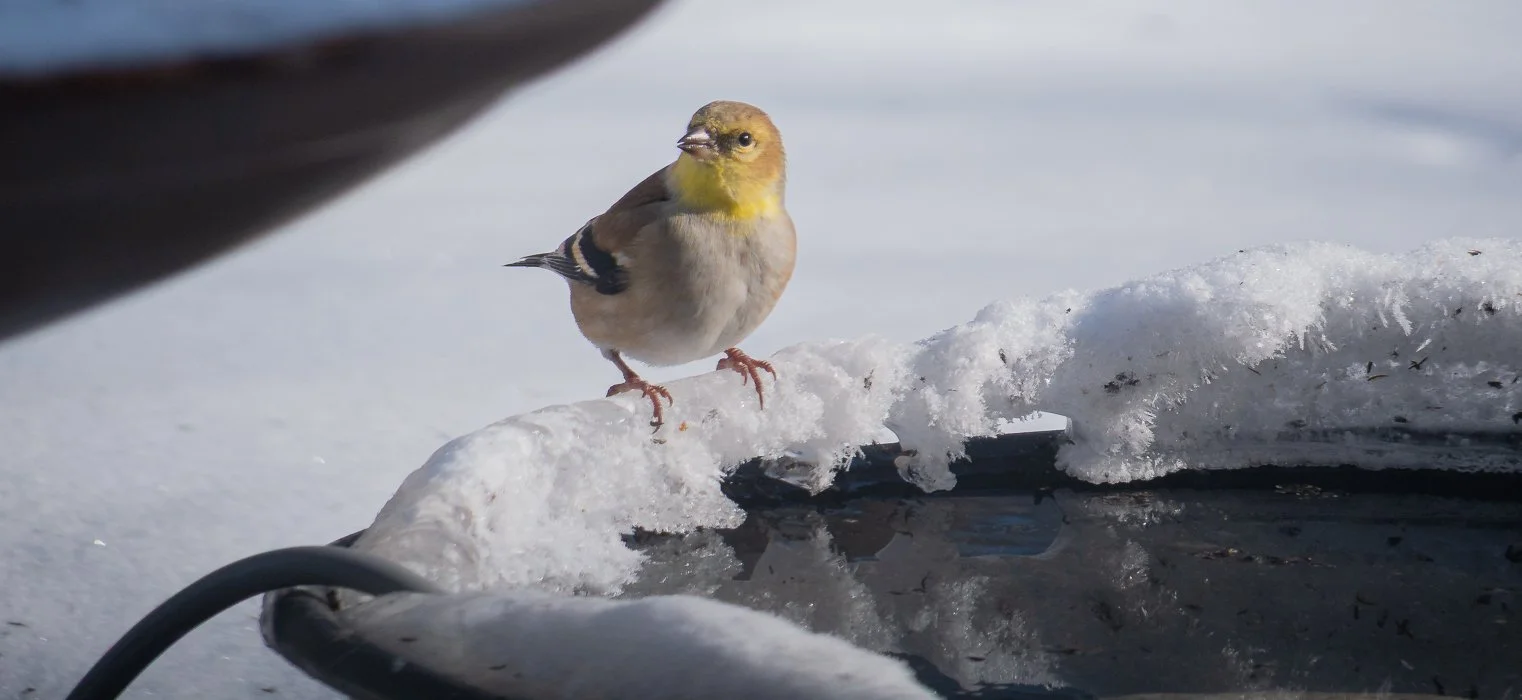
A goldfinch stops for a drink during freezing temperatures at our heated birdbath.
Water is critical for wildlife during extreme cold
A dependable source of water can be a critical factor deciding whether your backyard wildlife make it through extreme cold conditions.
The temperatures, often freezing overnight, make it difficult for our backyard birds – especially when it comes to obtaining water. Even those of us who are vigilant about keeping our feeders full, too often underestimate the importance of a reliable water source.
Ensuring a reliable source of fresh water is probably more important to our backyard birds than a source of food. Birds naturally store seeds leading up to winter and they can forage in our gardens for additional sources of food throughout winter.
But, having access to water becomes much more difficult.

A heated birdbath can be the difference between life and death for our backyard wildlife.
So, when our bird bath heater stopped working during a recent cold spell, I didn’t hesitate to go in search of another one. That led me directly to the Urban Nature Store where I had a choice of a number of heated bird bath alternatives from simple units that drop into existing bird baths to more extravagant bird baths with the heating element is embedded in the bird bath.
The selection was truly impressive. It’s important to note that heated birdbaths do not remain on at all times. Most have a thermal regulator on them that turns the unit off and on to maintain a water temperature just above freezing. This means the heater is not using electricity 24-hours a day.
I chose the K&H heater at $69 Canadian, but any of their offerings would have likely got the job done.
I must say, however, that this unit has performed exceptionally well, even in the record-cold temperatures we have experienced over the past couple of weeks.
We are lucky enough to live near a small, fast-flowing stream that provides emergency water sources to all our neighbourhood birds and wildlife that can easily access it.
However, I like to help out by ensuring a reliable water source in the garden. Not only does it make their lives a little easier, it attracts a wide variety of birds including many that may not regularly visit the feeders.
Squirrels are also regular visitors to the DIY birdbath.
For my other posts on bird baths, check out adding water to your garden and a DIY solar drip conversion.
Why water is critical for birds especially in winter
Water is critical to birds in the heat of the summer and even more important in the winter when traditional water sources are frozen over, including ponds and puddles. Bathing is an important part of a bird’s feather maintenance.
Wetting the feathers in a bird bath helps to loosen dirt and makes feathers easier to preen.
When preening, birds carefully rearrange the feathers and spread oil from the preen gland so they remain waterproof and trap an insulating layer of air underneath to keep them warm. That’s vital during cold winters where I live, especially when temperatures and wind chills can reach a bone chilling -30C and beyond and stay that way for days.
In fact, this has been a particularly bad winter in our area with prolonged periods of well-below freezing temperatures even during daylight hours. As I write this at around 11 am on January 31st, the outside temperature stands at minus 15 Celsius with a windchill of minus 23C. For those still using farenheit, that’s 5F and minus 10F with the windchill.
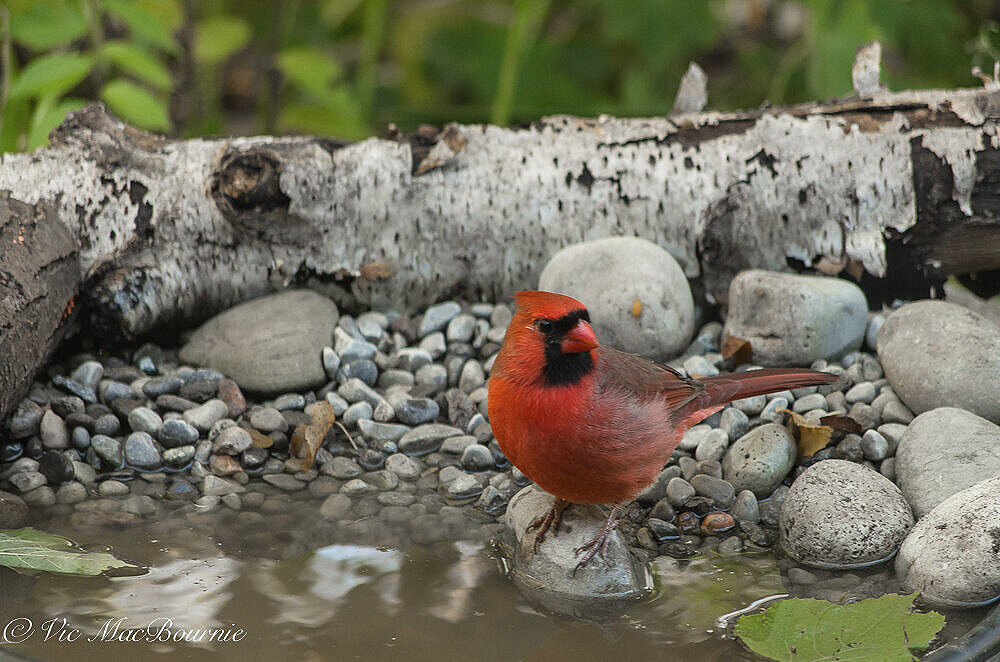
A cardinal stops for a drink among the stones in the heated bird bath and outdoor photo studio refection pond.
Birds lack sweat glands, so they traditionally need less water than mammals. They do, however, lose water both through respiration and in their droppings. Many insectivorous birds get most of their water from their food, but seed-eating birds, which are our most popular visitors in winter, have a dry diet and need to drink several times a day.
The appeal of a reliable water source may even be a stronger draw to birds than a well-stocked feeder, especially if there is no other reliable water source in the area.
Attract birds to your heated bird bath
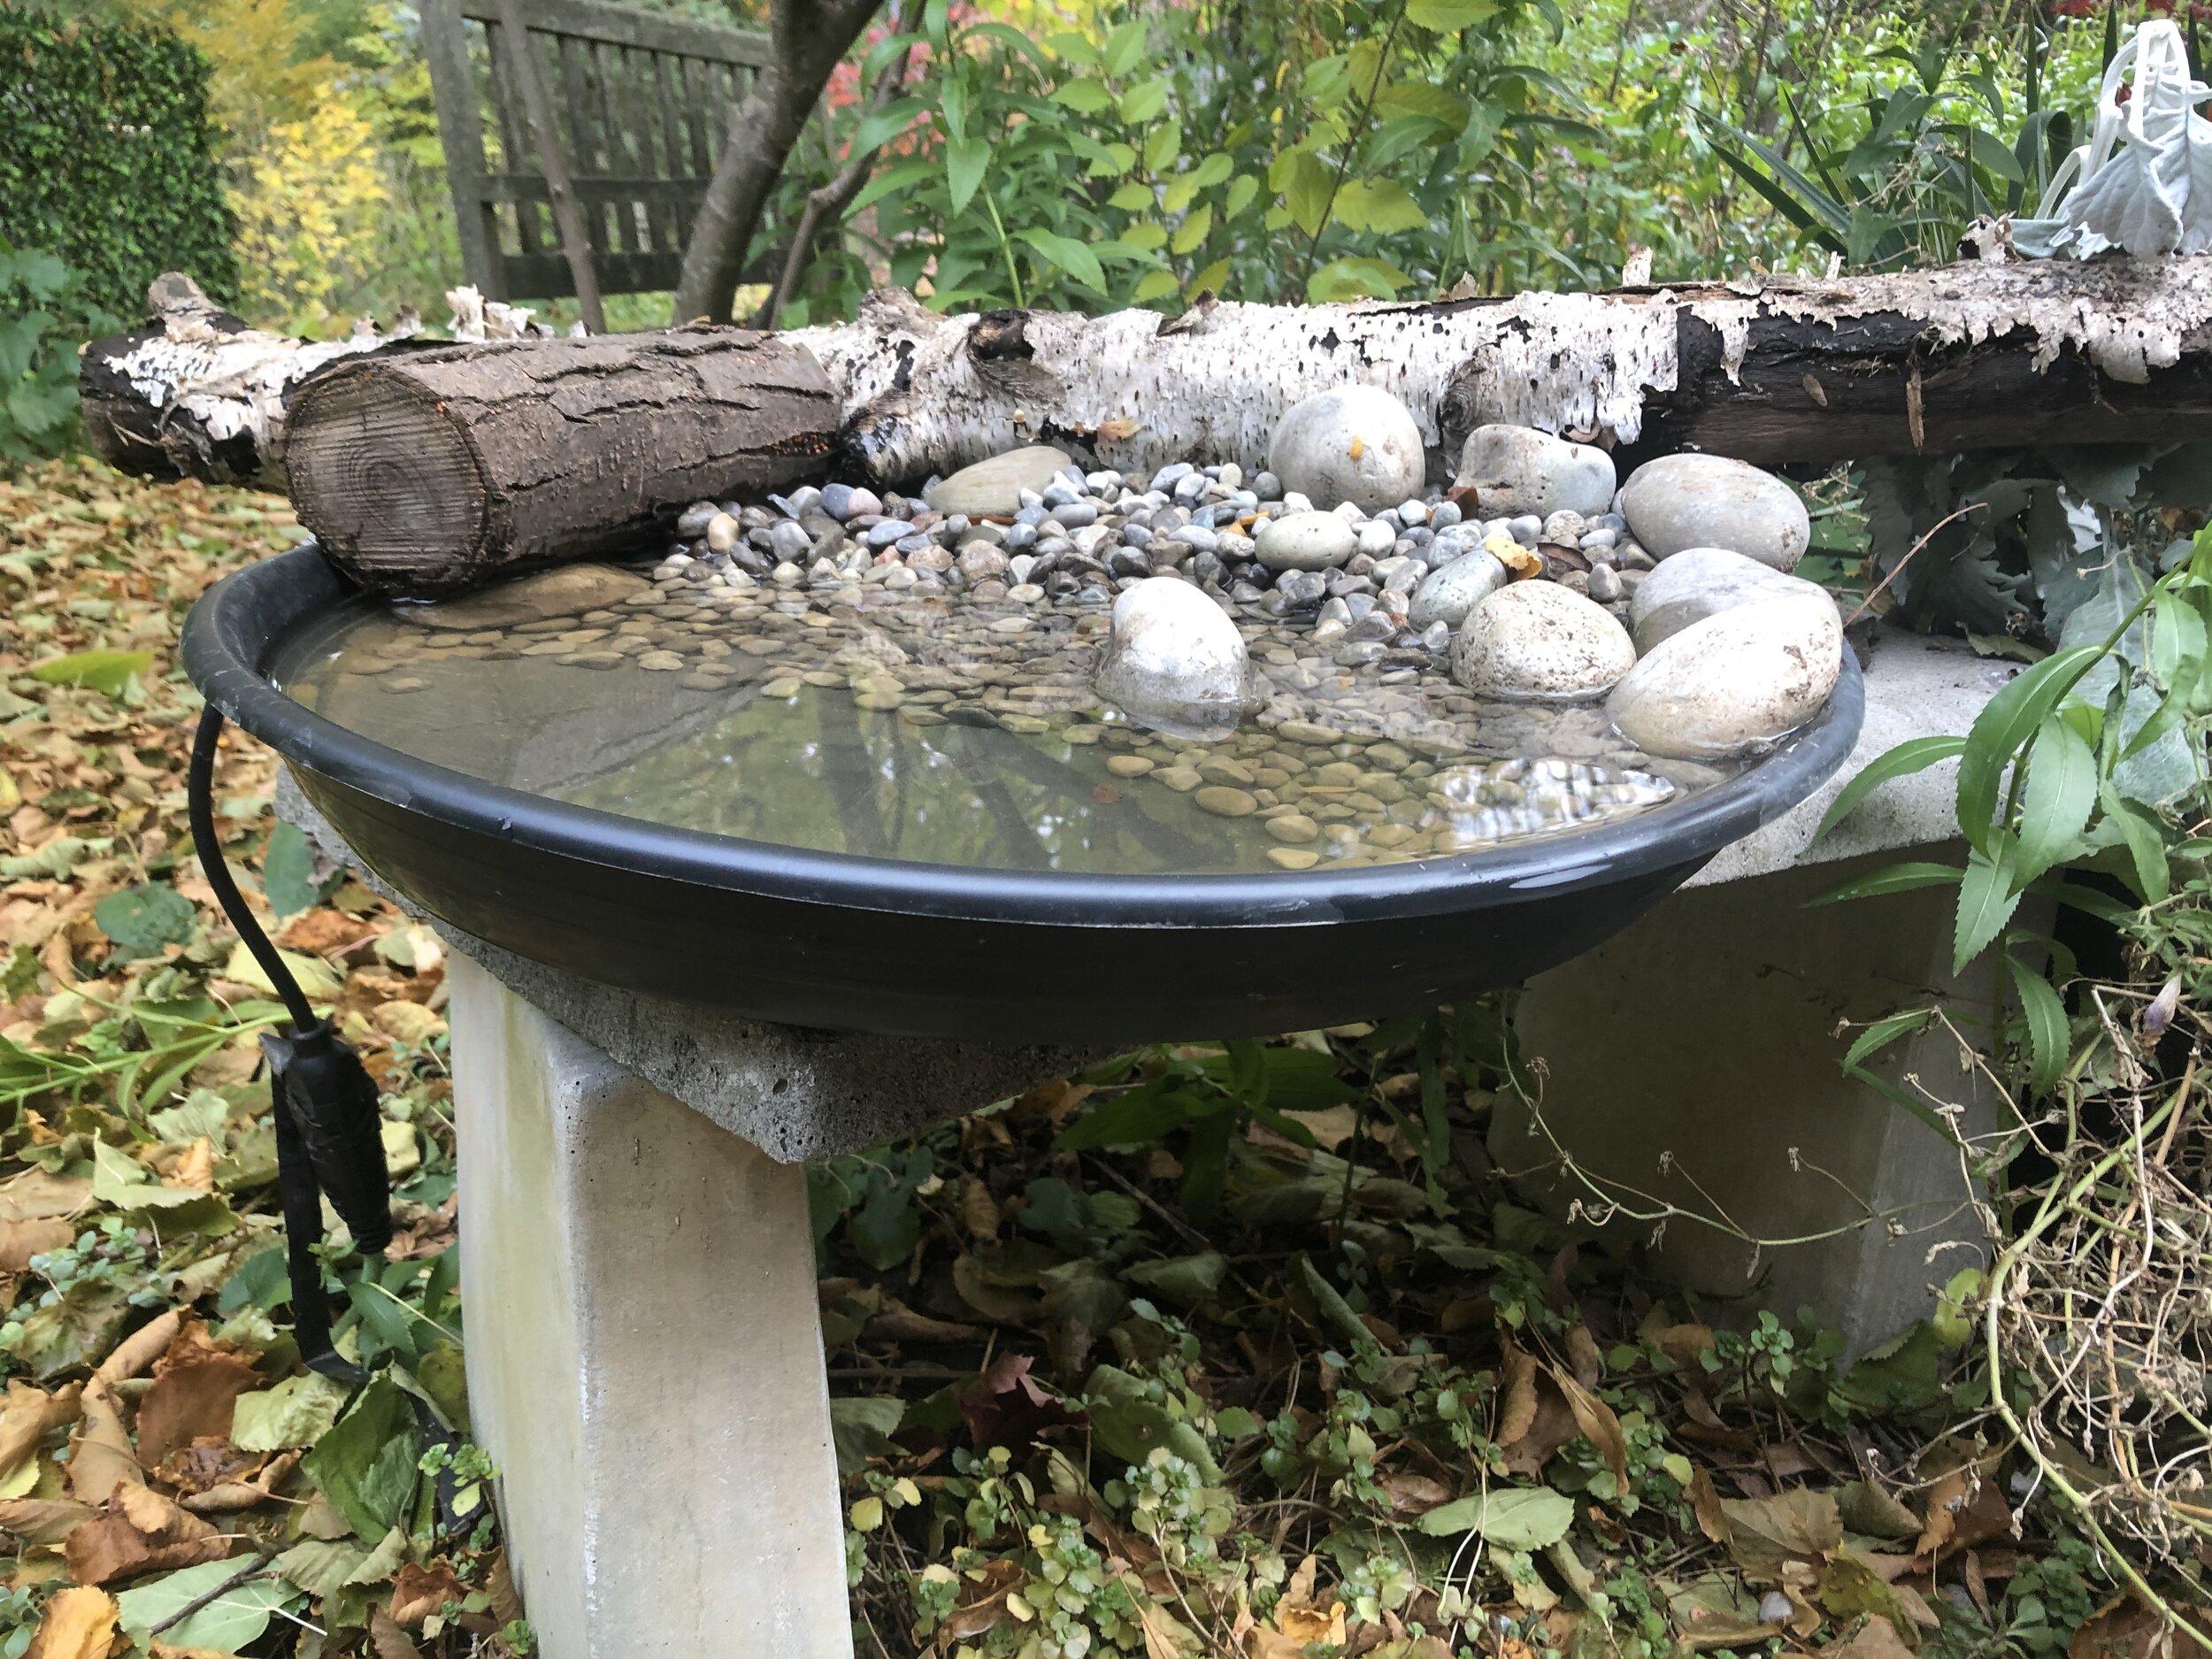
The heated bird bath ready for winter.
If you set up your heated bird bath in a separate area to where you normally have your bird bath, or your heated bird bath is entirely new to your garden, don’t be surprised if it takes a while for the birds to discover and be comfortable using it.
I have a couple of small feeders in the dogwood just above the heated bird bath, so there are always lots of birds around. Be sure to locate the feeder far enough away from the bird bath to ensure that the seed does not fall into the water.
My feeder is located just outside of our French door allowing me to photograph the birds from the comfort of our home. Consider locating yours near a window where you can both appreciate and/or photograph them.
To encourage birds to use your heated birdbath, be sure to set it up in a safe area of the garden. In winter, birds need even more cover in case of attack. We have a Coopers Hawk that visits regularly looking to make our birds into a meal.
Include perches above the bird bath to allow the birds to come down and check out the bird bath from a short distance. Include stones or landing spots inside the bird bath where smaller birds can either drink from or wade into the water slowly.
The stones also help hold the heat in the birdbath and offer birds more of an ice-free area to drink from the birdbath.
Build your own photo studio for the birds
With this in mind, I set about creating both a reliable water source and a backyard photo studio and reflection pond. In fact, I have two: one large reflecting pool and a smaller heated pool that will be the main source of water in the yard when the temperatures turn to freezing.
Our DIY project started with a round, medium-size black plastic basin that I picked up from a local nursery for just over $10.00. It’s a couple inches deep, so it’s perfect for small- and medium-sized birds to use safely. Larger birds, like jays and robins, will not hesitate to create havoc in the bath as they splash about, but we’re all good with their daily antics.
This bird bath is quickly becoming the gathering place for our backyard birds.
It sits on a concrete bench just outside our family room French door where I can easily monitor the water levels. At the same time, it’s close enough that I can use it to capture photographs of our feathered friends enjoying a bath. And, I can do it from the warmth of our family room.
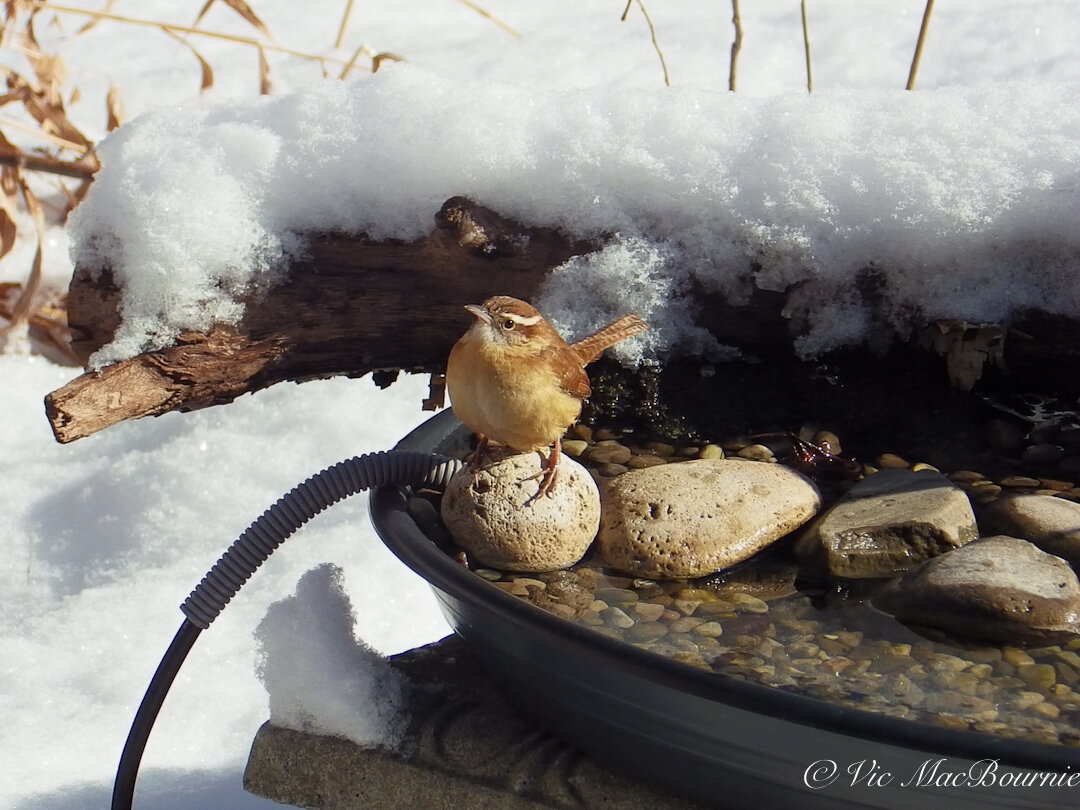
Cute little Carolina Wren taking advantage of the heated bird bath to get water during winter.
An electric heater from was carefully placed in the bird bath and hidden with a thick layer of pea gravel and a few larger river rocks to give the birds a landing spot.
A birch branch across the back will help to stabilize the bird bath in case a large bird or animal decides to use it as their personal bath tub. It also creates a lovely background for the birds using the feeder. A few other branches help to hide the edge of the plastic tray, give it a little more stability and add to its natural appearance.
The heater, buried in pea gravel, keeps the bird bath ice-free in the coldest temperatures but remain hidden under the gravel.
The heated pea gravel also plays a role in helping to keep the water ice-free, but, if necessary, adding a kettle full of hot water on particularly cold mornings will keep the water open.
The pea gravel also provides birds with a gradual slope into the water much like a sandy beach. This allows birds of all sizes to enter the water to a comfortable depth, and put them in a position that creates good photographic opportunities.
Although the goal was to create a reflection pond that doubles as a heated bird bath, the round plastic dish comes up a bit short to capture perfect reflections of the birds on a regular basis. It will work nicely for a small bird on the pea gravel, but the reflection will likely fall just short for a larger bird like a blue jay or cardinal.

The perfect ground cover for hot, sunny and dry areas in the garden
Snow-in-summer may not be every gardener’s dream, but if you like your ground covers and enjoy photographing beautiful, ethereal flowers in your garden, this white-flowering, silver foliage plant may be the ideal choice.
Elegant grey foliage, white flowers make snow in summer a great choice for sunny spots
If you are looking for a ground cover for a sunny, hot and dry area, look no further than the grey foliage and lovely white flower of Snow in Summer.
The ground cover affectionately named “snow-in-summer” is a favourite of mine. Its bloom is actually something I really look forward to each year. Snow-in-summer or Cerastium tomentosum is an herbaceous perennial that blooms alongside our wild geranium in early June.
It sits maybe 8-12 inches high and each plant quietly spreads out to form a dense mat of foliage to a width of 12 to 18 inches. Hardy in USDA plant hardiness zones from 3 to 7, this more or less well-behaved, delicate ground cover – a member of the carnation family – is valued for more than just its early summer bloom.
Snow-in-summer or Cerastium tomentosum is an excellent ground cover for sunny, hot and dry areas in the garden. It will bring a smile to any gardener and photographer with its delicate white flowers and silvery-grey foliage.
We have ours spilling out over our main garden pathway of pea gravel and blue flagstone where its silver-grey foliage is able to shine year-round. I would say it gets full sun where it is in our garden with some late afternoon shade.
It just loves the hot sun beating on it and reflecting up off the stone. The plants can take foot traffic and never really get out of hand in our garden.
Apparently, if it’s too happy where it is growing, it can become invasive. The combination of reseeding itself and sending out runners can make the plant a little bit of a problem in some areas.
If you are concerned about it running out of control, a 5- or 6-inch deep edge should keep it in check.
It is not particular about the soil it grows in and seems perfectly happy growing into our pea gravel where it is easy to remove and divide.
Here is an added bonus: it’s among the deer resistant family of plants woodland gardeners prize so dearly.
Looking for more information on ground covers? Please check out my other posts on ground covers I use in the woodland garden.
• Bunchberry perfect ground cover for woodland garden
• What is the easiest ground cover to grow?
• Three great ground covers for the woodland garden.
• Creeping thyme as a ground cover
• Moss and moss-like ground covers
Five more great ground covers for sunny areas
Lamb’s Ear (stachys byzantina)
Catmint (Nepeta)
Contoneaster (Contoneaster horizontalis)
Creeping Juniper (Juniperus horizontalis)
Silver Mound Artemisia (Artemisia schmidtiana)
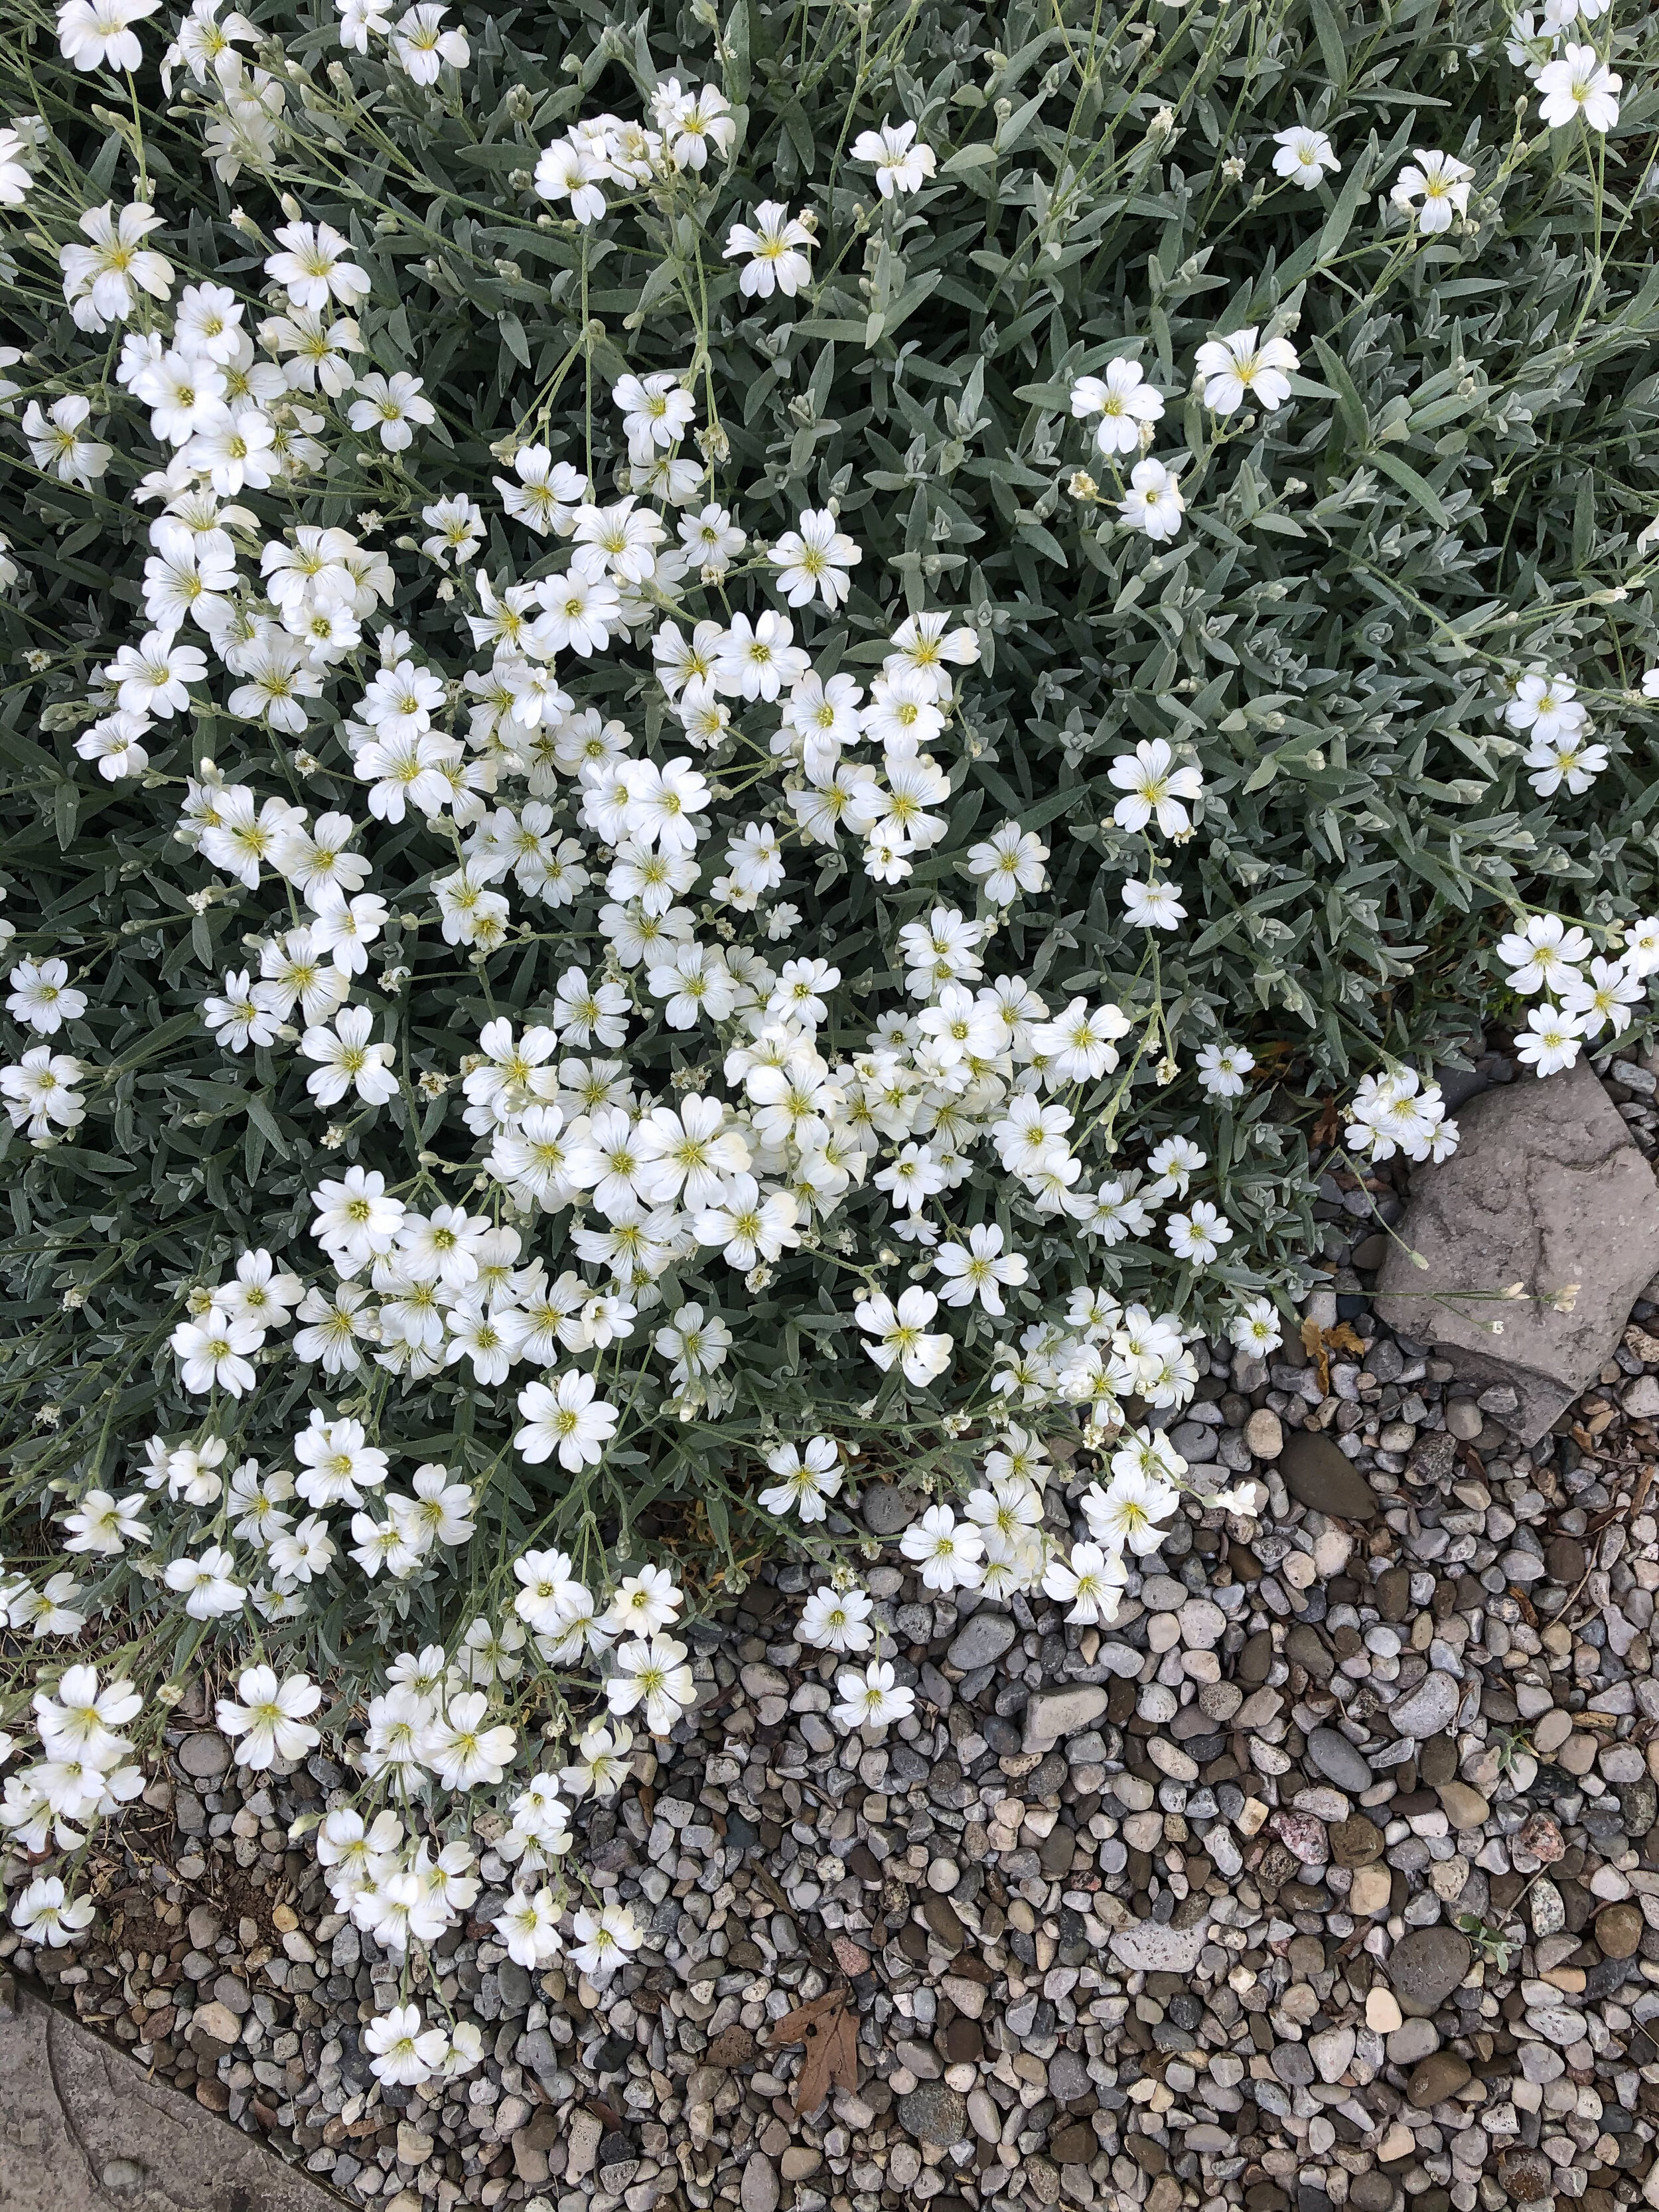
The elegant clear white flowers and silvery-grey foliage gives the plant a mediterranean feel that works well in a rock garden location or along a pea-gravel path like it is seen here.
Although this is the only spot in our garden where this plant is growing, I’m noticing that it has jumped over, around or under, our wild geranium and has taken a second spot beneath one of our bird baths along the same pea-gravel path.
That’s fine with us, it can be easily trimmed back before it decides to continue its march elsewhere.
It’s best to divide these plants shortly after flowering, when you are cutting off the spent blooms and tidying it up.
Established plants may be propagated by division in the fall or by cuttings.
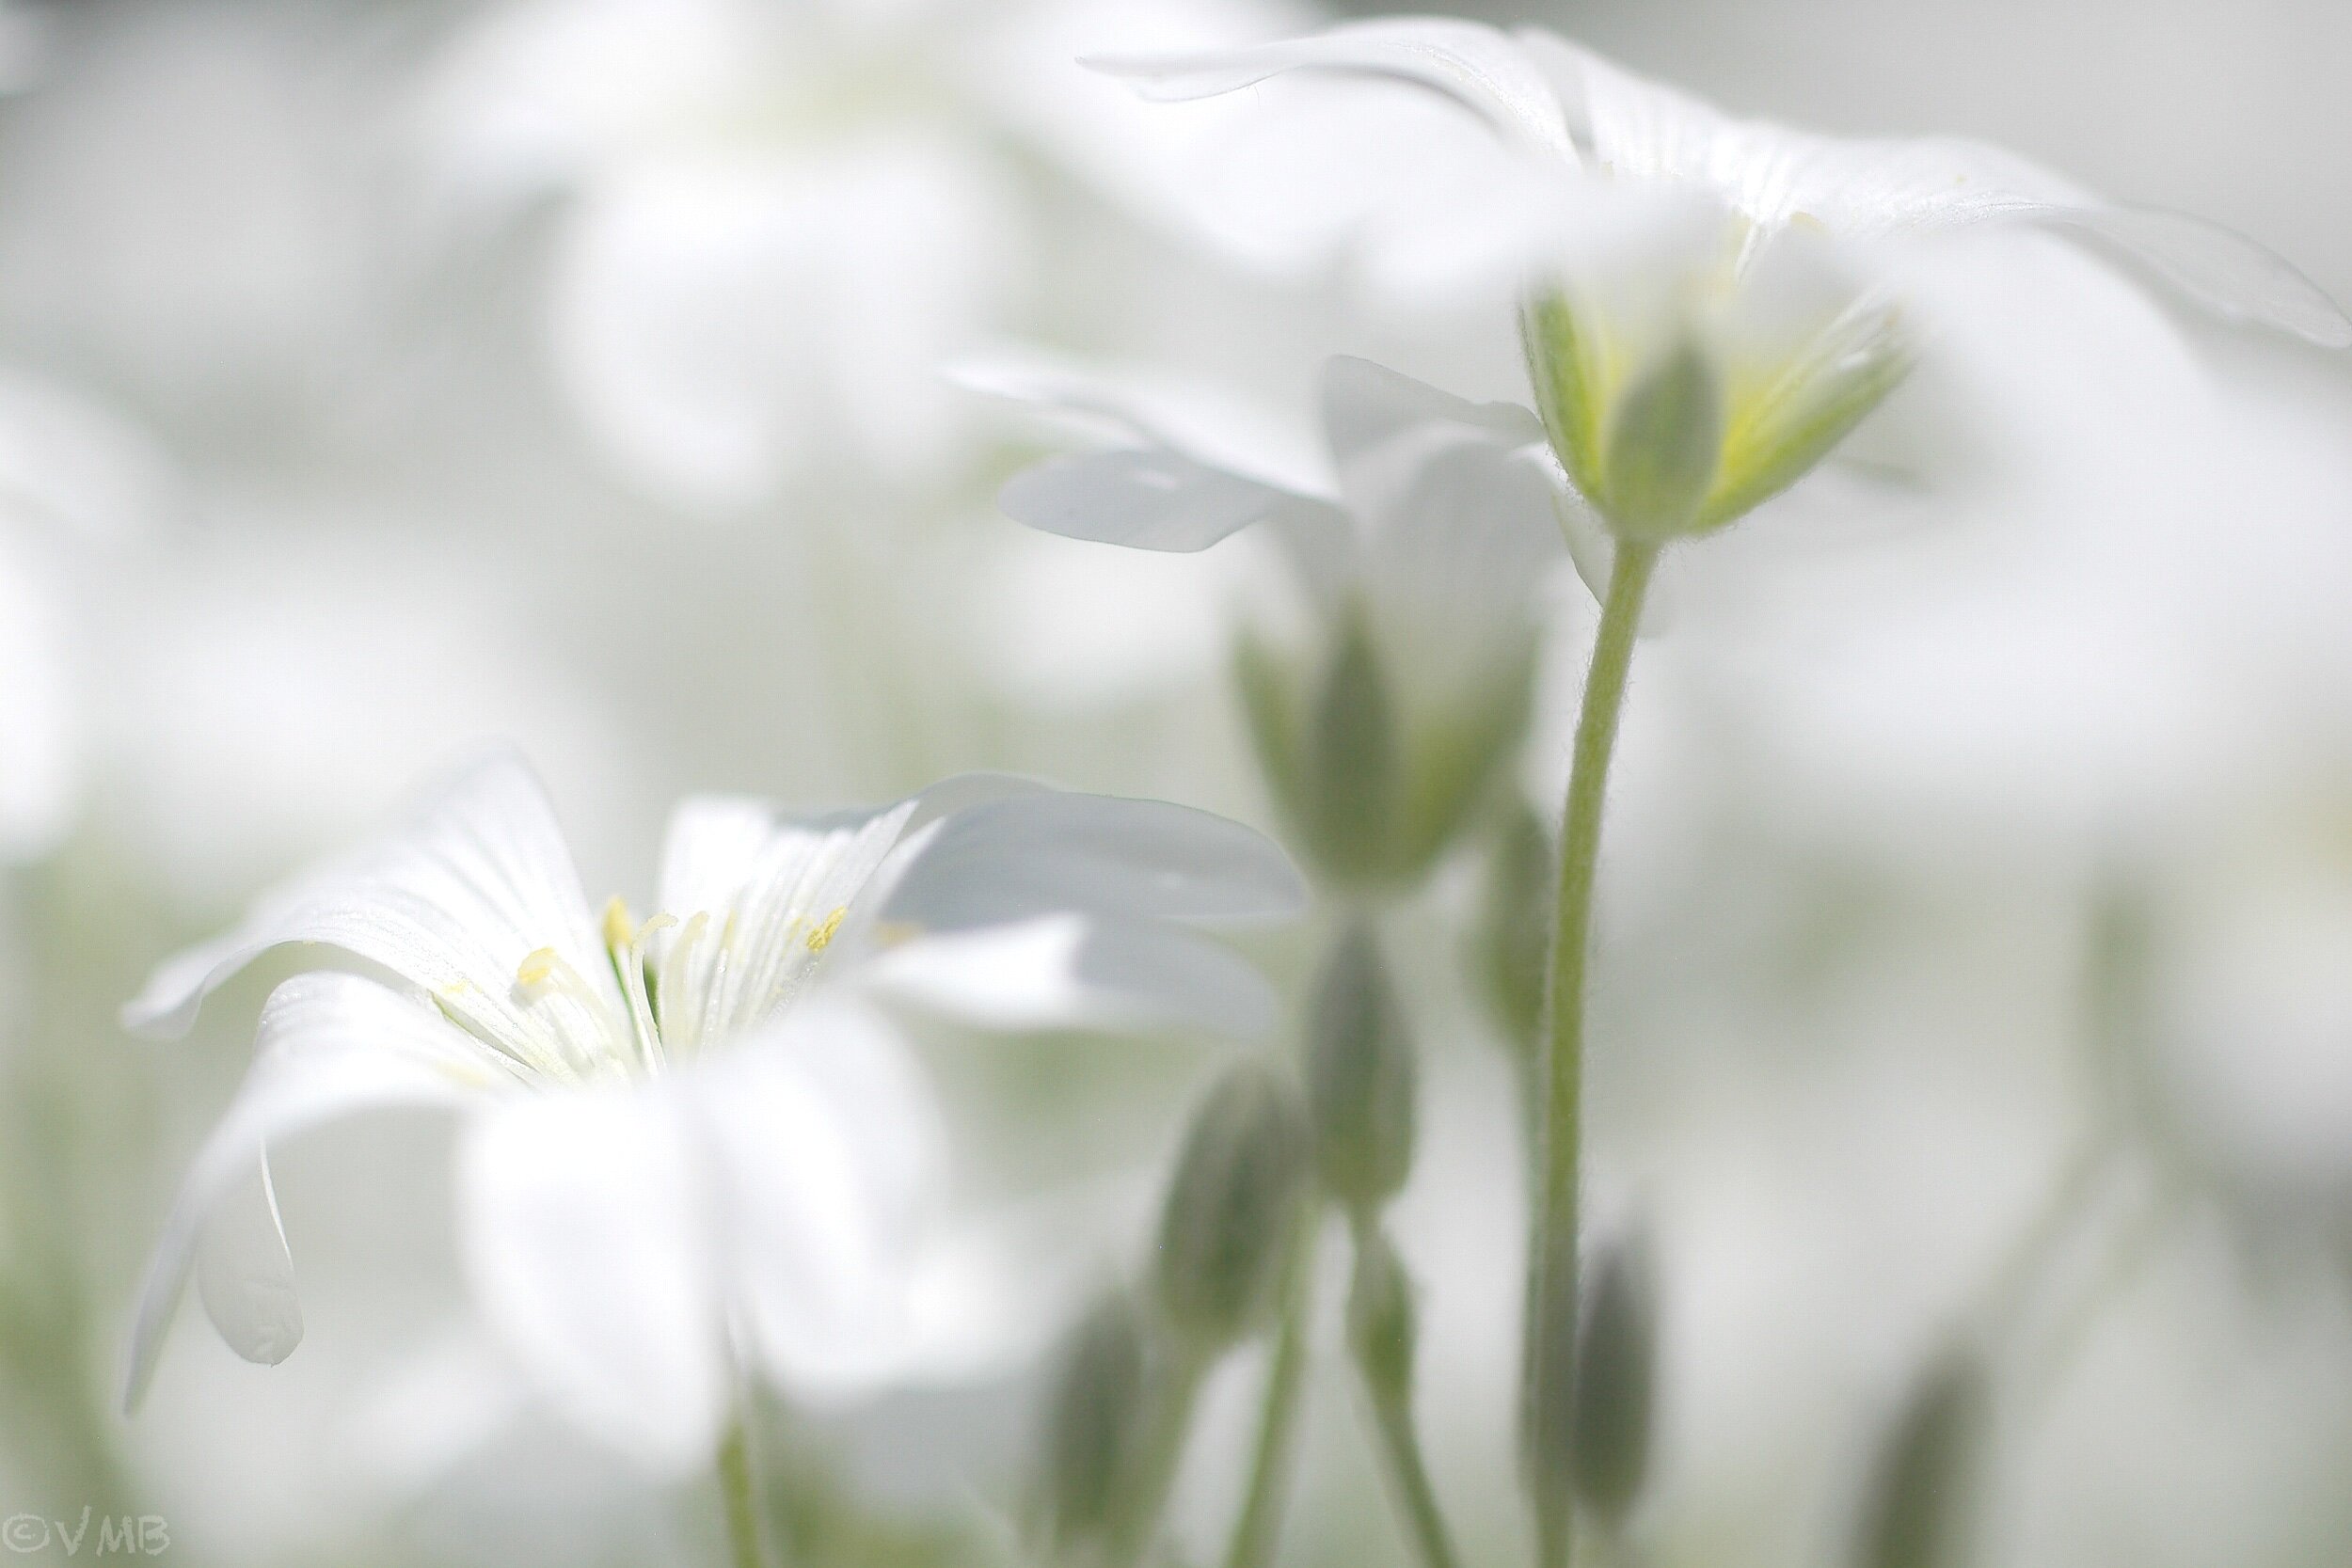
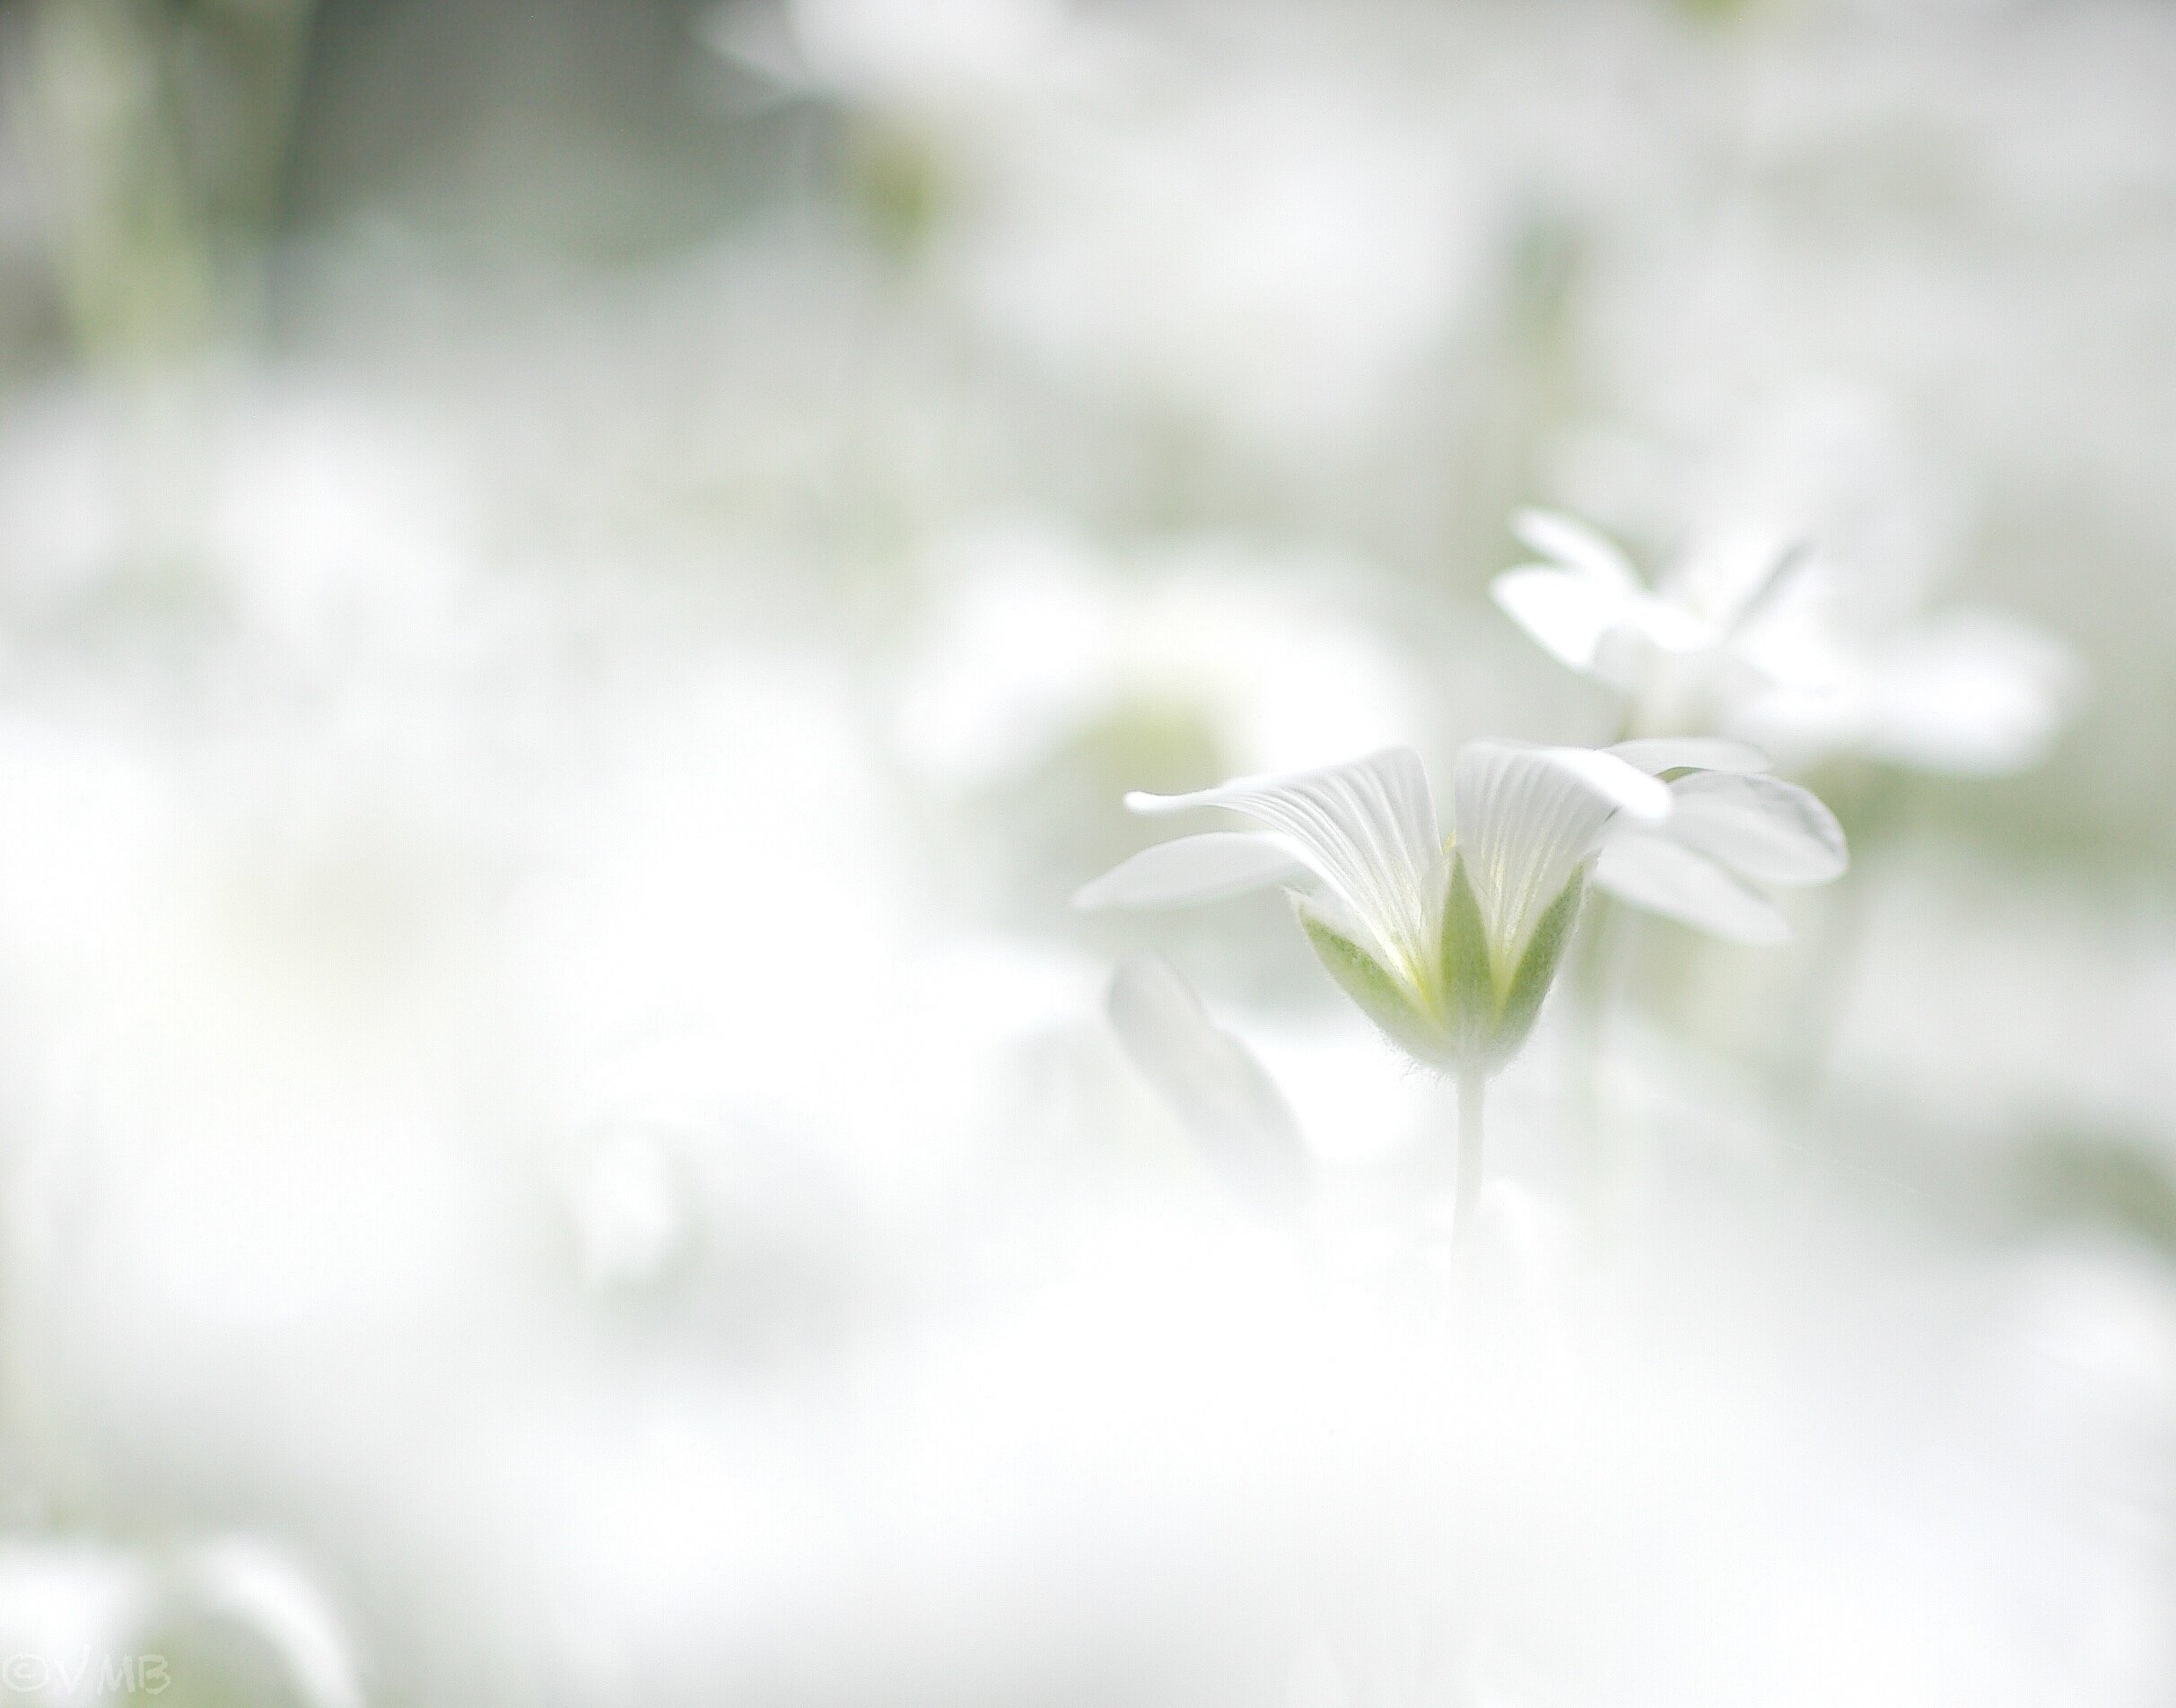
A 50mm macro lens with a profusion of flowers both in front of, and behind the in-focus flowers help to give these images an ethereal look often referred to as selective focus. More on photographing these plants below.
Space the snow in summer flower 12 to 24 inches apart to give plenty of room for spread. Mature plants grow to between 6 and 12 inches and have a spread of 12 to 18 inches.
Originally from Europe and western Asia, these plants can actually be pushed to grow in zones 8-10 as well, but growing in these zones they may be short-lived.
The plants silver-grey foliage gives away their overall toughness in the landscape being more or less heat tolerant. They do better in a dry, sunny heat situation rather than in humid conditions.
In fact, we are growing ours in more of a rock-garden style than as a border plant in a traditional garden, where it also excels.
These plants are said to be salt tolerant. If you are lucky enough to live by the sea, give them a try. They can be considered an invasive plant in some warmer climates so check with local authorities before planting.

Five sun-loving Ground covers.
Photographing these flowers in your garden
Snow in Summer is an excellent plant to experiment with photographically. It’s soft grey foliage and delicate white flowers makes it an ideal candidate to try “selective focus.” This creative style of photography uses a high-key, dreamy effect to create ethereal images.
Using fast, close-focusing lenses that are opened up to as much as f2.8 will create these effects.
Point-and-shoot tip: If you are using a point-and-shoot camera, consider using the “high-key” mode filter, which is usually built into theses cameras, to help you create the light and airy effect.
These “selective focus” images were made in full sunlight with a 50mm f2.8 Pentax macro lens. I used an older manual focus lens but newer auto focus lenses are available. Expect to spend a few dollars on these more specialty lenses.
Also available are 100mm macro lenses that enable photographers more control including a larger working distance to photograph insects and reptiles from farther back.
Many modern zoom lenses also offer a “macro” feature on them. These may work for some flowers, however their close-focusing abilities often fall just short of the mark and they are what we call “slow lenses”, meaning they only open up to f5.6 which is often not enough to give you the amount of out-of-focus effect you are looking for. In certain situations they would work, but if you are serious in pursuing this type of garden photography, consider splurging on a fast macro lens.
There are other ways to get close to flowers and insects in the garden that I’ll explore in later blogs, but trust me when I say true, fast macro lenses are the best way to go, if you want to explore this type of photography.
Macro lens is a good investment
I am lucky enough to own 3 macro lenses. All are older, manual focus lenses that still work on my digital cameras.
In these images, the camera’s settings had to be overridden about two f-stops to maintain the overall lightness of the image. If I had followed the camera meter, the image would have appeared muddy-grey rather than this delicate ethereal look.
Also, opening up the camera lens wide open to f2.8- f4, helps to keep the surrounding flowers completely out-of-focus with a nice dreamy look.
Shooting at f-8 or f16 would have created a sharper more documentary image of the flower, but that was not the look I was after.
Shooting the flowers with the lens wide open and in bright sunlight allowed me to shoot at a fast shutter speed without a tripod. Normally a small inexpensive tripod would be useful in an extreme closeup, but the shutter speed allowed me to shoot handheld.
Besides I don’t think my larger tripods would allow me to get this low to the ground. The situation forced me to lie on the ground and dig the camera into the pea gravel to get the best angles. (What we do to get the shot.)
For more on macro photography in the garden, check out my other posts including: Getting up close for flower and insect photography; Karen Hutton: Exploring the world of close-up photography.
Flowers that grow in profusion like this make for excellent “selective focus” subjects. Take advantage of these situations whenever possible.
Play with the camera settings a little until you get a feel for what works best. Using the camera’s overexposure compensation button is an easy way to change exposure in any camera mode.
These “selective focus” shots are difficult to do with a smart phone without the macro attachments I talked about in the previous blog and linked to here (macro lenses and other accessories.)
The photograph looking down at the plant from above, was taken with an iphone later in the day, after the area was in shade.
Taking this shot at mid-day would have created harsh shadows and likely made the image too contrasty and unuseable. If you must take a more documentary image in full sun, look for a way to shade the flower. White photo umbrellas would work wonderfully in this situation. They allow enough light to get through, yet remove the harsh shadows on the plant.

Once your subject is shaded, then consider using a reflector to bounce light back into the flowers. It could be as simple as a white card or a piece of tinfoil, but these 5 in 1 collapsible photo reflectors give you the flexibility to reflect light into your subjects at various levels and give you the option of reflecting warm, golden light if you are looking for an evening glow on your subject. They are easy to carry around and collapse into quite small, lightweight reflectors.
In my case, most of these accessories were not needed because the light grey pea gravel was able to bounce enough light back up into the flowers to keep that nice light airy feeling.
If the ground was soil or mulch, I would have used one of the collapsible reflectors to bounce the light back up into the plant. Probably the silver reflector would have brought the best results, but the white ones would have also worked well.
Photographing in our own gardens allows us to wait until the perfect times of day to get the best images possible. Keep an eye out for flowers or textures that are in their prime in your garden and try to capitalize on the proximity of your subject and the best light.
This page contains affiliate links. If you purchase a product through one of them, I will receive a commission (at no additional cost to you) I try to only endorse products I have either used, have complete confidence in, or have experience with the manufacturer. Thank you for your support. This blog would not be possible without your continued support.
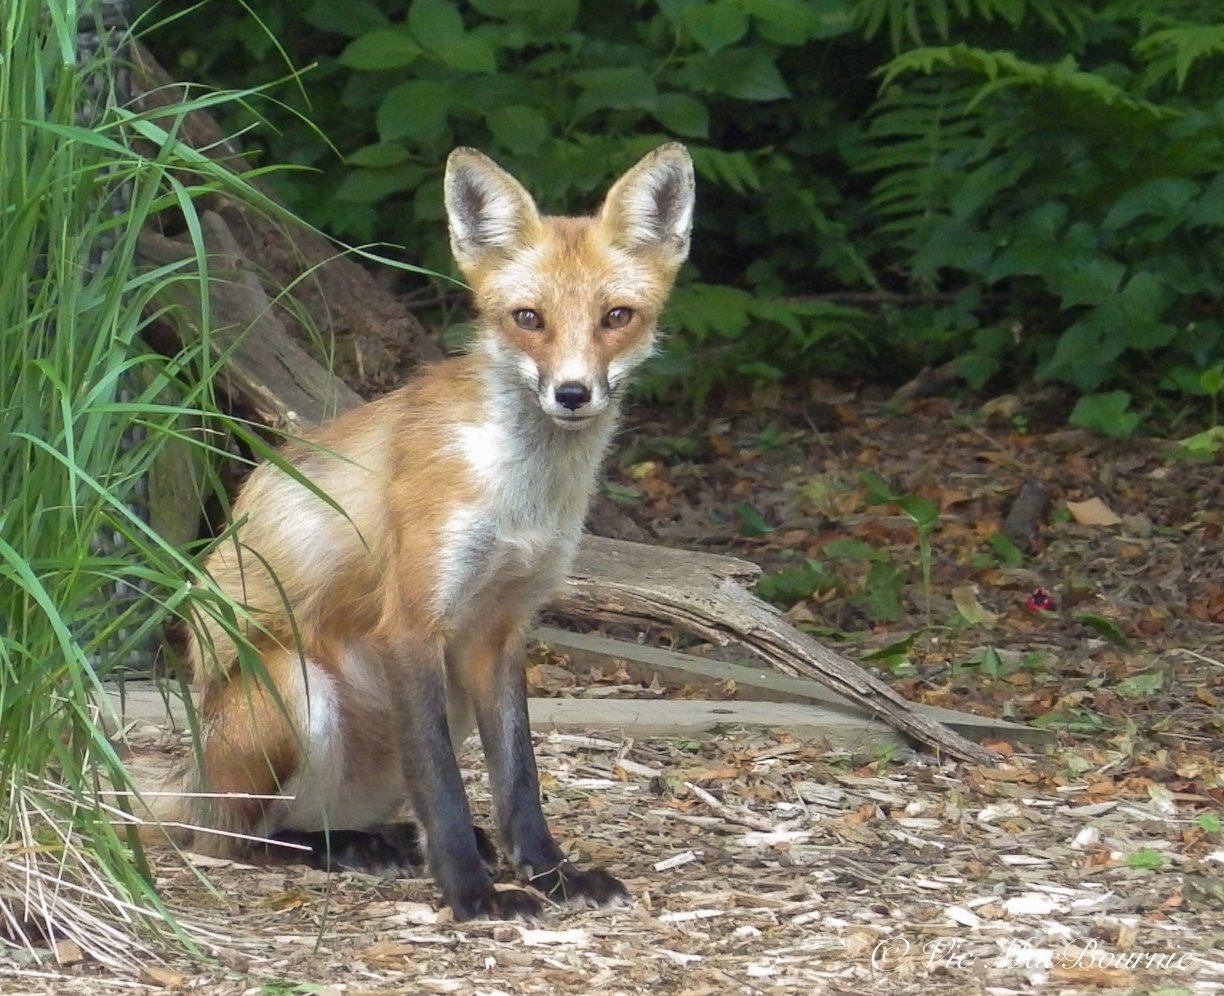
Tips to photograph wildlife in your woodland garden
Creating the right environment to be successful in the garden involves a lot of hard work. But, in the end, it pays off. It’s not luck that you saw an oriole, a fox or hummingbird in your garden. It’s the result of that hard work you put in earlier to create the right conditions.
Bridge camera is great choice for garden photography
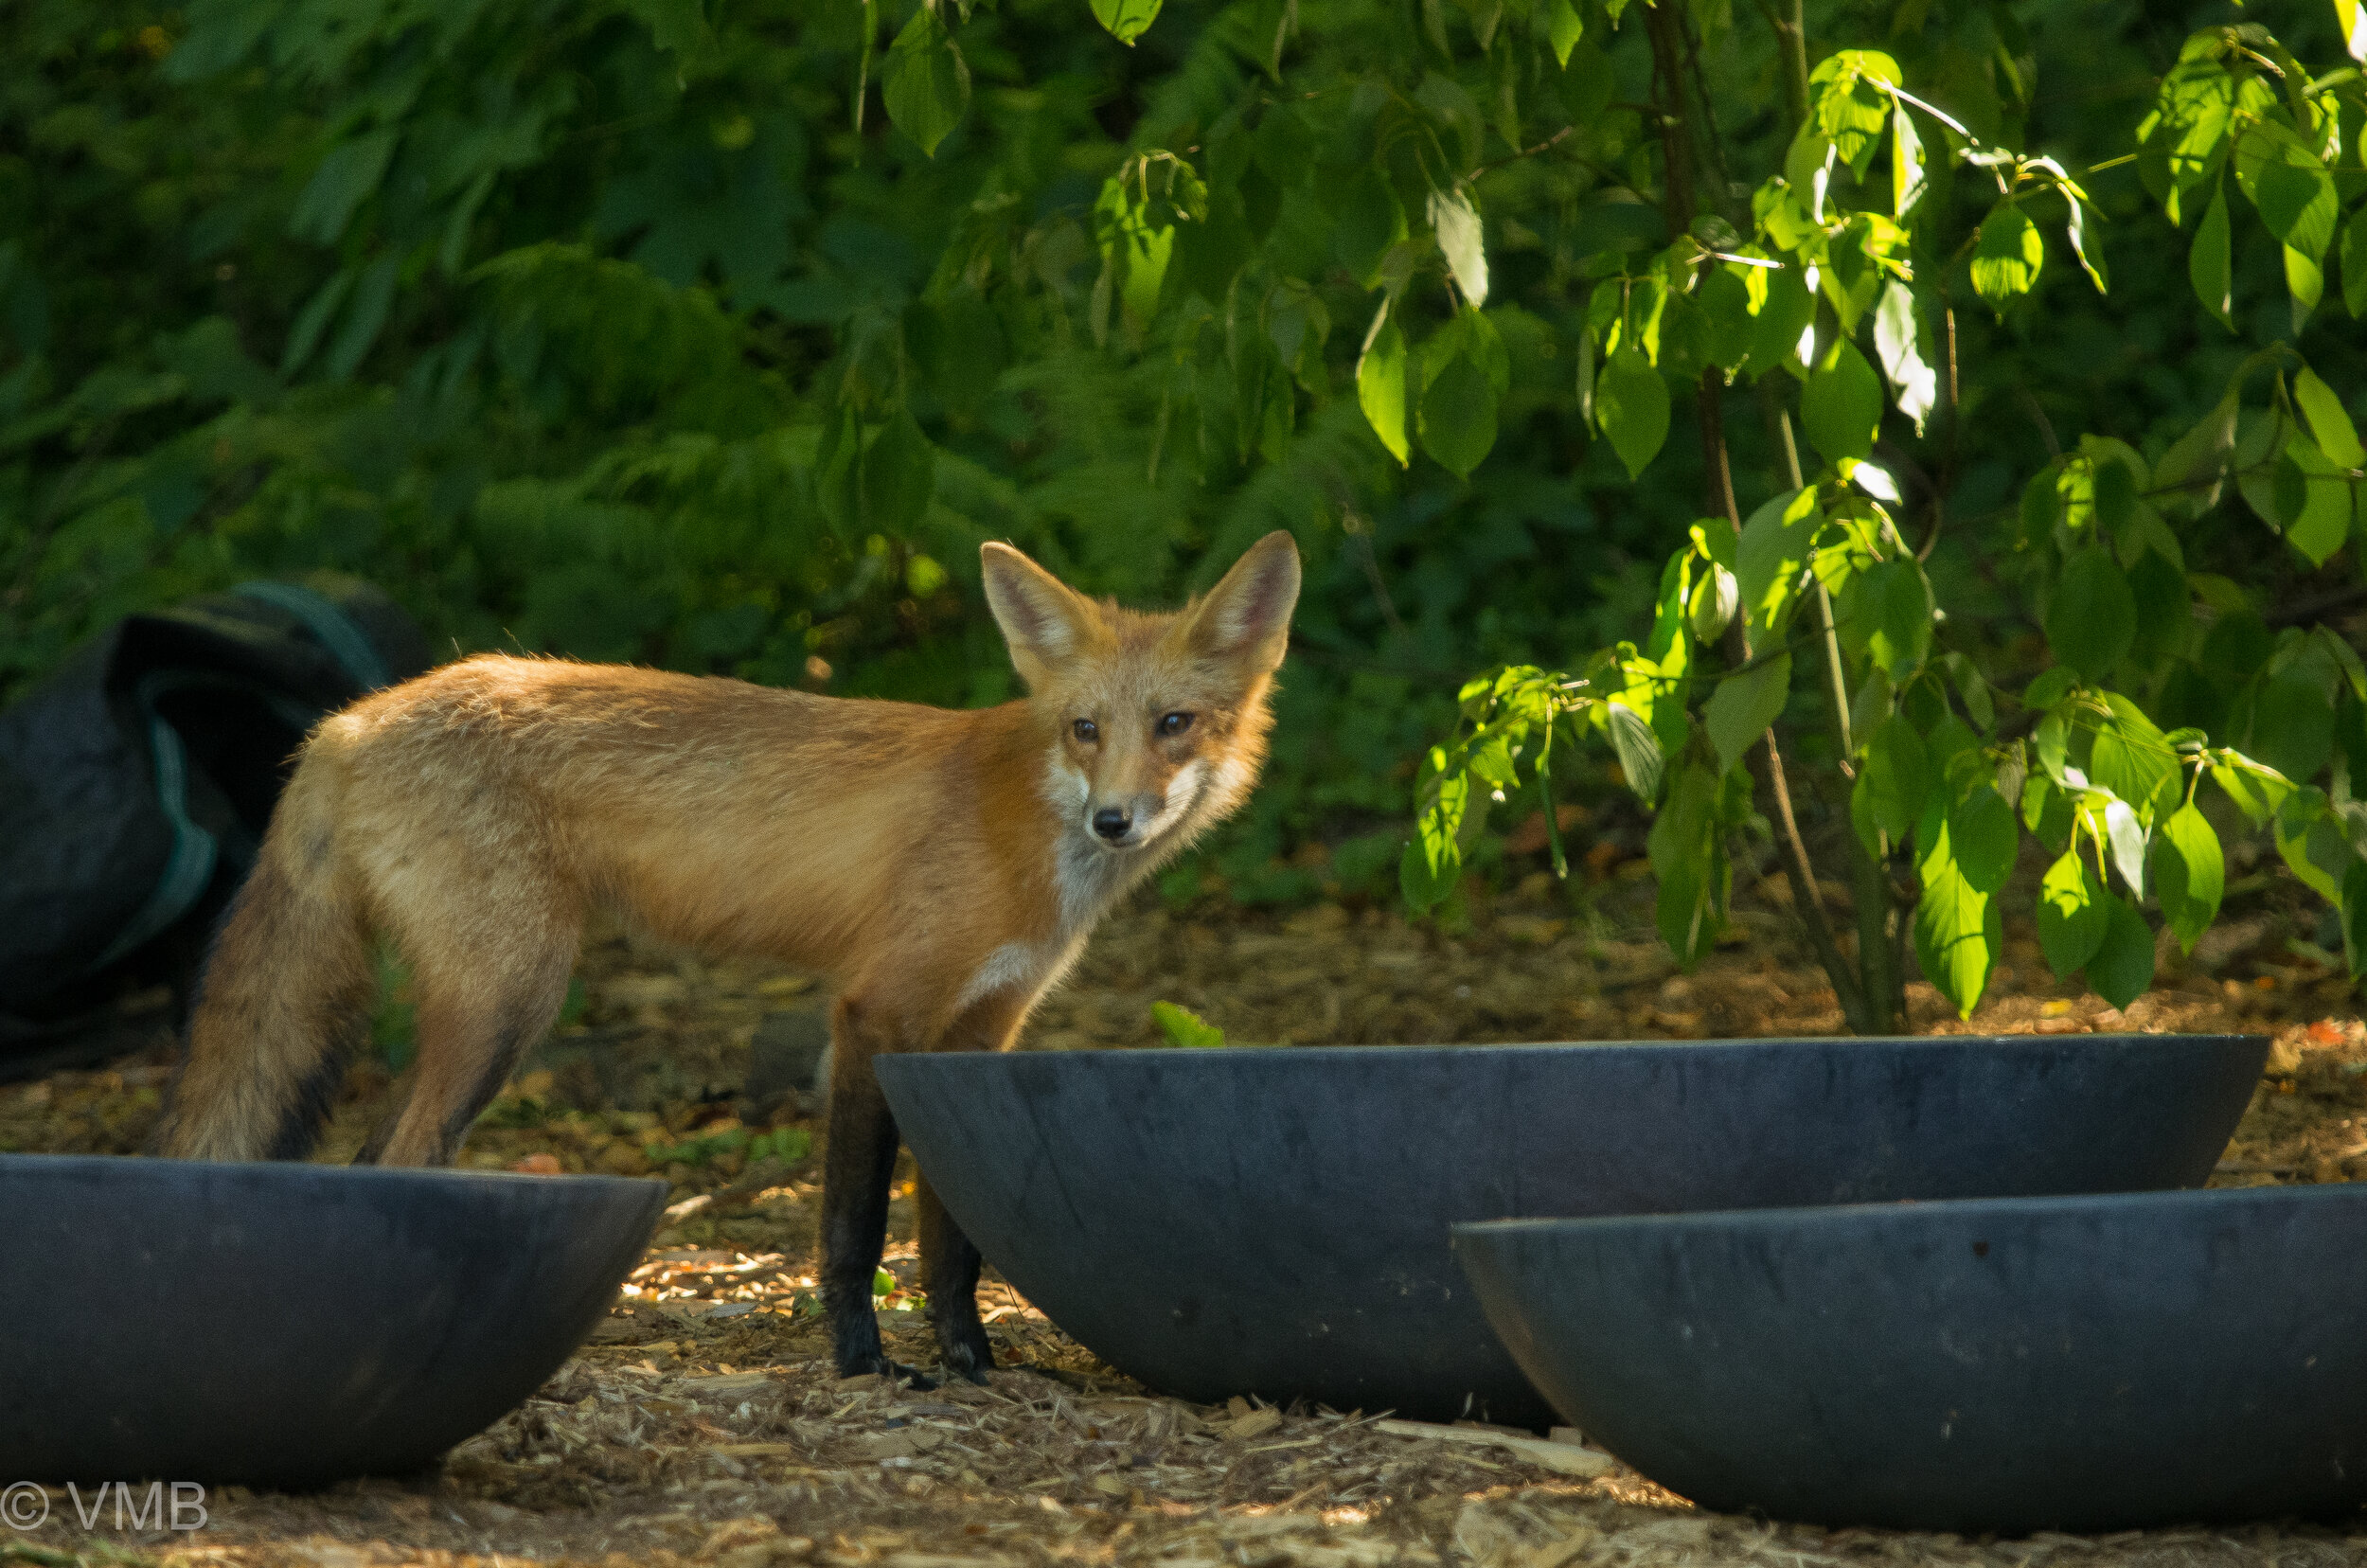
One of our neighbourhood foxes dropped in for its daily visit. It helped that I was armed with my camera on a monopod and my favourite lens.
This fox image is an example of how the right environment created an opportunity to capture an image that presented itself.
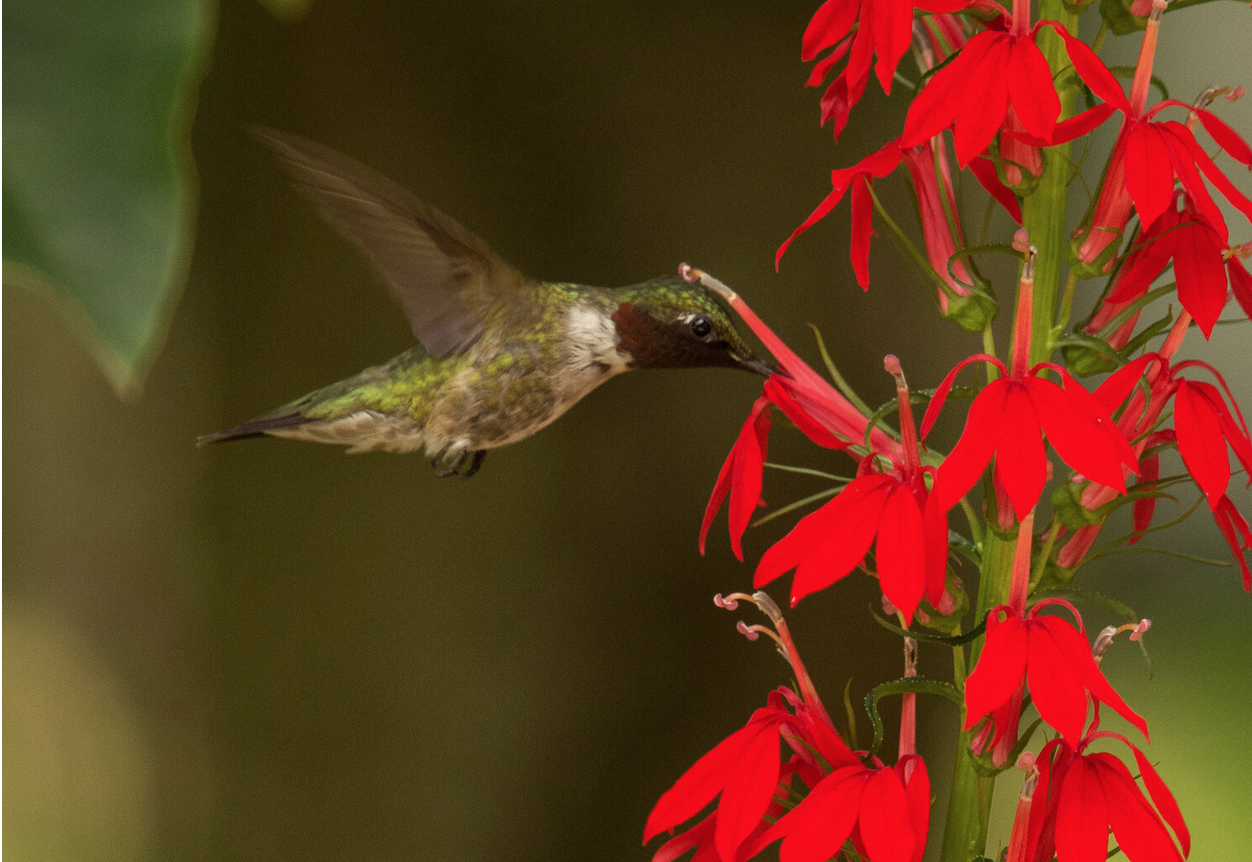
It began with a decision to work on getting a good image of a hummingbird feeding at a native Cardinal flower, but ended hours later with a memorable image of a fox.
Let me explain.
The cardinal flower was at its prime and I knew that, if I wanted to use it to get an image of a hummingbird feeding, I needed to act swiftly. So I set the camera on a tripod, filled up my coffee and waited.
(If you are interested in exploring garden photography at a higher level, be sure to check out my comprehensive post on the Best camera and lens for Garden Photography.)
If you are looking for a new camera or lens, check out B&H Cameras & Video for a complete line of cameras and lenses.
And, if you are wondering how a point-and-shoot digital camera that’s more than 10 years old can perform in the garden, be sure to check out my post on the Canon PowerShot Elph 500 HS.
The hummers came to the feeders surrounding the Cardinal flowers but only stopped at the flowers three times for a brief moment.
About three hours into the shoot, I noticed a fox standing by our shed looking my way. It was by no means stressed by my presence. In fact, it seemed perfectly happy to share the yard with me provided we stayed at a comfortable distance.
How often have you been in the yard and a great photographic opportunity presented itself to you? Too often, we are not prepared. Chances are, all we have is our smart phone by our side and the resulting image is nothing but a poor replica of a memorable moment.

The Pentax X5 and other bridge cameras from major manufacturers allow the photographer to be ready when the opportunity arises. I was sitting out in the garden when this fawn decided to visit. The 580mm reach on the Pentax X5 allowed me to get in close without scaring the little fawn.
But on this day I was in luck. The camera was already set up with my favourite 300mm F4.5 lens on a monopod.
I couldn’t ask for a better situation. Even our dog Holly had yet to notice the fox that trotted over to our three large water bowls and helped herself to a long drink.
A few quick bursts of photos from the 35mm DSLR camera and off she went. Like a ghost. There one moment … the next, gone. It was over as quickly as it began.
The lesson learned was simple: Be prepared.
Today, even if I just go out to enjoy my morning coffee, I always have a camera by my side ready for action. Sometimes it’s a simple “Travel camera” (read my travel camera review here) with a wide angle to short telephoto lens that is great for basic garden shots but will not likely get you close enough to most wildlife.
If you are looking to upgrade your camera equipment – be it a new camera body or lens – be sure to check out KEH Camera Exchange for the best prices on excellent used equipment. You can also trade in your used gear to help curtail the cost of new equipment.
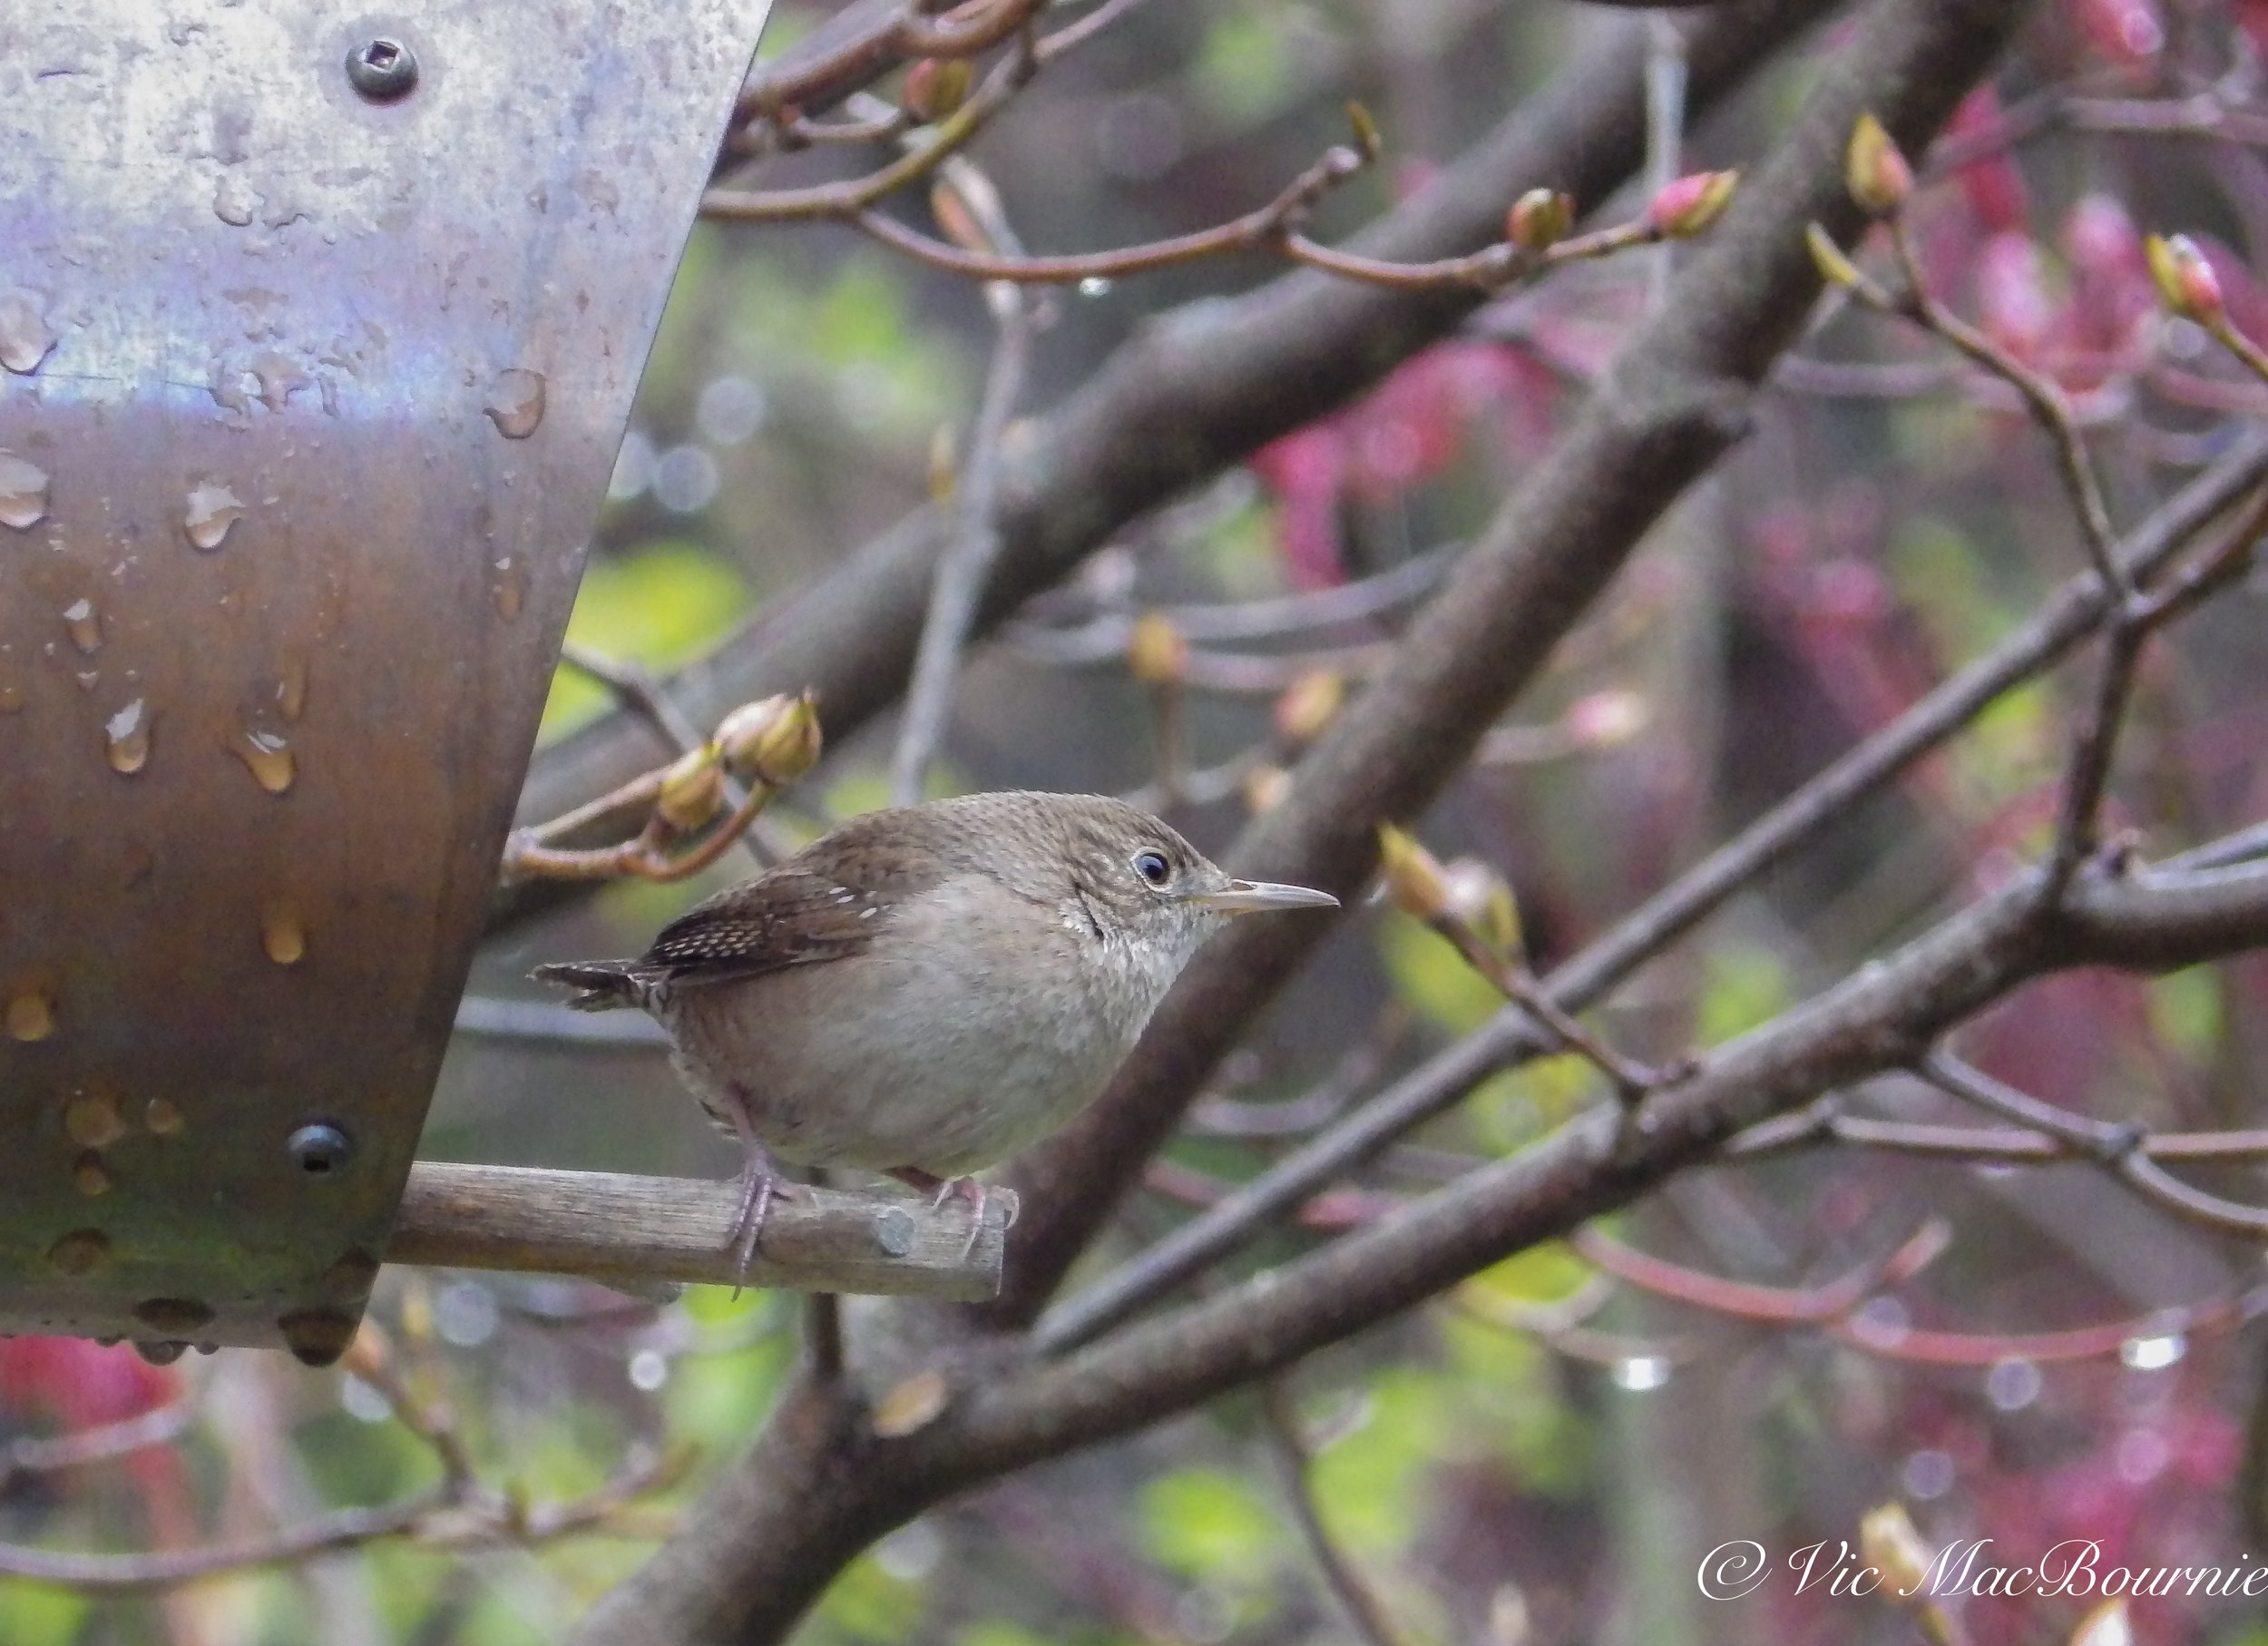
This Carolina Wren was photographed with the Pentax X5 Bridge camera that comes equipped with a super telephoto lens capable of shooting wide angle images as well as telephoto shots and even close-up macro type images.
Most likely, it is my versatile “Bridge camera” that allows me to shoot everything from long telephoto images of wildlife, including birds and butterflies, to sweeping wide-angle garden vistas, to macro shots of flowers and insects.
On this day, I happened to have my 300mm lens on the camera and ready to go, which made capturing the fox image possible.

This young fox decided to pose for me for a minute giving me time to focus the Pentax X5 “Bridge” camera to capture the image. I needed to use the full zoom power of the X5 (500mm) to capture the image.
More recently, however, I have a “bridge camera” with me. I have used the camera for more than a year now and have come to appreciate its versatility, with its ability to go from extreme telephoto to wide angle and even a very usable macro mode.

Bridge cameras, which are offered by all the major camera manufacturers, can be the perfect camera choice for garden photographers looking for a single extremely versatile camera that is at home photographing garden vistas as it is birds and other wildlife. Add to that versatility the ability to get in close to flowers for macro photography and it’s hard to believe that everyone is not lining up to purchase one. These cameras can be described as mid-priced cameras situated between a simple point-and-shoot and a more serious 35mm SLR with a complete line of lenses. Bridge cameras look like a typical digital single lens reflex (DSLR), but without the interchangeable lenses.
The bridge camera offers a built-in lens sporting a wide angle to long telephoto lens. The combination creates an easy-to-carry-around versatile camera that can deliver very good results with a little practise.
But they are not by any means perfect.
My bridge camera uses an electronic viewfinder in addition to the back LCD screen to view the image. The electronic viewfinder takes getting used to and falls far short of a optical viewfinder found in traditional DSLRs. To add to the difficulty of using the Bridge camera is a significant “shutter lag” meaning an excessive amount of time between when you press the button to take the image and the time it is actually taken. This shutter lag can mean the difference between getting the shot and missing it entirely.
In addition, because most of these cameras are so dependent on electronic viewfinders and the electronic zooming of the lens, some of these cameras tend to exhaust your batteries quickly, especially if you use the large back LCD screen as your primary viewer or to check your images regularly. My camera uses regular AAA batteries, which can be convenient when you are travelling, but compared to rechargeable batteries, can also be expensive to use. The other issue I have with the Pentax (which is no longer available) is the fact I cannot easily add filters to the front of the lens. This may not be a problem for most photographs, unless of course, you need to use a polarizing filter to remove glare from leaves or a pond.
Like most Bridge cameras, the Pentax X-5 bridge camera that I am using came with a very long 26X telephoto lens (the equivalent zoom for traditional 35mm cameras of about 22-580mm.) Most bridge cameras come equipped with a lens that provides the photographer with both a solid wide angle lens as well as a super-long telephoto lens.
This image taken with the Bridge Camera is an example of the type of images that are possible just sitting in the backyard waiting for the right opportunity.
Bridge cameras like my Pentax X-5 also come equipped with an impressive macro feature making it the perfect camera to carry with me into the garden for casual macro shots. For more serious macro photography, I will mount a 50mm or 100mm dedicated macro lens on a 35mm SLR camera.
Being prepared, having the right tools at hand and, of course, some luck on your side can mean the difference between getting the shot and missing it.
Even seeing wildlife, let alone getting good photos of them, depends on a lot of factors going your way.
Luck certainly plays a role in any shot, but I like to think that it plays a smaller role than most people think.

A macro image of a clematis taken by the Pentax Bridge camera the X5, on macro mode. This shows the versatility of the camera and its lens that is able to go from long telephoto (see above image of the Fox) to extreme macro without changing the lens.
Being out in the yard for more than four hours patiently waiting for the hummingbirds to cooperate creates the opportunity to be successful. Still, I was unsuccessful getting that shot of the hummingbird. Instead, I had to “settle” for the fox shot.
I like to think you create your own luck.
Setting out large water bowls meant to provide local wildlife with a fresh water source helped create that opportunity for the photograph.
Creating a natural garden, providing a source of natural food and moving water in the form of bubbling rocks and fountains, not using pesticides, having woodpiles … these all provide the right environment to getting the photograph, or the opportunity to observe the wildlife that call our property home.
PopPhoto website lists their favourite Bridge Cameras in this informative article starting with the best overall camera going to the Sony Cyber-shot DSC-RX10 IV, the Canon PowerShot SX70 HS as the best Wildlife camera and the Panasonic Lumix FZ80 as the best budget camera.
It doesn’t have to be a fox. It could have been a bird, a butterfly a reptile, or even a photograph of a beautiful tree or grouping of flowers.
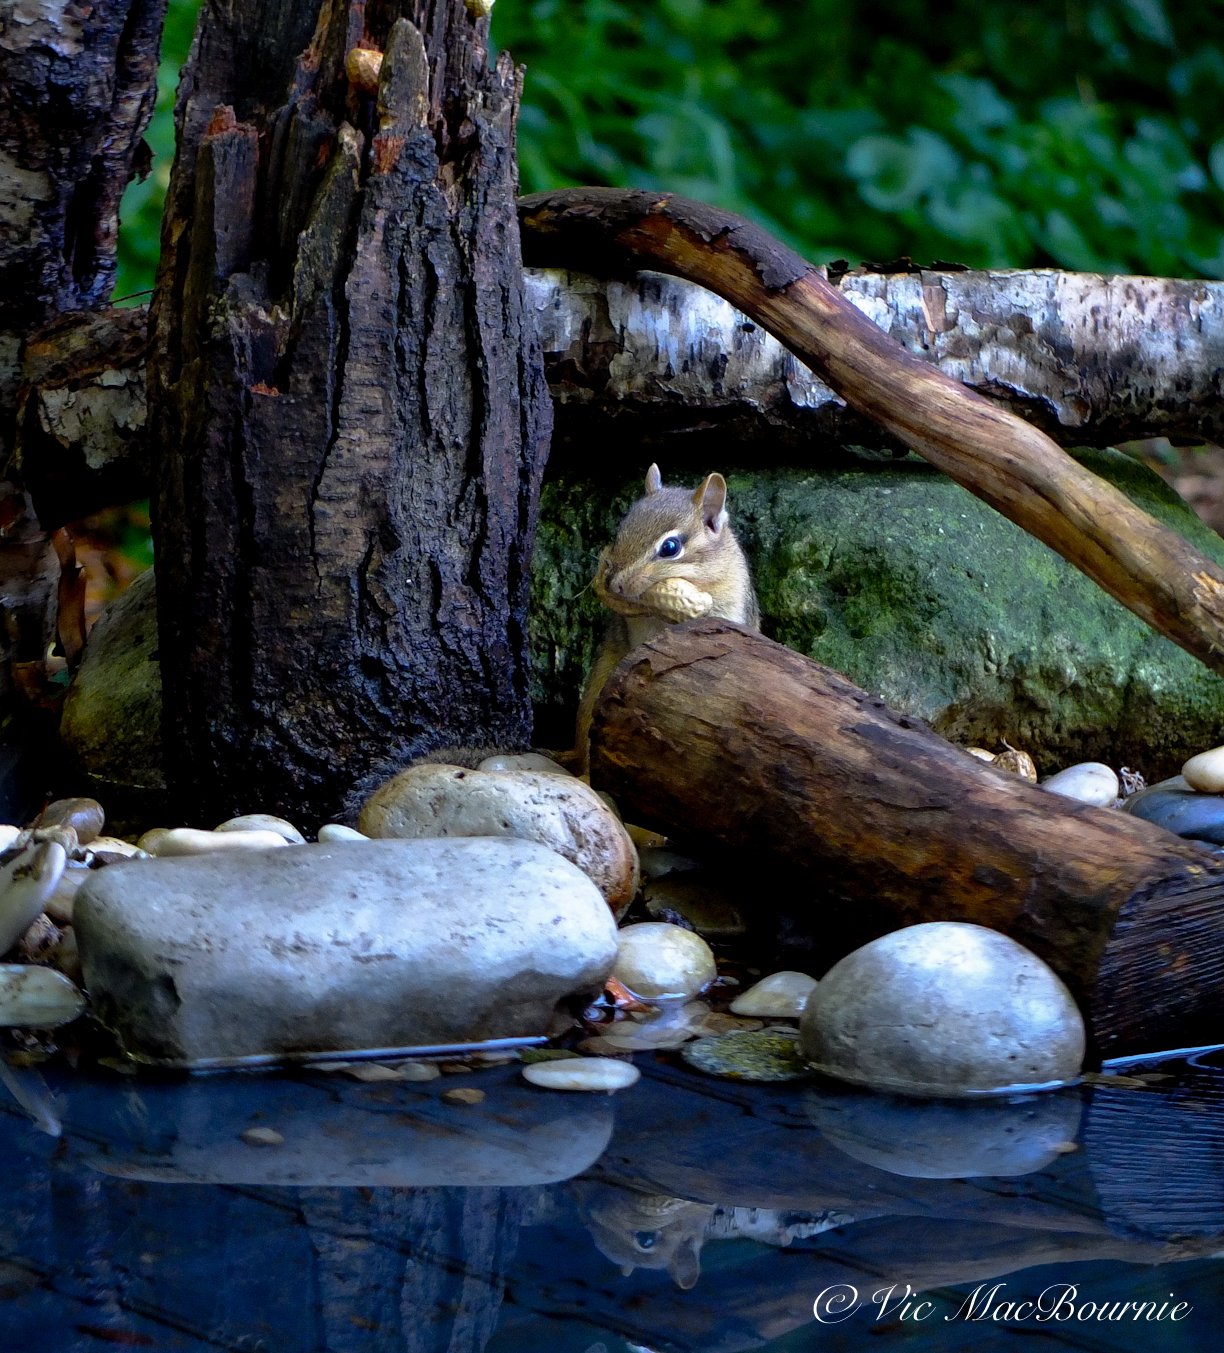
The day before this shot was taken, I was trying to capture some photographs of birds enjoying my new solar-powered fountain, when a little chipmunk decided to hang out with me for a while. So I got “lucky” and was able to get some great shots of the chipmunk too.
Getting lucky is really about creating the right environment to get photographic opportunities and then taking advantage of these opportunities.
It’s the same in your everyday life. Put yourself in the best environment to succeed and chances are you will.
Getting up early, spending time in our gardens, getting up close and intimate with flowers. These all create the opportunities to be successful.
I’ll be out again soon working on getting the shot of the hummingbird at the cardinal flower. Maybe I’ll get “lucky” and the hummer will cooperate this time.
This page contains affiliate links. If you purchase a product through one of them, I will receive a commission (at no additional cost to you) I try to only endorse products I have either used, have complete confidence in, or have experience with the manufacturer. Thank you for your support. This blog would not be possible without your continued support.
Garden photography: Build a portable DIY reflection pond in three simple steps
How to create a reflection pond in three simple steps. It begins with purchasing a rubberized boot tray. Then add some natural materials such as moss, river rock, pea gravel, pine needles and, in the fall, colourful leaves. The last step, add a little water and you are ready to start capturing professional looking reflection images of birds and mammals.
Create professional looking wildlife photographs
Ever wonder how photographers get those beautiful reflection shots of birds or animals?
It should come as no secret that many of those images are made with a well thought out reflection pond and a photographic blind.
In this post I am going to show you how to create a reflection pond in three simple steps and about ten minutes of your time.
I've always admired the incredible image of a lion drinking by the water hole in the evening – Its pink tongue and focused stare perfectly reflected in the water.
Without the mirror-like reflection, the image is just another impressive safari shot.
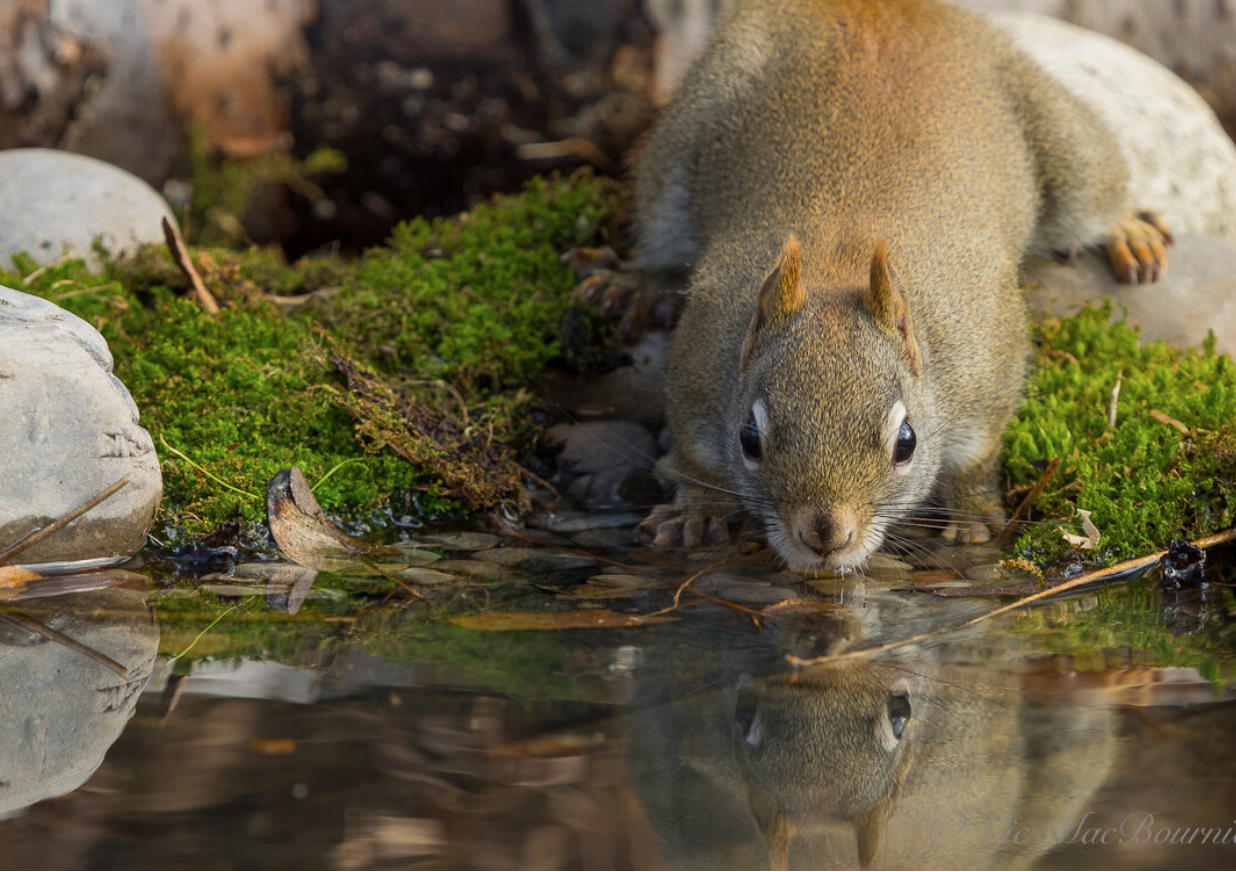
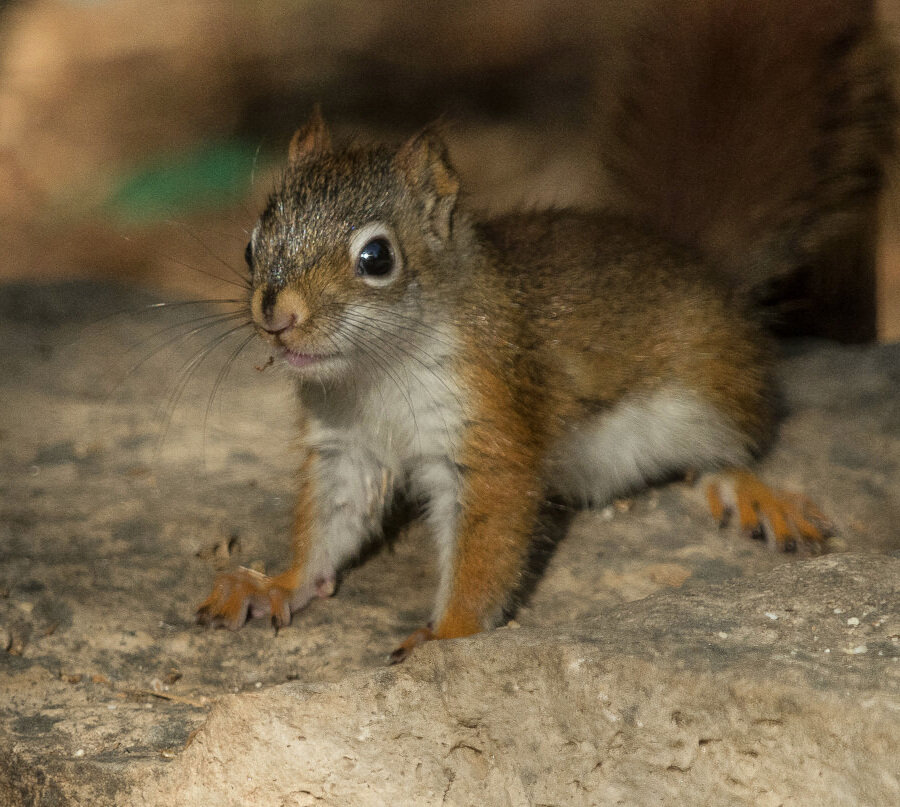
Our woodland and wildlife gardens can’t compete with an African watering hole, but that doesn’t mean we can’t create exciting reflection images in our own backyards. I know the red squirrel in the picture above isn’t quite a lion, but with a little work we can all imagine the possibilities.
Many of us have seen elaborate reflection ponds created to photograph birds and mammals. Some reflection ponds in Europe are so popular that photographers are willing to pay to use them to obtain outstanding photographic images of birds and mammals.
But here’s an epic hack of a readily available commercial product that makes creating a reflection pond as simple as possible and for under $50 Canadian. It’s so simple that, provided you have a few materials at hand, building it should take less than ten minutes.
(If saving money is your thing, check out my in-depth article on Building Your Garden on a Budget.)
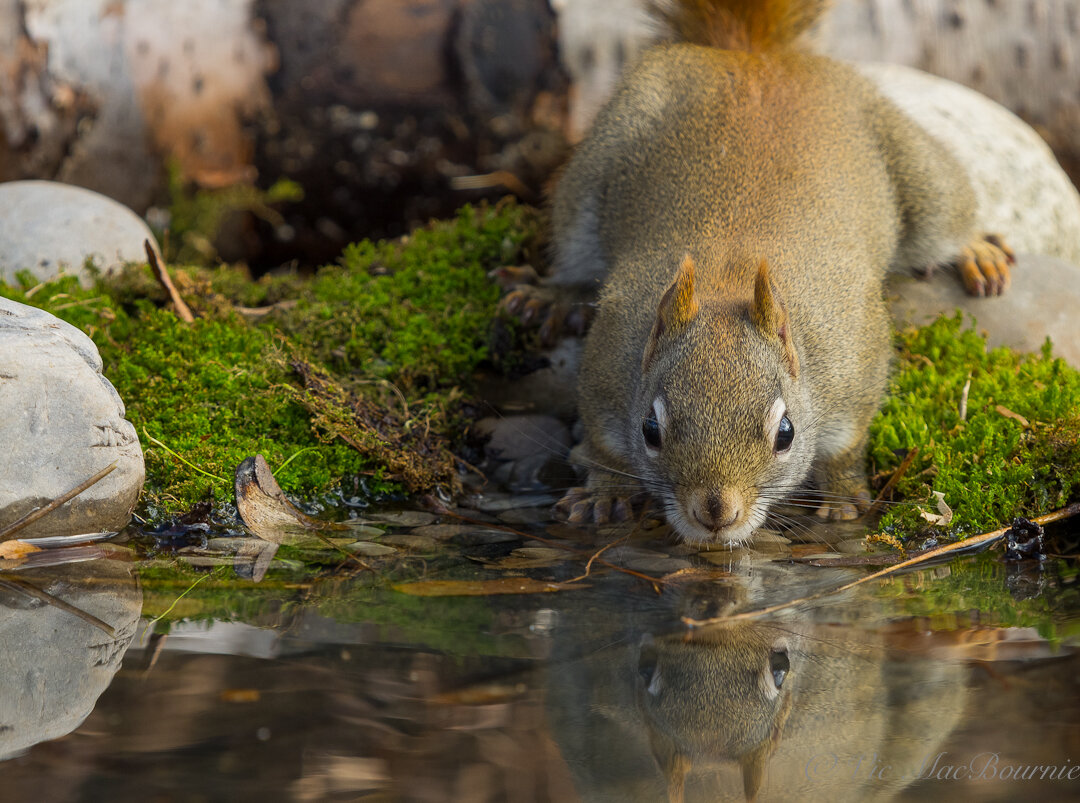
This reflection of a red squirrel at the pond is made to look natural with the addition of moss, pine needles, river rock and submerged pea gravel. This DIY reflection pond is extremely simple and inexpensive to create.
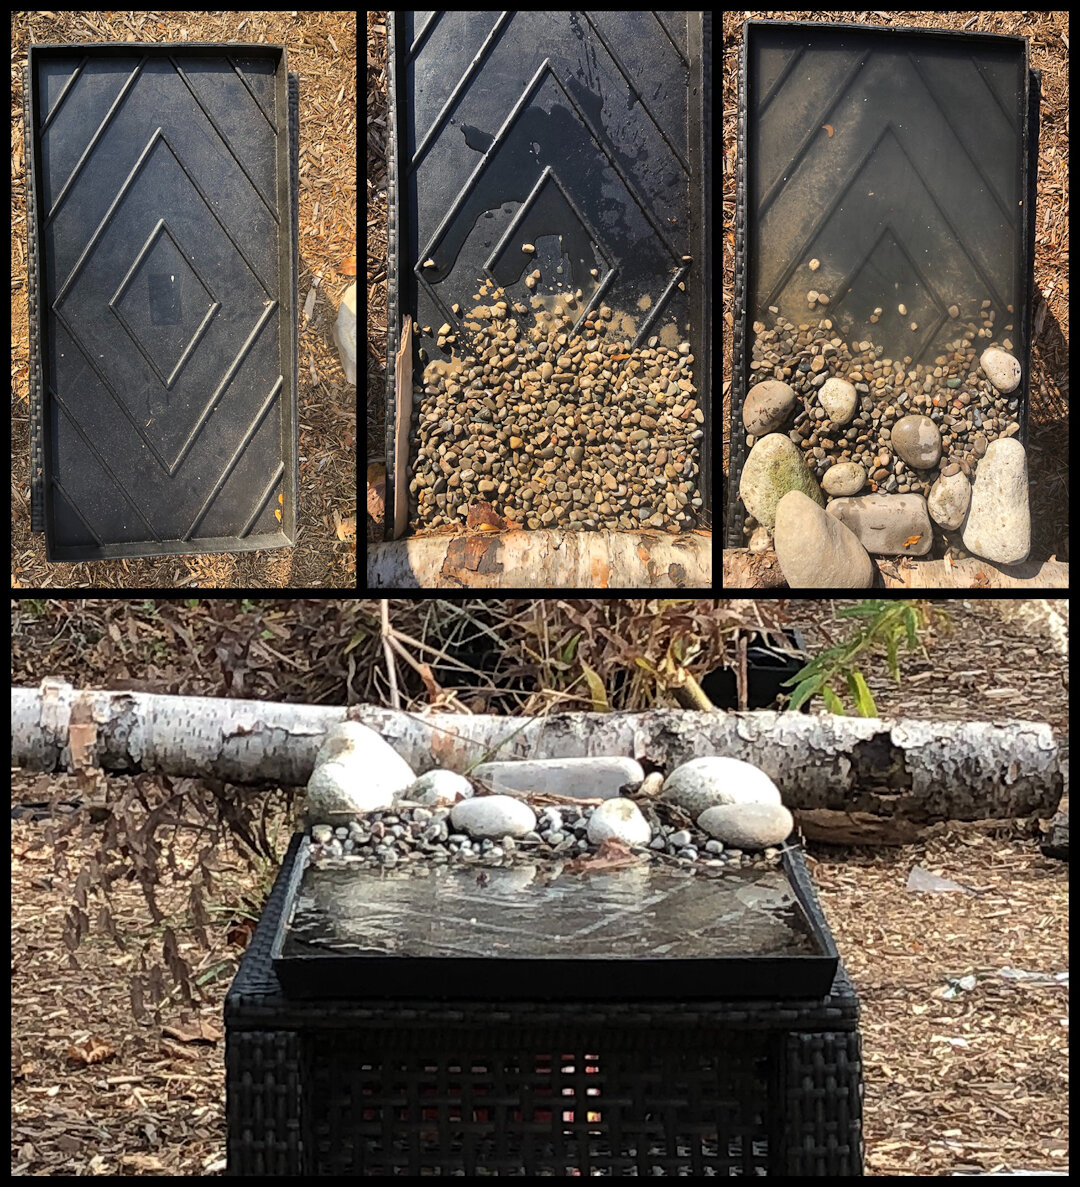
A step by step visual illustration of the creation of the reflection pond made from a rubberized boot tray.
Three simple steps to creating a reflection pond
1) Purchase a black rubberized boot tray. Mine was purchased from Lee Valley Tools outlet here in Canada and place it on a small table.
2) Add a few large river rocks, a couple of handfulls of pea gravel, maybe a birch log and moss, pine needles etc to your taste.
3) Add a couple pitchers of water to fill the tray and voila.
The reflected image of the red squirrel is just one example of what can be done with this simple, backyard reflection pond.
A little planning goes a long way in the creation of memorable backyard bird and mammal images. With that in mind, I went to work creating an outdoor studio to provide the inspiration to create my own “lion image.”
It's not uncommon for photographers to set up a few branches near a feeder as perches to guide birds to the best photographic locations.
My plan was to take that a step farther with the creation of a small reflecting pond to entice birds during the winter, when a reliable water source is a priority.
It all started with with the purchase of a 32-inch by 16-inch by 1.25-inch deep black rubber boot tray. It’s the perfect ready-made base to use as a reflection pond.
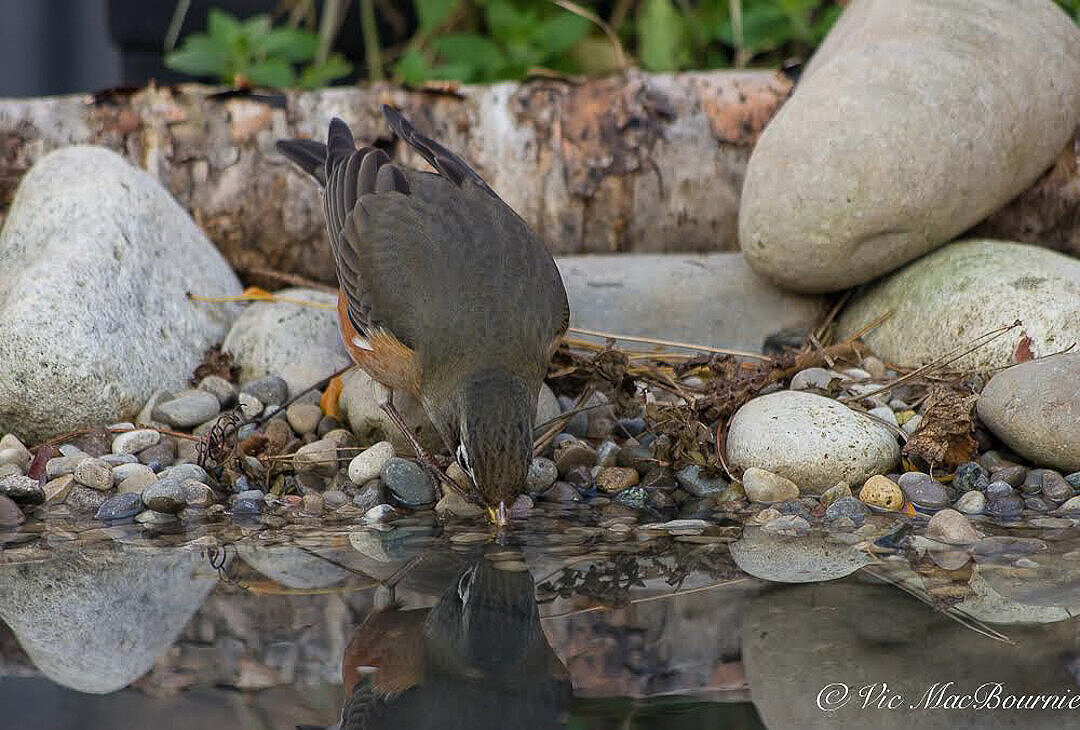
A robin stops by the reflection pond to steal a drink.
This boot tray, in case you are not familiar with it, is no cheap plastic flimsy tray that will crack in the cold. It’s made from a virtually indestructible rubber compound that is also non-skid and heavy enough to stay put even in high winds.
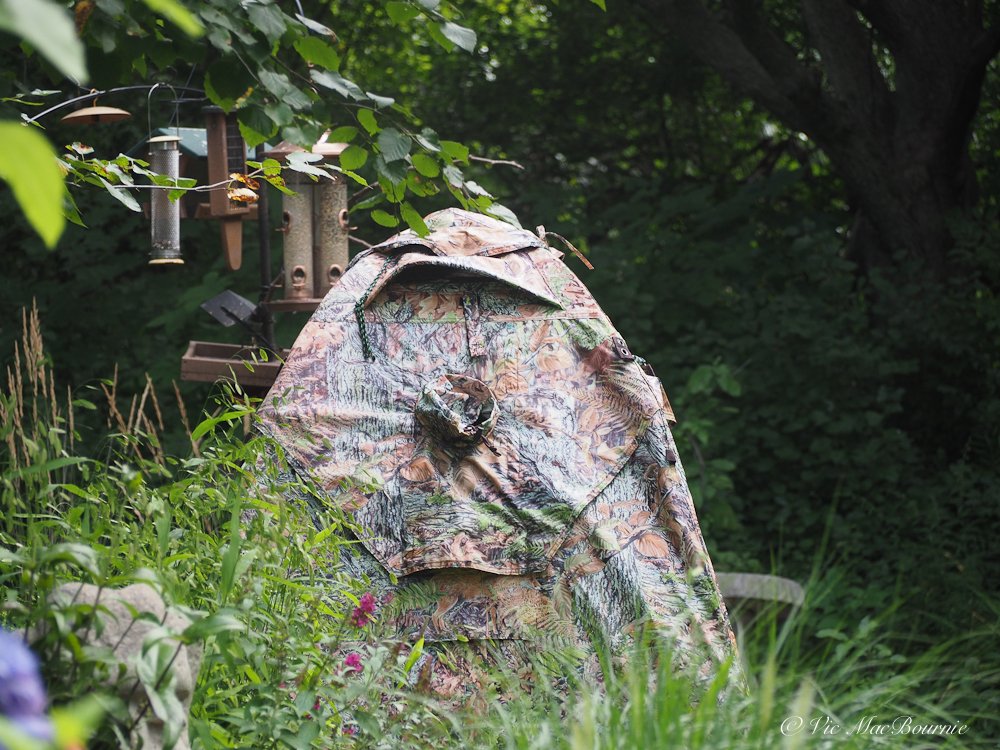
Placed on a similarly rectangular patio table that sits about two feet high, it's at the perfect height to capture reflections of the birds and mammals from my Tragopan V6 photographic blind or, if I put it close to a window in my home, from the comfort of my home.
Once I had the boot tray, the next step was to simply add some pea gravel, a couple of medium-sized and larger river rocks, maybe some pine needles, moss and a birch branch to give the outdoor photo studio a more natural look from behind the camera lens.
These natural materials will form the backdrop for the images and can be changed or manipulated to create different looks from one season to another. In summer, for example, moss and small wildflowers could be added. In fall, fallen leaves, pinecones, even an acorn or two.
Once the natural materials are in place, add a few pitchers of water to fill the tray to the top. Once the water is added, ensure that the tray is level by placing small stones or pieces of wood under the table’s legs.
Now, you are ready to begin photographing. It's really as simple as that. The birds will need time to get comfortable with the reflection pond.
During warmer months, you could slip a small mirror into the water to get a perfect reflection, but I don’t find that necessary. The fact the boot tray is black, will result in good to excellent reflection qualities provided your camera is set at the right angle to the water. A little experimentation here will help you get the results you want.
For the winter, set it up outside a back door on your deck or near a full-length window, so you can capture images in the comfort of your home.
With the Tragopan photography blind placed 7-10 feet from the reflection pond, I am able to use a very basic, inexpensive lens to capture the images.
By creating these types of lures to bring birds and mammals in close to either a photographic blind or a window in your home, you are much more likely to get outstanding images without having to purchase expensive photographic lenses.
It's important to note that to get a proper reflection, the camera should be at the same level or just above the height of the reflection pond. Some trial and error is necessary to get the best results.
I'll admit that the rubber boot tray falls a little short. It’s not perfect. If it were a little larger it would capture more of the reflection of larger birds or mammals, but it works beautifully for smaller- and mid-sized birds and mammals.
The fact it is black not only helps to create the perfect reflection, it also absorbs the light and works as a natural solar heater during the colder months. It will not keep it ice free in the coldest months, but it will help warm the water on sunny days.
My cost for the entire setup was about $40 Cdn, which was the cost of the boot tray.
In addition to the rectangular reflection pond, I also created a similar, smaller round version using a plastic planter tray purchased from a local nursery for about $11. That smaller pond is deeper so it allows me to use an electric birdbath heater to keep the small “pond” from freezing over.
For the winter, I have put both reflection ponds side by side in an area of the garden near a full-length glass door which allows me to photograph the birds and animals all winter from inside my home.
(I have taken the reflection pond to new heights by combining it with a natural backyard food table. Click on the link for the complete story about building a DIY feeding table/reflection pond photo studio.)
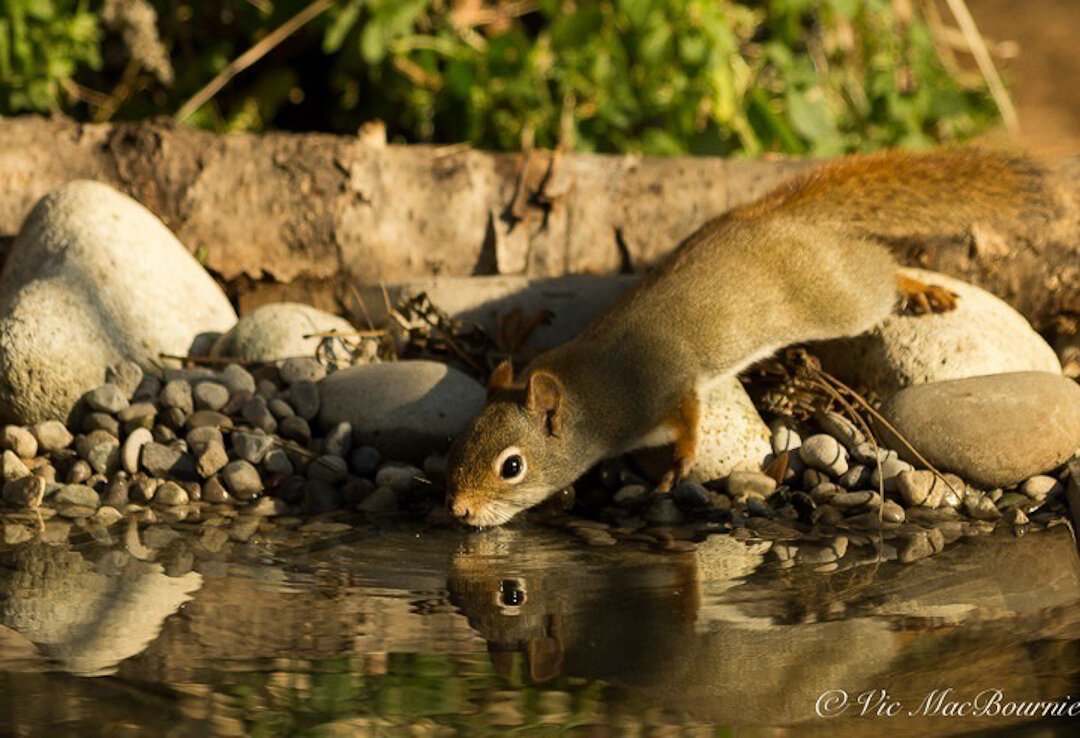
Another image of the red squirrel getting a sip of water from the reflection pond.
Tragopan Photographic blind is ideal companion to reflection pond
A note on using the one-man Tragopan V6 blind with this project. Besides working so well to hide my movements inside the blind, the viewing holes are set at the perfect height to photograph the best reflections.
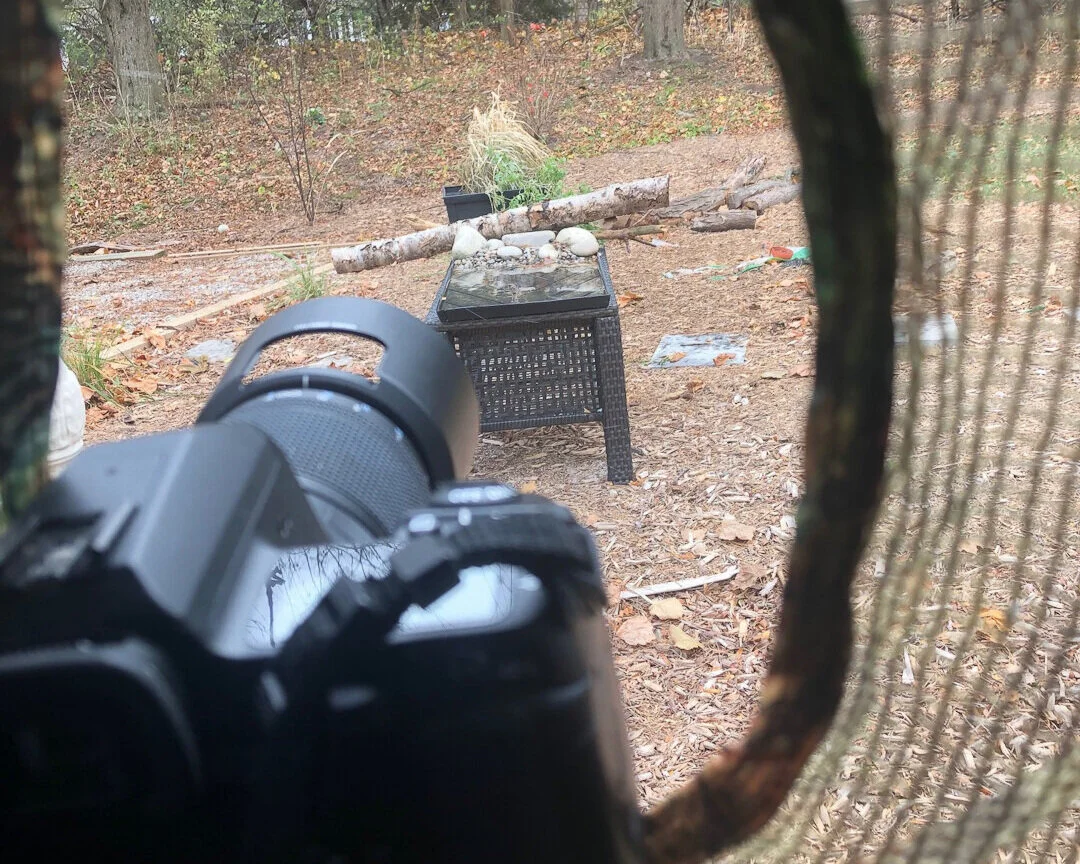
The reflection pond from inside the Tragopan V6 photographic blind.
In addition, both the blind and the reflection pond are extremely easy to move around the garden. By moving the blind around the garden, it’s possible to change backgrounds and even the reflections. For example, in the fall, move the reflection pond around the garden to capture the most intense fall colours. In the spring, do the same to capture spring flowering trees and shrubs.
I have used the blind extensively over the past several months and have grown to really appreciate the convenience of using it to capture images I would never have been able to get without it.
An added bonus to the blind is that as the weather turns cooler, the photo blind, that comes with a thermal lining built into it, will not only help cut the chilling winds and hold what little heat my body generates inside the blind.
The blind makes photographing during the cooler temperatures of late fall and early winter very comfortable for long periods of time.
Gardening on a budget links
Ten money-saving tips for the weekend gardener
DIY Bark Butter feeder for Woodpeckers
DIY reflection pond for photography
Click & Grow is ideal for Native Plants from seed
Garden photography: Tips to photographing hummingbirds in flight
Backyard bird photography involves planning, patience and the right equipment. Months of planning, hours of waiting and about five seconds of shooting resulted in this photograph of the hummingbird at a native cardinal flower.
Planning, patience: Key to capturing garden bird photographs
Garden photography isn’t always easy. In fact, I figure the photo took about six hours of patience and five seconds of shooting.
The result, pretty close to what I hoped for photographing with natural light in the shade of a magnolia tree. An electronic flash would certainly have punched it up both in colour and sharpness, but I decided to go with natural light.
The flash photo can wait for now.
Was luck involved? There is always a certain amount of luck in any good image, but to me luck would have meant getting the photograph in the first half hour, not the sixth.
Photographers looking to do more backyard bird photography might find it helpful to delve a little deeper into the creation of this image.
If I could have only one lens for wildlife and birds in the garden, it would be my F* 300mm F4.5. Check out my full story on the lens by clicking the link.
Much like most bird photography, good planning, lots of patience, and the right equipment went a long way in capturing the image.

Hummingbird feeds from a cardinal flower in the garden.
Planning: The planning started when I ordered the native plant from Onplants.ca back in the spring. I knew hummingbirds loved Cardinal flowers so I ordered three and planted them in an area where they would prosper. Then, I planted it where I would have easy access to them for photography. Beside the patio and a couple of feet from where I normally sit is the ideal location. And, so, that’s where the plants found a home. Nearby, there are three hummingbird feeders that encourage the birds to the general vicinity to where the plant is located.
Patience: Six hours speaks to the patience it took to get the shot. That length of time can be extremely long if you are out in the field, but sitting in a comfortable chair in the backyard makes the wait much easier. It’s one of the big benefits of practising backyard bird photography. Have a coffee, a beer or maybe a glass of wine and take your best shots. Couldn’t be easier.
In most cases a photography blind is not needed when shooting hummingbirds providing you take the time to acclimatize the birds to your presence.
(If you are interested in exploring garden photography at a higher level, be sure to check out my comprehensive post on the Best camera and lens for Garden Photography.)
Looking to upgrade your camera or lenses? Check out the excellent used cameras and lenses at KEH Camera Exchange.
Even if you’re not taking pictures, sitting out in the same chair and moving slowly will eventually cause the birds to recognize you as nonthreatening and allow them to go about their day as if you are not really even there.
This will not work with all birds, but many, especially Hummingbirds will eventually simply ignore you if you are always around their feeders.
Equipment: Bird photography has always been a specialty field involving high-powered cameras, motordrives and long, fast, expensive lenses. A visit to Point Pelee during spring migration, or any other of the birding hot spots around the globe, will certainly convince you that admission into serious bird photography requires more than an iphone or a point-and-shoot camera.
That’s not to say that with very careful planning you can’t get some good shots with these cameras. It’s just that it would be hard to do it consistently and the effort put forward might not be worth the results.
The small size of the hummingbird makes it even more difficult to get good results with these cameras.
So, with that in mind, I took the hummingbird challenge armed with a 35mm SLR camera with built-in motordrive and a 300mm F4.5 close-focusing telephoto lens (with a focal lens of around 450mm on the cropped sensor).
If I could have only one lens for wildlife and birds in the garden, it would be my F* 300mm F4.5. Check out my full story on the lens by clicking the link.
But this was not really the secret behind getting the photograph. They are merely the tools that helped make it possible.
The secret was a tripod, an electronic shutter release, and a camera set on backfocus.
With the camera locked into place on the tripod, and the electronic release ready to trip the shutter without moving the camera, the plan was almost complete.
If you are considering a new camera or lens to capture your best garden photography, travel photography or maybe just your kids and grandchildren, consider checking out the exceptional used camera equipment at KEH Camera Exchange. It’s a U.S. based camera and lens reseller. click on this link to check out their daily offerings.
However, one big problem remained. Normally, when you press the shutter halfway down, the camera refocuses, often going into search mode to find something to focus on. Trying to focus blindly with the hummingbird moving about makes it close to impossible.
That’s where back focus came into play.
What’s back focus you may ask?
On the back of most higher-quality 35mm SLRs is a button that enables the photographer to focus separately from the shutter control button. By using the back focus button, I was able to prefocus on the flowers and then release the shutter without it refocusing when the hummingbird reached the area where I expected it would be in-focus.
Focusing on the flower and then putting the camera into manual focus mode would also have worked.
In the end, the combination of planning, patience and equipment came together to create a pleasing shot. Months in the planning, hours of waiting for the plan to come together and a few seconds of actual shooting made it all happen.
A lucky shot if I ever saw one.

A female ruby-throated hummingbird feeds from a cardinal flower on a sunny afternoon.
Later in the season, I set up a similar situation where the Cardinal flower was primarily in the sun.
The higher shutter speed that the additional light provided helped to get the frenetic little bird in focus and brightened the colours in its feathers. I’m not sure I like the photos any more than the earlier images taken in a shadier part of the garden, but taking it was certainly a simpler process.
Again, patience was the key. The process was similar. Camera on a tripod focused on the flower (again using the back focus button) and a remote release attached to the camera. Every time the hummingbird came to feed, I took several photographs hoping that enough of them would be in focus and sharp.
As I said earlier, photographing the bird in a sunny location brought out the colours, provided a highlight in the bird’s eye and allowed me to shoot at a higher f-stop which helped to capture more of the bird in focus.
This page contains affiliate links. If you purchase a product through one of them, I will receive a commission (at no additional cost to you) I try to only endorse products I have either used, have complete confidence in, or have experience with the manufacturer. Thank you for your support. This blog would not be possible without your continued support.
Finding inspiration in local woodlands for our garden design
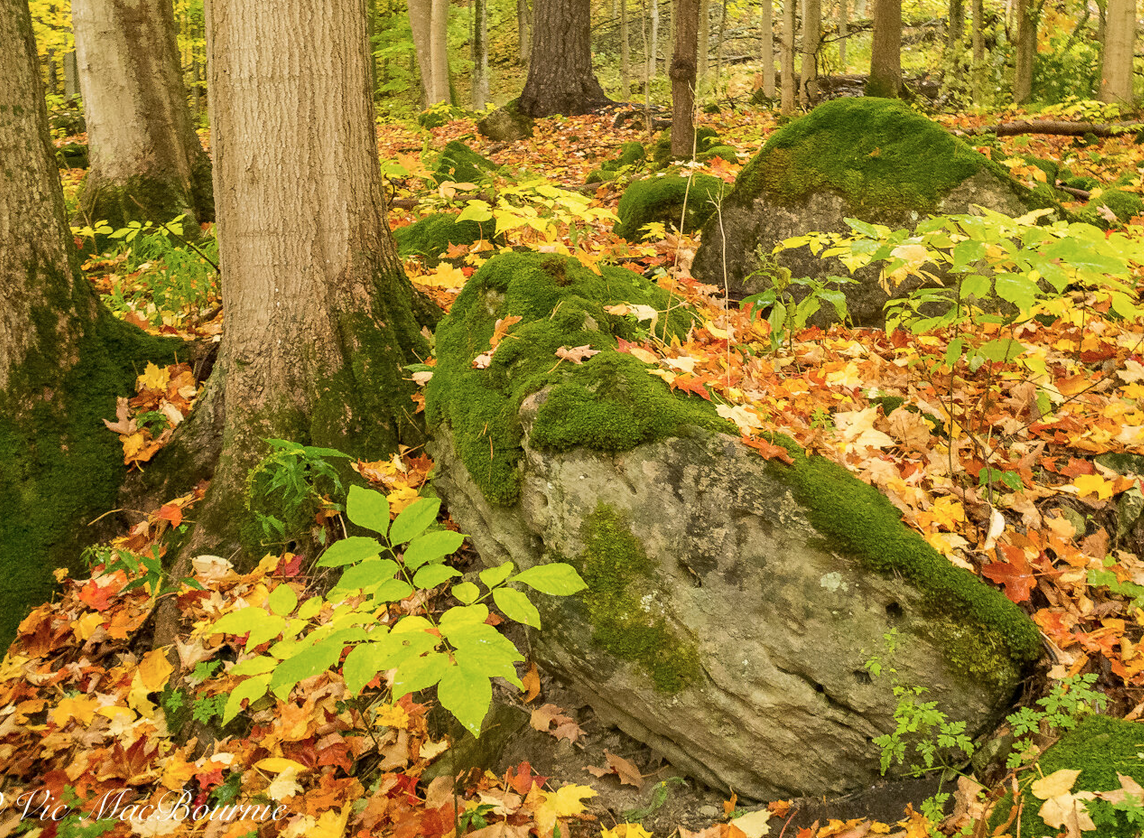
Drawing garden inspiration from the simple beauty of our fall woodlands is not only an important educational exercise but a joy we should all experience as fall turns to winter. Recognizing the beauty in a moss-covered rock and how we can incorporate that same feeling in our own gardens is just the beginning.
Take a walk in the woods for a little inspiration
There is nothing like fall in Ontario to inspire a Woodland gardener.
When the leaves change along with our weather, it’s the perfect opportunity to load my dog, Holly, into the Subaru along with my camera gear and head out to the forests and fields surrounding our home. Luckily, Holly and I don’t have to go far to experience mature forests and some spectacular fall scenes, but even if we did, getting out and about at this time of year is a top priority.
Especially on a rainy, overcast day when the colours are at their most vibrant.
Not only is it an opportunity to give my cameras a workout, it’s a vivid reminder of how simple, yet beautiful a natural Woodland garden featuring native trees and plants can be.
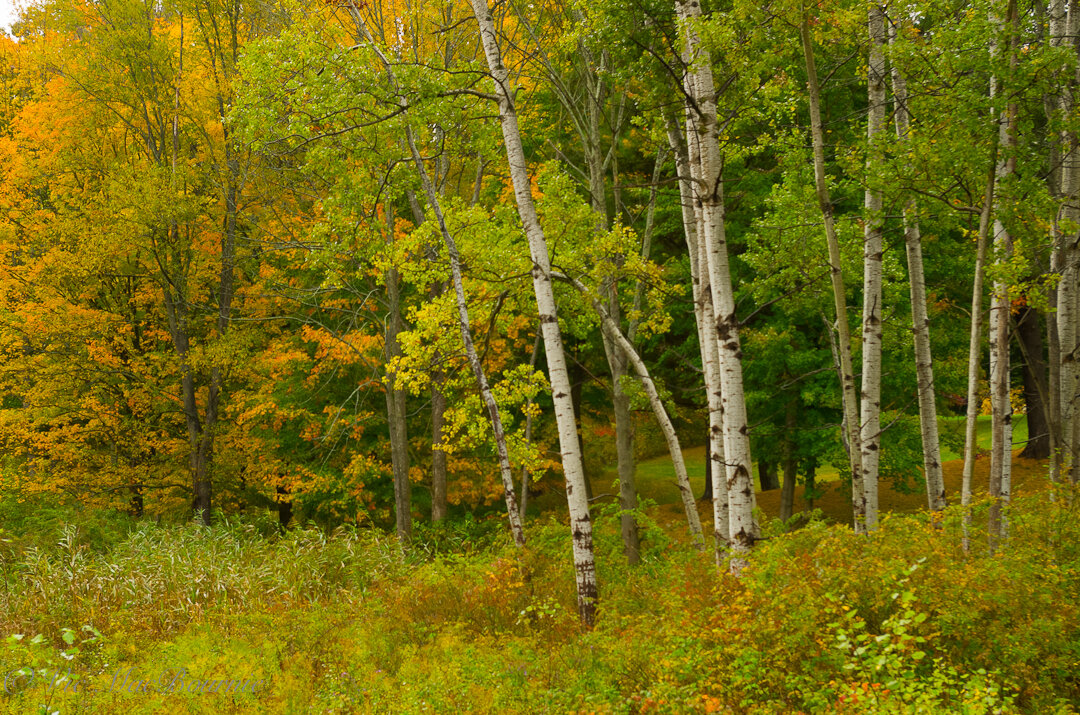
If you ever wondered whether a Woodland garden is right for you, a slow drive through the forest stopping to admire the details of a small stream, the texture of the hickory or the elegance of a birch grove on the edge of a forest, should make the decision an easy one. There is no better place to go to find inspiration for your own woodland garden.
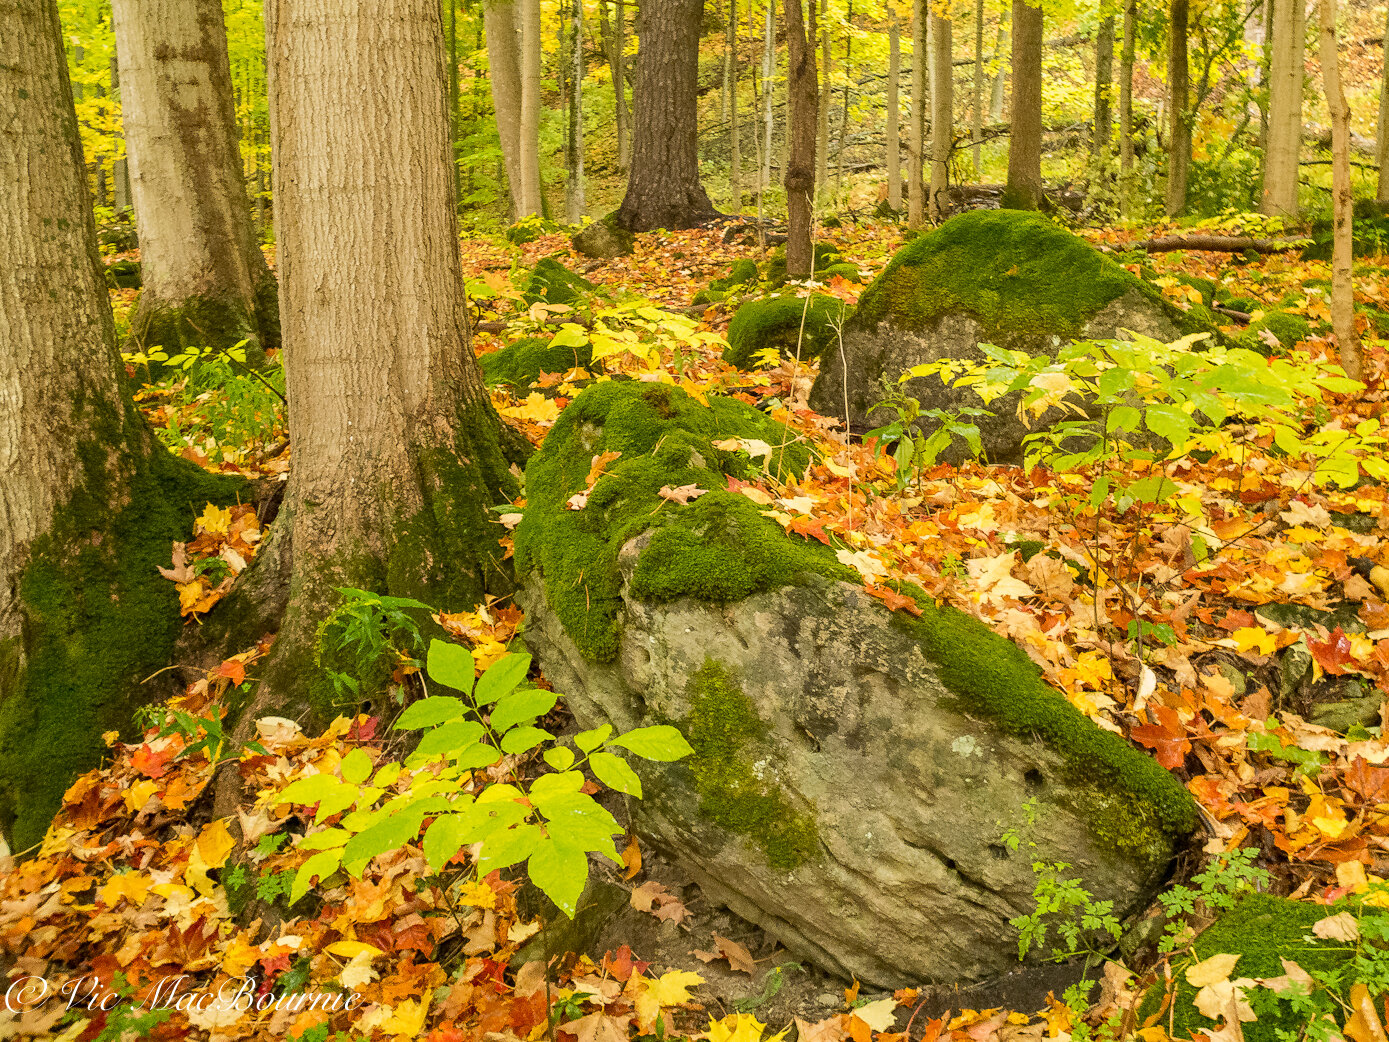
This image taken with the Fujifilm X10 shows the simplicity of a woodland and provides a little inspiration for gardeners looking to replicate nature at home.
This is the inspiration we can take home with us and try to recreate – even in a small way – in our own gardens.
Recreate nature in your backyard
Our small backyard birch grove, made up of three clump birch all planted about 10 feet apart, was inspired by a birch grove I remember walking through regularly probably 30 years ago on my fall strolls along the Niagara escarpment at Mount Nemo Conservation Area in Halton, just outside Burlington Ontario. But I suspect that inspiration also has its roots much further back when my wife and I vacationed in Alberta’s Rocky Mountains during October. I remember admiring the beauty of the groves of Aspens with their white tree trunks and yellowing leaves standing out in the magnificent landscapes.
Inspiration for our small birch grove may have can come from experiences earlier in my life in the Rocky Mountains, but another inspirational landscape that draws on the same experiences can be found a few kilometres from my home on the forest’s edge.
We can’t recreate the wide-open spaces of the mountains in our backyards, but we can use that inspiration to recreate a version of this that reminds us of those memorable times. (Rick Darke’s now out-of-print book, “The American Woodland Garden: Capturing the Spirit of the Deciduous Forest” illustrates this approach perfectly.)
The simplicity of a backdrop of fall colours can provide inspiration for Woodland gardeners. A single tree can take the place of a forest in a backyard setting.
Closer to home, a single maple in full colour stands out in the forest despite competition from other trees surrounding it. An inspiration to plant our own maple in our gardens. If space is a problem, consider a smaller tree that gives you much the same effect. A Japanese maple, though not a native tree, can provide that hit of red throughout the year. I have three Japanese Maples in the front garden and each has their own unique fall color display ranging from a deep red to a vibrant orange. A native dogwood or serviceberry – single or multi-stem – both smaller native trees with good fall colour are excellent alternatives that also have the benefit of outstanding spring flowers and berries that will attract a large variety of birds and mammals.
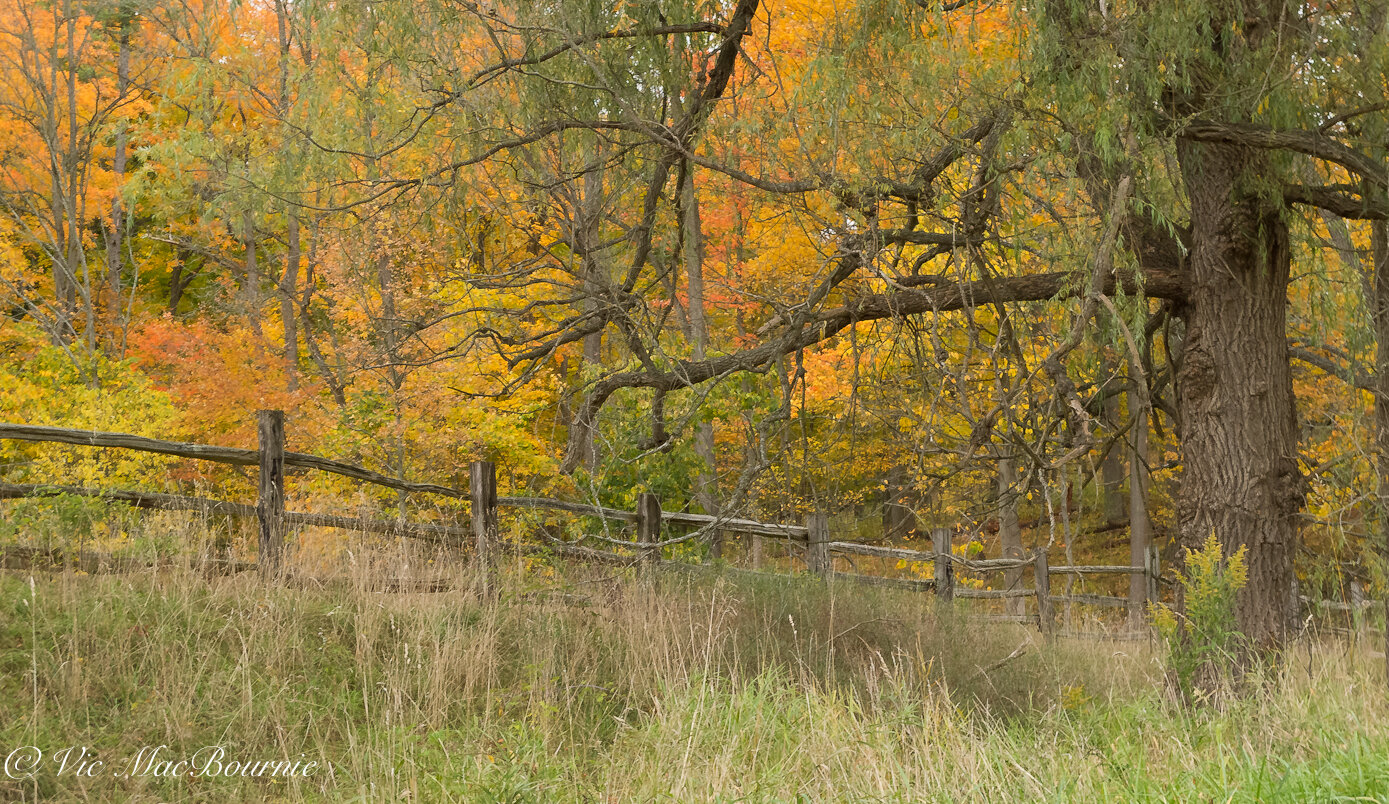
On a smaller scale, the moss-covered rock rising out of the forest floor dotted with a tapestry of coloured leaves can be the inspiration for a similar boulder added to the empty area under the maple in your backyard. It is a perfect example of garden art that is both natural and ever changing with the seasons. Place the moss-covered boulder near a bird bath and give our feathered friends a place to land before hopping to the birdbath. Filling the bird bath daily is also an opportunity to gently spray your mossy boulder to keep it looking its best and stop it from drying out.
It’s also the perfect opportunity to photograph backyard birds on a natural mossy boulder. Maybe you are lucky enough that the mossy boulder itself has a natural shallow pool where water gathers. (If you visit the rockeries of local nurseries early in the spring, when the new shipments are delivered, look for a rock with a natural shallow hollow already there. If you find one, don’t hesitate. Grab it. They are not easy to find.) In some cases, small hollows can be carved out of an existing rock to give you a similar experience.
On my most recent walk through the forest, there were no garden beds, native grasses were long and naturalized, the forest canopy was often layered with mature trees – many of them in various degrees of decay and snags perfect for wildlife looking for a home. Many of the smaller shrubs like Highbush Cranberry and Alternate-leaved dogwood (Cornus Alternifolia) and trees were loaded with berries and nuts providing life-giving nutrients to our feathered friends and woodland creatures preparing for the long winter ahead. Native ground covers, too, like virginia creeper, bunchberry (Cornus Canadensis) and Jack-in-the-Pulpit (Arisaema triphyllum) show off their berries. Under the canopies of large trees, leaves form a magnificent and colourful ground cover providing a warm blanket for the wildflowers and small creatures, and hunting grounds for birds and mammals that depend so much on these fallen leaves. (For more on leaving your leaves, check out this post.) Hidden among the fallen leaves are millions of eggs and pupae that depend on the fallen leaves to provide a warm incubator until spring arrives.
There were no rakes here, no leaf blowers to break the glorious sounds of nature, no gas-powered vacuums to shred the leaves and destroy any life in them… no bags of leaves lining the edge of the forest waiting to be carted away by massive “garbage” trucks.
It was simply nature in all its simplicity and glory inspiring us woodland gardeners to slow down and accept it’s natural beauty.
A woodland backdrop with natural grasses can provide inspiration to Woodland gardeners. Try to take time during the spring and fall to photograph your favourite woodlands to draw inspiration from nature and use it in your own garden. All of these photos were taken with a Fujfilm X10, high-end point and shoot camera.
Fuji X10 is ideal enthusiast camera to take with you everywhere
In these days of the iphone, Samsung and other smart phones with top-notch cameras built into them, it’s hard to imagine why anyone would pay good money for a small compact camera often referred to as a high-end, point-and-shoot or enthusiast camera.
There is no question that cellphone camera’s are ideal for so many uses including garden photography. (Check here for an earlier post on using a camera phone to photograph your garden.)
But if photography is more than a passing interest, and you love the feel of a high-quality, elegantly machined piece of equipment, or you are looking for a second camera that easily fits into a pocket while still providing excellent image quality, then you might want to consider a high-end point and shoot camera.
The good news is that there are many available on the market both new and used. Most are not necessarily from today’s most popular names in photography, and range in price from about $400 Cdn. to several thousand dollars.
The camera market is changing so rapidly that it’s difficult to keep up, so I won’t even try.
I can talk about the Fujifilm X10 (click for full review) that I have used over the past several years and that I took with me on my recent fall foliage outings. There have been several iterations of the camera since the release of the X10. But essentially they are small upgrades to the original X10. One reviewer described the Fujifilm X10 as a “camera where its innards are as progressive as its exterior is nostalgic.” I could not agree more.
For enthusiasts who care about the camera specifications: It has a 12MP 2/3 EXR CMOS sensor; a 28-112mm equivalent F2.0-2.8 lens; an optical viewfinder with 85 per cent coverage; a 2.8-inch LCD display, shoots raw and jpeg images and can shoot 7 frames per second at full resolution or 10 fps at 6MP.
It also features a macro setting and super macro setting for getting up “close” and “real close” to flowers and insects.
That fixed 28-112mm lens is a fast lens, which helps you get sharp images of your garden in the low light of early morning and late evening without a tripod. To ensure sharp images, the camera also has built-in shake resistance.
The first time I saw the Fujifilm X10 I had to have it. A digital camera with the elegance and ease of use of a Leica, with more features than any garden photographer would need. Above all else, it featured what every former film photographer dreamed of – the ability to dial in specific nostalgic fuji films but in digital form. Every nature photographer has a soft spot in their hearts for the vibrant colours of Velvia; portrait photographers loved the softness of Astia, and for everyday use there is Provia. In addition, photographers have the option of dialing in Black & White film complete with filters for that Ansel Adams look.
Velvia is my choice for any garden shots involving highly colourful flowers where I need to pull out that vibrancy. Astia adds a lovely softness to early, mist-filled mornings.
So what makes this a great camera to document your garden? Besides having all the necessary features to help you create beautiful garden images including closeups of flowers, larger garden views in low light, multiple frames per second to capture wildlife and a variety of film choices to create different effects, its greatest assets are its small size and its inherent ability to inspire you to pick it up and actually take photos with it.
Not unlike my outing into the natural woodland to draw inspiration, photography enthusiasts can draw similar inspiration from an elegant camera that encourages you to pick it up and capture the garden in all its beauty. These enthusiast cameras, unlike bulky 35mm SLR cameras, are compact enough to carry around with you on a regular basis and will inspire you to document the changing seasons in the garden and explore the artistic images that are there just waiting to be unleashed.
And, if that is not enough, just think about how much better your instagram account could become.
• This page contains Amazon affiliate links. This blog would not be possible without your continued support.
Garden photography: Tragopan blinds help get you up close to backyard birds
It’s not always about getting photos, but nothing is better than nailing the photograph you’ve been trying to get for weeks. A Tragopan photographic blind just may be the best tool to get up close and personal with your favourite birds and woodland creatures. Not only will it improve your photography, it may also provide some memorable moments as you experience your backyard wildlife in a whole new way.

The Tragopan blind allowed a close approach to this young fox who regularly visits the garden.
Memorable moments and favourite photographs
It’s not always about the photos, but when you nail the shot you’ve been trying to get for weeks, it’s always a good day.
And just about every day has been good since I landed a Tragopan V6 photographic blind.
Like I said, though, it’s not always about getting a good shot. One of the greatest joys I’ve experienced in the first full week of using the blind is getting the opportunity to experience our backyard birds and squirrels up close and personal. Observing the wildlife has been almost as much fun as photographing them.

White-breasted Nuthatch, taken from inside the Tragopan photographic blind.
I’ve even come to know a couple of the squirrels on a more personal basis. There’s the very timid little baby red squirrel who likes to hang out under the bird feeder but scampers up the pole and hides under the squirrel baffle at the least sign of danger. Then there’s the small female black squirrel who obviously has given birth recently and likes to hang out close to the blind.
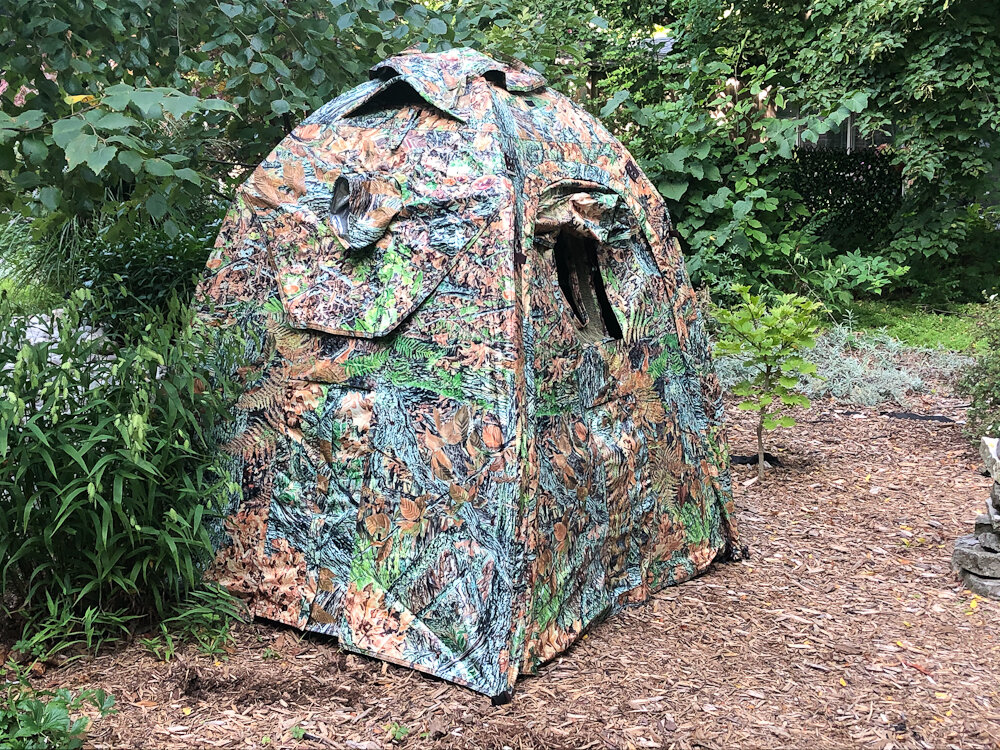
The Tragopan V6 photography blind set up in the woodland garden.
This blind has given me new insights into the goings on in the backyard. At one point, a hawk flew over the yard and the birds and animals scattered in all directions. The yard grew completely silent and I noticed that all but one small Downy woodpecker found refuge. The little Downy clung motionless to the hanging feeder for at least 10 minutes until it felt the danger was completely gone. It was fascinating to watch from a mere 6-8 feet away.
It was just one of a host of memorable moments that I experienced since UPS delivered the one-person blind made specifically for photographers.

This image of a chipmunk was photographed with a compact camera equipped with a 112mm lens in the Tragopan blind.
How close can you get with a Tragopan blind?
I decided to put the Tragopan photo blind to a real test. How close could I get to wildlife using my Fujifilm X10 compact camera equipped with a mere 28-112mm lens. Of course, in the garden where many of the backyard wildlife are more accepting of me, it can be easier to get close. However, most wildlife photographers invest a lot of money in cameras and lenses that enable them to get up close.
Good planning is critical to successful wildlife photography and be combining the Tragopan blind and my outdoor nature reflection pond, I was able to capture the above image of the chipmunk. In the same photo session, a bluejay also paid me a visit.
So, even if you can’t afford an expensive lens, a Tragopan photo blind might just be all you need to get in close to backyard wildlife.
Many memorable moments in the blind
The other memorable moments have been digitized on photo cards and now sit proudly in Lightroom’s digital database on my computer’s hard drive. There are the woodpeckers, the blue jays, the white-breasted nuthatch, red-breasted nuthatch, the many squirrel shots and chipmunks. In exactly one week in the blind, my success ratio of good shots is through the roof.
I’ve never owned a blind. The closest I’ve come to using one was the purchase of a camo throw that I used to try to photograph deer at a local conservation authority years ago. I tucked it away in tall grass under a tree thinking it was a safe hiding place only to come back the next day to find it gone.
So, this is a new experience for me.
My Tragopan blind set up near the bird feeders in a corner of the yard. The Tragopan blind is an essential photographic accessory that works as well in the garden as it does in the field.
(If you are interested in exploring garden photography at a higher level, be sure to check out my comprehensive post on the Best camera and lens for Garden Photography.)
I could write about the high build quality of the blind. The fact that everything is double stitched, and that the inside has a silver thermal lining that keeps out the heat of the sun, holds in the warmth in fall and winter and blocks any movement in the blind especially when it is backlit. I could write about all the small things that, unlike a blind made for hunting, makes this blind perfect for photographers.
One of our baby red squirrels looking as cute as ever. The photo blind makes getting pictures like this much easier without the need for extremely long lenses.
And did I say that the blind is built specifically for photographers. It is NOT a hunting blind converted for photographers. Ethically, that makes me feel a whole lot better.
“Designed for photographers by photographers” is how Tragopan describes their line-up of blinds. “We’ve tried to think of everything you’ll need to stay concealed and keep yourself and your subject comfortable. Our goal is to make your job of creating great images easier.”
It’s no surprise that one of the company’s goals is to make our job of creating great images easier. What I love, is that one of their goals is also to keep your subjects “comfortable.” I can’t imagine a hunting blind that would make that claim.
I could go on about what makes this blind better for photographers than even the best “hunting” blinds, but I’m not sure readers of this blog need all those details in this post. (There will be other more detailed reviews later.)
The real question for readers here is: who needs this blind and why?
You might think that only dedicated wildlife photographers would go to the trouble of buying a photo blind. In this age of social media, however, many of us are looking for simple, inexpensive ways to improve our Instagram and Facebook posts. Many of us just want to document our gardens and the birds and animals that either call it home or visit it on a regular basis.
Let me say that there might not be a better photographic tool than a blind to improve your backyard bird and wildlife photography, especially if your photography equipment is limited to a few kit lenses and your longest telephoto is a 70-200mm zoom.
There are basically two ways to get closer to your subject. Either buy a longer lens in the realm of 300-400mm for several thousand dollars, or figure out a way to get closer to your subject.
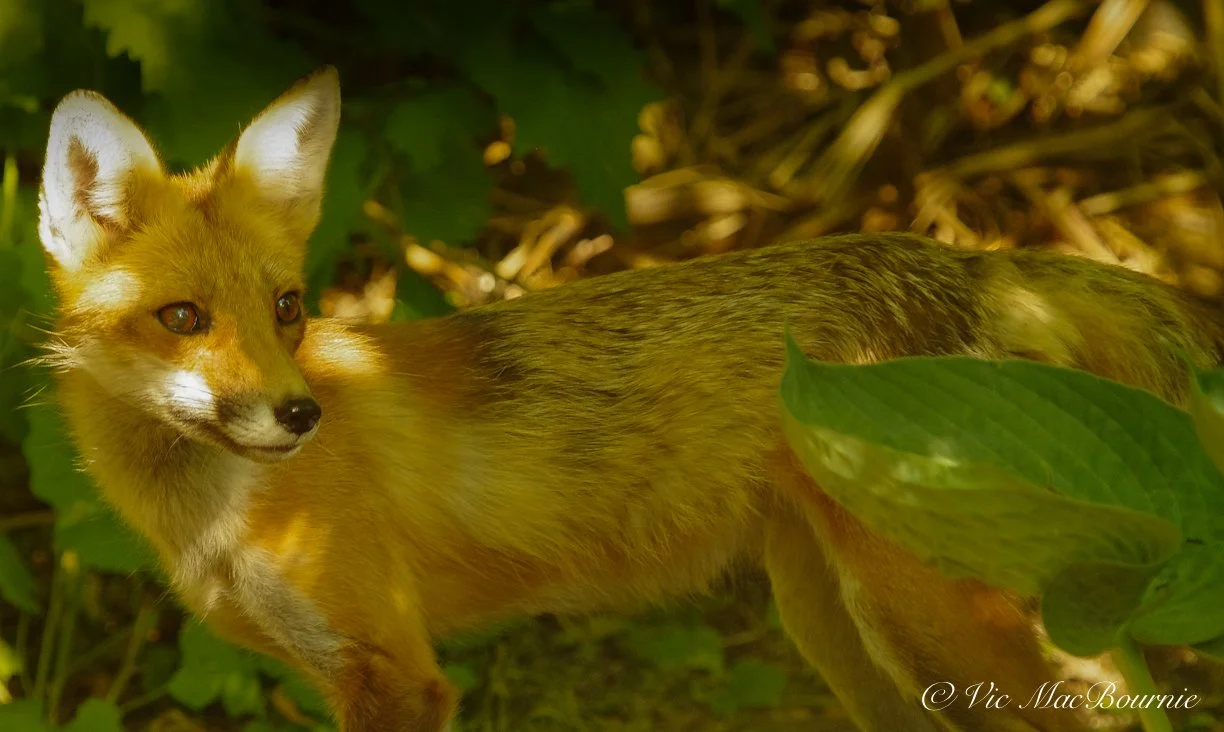
The Tragopan blind made getting this image of a young fox possible.
The blind gets you a whole lot closer for under $300. And because it’s small and light, (sets up in less than a minute or two) it can be easily moved anywhere in the yard or taken out into the field to photograph or observe a host of other subjects.
One of the benefits of photographing in our yard is that many of the birds and wildlife are already accustomed to our movements and accept a closer approach than they would in the wild. But there are many birds and backyard wildlife that do not allow a close approach. The blind not only allows your subjects to become more comfortable, it also allows a close approach to more skittish birds and wildlife. You might be able to get a shot of a bold little chickadee without a blind, but what you really want is a closeup of the sparrow hawk that visits every afternoon looking for dinner.
And, because the blind is mostly used in your yard, you can leave it up for days, even weeks without worrying about someone walking off with it. Set up and tear down is is so easy that I simply store my blind in the shed overnight and pop it up in the morning or evening when I want to use it.
A photographic blind may not be for everyone, but for anyone interested in improving their photography, whether it’s to take their hobby to a higher level, or just to document the wildlife in the yard for their social media accounts, a photographic blind might be the ideal investment.
I hope to use the blind to get photographs of fox, deer, wild turkeys and more. Stay tuned for future posts on how the Tragopan performs under different conditions throughout the fall into winter and finally into the spring months.
For more information on Tragopan Photographic blinds, go to www.photographicblinds.com. or just click on to one of these links.
* I want to disclose that Tragopan Photographic Blinds have provided me with a blind to use for a period of time to test and review. I was required to pay delivery costs of the blind and GST. In no way have they required me to write positive reviews of the product.
• This page contains affiliate links. If you purchase a product through one of them, I will receive a commission (at no additional cost to you) I try to only endorse products I have either used, have complete confidence in, or have experience with the manufacturer. Thank you for your support. This blog would not be possible without your continued support.