

Nature’s garden art (Five tips and DIY ideas)
Garden art comes in many forms in a Woodland Garden, from nature in the form of a moss-covered boulder or a fallen tree branch to a rusty buck standing watch over the garden. Garden art can be subtle or add a little whimsy to your outdoor space.

This late winter image shows how garden art like this Easter Island head, can add interest to the garden even in late winter when the garden is not at its best.
Mother nature provides its own artistic touch
If you are looking for garden art to enhance your woodland, look no further than Mother Nature – a mossy boulder, an elegant tree branch rising out from a bed of ferns. This is nature’s art at its finest.
If we take the time to really look carefully, nature often provides her art to us for free.
Fallen pine cones that “litter” the ground are works of art in themselves.
The moss-covered tree trunk works perfectly placed along the woodland pathway.
These are the gifts nature gives us if we look for them.
Look for natural materials that get better with age
But relying entirely on natural elements as art may not be enough to satisfy every gardener’s desire to inject a little sophistication and a touch of elegance into their woodland.
If you are looking to purchase artistic elements for your garden, consider investing in natural materials that age gracefully. Almost anything made with copper will improve with age.
That patina copper takes on with age is just too beautiful not to invest in if given the chance.
I think garden art works best when it is not only elegant and sophisticated, but serves a useful purpose.
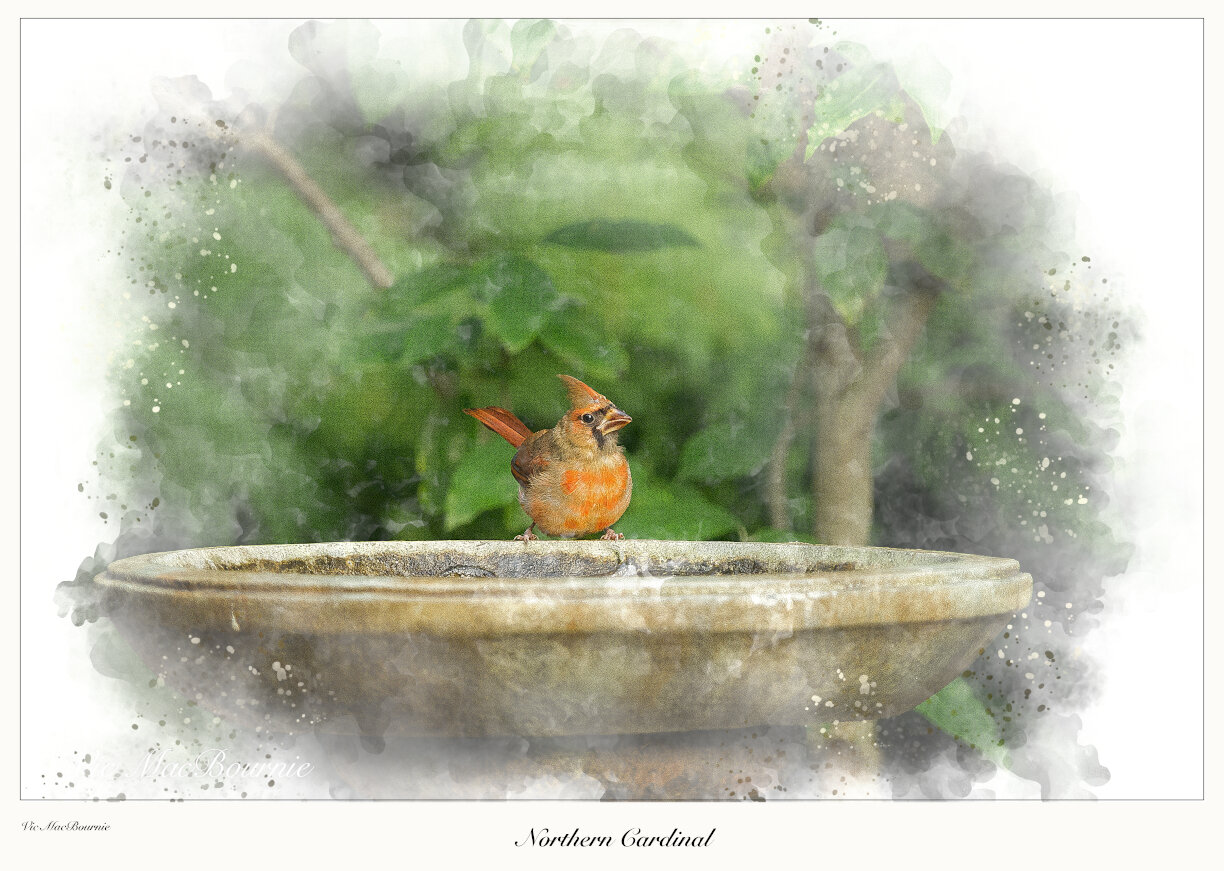
An elegant birdbath is itself a piece of garden art. But, when a cardinal is added to the scene, nature’s art truly shines.
Copper birdhouses and birdbaths ideal for the woodland
Birdhouses and birdbaths are perfect examples of garden objects that, if chosen well, can not only add sophistication to a corner of the garden, but attract our feathered friends – one of nature’s finest work. How can we resist a cardinal on a birdbath or a goldfinch at a beautiful feeder?
Many of the finest bird feeders are being made by artisans and can be found on places like Etsy. The copper-enhanced Baltimore Oriole and hummingbird feeders found on Etsy are just two examples of how artisans are recognizing the value of garden art and meeting our needs for a more sophisticated approach to garden art.
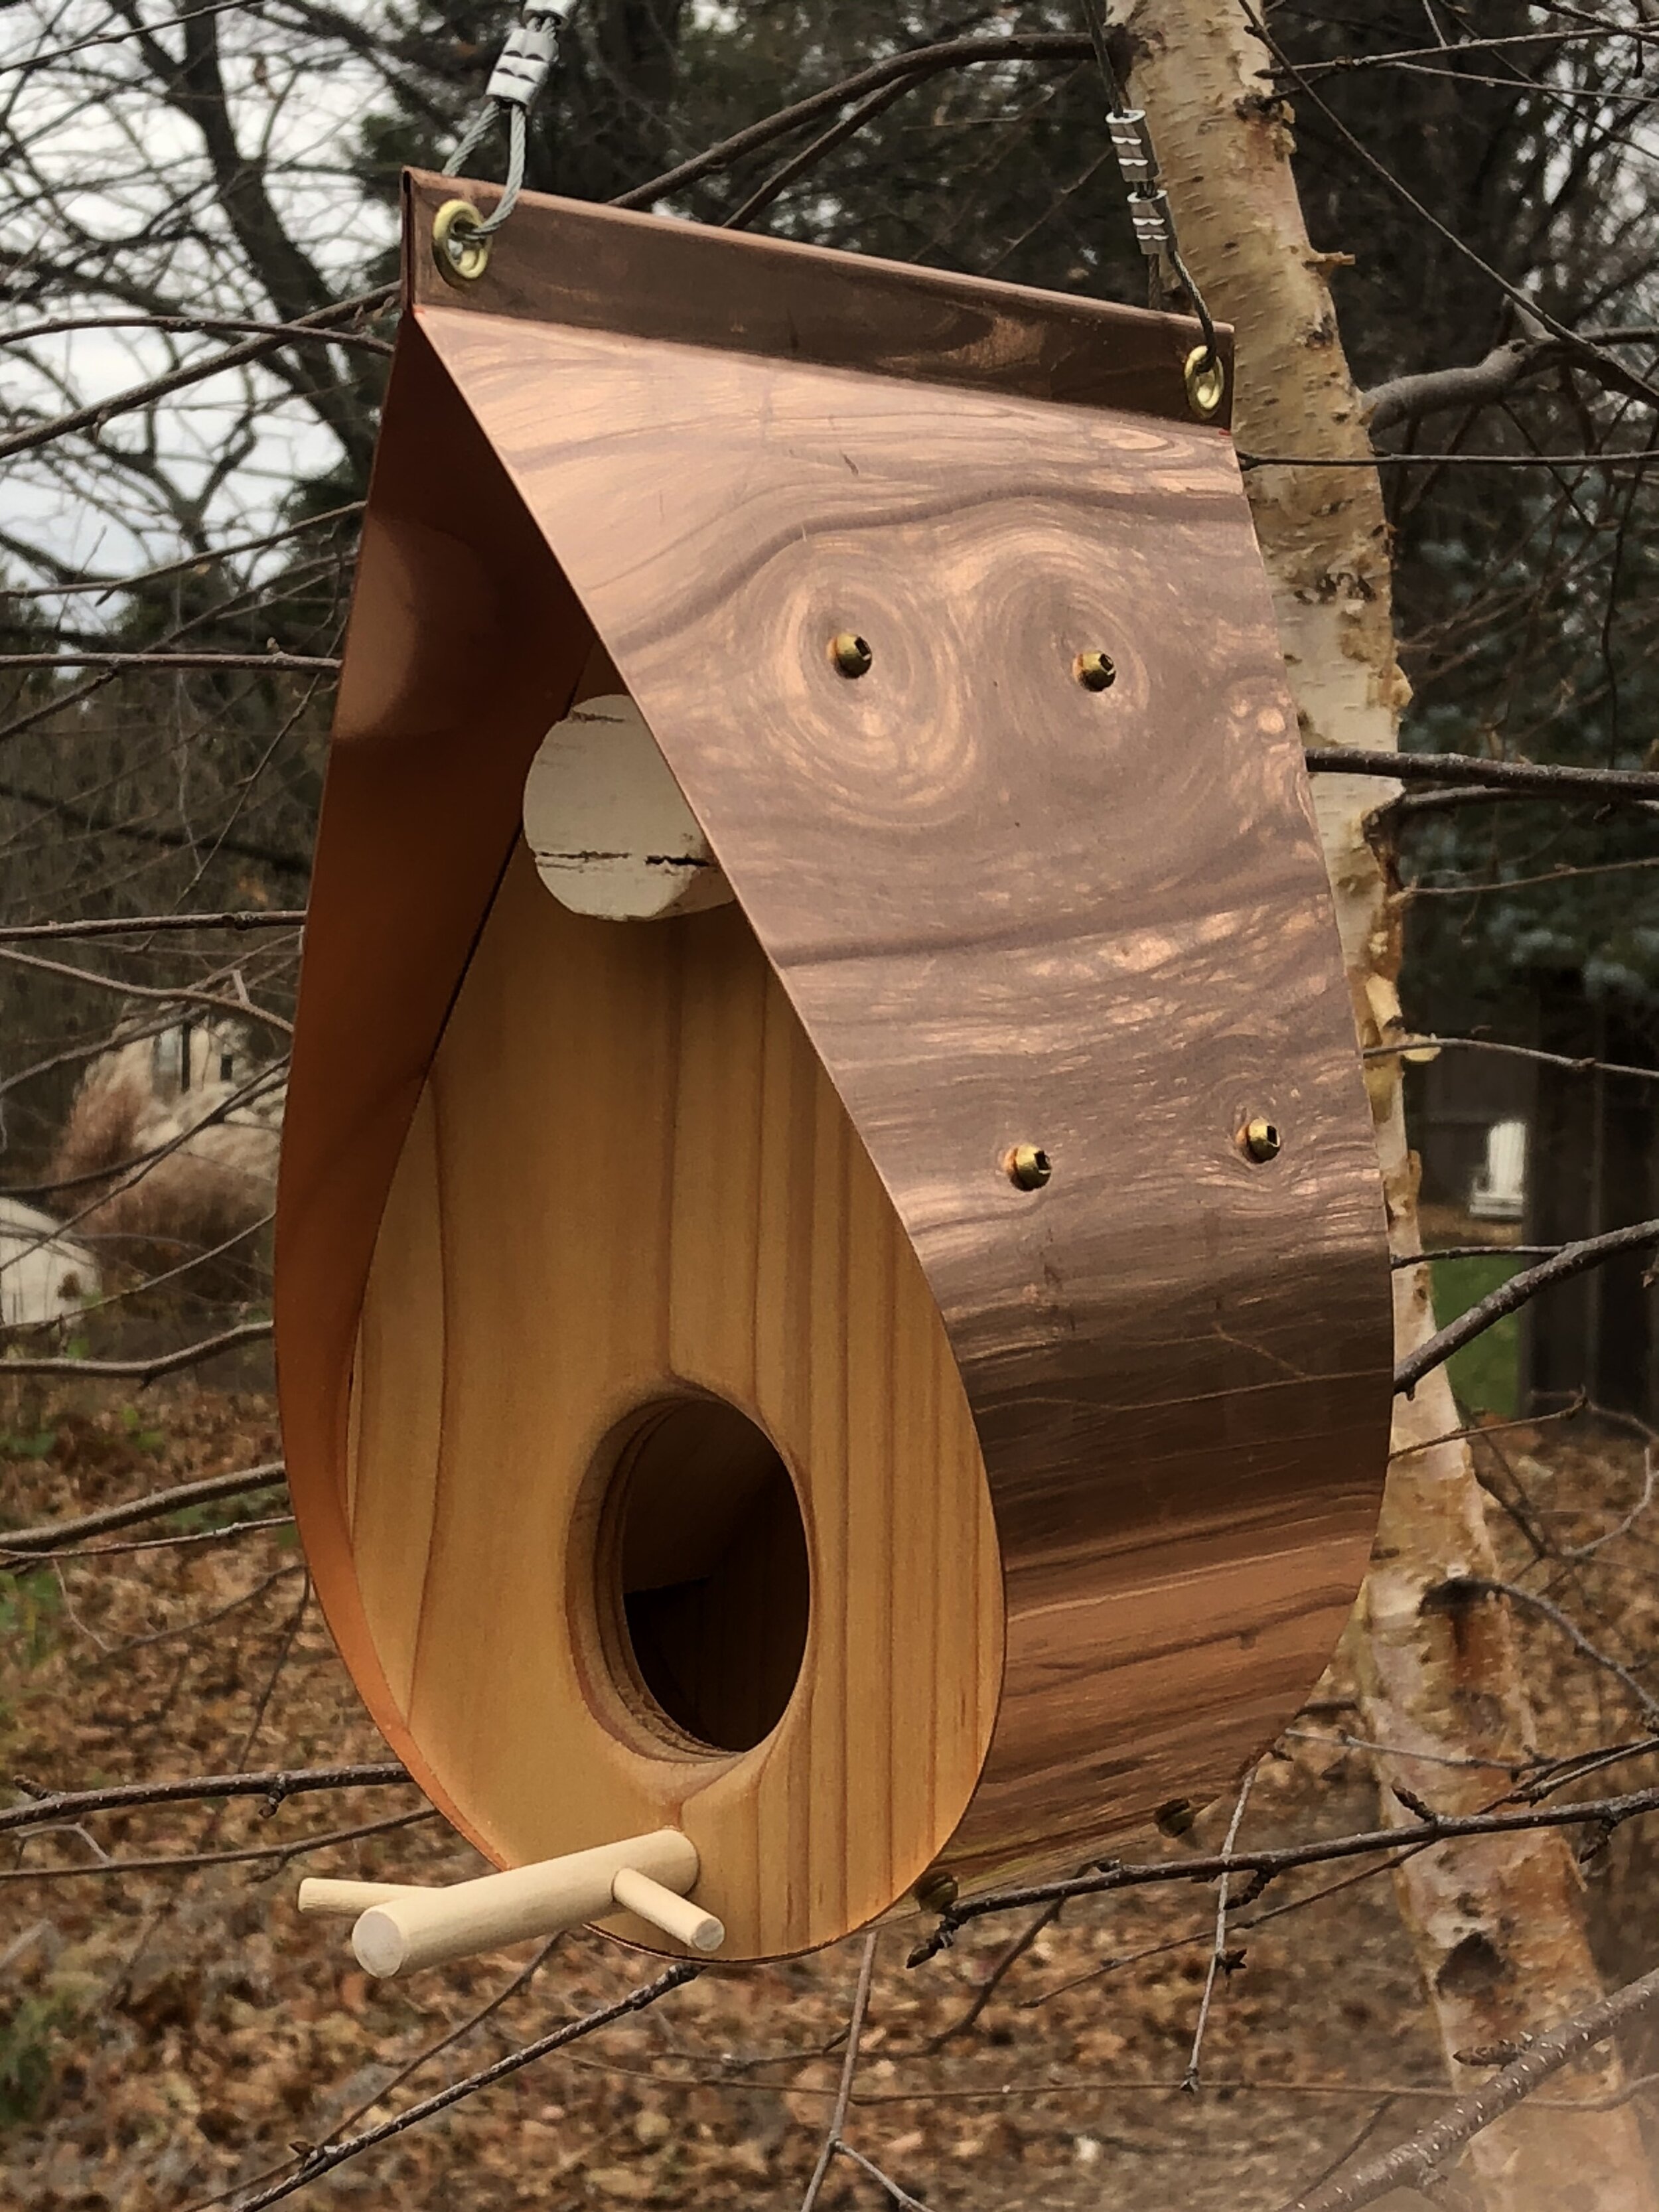
The ultimate bird feeder made with copper and cedar.
There was a time not too long ago when the only garden art available amounted to plywood cutouts of an elderly husband and wife from ‘behind’ out weeding in the garden. You remember them. Everyone had a good laugh at the couple’s expense.
But those times have changed.
I wrote a post about an architect couple from France who moved to Toronto and started a business combining their architectural skills and love of natural materials to create an exquisite bird feeder made from copper and cedar. (see picture) This feeder, although expensive, will provide a lifetime of joy and can be passed on to your children. It is available in new copper (as illustrated) or copper that has already been chemically aged with a lovely verdigras patina.
There are, of course, other bird feeders that are works of art, but don’t expect to find them at your discount store.
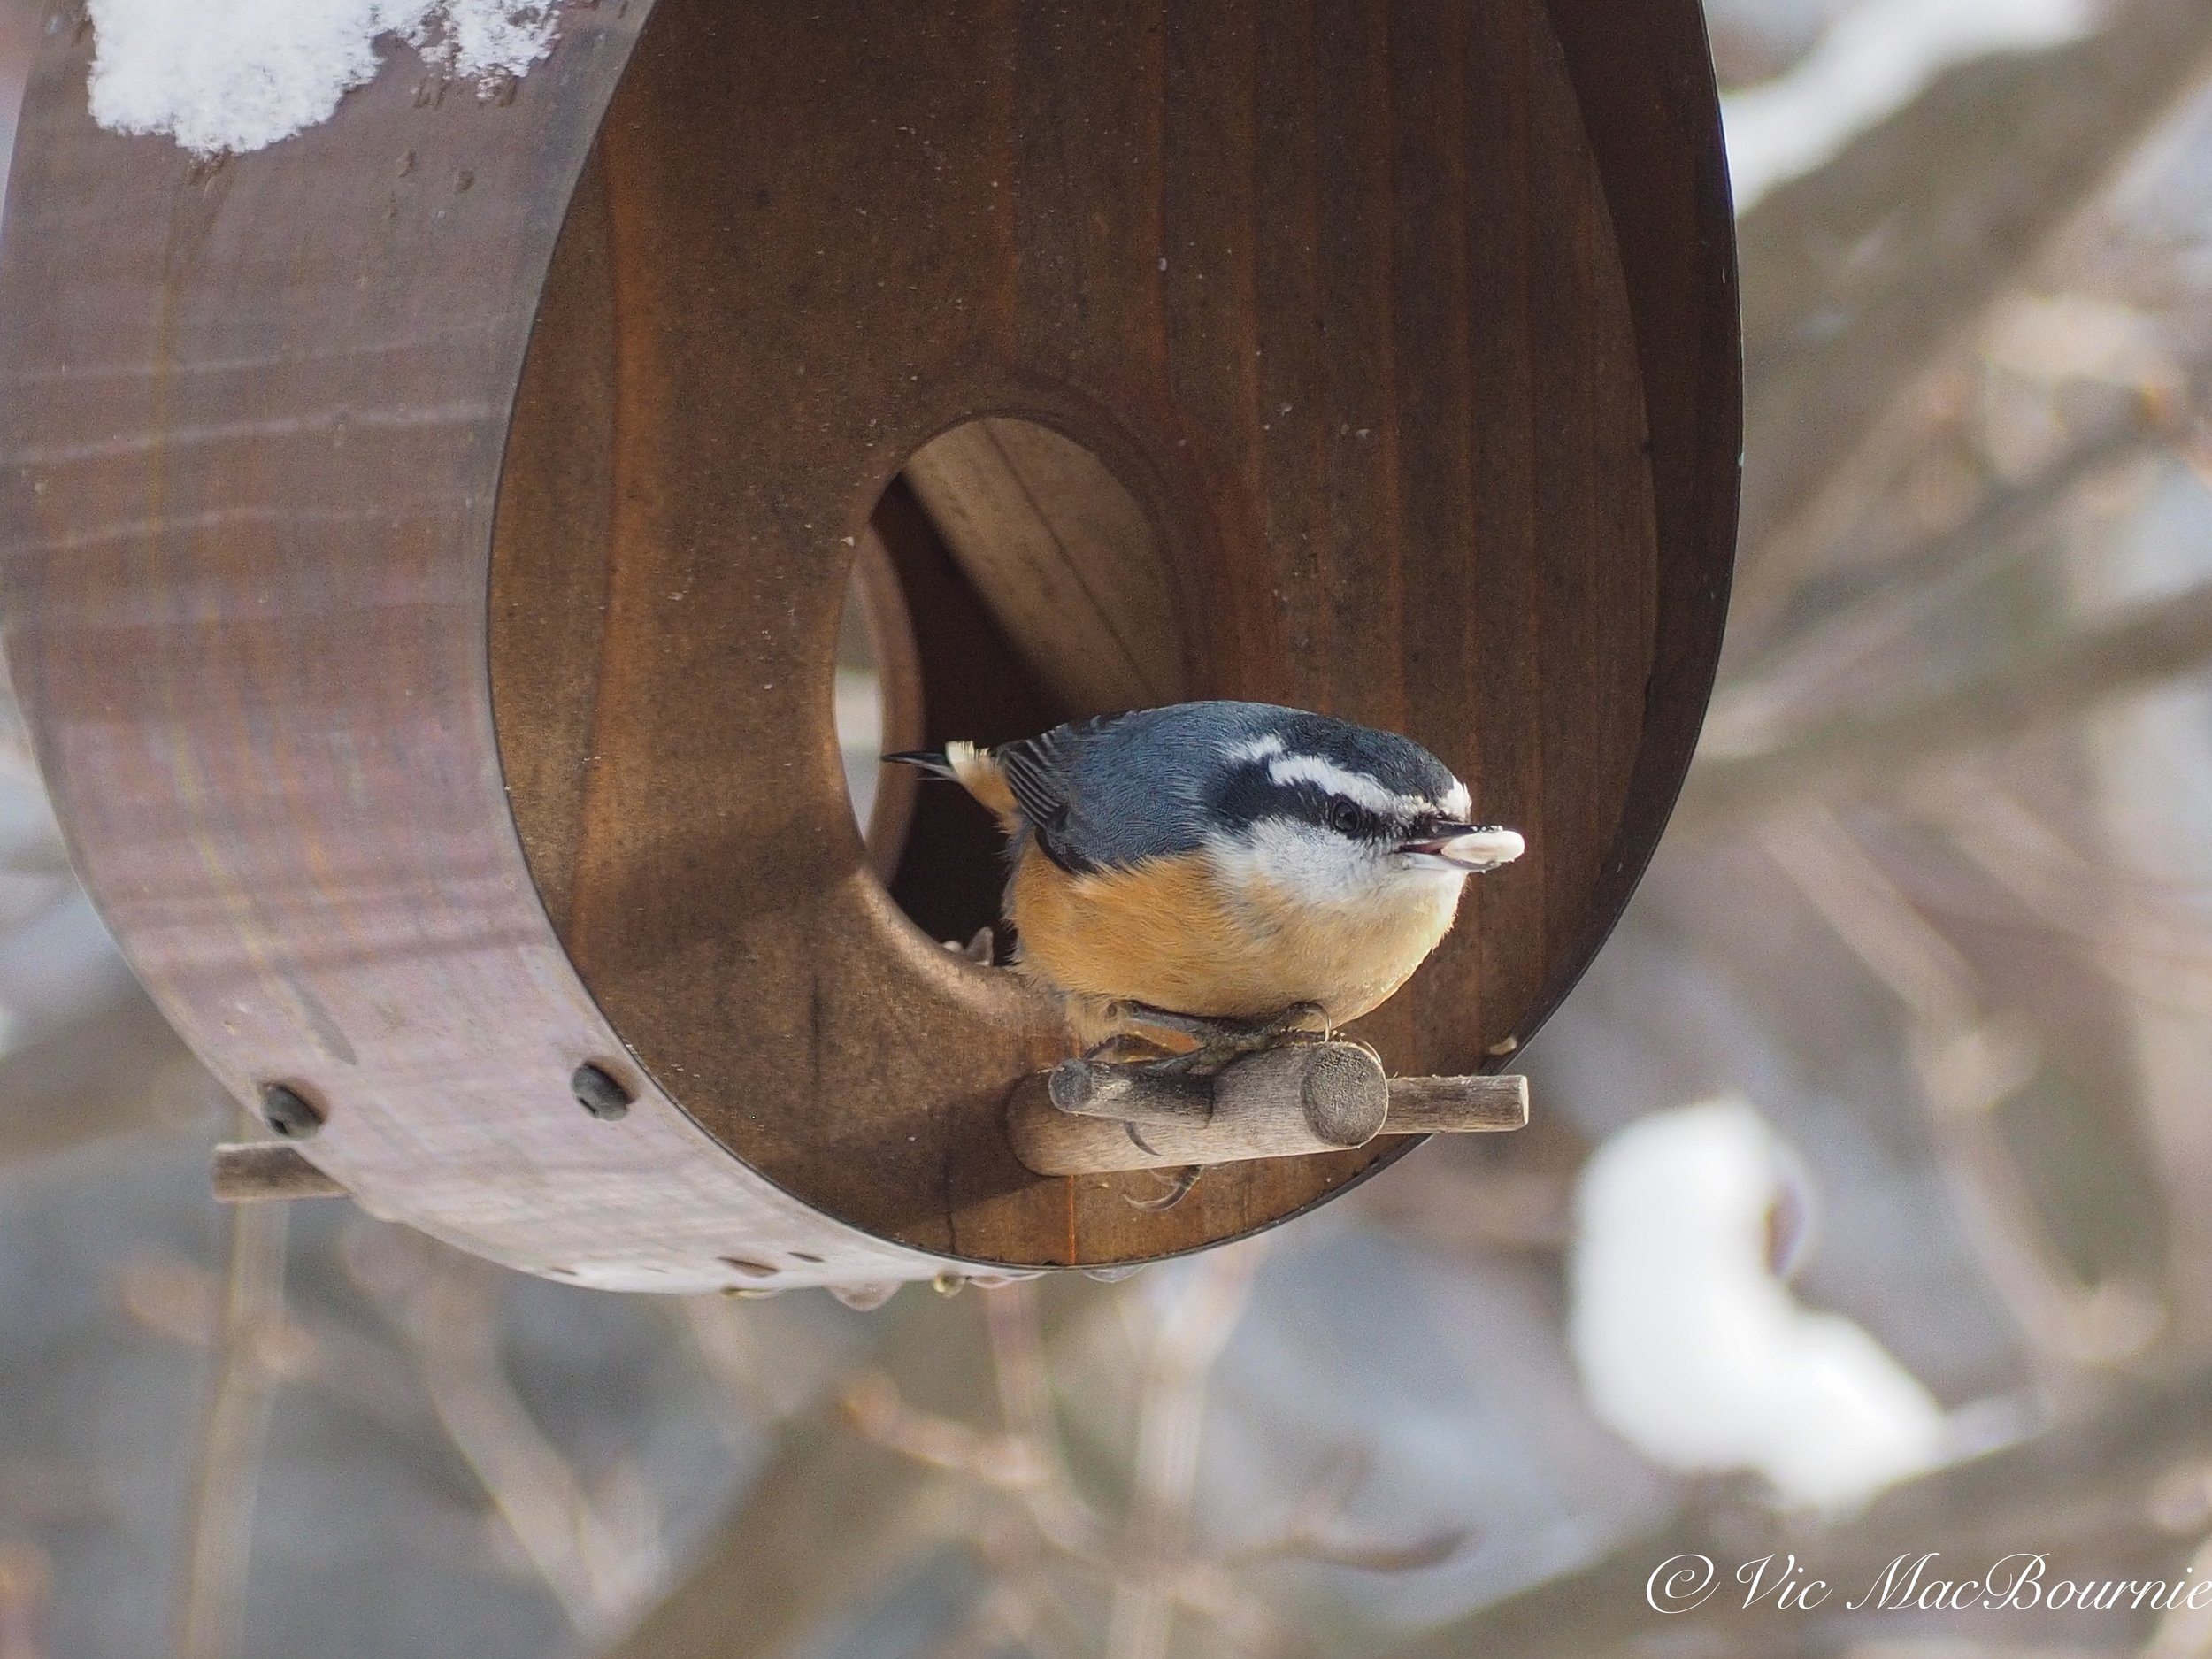
The copper and cedar bird feeder has aged nicely and taken on a lovely patina in only a few short years. And the birds love it too.
Although a finely aged concrete bird bath has been a staple in so many gardens, copper birdbaths not only look beautiful, they have natural microbial benefits that can make them a better choice.
I wrote about an elegant copper bird bath available at a fine garden and home boutique, but similar ones are available at many bird and home stores.
For more on growing your garden on a budget, check out my in-depth article here.
Use the iconic garden bench as art

The garden bench – especially an older, moss and lichen covered bench – can be a beautiful, yet useful addition to the garden.
Many years ago – certainly more than 20 years – I was desperate to get a garden bench. We lived in a typical subdivision and I was working diligently to create a mini woodland garden in the yard. The bench represented a destination along a simple path in this tiny garden. I wrote an earlier post on designing a woodland garden in a small yard and focused on the importance of a pathway in a small garden to help the viewer experience the garden as they walked through it.
Not only did our traditional garden bench provide a destination for the visitor, it offered the gardener a place to rest and enjoy the garden from a different perspective.
It’s another excellent example of how we can turn a utilitarian garden object into a wonderful piece of garden art.
Creating your own garden art is always the best approach.
Five tips and DIY ideas to add art to your backyard landscape
Look for naturally-aged garden objects such as birdbaths, birdhouses and garden benches that people are selling either at garage sales or at on-line sites such as Kijiji. I have picked up some of my favourite “art” pieces this way.
Use techniques (like the one described below) to age newer items rapidly so they better fit into your woodland setting
Most “artistic” elements are best discovered rather than presented for everyone to see. Consider using vegetation to hide your art, especially more whimsical pieces that, when unexpectedly discovered, will bring a smile to your visitor.
Purchase lasting pieces that incorporate natural materials like copper, cedar and even rusty steel that will add a rustic element to your garden.
Whenever possible, look to nature for its existing art forms. The beautifully coloured rock, an old cedar tree root, an elegant piece of driftwood. These are often found objects that add a natural element to the garden and be combined with bought items to create a lovely juxtaposition of old and new.
In those days garden art, even a nice garden bench was not easy to find. I did, however, find an inexpensive wooden bench at a discount department store and bought two. More than 20 years later they still form a focal point in our woodland garden. Never, however, do I actually sit on them. These inexpensive garden benches have taken on an incredible aged look, covered in lichen and mosses. After a spring rain, they more or less turn a soft green as the thick moss bursts to life from its more dormant state.
Our two benches now hold large black containers that are planted with colourful, hard-working annuals that create a hit of colour in the garden and draw attention to the beautiful wooden benches.
In another part of the garden, we have a small cement garden bench that is beginning its aging process. Letting it age naturally is a slow process. It might be time to help it along a little using the following method. It’s perfect for quickly aging cement containers, benches and garden statuary.
How to give concrete a mossy, aged patina
A quick search on the internet provides several alternatives to creating an aged look for new concrete. It works on statuary as well as concrete containers. Mother nature and time does most of the work naturally, but some simple steps help to hurry the effect along. What might take mother nature years to create, can be done in a few weeks or months by following these steps.
• Start by mixing a weak solution of water and black acrylic or water-based paint and apply it to the cement statuary. Let dry and apply a second or third coat. The effect is simply to give the statuary a ‘dirty’ look rather than the stark white one it often has when it is new.
• Mix yogurt or buttermilk in a bucket with equal amounts of water, compost or soil and even some manure. You can add in some crushed moss at this stage as well. The result should be a thick spreadable paste.
• Paint on the mixture to the cement statuary or container ensuring you cover all areas especially creases where moss would naturally take hold.
• Take a handful of moss and rub the surface of the concrete to spread the moss spores into the concrete.
• Finally, store the concrete statuary or container in a moist and shady spot to encourage the aging process and keep it moist for a number of weeks until you see the moss get established.
Our gardens need to be inspirational places and what better way to achieve that than to add a few pieces of garden art, whether they are nature’s art like the boulder or store-bought statuary.
Statuary is great addition for the woodland garden
Garden statuary has always been a part of the garden and works well as it ages, often taking on a mossy patina.
In my Japanese-inspired woodland garden, we have incorporated traditional Japanese statues praying together surrounded in a patch of moss. With a little encouragement, I am hoping they will take on a mossy appearance for a truly aged look.
In another area of the garden, a statue of Saint Francis, the patron saint of animals, would be a perfect addition.
We have a number of aging cement statues of small animals tucked away throughout the garden. For much of the growing season they are mostly hidden from view, tucked away in the vegetation. It would be easy to miss them on a walk through the garden.
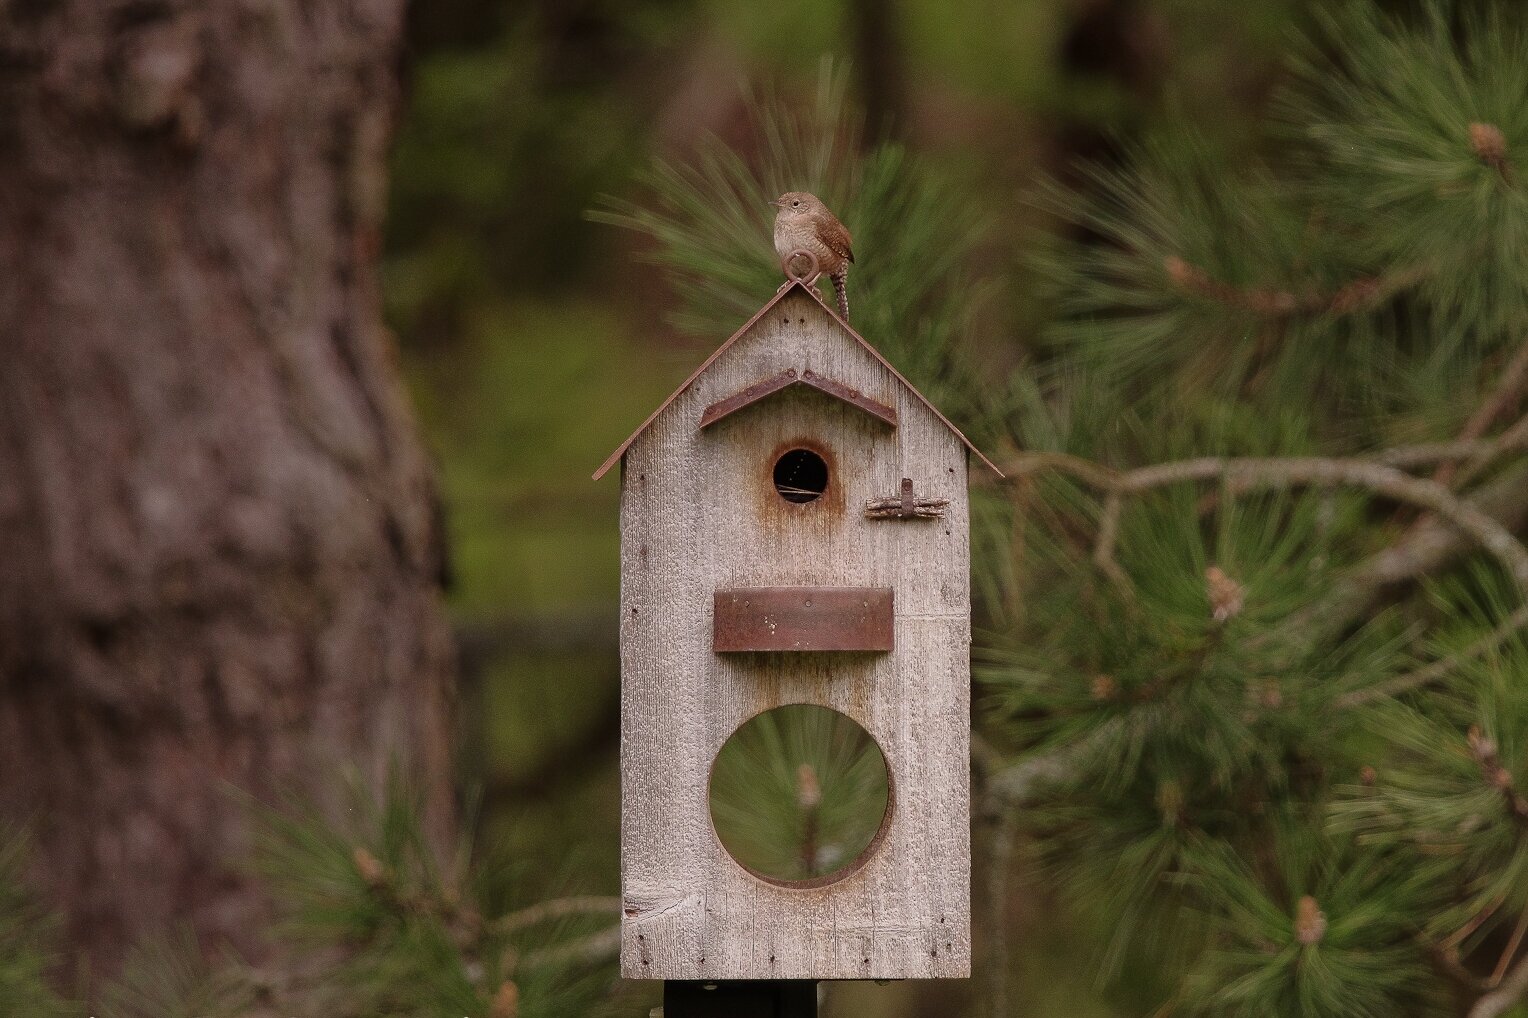
This rustic bird house and feeder fits the woodland theme and provides the ideal home for this Carolina wren.
In most woodland gardens, however, garden art should be more subtle. Consider a trip to your local nursery or rockery in the spring and scour their new moss-covered boulders to find the one that works perfectly in your woodland setting.
In another area, a gnarly branch that fell from a tree can serve as art. Place it somewhere in the garden where it’s natural beauty can age gracefully and work its way back into the soil while it provides homes for insects, small reptiles like red-backed salamanders and toads.
The moss-covered rock or twisted branch may also form the perfect natural landing spot to catch some great photographs of birds in your garden. Encourage moss and lichens to grow in the cracks but leave enough room to tuck in a few sunflower seeds to attract the birds to the exact spot you want to photograph them.
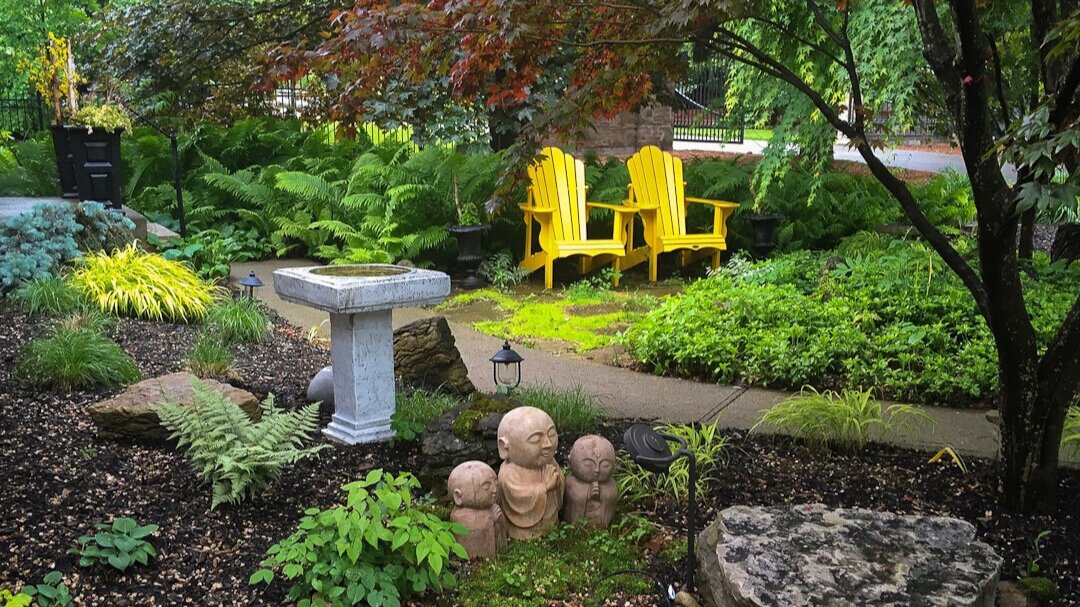
Rusty Buck standing guard in the ferns ties in to the rustic theme of the garden art in this section of the garden.
The rusty buck as garden art
Probably our favourite piece of garden art my wife and I purchased was from a boutique garden store we noticed on a day-outing. The store was tucked away in a small Mennonite community about an hour and a half drive from our home. We both noticed it as we drove by and immediately turned around to check it out. It’s another example of a piece that gets better with age. Now every time we see our rusty buck tucked in the ferns, it brings a smile to our face. Not sure what the native male deer think when they see our rusty buck, but it’s been knocked over on the ground in the morning more than once. Could be the wind, could be a jealous buck. We may never know.
Gardening on a budget links
Ten money-saving tips for the weekend gardener
DIY Bark Butter feeder for Woodpeckers
DIY reflection pond for photography
Click & Grow is ideal for Native Plants from seed

DIY: A solar drip for the birds
Converting a rarely used bird bath dripper into a solar powered fountain that is used daily, is a simple, DIY project that will please both the birds and the birdwatchers.
Turn a bird bath dripper into a solar-powered fountain birds will love
Birds love moving water and a drip, drop is about as good as it gets for them.
So, when I saw a nice copper bird bath dripper on Kijiji this spring, I jumped on it. The dripper was very high quality and I couldn’t pass it up. A copper drip tube attached to a lovely piece of slate with brass hose fittings.
It just doesn’t get any better than that.
Fast forward to this fall. Back on Kijiji looking for a cheap plastic bird bath to use this winter with an electric heater to provide water for our winged visitors throughout the freezing Southern Ontario winter, and … there it was. A magnificent copper bird bath for a very reasonable price. I remember saying to my wife that “someone in Toronto was going to get a great deal on a used copper bird bath.”
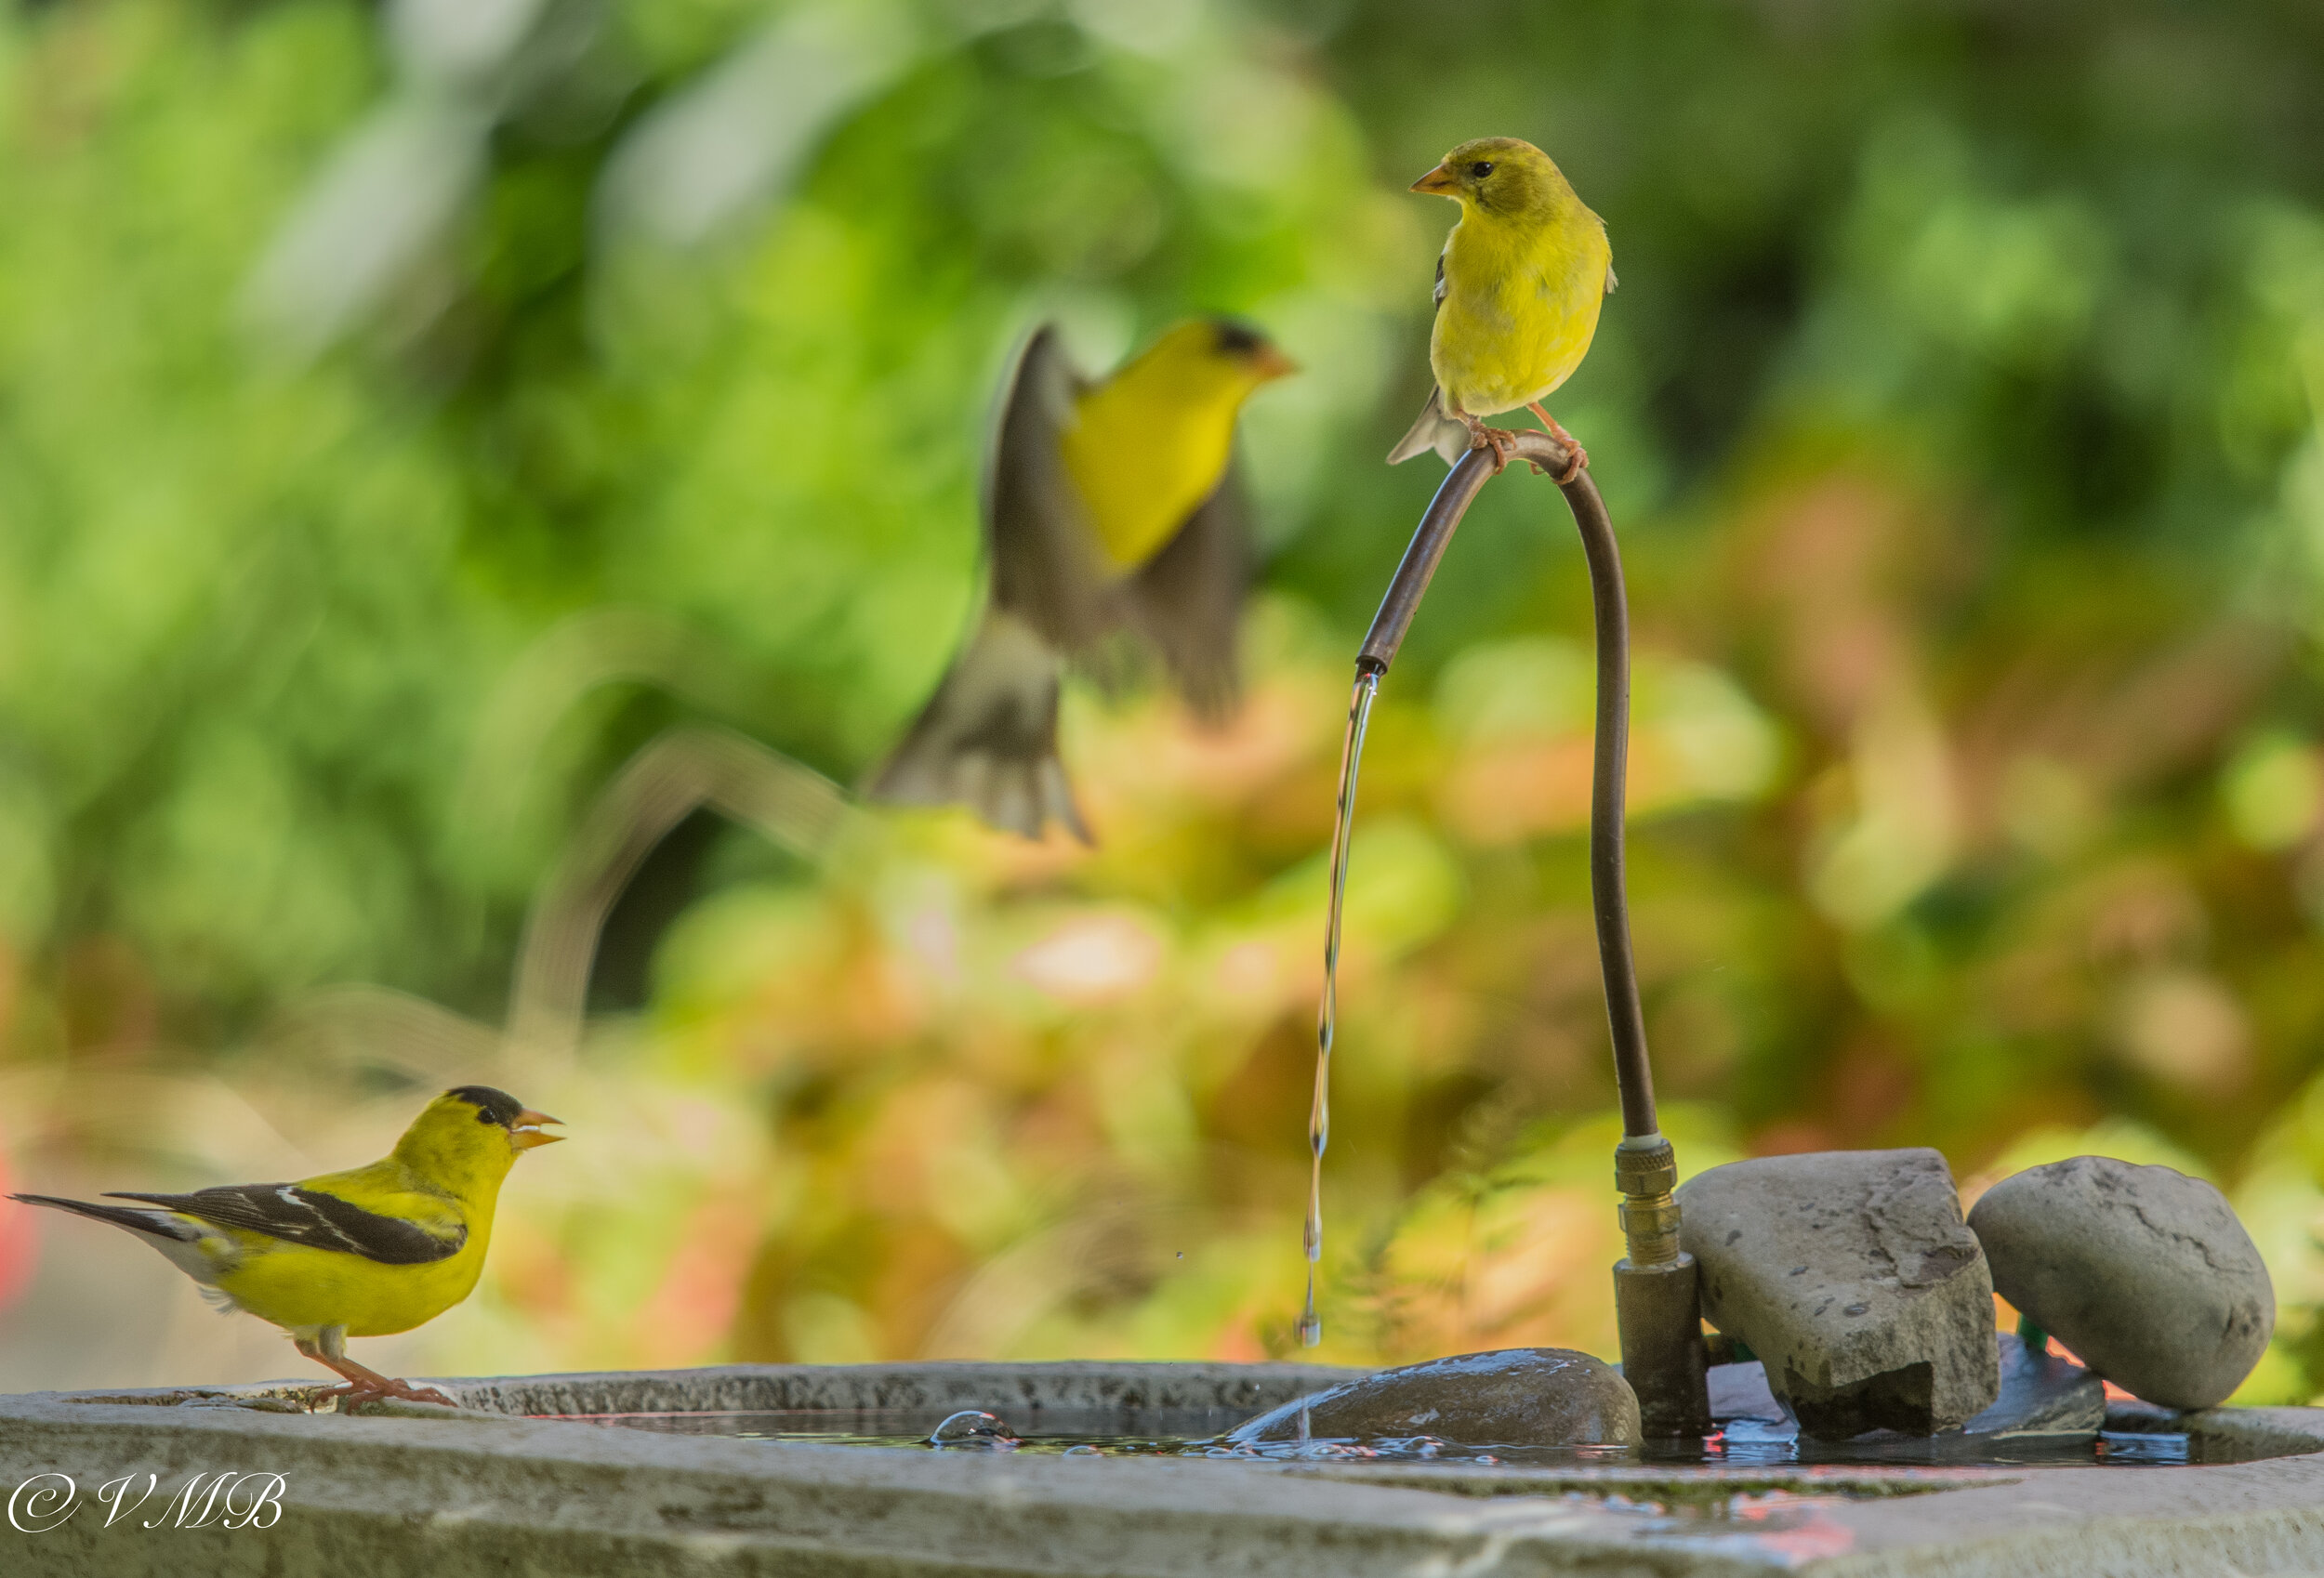
The converted dripper that operates as a solar-powered recirculating pump is certainly a treat for the Goldfinches in the garden.
The cheap plastic bird bath turned out to be an expensive copper one but I couldn’t be happier. The next morning I was on my way to Toronto (about a one-hour drive) to pick up the birdbath. To help justifiy the two-hour return trip, I combined it with a grocery delivery to my daughter who, it turned out, lived just 10 minutes from my prized bird bath.
Keeping an eye open for bird baths, bird houses and bird feeders on your favourite on-line used marketplace sites like Kijiji or Craigslist is a good way to get started with backyard birding or just to upgrade or add to your baths, houses and feeders.
Besides scoring the copper bird bath, I decided to do a slight hack on my already converted dripper to use it with the new bird bath.
For more suggestions and some of my favourite garden things, be sure to check out my Favourite Things post.
Although birds love drippers, the units need to be hooked up to a hose that needs to be left on while the amount of water is controlled to the point where just a drip at a time falls into the birdbath. Eventually, though, if left on and unattended, the bird bath overfills and drips over the edge potentially flooding an area.
I tried to make it work. I really did. Set up a nice deep bird bath that actually had a small leak. So it could handle the constant dripping without really overflowing. Trying to get the right flow was a pain and remembering to turn it off added to my frustration.
If only I could convert it to a recirculating dripper or even use it like a fountain.
Once I got the idea, it didn’t take long to convert the dripper to a solar powered unit. It’s no longer a “dripper” but that doesn’t matter because it is recirculating the water in the birdbath rather than adding to it.
The original dripper unit came with a very long, thin rubber hose that connected to the hose faucet. By cutting that into a short (maybe 6-inch) hose and connecting that to the pump’s outlet via one of the alternative fountain heads provided by the solar pump, the unit works even better than expected.
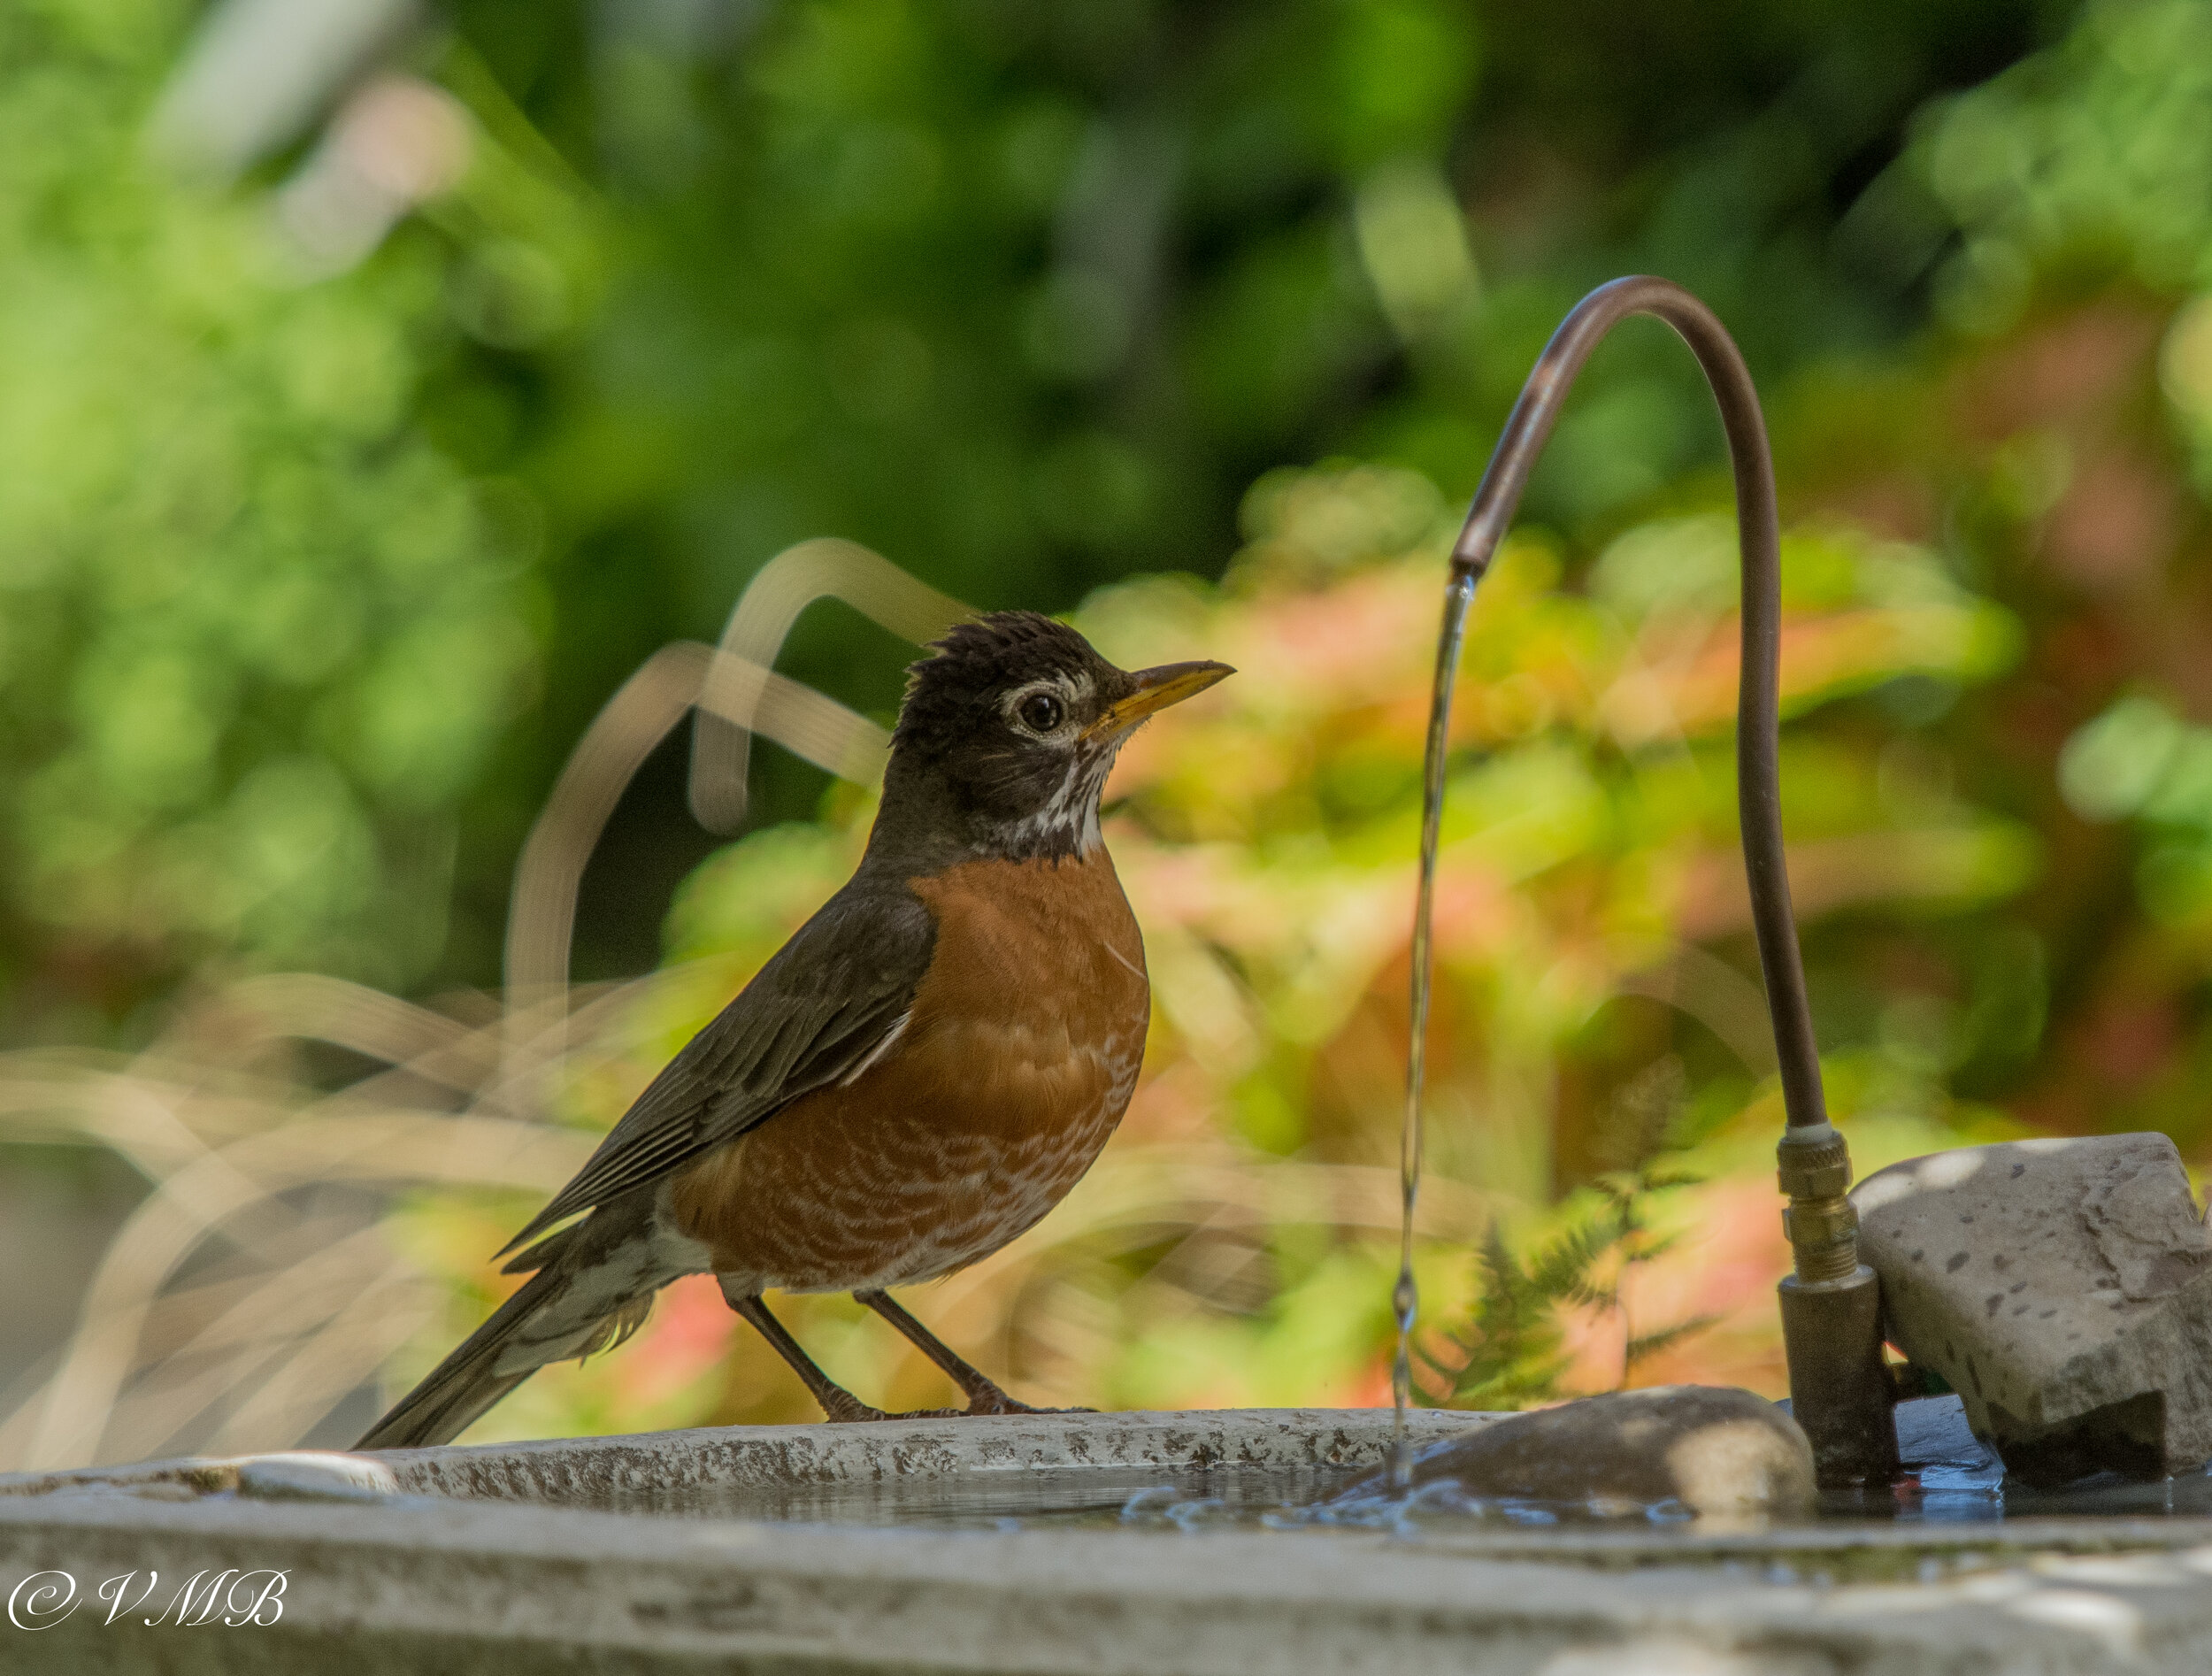
A robin takes a drink from the bird bath with the solar-powered fountain.
When the sun was out, it provided birds with a gentle flow of water recirculated from the bath itself.
This approach worked well but a small problem emerged. Trying to keep water levels high enough so that the small solar pump stayed below water became a daily concern.
The combination of birds using the bird bath, evaporation and some splashing caused by the fountain, created a daily water loss that meant constant monitoring of water levels. Everyday the water had to be topped up for fear of the bird bath running too low on water and potentially ruining the pump.
So, a small change to the original dripper conversion should work well with the new bird bath and its new location. By hiding a large bucket of water near the copper bird bath and sinking the solar pump to the bottom of the bucket, there is no fear of running the pump dry. On sunny days the bird bath will likely overflow a little but it’s placed in an area that does not get a full day of sun and will benefit from access water. A little overflow on sunny days will help to keep the water fresh and the bird bath full. In addition, I can’t help but think that it might be the perfect place to grow a thick carpet of moss around the birdbath where the access water will fall.
We set up the new bird bath and dripper/fountain right outside our family room French door to give us a window into the woodland and our keep an eye on the action at the bird bath. I’ll report back on how it’s working and how much the birds are loving it. It’s always a good idea to place feeders and bird baths so that you can watch them from inside your home. Read my blog on “A window into your woodland,” here.
I want to put a real plug in for these small, inexpensive solar-powered recirculating water pumps. This will be the third solar pump I’m using in the garden and I expect to put an order in for another one. There are so many uses for these small pumps. They come with a number of different fountain heads from a single stream of water to a gentle multi-stream fountain that would be perfect for hummingbirds who like to play in gentle streaming fountains.
A quick look on YouTube under “small solar fountain” turns up numerous DIY projects.
Definitely worth trying out.
For more on Building your Garden on a Budget, check out my earlier in-depth article here.
Consider installing a high-end, off-grid solar power system
If you are like me and don’t have electricity in your garden, or at least don’t have it in the far reaches of the garden, consider installing a complete off-grid solar-powered electrical system like the American-based Shop Solar Kit company.
Maybe you have a pergola in the back of the garden, or even a she-shed that you would like to have full power running a small refrigerator, sound system or full-size lamps and lighting. If you need to run pumps and lighting to a garden pond, you can do it with one of these highly capable systems that, once installed, operate at no cost to you at all.
There are complete DIY kits available for approximately $1,500 and up.

Gardening on a budget links
Ten money-saving tips for the weekend gardener
DIY Bark Butter feeder for Woodpeckers
DIY reflection pond for photography
Click & Grow is ideal for Native Plants from seed
Remove your turf and save money
Hiring students to get your garden in shape
If you are interested in backyard birds, please consider signing up for my backyard birds newsletter. The sign-up page is at the bottom of my homepage. Not only will the newsletter provide in-depth articles on attracting, feeding and photographing backyard birds, I am also working with local artisans to provide discounts on incredible bird-related feeders, houses and other goodies backyard birders will love. In addition there will be regular giveaways , including gardening books and birding items.