
Garden photography: Build a portable DIY reflection pond in three simple steps
How to create a reflection pond in three simple steps. It begins with purchasing a rubberized boot tray. Then add some natural materials such as moss, river rock, pea gravel, pine needles and, in the fall, colourful leaves. The last step, add a little water and you are ready to start capturing professional looking reflection images of birds and mammals.
Create professional looking wildlife photographs
Ever wonder how photographers get those beautiful reflection shots of birds or animals?
It should come as no secret that many of those images are made with a well thought out reflection pond and a photographic blind.
In this post I am going to show you how to create a reflection pond in three simple steps and about ten minutes of your time.
I've always admired the incredible image of a lion drinking by the water hole in the evening – Its pink tongue and focused stare perfectly reflected in the water.
Without the mirror-like reflection, the image is just another impressive safari shot.
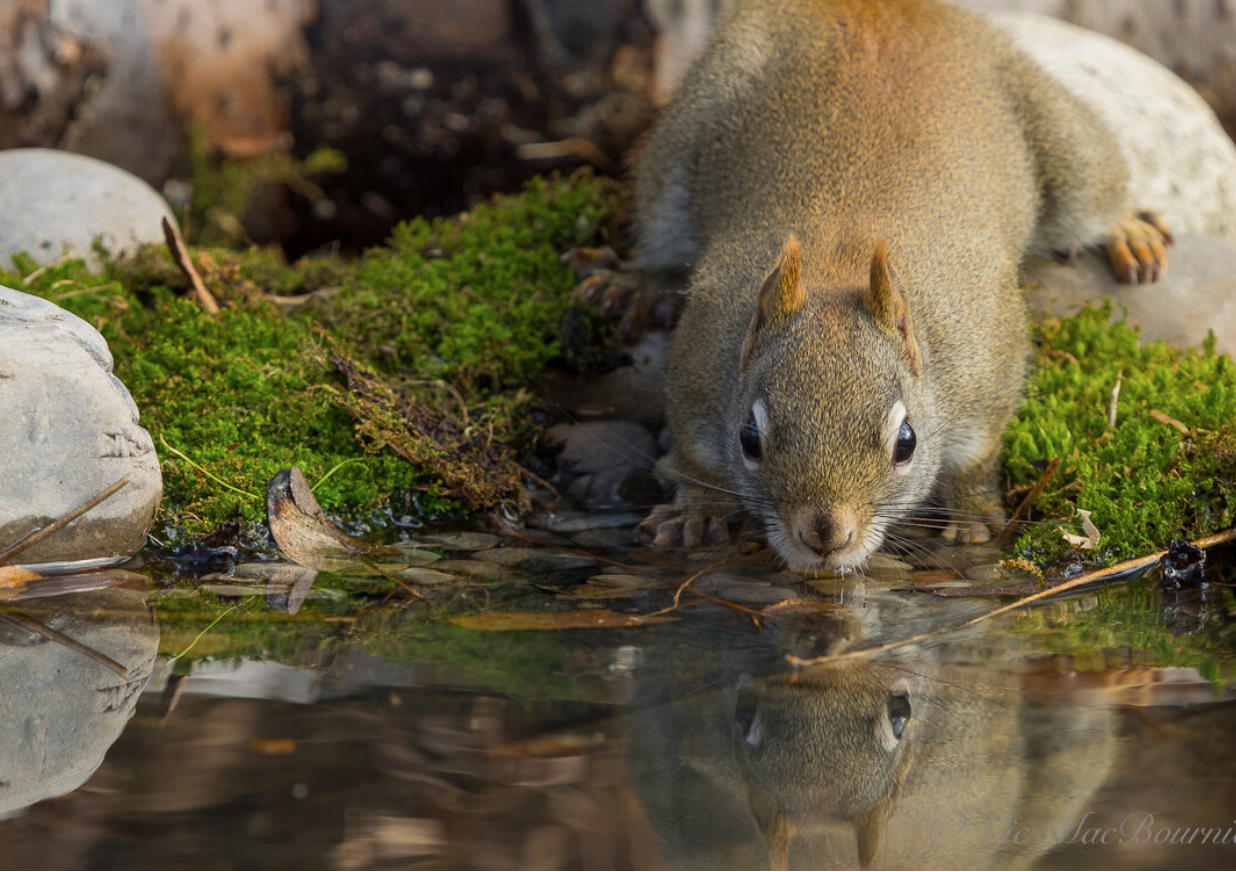
Our woodland and wildlife gardens can’t compete with an African watering hole, but that doesn’t mean we can’t create exciting reflection images in our own backyards. I know the red squirrel in the picture above isn’t quite a lion, but with a little work we can all imagine the possibilities.
Many of us have seen elaborate reflection ponds created to photograph birds and mammals. Some reflection ponds in Europe are so popular that photographers are willing to pay to use them to obtain outstanding photographic images of birds and mammals.
But here’s an epic hack of a readily available commercial product that makes creating a reflection pond as simple as possible and for under $50 Canadian. It’s so simple that, provided you have a few materials at hand, building it should take less than ten minutes.
(If saving money is your thing, check out my in-depth article on Building Your Garden on a Budget.)
This reflection of a red squirrel at the pond is made to look natural with the addition of moss, pine needles, river rock and submerged pea gravel. This DIY reflection pond is extremely simple and inexpensive to create.
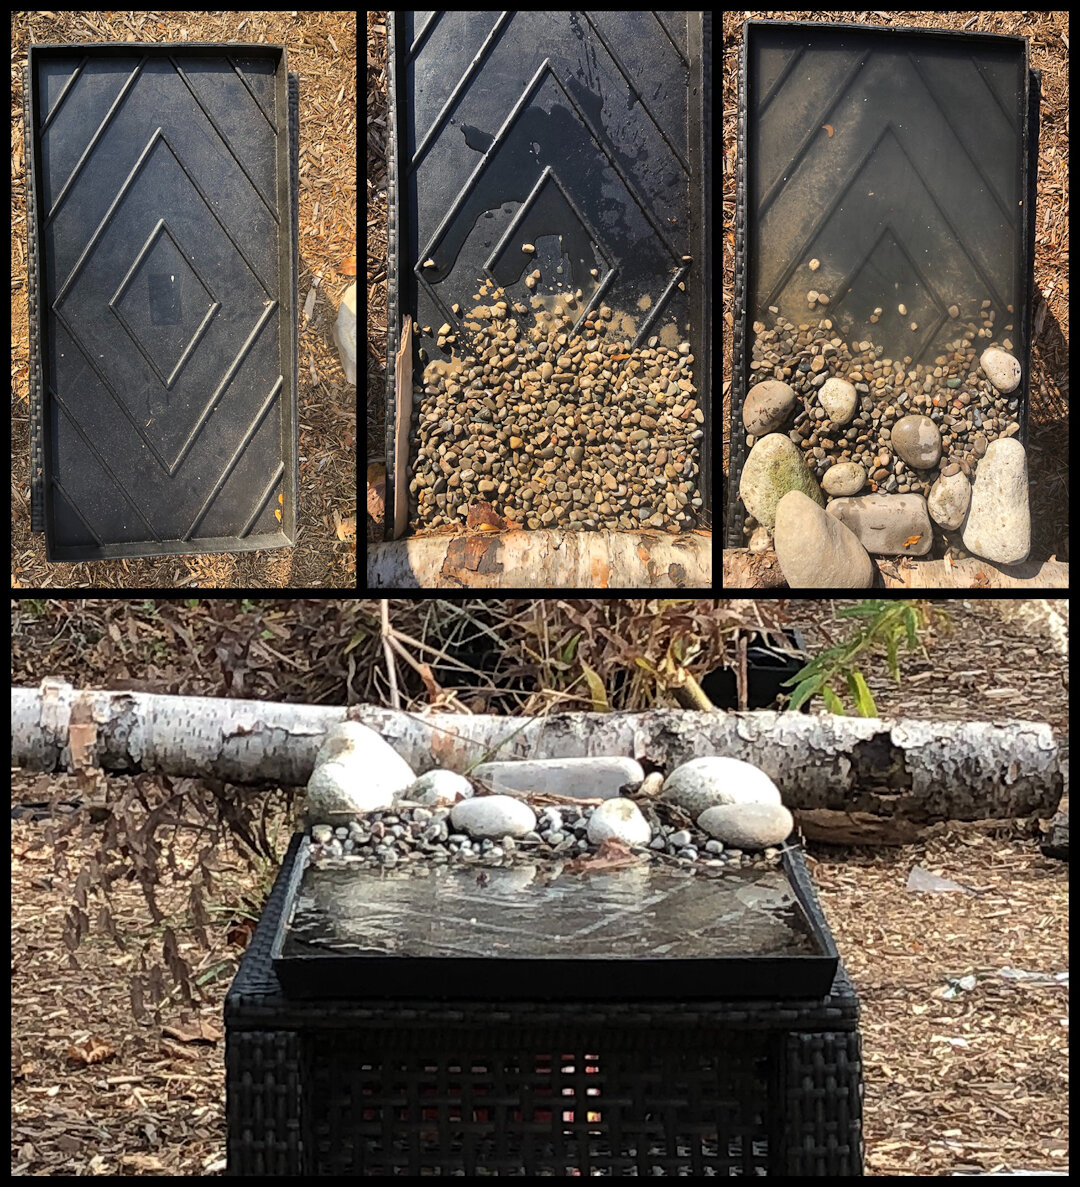
A step by step visual illustration of the creation of the reflection pond made from a rubberized boot tray.
Three simple steps to creating a reflection pond
1) Purchase a black rubberized boot tray. Mine was purchased from Lee Valley Tools outlet here in Canada and place it on a small table.
2) Add a few large river rocks, a couple of handfulls of pea gravel, maybe a birch log and moss, pine needles etc to your taste.
3) Add a couple pitchers of water to fill the tray and voila.
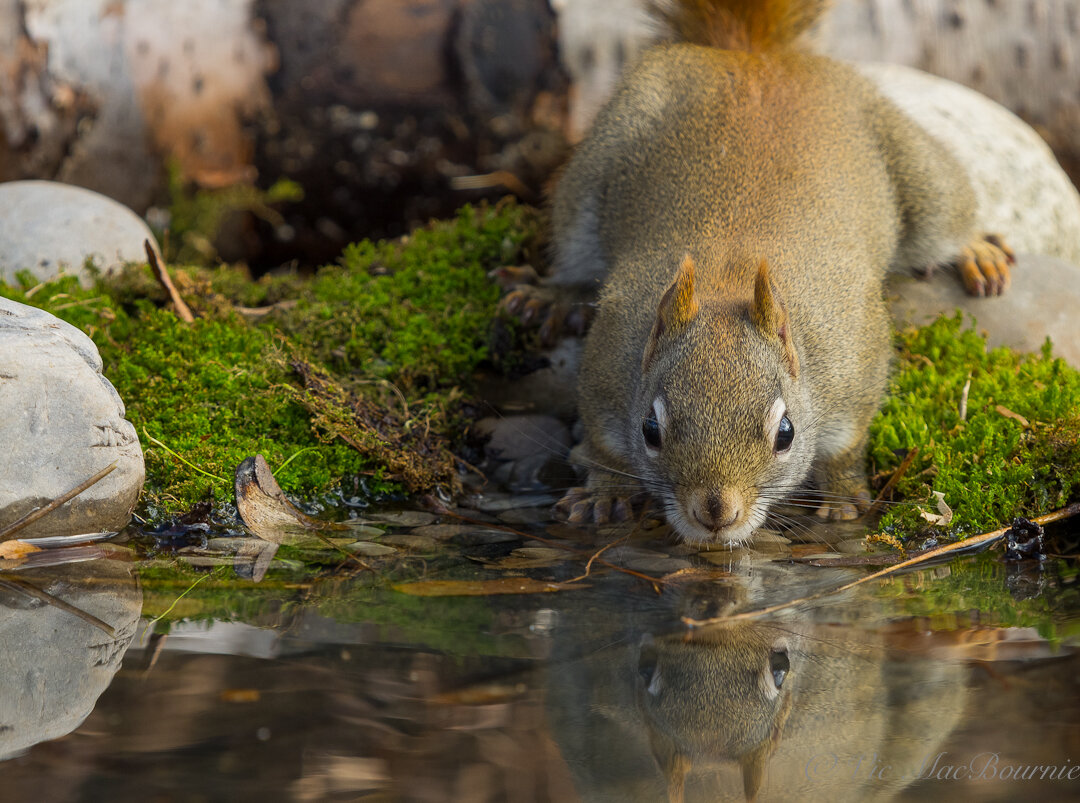
The reflected image of the red squirrel is just one example of what can be done with this simple, backyard reflection pond.
A little planning goes a long way in the creation of memorable backyard bird and mammal images. With that in mind, I went to work creating an outdoor studio to provide the inspiration to create my own “lion image.”
It's not uncommon for photographers to set up a few branches near a feeder as perches to guide birds to the best photographic locations.
My plan was to take that a step farther with the creation of a small reflecting pond to entice birds during the winter, when a reliable water source is a priority.
It all started with with the purchase of a 32-inch by 16-inch by 1.25-inch deep black rubber boot tray. It’s the perfect ready-made base to use as a reflection pond.
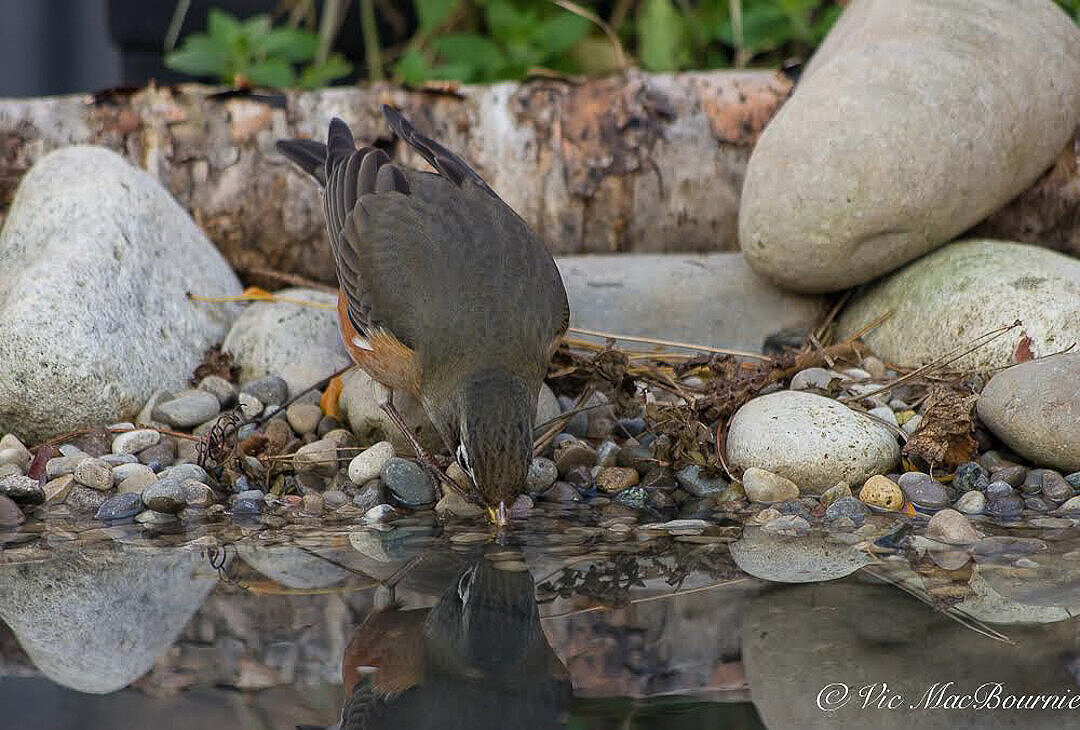
A robin stops by the reflection pond to steal a drink.
This boot tray, in case you are not familiar with it, is no cheap plastic flimsy tray that will crack in the cold. It’s made from a virtually indestructible rubber compound that is also non-skid and heavy enough to stay put even in high winds.
Placed on a similarly rectangular patio table that sits about two feet high, it's at the perfect height to capture reflections of the birds and mammals from my Tragopan V6 photographic blind or, if I put it close to a window in my home, from the comfort of my home.
Once I had the boot tray, the next step was to simply add some pea gravel, a couple of medium-sized and larger river rocks, maybe some pine needles, moss and a birch branch to give the outdoor photo studio a more natural look from behind the camera lens.
These natural materials will form the backdrop for the images and can be changed or manipulated to create different looks from one season to another. In summer, for example, moss and small wildflowers could be added. In fall, fallen leaves, pinecones, even an acorn or two.
Once the natural materials are in place, add a few pitchers of water to fill the tray to the top. Once the water is added, ensure that the tray is level by placing small stones or pieces of wood under the table’s legs.
Now, you are ready to begin photographing. It's really as simple as that. The birds will need time to get comfortable with the reflection pond.
During warmer months, you could slip a small mirror into the water to get a perfect reflection, but I don’t find that necessary. The fact the boot tray is black, will result in good to excellent reflection qualities provided your camera is set at the right angle to the water. A little experimentation here will help you get the results you want.
For the winter, set it up outside a back door on your deck or near a full-length window, so you can capture images in the comfort of your home.
With the Tragopan photography blind placed 7-10 feet from the reflection pond, I am able to use a very basic, inexpensive lens to capture the images.
By creating these types of lures to bring birds and mammals in close to either a photographic blind or a window in your home, you are much more likely to get outstanding images without having to purchase expensive photographic lenses.
It's important to note that to get a proper reflection, the camera should be at the same level or just above the height of the reflection pond. Some trial and error is necessary to get the best results.
I'll admit that the rubber boot tray falls a little short. It’s not perfect. If it were a little larger it would capture more of the reflection of larger birds or mammals, but it works beautifully for smaller- and mid-sized birds and mammals.
The fact it is black not only helps to create the perfect reflection, it also absorbs the light and works as a natural solar heater during the colder months. It will not keep it ice free in the coldest months, but it will help warm the water on sunny days.
My cost for the entire setup was about $40 Cdn, which was the cost of the boot tray.
In addition to the rectangular reflection pond, I also created a similar, smaller round version using a plastic planter tray purchased from a local nursery for about $11. That smaller pond is deeper so it allows me to use an electric birdbath heater to keep the small “pond” from freezing over.
For the winter, I have put both reflection ponds side by side in an area of the garden near a full-length glass door which allows me to photograph the birds and animals all winter from inside my home.
(I have taken the reflection pond to new heights by combining it with a natural backyard food table. Click on the link for the complete story about building a DIY feeding table/reflection pond photo studio.)
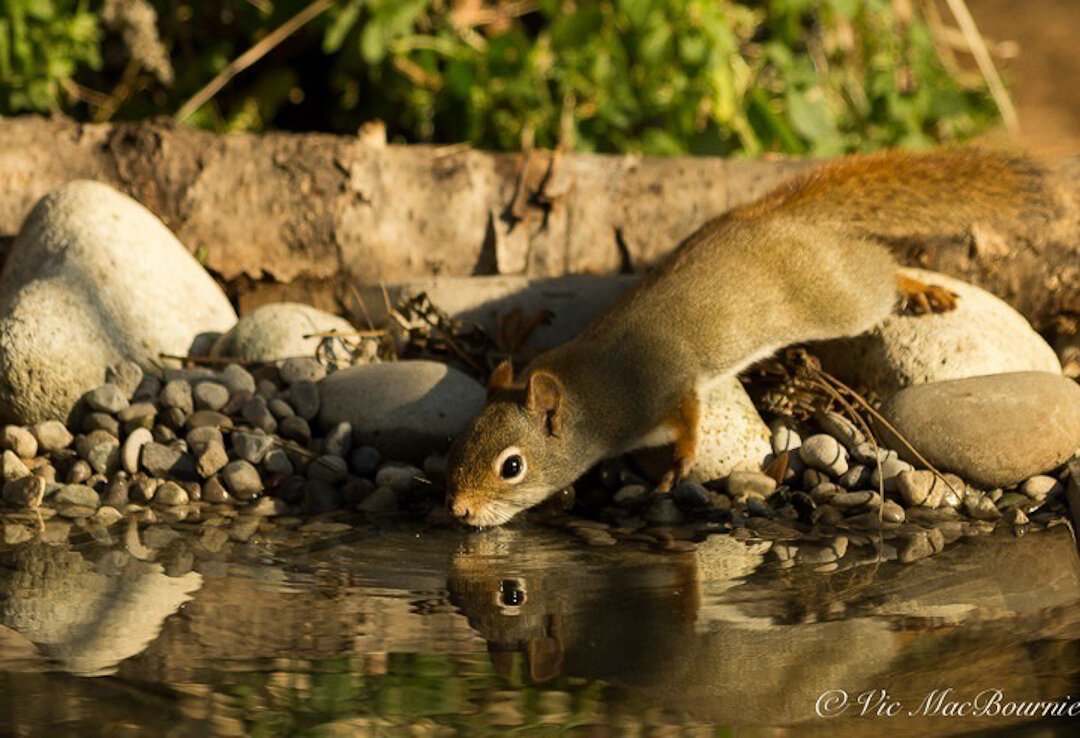
Another image of the red squirrel getting a sip of water from the reflection pond.
Tragopan Photographic blind is ideal companion to reflection pond
A note on using the one-man Tragopan V6 blind with this project. Besides working so well to hide my movements inside the blind, the viewing holes are set at the perfect height to photograph the best reflections.
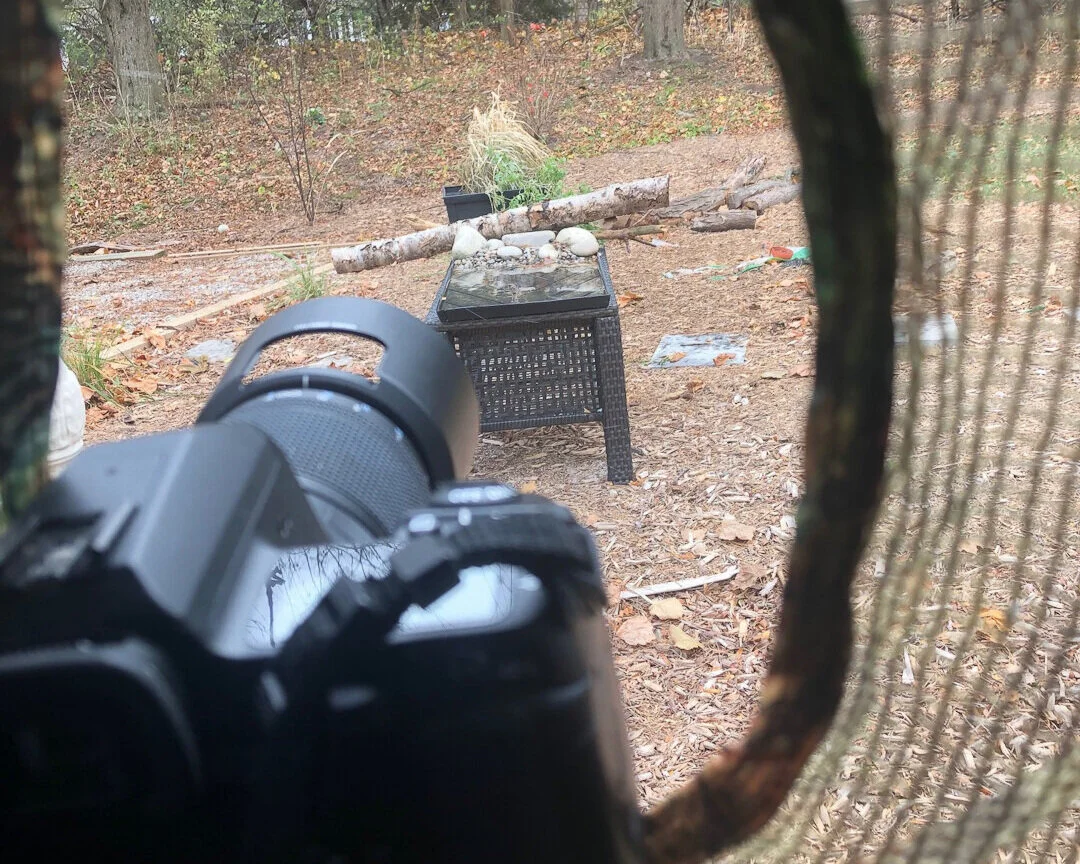
The reflection pond from inside the Tragopan V6 photographic blind.
In addition, both the blind and the reflection pond are extremely easy to move around the garden. By moving the blind around the garden, it’s possible to change backgrounds and even the reflections. For example, in the fall, move the reflection pond around the garden to capture the most intense fall colours. In the spring, do the same to capture spring flowering trees and shrubs.
I have used the blind extensively over the past several months and have grown to really appreciate the convenience of using it to capture images I would never have been able to get without it.
An added bonus to the blind is that as the weather turns cooler, the photo blind, that comes with a thermal lining built into it, will not only help cut the chilling winds and hold what little heat my body generates inside the blind.
The blind makes photographing during the cooler temperatures of late fall and early winter very comfortable for long periods of time.
Gardening on a budget links
Ten money-saving tips for the weekend gardener
DIY Bark Butter feeder for Woodpeckers
DIY reflection pond for photography
Click & Grow is ideal for Native Plants from seed