

Cooking with cast iron on the BBQ
Cooking with cast iron has to be one of the most rewarding and exciting ways to prepare meals outdoors in the garden, whether it’s on the open fire or in the BBQ.
Cooking with cast iron turns everyone into a pit master. It’s too bad most weekend BBQ warriors don’t spend the time or effort to make cast iron part of their cooking arsenal.
If that sounds like you, keep reading because I think you will realize that you need at least one cast iron skillet.
Why you need a cast iron skillet
Hey, you might say, “I like to cook right on the grill and I don’t want anything between the hot flame and my food.”
Did you know that by using a cast iron skillet you can actually impart savoury and smoky flavours into the food you are cooking. That can be good if its complimentary, and bad if you are imparting yesterday’s filet flavours into your pie crust. But it’s mostly great when your skillet is adding flavour to your food.
Did you know you can perfectly sear meats in the cast iron pan and then transfer the pan directly into the oven or just leave it in the BBQ to cook slowly, creating the perfect one-pan cooking experience.
Did you know you can throw that same cast iron cookware directly into an open campfire in the backyard or at the lake.
Did you know that, with a little care, cast iron pans can last forever. Many families are so in love with their cast iron that they even pass them down over generations.

A bottle of high quality vegetable oil and a rag is really all you need besides the oven to season your cast iron cookware.
It’s okay if you are just learning, I am too
Let’s make this clear, I’m no expert when it comes to cast iron cooking (I’ve managed to collect a couple of skillets a two-sided Vermont Castings griddle and a Vermont Castings Dutch Oven), but I’m ready to go all in to learn the ins-and-outs of this ancient art of cooking. If you are looking for a solid skillet to start with, Lodge Skillets are excellent starting points at a reasonable price.
In fact, I recently joined a couple of Facebook groups dedicated entirely to cooking with and collecting cast iron cookware. If you ever doubted the passion people have for cast iron cookware, just spend a few minutes in one of these groups.
Part of my interest in cast iron cooking began with the purchase of our Vermont Castings Vanguard propane BBQ that came with a couple of heavy, well-made cast iron cooking grids. Seasoning up those was so much fun that I immediately went out and purchased the Vermont Casting cast iron griddle accessory.
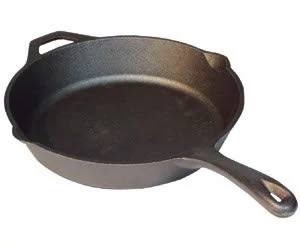
Below image (link) is the 14-inch seasoned skillet from Camp Chef that is the perfect size for quick meals.
That’s when things really took off – pancakes, eggs, little breakfast sausages, onions, mushrooms even smash burgers all became easily within reach once the griddle came on scene.
A small skillet followed, then a larger one for my Jambalaya dish, and finally the ultimate – a special Vermont Castings Dutch Oven made especially for their excellent BBQs. But the Dutch Oven can also be used on and in the stove as well as on open fire pits.
Over the next few months, I hope to share some of my favourite recipes with readers.
Cooking outside on the BBQ or over an open flame is an excellent excuse to spend time out in the garden and, I can’t think of many better ways to fully experience our gardens than spend time nursing a four-hour cook in the dutch oven listening to the birds singing and then sitting down with family and friends for a great meal al fresco style.
Before we can do that, however, we need to season those cast iron skillets, griddles and Dutch Ovens.
How to season cast iron cookware
Before you begin using your cast iron cookware, you will have to take some time to “prepare” the items to begin creating the “seasoning coat” that ensures a hard, non-stick coating and makes cast iron cookware so desirable by those who worship its cooking qualities.
Even if your cast iron comes “pre-seasoned,” it’s a good idea to add between one and three more preseasoning treatments to the cookware before using it. The more “seasoning” the better, but you can slowly build up the seasoning with each cook if you want to cut corners.
Even if you read that it is not necessary to season a preseasoned skillet or other cast iron item, take my word– just do it.
To add the first “seasoning” to your newly purchased “preseasoned” cookware, it’s a good idea to first wash the item with a mild liquid detergent in hot water. (In the past using soap was not recommended because of the strong Lye that was used to make soap. Today’s detergents do not use lye and are mild enough to use on cast iron.)
Some say not to use soap in this step because it will likely remove some of the thin coat of preseasoning that was put on at the factory. I think you can go ahead and use a bit of soap but a scrubbing with just hot water will be enough.
Once that is completed, dry the cookware off with a cloth and put it into a hot oven for a few minutes to complete the drying process.
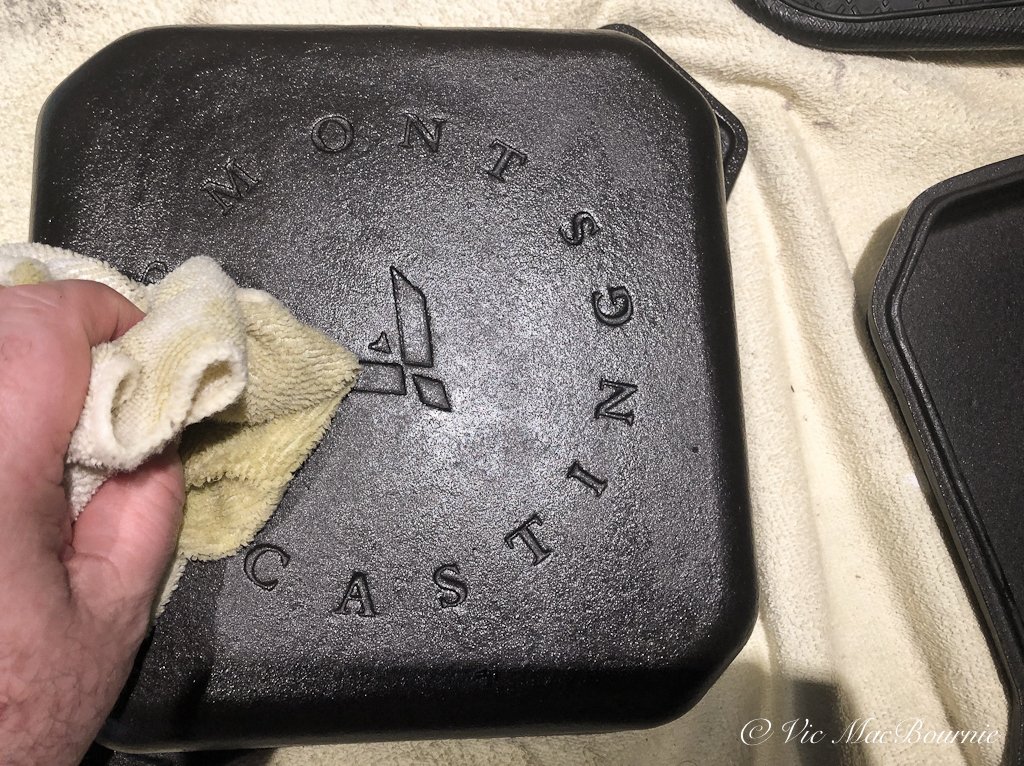
Next, remove the hot cast iron item from the oven, place it on a safe surface and use a soft cloth to rub a very thin layer of vegetable oil (preferably avocado, grape seed or a high quality virgin olive oil) over the entire surface of the cast iron cookware including the bottom, sides and handle but paying special attention to the inside and sides of the skillet or other cookware.
Before putting the item into the oven, use a clean, dry cloth to remove any access oil.
Then, turn up the heat in the oven to high (preferably 500 or greater) and leave the cookware in the heated oven for about an hour. After an hour, let the item cool naturally inside the oven. (This can also be done inside your gas or woodburning BBQ).
Repeat, as necessary to acquire the number of seasonings you want on the cookware, but, after the initial seasoning, more can be slowly added following each use.
The Vermont Castings specially designed Dutch Oven is perfect for using on the BBQ, in the oven, on the stove or even on an open campfire.
Here are the seasoning steps in point form
Give the preseasoned skillet a quick cleaning with hot water. You can add a little mild liquid detergent if you wish.
Dry the skillet with a soft cloth and heat it on the stove or in the oven to remove all the water on the surface.
Use a high smoke point oil like canola and rub it into all areas of the skillet including the non-cook surfaces.
Once it is fully coated, use a clean cloth to wipe off any excess oil.
Place the cast iron pan upside down in your oven and use either a piece of aluminum foil or a cookie dish to catch any oil drips that may occur. Providing you have used a thin coat of oil and wiped off the access, you should not experience any dripping.
Heat oven to its highest temperature and bake the cast iron for about one hour.
Turn off oven and allow the pan to cool naturally.
Once the cast iron is cool to the touch, you are free to begin using the item to cook.

The Vermont Castings Dutch Oven made especially for use with their BBQs.
How to maintain the seasoning on your cast iron cookware
Once you have established the initial seasoning, maintaining the cookware is quite simple. Following every cook with the cast iron cookware, ensure the item is clean either by washing it with hot water and a mild detergent if necessary, or preferably, just by wiping it out with a clean cloth, drying it thoroughly and adding a thin coat of oil before heating it in the oven or BBQ on high for 15 or 20 minutes.
This should maintain and enhance the coating and non-stick qualities over time.
How to fix dirty or rusty cast iron cookware
Depending on what and how you cook a particular dish, you may have to take additional steps to clean a skillet, griddle or Dutch Oven from time to time. If there are burnt-on food items remaining on the cookware even after a wash with hot water, consider using a plastic or wooden spatula to remove any stuck-on or burnt food. If this does not remove the items, you can add a teaspoon of coarse salt and a sponge to scrub off any particles. The dry salt will help to scrape off the carbon left on the cookware but not scratch off the “seasoning.”
Be sure to carefully wash off the salt and season the cookware following the cleaning and storage of the cookware.
And that’s it folks. Oh, one last thing. If you do leave your beloved skillet out in the rain and it gets a little rusty, simply follow the steps above and after a few seasonings it should be back to perfect.

What’s better the Kamado or the Kettle BBQ
Choosing between a Kamado-style charcoal barbecue and the traditional Kettle-style is a debate that continues to rage between traditional grillers both young and old. There are no easy answers to which is best but price might help us settle the argument. Especially when you consider my previous blog post on building a garden before filling your yard with high-end BBQs, fire tables and hot tubs.
Kamado-style grilling vs the Kettle
So, what’s better a Kamado or a Kettle? Trying to choose between a Kamado-style grill or a more traditional Kettle charcoal BBQ really comes down to price. There is no question that the Kamado style grill, whether it’s a Big Green Egg, Kamado Joe or Louisianna Grill, is more adaptable to most grilling styles than the Kettle. The problem is that you will pay dearly for that convenience.
Both get the job done. If you are like many busy people, however, and don’t want to spend hours behind the BBQ preparing a meal for your family, you should probably look into a natural gas or propane unit.
But retirement certainly has its benefits.
Somehow, spending two-three hours cooking chicken wings on a charcoal BBQ is a luxury I can afford these days rather than an inconvenience. Nursing the little guys with a low and slow smoke over our new Louisiana Kamado-style Grill can be an enjoyable way to spend an afternoon. I must admit, however, that I never felt that way working full time. It was off to the local pub for a basket of chicken wings and a pitcher of beer.
The chicken wings were hit and miss but the beer was always good.
Besides, trying to cook chicken wings on our old rusty propane BBQ would have been an exercise in futility. It might have been easier to just cook them over an open flame.
So it was time.
For more suggestions and some of my favourite garden things, be sure to check out my Favourite Things post.

This image, from the Louisianna Grills website, shows our Kamado-style grid in action out on the road. The portability of the unit makes it perfect for camping or tailgating.
A search on YouTube led me to the popular Kamado-style grills and smokers dominated mostly by the popular Big Green Egg and the Kamado Joes. They looked cooler than the BBQs I remember growing up, but they came with hefty price tags for what my wife and I needed. Besides, I wasn’t even sure if I wanted a charcoal BBQ after living most of my adult life with propane.
A quick search on-line turned up the Louisiana Grills’ Kamado mini for a good price. Sold.
It was advertised as being able to handle 10 hamburgs at a time, but when it arrived I quickly realized that 10-burger claim must have been a typo. As one on-line review suggested, more like room for 10 meatballs. Oh well, it was still perfect for the two of us and even big enough to handle cooking for three or four with a little ingenuity.
Our mini Kamado has a 10-inch grill surface and lacks the accessories the larger Big Green Egg and Kamado Joes offer. So far, though, I’ve really enjoyed barbecuing with it and have not really felt restricted by the lack of accessories or the very small grilling area. No doubt one of the the reasons is that we teamed it up with a propane BBQ. More on that in a later post.
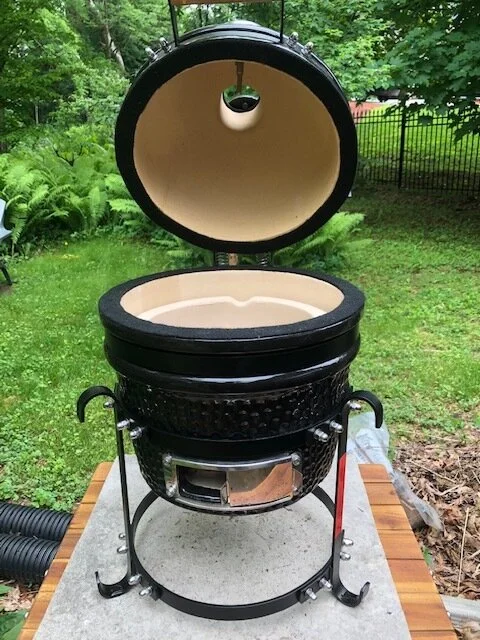
Our Kamado-style grill is small but mighty handling everything I have thrown at it so far. It is a mini grill, ideal for taking with you to the cottage or a tailgating party.
If you are buying into the whole Kamado experience, Big Green Egg, Kamado Joe and Louisiana Grills pretty much have you covered as far as ceramic bodies are concerned. There are other top-notch manufacturers of Kamado-style grills that are definitely worth checking out. including all-steel models by a number of prestigious manufacturers. The 22-inch stainless steel Caliber Pro Kamado, for example, will set you back about $1,900 U.S. but weighs in at a mere 75 pounds, making it a real alternative. And it comes in several colours including turquoise.
The market, however, is definitely dominated by the two big boys. Big Green Egg, for example, offers the Mini, MiniMax, Small, Medium, Large, XLarge and 2XL. Kamado Joe offers a similar line up of grills and an impressive array of accessories.
The mini Egg is the closest to the Louisiana Grill we purchased with a grid diameter of 10 inches or 25 cm. and a weight of just under 40 pounds or 18 kgs. Both are advertised as the perfect solution for picnics and tailgating, but they would also work well on apartment balconies and camping when you don’t want (or can’t) use propane canisters.
We were looking for something small and stylish, and were intrigued by what we had seen on Burlington Ont. resident Smoking Dad BBQ’s YouTube channel. The guy takes Kamado-style BBQing to an art form and I wanted to get in on the action – at least in a small way.

Firing up our Kamado grill for the initial burn in knowing it will never again be this clean.
In comparison to our 10-inch diameter, the Xlarge Big Green Egg has a grid diameter of 24 inches or 61 cm and weighs in at a hefty 219 pounds. Keep in mind that the grill size can easily expand with accessories that let you vertically more than double up on grill size. The Eggspander kit is on the Big Green Egg site at $265 U.S. and more than $400 Cdn on Amazon. There is not a Big Green Egg accessory you can think of that is probably not available for either the Big Green Egg and Kamado Joes, but be aware that it can get very expensive with each new gadget. The pizza accessory for the Kamado Joe, known as “DOJOE”, will set you back in the neighbourhood of $300 Cdn on Amazon. An excellent alternative to buying a separate, wood-fired pizza oven, but still not cheap considering the original cost of the BBQ.
So why choose a Kamado-style grill over, say the traditional Kettle grill, such as the popular Weber Kettle? Proponents of Kamados will tell you the secret is in the ceramic housings that retain both heat and moisture resulting in a finished product that is more tender and juicier than it would be on a regular charcoal grill. I am going to refer readers to this excellent and informative article to help further explain the benefits of the Kamado grills.
And, as champion Pit Master Chris Lilly once said about Kamado grills: “Ask your children what colour they want, because they will inherit it.”
With all that said: what about the more traditional charcoal grillers such as the extremely popular Webber Kettle. There is a reason these things have been around since they were invented by Weber’s founder George Stephen in 1952 and has since developed a cult following around the world. The Kettle’s are also available in various sizes, have an easy cleaning setup, a huge number of accessories and continue the long tradition of charcoal grilling while offering regular modern updates.
And, have we talked about the price. The basic Weber Original 18-inch black Charcoal Kettle will set Canadians back a mere $119. Upgrade to the Premium 22-inch model and you are at $229 Canadian. Add $10 for a coloured version (crimson, copper or green. A premium 26-inch Kettle will set you back a mere $469 Cdn.
Whether it’s a Weber or Kamado Joe you are cooking on, cast iron cookware is almost indispensible. For my post on using, seasoning and why you need a cast iron skillet, check out Cast Iron Cookware.
In a previous blog post, I talked about the importance of creating the bones of your garden before you go out and purchase the latest and greatest BBQ. Getting that garden foundation established as early as possible will pay off in the long run. Even if that means only buying a single tree to begin your woodland garden.
This is where the Weber Kettle or a similar BBQ steps to the forefront. It’s a simple, inexpensive BBQ that will go a long way to give you a foundation in BBQ techniques at a very reasonable cost. Weber’s website even offers excellent posts to teach you how to master the art of cooking with charcoal. If you are just starting out in the world of charcoal barbecuing and looking to create your ideal woodland garden, the Weber Kettle is an excellent choice to get you on your way.
If your garden is much further along and you are ready to take barbecuing to the next level, consider a more expensive Kamado-style BBQ.
Either way you can’t lose.
I also have a propane BBQ which gets plenty of use. Our Vermont Castings Vanguard BBQ is an excellent choice for those looking for a propane or gas style BBQ.
Check out this link for my article on our Vermont Castings Vanguard propane BBQ.
And this article for information on using cast iron cookware on the BBQ.
This page contains affiliate links. If you purchase a product through one of them, I will receive a commission (at no additional cost to you) I try to only endorse products I have either used, have complete confidence in, or have experience with the manufacturer. Thank you for your support. This blog would not be possible without your continued support.