
Tips to photograph wildlife in your woodland garden
Creating the right environment to be successful in the garden involves a lot of hard work. But, in the end, it pays off. It’s not luck that you saw an oriole, a fox or hummingbird in your garden. It’s the result of that hard work you put in earlier to create the right conditions.
Bridge camera is great choice for garden photography
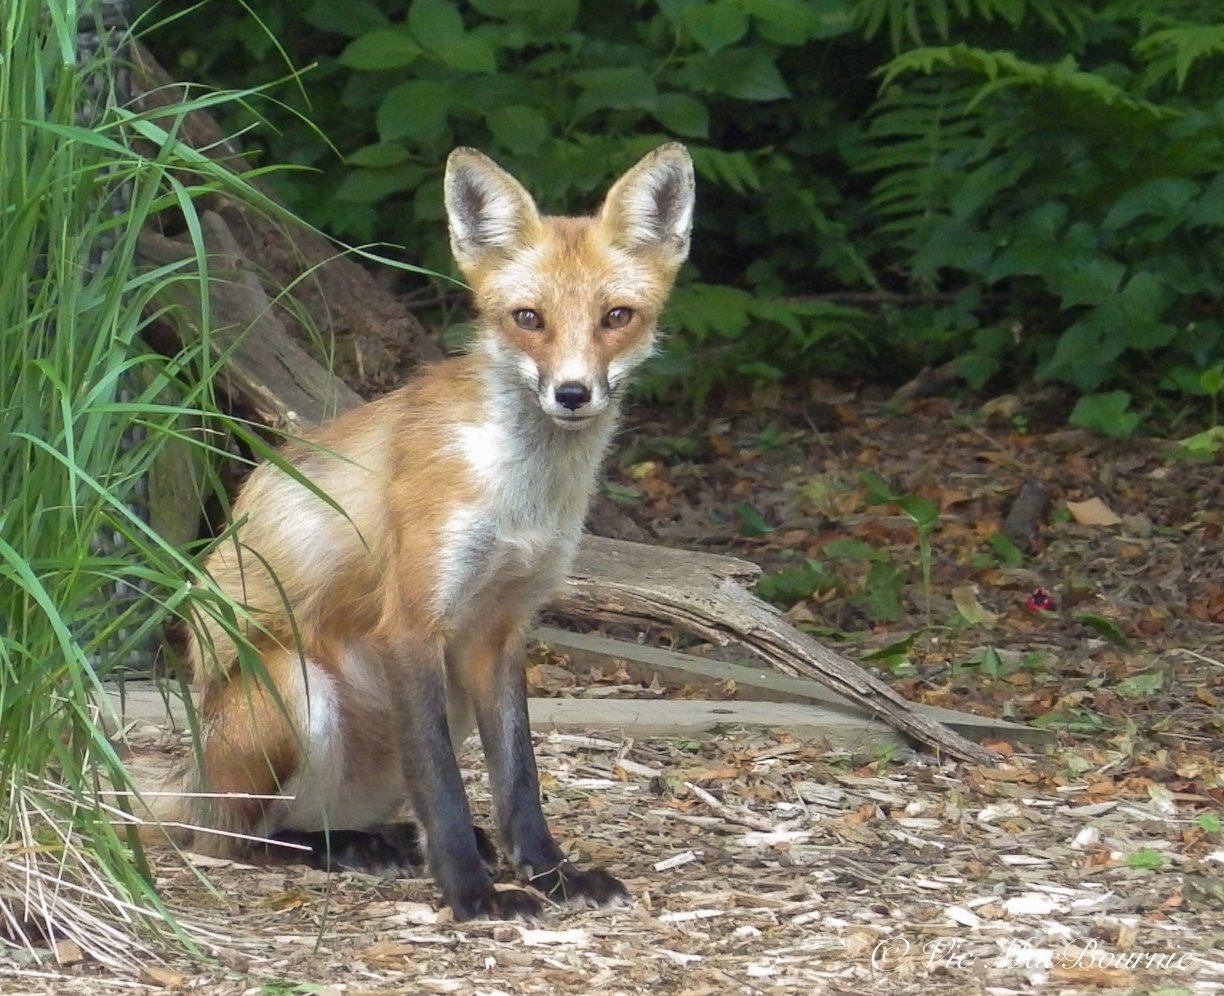
One of our neighbourhood foxes dropped in for its daily visit. It helped that I was armed with my camera on a monopod and my favourite lens.
This fox image is an example of how the right environment created an opportunity to capture an image that presented itself.
It began with a decision to work on getting a good image of a hummingbird feeding at a native Cardinal flower, but ended hours later with a memorable image of a fox.
Let me explain.
The cardinal flower was at its prime and I knew that, if I wanted to use it to get an image of a hummingbird feeding, I needed to act swiftly. So I set the camera on a tripod, filled up my coffee and waited.
(If you are interested in exploring garden photography at a higher level, be sure to check out my comprehensive post on the Best camera and lens for Garden Photography.)
If you are looking for a new camera or lens, check out B&H Cameras & Video for a complete line of cameras and lenses.
And, if you are wondering how a point-and-shoot digital camera that’s more than 10 years old can perform in the garden, be sure to check out my post on the Canon PowerShot Elph 500 HS.
The hummers came to the feeders surrounding the Cardinal flowers but only stopped at the flowers three times for a brief moment.
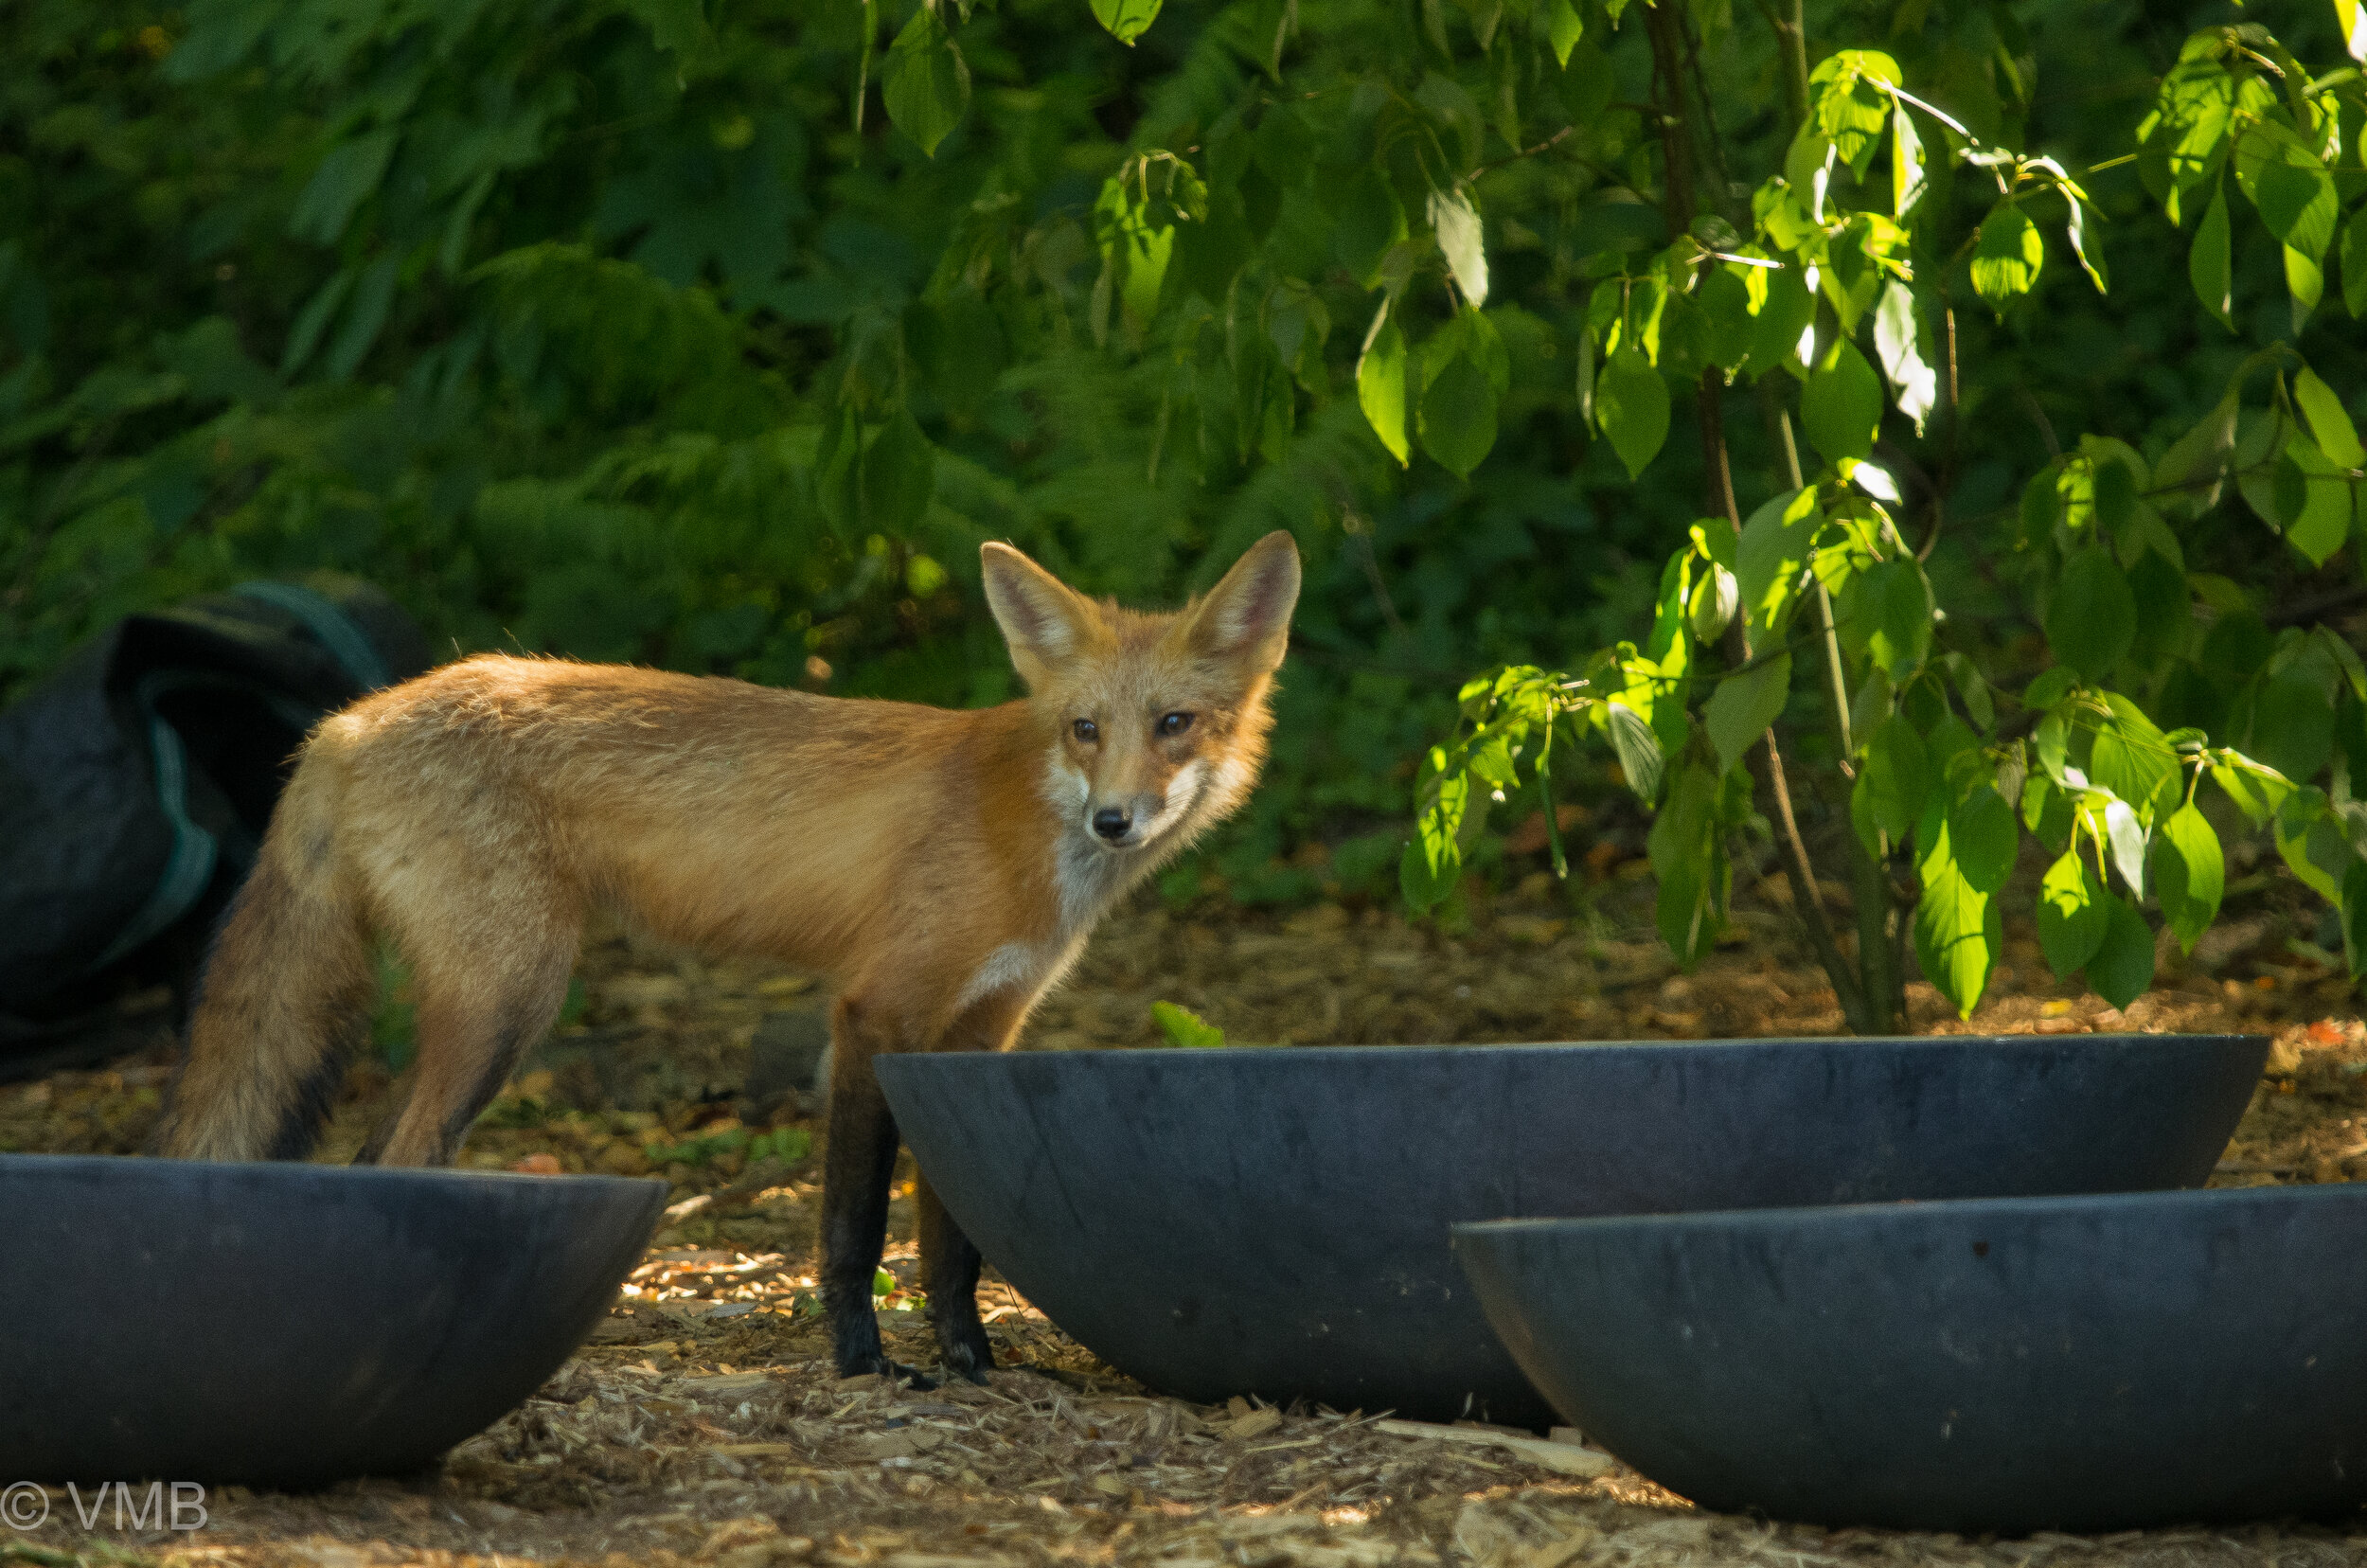
About three hours into the shoot, I noticed a fox standing by our shed looking my way. It was by no means stressed by my presence. In fact, it seemed perfectly happy to share the yard with me provided we stayed at a comfortable distance.
How often have you been in the yard and a great photographic opportunity presented itself to you? Too often, we are not prepared. Chances are, all we have is our smart phone by our side and the resulting image is nothing but a poor replica of a memorable moment.

The Pentax X5 and other bridge cameras from major manufacturers allow the photographer to be ready when the opportunity arises. I was sitting out in the garden when this fawn decided to visit. The 580mm reach on the Pentax X5 allowed me to get in close without scaring the little fawn.
But on this day I was in luck. The camera was already set up with my favourite 300mm F4.5 lens on a monopod.
I couldn’t ask for a better situation. Even our dog Holly had yet to notice the fox that trotted over to our three large water bowls and helped herself to a long drink.
A few quick bursts of photos from the 35mm DSLR camera and off she went. Like a ghost. There one moment … the next, gone. It was over as quickly as it began.
The lesson learned was simple: Be prepared.
Today, even if I just go out to enjoy my morning coffee, I always have a camera by my side ready for action. Sometimes it’s a simple “Travel camera” (read my travel camera review here) with a wide angle to short telephoto lens that is great for basic garden shots but will not likely get you close enough to most wildlife.
If you are looking to upgrade your camera equipment – be it a new camera body or lens – be sure to check out KEH Camera Exchange for the best prices on excellent used equipment. You can also trade in your used gear to help curtail the cost of new equipment.
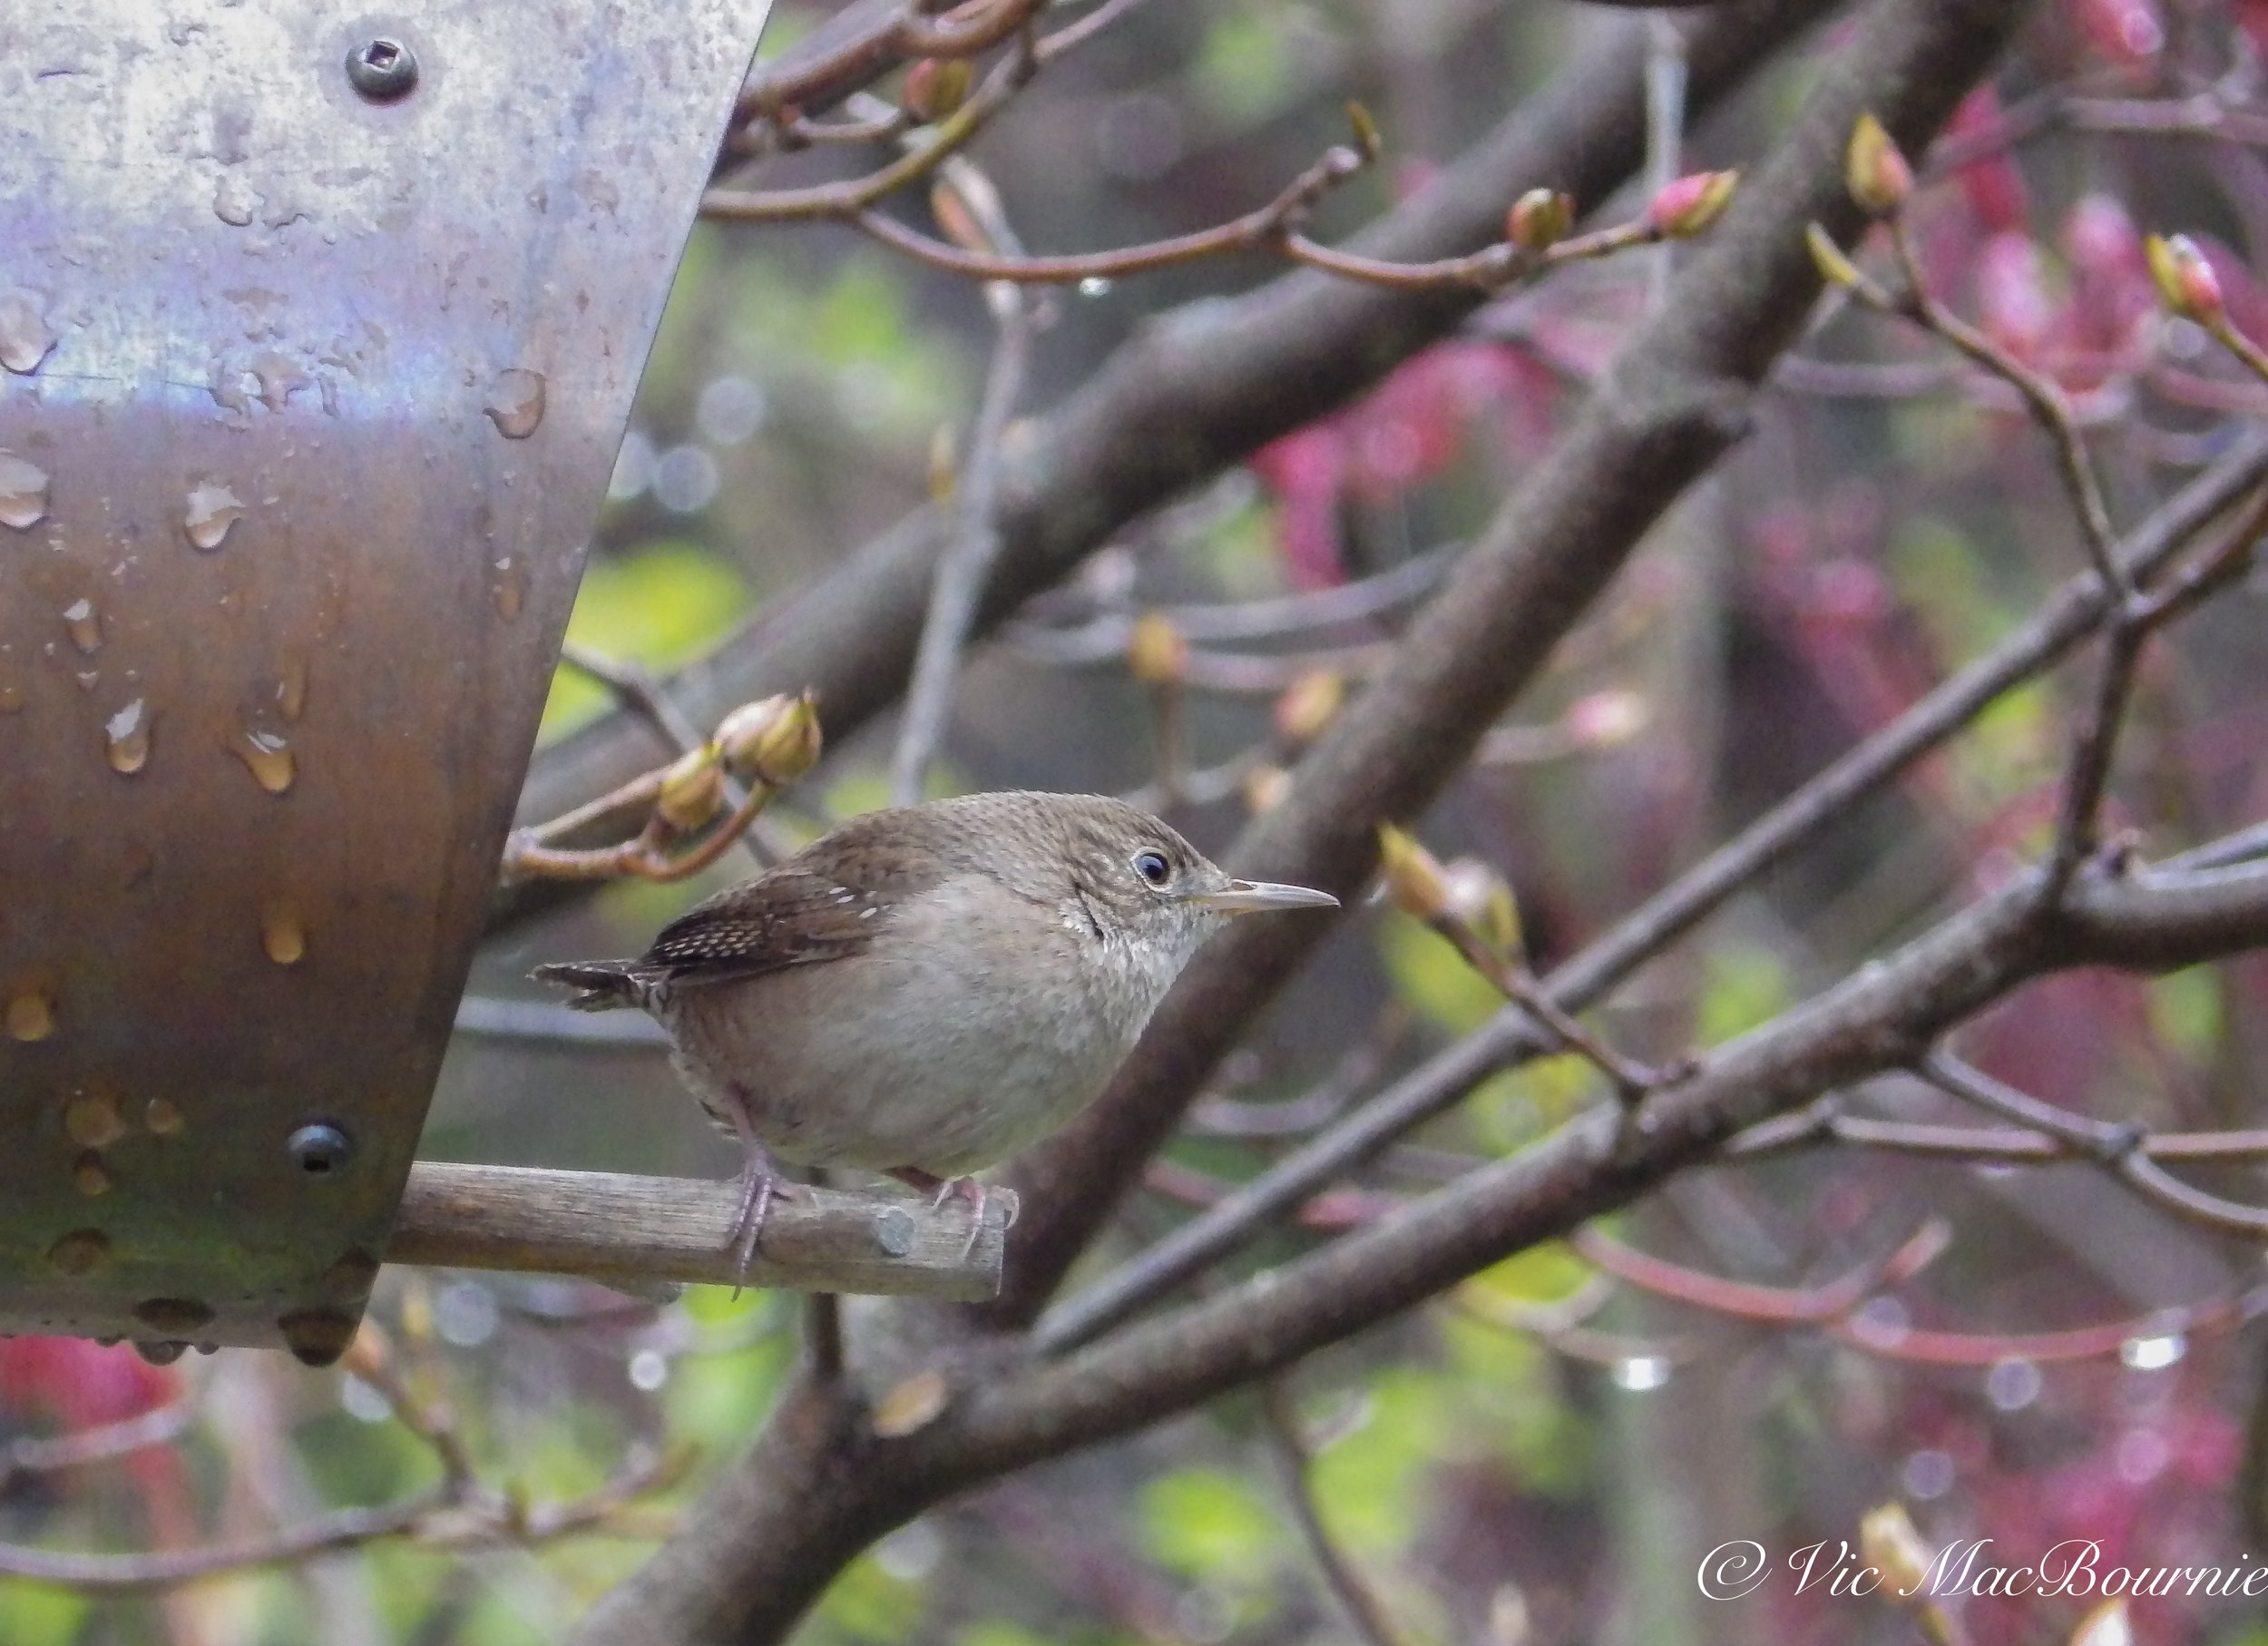
This Carolina Wren was photographed with the Pentax X5 Bridge camera that comes equipped with a super telephoto lens capable of shooting wide angle images as well as telephoto shots and even close-up macro type images.
Most likely, it is my versatile “Bridge camera” that allows me to shoot everything from long telephoto images of wildlife, including birds and butterflies, to sweeping wide-angle garden vistas, to macro shots of flowers and insects.
On this day, I happened to have my 300mm lens on the camera and ready to go, which made capturing the fox image possible.

This young fox decided to pose for me for a minute giving me time to focus the Pentax X5 “Bridge” camera to capture the image. I needed to use the full zoom power of the X5 (500mm) to capture the image.
More recently, however, I have a “bridge camera” with me. I have used the camera for more than a year now and have come to appreciate its versatility, with its ability to go from extreme telephoto to wide angle and even a very usable macro mode.

Bridge cameras, which are offered by all the major camera manufacturers, can be the perfect camera choice for garden photographers looking for a single extremely versatile camera that is at home photographing garden vistas as it is birds and other wildlife. Add to that versatility the ability to get in close to flowers for macro photography and it’s hard to believe that everyone is not lining up to purchase one. These cameras can be described as mid-priced cameras situated between a simple point-and-shoot and a more serious 35mm SLR with a complete line of lenses. Bridge cameras look like a typical digital single lens reflex (DSLR), but without the interchangeable lenses.
The bridge camera offers a built-in lens sporting a wide angle to long telephoto lens. The combination creates an easy-to-carry-around versatile camera that can deliver very good results with a little practise.
But they are not by any means perfect.
My bridge camera uses an electronic viewfinder in addition to the back LCD screen to view the image. The electronic viewfinder takes getting used to and falls far short of a optical viewfinder found in traditional DSLRs. To add to the difficulty of using the Bridge camera is a significant “shutter lag” meaning an excessive amount of time between when you press the button to take the image and the time it is actually taken. This shutter lag can mean the difference between getting the shot and missing it entirely.
In addition, because most of these cameras are so dependent on electronic viewfinders and the electronic zooming of the lens, some of these cameras tend to exhaust your batteries quickly, especially if you use the large back LCD screen as your primary viewer or to check your images regularly. My camera uses regular AAA batteries, which can be convenient when you are travelling, but compared to rechargeable batteries, can also be expensive to use. The other issue I have with the Pentax (which is no longer available) is the fact I cannot easily add filters to the front of the lens. This may not be a problem for most photographs, unless of course, you need to use a polarizing filter to remove glare from leaves or a pond.
Like most Bridge cameras, the Pentax X-5 bridge camera that I am using came with a very long 26X telephoto lens (the equivalent zoom for traditional 35mm cameras of about 22-580mm.) Most bridge cameras come equipped with a lens that provides the photographer with both a solid wide angle lens as well as a super-long telephoto lens.
This image taken with the Bridge Camera is an example of the type of images that are possible just sitting in the backyard waiting for the right opportunity.
Bridge cameras like my Pentax X-5 also come equipped with an impressive macro feature making it the perfect camera to carry with me into the garden for casual macro shots. For more serious macro photography, I will mount a 50mm or 100mm dedicated macro lens on a 35mm SLR camera.
Being prepared, having the right tools at hand and, of course, some luck on your side can mean the difference between getting the shot and missing it.
Even seeing wildlife, let alone getting good photos of them, depends on a lot of factors going your way.
Luck certainly plays a role in any shot, but I like to think that it plays a smaller role than most people think.

A macro image of a clematis taken by the Pentax Bridge camera the X5, on macro mode. This shows the versatility of the camera and its lens that is able to go from long telephoto (see above image of the Fox) to extreme macro without changing the lens.
Being out in the yard for more than four hours patiently waiting for the hummingbirds to cooperate creates the opportunity to be successful. Still, I was unsuccessful getting that shot of the hummingbird. Instead, I had to “settle” for the fox shot.
I like to think you create your own luck.
Setting out large water bowls meant to provide local wildlife with a fresh water source helped create that opportunity for the photograph.
Creating a natural garden, providing a source of natural food and moving water in the form of bubbling rocks and fountains, not using pesticides, having woodpiles … these all provide the right environment to getting the photograph, or the opportunity to observe the wildlife that call our property home.
PopPhoto website lists their favourite Bridge Cameras in this informative article starting with the best overall camera going to the Sony Cyber-shot DSC-RX10 IV, the Canon PowerShot SX70 HS as the best Wildlife camera and the Panasonic Lumix FZ80 as the best budget camera.
It doesn’t have to be a fox. It could have been a bird, a butterfly a reptile, or even a photograph of a beautiful tree or grouping of flowers.
The day before this shot was taken, I was trying to capture some photographs of birds enjoying my new solar-powered fountain, when a little chipmunk decided to hang out with me for a while. So I got “lucky” and was able to get some great shots of the chipmunk too.
Getting lucky is really about creating the right environment to get photographic opportunities and then taking advantage of these opportunities.
It’s the same in your everyday life. Put yourself in the best environment to succeed and chances are you will.
Getting up early, spending time in our gardens, getting up close and intimate with flowers. These all create the opportunities to be successful.
I’ll be out again soon working on getting the shot of the hummingbird at the cardinal flower. Maybe I’ll get “lucky” and the hummer will cooperate this time.
This page contains affiliate links. If you purchase a product through one of them, I will receive a commission (at no additional cost to you) I try to only endorse products I have either used, have complete confidence in, or have experience with the manufacturer. Thank you for your support. This blog would not be possible without your continued support.
Take your Travel camera to the backyard to capture great garden photography
A Travel camera like the Panasonic Lumix camera is the ideal choice for capturing fall in your woodland garden. It’s portability makes it easy to carry around on your daily chores, yet its list of full features leaves nothing to chance. From long telephoto lenses to capture wildlife, to excellent macro capabilities and video, one camera really can do it all.

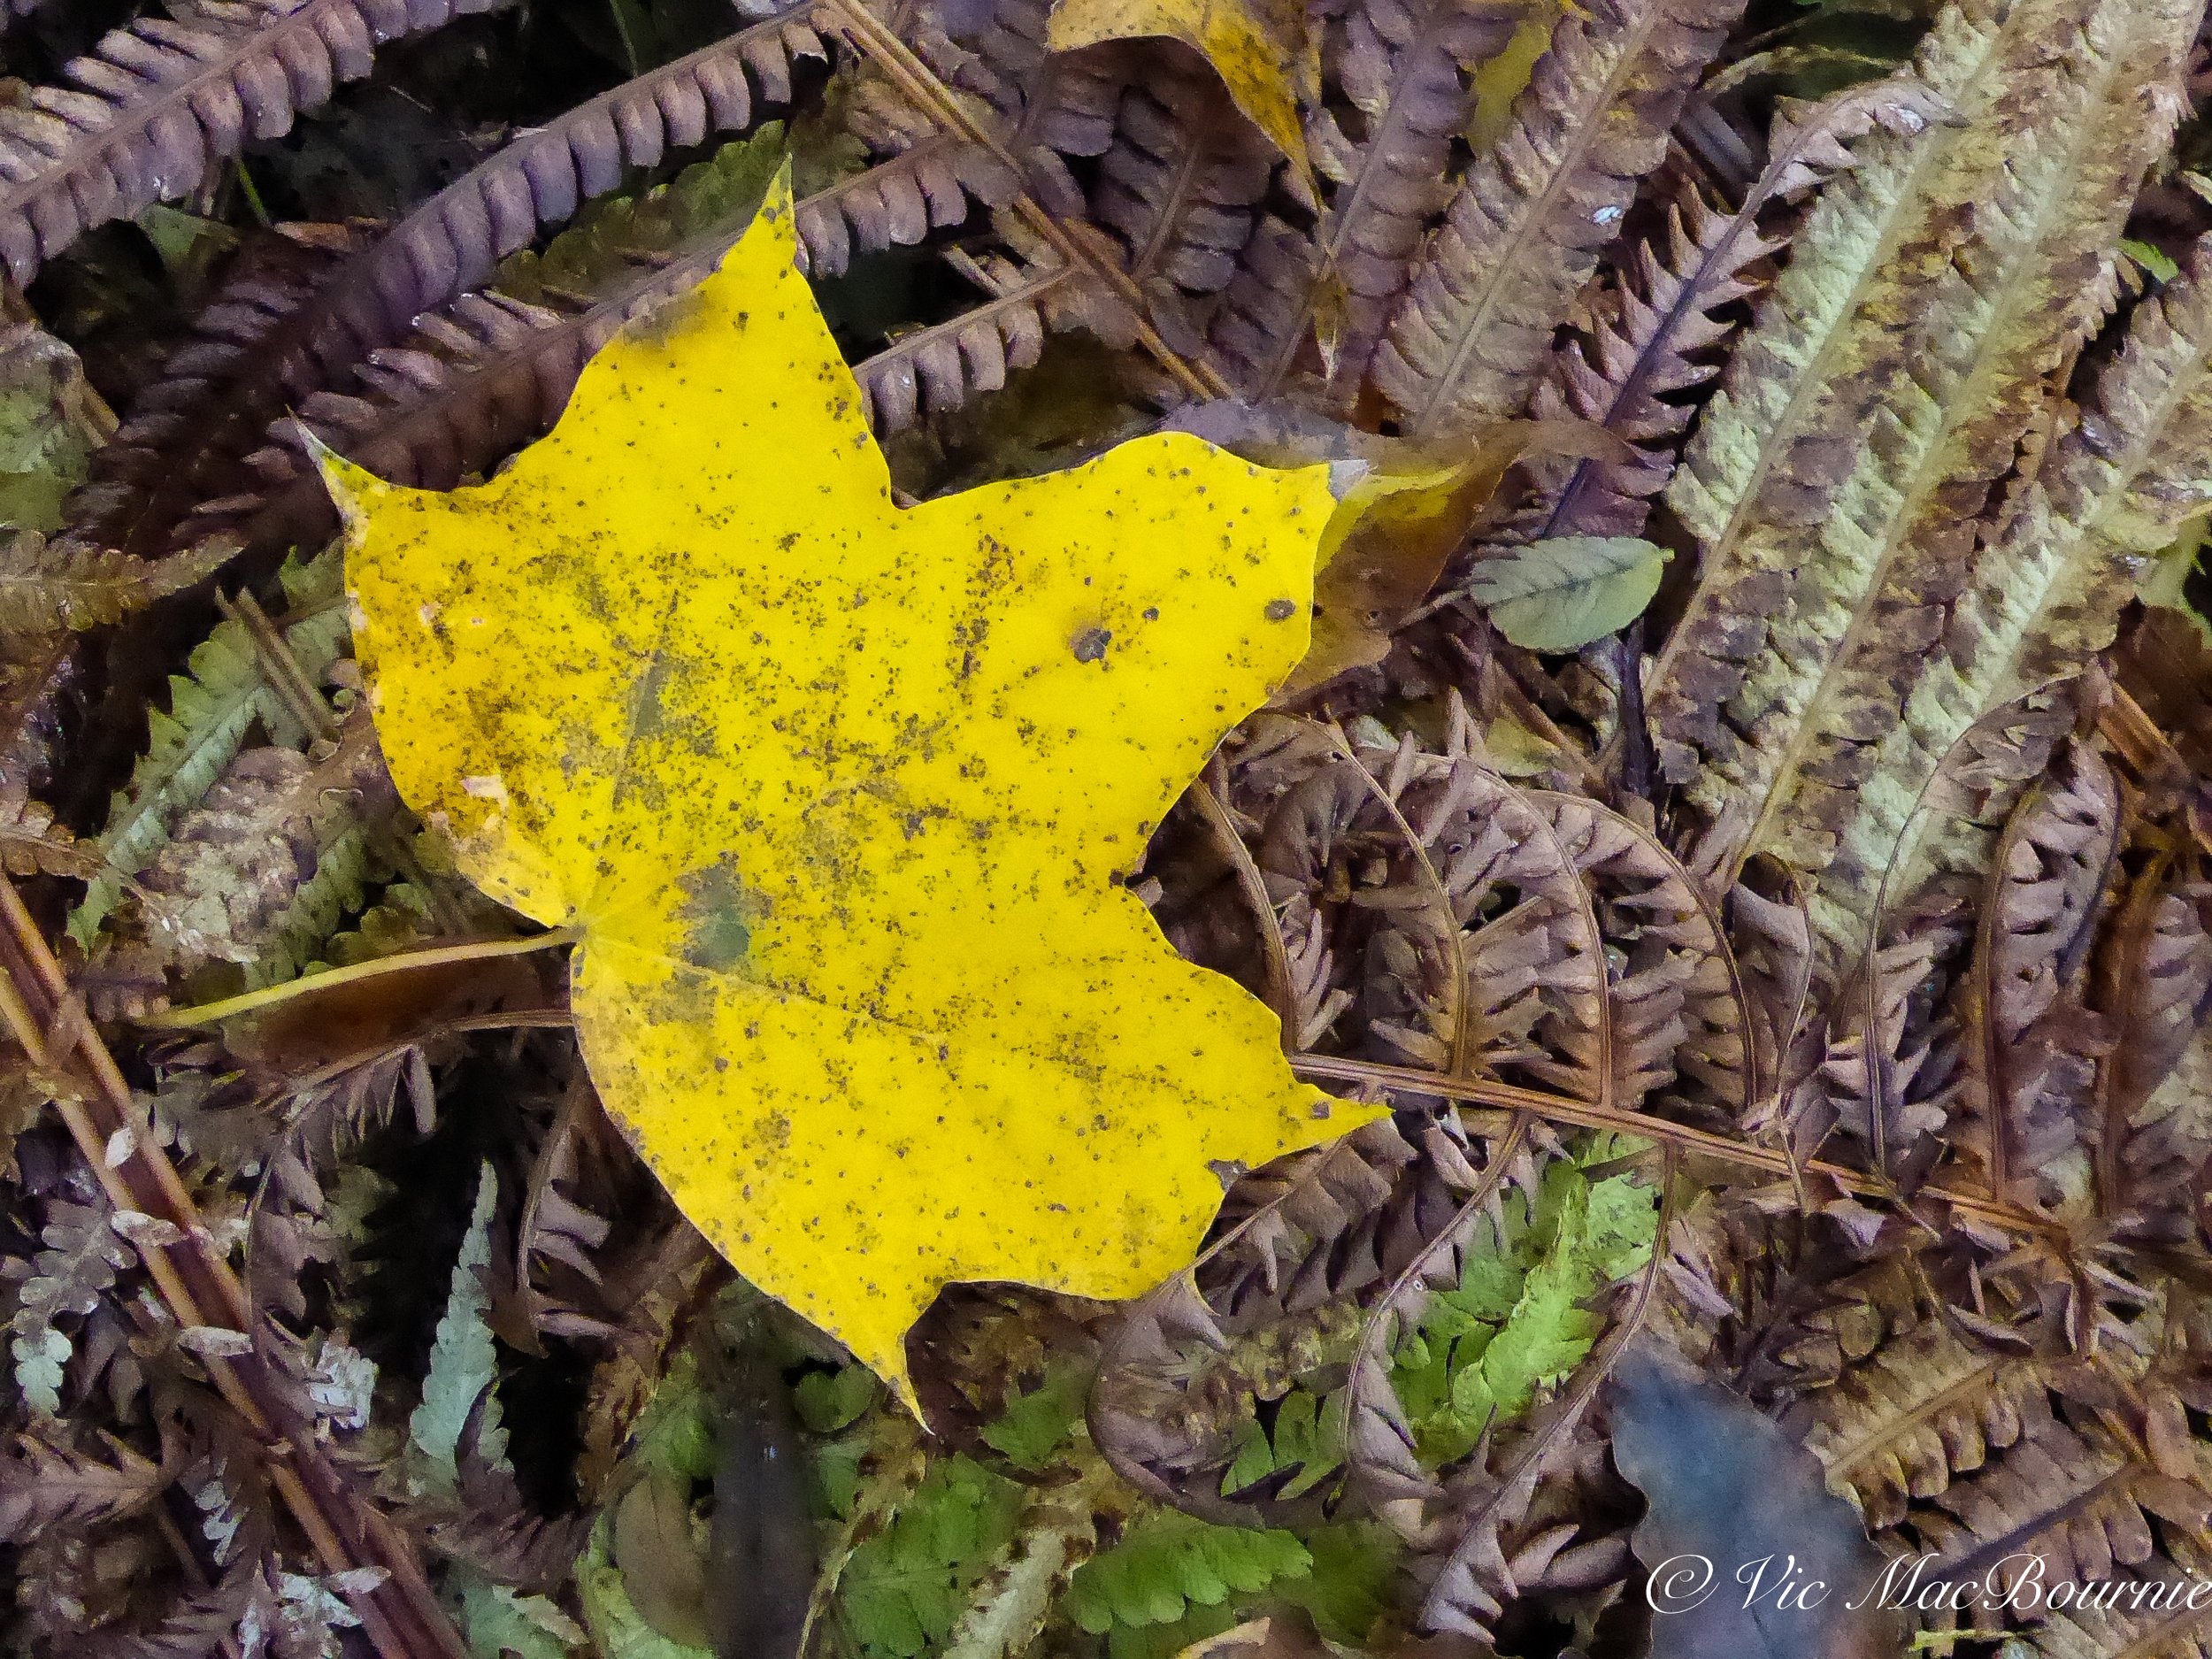
A maple leaf stands out in its bright fall colour among the spent ferns in the Woodland garden.
What’s the best camera for garden photography?
Can you use a travel camera to document your garden?
Absolutely you can. Not only can you use a small, point and shoot travel camera to photograph your woodland garden, but it just might be the ideal camera to get the job done.
A high-quality travel camera is small enough to easily fit into a pocket, but most pack a full set of features including a very long zoom lens that lets you get in close to most birds and wildlife. Their macro capabilities are also perfectly acceptable to photograph garden flowers, butterflies and insects, and their list of built-in filters turns the art of photographing and documenting your garden over the seasons into a creative adventure.

This Panasonic Lumix Travel camera is an ideal choice for garden photography.
Although the travel camera category was designed as the one-stop solution to capture a vacation with a single point-and-shoot camera that tucks nicely into a purse or pants pocket, what’s not to say it can’t be used as the ideal “staycation” camera in your backyard?
Click on the link to see a complete list of Panasonic’s Point and Shoot cameras.
Using it on a regular basis in the garden is also great practise for the time you need it to document that epic vacation. There is no better way to learn the ins and outs of a camera than to use it on a regular basis.

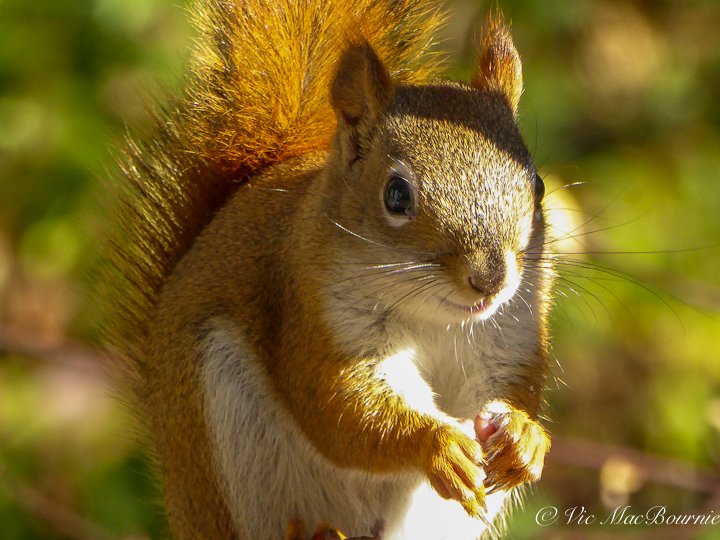
This close-up of a red squirrel shows the telephoto capabilities of the Lumix DMC-ZS50 camera.
(If you are interested in exploring garden photography at a higher level, be sure to check out my comprehensive post on the Best camera and lens for Garden Photography.)
Many travel cameras are about the same size as a smartphone but offer so much more flexibility and creativity.
Let’s make this clear, this is not a review of a specific camera. I’ll let camera experts do that on their blogs or YouTube channels.
This is a general article to help guide gardeners with their photography needs. Although it focuses on a particular camera, this is not the latest travel camera and lacks features many modern cameras now support. The article explores the “travel camera niche” and how gardeners can get the most out of using these types of cameras on an everyday basis in their backyards or travelling to some of the great gardens of the world.
In this article, we’ll use the Panasonic Lumix DMC-ZS50 travel camera (about 6 years old now) and feature a number of photographs taken with it one fall morning.

Image of raccoon high in the forest canopy. The image was taken with the DMC-ZS50 at the full 700mm telephoto.
Although I am using the Panasonic Lumix, the article pretty much pertains to any good point-and-shoot camera on the market today.
The modern Panasonic Lumix travel camera is the Lumix DV-LX100 Mark ll, which sells for upwards of $1,000. For those who like to compare specifications, this 21.7 MP Four Thirds MOS sensor camera sports a 24-75mm Leica DC Vario-Summilux F1.7-2.8 lens, comes with wi-fi and bluetooth and a 3-inch touch screen monitor. It has 4K video and 4K photo technology at 30 frames per second.
As you can see, these new cameras are packed with high-end features.

Using a soft focus filter gives a dreamy effect to this image of a Flowering Dogwood in fall colour.
I decided to use my Panasonic Lumix DMC-ZS50, a travel camera that made its debut back in 2015, to document my fall garden. The camera, which originally sold for as much as $500 back then but can now be purchased used for a fraction of that cost, comes with a 30X optical Leica zoom lens ranging from a lovely 24mm wide angle to an almost unbelievable 720mm telephoto lens. This kind of power will easily fill your viewfinder with everything from a humminbird to that colourful cardinal.
It handles low light conditions admirably and includes a Live View Finder to enable you to take photographs when lighting conditions make it difficult to use the 3-inch LED screen. The technology available in these point-and-shoot cameras, even a six-year-old model, is impressive. An eye sensor in the camera, for example, automatically detects your viewing preferences and switches image display to the Live View Finder when you are ready to use it.
If you are looking to purchase a new travel camera, deciding which of the many cameras to purchase involves some research on what features mean the most to you.
Besides the high quality Leica lens in the Panasonic cameras, I particularly like the ability to easily be in control of the camera settings. The Lumix DMC-ZS50, for example, includes a control ring around the lens that reminds me of my older manual focus cameras.
The Control Ring provides smoother manual control of the exposure, zoom and focus: leaving the photographer free to concentrate on shutter operation with their other hand.
The camera maker describes it this way: “Its intuitive design, precise focusing; plus smooth and silent operation, gives you total control over every picture and video taken.”
Speaking of video, these travel cameras’ abilities to shoot high-quality video just keeps getting better with the introduction of each new model.
Many models even allow you to easily shoot time-lapse sequences.
Why would I want that, you ask? Imagine setting up your camera on a tripod in front of your favourite flower and watching it open up over the course of the day, but seeing it all happen in 20 seconds on your computer screen or television. Or, set up the time lapse feature on a monarch butterfly about to emerge from its pupae and experience its transformation before your eyes.
Maybe you just want to set up the camera to document a day in the garden and how the sunlight changes over the course of the day. The time-lapse feature will get the job done.
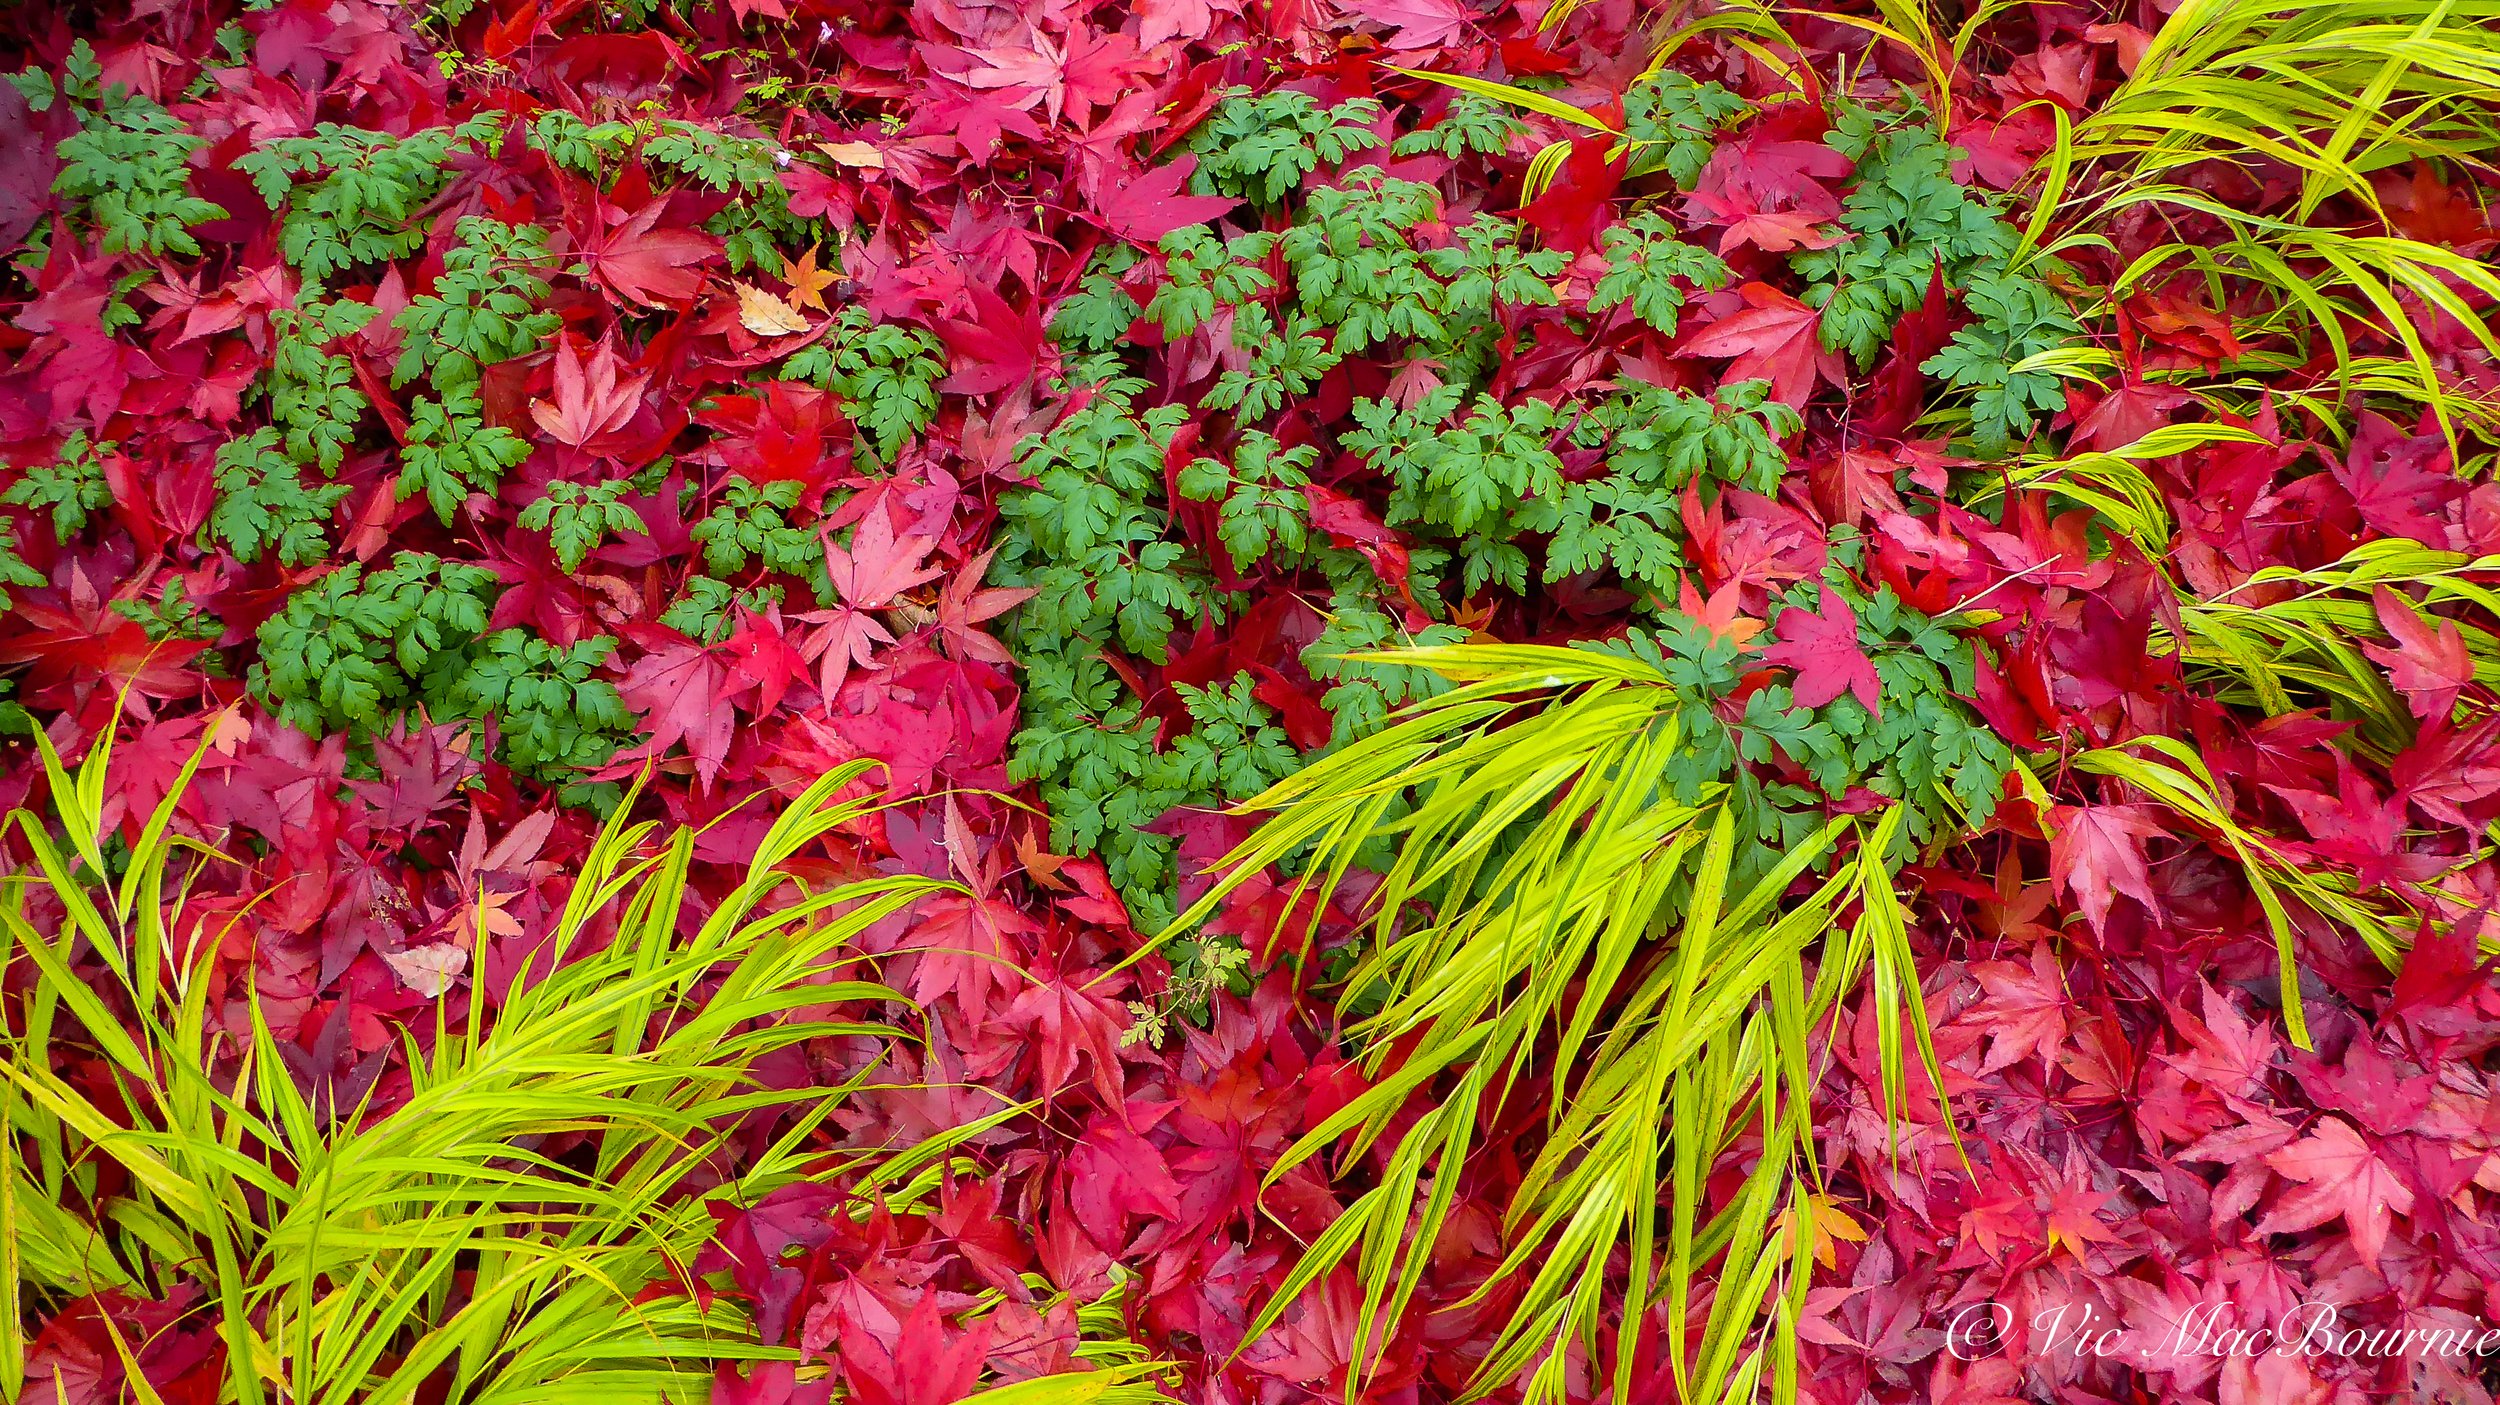
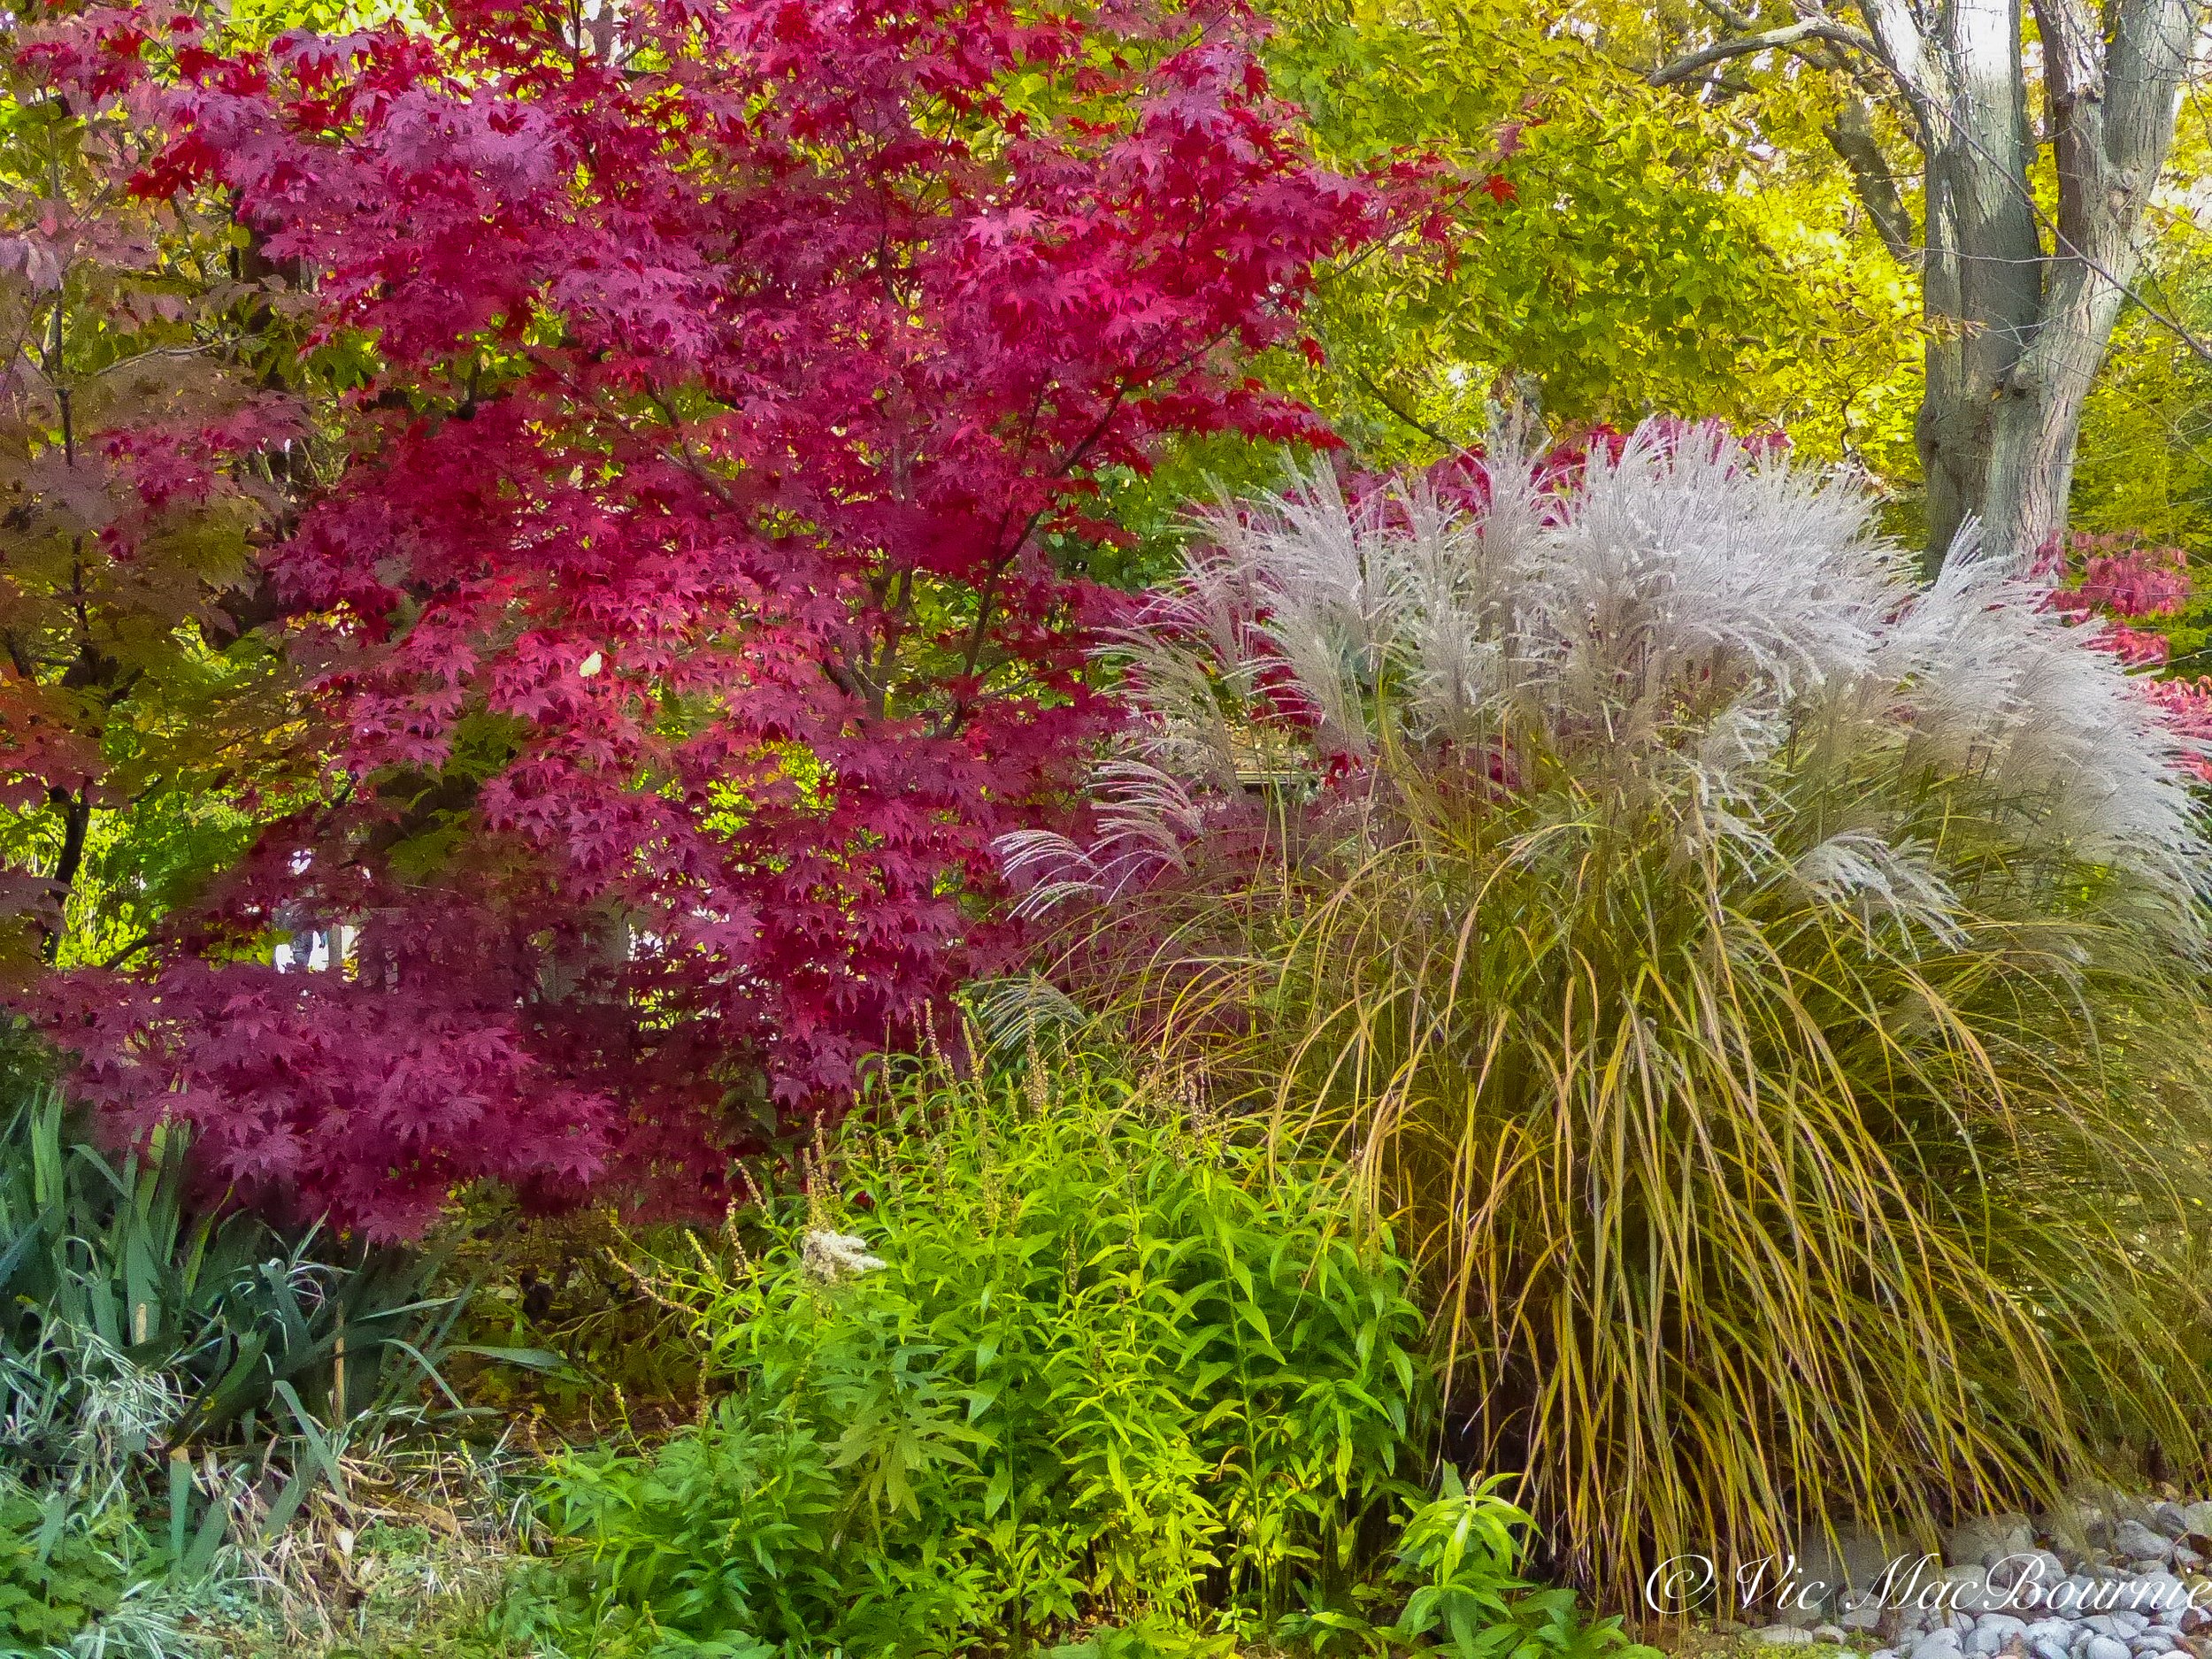
Japanese Maple leaves in fall colours cover ornamental grasses and wildflowers.
Today’s Travel Cameras
Modern travel cameras come equipped with an even larger array of features, larger sensors that produce even higher quality images and videos. You can expect to pay anywhere from about $500.00 to more than $1,000.
The highly rated Sony ZV-E10 is priced at more than $1,000 Canadian, while Panasonic’s Lumix G100 sells for close to $700. Nikon’s Z fc will set you back almost $1300 U.S. or close to $1,400 Cdn.
Many have adopted features such as touch control focus on the back screens similar to a smartphone or tablet.
This article is not a review of the latest cameras. For a full comparison of modern travel cameras, check out this link from Digital Camera World for the latest in portable travel cameras for 2021.

Picture perfect garden photography with your smartphone
Smartphones are excellent choices for garden photographers. Here are tips and tricks on how to get the most out of your smartphone camera for woodland and wildlife photography and suggestions for accessories that help you take better pictures with your favourite smartphone.
Tips and tricks to get the most out of your smartphone camera
They say the best camera is the one in your hand, and let’s face it, these days the camera in your hand is almost always a smartphone.
Not only are the cameras in today’s smartphones excellent, but the ease of sharing your garden photographs from the smartphone directly to social media or email is just too simple in comparison to the effort needed to share photos from digital cameras.
With that in mind, this post is going to focus on using a smartphone to photograph your garden.
In other posts, I’ll explore the benefits of using 35mm digital cameras and high-end point and shoot cameras, both of which offer more control, quality and accessories to tackle garden and wildlife photography.
Photo accessories add versatility to smartphones
Accessories, however, are not restricted to 35mm digital cameras.
There are some great accessories available for smartphones that will help expand your creative vision and enable you to capture images you would never have been able to capture with just your phone. More on those later.
In addition, many of the free editing programs that are available for smartphones are outstanding and can lift your garden photography to new heights.

Taken with an smartphone and edited in Lightroom to saturate the colours.
The image of the Sun’s rays streaming through the trees in the early morning (above) was taken with my iPhone following a heavy overnight rain.
I took several photos, but when I looked at them closely, I realized the best photo was an image within an image. Even with a heavy crop and some editing in a Lightroom phone app, the image held together surprisingly well.
Again, it shows what you can do with a smartphone camera, good lighting and a little knowledge about basic photographic editing.

The early morning light filters through the woodland garden and allowed me to capture a fleeting moment with my iphone camera.
One of the features that set smartphones apart from traditional cameras is the AI (artificial intelligence) now incorporated into most smartphones. This AI makes getting the proper exposure and focus for most images almost foolproof.
Although the latest smartphones are excellent and getting better every year, they’re not perfect.
Not unlike regular digital cameras, they can be easily fooled by extreme lighting conditions.
The resulting photographs will likely either be overexposed or underexposed.

By pinching the smartphone and enlarging the image, it’s possible to get good closeups or macro images of flowers like this native lady slipper. Some newer phones even have special macro lenses built into the phones.
Higher-end cameras that shoot RAW files or produce larger file sizes can withstand heavy editing without digitally “falling apart.” The smartphone digital file, however, is relatively small and severely editing the photograph can make the image unusable for all but basic sharing on social media.
The trick, especially with a smartphone, is to get the proper exposure from the beginning. Getting the best exposure often requires adjusting the camera settings to create an over- or underexposed image.

Our front Japanese-inspired garden taken with a smartphone.
Tricks to get the most from your smartphone camera
I am currently using an iphone 8 so everything I’ll write here will pertain to that phone. Other makes and models, however, offer similar features.
If you have never overridden the camera in your smartphone, or didn’t even know you could, you might be surprised what you can do with the phone’s camera settings.
For starters, if you are focusing in close on a particular flower in your garden, you can ensure it is in focus by touching the camera screen where the flower is located. This is especially helpful if you are trying for a closeup image of the flower. A yellow square will then overlap the area you touched on the screen. That cameraphone will then focus on that specific area and adjust exposure.
The closer you get to the main subject, whether it is a flower or a fall leaf, the more important it is to use the macro feature on the phone.
Once you touch the screen and the yellow square appears over the flower, you will notice that there is a sun icon with a slider line above and below it. This control allows you to change the exposure of the image. By sliding the sun image up, you brighten the image. By sliding it down you underexpose or darken the image.
The results can be dramatic.
The feature is particularly useful if you are shooting into the sun.
The amount of light coming into the camera will tell it to darken the image, but if you like the airy “high-key effect” than you can use the slider (moving it up) to keep the image bright.
If you are photographing a sunset, you may want to use the slider to darken the image and saturate the colours in the sunset. To darken the image, you would move the slider down.
I’m noticing dark, moody images have become more popular on instagram to create a more “theatrical” look.
But don’t underestimate the beauty of “high-key images.” They can be a nice effect, especially with light-coloured, delicate flowers. To bring the whiteness or brightness back to your flower images, touch the sun and slowly bring your finger up the screen. Notice the whole image getting brighter.
I was recently trying to capture an image of our flowering dogwood flowers that were back lit by the sun. The image the smartphone gave me underexposed the flower's dramatically, but by using the above technique I was able to maintain the delicate, ethereal effect I wanted in the image.
On another day, my pink supertunias were highlighted by a sunbeam that just lit them up beautifully against our grey shed which was in total shade. The smartphone read the scene and overexposed the flowers. Only by dramatically underexposing the scene was I able to recreate the pink supertunias standing out so boldly against the grey shed.
Built-in motordrive in Smartphones
One last technique to pass along that you may not know about.
Imagine you are sitting in your favourite chair in the garden checking out your instagram when a pileated woodpecker lands on a nearby branch. You raise the phone and grab a quick shot. It doesn’t move, so you grab another shot and it’s gone. You get two shots but neither is very good. In both cases the woodpecker turned its head just as you took the picture.
Here’s the tip many don’t know about: Your smartphone has a motor drive built into it. While you got two shots in the short time the woodpecker was on the branch, by holding your finger on the button you may well have got 10-20-30 shots to choose from instead.
At least one of those shots will be the perfect shot.
Grab your smartphone and give it a try.
Use your smartphones’ built-in zoom
In addition to the above technique, I’m guessing most people know about the two-finger zoom feature on smartphones that allow you to zoom in digitally on your subject.
Quality certainly suffers when you use this feature and remember to hold the camera steady when you take the shot, but the zoom feature allows you to get closer to the bird in the tree or the fawn in the back of the garden.
Don’t expect to get the same results you would with a 600mm F4 lens, but zooming in closer can make a big difference in garden photography where birds, insects and mammals are often easier to get close to.
Accessory lenses add even more versatility
Another way to add more versatility to your smartphone lens is with smartphone lens accessories.
There are a host of clip-on lenses that turn your smartphone lens into a fisheye lens, macro lens or telephoto lens. Often they are available in a package incorporating several lenses.
Checkout smartphone accessories available at Amazon, here.
The prices vary depending on the package and the quality of lenses. If you use your smartphone as your primary camera, these lenses are certainly worth considering.
Some lens packaged even include a circular polarizer, which is probably the single most important filter a garden photographer will need. The polarizer, not unlike polarized sunglasses, cuts through glare and reflection from leaves and other reflective surfaces including water but not steel.
A careful search on Amazon shows there are many lens/filters packages that include polarizers as well as star, graduated sky filters and neutral density filters. It is probably best to focus on a high quality circular polarizing filter rather than any other type of filter.
Tripod accessories for smartphones
The accessories seem endless on Amazon. Tripods and tripod adapters are also numerous. And if you find yourself using a tripod regularly, which is a good idea, you can get a bluetooth shutter release so you can take the picture without touching the phone and adding shake to the image.
An alternative is to just set a 5-10 second timer on your phone as a hands-off alternative.
Photographing your Woodland garden has never been easier.
A cup of coffee in one hand, the smartphone in the other and a walk around the garden in the early morning is sure to reveal some beautiful images.
A glass of wine in one hand, the smartphone in the other and an early evening stroll through the garden is sure to reveal even more outstanding images.
In your own garden, it’s particularly convenient to take advantage of these ideal times to take outstanding images. It doesn’t always need to be images of flowers.
When the sun is low in the sky and the wind has died down the garden becomes a magical place and the light takes on a new warmth that makes for the best photographic opportunities.
Don’t let these times go to waste.
This page contains affiliate links. If you purchase a product through one of them, I will receive a commission (at no additional cost to you) I try to only endorse products I have either used, have complete confidence in, or have experience with the manufacturer.