

DIY: Turn a birdbath into a succulent planter dish (step by step guide)
This DIY succulent hummingbird feeder is a fun gardening idea that is easy to build and beautiful to look at.
How to make a succulent dish garden (with a twist)
Here is a Do-it-yourself project that is both easy to create and results in a lovely succulent dish garden.
I’ve added a little twist by creating a mini photo studio with the addition of a small hummingbird feeder. All you need to complete the project is an old bird bath, some cactus soil, crushed clay stone and a small hummingbird feeder.
The project can be completed in less than an hour and will surely brighten up your backyard and add a great spot to photograph hummingbirds coming to your garden.
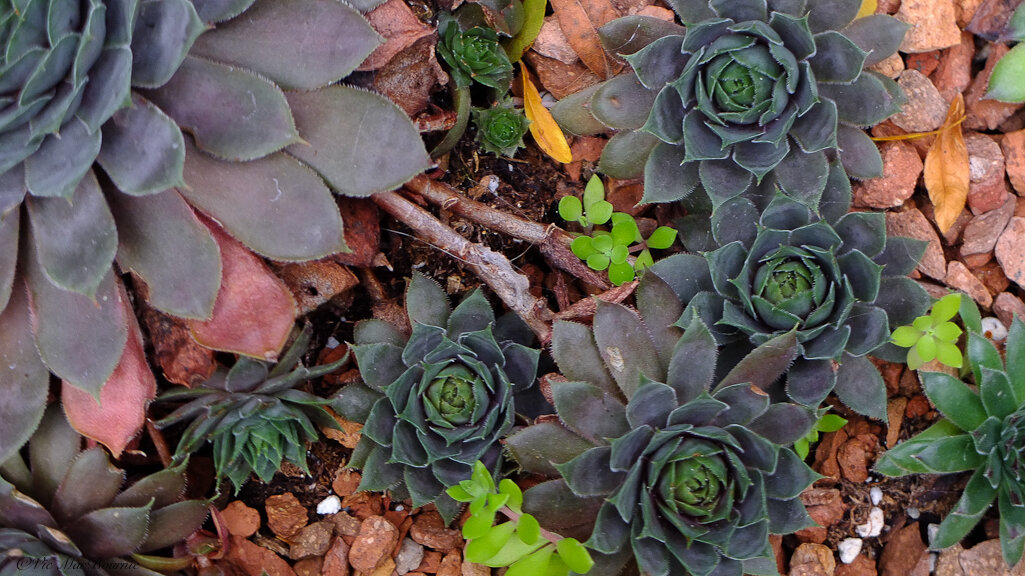
Succulents have certainly become popular recently. Here I have used a series of hens and chicks to make the project more hardy to stand up to our cold winters.
The popularity of succulents, however, is for good reason. Today’s succulents are outstanding. Large, small, colourful, tiny, easy to grow and even easier to maintain.
After all, the plants really don’t need a lot of care. Plant them in gritty, well-draining soil mixed with a little stone or pea gravel. Water them in extreme drought if necessary otherwise, just let them take care of themselves.
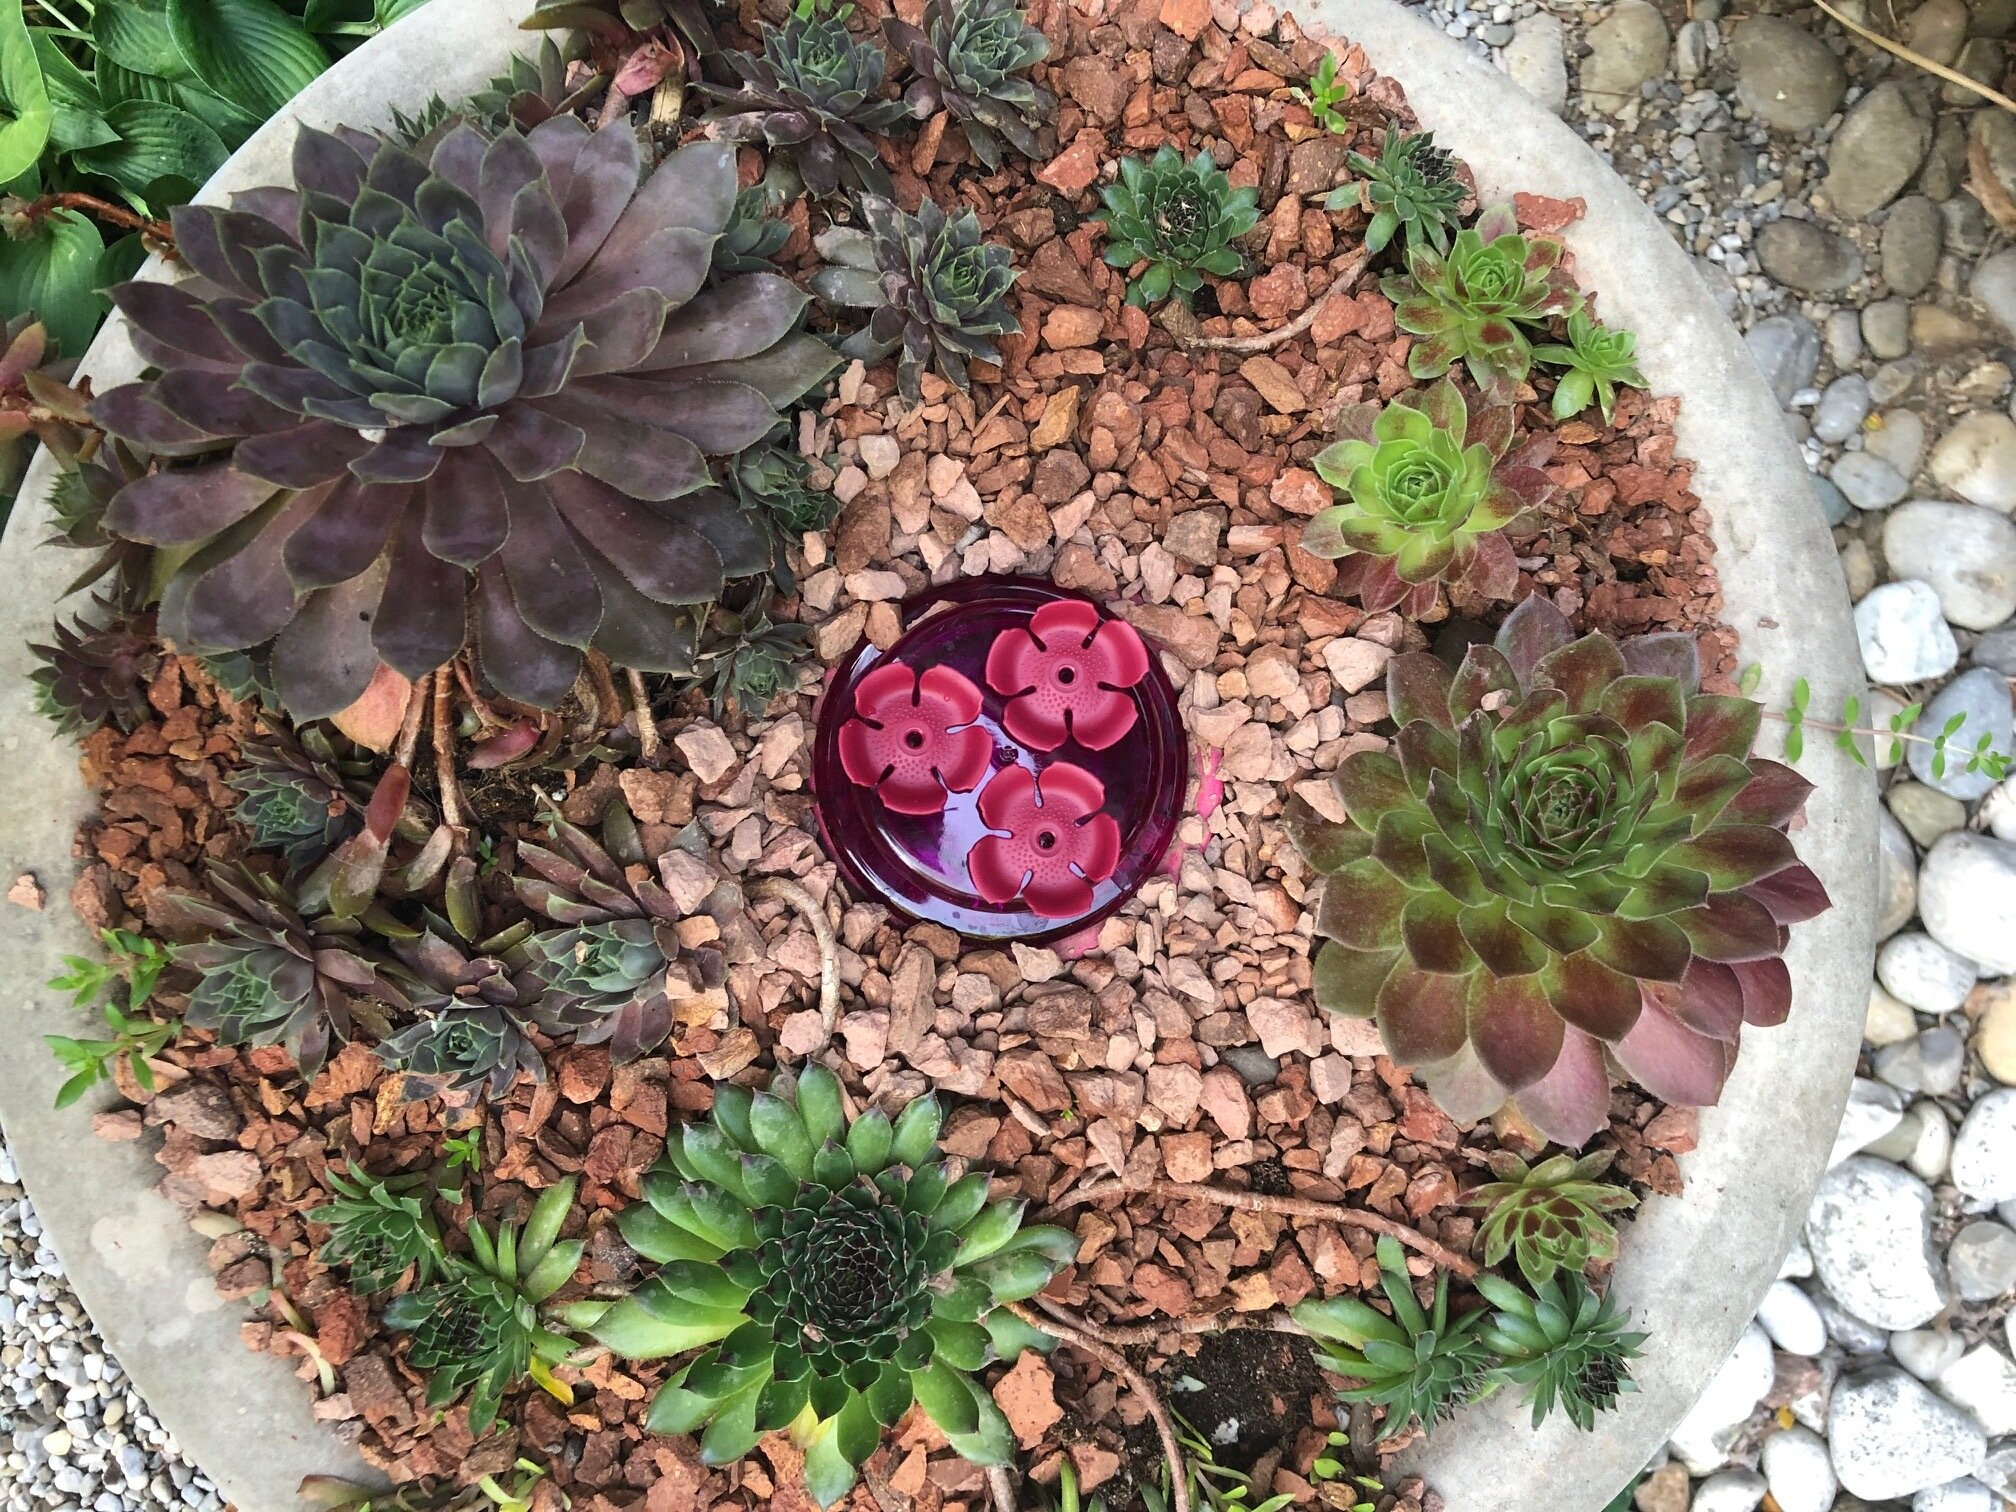
An old bird bath converted to a succulent planter with a twist – a Perky-Pet handhold/tabletop hummingbird feeder is buried in the stone. The set-up was designed as a potential stage for hummingbird photography.
So with all this in mind, and with an old leaky bird bath sitting empty in the yard, I figured it was a good time to create one of these popular planters.
We’ve had the planter for several years and, besides replacing some of the succulents last year after a brutally cold winter, it has become a focal point along our pathway. I can’t say that it has attracted many hummingbirds over its time, but I’ll keep experimenting with different hummingbird feeders to find one that keeps them coming back.
This small round hummingbird feeder fits the succulent dish perfectly.
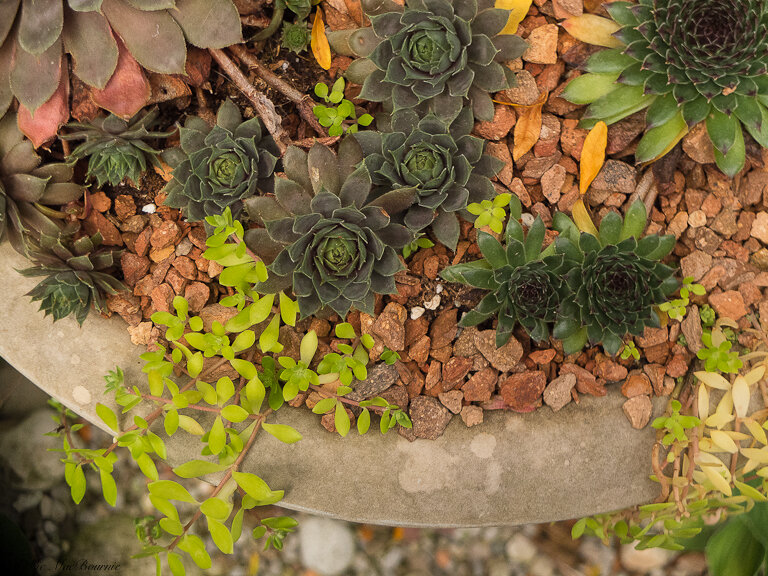
A more detailed shot shows the vibrant colours of the stone, succulents in the DIY birdbath conversion.
I happened to have the small hummingbird feeder designed to teach the tiny birds to eat out of your hand.
Converting birdbath into succulent planter
The project was simple and involved just a few items that I had around the house, and an electric drill.
1) First, I drilled about five holes through the bottom of the fibreglass bird bath to allow good drainage.
2) Then, add pea gravel in the middle area where the hummingbird feeder sits.
3) Next, surround the pea gravel with store-bought cactus soil and mix it with pea gravel to keep it loose and well draining.
4) Now it’s time to plant the succulents around the edges of the bird bath, mixing large and small.
5) I added some sedum that was already growing in the garden
6) I also had a curved wire that looked perfect as a hummingbird resting stop, so that was placed in the container but far enough from the feeder not to interfere with any hummingbirds that might be feeding while in flight.
7) I filled the little hummingbird feeder and placed it in the middle of the succulent container.
8) Finally, red chipped clay stone was placed over the soil as a mulch and a nice clean backdrop for the succulents. The stones help to keep water from splashing up dirt onto the succulents and gives the whole container a more desert feel.

How to care for a succulent dish (birdbath) garden
Caring for a succulent dish – in this case a birdbath – is simple. Succulents do not need a lot of water. In fact, too much water would be the main reason for their demise.
Think desert landscape and you’ll know how much you’ll need to water your dish. I rarely water our succulent dish. Instead, allowing our summer rains to get the job done with the occasional watering works well.
Providing good drainage is probably the most important step you could do to ensure the survival of the plants.
Ours is planted is an area close to the house that gets mostly morning sun into early afternoon.
For more on gardening on a budget, check out my in-depth article here.
Gardening on a budget links
Ten money-saving tips for the weekend gardener
DIY Bark Butter feeder for Woodpeckers
DIY reflection pond for photography
Click & Grow is ideal for Native Plants from seed
Remove your turf and save money
Hiring students to get your garden in shape
If you are interested in backyard birds, please consider signing up for my backyard birds newsletter. The sign-up page is at the bottom of my homepage. Not only will the newsletter provide in-depth articles on attracting, feeding and photographing backyard birds, I am also working with local artisans to provide discounts on incredible bird-related feeders, houses and other goodies backyard birders will love. In addition there will be regular giveaways , including gardening books and birding items.
This page contains affiliate links. If you purchase a product through one of them, I will receive a commission (at no additional cost to you) I try to only endorse products I have either used, have complete confidence in, or have experience with the manufacturer.

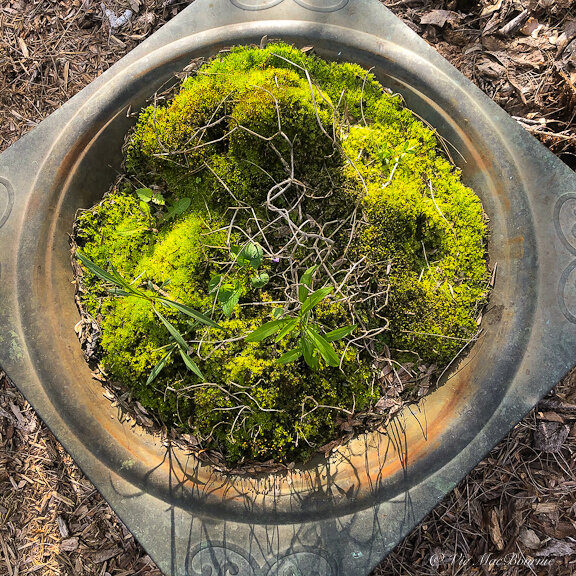
DIY: Moss garden container (in a few simple steps)
Creating your own moss garden container is a fun and rewarding experience. This container was created in the Japanese style from a former copper fire pit combining moss, a Japanese Maple and a large stone.
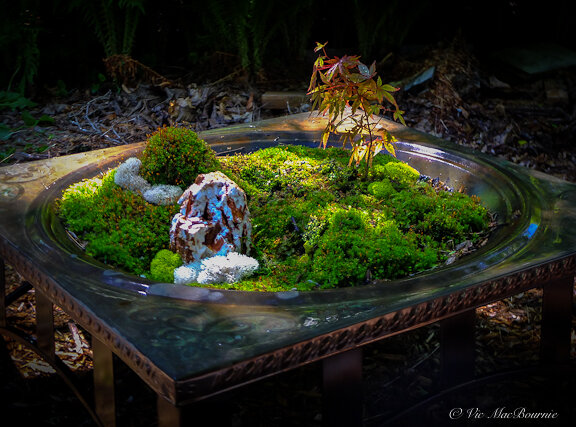
The finished moss garden container in its copper former fire pit.
DIY moss garden at home in Woodland garden
I had been harvesting moss from our old fire pit for years, but it was now time to turn it from an eyesore into a DIY piece of garden art for the woodland garden
And, once the idea came to me, I was surprised how easy it was.
I like to think the finished result was years in the making, but it actually only took about an hour worth of work once the plan was put into motion.
The result of my work, and probably about $20 in costs, is the creation of a beautiful moss garden container and a natural piece of art that looks right at home in the woodland garden and imparts a touch of Japanese-style elegance along one of our shaded paths.
I set the moss container up in a spot in the garden where I can see it when I sit on the patio. In the morning, when I’m out with my coffee, the Japanese Maple is back lit and the moss lights up as if a small spotlight were on it.
Looking for more money-saving tips for your garden. Be sure to check out my in-depth article on building your garden on a budget.
It certainly steals the show in the morning.
Although I chose to use an old, weathered fire pit with a beautiful copper top, any large bowl could serve the same purpose.
Check out thrift stores, Craig’s list or Kijiji for old fire pots that would make appropriate containers for the moss garden.
You might already even have something in the shed that would work perfectly. A galvanized steel container would impart a similar old-world feeling.
What you will need:
• A large container of some sort. Preferably with drainage holes. If there are no drainage holes, you will need to drill a few holes in the bottom to allow for proper drainage. It’s good to keep the bowl damp but not full of water.
• A base to grow the moss on. While most of us will use soil (slightly acidic soil is an excellent base), this fire pit has always been full of wood that was mostly already burnt into a charcoal. I simply left the partially burnt wood in the fire pit, in a shady spot over the years, and the most beautiful moss grew on the charcoal. In fact, plenty of years I harvested a good amount of it for use in garden containers and, by the next spring or even later that fall, it had all grown back in.
• As an alternative to growing your own moss, you can now purchase it from on line sources or likely even at high quality nurseries that specialize in garden crafts and DIY projects. Just make sure it is commercially grown and not taken from the forest. Commercially grown sheet moss performs better and is more uniform. (Check out the Supermoss sheets available at Amazon. Similar moss sheets might be available at your local nursery.)
• If you are planning to use you moss bowl in a sunnier location, consider using one of the moss-like perennials such as Irish or Scotch moss. Even thyme will give you that moss-like look without the need for much, if any, upkeep. (see my earlier article on moss-like ground covers)
• I used a small Japanese Maple mostly because we had one growing from a seed in the garden that was the perfect size for the project. I was seriously considering using a maidenhair fern rather than the Japanese Maple, but I have another project in mind that would be better suited for the fern. A small, elegant fern like the Maidenhair would be perfect, but you could also use a store-bought orchid (which would obviously need to be brought in over the winter). The damp environment in the moss bowl would likely be the perfect medium for growing an orchid.
• If you want to keep it simple, consider using elegant twigs cut from your own garden, (corkscrew willow branches work beautifully and can be purchased at most garden shops). Strip the bark and let the sun bleach them to make them stand out against the moss. Other choices include an interesting stone, much like the one I used in this setting.
• In this case, I put the Japanese Maple into a small biodegradable pot packed with fresh soil which could be easily swapped out for another plant without disrupting the moss.
• A single large stone or an odd number grouping of say 3 stones helps to anchor the design and could become the focal point of the moss garden or an anchor point to balance off the plant material. In Japanese gardens, rocks have long been used as anchor points and used to show the strength and stability of the garden and the earth.
• In my design I actually went out and purchased a rock to use in the design. Although I have lots of rocks on the property, I was looking for a certain type of stone that would look appropriate in the design. I went looking for a stone with earth-tone colours that was unique and would stand tall in the moss, appearing to emerge out of the earth rather than sitting on top of it. A grouping of threee similar stones emerging from the moss at varying heights would be stunning and likely all you would need in the moss garden.
• Finally I added a little reindeer moss and supermoss bits (purchased from the same craft store as the rock) to give the design texture and a little more variety of moss.


Simple steps to put the creation together
• Once all the items for the design are ready, it is time to begin creating your moss masterpiece.
• In my case the moss was already in place and my first steps involved cleaning up the moss of small plants (we can call them weeds) that had made their way into the moss as well as dead branches etc. I carefully removed the weeds and tucked the moss back into the holes created by removing the plants.
• If you are using commercially bought sheet moss, you will simply lay that over your acid-based soil and tamp it down for a nice fit. It is probably a wise idea to create an undulating surface with the soil prior to laying the moss in, just to give the design a more natural look.
• Once the moss is in place, cut out areas to place your stone(s) and place them into the soil, before replacing the moss around the base of the stone(s). Make sure the stones are emerging out of the moss rather than sitting on top. In proper landscaping designs, it is not uncommon for three quarters of the rock to actually be buried in the earth. Depending on the stone(s) you choose, you may not have to bury the stone(s) that deep, but it is vital that the stone(s) appear rooted in the earth.
• The same procedure is more or less followed by planting the tree or orchid etc. Create a pocket in the soil for the plant to sit in. I put the tree in a small container and planted that into the moss but you could plant it directly into the soil. If you are using an orchid, you would either plant it in a container with the suitable orchid mix or ensure the proper mix is in the pocket you created. By using a container, it’s easy to change up your design throughout the season by simply changing the container.
• Now it’s time to gently water your moss garden with a fine mist.
Caring for your moss garden
If done properly and placed in a mostly shady location your moss garden should need little care over the summer, spring and fall. In winter, depending how cold it is where you garden, you might want to cover the container or move it to a shed or garage.
Any plants that are growing in the container can either be left where they are if they are cold hardy, protected from the cold if you are concerned, or removed and taken indoors. The moss itself should not need any special care accept to clear any fall leaves off it before winter.
Although you may think it needs to be in an area of deep shade, mosses actually benefit from a little indirect sun preferably in the morning. If you can put your moss container in an area that gets dappled shade in the morning it should do very well.
One of the beauties of creating a moss container is that it can be moved around the garden either during the day or more likely through the seasons to give it just the right amount of sun and shade.
Monitor the moss to keep it free of leaves and unwanted plant growth.
Water your moss daily if possible but ideally only with a light misting. Do not drown the moss in water, a light misting to keep it damp is ideal.
A once a week watering to keep the soil below the moss damp will help create moisture around the moss.
Fertilization is not needed. If you feel you need to fertilize a plant growing in the moss, just fertilize around the plant itself, preferably by removing a small amount of moss, fertilizing the plant, and returning the moss in its place.
Other than that, enjoy your moss container.
Gardening on a budget links
Ten money-saving tips for the weekend gardener
DIY Bark Butter feeder for Woodpeckers
DIY reflection pond for photography
Click & Grow is ideal for Native Plants from seed
Remove your turf and save money
Hiring students to get your garden in shape
As an affiliate marketer with Amazon or other marketing companies, I earn money from qualifying purchases.

DIY: A solar drip for the birds
Converting a rarely used bird bath dripper into a solar powered fountain that is used daily, is a simple, DIY project that will please both the birds and the birdwatchers.
Turn a bird bath dripper into a solar-powered fountain birds will love
Birds love moving water and a drip, drop is about as good as it gets for them.
So, when I saw a nice copper bird bath dripper on Kijiji this spring, I jumped on it. The dripper was very high quality and I couldn’t pass it up. A copper drip tube attached to a lovely piece of slate with brass hose fittings.
It just doesn’t get any better than that.
Fast forward to this fall. Back on Kijiji looking for a cheap plastic bird bath to use this winter with an electric heater to provide water for our winged visitors throughout the freezing Southern Ontario winter, and … there it was. A magnificent copper bird bath for a very reasonable price. I remember saying to my wife that “someone in Toronto was going to get a great deal on a used copper bird bath.”
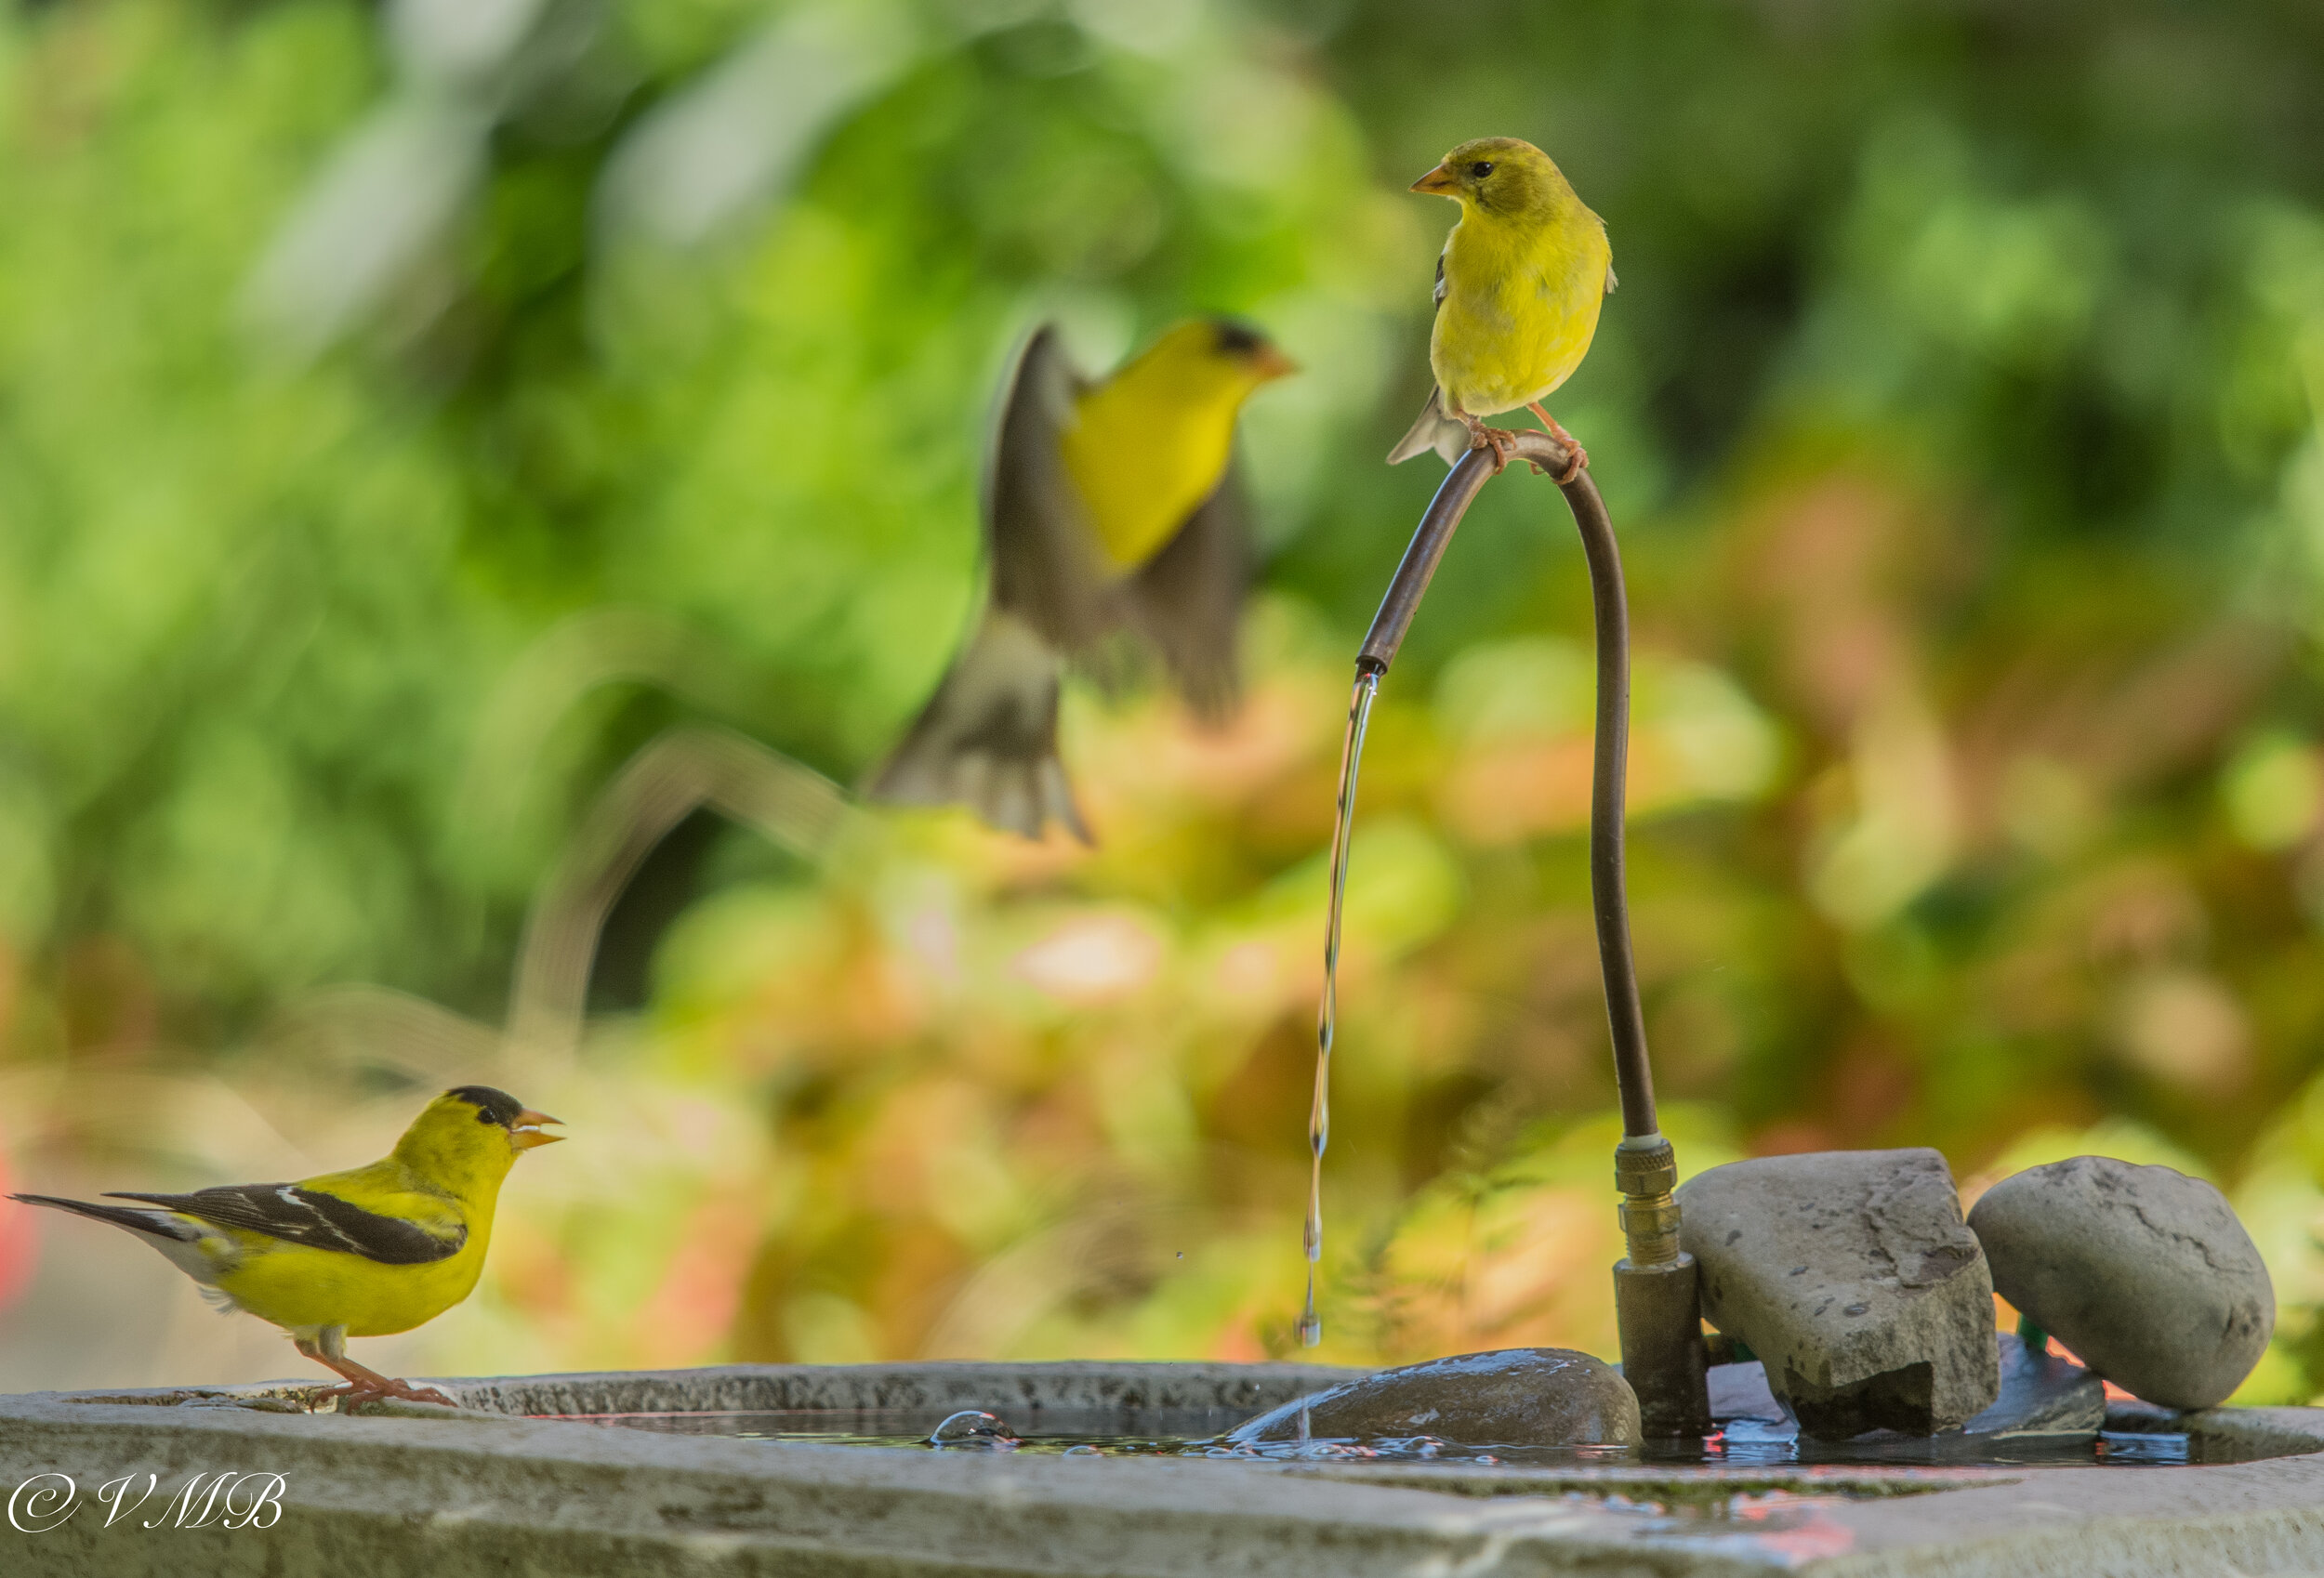
The converted dripper that operates as a solar-powered recirculating pump is certainly a treat for the Goldfinches in the garden.
The cheap plastic bird bath turned out to be an expensive copper one but I couldn’t be happier. The next morning I was on my way to Toronto (about a one-hour drive) to pick up the birdbath. To help justifiy the two-hour return trip, I combined it with a grocery delivery to my daughter who, it turned out, lived just 10 minutes from my prized bird bath.
Keeping an eye open for bird baths, bird houses and bird feeders on your favourite on-line used marketplace sites like Kijiji or Craigslist is a good way to get started with backyard birding or just to upgrade or add to your baths, houses and feeders.
Besides scoring the copper bird bath, I decided to do a slight hack on my already converted dripper to use it with the new bird bath.
For more suggestions and some of my favourite garden things, be sure to check out my Favourite Things post.
Although birds love drippers, the units need to be hooked up to a hose that needs to be left on while the amount of water is controlled to the point where just a drip at a time falls into the birdbath. Eventually, though, if left on and unattended, the bird bath overfills and drips over the edge potentially flooding an area.
I tried to make it work. I really did. Set up a nice deep bird bath that actually had a small leak. So it could handle the constant dripping without really overflowing. Trying to get the right flow was a pain and remembering to turn it off added to my frustration.
If only I could convert it to a recirculating dripper or even use it like a fountain.
Once I got the idea, it didn’t take long to convert the dripper to a solar powered unit. It’s no longer a “dripper” but that doesn’t matter because it is recirculating the water in the birdbath rather than adding to it.
The original dripper unit came with a very long, thin rubber hose that connected to the hose faucet. By cutting that into a short (maybe 6-inch) hose and connecting that to the pump’s outlet via one of the alternative fountain heads provided by the solar pump, the unit works even better than expected.
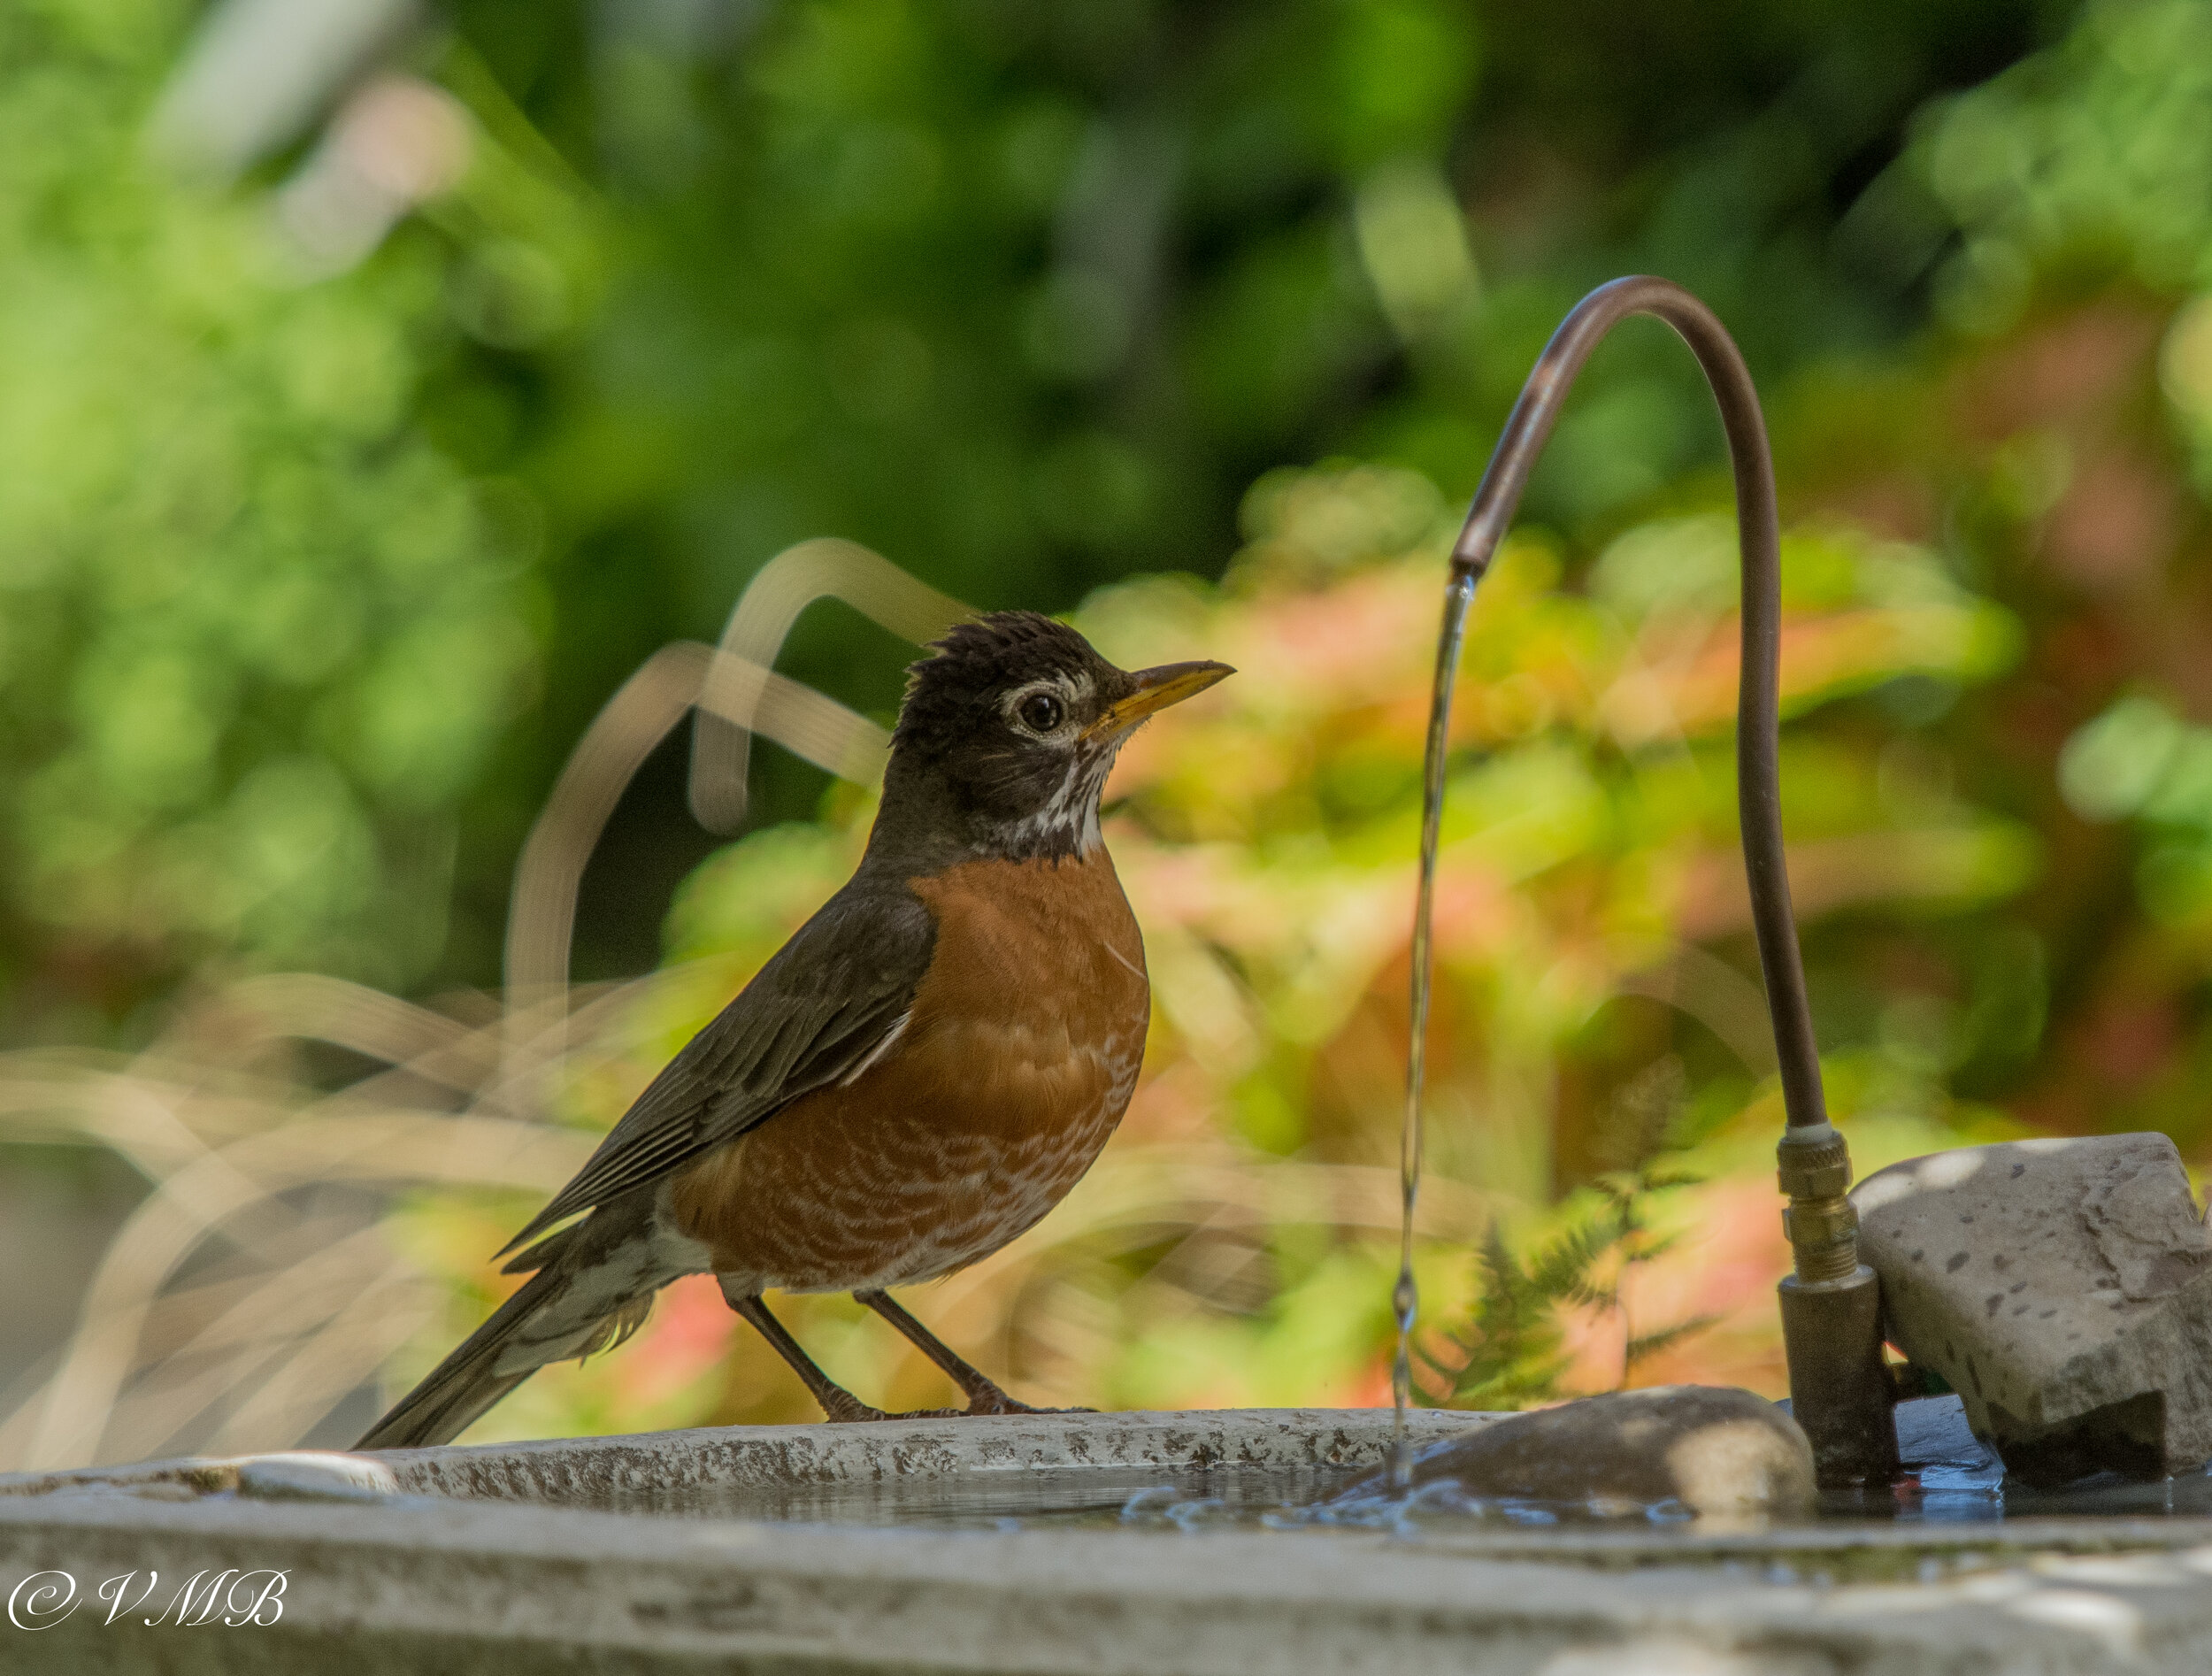
A robin takes a drink from the bird bath with the solar-powered fountain.
When the sun was out, it provided birds with a gentle flow of water recirculated from the bath itself.
This approach worked well but a small problem emerged. Trying to keep water levels high enough so that the small solar pump stayed below water became a daily concern.
The combination of birds using the bird bath, evaporation and some splashing caused by the fountain, created a daily water loss that meant constant monitoring of water levels. Everyday the water had to be topped up for fear of the bird bath running too low on water and potentially ruining the pump.
So, a small change to the original dripper conversion should work well with the new bird bath and its new location. By hiding a large bucket of water near the copper bird bath and sinking the solar pump to the bottom of the bucket, there is no fear of running the pump dry. On sunny days the bird bath will likely overflow a little but it’s placed in an area that does not get a full day of sun and will benefit from access water. A little overflow on sunny days will help to keep the water fresh and the bird bath full. In addition, I can’t help but think that it might be the perfect place to grow a thick carpet of moss around the birdbath where the access water will fall.
We set up the new bird bath and dripper/fountain right outside our family room French door to give us a window into the woodland and our keep an eye on the action at the bird bath. I’ll report back on how it’s working and how much the birds are loving it. It’s always a good idea to place feeders and bird baths so that you can watch them from inside your home. Read my blog on “A window into your woodland,” here.
I want to put a real plug in for these small, inexpensive solar-powered recirculating water pumps. This will be the third solar pump I’m using in the garden and I expect to put an order in for another one. There are so many uses for these small pumps. They come with a number of different fountain heads from a single stream of water to a gentle multi-stream fountain that would be perfect for hummingbirds who like to play in gentle streaming fountains.
A quick look on YouTube under “small solar fountain” turns up numerous DIY projects.
Definitely worth trying out.
For more on Building your Garden on a Budget, check out my earlier in-depth article here.
Consider installing a high-end, off-grid solar power system
If you are like me and don’t have electricity in your garden, or at least don’t have it in the far reaches of the garden, consider installing a complete off-grid solar-powered electrical system like the American-based Shop Solar Kit company.
Maybe you have a pergola in the back of the garden, or even a she-shed that you would like to have full power running a small refrigerator, sound system or full-size lamps and lighting. If you need to run pumps and lighting to a garden pond, you can do it with one of these highly capable systems that, once installed, operate at no cost to you at all.
There are complete DIY kits available for approximately $1,500 and up.

Gardening on a budget links
Ten money-saving tips for the weekend gardener
DIY Bark Butter feeder for Woodpeckers
DIY reflection pond for photography
Click & Grow is ideal for Native Plants from seed
Remove your turf and save money
Hiring students to get your garden in shape
If you are interested in backyard birds, please consider signing up for my backyard birds newsletter. The sign-up page is at the bottom of my homepage. Not only will the newsletter provide in-depth articles on attracting, feeding and photographing backyard birds, I am also working with local artisans to provide discounts on incredible bird-related feeders, houses and other goodies backyard birders will love. In addition there will be regular giveaways , including gardening books and birding items.